Clock frequency refers to the number of oscillations that occur in one second. The number of clock cycles, if we talk about a personal computer, is the operations (instructions of the program code) that the processor performs during this period of time. PC performance directly depends on the clock frequency and it can be overclocked, increasing the number of oscillations.
« Hertz"- this is the name of the unit by which the frequency is measured. This unit of measurement was derived by Henry R. Herz. At the end of the 19th century, a physicist conducted a special experiment that proved the wave nature of light. According to Hertz’s theory, light is nothing but an electromagnetic wave propagated by special waves. And the longer the electromagnetic radiation (wave), the brighter the light we see. The color of light directly depends on the wavelength.
The clock frequency is of two types - external and internal. The board, processor, RAM exchange information (data), and the external frequency is responsible for this. But it depends on the internal how quickly and correctly the processor itself will work.

If you overclock the processor, all programs (operations) will work much faster than if you do not. Overclocking is used when the user is no longer satisfied with the performance of his computer and wants to increase the standard number of clock cycles. What does this procedure give the user? The ability not to spend money on a new processor and continue working with the old one, which after overclocking can still last a long time. A computer will become more productive without replacing hardware, and that's a fact.
Having overclocked the processor, you will encounter some problems that are quite significant. After the procedure, your personal computer will consume more electricity, in some cases, the increase is very noticeable. Overclocked processors “sin” in that they increase heat dissipation. And most importantly, the devices break faster, because they have to work in an extraordinary mode. Together with the overclocked processor, the number of oscillations (clock frequency) of the RAM also increases, therefore, it can also quickly fail.
What needs to be done before overclocking?
Acceleration reserve is called the maximum clock frequency. If you exceed this maximum, the device will fail. Almost all processors are overclocked without consequences up to 17%, exceeding the original data. And there are devices that can be dispersed even less. Intel has a special series of processors that have a multiplier unlocked (it is possible to change it in the BIOS). These devices are best overclocked.Maximum clock speed is bad. On the one hand, a personal computer significantly increases its speed, and on the other hand, when the processor heats up to the maximum permissible value, it lowers the temperature by skipping oscillations (clock cycle). Therefore, if you want to overclock the device to the maximum, then you must take care of a good cooling system. Without cooling, you will not get the maximum percentage that the processor is overclocked by. It will decrease due to the fact that it will skip measures, trying to lower the temperature. Also do not forget that electricity consumption is also increasing. In order for the overclocked processor to work efficiently, you need to install a new power supply.
Before overclocking the processor, follow these three points:
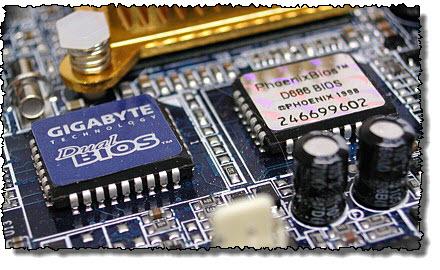
- The computer BIOS must be updated to the latest version.
- You should know how the processor cooling system works: whether it is installed securely and if there are any malfunctions.
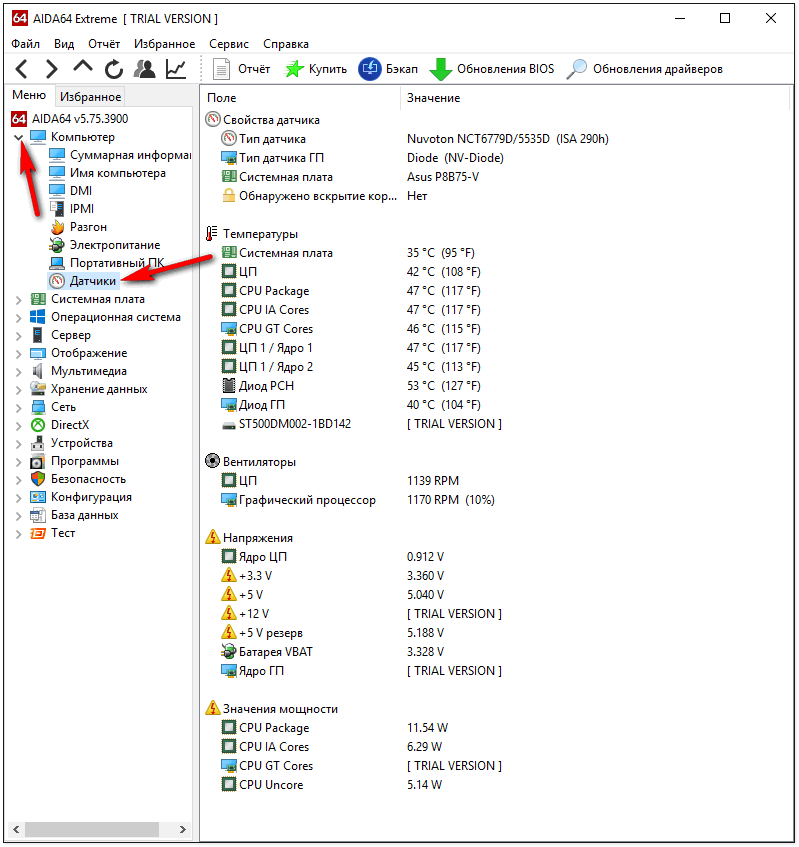
- Determine by looking in the BIOS, or using special programs, the processor clock speed, its initial value.

Also, check how your processor works during full load. For testing, you can use the program. This free, easy to use, but functional utility will check the stability of the device and display the results on the screen.

But only after that you can begin to overclock the processor. Below we will consider three programs that can do this safely.
Overview of Intel overclocking software
Setfsb
Using the first program is very simple, and even inexperienced users will learn it. True, the developers do not recommend it to beginners in order to avoid critical errors. This utility will very quickly and simply accelerate the central processor without rebooting the system. One movement of the slider in a specialized utility and you're done.
With this specialized program, you can overclock any processor model, but only if the motherboard is suitable. Not all models are supported by it. And in overclocking the processor, the motherboard is of great importance. Indeed, during the procedure, the system clock frequency also increases. And this leads to an effect on the clock generator, which is located on the motherboard.
Before using this utility, go to the official page and check if there is a model for your personal computer in the list of allowed motherboards. The advantages of this program include low weight (only about 300 kb), ease of development and management, high work efficiency, regular updates.
Recommendation! The developers of the program do not advise using it for beginners who do not understand what this may threaten. And besides, an inexperienced user is unlikely to be able to independently find out which model of a clock generator is in his computer. It is specified manually.
Overclocking the processor using the SetFSB utility:- What is the model of the clock on the motherboard? Select it from the “Clock Generator” drop-down list.
- Click “Get FSB.” You will see two frequencies - the device itself and the system bus.
- Gently move the slider, constantly measuring the temperature of the processor. This can be done using a specialized utility.
- When the slider position is optimal, click Set FSB.
CPUFSB
Another effective program that allows you to overclock all models of Intel processors. The utility is not free and is downloaded from the official page of the developer. The program is included in a specialized tool that allows you to overclock the processor and monitor its stability. If you could not use the first program, SetFSB, because it did not support your motherboard, then this can work. Since more motherboards are supported here.
In addition, there is a more convenient user interface: there is support for the Russian language. As for the overclocking itself, these two programs work the same way: they increase the system clock speed.
How to overclock the processor using CPUFSB:
- Find the motherboard model in the drop-down list.
- Find the PLL chip model in the drop-down list.
- Click on “Take Frequency”. You will see the initial frequency of the device and the system bus.
- The frequency increases in the same way: with gentle movements until the desired level is reached. Do not forget to observe the temperature of the processor using a special program. Once the desired values \u200b\u200bare set, click “Set Frequency”.
SoftFSB
The program also allows you to quickly and easily overclock the processor, has a simple user interface and is easy to learn, albeit in English. The only minus is no longer supported by the developer, and therefore it is unclear whether you can use it. The utility can be downloaded on the official page for free. With this program you will overclock the processor with any model of the motherboard and the clock generator.This program is also intended only for experienced users who are familiar with motherboard models and clock generators.
How to overclock the processor using SoftFSB:
- Find your model of clock and motherboard.
- Find out what is the current frequency of the bus and processor.
- Gently move the slider until you find the desired frequency. At the same time, do not forget to monitor the temperature of the processor in similar programs.
- When the optimal number of measures is selected, click on “SET FSB”.
These utilities, which you met above, can be used for both personal and laptop computers. But when overclocking the processor on laptop computers, you should be as careful as possible so as not to harm or damage the processor. The system clock speed should not increase to the limit value.
Acceleration What is it?
Acceleration - forced operation of equipment at higher frequencies. Overclocking processors directly by the user appeared a long time ago, approximately starting from 486 processors. Even then, people wanted to speed up their computer without spending money from their budget. Since the processor was that part of the computer whose speed has always been measured in megahertz, the goal of overclocking was to increase these very megahertz. At first, the processors did not really strive to give joy to their owners. The reason for this is that in those days, computers were much more expensive than now, and processor manufacturers squeezed everything they could out of them. Therefore, they had practically no margin of frequency. But time changes everything. In our case - for the better :) (otherwise this article would not have been used). So, the purpose of this article is to help beginners as much as possible, and to help processor manufacturers as little as possible :) ...
Why are CPU manufacturers happy with overclocking?
In fact, the CPU manufacturer does not seek to delight users, it only tries to squeeze the maximum benefit out of its “products”. In addition, there are several more points about the possibility of overclocking, here they are:
Processor Release System.
For example: AMD Athlon XP 1500+ and 2000+ on the Palomino core are not released separately (that is: AMD needs to fill the gap in the market for XP 1500+ processors, excellent, we start the process of manufacturing XP 1500+ ... it's not so simple). That's why:
Nuclear heterogeneity
Modern processors are very sophisticated devices that contain millions of transistors. And how to make sure that there are, for example, 40,000,000 million transistors in two 1,500 processors? No way. Necessarily in one there will be, for example, 100 more, in the other 200 less. And the first will work a little faster, and the second a little slower. And the number of transistors depends on the ability of the processor to accelerate.
How to find out the manufacturer, on which CPU to glue the label 1500XP, and on which 2000XP?
Test processors? So: 10,000,000 Athlon XP Palomino released. Put 10,000,000 computers with these CPUs, plant 10,000,000 people for them, and give everyone the installation: overclock the processors to the maximum. It is clear that no one will do this in view of the very high costs. And here such a science as statistics comes into play. Demonstrate a simplified model: AMD planted 1,000,000 processors per year. In the first half of the year, 400,000, in the second half of the year - 600,000. Of the first half, they took 100 and tested. 10 processors earned like 2000XR, 90 - like 1500XR. From the second: 10 - 2100ХР, 90 - 2000ХР. We mark the first batch as 1500ХР (it makes no sense to select 10% from 40,000 CPUs operating as 2000). We mark the second as 2000XP for the same reasons. And why the first batch was smaller and the quality was worse, I will consider in the following paragraphs.
Test conditions
The fact is that at the factory processors are tested in harsh conditions (temperature conditions, testing time, etc.), so that they are guaranteed to work at the declared frequencies. When buying a processor, we try, on the contrary, to provide it with good conditions (we buy an expensive cooler, sometimes we even leave the case open, etc.). For this, the processors thank us and operate at higher frequencies.
Brand and others like them
Such computers are not common in the CIS countries because of their high cost. There are many corporations selling ready-made computers in branded cases, often with in-house monitors, mice, keyboards, etc. Among these companies: Dell, Compaq, Toshiba, etc. They equip their computers only with high-quality components. Therefore, the processors in these computers can stand with intentionally reduced frequencies for the greatest reliability of the system.
Marketing
It is important not only to produce a high-quality and fast processor, but also to skillfully paint its advantages. For some reason, manufacturers do not like to disclose flaws :). All this is done to convince us to buy a product of this particular company, and not any other. Intel skillfully uses this rule.
Not all processors are equally useful ...
There is always a demand for top models, but it is relatively low. It often happens that processors with lower frequencies sell much better. Because of this, there is a gap in the market. Manufacturers seek to fill it and re-mark the processors. If you do not do this, then top models accumulate in the warehouse. But they will still have to be sold sooner or later, and at a price that is noticeably lower than planned.
Technical process
At the plant in the second half of the year there were more processors and their frequencies were higher. This is due to the technical process, which determines the value of the transistor, measured in microns. The smaller this value, the better the processor will overclock. That is, more transistors can be placed in the core of the same volume and, therefore, the frequency will be greater. And with the younger models, we will do this: we will place a smaller number of transistors in the same volume, because of which the heat generation will be less and the disposition to accelerate is higher.
Potential
Since processors of the same series are produced on the same technological line and differ only in frequencies, one can observe the following picture: the 1500MHz processor is overclocked to 1800MHz, and the 2000MHz processor is overclocked to 2100MHz. What do we see? Of course, the second processor is the leader in frequency, but it only clocked at 100MHz, and the first at 300MHz, although it is inferior in frequency. This is explained by the fact that 2000MHz is already almost at the limit of its capabilities. Therefore, processors of the same series with the lowest frequency overclock much better in relative terms than their older brothers.
Date of issue
The later the processor is manufactured, the better it is for overclocking. Engineers of companies are constantly trying to better establish production in order to ensure a higher percentage of suitable products, therefore, to reduce costs. This is achieved through the use of more advanced technologies (new packaging of the case, etc.). And the more technologically perfect the percent, the better it is adapted to non-standard frequencies.
Why do we need this acceleration?
Overclocking is involved for a number of reasons, ranging from increased productivity to enthusiasm. These are the reasons:
- I want it faster! (c) Our user
- I want for less money! (c) Our user
System balance
It often happens like this: I bought a cool video card and thought that everything was OK. But it was not there. I forgot / did not know / did not remember that the old Duron 600MHz remained in the system, and GeForce 4 was already on the table. The processor in its importance in games (since almost every user is sophisticated in games, it happens that for the sake of games people are engaged in overclocking) occupies one podium with a video card. Therefore, in order to somehow make the video card work as expected, the processor accelerates.
Passion
And then came my favorite item! Many people (including me) disperse everything that is possible for excitement. Why overclock a processor with a frequency of 2 GHz? - Ask the novice user / overclocker. Yes then - it’s interesting to get the most out! (Even if this maximum is not really needed) It's like roulette: it was lucky - it was well dispersed, not lucky - it was still dispersed, but not by much. Adrenaline adds even more that such manipulations can also burn the "gem". Although, cases of processor overclocking from overclocking are extremely rare. Just everything must be done with the mind, and not with dull excitement. If everything is done correctly, then the probability of failure is 0.0XXX%.
What if it burns out?
As stated in the previous paragraph, with the right actions, the risk is extremely small, but there is one. Here are a few overclocking disadvantages:
Fatal - processor burned out. This can happen if:
- When assembling, I forgot to attach a cooler. It is treated simply: you need to be careful and check the system as a whole before starting.
- The cooler stopped. In BIOS of most motherboards there is an option: stop the system when the cooler stops.
- The temperature of the processor goes beyond the permissible limits; one fine day the computer crashed and didn’t come to life. Watch the temperature. Usually it should not exceed 60 degrees.
- I wanted to unlock the multiplier on Athlon / Duron and after that the system does not start. Carefully wipe the remnants of conductive varnish / pencil from the processor and, if in this case "nothing starts" (c) Masyanya :), bring the stone to the company where you bought it under warranty. When talking with the manager, you need to make an innocent stupid face and mumble all the time: I played Quake / Unreal / NFS ... and he ... he stopped and does not work now. No smart words to the manager’s questions about whether you got the processor / removed the cooler, etc. Say - NO.
- I went to a neighbor to put my stone on his computer, brought it home, inserted it into my computer - it does not work. See paragraph above.
- Chipped on the core with inaccurate installation of the cooler, but there is a guarantee. Try to blurt out the thermal paste on the core so that it covers the place of cleavage and forward to the firm. There are few options for a successful result, but they are. This is better than mourning a deceased processor at home.
- The leg broke off. Try to contact a professional workshop, they will probably help you there. I advise you not to trust this occupation to any neighbor "Sasha", who supposedly knows how to handle a soldering iron - you will bring the processor to the workshop with five broken legs.
Lifetime
Processors are designed for about 10-15 years of continuous operation. By your actions you can reduce their service life to 5-10 years. But after this time, your processor will cost a couple of cans of beer :).
Extreme overclocking
Occupation for fearless people. I don’t belong to such, therefore, I don’t do such things (I will not describe in this article, since it is designed for beginners and advanced users who are better off not taking this lesson. And experienced overclockers would hardly find anything new in my knowledge of extreme acceleration) and I do not advise you. But if you still get nasty, you can try. I only note that the chances of dying by the processor increase dramatically.
Manufacturer and overclocking
Manufacturers have a negative attitude to overclocking, but there are some exceptions (why won't AMD block the tightly?).
Expediency
What will I get from overclocking if I have ХХХМВ memory, a GeForce X video card, etc.? It is advisable to overclock the processor in all cases (except in similar situations: you are a gamer, you have 3GHz CPU \\ TNT2 M64 \\ 64Mb RAM). The question is, what negative aspects can overclocking bring?
- When overclocking with FSB, not only the processor is heated, but also all the system components. Therefore, almost everything can fail (memory, hard drive, SCSI-board, even the power supply).
- The problem is to determine: what exactly is failing? Most often: memory or CPU.
- After several hours of operation, the computer freezes. Almost always this happens due to overheating. Need a better cooler.
- After buying a more "sophisticated" cooler, the case will make much more noise.
- Sometimes: a feeling of fear. What if it burns out?
Optimization
Often, after optimizing the memory (setting lower timings in BIOS, setting up the OS, etc.), overclocking, and optimizing the video card, you can get abouta greater increase in performance than from overclocking the processor.
Free ram
If you have a small frame and your tray in Windows represents something like: AVP Monitor, ICQ, PowerStrip, Chat, CPUCool, Winzip, Windows Messager, etc., then it makes sense to unload something, since these programs take up valuable space in random access memory.
Main board
Update BIOS. Perhaps it appeared settings that were not previously available. Typically, manufacturers do not like to talk about any specific changes in BIOS versions, so you usually have to check it yourself. P.S. The purpose of writing this article: to help the user get "free" megahertz, and not to talk about BIOS settings under the heading: "Put in it a pair of Enabled and 2T and everything will work 2 times faster." This is a question of a separate article.
OS Options
There is the possibility of tuning the performance of almost every OS. Therefore, you can simply reinstall or configure the OS. The performance gain can be significant (depending on the state of neglect of the OS :)).
Overclocking a video card
This item is addressed to fans to play 3D games. For such users, overclocking the video card can give the same increase as from overclocking the processor. “How and what” to do is well written in the article “FAQ on overclocking video cards” (for which many thanks to my namesake Alexey F. aka fin :)).
Video optimization
There is the possibility of optimizing the video card. This is done using the settings in the drivers.
Preparation for overclocking or bringing to mind.
To do this, you need sandpaper of fine grain, army GOI paste, a piece of cotton :) fabric and thermal grease. This is done like this: Unpack a freshly purchased cooler. If foil or some kind of viscosity similar to chewing gum can be glued on its base, boldly peel them off. We look at the place where the core should be in contact with the base of the radiator: there should be no traces of glue on it. Next, take the sandpaper and polish the base of the radiator (in some articles, the authors also recommend polishing the surface of the processor core ... I strongly do not recommend this) so that it is even. An ideal surface cannot be achieved. Here GOI paste is called to come to our aid (in the army it is not used for polishing radiators :)). Rub a piece of cloth on it and polish that very base. When the work is finished, you can see on the radiator a reflection of your satisfied face :).
Next, we take thermal paste of Sovdep production KPT-8 (pastes based on silver, etc., I do not recommend using: firstly, because KPT-8 does its job perfectly for less money, and secondly, when using pastes based on conductors there is a risk of shortening something) and apply it to the processor core. You should not be afraid of busting, because when installing the cooler, the remaining paste will be squeezed out, it is enough to just slightly move the radiator from side to side.
How do I overclock my processor?
Overclocking a processor depends not only on the processor itself, but also on the specific hardware in the system. I'll take the case when all the components of the system are perfectly adapted for overclocking:
By changing the FSB frequency
The most popular overclocking option available to almost everyone. The formula for calculating the processor clock frequency: FSB x Multiplier \u003d Clock Frequency. In the BIOS of the motherboard or with the help of DIP switches (there used to be jumpers. The same as DIP, only the device is simpler :)) the FSB frequency you need is multiplied by the "multiplier" and the processor frequency is obtained. We increase the FSB frequency by 5MHz, run the computer, run 3D Mark2001 a couple of times, or something like that. If everything went OK, repeat the procedure ... we reach the moment when the system boots up, but after a couple of minutes it starts to work unstably (fatal error, 3D Mark crashes, incomprehensible system errors appear, etc.). It is time to move 5MHz back. We test the system for several hours for overheating (it can be more, but after several hours 3D Mark, CPUBurn, etc., and so it will all become clear.). If all tests pass, the processor is overclocked. It remains to adjust the frequency by adding 1 MHz to the FSB and testing as described above. Acceleration with FSB gives b abouta larger increase in performance (since almost all system components are accelerated, in particular, RAM gives the largest increase of these "all"), rather than using a multiplier.
Using a multiplier
Almost all modern processors, with the exception of AMD Duron / Athlon (I do not take into account the old processors and Athlon for Slot A), do not have the ability to change the multiplier. Initially, Duron / Athlon could not change the coefficient, but after smart people figured out AMD’s secret, everything became more fun :). Different versions of these processors multiplier unlocked in different ways. Here are the unlock instructions:
AMD Athlon (Thunderbird), Duron (Spitfire)
These processors are unlocked without much straining. It was enough to connect with a simple pencil (graphite passes current, but has a lot of resistance, which, however, is not so big for this procedure :)) bridges L1, stick the whole thing with tape (graphite tends to crumble over time) and the processor is ready to use :).
AMD Athlon XP (Palomino), Duron (Morgan)
Here the situation is much more complicated. Let me remind you once again: if you are not sure that everything will work out for you, DO NOT DO IT. So let's get started:
Tools and Tools
So, how can you make your Athlon XP stone work not at the frequency that it was given to, so to speak, from above, but at a higher one, and at the same time prevent the processor from losing face, that is, presentation?
This is more difficult to do than in the case of the AMD Athlon Thunderbird, on which the bridges were closed with an ordinary simple pencil, but still possible. For this we need: a sharp knife, like a clerical or surgical knife, high-quality transparent adhesive tape, some quick-hardening glue that does not conduct current (the so-called superglue that is on any flea tray will come off), a tube of Kontaktol glue that can be used buy in any decent auto parts store, a magnifying glass (aka magnifier) \u200b\u200band 40-45 minutes of free time and worries.
The presence of a multimeter or tester is also highly desirable. Superglue can be completely replaced with any other glue, it is only important that it quickly changes the state of aggregation, that is, it becomes solid - we don’t want to sit on the processor for 24 hours?
Instead of Kontaktol glue, it’s quite possible to use any other well-conducting current, washed off with solvent and a fairly sticky substance - for example, zaponlak with metal filler, which is sold in any self-respecting store selling all kinds of smart radio components.
Melted solder is unacceptable: you will of course achieve the result, but here you’ll lose the marketable appearance of the processor for sure.
Of course, in addition to, so to speak, acquired resources, we will also need some innate and acquired human qualities. What kind? Yes, the simplest: straight arms, the same head, and preferably not located anywhere, but on your own shoulders. Do not take alcohol before you are going to make the profanities described here with your processor - everything can end badly for him and for you. The movements you perform must be clear, fast, and confident.
Change the multiplier
So, the L1 bridges have not disappeared. And even they are located on XP in the same place as Thunderbird. But look at these bridges carefully: between the two points, which, in fact, we need to connect, there is an inconspicuous groove in which, with a further game of peepers, it is quite possible to see a thin copper coating.
If you still try to close the bridges with a pencil or solder, then inevitably not only connect them to each other, but also close them to the very copper substrate. The result will be rather gloomy: the processor refuses to start, and it will be very difficult to bring it back to life.
As you already understood, our task is to close the L1 bridges without "earthing" them with copper sputtering. To do this, you just need to fill the grooves with a dielectric, which in our case is superglue or its substitute. Despite the apparent simplicity of the task, it is necessary to do this very, very carefully - after all, the dielectric should not get on the contact pads of the bridges, but the groove must be filled in nowhere - for better insulation.
We must localize the grooves with adhesive tape, which we will actually do. Clean the surface of the processor substrate with alcohol or cologne. (Just not swallowing and exhaling onto the substrate with a thin layer)
Then stick two strips of adhesive tape about 1 cm wide, each along the bridges, so that they cover the contact pads, but the grooves are not affected. The width of the resulting slit should not exceed 1-2 mm. If the rubber foot on the backing is bothering you, tear off or cut it off. After that, with two more strips of adhesive tape of approximately the same width, finally localize the place of application of the glue - in other words, stick them perpendicular to the already glued strips so that only the grooves of the L1 bridges remain open, and nothing more.
It is imperative that the tape you use has good stickiness and no bad habit of swelling anywhere. It is necessary to glue it onto the substrate tightly so that no blisters remain on the seam, otherwise glue can leak into such a swell, closing the contact area and thereby ruining the entire first stage of operation "b".
If you did everything right, then after the glue dries and the adhesive tape is peeled off, you will see a flat (or not so) glue tubercle lying exactly on top of those ill-fated grooves. By the way, we don’t need this mound: to apply normal smooth paths of a conductor over a thin, uneven and crumbling tubercle of glue — an occupation much more ungrateful than doing the same, but on a smooth surface of the substrate.
Therefore, we take the scalpel in our hands and carefully, leading the blade parallel to the substrate and almost touching it, cut off the remnants of glue. It is important not to exert excessive force on the knife - you can scratch the substrate or, for example, dig out the dielectric from the groove. It is also important that the knife is really sharp, and not the one you promise to grind for a year, and even the bread under it is not cut, but broken.
Everything, you can open your eyes. What do we see? And we see an idyllic picture - a flat, clean surface of the substrate and neatly hated grooves neatly filled with a dielectric. If we see something else, it means that we did something wrong and this "not so" must be redone immediately.
But even after obtaining a perfectly flat surface, you cannot use a pencil - the graphite resistance is too high and the processor will still not work the way we want. The use of sharpened solder is not justified - all the same adhesive, even hardened, tends to crumble and scratch, so you still won’t get a smooth path. This is where our liquid conductor comes in handy: with its help, as well as with the help of adhesive tape that has already served us, we can make smooth and reliable tracks between the contact pads.
Again cut off from the skein of adhesive tape two strips about 1 cm wide each. Again we paste them along the platforms, but now we leave them open too. Then, gluing two more pieces of adhesive tape perpendicularly to these strips so that only the first bridge of five remains open. That is, only a tiny rectangle remains open.
If at the previous stage I advised you to glue the adhesive tape tightly, then here I HIGHLY RECOMMEND you to glue it VERY DENSE - the conductor is not a dielectric, its leakage is much more dangerous, an unnecessary circuit may cost you the processor.
Got it? Now take a deep breath and use a thin tool to apply a layer of the conductor to the open rectangle. It is not necessary to feel sorry for him; You must apply a solid layer, but not a drop - it is completely useless to us.
You can exhale. While there is a blur in the eyes caused by a lack of oxygen in the blood, put all the tools in place and do not touch anything until the glue or varnish is completely dry. I emphasize - completely dry! That is, such a state of the conductor when it will be possible to stick adhesive tape on it, without fear that glue will spread out from careless pressing. After this significant event has occurred, feel free to tear off and throw away the adhesive tape.
And repeat the procedure for the second, third and so on bridges. The most important thing at this stage is to prevent any shorting of the bridges between themselves. Of course, you can then remove the small “goat” with a scalpel, but there is a great risk of scratching the substrate. The result of processing all the bridges is the unlocking of the processor multiplier. Carefully inspect the bridges, preferably under a magnifying glass, in order to make sure that there really are no unnecessary contacts between them. After this, it is highly advisable to measure the resistance of the resulting tracks, as well as ring them for contact with each other.
This is where the multimeter comes in handy. Without applying any force to the probe, place it on the first bridge and touch the second probe with the other end of the same bridge. The resistance should be close to 0. If this is not the case, then the bridge has not been drawn - repeat the application of the conductor. If so it is - consistently touch the second probe with all the other bridges L1. If on any measurement you get almost zero resistance between the probes, look for a short circuit.
If this did not happen, proceed to the next bridge.
Are all tests successful? Well, now press one probe to the small contact area above the inscription "Assembled in ...", and the second step through all the newly created bridges. Resistance should be non-zero in all cases. The area to which the first probe is pressed obviously has direct electrical contact with copper sputtering, and this test checks the reliability of our adhesive insulation.
If somewhere there is a breakdown, you will have to destroy the bridge just put in place, re-fill the groove with glue and then restore the destroyed one again.
So, everything is done and you can start overclocking.
P.S. Be extremely careful with the unlocking of "brown" atlons. Once, after such a procedure, the atlon accelerated to a frequency of 0 MHz :(. There were no signs that the percent burned out, there were also “accidentally closed bridges”, the processor was extremely neat. To make the bastard work, I removed the conductive varnish, but that didn’t help either. So think after that: what did I do wrong? On the “green” Athlone, I closed all the L1 bridges between each other, after which the processor simply did not start. When the varnish was removed, everything worked.
AMD Athlon (Thoroughbred)
When the processor on the Thorobred core exited, AMD went towards overclockers, firstly, it left an unblocked multiplier on some models (those with a factory multiplier of up to 12.5), but unlocking the rest is not difficult. Secondly, I made a well overclocked processor (and this is good). Well, let's figure out how to unlock a torobred with a multiplication factor above 12.5. And this is very easy, you just need to close the 5th bridge of the L3 group, this can be done in two ways:
a) Already the traditional way: connect the two points of the 5th bridge of the L3 group with conductive varnish, pre-glued with tape, or superglue the slot between the points, and the processor is unlocked.
FIG. 1 b) This method is even simpler: you just need to close the two legs of the AJ27 and AH28 processor with a thin wire (Fig. 2), the result is the same. (About legs more in detail below).
 FIG. 2
When the processor is unlocked by these methods, it will be possible to set various (up to 12.5 inclusive) factors through the motherboard, if the latter has such a function. But what to do if there is no such function, or if you need to set the multiplier above 12.5, then this method is no longer effective. How to do this, read below.
You can set various factors from 5 to 18.5 by setting various combinations (open, closed) of 5 L3 bridges. For example, you have a torobred 1700+ its native factor 11 is the position of all bridges closed (they are all closed), and we need to put a factor of 13, for this we need to cut the 3rd and 5th bridges of the L3 group, and in order to return the factor of 11 we need to cover them with conductive varnish.
More on L3 bridge combinations:
 FIG. 3
You need to cut the bridges with two batteries of 1.5 volts each, one contact to one of the points of the bridge, and the second you need to connect to the needle and drive between the points and the bridge will cut. However, the bridges can not be cut, but simply isolate certain processor legs that are connected to the top points of the L3 bridges.
This is done like this - it is pulled out of the network cable (twisted pair UTP) of the wires, the wire is pulled out of the insulation and this (some other) insulation can be pulled to the legs - in this case, you need to drill holes (manually) just a little bit on the moving part of the socket, so that then when removing the core, the insulation did not remain there:
| Bridges L3 | CPU legs |
Insulating these processor legs will be equivalent to cutting the L3 bridges. Also, using the same legs, you can restore previously cut L3 bridges. Just need to bring the GND signal to the leg corresponding to the top point of the L3 bridge - this will be equivalent to closing the bridge:
 FIG. 5
Overclocking stability.
Voltage
Voltage can be increased / decreased by CPU, RAM, AGP, IO. Usually raising the voltage to the processor gives more stability, with it you can get better overclocking results. True, when raising the voltage to the CPU / RAM / NorthBridge, they begin to bask more. To do this, it is necessary to provide good cooling. A review of coolers for processors can be found on almost any hardware site. Chipset cooler mat. It is desirable to replace the boards, for example, with a Pentium I cooler. There will be enough memory for radiators attached to its chips. You can make them by cutting the radiator from the old mat. board or processor. Then glue it with hot glue (not super glue!), Which can be bought on any radio market.
 FIG. 6
I recommend increasing the voltage by a maximum of 15% of the nominal value. Above is not safe! With overclocking the CPU, it is necessary to raise the voltage to the memory, since most mat. The boards work in synchronous FSB / RAM mode. There is no need to raise the voltage on the AGP, as modern video cards can work at AGP frequencies, much more than the nominal ones. This option is relevant for owners of Matrox video cards, whose products have long been famous for their dislike for overclocking. The voltage on the IO (Input / Output) can be raised to increase the overall stability of the system.
FSB / PCI / AGP Ratio
In order not to suffer other equipment during overclocking (hard drive, PCI devices, video card, etc.), dividers were invented. For example: Intel Celeron I runs on 66MHz FSB, while in synchronous mode, the PCI / AGP frequency will also be 66MHz. AGP has a nominal frequency of 66MHz, while PCI has 33MHz. If the frequency is 2 times higher, the hard drive will generally refuse to work. Label showing the dependence of PCI / AGP frequencies on FSB frequencies:
From this plate it can be seen that there are FSB / PCI / AGP dividers: 1: 2: 1; 1: 3: 2/3; 1: 4: 2; 1: 5: 2/5; 1: 6: 3. With this mat. a board with divider support, for example, 1: 6: 3, has a set of previous dividers. Moreover, he can choose the right one depending on the FSB frequency, but lower the nominal frequencies for PCI / AGP mat. motherboards do not know how (for example: an Intel 815 motherboard at a FSB frequency of 95 MHz will select a 1: 2: 1 divider, rather than 1: 3: 2/3.
Conclusion: when overclocking, it is better to use officially supported frequencies (see table above). That is: you have an AMD Athlon XP running on a 133MHz FSB. To convince him to work at 166 MHz (in the presence of a mat. Board with a divider of 1: 5: 2/5) will be easier than at 159 MHz.
Cooling
As you might have guessed: a good cooler is needed for effective overclocking. Remember: not only the processor is cooled using the cooler, therefore, it is necessary to provide high-quality cooling to almost all components.
Housing design
It is better to choose a case with a horizontal arrangement of the power supply (it is located so that it can freely pass air to the processor cooler), fortunately this design is present in almost all the latest cases.
Processor descriptions
Here's what many novice overclockers really want to know. Description of processors, overclocking capabilities, etc.:
AMD Duron (Spitfire / Morgan (Duron XP)):
Frequencies: 600 to 900 MHz for Spitfire and 900 to 1300 MHz for Duron XP
Morgan is a stripped down Athlon `XP (stripped down, as always, the cache of the second level and FSB \u003d 100MHz, not 133).
Specifications:
Technology 0.18; 0.13 microns, core voltage 1.6-1.7V, power dissipation from 26 to 45W - Spitfire, from 46 to 57W - Morgan, both cores include about 25mln. transistors. Both have a bus 100x2 \u003d 200MHz, the real frequency is 100MHz, just the data is transmitted on both edges of the signal. 1.6 Gb / s bus bandwidth. The first level cache is 128kb (64kb for data and 64kb for instructions), the second cache is 64kb. Both caches store data that do not intersect with each other and complement each other, so that the effective amount is 192kb. Thanks to this caching system, AMD processors manage to be faster than similar Intel processors.
Packing :):
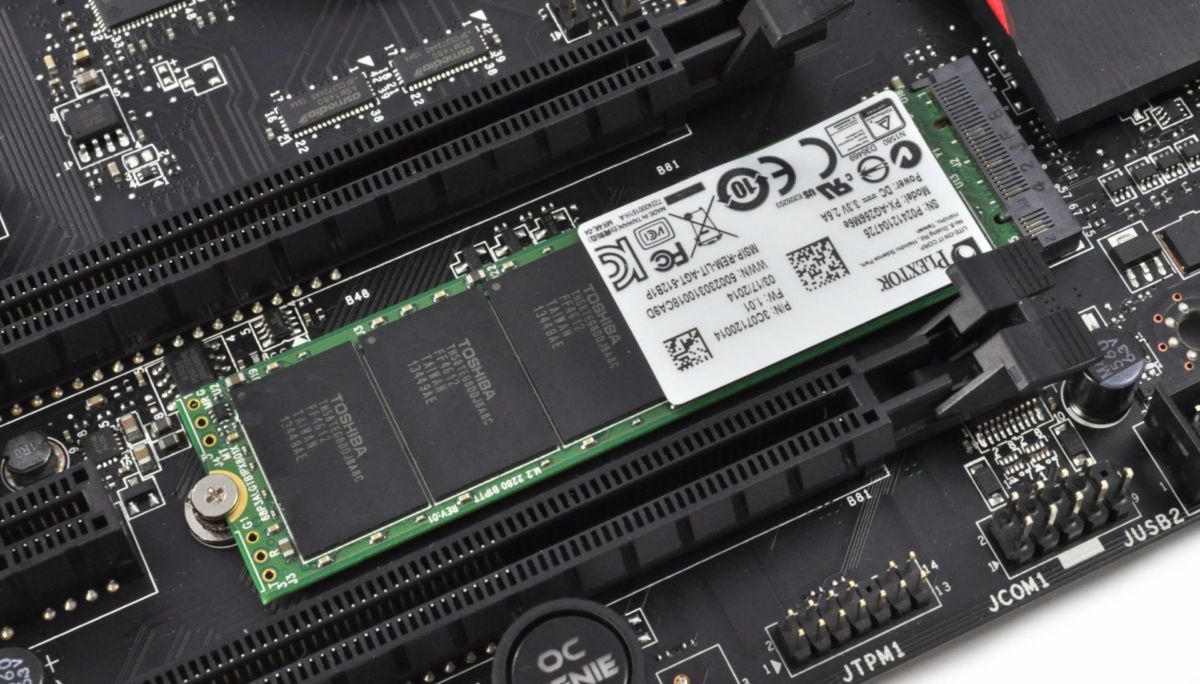
Connector - Socket-462 (Socket - A). Manufactured Socket-A-PGA462. The processor crystal is brought to the surface for better cooling. The processor is fragile enough, so be careful when installing the cooler, for this, four gaskets are installed at the edges to soften the load. When buying a processor, check the kernel for chips (usually along the edges of the crystal) so that you do not have to do the warranty return procedure immediately after purchase. The Athlon XP / Duron XP series processors have a built-in thermal sensor that allows you to most accurately capture data on the temperature of the processor. True, only the latest billards support this function.
Command Sets:
Spitfire: Extended MMX (+19 additional instructions) and Enhanced 3DNow !, with 5 additional. instructions. It uses 3 superscalar fully pipelined blocks of floating point calculations with the ability to change the sequence of instructions and 3 superscalar completely pipelined blocks of address calculations with the ability to change the sequence of instructions. This allows for impressive performance in applications that use complex mathematical and geometric calculations in large volumes, in particular in games.
Morgan: The same instructions as in Spitfire + 3DNow! Professional, which includes 107 SIMD instructions, which is 52 more than in 3DNow! Enhanced. Thanks to this innovation, the 3DNow! Professional is compatible with the SSE instruction set used in Intel processors. Also, the changes comprehended the mechanism for predicting the instructions used, due to which the new kernel is trying to load instructions into the processor cache in advance, which may be required for further calculations. Thanks to this technology, it is possible to reduce the number of idle processor cycles associated with waiting for the receipt of the necessary data from RAM. Using the increased fast address translation buffer (TLB buffer), which is responsible for caching main memory data.
Performance:
The processor is ahead: Intel Celeron Mendocino (20-30%), Coppermine (10-20%). Lags behind: Intel Pentium III (3-5%), Intel Pentium III Tualatin (10-20%), Intel Celeron Tualatin (5-15%), AMD Athlon / XP (5-20%). The difference between Spitfire and Morgan is approximately 2-5%. As the Duron processor coefficient increases, the lag behind the Athlon increases due to the smaller cache size. The percentage difference depends on the frequencies of the system bus, the type of memory used, test applications.
Acceleration:
Younger processors with frequencies of 600-650 lend themselves well to overclocking, but they have already been discontinued and it is very difficult to find them on sale. They usually accelerate up to 1 GHz. The ceiling of their frequency is approximately 1100 MHz (due to 0.18 μm technology). Therefore, older models accelerate poorly. The new processor models based on the Morgan core, released using 0.13 micron technology, accelerate quite well. Overclocking depends on the size of the cache (the smaller the better for overclocking), and on Duron it is only 64kb. For overclocking, you need to take care of good cooling, since the heat dissipation of these processors leaves much to be desired.
Pros:
- Fairly high speed.
- The lowest price among competitors.
Minuses:
- Strong heat during operation.
- Fragile enough.
Low clock speeds (I do not consider it a minus, since the processor is positioned for low-cost office and home computers).
Summary: Great processor for home and office. Excellent price / performance ratio.
AMD Athlon (Thunderbird / Palomino / Thoroughbred)
Thunderbird: From 700 to 1300 at 100 MHz FSB and from 1000 to 1400 at 133 MHz FSB
Palomino: From 1333 to 2000 MHz (from 1500ХР to 2400ХР) on 133 MHz FSB
Thoroughbred: From 1466 to 2167 MHz (from 1700ХР to 2700ХР) on 133 MHz FSB
Specifications:
Thunderbird: The same as Duron Spitfire, with the exception of: FSB 100 and 133 MHz. Cache memory of the second level (L2) - 256kb. Power dissipation from 50 to 90W.
Palomino: 37.5 million transistors, 0.18 microns, power dissipation from 60 to 90W. The rest is like Thunderbird.
Thoroughbred: 0.13mkm, power dissipation from 60 to 90W. The rest is like Thunderbird.
Packaging:
Thunderbird: Same as Duron Spitfire. Only the body is painted in coffee color. Earlier versions of processors released under Slot A were in SECC2 packages.
Palomino: Same as Duron. They are only produced in plastic Socket-A-OPGA462 (Organic pin grid array) of brown or green (latest models) colors, due to which the processor has become a little lower.
Thoroughbred: Same as Athlon XP. The crystal area only decreased and it became a rectangular shape.
Command Sets: Thunderbird: Same as Duron Spitfire.
Palomino: Same as Duron XP.
Thoroughbred: Same as Athlon XP.
Performance:
Thunderbird: The processor is ahead: Duron, Intel Celeron, Intel Pentium III, Intel Pentium 4 (there are several applications, for example, WinRAR and Quake3, where P4 is a bit ahead). Lags behind: Athlon Palomino / Thoroughbred, AMD Athlon Barton. On a par with Intel Pentium III Tualatin (Depends on the type of memory used and applications).
Palomino: The processor is ahead of: AMD Duron, AMD Athlon Thunderbird, Intel Celeron, Intel Pentium III, Intel Pentium III Tualatin, Intel Pentium 4. Behind: AMD Athlon Barton. Thoroughbred: Same as Athlon Palomino. The difference depends on the frequencies of the system bus, the type of memory used, test applications. Data obtained at equal frequencies.
Acceleration: Thunderbird: It accelerates worse (due to the larger cache size) than Duron Spitfire. Only a ceiling of frequencies of approximately 1500 MHz. The rest is like Duron Spitfire.
Palomino: The first versions in brown cases accelerate poorly. Versions in green cases accelerate well (most likely due to technological standards). Green stones marked 1500XR and 1600XR are best accelerated. Usually, with good cooling, it is possible to set the coefficient to 12.5 and make them 2000XP or put them on 166MHz FSB. The latter gives a big increase in productivity. On some mat. boards (KT333, KT400, etc.) can set the asynchronous mode of operation of the FSB and memory, but this gives a meager increase in performance. The frequency ceiling is approximately 2 GHz.
Thoroughbred: Due to 0.13 micron technology, low-end processors overclock simply cool. The stone 1700XR (1466MHz) is the king of overclocking. Honored Overclockers of the Russian Federation :) on the website www .. Quite a lot of processors are chased to a rating of 2700XR. The ceiling is about 2.4 GHz.
Pros:
- Excellent price / performance ratio.
- Good overclocking capabilities (for Athlon XP).
Minuses:
- Strong heat during operation.
- Large power consumption (demanding power supply).
Summary: Great processor for home / professional / gaming / video / graphics systems.
AMD Athlon XP (Barton)
Frequencies: 1833 to 2167 + MHz
Specifications:
Used 166 (333) MHz FSB. L1 cache - 128kb, L2 - 512kb (at the processor frequency). Technology: 0.13mkm. Voltage: 1.65V, heat dissipation: 55 - 74 W.
Packaging:
Connector - Socket-462 (Socket - A). Manufactured Socket-A-PGA462. The processor crystal is brought to the surface for better cooling. Four gaskets are installed along the edges to soften the load. The processor crystal is rectangular (large ribs are longer than Thoroughbred's). The processors have a built-in thermal sensor that allows you to most accurately capture data on the temperature of the processor. True, only the latest billards support this function. Barton supports a fairly large number of motherboards on a variety of chipsets (sometimes even those that do not officially support 166MHz FSB). The list can be found at the end of the article.
Command Sets:
Many hoped to add the SSE2 instruction set to the Barton core, but unfortunately this did not happen. The processor supports the same "gentleman's set": 3DNow! Pro, MMX, SSE.
Performance:
Unfortunately, the 512kb L2 cache does not provide the desired performance boost (approximately 5-10% compared to Thoroughbred). Yes, and the price of processors still leaves much to be desired, but still Barton is the leader in performance today. Overtakes: All. Lagging: None.
Acceleration:
Despite the doubly increased amount of cache memory, the processor accelerates pretty well (it is heated, however, like a frying pan). Approximate overclocking is comparable to Athlon Palomino. True, for this you need to have a modern mat. fee. So far, only nVidia nForce2 and VIA KT400A CE are among the best "products" for these purposes, as they are capable of stably operating at FSB frequencies above 200 MHz.
Pros: Leader in performance.
Minuses:
- Fairly high price (at the time of release)
- Strong heat during operation.
- Mat required. board that works correctly with 166MHz FSB.
- A high-quality and powerful power supply is required.
Summary: The processor will find its application in high-performance computers of the Hi-end class. At the moment, little suitable for a home gaming computer because of the high price.
Intel Celeron I (Mendocino)
Frequencies: 300 to 533 MHz
Specifications:
Used 66MHz FSB. The L1 cache is 32kb (16kb per instruction and data), the L2 cache is 128kb integrated into the core and runs at the processor clock frequency (the first Celeron versions (from 266 to 333MHz) did not have L2 cache for Slot1, and their performance was quite low) . Technology: 0.25 microns. Voltage: 2V, power dissipation: 18 - 30 watts. Packaging:
PPGA housing with a cover that protects the crystal from damage. Socket-370 Some younger models were released in Slot1 performance. If you have a mate. board for Slot1, then processors for Socket-370 can be installed with a special adapter Slot1-\u003e F-PGA or FC-PGA.
Command Sets:
It has two MMX modules, a conveyor unit for floating point calculations (thanks to which it turned out to be faster in games than similar AMD K6 / K6-2 models). Supports execution of commands with changing the sequence of execution.
Performance:
It has low performance by today's standards (66MHz FSB, small cache size, no support for SSE). Such a processor is perfectly suited for office PCs. Lags behind: from all the others discussed in this article. Outperforms: AMD K6 / K6-2 (30-40%), VIA / Cyrix (40-50%) in games. Along with AMD K6 / K6-2 in office applications.
Acceleration:
266 MHz Celeron without L2 cache almost always overclocked to 400 MHz (100 MHz FSB). The younger CeleronA models (300, 333MHz) usually clocked up to 400-450MHz. Sometimes it was possible, with raising the voltage by 0.2-0.3V, to make 400MHz Celeron work on 100MHz FSB (600MHz). Celeron I has a ceiling of 600 MHz, so, for example, the 500 MHz processor did not want to sit even on a 75 MHz FSB.
Pros:
- Low price.
- Compatible with older boards on Slot1, PPGA, FCPGA.
Minuses:
- Slow performance.
- Low clock speeds.
Summary: Inexpensive processor for simple office tasks.
Intel Celeron II (Coppermine128 / Tualatin)
Clock frequencies: From 533 to 766 MHz - 66 MHz FSB, from 800 to 1100 MHz - 100 MHz FSB for Coppermine 128. 1200 to 1500 MHz for Tualatin
Specifications:
Coppermine128: 32kb cache L1, 128kb cache L2. 0.18 μm, the voltage depends on the frequency: from 1.5 to 1.75V. Power dissipation: from 11W to 30W. Tualatin: 32kb cache L1, 256kb cache L2. 0.13μm, voltage: 1.475V. Power dissipation: 30 to 38W.
Packaging:
Coppermine128: FC-PGA case, green. The processor can be installed in the mat. board with Slot1 connector with an adapter. About his support. the board can be found on the manufacturer's website, you may have to alter the BIOS. This is due to the fact that not all old mate. The boards under Slot1 can set the voltage to 1.75V.
Tualatin: FC-PGA2 case, green with a special protective cover-heat distributor (Integrated Heat Spreader), contributing to better cooling of the core, as well as protection against mechanical damage. The processor cannot be installed in the old mat. The board without the intervention of a soldering iron (the old motherboards do not support 1.475V power and you can’t fix the situation with the new BIOS firmware).
Command Sets:
It has two MMX modules, a conveyor unit for floating point calculations, 8 additional registers and 70 additional SIMD instructions (SSE). Tualatin additionally has an improved block for predicting and caching data that the processor may require for current operations, which gives a performance increase of several percent.
Performance:
Coppermine128: Lags behind: Intel Pentium III, AMD Duron / Athlon. Ahead: Intel Celeron I, AMD K6 / K6-2, VIA / Cyrix. Tualatin: Lags behind: AMD Athlon. Ahead: Intel Celeron I / Pentium4, AMD K6 / K6-2, VIA / Cyrix. Along with Intel Pentium III, AMD Duron.
Acceleration:
Coppermine128: The ceiling is about 1200 MHz. The younger models are relatively well overclocked (for example, 600 MHz clocked up to 900-950 MHz). Tualatin: The ceiling is about 1700-1750 MHz. Due to the use of 0.13 micron technology, the processors overclock well, and the increased L2 cache interferes with overclocking.
Pros:
- Good performance (for Tualatin).
Minuses:
- Slow performance (for Coppermine).
- Relatively high price.
- No versions with FSB 133MHz.
Summary: Coppermine is a fairly slow processor. Designed to upgrade older systems. Buying a computer based on Celeron Coppermine I consider economically inexpedient. Celeron Tualatin is a good processor that can take pride of place in a car of a not very demanding gamer.
Intel Pentium III (Coppermine / Tualatin)
Clock frequencies: From 533 to 1133 MHz for Coppermine (Index E means 100 MHz FSB, EB - 133 MHz FSB). From 1133 to 1266 MHz for Tualatin cache L2 256kb, from 1133 to 1266 MHz for Tualatin L2 512kb
Specifications:
The 512kb cache version of Tualatin was originally conceived as a server version of the processor, and was called the Pentium III-S. There are no differences from the version with 256kb cache, except for a slightly reduced voltage.
Coppermine is available in 0.18 microns, and Tualatin in 0.13 microns technology. The FSB frequency can be 100 or 133 MHz. L1 cache - 32kb. The voltage for Coppermine is 1.65-1.7V, for Tualatin L2 256kb - 1.475B, for Tualatin L2 512kb - 1.45B. Mobile versions of processors are always equipped with 512 kilobytes of L2 cache. Power dissipation - from 20 to 35W.
Packaging:
Processor versions for Slot1 are no longer available. Now the processors are available in two types of cases: FC-PGA ((Coppermine) a small black crystal on a green plastic case for the Socket370 socket) and FC-PGA2 / Socket370 ((Tualatin) a green plastic case with a special protective cover that distributes heat). In Slot1, you can install processors in FC-PGA packages through an adapter. Processors on the Tualatin core install in the old mat. The board will not succeed without soldering.
Command Sets: The same as in Celeron on similar cores.
Performance:
Coppermine: Lags behind AMD Athlon, AMD Athlon Barton, Pentium III Tualatin. Ahead of Intel Celeron / Pentium4, AMD Duron. Tualatin: Lags behind AMD Athlon. Ahead of Intel Celeron / PentiumIII / Pentium4, AMD Duron.
Acceleration:
Coppermine processors are typically overclocked to 150-200 MHz. The most suitable for overclocking processors with a frequency of FSB 100MHz. Tualatin L2 256kb accelerates to 200-300MHz. Tualatin L2 512kb usually accelerates to 100-150MHz. For Coppermine, the ceiling is about 1250 MHz, for Tualatin - 1700 MHz.
Pros:
- Great for upgrades (for Coppermine).
- Low power dissipation.
- Good performance (for Tualatin).
Minuses:
- Low speed (for Coppermine).
- Relatively high price.
- Low limit frequency.
Summary: decent processor for home PC / work with audio / video data (for Tualatin). The processor is most suitable for upgrading a Celeron-based computer (for Coppermine).
Intel Pentium 4 (Willamette / Northwood) / Intel Celeron
Clock frequencies: Celeron: 1700 to 2000 MHz Willamette: 1.3 to 2 GHz. Northwood: 1.6 to 3.06 GHz
Specifications:
Used 400MHz FSB, bandwidth 3.2 Gb / s. L1 cache - 12000 instructions (8kb), L2 cache - 256kb (512k for Northwood) runs at the processor frequency. Manufacturing technology 0.18mkm for Celeron and Willamette, 0.13mkm for Northwood. Power dissipation - 50 - 70W.
Packaging: Socket423 for Willamette, Socket478 for Celeron and Northwood. Voltage is 1.7-1.75V for Willamette, 1.475V for Celeron and Northwood.
Command Sets:
The block of integer operations operates at twice the core frequency. 144 new SIMD instructions have been added - a set of SSE2 (a total of 214 instructions). Uses a new conveyor - Hyper Pipelined Technology with a depth of 20 stages. Improved prediction of transitions and execution of commands with a change in their order - Advanced Dynamic Execution.
Performance:
Celeron: Lagging: Intel Pentium III / Celeron Tualatin, AMD Duron / Athlon. Ahead: Intel Celeron Coppermine, Via / Cyrix. Pentium 4: Lag: Intel Pentium III / Celeron Tualatin, AMD Duron / Athlon. Ahead: Intel Celeron Coppermine, Via / Cyrix. Depending on the type of memory used, the gap may be reduced.
Acceleration:
Celeron is chasing quite well. Some instances with a frequency of 2 GHz can be overclocked to 3 GHz with good cooling. This fact is explained by the presence of a small amount of cache memory. Pentium 4 Willamette is not the best object for overclocking. It works at pretty high frequencies at face value. 200MHz average overclocking result. Pentium 4 Northwood, thanks to 0.13 micron technology, chases pretty well. For younger models, the average result is 400MHz.
Pros:
- Leader in clock frequency (for Pentium 4).
- SSE2 suite.
Minuses:
- Not suitable for modernization.
- Large power dissipation.
- High price.
Summary:
Pentium 4 is a good processor for professional high-performance systems, which, unfortunately, is not suitable for home gaming systems due to the poor price / performance ratio.
Celeron is difficult for me to recommend in any system. Today’s Celeron has nothing to do with previous versions of Celerons, which at one time combined excellent features at an affordable price. The processor is absolutely unnecessary by today's standards.
I do not consider other processors, since they are relevant only for office applications and this information will be interesting to a very small number of users. In paragraph "SUMMARY" expressed my personal opinion. If someone does not agree, write.
The same, only in the tables:
| CPU | Supported Chipsets |
| Athlon 100FSB | VIA KT133 / A, KM133 / A, KL133 / A, KLE133 / A, KT266 / A, KM266, KT333, KT400, Ali Magik 1, SiS730 / 733/735/740/745, nVidia nForce / 2 |
| Athlon 133FSB | Ali Magik 1, VIA KT133 / A, KM133, KT266 / A, KT333, KT400, AMD760, SiS730 / 735 |
| Athlon XP 133FSB | VIA KT133A, KM133A, KL133A, KT266 / A, KM266, KT333, KT400, Ali Magik 1, SiS730 / 733/735/740/745, nVidia nForce / 2 |
| Athlon XP 166FSB | Almost all boards on KT333 \\ 400 and nForce2 (at the moment, the full list is not available to me) |
| Duron 100fsb | VIA KT133 / A, KM133 / A, KL133 / A, KLE133 / A, KT266 / A, KM266, KT333, KT400, Ali Magik 1, SiS730 / 733/735/740/745, nVidia nForce / 2 |
| Celeron 66FSB | |
| Celeron 100FSB | i440BX, i810, i815, VIA PRO 133A / PM133 / PL133 / PLE133 / 266, Ali Alladin TNT2, Ali Alladin Pro5, SiS630 / 633/635 |
| CeleronT 100FSB | Like Celeron128, only at the end of the model is T or B added (in Intel motherboard). Example: i815B or VIA PRO 133T |
| CeleronW 400FSB | |
| Pentium IIIC 100 / 133FSB | i440BX, i810, i815, VIA PRO 133A / PM133 / PL133 / PLE133 / 266, Ali Alladin TNT2, Ali Alladin Pro5, SiS630 / 633/635 |
| Pentium IIIT 133FSB | |
| Pentium IIIS 133FSB | Like Celeron128, only at the end of the model is T or B added (in Intel motherboard). Example: i815B or VIA PRO 133T |
| Pentium 4W 400FSB | Intel845GL / 845D / 845A / I850 / I845PE / I845E / I845G / I845GL, SiS645 / 645DX / 648/650, VIA P4X266A |
| Pentium 4N 400 / 533FSB | Intel845GL / 845D / 845A / I850 / I845PE / I845E / I845G / I845GL, SiS645 / 645DX / 648/650, VIA P4X266A |
Finally…
Thank you for reading the article to the end. I hope you learned something new from it. The article turned out to be not quite small :), and, unfortunately :), it will be constantly supplemented (for now, for oneself, and if there is interest in the people, it will be laid out on the Internet). I ask you not to judge strictly, since this is my first article, which the author wrote, that is me, it took a lot of time (1.5 months) to write. But be that as it may, the writing was useful not only to me, but also to my friends and acquaintances. So time has not already been wasted ... Several things prompted me to write this article:
- I remember myself when I got a computer (~ 5 years ago) ... At first there was just a passion for games and so on. Then I wanted something new ... I became interested in overclocking: first I burned BIOS on my video card when I tried to change the initial screen saver using a notepad :), then the memory started to work badly when overclocking my Celeron, then I killed (or maybe he killed himself :) ) Athlon of my neighbor ... So, by trial and error, reading a bunch of articles (which I was tortured to search on the internet) and so on. Learned to squeeze juices from a computer (including a processor). And so I decided to put it all in one note :) for beginners.
- The second point is closely related to the first: for friends, acquaintances, comrades, etc., who bombard me with questions related to the dispersal of something in their typewriters.
- Alexey F aka fina, which seemed to me a very interesting material, despite the fact that I already know all this. I wanted to do something similar, only about another, no less significant part of the computer.
- Of course I want to see my work on the pages www.site. The main participation, and the prizes - it's not for me to decide.
The article tried to combine the FAQ with a "tutorial on overclocking for beginners." The author of the article has too little modesty, so she admits: my name is Alex, I live in Minsk, Belarus, I study at the Belarusian State University at the Faculty of Law. I am fond of girls, money, cars, computers and so on. In the distant future I plan to create a website for overclocking, where all the information I know about those computer components that can be overclocked will be posted :). Home computer configuration:
- AMD Athlon XP (Palomino) [email protected] ([email protected]\u003d 2V)
- Volcano IX + KPT8 4000RPM
- Gigabyte 7VAX KT400
- 256Mb DDR PC2100 [email protected] CL2, 2.5.2., 1CMD.
- Elsa Gladiac 920 (GeForce3) 200 / [email protected]/ 560MHz
- HDD 80Gb IBM 120GXP 7200RPM UDMA100
- CD-RW Teac W54E 4x / 4x / 32x
- SB Live! Value
- Lucent 56K Modem
- Realtek 8139AS net
- 15` Monitor Samtron 55B :) Antiques
10062 parrots in 3DMark 2001SE if anyone is interested :). For all this, it was required: 1. Change the heatsink with the cooler on the video card to the cooler from PIII, put the whole thing on KPT8 + Superglyuk. Stick in the same way the radiators on the memory (in general, in my opinion, they were simply glued there). 2. Hang the fan from the case near the video card for additional cooling of the chip and memory. 3. On the back of the video card chip, put the cooler from the first pentium. 4. Change the radiator with cooler on the north bridge mat. Boards. Just as I did with the chip on vidyuhe. 5. Put the radiator from P3 to the south bridge of the motherboard (before that it was quite hot to the touch). 6. Place the fan on the housing for air intake into the housing. 7. Lubricate Volcano IX with Castrol synthetic engine oil :).
After all this, it was possible to overclock the system and bring down the ardor of a roaring volcano so that it was no louder than the other coolers in the system, which turned out 6 + 1 on the power supply. If there is a digital camera, then I will post pictures :).
I remind you once again: almost everything written in this article was checked by me personally (those who do not trust me may not read further :)), but the use of these instructions / tips in overclocking your computer is done at your own peril and risk. Therefore: (now excuse will follow :)) the author of the article does not bear any responsibility for broken / burned equipment.
Thanks and ingratitude:
Many thanks to my neighbors, Yegor Nemtsev and Dmitry Levin, for their help in the design. To Sergey Buchin and the site www.upgrade.com for saving me from writing an article on Athlon XP (Palomino) bridges, for the same reason, I thank Tyl`a, who kindly provided me with an article about Thoroughbred` bridges and legs.
Thanks: my girlfriend Ana and my neighbors and friends who, without knowing it, distracted me from writing an article by inciting to drunkards, bars, cinema, etc. Their efforts left in vain :). I thank in advance those who will help me and make comments or additions. Do not kill yourself criticism!
Summary: if you do not understand any words or expressions, write to me by e-mail. I am pleased to explain, but I do not think that any words will cause difficulties.
(c) Alexey Lisok
This article was sent to our second contest.
When the laptop stops meeting our requirements, it's time to think about buying a more modern and fast car. But this will hit the wallet to some extent. It is possible to overclock the laptop processor, thereby increasing its performance. How to overclock the processor on a laptop, we will analyze in this article. It is important to know that overclocking the processor of a desktop personal computer and a laptop have a number of differences. And you need to observe a number of necessary conditions for the safe dispersal of your car. It is possible that if the computer does not work correctly, it will fail. Therefore, before increasing productivity, you need to think carefully, unless you specifically want to ruin the device and, with a clear conscience, purchase a new laptop. In the article we’ll tell you through BIOS.
Possible options for overclocking a laptop
The acceleration process itself is quite easy, and even an ordinary user can manipulate it. But it should be borne in mind that an increase in system performance can both improve the performance of processors and harm a laptop. It is strongly recommended that you think carefully and weigh the pros and cons before starting overclocking.

In laptops, there is no detailed BIOS setting, which will undoubtedly add complexity to the work. Also, problems will arise due to the absence of jumpers on the motherboard, as a result of which the question of bus frequency will arise. All mobile devices are designed for a longer period than after overclocking. This can lead to unscheduled breakdown, as some nodes will be forced to work with more load. The overclocking process includes changing the characteristics of the video card, processor and RAM. How to overclock the processor on a laptop? This question remains acute in the improvement of hardware.
There are several options for overclocking the processor:
- Via BIOS.
- With the help of special programs.
Improving processor performance through BIOS

The central processor interacts with the RAM via the bus. Of course, in this case, you can go for the easiest way - to increase its frequency. But most manufacturers of mobile devices block this feature in BIOS.
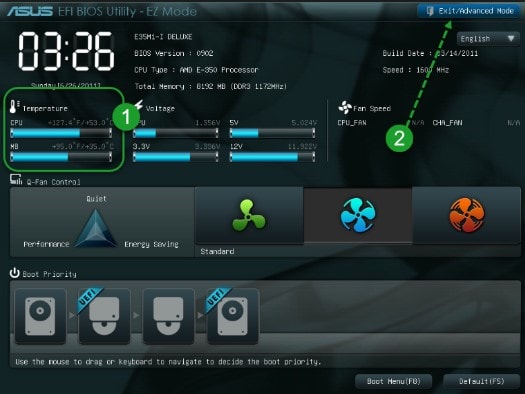
To enter the BIOS while turning on the computer, you must periodically press the DEL or Delete key.
We increase processor performance through BIOS
To do this, you must:
- reduce memory frequency;
- set a fixed frequency;
- increase the frequency of the system bus.
We consider each item in more detail.
Set the minimum frequency
- In BIOS, open the Advanced Chipset Features tab.
- Use the arrows to select the Memclock index value function and confirm by pressing the Enter button.
- Select the smallest value from the list that appears.
- Open the Memory Timing tab and set the parameters higher than the default.
- Press the F10 key to save the changes.
- After all the manipulations done, the device must be rebooted.
Set a fixed frequency
- In BIOS, open the Power BIOS Features section.
- In the AGP / PCI Clock tab, set the value to 66/33 MHz.
- Decrease the value in the HyperTransport option.
- Save changes by pressing F10.
- Reboot the laptop.
After all the changes made, your device should show better performance.
We increase the parameters of the FSB system bus

- Enter BIOS.
- In the POWER BIOS Features section, select CPU Clock.
- Change the value to 10 MHz.
- Press F10 to save changes.
- To restart a computer.
- Next, we need the Everest program, in which it is necessary to monitor the temperature of the central processor. Values \u200b\u200babove 70 ° C must not be allowed. If, nevertheless, the indicators are high, it is necessary to lower the FSB frequency.
- If the laptop shows stable performance, you can increase the value by another 10 MHz.
If after all the operations have been performed, the laptop is unstable, it is necessary to reset the BIOS. To do this, we restart in the item Load Optimized Default, after which the system will return to the factory settings. The question of how to overclock the processor via BIOS is asked by most users who want to increase the performance of their mobile device. If you do not abuse the improvement, your laptop will last for many more years.
Overclocking the CPU using programs

How to overclock the processor on a laptop, if for some reason it is not possible to use the BIOS settings? Software designed specifically for this purpose will come to the rescue. Overclocking potential depends on a large number of factors. All existing programs today are not suitable for all types of processors. To disperse the "heart of the computer", the program must fit exactly your hardware. Choosing a utility, you need to start first of all from the processor manufacturer. Consider the most common solutions.
AI Booster
The program is designed to overclock AMD Athlon processors. At startup, a small window will appear in which the current frequency is written. At the bottom of the control panel there is an arrow. If you click on it, a tab with percent will open. In this field you need to enter a value that determines how many percent you need to increase the processor. After this, the action must be confirmed, and the computer will restart. After the restart, the changes will take effect. The main advantage of this program is that if the laptop is unstable after overclocking, the program itself will return the system to its original state. As a bonus, this utility has a nice and simple interface.

AMD OverDrive
The program is suitable for both beginners and professionals. Created software specifically for AMD Phenom. The basis of two modes. The first is for novice users, where you just need to specify a value for overclocking. The second is for experienced programmers. In this mode, you can increase the efficiency of each core individually, control the frequency of the buses and other parameters. A status monitor is built into the program, by which you can track the operation of the cores and temperature. Additional tests will help diagnose the system before overclocking and after, thereby comparing the values. The software has the option of automatic overclocking. She will calculate the maximum possible frequency and herself will collect information about the processor, motherboard and cooling system. The program will take some time for all manipulations.
Intel Desktop Control Center
To increase the performance of Intel processors, the Intel Desktop Control program was created. With its help, you can control the processor in full. There is a function to switch the parameters of the laptop between overclocked and standard. As in the utility for AMD, there are a huge number of system tests. Before overclocking, you need to take care of a good cooling system, on which the processor’s performance will directly depend, and if necessary, purchase an external cooling pad. You can also increase the speed of rotation of the cooler. How to properly overclock the processor can be found in the instructions that came with the program.
How to increase the processor on a laptop and not harm the device? The answer is simple, you need to choose a program that will monitor the status of the device and, if necessary, lower the frequency automatically. This is not the whole list of overclocking software that exists today. If you compare overclocking through BIOS and through utilities, then the second method is safer and easier. Smart software itself will analyze the configuration of the laptop and select the optimal parameters for overclocking. If you need to quickly overclock the processor, the program will help you.
Overclocking the processor on Android

Every mobile device owner wants to increase processor performance. How to overclock the processor on the "Android", if there is no BIOS? It is recommended to overclock gradually and after each frequency addition, check the parameters using additional utilities. It is worth remembering that overclocking the processor is at your own risk, but if you only raise the parameters a little, nothing bad will happen. Before you begin, you need to make sure that you have Rott rights.
To overclock the processor on "Android" there is a program SetCPU. Using this utility you can not only increase its speed, but also reduce it. Lowering the clock frequency is mainly relevant for extending the time between charges of the device. Great and functionality of the program. It is possible to create profiles and set the maximum and minimum frequency values \u200b\u200bfor each device state. For example, at a certain charge level and temperature, the application will choose the optimal speed. It should be noted that overclocking may fail on a standard core. But on the modified core everything will work out.
Many will ask why overclock the processor. A huge number of laptops are produced annually, and their equipment and capacity are constantly improving. Each year, buying a new device is at least impractical. If the computer ceases to satisfy the need for performance, you can increase the parameters. How to overclock the processor on a laptop, this article explains in detail. You must not forget that the avaricious pays twice. No need to strive to increase the processor by 100%, this will only damage the laptop. But to increase productivity by 10-15% is quite realistic. It should be borne in mind that with a higher load, the processor will heat up more, and therefore, for its normal operation, good cooling is necessary. We hope this article will help to increase processor performance on your device.
A processor is one of the most expensive components in a computer. The price of modern CPUs can exceed the cost of all other components of the computer assembly, especially when it comes to server models.
When the user is faced with the task of slightly increasing the performance of the central processor, for example, for a more stable indicator of the frame rate in a particular game, you can not replace the CPU, but overclock it. Overclocking, which is also called overlocking, lends itself to Intel and AMD processors.
Overclocking allows you to increase the processor clock speed, which increases the number of instructions that the chip executes in a second, that is, it increases the CPU performance. In the framework of this article, we will consider the option of overclocking Intel and AMD processors, but it is also possible to overclock the BIOS.
Recommended reading:Is it safe to overclock the processor
The essence of overclocking the processor and the video card is the same - the user, by replacing the original software “at a low level”, increases productivity. If you look at this issue from the technical point of view, then the voltage on the key components of the board simply rises, which allows for an increase in power.
Almost every processor on the "native" software runs only 50-60% of its maximum power. Accordingly, it can be dispersed, bringing this indicator closer to 100%. But it is worth remembering that overclocking is accompanied by:

With proper overclocking, the risk of “burning" the processor is minimal. It is important to understand that the capabilities of a particular CPU model are not unlimited, and it will not work to increase productivity by 50-100%. It is recommended to overclock no more than 15%.
Please note: When overclocking the processor, the memory performance also increases, which can negatively affect it.
CPU overclocking preparation
 Before you start overclocking the processor, it will not hurt to familiarize yourself with information from "experienced" experts on a specific CPU model on the forums on the Internet. The fact is that some processors, for example, the base i3, i5 and i7 series from Intel, are poorly overclocked, and their power is better not to increase by more than 5-8%. At the same time, the line of Intel's i-series K-processors, on the contrary, is intended for overclocking, and the performance of such CPUs can be increased by 15-20% without any particular risks.
It is also important to know the overclocking potential so that there are no missed measures. With a strong increase in performance and the appearance of signs of overheating, in order to lower the temperature, the processor may begin to skip clock cycles. Similarly, he will protect himself from failure, but the quality of his work will be significantly lower than before overclocking.
- Update motherboard BIOS;
- Test the stability of the processor in normal mode. To do this, install and use a diagnostic application, for example, S&M;
- Determine the processor clock speed using the CPU-Z utility.
When the preparation is complete, you can begin to overclock the processor.
Please note: Processor overclocking techniques for desktop computers and laptops do not differ from each other. Despite this, when overclocking the CPU on laptops, you need to be very careful not to raise the frequency of the system bus on the motherboard to high values.
How to overclock an Intel processor
Overclocking Intel processors can be performed by several applications, each of which has its pros and cons. Some of the programs are not suitable for certain processor models, others are not recommended for use by amateurs, and they are suitable for professionals. Below are the three most popular programs for overclocking Intel processors, among which at least one should be suitable for your CPU model and motherboard.
 Important:
To overclock the Intel processor, you need to know the clock model of the motherboard installed in the computer. The easiest way to determine it is if you disassemble the system unit (or laptop) and study the inscriptions on the motherboard. Some experts say that during overclocking, you can use the brute force method, selecting all available options for the clock generator in the program until the correct one is found. We strongly recommend not to act in this way, you need to take care in advance of determining the model of the clock generator.
Important:
To overclock the Intel processor, you need to know the clock model of the motherboard installed in the computer. The easiest way to determine it is if you disassemble the system unit (or laptop) and study the inscriptions on the motherboard. Some experts say that during overclocking, you can use the brute force method, selecting all available options for the clock generator in the program until the correct one is found. We strongly recommend not to act in this way, you need to take care in advance of determining the model of the clock generator.
Overclocking an Intel processor using CPUFSB
One of the most common and convenient programs for processor overlocking is CPUFSB. It is compatible with almost all modern Intel CPUs, including support for overclocking i-series processors, that is, Intel Core i5, i7 and others. When overclocking the CPU, the CPUFSB application acts on the clock, increasing the reference frequency of the system bus. Among the advantages of the application, you can also highlight the presence of the Russian language, and its cost is a minus, since the program is not officially distributed free of charge.
To overclock a processor using CPUFSB, you must:

Please note: After restarting the computer, the set overlocking values \u200b\u200bwill be reset. To prevent this, you can set the accelerated frequency in the column “Install CPUFSB at the next start”. Due to this, the application at startup will automatically raise the frequency by a predetermined amount. If the overclocked processor needs to be constantly supported, you can put the CPUFSB program into startup.
Intel overclocking with SetFSB
The operating principle of the SetFSB application is identical to that used in the CPUFSB. The program also increases the reference frequency of the system bus by acting on the clock generator, which causes an increase in processor performance. Unlike CPUFSB, SetFSB does not have Russian language support. The utility is distributed for a fee on the developers website.
Before starting overlocking using SetFSB, you need to look at the application developers website for a list of motherboards with which it works. If there is no board used on the computer in the list, then the application will not work.
It is worth noting: Unlike CPUFSB, the SetFSB application copes well with relatively old processor models - Intel Core Two Duo. If you plan to overclock just such a CPU, you should give it preference over competitors.
To overclock the processor with SetFSB, you must:

As with the CPUFSB program, overclocking results will be reset after the computer restarts.
Intel Overclocking with SoftFSB
SoftFSB is a well-established program that is distributed for free, and it allows you to easily overclock the processor. This utility has one significant minus - developers stopped supporting it in the mid-2000s. As a result of this, the program can only work with relatively old motherboards and Intel processors. It is often used by system administrators in enterprises where computers have not changed for decades, and the requirements for their performance are growing even from standard applications.
SoftFSB works on the same principle as SetFSB, as well as CPUFSB, that is, by acting on the clock. Overclocking the processor in the application is performed according to the following algorithm:

The principle of operation of the three most popular applications for overclocking Intel processors of different generations is described above. Dozens of programs designed for overclocking the CPU work similarly.
How to overclock an AMD processor
As in the situation with overclocking a video card based on an AMD chip, you can use standard software from the manufacturer to overclock the processor. This allows you to bring to zero the risk of burnout of the chip. There are two options: use the Catalyst Control Center program, which is installed with the drivers on the computer, or download a special application for processor overlocking - AMD Overdrive from the official AMD website.
Please note: Despite the fact that software from the chip manufacturer is used for overclocking, AMD will void the warranty if overlocking is performed. This is stated when activating the Overdrive function, which is responsible for overclocking the processor.
To overclock an AMD processor using the Catalyst Contol Center, you must:

As you can see, the Catalyst Control Center application does everything instead of the user, depriving him of the ability to control the process, which not everyone will like. AMD Overdrive application allows you to participate in AMD overclocking in more detail.
It is probably no secret that the speed of a computer can be increased not only by replacing the part with a more productive one, but also by overclocking the old one. If it’s a secret, I’ll explain🙂
Overclocking, overclocking- This is an increase in the performance of PC components (processor,, and), due to an increase in their standard characteristics. If we are talking about the processor, then this implies an increase in the frequency, multiplier coefficient and voltage thereof.
2 Increase frequency
One of the main characteristics of a processor is its frequency. .
Any processor also has such a parameter as a multiplier (number), which if you multiply by the FSB bus frequency, you can get the real processor frequency.
Therefore, the easiest and safest way to overclock the processor via bios is to increase the frequency of the FSB system bus, due to which the processor frequency increases.
In all cases, the processor frequency will be 2 GHz
- bus 166 and a frequency multiplier of 12;
- bus 200 and a frequency multiplier of 10;
- bus 333 and a frequency multiplier of 6.
Simplicity lies in the fact that the FSB frequency can be changed directly in the BIOS or programmatically in 1 MHz increments.
If earlier, this method could easily end sadly for the processor (by burning). Then today, killing a multi-core processor by simply increasing the frequency is very problematic.
Once a beginner overclocker goes too far with the processor frequency, the system will immediately reset its default settings and everything will be fine after a reboot.
To change the bus frequency, go to BIOS and find there the value of the CPU Clock, as shown in the picture.
Press Enter on this value and enter the bus frequency. nearby you can see the processor multiplier and the effective processor frequency 2.8 GHz.

Please note that the processor multiplier in the example is quite high 14x at FSB 200MHz, in this case I would recommend increasing FSB in steps of no more than 5-10MHz (that is, the frequency will increase by 70-140MHZ).
In the case of other values \u200b\u200bof the multiplier and frequency, increase the frequency of the bus in steps of no more than 10%. There is no need to rush when overclocking, and with this step it will be easier for us to calculate the most optimal frequency for your CPU in tests.
If you want to achieve tangible results during overclocking. You can’t do without a good cooler; pay attention to the Zalman cooler.
We carry out tests with temperature measurement and at maximum load on the processor. You can do this with programs such as Everest, 3D Mark.
If the temperature at maximum load is higher than 65-70 C, then it is necessary either to increase the speed of the cooler to the maximum, or to reduce the FSB frequency.
3
The processor multiplier can also be changed. This will affect the increase in CPU frequency. For example, at a frequency of:

- bus 133 and a frequency multiplier of 10; (1.33 GHz)
you can change the coefficient by 15 and as a result get instead of 1.33 Ghz, 2.0 Ghz. Not a bad gain, is it?
There’s only one thing, but your processor must be unlockedmultiplier, such processors are usually labeled Extreme in case the Intel processor and the Black Edition are AMD processors.

But even if you do not have an extreme version, do not worry. After all, with the right approach of the first option, you can achieve excellent results. Although, most likely, you can not do without ...
4 voltage increases
The principle is simple. If you give more light to the bulb than it needs for the glow, then it will burn brighter. The processor, this thing is more complicated than a light bulb, but the meaning is about the same.
Increasing the voltage allows you to more seriously overclock the processor. To achieve stable processor operation at higher frequencies, it is necessary to increase the voltage on it. Here are a few things to consider:
- Be sure to put a good cooler.
- Do not increase the voltage by more than 0.3 V.

To do this, go toBIOS (Del key when starting the PC), then go to the item Power Bios Setup \u003d\u003e Vcore Voltege and increase the value by 0.1 V. Next, set your cooler to maximum and set the FSB frequency higher.
Testing, if everything is fine and performance suits you, then this can stop.
When you reach a critical level of processor performance (that is, when the frequency increases by 3-5%, a reboot occurs), I advise you to reduce the frequency by 5%, so you will fix your overclock with stable operation for a long time.