Today we will solve the problem of connecting a TV to a computer, whether it be a stationary PC or laptop - there is not much difference. There are several options, or rather, there are several connection methods, but we will use the most modern interface - HDMI. It is with its help, using only one cable, we will transmit both the image and the sound to the big screen.
Moreover, the output will be carried out with the maximum resolution that the TV is capable of and which the computer can provide. Some time ago, we talked. Now go to the big screen.
Before connecting
Before we begin to answer the question of how to connect the TV to the computer via HDMI, you need to make sure that some conditions are met, namely:
– Your computer must have HDMI output.
– The TV must have an HDMI input. All modern television receivers have at least one such connector, but they have, but, as a rule, they are installed by several. It will take any free.

– You need to purchase an HDMI cable. Choose the length, the manufacturer’s company, the cable model yourself based on the physical distance of the devices from each other, your preferences, financial capabilities. It is desirable that the cable conforms to interface version 1.3, and better - not lower than 1.4.
- It is highly desirable that on your PC stood latest driver video card. This can help get around potential problems.
If all these points are fulfilled, the presence of connectors is installed, the cable is present, you can proceed directly to the connection.
Immediately say that switching different devices (while the computer and the TV are not connected to each other in any way, except the electric network) recommended when their power is off. Or, at least, turning off one of them. This is not a mandatory requirement, but its implementation can save you from possible malfunctions, such as: failure of the HDMI interface of the video card, TV, problems with the motherboard, etc. Repair can be very expensive.
We warn in advance of yet another possible pitfall. The TV supports a resolution of at least HD (1280 × 720), but most likely FullHD (1920 × 1080). What can not always be said about the resolution of a computer monitor, and even more so a laptop. In this case, in the “Screen mirroring” mode on the second device, a “picture” will be displayed, similar in parameters to that displayed by a computer monitor. This will be mentioned below.
We connect and configure
So, all the preparatory steps are completed, proceed to the connection. As already mentioned, to avoid possible problems, turn off the TV and, preferably, the PC. After that, you can connect the HDMI cable to the corresponding connectors of both devices.
Modern TVs, in most cases, are equipped with several HDMI inputs, which one to use is a matter of taste. Use the one that is easier to reach, just remember see number HDMI input.
Now you can turn on the device. Here it should be said about one more subtlety that can manifest itself. It happens that the TV connected to a working computer does not “see” them. Therefore, it is advisable to follow this sequence of switching on: first the TV, then the computer.
The remote control of any television receiver, as a rule, is equipped with a button for selecting a signal source. By clicking this button, a list of available inputs will be displayed. Their number, names, depend on the manufacturer of the television receiver, but everyone has HDMI inputs (usually they are called HDMI1, HDMI2, etc.). Choose the one to which you just connected the cable.
In most cases, when you boot the computer on the second screen, you will immediately see a desktop image. Naturally, with options that match the capabilities of your PC monitor.

If such an image exists, then we can say that almost all the work has been done. There is little left: check the sound transmission from the computer to the TV and, possibly, change the operating mode if it is necessary that different screens show different information. For example, a computer monitor is used for work, and a large screen broadcasts a movie.
To see and, if necessary, change the parameters of the second screen, you need to right-click on the desktop, in the menu that appears, select " Screen resolution».

Let's start with the operating modes. There may be several(hereinafter the options from the “Screen Resolution” menu):
- Duplication of screens. In this case, both display devices work synchronously, showing an identical "picture", that is, the desktop of your computer, and all your actions will be visible.
- Screen expansion. A more interesting mode, which allows not only to “stretch” the desktop to 2 different display devices, but also to get different display sizes on them. For example, a laptop monitor often has a screen resolution of 1366x768, and a TV has a full FullHD.
- Display the desktop on the 1st or 2nd screen. If, when a second display device is connected, it is necessary that the image is on only one of them, then these modes are intended for this.
In addition, you can swap the numbering of devices, change the orientation (from landscape to portrait), change the resolution.

Now let's run some movie, concert or any program on the big screen. Of course, recorded in FullHD format, otherwise, why did we fence the whole garden. We load our favorite media player, move it to the second monitor with the mouse, select the movie of interest, turn on playback, and transfer it to full screen mode. Not only the image should appear, but also the sound. Most likely it will. For example, it took the author just a few minutes to slowly bring a Judas Priest concert to the big screen by connecting his laptop with a rather cluttered Windows 7 to his TV.
If everything went smoothly - enjoy the result. Everything is done correctly, it works correctly, the corresponding pleasure.
Possible problems
Among the most common problems are the “invisibility” of the connected TV, the lack of image and / or sound. Ways to help avoid them in advance were listed at the beginning of the article. Now we briefly list the main solutions.
– Make sure that the used HDMI cable is working.
If there is no picture on the TV at all, check if the selected HDMI input matches the one to which the cable is connected.
Try resizing the monitor image, display mode.
- If no sound is transmitted, then check which device is used to transfer it. To do this, open the "Control Panel", select the "Hardware and Sound" section, then - "Sound".

The TV should not only be in the list that appears, but also be marked as “Default device”. If this is not the case, then right-click on the playback device corresponding to the connected TV, then assign it as the default one. If it is not in the list of devices, then in the same window, right-click on an empty spot and check “Show connected devices”. The TV should appear on the list.
If it is still not there, you should check which versions of the sound device drivers you have installed and update them.
It happens that everything is done correctly, the cable is working, the driver does not happen newer, and how it does not work as needed. Most likely, the matter is in the operating system. In the most advanced case, it may happen that you have to reinstall the system.
Usually connection problems do not happen. If something works wrong, then you should look for the reason, rather, in the "software" part. Select drivers, and not just update them, but, preferably, completely remove the old ones and only then install new ones.
Owners of older versions of Microsoft's OS, such as XP, may encounter the situation that everything is configured as it should, but it does not work. You will have to configure using the utilities that are part of the video driver. As a rule, after short experiments, getting everything to work as it should.
Good luck with your connections.
P.S. If nevertheless something did not work out, write in the comments, we will help!
I answer all questions in detail.Friends! Everything that you do on the computer, watch movies, cartoons, chat on Skype, play, view photos, slides or Internet pages in a browser, all this will also be shown on the screen of your TV if the TV is connected to the computer via an HDMI cable. Now, almost every TV has an HDMI input, and most video cards have an HDMI output.
The HDMI interface was invented in order to interconnect two high-tech digital devices (they are undoubtedly your computer and TV) and transfer information from device to device without loss of quality. Such transmitted information may be an image and multichannel quality sound. If you have a movie or a movie on your computer, in any HD, Blu-ray or AVI, MOV, MPG, MP4 format, then all this can be watched on your TV. There are slides or photos, please see. I don’t even speak about games, since they are not their supporter, they take a lot of time from young people that can be spent on studies. We connect the TV to the computer via HDMI with a second monitor We will use an HDMI cable to connect the computer to the TV, it looks like this and can be up to 20 meters long, choose the cable of the length you need.

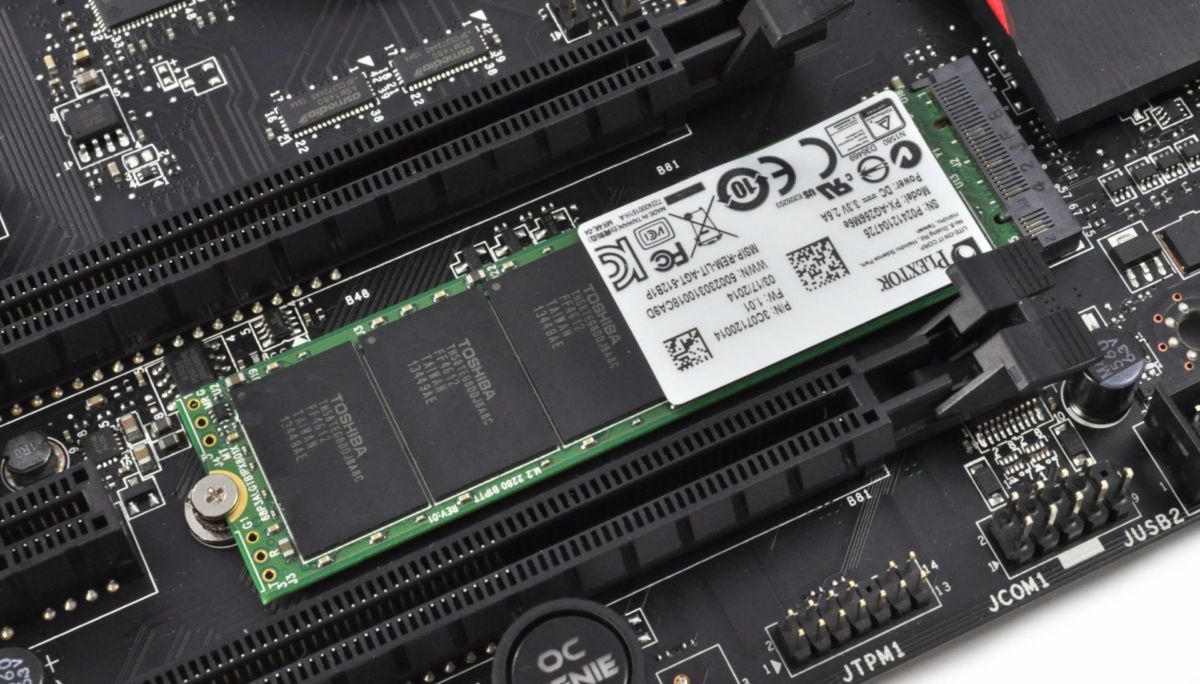
For example, take a Samsung TV, a not entirely new 4 series (type LED), bought several years ago, but it already has two connectors for connecting HDMI devices.

The computer that we will use to connect to the TV was also purchased about three years ago, it has an Nvidia video card and also with an HDMI connector.

As I said, there are two HDMI connectors on our TV. On the TV turned off, connect the HDMI cable to the HDMI 2 connector,

The back end of the cable is connected to the HDMI connector of the video card of a desktop computer. The computer, in turn, is already connected to the monitor (also Samsung SyncMaster 971P) with a DVI cable.

Turn on the computer and TV. There may not be an image on the TV at once; instead, we see the following message: “Cable is not connected” “Check cable connection and source parameter” or “Weak signal or no signal”

On Samsung TVs, to display a list of all available video sources, you need to press the button on the Source remote control.

A menu appears on the TV, in this menu, using the remote control, select the HDMI 2 connector,


Now, on our TV, an exact copy of the desktop of our computer should appear. But again there is nothing, the same error comes out on the black screen. So we go to the "Screen Resolution" settings. Right-click on the desktop and select "Screen Resolution".

As you can see in the window that appears, the second (2) Samsung SyncMaster 971P monitor is set as the main screen, and in the “Multiple Screens” option we have “Display the desktop on only 2 monitors”, which’s why the image is only on the screen of the computer monitor, but it’s not on the TV

We bring everything to this state in this window. Select parameter
Multiple screens: “Duplicate these screens”
In the “Screen” parameter, “Multiple Monitors” is automatically set, click Apply and OK.

The desktop of our computer appears on the TV.

The resolution of our small Samsung TV is 1366 x 768. If your computer monitor supports this resolution, it means that it will be set to the same resolution 1366 x 768 automatically. If not, then either the TV or the monitor will have the wrong resolution. For example, my Samsung SyncMaster 971P monitor has a maximum resolution of 1280x1024. When using a TV and a computer monitor at the same time, the main thing for me is to set the resolution on the TV correctly, otherwise why did I connect it then. I set 1366 x 768 resolution on a Samsung TV, the image is perfect.

And on a computer monitor, such a resolution of 1366 x 768 looks like this.

And nothing can be done here. If you need a perfect picture on a TV and a computer monitor, then they should support the same screen resolution, that is, have the same characteristics. After connecting the TV to the computer via HDMI, there is no sound on the TV Friends! Do not forget that the HDMI interface transmits video and sound through one cable and we can specify in the settings of the operating system to use the built-in speakers of the TV to output sound.
Let's fix the problem using a TV instead of a monitor. Go to Start-\u003e Control Panel-\u003e

Equipment and Sound-\u003e Sound

If you don’t have anything in this field, right-click on an empty space and select “Show disabled devices” in the menu that appears. "Show connected devices"
Now we look at the name of our TV, in my case it's Samsung, you need to turn it on, and turn off the rest. Right-click on Realtek and select Disable.

We also turn off the speakers.

Samsung - Enable, Apply and OK.
Instruction manual
To get started, explore the capabilities of the video card installed on your computer or. Make sure that this adapter is designed to transmit both types of signals.
If you are using an ATI (Radeon) video adapter, it may not be output HDMI In this situation, it is recommended to use the DVI channel in conjunction with a special adapter. Make sure you are using an original DVI-HDMI connector that can transmit audio.
Check the specifications of your TV. Make sure its HDMI port is designed to receive audio. Suitable HDMI-DHMI format cable.
Connect the computer's video card to the correct port on the TV. If you want to use both a monitor and a TV, configure the synchronous operation of these devices. To do this, open the “Screen Resolution” menu and select the appropriate mode.
Use the “Duplicate Screen” function if you want to transfer the same image to all connected devices. In the situation when you need to use both displays independently of each other, activate the "Extend screen" mode. In this situation, you must first designate the computer display as the primary device.
Proceed to configure the sound transmission. Open the control panel and select the “Hardware and Sound” menu. Click on the “Manage Sound Devices” link.
Go to the “Playback” tab and find the ADM (Nvidia) HDMI Output equipment. Select its icon with the left mouse button. Click the "Default" button.
Now click the “Apply” button and close the dialog menu. Run a custom video clip and make sure your HDMI output works stably. When you disconnect the cable from the port, the standard audio port located on the corresponding board will automatically turn on.
Sources:
- hdmi tv output
Incorrect video card settings and monitor can not only affect image quality, but also adversely affect the user's vision and overall well-being. Before working on a computer, it is necessary to adjust all the video system settings to the maximum.
Instruction manual
Open the Start menu and select “Control Panel”; in the window that opens, double-click the “Screen” icon. The “Properties: Screen” window will be launched, go to the “Settings” tab. Here you can configure, to do this, drag the “Screen Resolution” slider to the desired position, select the value that is most comfortable for work, as a rule, the higher the screen diagonal, the higher the resolution is selected.
In the same tab, you can adjust the color palette of the screen (color rendering quality), this parameter sets the number of colors and shades that are displayed on the screen, usually, the choice is between the “Medium” and “Highest” values. For most users, the value “Average” is quite enough, “Highest” makes sense to set when working with high-quality images.
Click on the "Advanced" button. In the window that opens, go to the “Monitor” tab. Here the most important setting of the video system is done - the screen, this parameter sets the speed of flicker or the number of redraws of the image on the monitor screen. The higher this value, the less tired your eyes will be when working. It should be remembered that the overestimated values \u200b\u200bof the “Screen Resolution” and “Color Quality” parameters lower the maximum value of the “Update Frequency” parameter, and this parameter is a priority. Set the refresh rate to 85 Hz for the CRT monitor or 70 Hz for the LCD monitor and, based on these values, set the remaining parameters.
Drivers for the video card and monitor must be installed, otherwise, Windows will automatically set the refresh rate to 60 Hz, this frequency is enough for the computer to function stably, but it is not acceptable for a person with prolonged use.
It is a high-definition multimedia interface, it allows you to transmit digital information with high resolution, as well as digital audio signals that have copy protection.

You will need
- - computer;
- - television;
- - HDMI adapter;
- - drivers.
Instruction manual
Check the following points before HDMI. Conclusion sound through this interface can only be implemented for cards HD2000 and higher. Sound will be output only if you have a proprietary ATI adapter. If the card contains an HDMI output, then the chip is sealed. On some cards, the chip can be soldered into the card itself, and one of the DVI connectors of this card is yellow, then connect the adapter to it. If you do not have a proprietary ATI adapter that matches the card series, then output the sound with a separate cable through the sound card output to the input. For many, a separate video input is made for and sound, when you turn it on and sound input.
Use the following types of adapters for different cards to configure sound it turned out on HDMI the first time: for cards of the HD2000 series, use the black adapter with the code 6141054300G and the inscription Rev.A. For cards of the HD3000 series, take the gray adapter, its code is 6140063500G and the inscription is Rev.B. For HD4000 cards, a gray adapter, code 6140063501G and the inscription Rev.A (or B).
Adjust the sound after connecting. If after you have installed the drivers for the sound chip of the video card, the sound means that the sound chip has been set as the default sound device. Set the primary as the default device. To distribute the output sound to different cards, for example, music and games on the main card, and movies - using the HDMI output, in the player, set the output to HDMI Audio. After that, to improve the sound of HDMI, restart the computer and install realtek 2.09 audio drivers, they can be downloaded on the website http: //www.realtek.com.tw/Downloads/downloadsCheck.aspx? Langid \u003d 1 & PNid \u003d 14 ...
Sources:
- how to configure sound via hdmi
When connecting a TV to a computer (using the latter to output a video signal on a larger screen), resolution The desktop is installed automatically. To change the resolution to more suitable settings, use standard Windows tools.

Instruction manual
Access to screen settings depends on the operating system you are using. To find out which operating system is installed on your computer, right-click on the “My Computer” shortcut and select “Properties”. This is where the name of the operating system and other parameters will be displayed.
For the Windows XP operating system, the algorithm for setting values \u200b\u200bis as follows. Launch the “Control Panel” from the “Start” menu. Go to the "Properties" section. Next, go to the “Screen” tab. Select the “Settings” tab, where you will see a slider for setting the screen resolution. Use recommended values.
For Windows Vista or Windows 7, do the following: Right-click on a free area of \u200b\u200bthe desktop. Click on “Personalization,” and then “Display Settings.” In the Resolution section, move the slider left or right to adjust the TV screen resolution.
If your video adapter has its own utility for adjusting screen settings, use its functionality. In the display properties, click the Advanced button, and then select the Adapter tab. Click on the List of all modes button. Here you can choose resolution, color rendering option and screen refresh rate.
If you set the wrong values \u200b\u200band the TV cannot display the system desktop, do not be alarmed. In any case, a message will appear on the screen, which without user confirmation will return the screen settings to previous values. Wait 15 seconds and do not press anything.
The TV has less stringent image quality requirements than the monitor. Therefore, a computer monitor, the parameters of which you are no longer satisfied with, can be used as a TV. To do this, you need to connect an external TV tuner to it.

You will need
- - monitor;
- - external TV tuner;
- - digital television decoder;
- - active computer speakers;
- - cables;
- - extension cord with several outlets;
- - TV antenna.
Instruction manual
Check the monitor. Connect it to a computer with a suitable video card, display any video, at least from YouTube, in full screen. Move away from the monitor to the distance at which you intend to watch TV shows. Make sure the image quality suits you.
Select the correct TV tuner. The type of output (VGA, DVI or HDMI) should match the type of monitor input. The tuner must be designed for work. Note that devices with VGA outputs are most often able to accept only analog ones. If the analogue in your region has already been terminated, or its early termination is planned, you will have to add an external set-top box-decoder of the corresponding standard to such a tuner.
Connect the tuner with a cable (VGA, DVI or HDMI) to. If the tuner can only receive analogue TV shows, and the broadcast in your area is only digital, use a cable with RCA connectors to connect the digital decoder to the tuner. Use the yellow sockets for this. Connect the antenna to the device that will receive transmissions - the tuner or decoder. Turn on all appliances. When pairing a digital decoder with an analog tuner, switch the second to AV (low-frequency input) mode. Take the remote control from the device to which the antenna is connected, and automatically or manually search for TV channels according to the instructions.
You have already received the image, but most likely there is still no sound. Sound will appear only when three conditions are combined: the connection is made via HDMI, all devices and cable support audio transmission via HDMI, the monitor has built-in speakers. If at least one of these conditions is not met, add one more component to the system - active
How to connect a computer to a TV
Good afternoon, dear readers of the portal Your World PC. In today's article, we will show you how to connect a TV to a computer via HDMI. To configure the connection we need: a computer with a video card in which there is an hdmi output, a TV and the actual hdmi cable itself. If you do not have such a cable, you can use another, vga or dvi. But be sure to make sure that your television has the appropriate inputs. If your TV has hdmi, then we recommend that you use it, because if you connect the TV to a computer via vga or dvi, you will need another cable for connecting sound. But when connected via hdmi to the TV, everything will be displayed on a single cable and video and sound.
Connect a cable from a TV to a computer using HDMI
In our article, we will connect the TV to the computer using a 10 meter hdmi cord. If you use a different type of cable, the connection and all settings will be exactly the same as ours.

So, first we connect the cable to the computer. On the back of the system unit, we find the HDMI output on our video card and connect one of the ends of our cord into it.


After that, we connect the second end to the TV (you can connect both when the equipment is turned on and off, but we would still recommend that you turn it off).


Connecting with other cords - VGA and S-Video
In fact, the process itself does not change, only the lace and sockets in which you will connect it change. But in order to make it more understandable and clear to you, we will show which cords where you want to insert.
So the VGA cord is an analog video. This cable has the following appearance.

It connects to the computer here in this slot.

And on TV, this is it.

Important tip! Please note that VGA cables have a very big drawback. When using cords more than 5 meters, the picture quality is very sharply reduced. For example, we had experience when we connected a regular monitor using a 10-meter VGA cable. Image quality dropped so much that it was extremely difficult to read the text, and the video was very blurry! So, if your computer is located more than 5 meters from the TV, then use only HDMI.
S-Video cord is an outdated format (mainly used only on video cards of older computers). It looks like this.

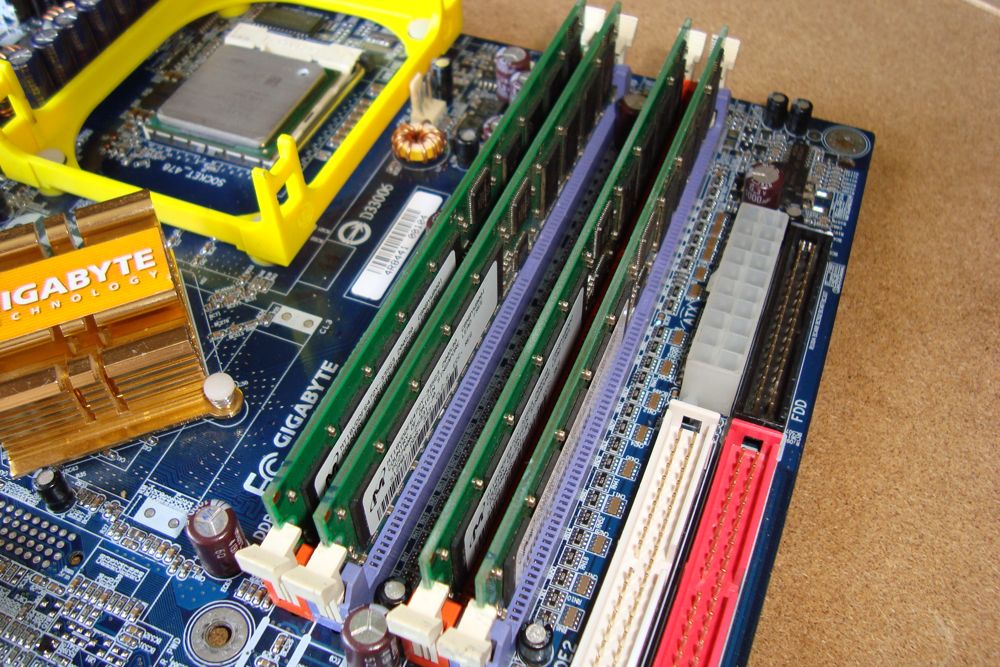
The computer connects to where the photo is indicated by an arrow.

And on the TV, this is the connector.

Settings to be done on the computer
Step 1 - Screen Setup
Now that our cable is already connected, we start the computer (we do not turn on the TV yet). When the computer boots up, turn on the screen settings. To do this, right-click on an empty spot on the desktop and select the “Screen Resolution” property. Here you can configure the output options on the computer and TV.

For example, you can duplicate screens (that is, what you see on a computer screen will be the same on a TV).

You can simply expand the screen (this means that the TV will be a continuation of the computer monitor screen. You can turn on the movie and drag it with the mouse onto the TV, and on the computer do your own thing).

Just select the mode that suits you and click the "apply" button.
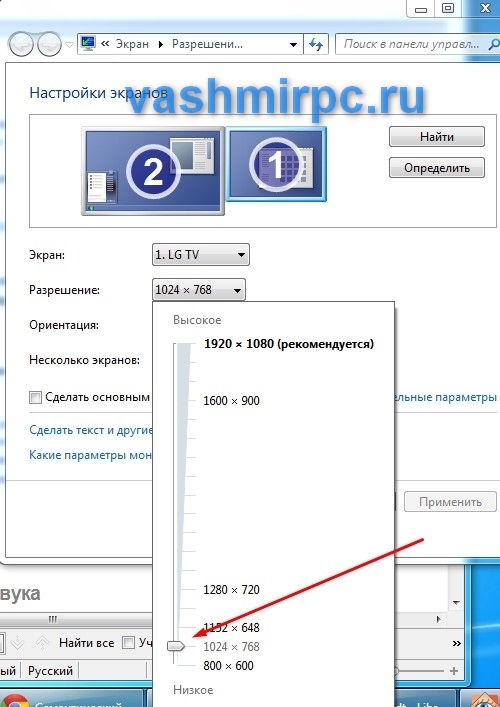
Step 2 - adjust the resolution of the TV
The next step is to adjust the TV screen resolution. Why is this needed? If you do not adjust the resolution, then the picture on your TV will not be full screen, but something like this.

Therefore, in the screen settings, select our TV.

And we adjust the resolution for it, we recommend setting the resolution to 1024 by 768, (this is the standard resolution that is suitable for almost all TVs. If you do not have a full screen picture even with 1024 by 768, try other resolution options and select your own). On our TV with this resolution, the picture is displayed on the full screen.

Step 3 - Sound Settings
So, we have already configured the output of the picture to the TV, now we need to configure the sound output. To do this, go to "control panel - equipment and sound - control sound devices."

In the window that opens, you will see a device called HDMI Output. These are the speakers of your TV. In order to enable the translation of sound on them, you need to set them as the default device. To do this, right-click on the device’s icon and select “use by default” and apply. After that, the sound will be output on the TV.

Settings to be done on the TV
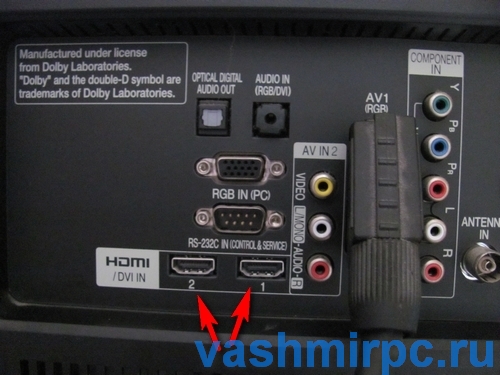
Now that all the settings are done, you can turn on the TV. To connect it to a computer, you need to specify a signal source in its settings. This is done simply. Go to the menu and look for similar settings there. In our case, on an LG TV, these parameters can be accessed by pressing the “input” button on the remote control.

You will see a menu in which you need to select HDMI and press the “ok” button on the remote control. After that you will have a picture.


That's it, now you already know how to connect a TV to a computer and you can comfortably not only watch movies and listen to music, but also play video games.
In the case when Wi-Fi Direct is not configured, Miracast is not supported, there are no flash drives with a large volume, and we really want to see high-quality movies, we recall the HDMI connector - a great way to duplicate the image to another device without losing quality. Therefore, the question arises: how to connect the TV to the computer via HDMI in Windows 10 and what is required for this? The answer is below.
What do you need to connect?
To connect, we need:
- laptop or desktop PC with HDMI output;
- tV with HDMI input;
- two-way HDMI cable.
Attention! For high-quality pictures with an audio track, do not use adapters from HDMI to DVI and VGA, otherwise watching movies and photos will leave only negative emotions.
Connection Instructions
So, to transfer the image to the TV, we need to connect two devices using a cable:

Most likely, you will not see the projection of the laptop screen on the TV.
For this TV and PC you need to configure:

But if this did not happen, the external signal transmission is disabled on the laptop or PC.
To enable it you need:

The best way is the option "Only the second screen", in which the image from your machine will be accurately copied to the TV screen, and the computer display itself will remain off. Choosing a different connection will lead to the simultaneous operation of two monitors, which has a distracting effect.
If your panel has a high resolution display, the transmitted image may be blurry or grainy.
To make full use of the resources of the TV screen, you need:

Advice! If you don’t have cable TV, and IPTV hits your wallet a lot, you can watch TV through a computer: turn on online broadcasting or sopcast on your PC and broadcast the image on TV.