Microsoft Outlook is an email client that, in addition to working with email, also provides the client with a wide range of additional functions.
Thanks to this messenger, the user will always have access to, the scheduler and a host of other convenient developments.
Content:
As for electronic correspondence, it also has its own characteristics, such as the presence of an electronic signature, which can sometimes be very useful.
The signature usually contains the full name of the sender, his position and the company in which he works.
Thus, it certifies his identity, which excludes the possibility of communicating with various scammers. Besides, it may contain:
By means of the program, a signature once created can be automatically attached to all outgoing letters, but at some point there may be a need to change it.
How to do this correctly, we will describe in the instructions below.
Set up existing signatures in Outlook
To edit one or more signatures, you must proceed to the following steps:
1 in Outlook, select the tab "File";
find 2 in it "Options" and go to them;


4 in it we find a button "Signatures" and by clicking on it, we switch to the mode of creating and editing signatures.

In the window "Select a signature to change" all existing previously created signatures are listed, which can be renamed or deleted.
By means of the same window, new signatures are created.
To go to settings, you should click on the desired entry and then all the data known about it will be displayed. An edit box will appear in the lower window. In it, you can correct something or completely rewrite the information again, depending on your needs.

In addition, additional features are placed in the same panel, such as placement, and Internet links to the website of your company or enterprise, for example.

The final section contains the default settings. If you have several signatures, mark the one you use most often and it will be attached automatically.
In this section, you can also select separately signatures for new letters and for replies to someone's requests.

After all the manipulations you want to correct the signature are perfect, save the result and leave the section by clicking the "OK" button.
In addition to the standard way to change the signature, where everything is step-by-step and simple, There is another way to configure it - manually. To implement it, the user needs to find the signature icon on the top toolbar when creating a new letter, click on it and select the appropriate option.

Rice. 9 - Manual signature setting
Outcome
The procedure for editing a signature looks about the same in both 2013 and 2016, so if you follow the instructions above, you should not have any difficulties.
If you do not initially have the created signature, then in the same way described, you can go to the "Signatures" section and select the "Create" button instead of editing.
Fill in all the fields that have already been mentioned, just add the email address and you will receive a ready-made signature. Most importantly, do not forget to save it after that.
As you can see, the procedure is simple and does not require too much time from you.
In Outlook, you can create one or more personalized signatures for email messages. The signature can include text, graphics, an electronic business card, a logo, or even an image of a handwritten signature. You can set Outlook to automatically add signatures to all outgoing messages, or you can create your own signature and add it to messages on a case-by-case basis.
Create a signature and set up adding a signature to messages in Outlook
Important: If you have a Microsoft Office 365 account and use Outlook and Outlook on the web or Outlook on the web for business, you must create a signature in both products. To create and use email signatures in Outlook on the web, see Create and add an email signature in Outlook.com or Outlook on the web.
If you want to see how it's done, .
In chapter Choosing a Default Signature configure the following options for the signature:
In the drop down box email account select the email account to be associated with the signature. You can set up different signatures for each email account.
If you want your signature added to all new messages by default in the dropdown new messages, select one of the labels. If you do not want to automatically add a signature to new messages, select (no option). It does not add a signature to any messages, replies and forwards.
If you need a signature in messages, reply and forward, in the drop-down list replies and forwarded messages choose one of the signatures. Otherwise, accept the default setting (none).

Select OK button to save the new caption and return to the message. Outlook doesn't add a new signature to the messages you opened in step 1, even if you chose to sign all new messages. You will need to manually add a signature to one message. The signature added automatically will have all future posts. Adding a signature manually, select from the menu messagesignature and select the signature you just created.
Open a new email message.
Select an item signature> signatures on the menu message.
Depending on the size of the Outlook window and when composing a new email message or replying or forwarding messages menu and signatures The button can be in two different places.
In chapter select signature to change select a team Create and in the dialog box New signature enter Name for signature.
In chapter change signature create your signature. You can change fonts, font colors and sizes, and text alignment. If you want to create more robust signatures with bullets, tables, or borders, use Word text formatting, then copy and paste the signature into the box change signature.
Notes:
Adding a logo or image to a signature
If you have a company logo or image, follow these steps to add a signature.
Inserting a signature manually
If you don't want your signature to be added to all new messages, replies, and forwarded emails, you can insert it manually.
The Outlook client from Microsoft Office is the most convenient program for creating and sending e-mail messages in any account. Microsoft also offers to create your account with the form ***@Outlook.com, then you will be able to use an email box in your browser, here you can compose, format and send messages. In order not to manually add a signature with your contact details after the text of the message each time, create a convenient template that you can insert at will in just one click.
How to set up a signature in the Microsoft Office Outlook client
For the owners of this office utility, a lot of new opportunities open up to make it easier to work with an electronic box, no matter what account you have. Learn how to create a beautiful and informative signature in this program by following a simple instruction:
- Login to the client using the password and login of your main email.
- Find in the program header in the “Home” tab a small window with the “Reply” sheet icon. Even if you don't need to reply to this user, click on this field anyway, as this is the fastest way to set up a signature in Outlook. You will simply erase the unnecessary letter later.


- A new message input window will appear in front of you. This small workspace also has its own tabs and tools. Go to the main "Messages" section, and then find the "Signature" box in the upper right part of the screen. Click on it to bring up the pop-up menu.


- In it, select the item "Signatures ..."


- Now you see the third working window, it is in it that you can create new signature templates, format them, save or delete changes. To enter a new signature, click "Create".


- Enter a title for this template to make it easier for you to navigate later. For example, call it “My contacts” to indicate your electronic data in the message signature, or “Thank you” for kind words.


- Now enter the signature itself, which will be displayed under the message. Its size is unlimited, but for a more comfortable viewing, try not to write too much.


- Now pay attention to the right side of the settings on the screen. In the "New Messages" field, set a template that will be automatically placed in all email messages that you create through the "Compose" button. And in the “Reply and Forward” field, put a signature that will be inserted only in response messages and forwarded by you to other users.
By clicking on the "Business card" button above the text entry box, you can apply a ready-made template with personal information about yourself, if you have one.

- Now try setting up the "Personal Form" tab. Go into it.
You can change the background of the signature, its font and size. Try to customize the theme by clicking on the appropriate button at the top of the window.


- There are many different backgrounds and ready-made templates to choose from, click “ok” to select the one you want, adjust the font and exit the personal form window. All changes will be saved. This way you can set up a signature in the Outlook client on your computer, but if you use mail from Microsoft in a browser, then you will need a slightly different algorithm.


How to set up a signature in Outlook mail in a browser
This method has a faster process, but also fewer settings. Access your Outlook mail through any browser on your computer.
- Find the gear icon in the top right corner and click on it.


- In the pop-up list, click on "Settings".


- You will see a long list of mail customization options, to find exactly the signatures, scroll down.

- When you see the "Structure" section, expand it and among all the lines click on "Email Signature". A window with settings will appear in front of you.


- Here you can set sending options, for example, insert the signature only in new messages, or only in replies and forwards.
Enter the signature text itself and format it as you wish.
After that, click "Save" above the workspace.


Your signature has been created and saved, now it will appear under the text of your message to other users.
This is how you learned how to insert your signature into email from Outlook.
How to Create an HTML Signature in Outlook 2010/2013/2016
In this example, we will configure the HTML signature for Microsoft Outlook 2013.
To begin with, we made up a signature in html, which we will connect to Outlook.
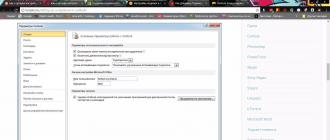
Let's open Microsoft Outlook 2013. Go to the "File" menu, "Options" section. Next - "Mail", section "Signatures".


Here we create a signature for the mail account, leaving the contents of the signature empty.


Bind the signature to the account. Change the following parameters:
Email account - select the required account from the list.
New message - select the name of the signature we created.
Reply and forward - if it is necessary to add a signature when replying and forwarding letters, then select the name of the signature that we created.

Press "Ok" in the "Signatures and Forms" window. Press "Ok" in the "Outlook Options" window.
Now you need to go to C:\Users\Your_profile\AppData\Roaming\Microsoft\Signatures - in the folder we will see files with signatures.

Signatures are stored in HTML format. Open the file with the name of the signature (in our example, "Signature Business Solution.htm" with any test editor, between the lines
....

Delete between the tags and enter the one you need from the file that you prepared earlier. We save the file. Open Outlook, create a new letter and check.

In Outlook, you can create one or more personalized signatures for email messages. The signature can include text, graphics, an electronic business card, a logo, or even an image of a handwritten signature. You can set Outlook to automatically add signatures to all outgoing messages, or you can create your own signature and add it to messages on a case-by-case basis.
Create a signature and set up adding a signature to messages in Outlook
Important: If you have a Microsoft Office 365 account and use Outlook and Outlook on the web or Outlook on the web for business, you must create a signature in both products. To create and use email signatures in Outlook on the web, see Create and add an email signature in Outlook.com or Outlook on the web.
If you want to see how it's done, .
In chapter Choosing a Default Signature configure the following options for the signature:
In the drop down box email account select the email account to be associated with the signature. You can set up different signatures for each email account.
If you want your signature added to all new messages by default in the dropdown new messages, select one of the labels. If you do not want to automatically add a signature to new messages, select (no option). It does not add a signature to any messages, replies and forwards.
If you need a signature in messages, reply and forward, in the drop-down list replies and forwarded messages choose one of the signatures. Otherwise, accept the default setting (none).
Select OK button to save the new caption and return to the message. Outlook doesn't add a new signature to the messages you opened in step 1, even if you chose to sign all new messages. You will need to manually add a signature to one message. The signature added automatically will have all future posts. Adding a signature manually, select from the menu messagesignature and select the signature you just created.
Open a new email message.
Select an item signature> signatures on the menu message.
Depending on the size of the Outlook window and when composing a new email message or replying or forwarding messages menu and signatures The button can be in two different places.
In chapter select signature to change select a team Create and in the dialog box New signature enter Name for signature.
In chapter change signature create your signature. You can change fonts, font colors and sizes, and text alignment. If you want to create more robust signatures with bullets, tables, or borders, use Word text formatting, then copy and paste the signature into the box change signature.
Notes:
Adding a logo or image to a signature
If you have a company logo or image, follow these steps to add a signature.
Inserting a signature manually
If you don't want your signature to be added to all new messages, replies, and forwarded emails, you can insert it manually.