I started talking about what a virtual machine is and what it is for.
And now I will tell you about the program for working with virtual machines, how to install and configure it.
There are many different programs for working with virtual machines, the most common are: Oracle VirtualBox, VMWare Player, VirtualPC.
Each of the options has features, advantages and disadvantages, but VirtualBox absorbs all the advantages of the other options, is free and has very flexible configuration and support for many operating systems for virtualization. Of course, there are also disadvantages, but they will be noticed only by professionals who do this and use virtual machines for special needs, using different technologies.
And therefore, in the article I decided to show how to work with VirtualBox, and if someone becomes interested, you can figure out other options without problems.
So here we go ...
First of all, download the program Oracle VirtualBox... Go to the site: virtualbox
If you are using an operating theater windows system, click on the link "x86 / amd64" opposite the line "VirtualBox 4.3.12 for Windows hosts".
If the browser is configured so that a request is always issued before saving the file, then you will receive a window where you need to specify the location where the file will be downloaded. Select a convenient folder for downloading on your computer and click "Save":
If there is a setting in the browser that the files will be downloaded without a request to the specified folder, then such a window as above, accordingly, will not appear and the file will be downloaded to the folder specified in the settings.
The file size is about 100 Megabytes.
Run the downloaded file and the installation of the program will begin. In the first window, click "Next":
In the next window, you can disable some options and functions that you think will not be used in the program and this will reduce the size installed program... For all beginners and those who are not particularly computer savvy, I recommend leaving all options enabled and just clicking "Next":
Upon completion of the installation, they offer 3 options: bring the icon to start the program on the desktop; move the icon to the panel quick launch (for operating systems Windows Vista, 7, 8), associate virtual machine files with the VirtualBox program. Turn the first 2 options on or off at your discretion, and the last "Register file association" is highly recommended to enable:
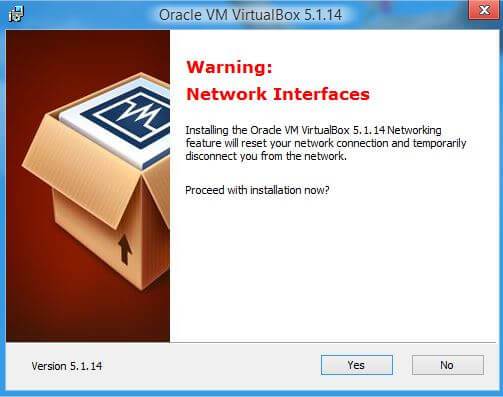
Click "Yes" in the next window. Here we are warned that additional network connections will be installed for virtual machine and the real connection may be broken. Nothing terrible will happen and you most likely will not even notice anything:
In the last window, before installing, click the "Install" button:
The installation process will begin and a window will appear near the end where you need to confirm the installation of the USB software (so that real USBs work in the Virtual Machine):
You just need to check the box "Always trust Oracle Corporation software" and click the "Install" button.
After installing the program, there will be a check mark in the window, which means that the program will start by itself after clicking the Finish button. I recommend leaving this checkbox and click Finish:
In any case, the program can be launched from the icon on the desktop or from the menu "Start"\u003e "All Programs".
After installing and running the program, it will look like the image below:
Let's make some program settings right away. To do this, go to the File\u003e Preferences menu:
The first thing we will do is set the folder for storing virtual machine files. These will be complete systems and will take up enough space. For example, I use a Windows XP virtual machine for my purposes, it is the fastest of all windows line... So I have all the updates installed in this virtual machine, Microsoft Office 2010, SafeSerf autosurfing software and 2 browsers ( Mozilla firefox and Google chrome) and the folder with the virtual machine already has a size of 8.74 GB. So, when choosing a folder for storing virtual machines, keep this in mind.
You can set the folder for storing virtual machines on the first General tab. There you need to open the list next to the words "Folder for machines" and select "Other". Next, specify a convenient folder for storing virtual machines. You can, of course, leave the default one, but it is best to store virtual machines on a disk that is not a system disk (the one on which Windows is installed) and on which there are many free space, because the size of virtual machines can be 15 GB or more:
In the settings on the "Updates" tab, check that the "Check for updates" box is ticked and I advise you to set the check period to "1 month" so that reminders do not come too often. Also, "Stable Release Versions" should be noted:
We finish with the settings, the rest does not require any changes for normal work... And if there is any need to change something, then you can always refer to the settings.
Now our task is to install and run the virtual machine itself in VirtualBox. Let's get started.
Creating a new virtual hard disk for installing the operating system and configuring it.
Let's consider working with a virtual machine at windows example XP. In most cases, I use this particular system as a virtual one, because it is the most productive, unlike its successors (Windows Vista, 7, 8), and also requires the least resources and takes up the least space on the hard disk. I use Windows 7 as a virtual one only for special purposes, when I need to try something on it.
Of course, to install the system on a virtual machine, you will need the disk itself with the required operating system or an .ISO format image. You can find them on the Internet in the public domain on torrent trackers (for example http://pirat.ca/) and others, and it can also be found on simple sites / blogs.
So, we begin the process of preparing a virtual machine for work using the example of Windows XP:
Find a disk or image with the desired system.
Password for unpacking archive: 123
Disable your antiviruses before unpacking, because most of them consider the file "help_3.4.exe", designed to activate the system, as a virus. This is not a virus, but the reaction of antiviruses is such because it is a hacking program, because it activates the system. Antiviruses are mistaken for all hacking programs as "dangerous."
To start installation in VirtualBox, select the menu "Machine"\u003e "New":
A window will appear in which you need to specify the name (in the "Name" field) of the virtual machine being created. Just specify so that you yourself understand what kind of virtual machine it is (if there are several). In the "System type" list, you can select the type of operating system to be installed. Since we are using Windows XP in the example, we leave everything at default. In the "Version" list, select the version you want... In our example, this will again be "Windows XP". Click "Next":
The next step is to select the quantity random access memory, which will be allocated for the virtual machine. For the simplest tasks and testing Windows XP, the recommended size (by default) is 192 MB. For newer systems, the recommended size will be different. But it is better not to set less than recommended, the virtual machine will slow down. If you plan to use a virtual machine to work in boxes and run many accounts at the same time, then you should allocate a lot of memory, and at least 2 GB. (2048 Mb.). But here it is worth starting from how much real RAM is installed in your computer. I recommend setting the amount of memory for running a virtual machine equal to half of the real one. For example, if you have 8192 MB of RAM (8 GB) in your computer, you can allocate 4096 MB (4 GB) for the virtual machine. You can do even more, but then already monitor the performance of the real operating system in which it is running. If it slows down, then reduce the amount of allocated memory. I will show you how to change the volume in the following steps.
So, you have selected the required amount of memory. Click the Next button:
5. The next step is to select "Create a new virtual Hard disk". Pay attention to the recommended volume of hard disk for this system (later you will need to select). Click the "Create" button:
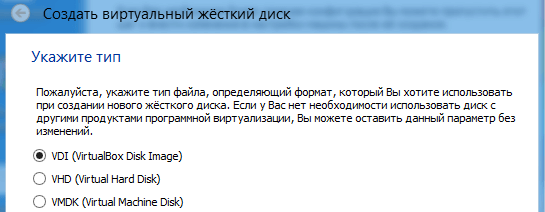
Now we will be asked to select the format of the virtual disk. This choice will depend on what other programs you can use the created virtual hard disk with to create and run virtual machines. The easiest way is to leave the default choice "VDI" (VirlualBox disk format), since you should not use the created virtual machine with other programs. Click "Next":
7. At the next stage, you need to select the type of virtual disk to be created: physical or dynamic. I recommend choosing a dynamic one, since it is not uncommon for certain needs to expand its volume, but the physical does not allow this. So, select "Dynamic virtual hard disk" and click "Next":
8. Now you need to set the size of the virtual hard disk that will be used for the virtual machine. How much you set, you will see this in the virtual machine. As you remember, the recommended volume for our system is 10 GB. When this window appears, this optimal volume will already be set here. If no particularly large programs and files are used in the system, then 10 GB is quite enough (I work with just such a volume). Calculate what you will use the system for, what volume of programs you will install on it, and roughly estimate how much volume it will take. Never choose less than 10 GB, it may simply not be enough for the system itself for updates and other things.
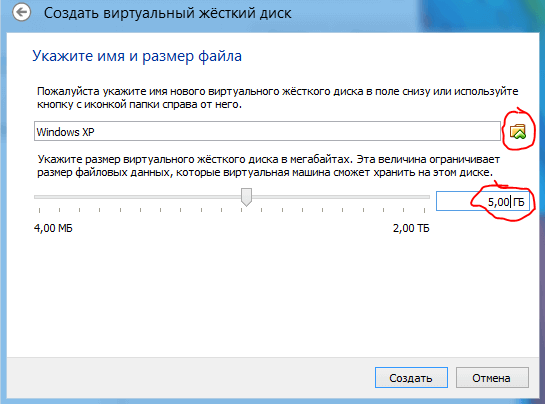
In the upper field, you can also specify the name of the created virtual disk. By default, it is the same as the name of the virtual machine and I recommend not changing anything. After selecting the volume of the disk, click the "Create" button:
After that, the virtual hard disk will be created, and the virtual machine as a whole, too, but without the operating system installed on it. You will be returned to the main VirtualBox window. Now let's go straight through the settings of the created virtual machine.
9. So, in the main window your created virtual machine will appear without a system yet. Select it with the mouse and click the "Settings" button and consider the main useful and desired settings:
In the first tab "General", and then on the right in the "Advanced" tab, there is a useful option "Remember changes during VM operation". If this option is enabled, then after each shutdown of the virtual machine, all changes on it will be saved. If you uncheck this box, then any changes made in the system will not be remembered. Those. you will turn on the virtual machine and each time you will see it in the same state as you started it the previous time. This allows you to 100% protect the system from viruses, and also just keep the virtual system clean.
I recommend at the beginning to leave this checkbox in place (i.e. so that all changes are saved), do everything required settings systems, install and configure everything required programs in this system, and only then uncheck this box and not be afraid that your virtual machine will get clogged with something.
11. Switch to the "System"\u003e "Motherboard" tab. Here you can change the amount of RAM allocated for your virtual machine. It, if you remember, was asked at the beginning of the process of creating a virtual machine. I had a volume of 192 MB set and in my example I will not change it.
Now let's switch to "Processor" in the same window. Set the CPU Utilization Limit to 90%. If you leave 100%, the virtual machine will sometimes give an error at startup and will not start.
14. Now let's consider the last and very important function in the settings of the created virtual machine - "Shared folders".
While working with a virtual machine, you will probably need some files from real system... For example, in both systems, I use a file with data about accounts on buks and their wallets. It takes a very long time to open a file in a real system and rewrite logins and passwords manually into a virtual machine, if necessary, when entering a site, and the clipboard does not work. Those. you cannot just copy text from some file on a real system and paste it into a virtual system. For all this there is a special function "Shared folders". We need to add a folder from the real system we are working on and it will be available in our virtual machine.
So, in the settings of the virtual machine, open the "Shared folders" tab and then add new folderby clicking the button on the right (it is the only one available) with the image of a folder with a plus sign:
In the window that opens, in the "Path to folder" field, press the drop-down button:
Now the window will display the folder we have selected and its name. Be sure to check the Auto-connect checkbox so that the folder is always immediately available when the virtual machine boots. Check the "Read only" checkbox based on your own needs. If you check this box, then nothing can be written or copied from the virtual machine to the added shared folder.
I do not check this box so that you can copy any desired file from the virtual machine to the real system, or change something from the virtual machine in the file of the real system. After making the settings, click "OK":
Of course, you can add as many folders as you like to suit your needs and for your convenience. At this stage, the shared folders are configured on this, but in order for them to work later, it will be necessary already from installed system install the special "GuestEdition" add-on. It's quick and easy, and we'll come back to it after installing the virtual operating system Windows XP.
On this, we examined the basic and necessary settings. Click "OK" in the main settings window:
Now the most important thing remains - to install the operating system on the created virtual hard disk. And that is all. Although installing the operating system is a completely separate issue, I will still show this process using the example of Windows XP. Still, this is part of the topic at hand.
VirtualBox is a free program that allows you to run an operating system inside another, through virtualization. For example, by installing this program on Windows 10, you can run other windows versions, Linux, Android and others. It works like this:
The program reserves part of your PC's resources (CPU, RAM, video memory, storage space for the OS) for the operating system.
Installing VirtualBox
First you need where you can find latest versions programs for different OS. I'll download the Windows version.
There are no difficulties in installation, everything is as in regular programs... It is not recommended to change the installed components.


If you wish, you can uncheck some of the checkboxes, but I recommend leaving the second and fourth ones. Next, you will receive a warning that network connection the Internet will be interrupted to install the virtual driver, we agree. Click "Yes".
After we press "Install".

The installation process will go, where you will be prompted to install the driver, for all such offers, click "Install".


This completes the VirtualBox installation process. Click "Finish".
Creating a virtual machine on VirtualBox
There shouldn't be any difficulties in creating a virtual machine. Run the program and press the "Create" button.

In the next window, you will need to specify the name and type of OS you will install.

Next, we determine the size of the RAM to be allocated to the virtual machine. For Windows XP, I will allocate 512MB of RAM. It all depends on the amount of memory you have installed. If there is enough, then much more can be allocated.

In the next window, you are asked to select the location and size where the OS will be installed. Since this is the first time we are setting up a virtual machine, we need to select "Create a new virtual hard disk". Click "Create".

In the next window, you need to select the type of disk, fixed or dynamic. It depends on your preference, I will choose fixed.

We choose how many GB of memory you want to allocate for installing the OS and its programs. I will allocate 5GB. And also the place where the created disk will be stored, choose where there is free memory. Click "Create".
The process of creating a virtual disk will go.

This completes the creation, and you will see that you will have a virtual machine with the name that you gave it earlier, I have it Windows XP.

Addition:
If you click on the "Configure" button, then you will see sections in which you can customize the properties of the machine in more detail.

For example, how many cores you want to give and their load limit. And in the "Display" section, you can increase the amount of video memory for the video card.
Installing an operating system on VirtualBox
To start the installation, click on the green button (arrow) "Run". You will see a window asking you to select the path to the installation disk image.

We indicate the path to the previously downloaded OS image.

Click "Open". After that press "Continue". The usual for everyone will go normal installation OS. You will also need to create one or more local drives. When the installation is complete, you will need to remove installation image... To do this, click on the "Devices" tab,
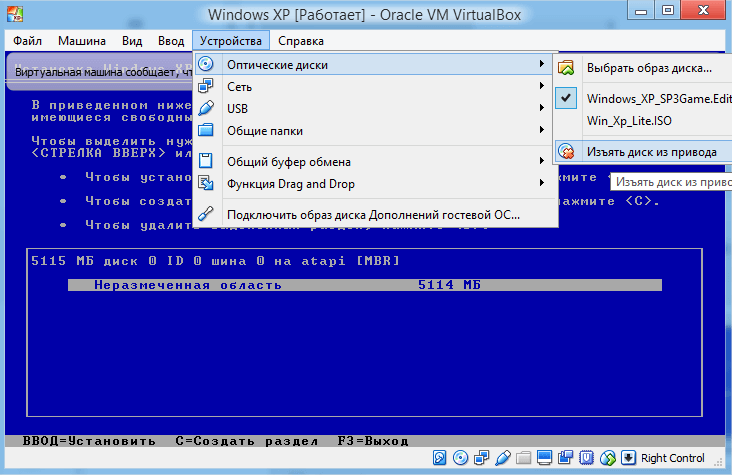
select the sub-item “ Optical discs"And click" Remove disk from drive "there, and restart the newly created OS. That's all for now, good luck.
Getting Started with VirtualBox
(for Dummies)
2014.12.12. |
Recently, in Getting Started with VMware Workstation, I covered the basics of working with a VMware virtual machine, hoping to show that working with virtual machines is simple and rewarding. VMware is good for everyone, but it has one drawback - it is paid and not cheap. Today I want to talk about a free alternative to VMWare - the VirtualBox virtual machine.
I will be using VirtualBox 4.3.20 for Windows and the guest operating system ubuntu-12.04 as an example. And I will install and configure all this in the host. operating system Window 7.
1. Install the VirtualBox 4.3.20 for Windows virtual machine.
The most convenient way is to download the virtual machine distribution kit from the official site “www.virtualbox.org”, from the page https://www.virtualbox.org/wiki/Downloads. There you will find all the latest versions of the virtual machine for most of the popular operating systems. I am downloading for Windows operating system (Figure 1).
The distribution kit of VirtualBox 4.3.20 for Windows is presented as a single executable file VirtualBox-4.3.20-96997-Win.exe with a volume of 105 MB.
After launching the executable file, a window opens informing about the preparation for the start of the program installation (Figure 2).

After a few seconds, the installation assistant window will open. To start installation, click the Next button. After that, the window for selecting the volume and location of installation will open (Figure 3).

By default, you will be prompted to install all the components of the virtual machine; I do not recommend disabling the installation of any components unnecessarily, since all of them will be needed even with minimal use of the virtual machine. Also, by default, it will be offered to install the program in the "Programs Files \\ Oracle \\ VirtualBox \\" folder and here I will not change anything. To proceed to the next stage of the installation, press the "Next" button.
In the window that opens (Figure 4), the basic settings for starting a virtual machine will be offered:
Create a shortcut on the desktop;
- create a shortcut in the quick launch bar;
- register the Virtual Box file extensions in the operating system.
Of these settings, I will leave the first and third, but this is a matter of taste and habit.

To continue the installation, click "Next", after which a window will open (Figure 5) warning that during the installation process the network connection will be broken. To avoid data loss, it is advisable to assure the operation of applications using network connection and wait for the completion of downloading all data from the network.

The network connection will be interrupted for just a few seconds and then will be automatically restored, so feel free to press the "Yes" button to proceed to the next stage of preparation for installation. In the window that opens (Figure 6), it is reported that all necessary preparations you have completed the installation of the program and you can proceed with the installation. To start installation, click the "Install" button and you will see a window showing the installation process (Figure 7).


During the installation process, the operating system will ask for confirmation of permission to install USB channel controllers for the virtual machine (Figure 8), network adapters (Figure 9), and network services (Figure 10).


For comfortable work with a virtual machine, it is desirable to be able to access uSB controllers and work with the network, therefore we agree with the installation of these components.
After the installation is complete, a window will open on the screen informing about this long-awaited event (Figure 11). Click the Finish button to complete the installation and proceed to creating and configuring the virtual machine.

2. We create a virtual machine.
Well, let's start creating a virtual machine. It won't be any more difficult than installing VirtualBox. And so, we launch VirtualBox and the main program window opens in front of us (Figure 12).

To create a virtual machine, press the button or select the menu item: "Machine-\u003e create" or press the key combination Ctrl + N. In the window that opens (Figure 13), set the name of the virtual system, the type and version of the guest operating system.

My virtual machine will be named "VM". Since I decided to use ubuntu-12.04 as a guest, the guest type will be Linux and the version will be Ubuntu (32 bit). After setting the required parameters, click "Next".
In the window that opens (Figure 14), select the size of the RAM allocated for the virtual machine.

In most cases, the default 512 MB of memory is sufficient. If you have little RAM, then this size can be reduced, but do not set it too low, as this may affect the performance of the virtual machine. If necessary, if a virtual machine needs to run resource-intensive applications, the amount of allocated RAM can be increased. After choosing the amount of RAM, click "Next".
In the next window (Figure 15), you need to select the virtual hard disk with which the virtual machine will work.

There are two options: choose an existing one or create a new one. Since we are just starting to work with VirtualBox, we do not have the already created virtual hard disks, so we select "Create a new virtual hard disk" and click "Create".
In the window that opens (Figure 16), click first of all on the "Hide details" button. In this version of VirtualBox, there is an error in the translation or name of this button and when you click the "Hide details" button, a window with detailed settings the created virtual hard disk.

After clicking the "Hide details" button, a window with advanced settings of the hard disk opens (Figure 17).

First of all, we select the type of virtual hard disk. To ensure compatibility with other virtualization programs, it is possible to create virtual hard disks of several types, for example hard drives VMDK can be used with VMware virtual machines.
Since the purpose of this article is to give basic skills in working with the VirtualBox virtual machine, I will choose the type of virtual disk VDI - the format of hard disks designed to work with VirtualBox virtual machines.
ATTENTION: make sure that your hard disk enough space to create a virtual hard disk before you start creating it.
To create a virtual female disk, click "Create". Then a window will open showing the process creating tough disk (Figure 18). This may take several minutes.

The created virtual disk is an ordinary file in the host operating system with the name and VDI extension you specified. This file can be moved, copied, transferred to another computer. For example, if you need to work with the same virtual machine at home and in the office, you can transfer it to a flash drive. file hard disk and work at home and in the office with the same virtual machine.
After creating the virtual hard disk, a new virtual machine will appear in the main window of the VirtualBox program, ready for use (Figure 19). All that remains is to install the guest operating system on it.

3. Install the guest operating system.
The installation of the guest operating system will start automatically after the first start of the virtual machine. And so, we start the virtual machine by pressing the button. After a few seconds, a window will open (Figure 20), in which you will be asked to specify the path to the boot disk or image boot disk.

I will install the operating system from the boot disk image (ubuntu-12.04-oem-i386.iso) downloaded by RuTracker.org in advance. To select a boot disk image, press the button and in the window that opens (Figure 21) select the ubuntu-12.04-oem-i386.iso file, press the "open" button and to start installing the operating system in the window (Figure 20), press the "Continue" button.

Immediately after pressing the button, the virtual machine will start (Figure 22) and after a few seconds the installation of the guest operating system will automatically start. During the installation of the operating system, you will see prompts designed to make it easier to work with the virtual machine.

The installation of the guest operating system will proceed in exactly the same way as when installing this operating system on a real computer or on a VMWare virtual machine. Since I have already described the process of installing a similar operating system in the article "Getting Started with VMware Workstation", in the section on installing a guest operating system, I will not repeat myself and will go straight to describing the basics of working with a virtual machine.
4. Basic operations with a virtual machine.
4.1. Running a virtual machine
Start the virtualization program VirtualBox. The main program window will open on the screen (Figure 23).

If in the left part of the window that opens, in the list of available virtual machines, there is no one you need, then select the menu item:
Machine-\u003e Add
In the opened file manager select the virtual machine you need (file with the .vbox resolution) and click the "open" button. The selected virtual machine will appear in the list of available virtual machines on the left side of the main VirtualBox window.
In the list of virtual machines in the window (Figure 23), select the one you need. I will select a virtual machine named "VM" and start the selected virtual machine in one of the following ways:
By clicking the button at the top of the window, under the "Edit" menu;
- by selecting a menu item: Machine-\u003e Run.
After starting the virtual machine, if its state has been saved, the state of the virtual machine will be automatically restored and you can continue working as if you had not turned off the virtual machine. If the state of the virtual machine was not saved, then the installed guest system will start, similar to the launch of the operating system when a real computer is turned on.
4.2. Pause the virtual machine.
It is often necessary to temporarily leave the workplace. If at this moment a certain program is running and you cannot miss any important moment in the process of this program, then VirtualBox provides the ability to temporarily suspend the operation of the virtual machine. To do this, select the menu item: Machine-\u003e Suspendand the virtual machine will automatically pause. To resume work, select the menu item again: Machine-\u003e Suspend.
Naturally, you can shut down the stateful virtual machine and then restart the virtual machine, but this takes much longer. If pause takes a fraction of a second, then saving the state can take several tens of seconds. If you often have to be distracted, then it is much more convenient to pause.
4.3. Shutting down the virtual machine.
There are several ways to shut down the virtual machine:
1. Click the shutdown button in the upper right corner of the window (Figure 24). In the menu that opens (Figure 25), select one of the following items:
- "Save Machine State", which saves the machine state and then shuts down the virtual machine. The next time you start the virtual machine, the state of the virtual machine will be automatically restored and work will continue as if you had not turned off the virtual machine.
- "Send shutdown signal", this will open the shutdown window, the appearance of which depends on the operating system used. Using this window, you will be able to shut down the guest operating system in a regular manner, and after the guest operating system is shut down, the virtual machine will shut down automatically.
- "Turn off the car." This action is equivalent to de-energizing a real machine.
I would like to draw your attention to the fact that in the version of VirtualBox used in this program, regardless of your choice in the operating system shutdown window, a few seconds after selecting "Send shutdown signal" the virtual machine turns off.


2. Shut down the guest operating system in a regular way provided by the guest operating system, and the virtual machine will automatically shut down after the guest operating system is shut down.
3. Select a menu item: Machine -\u003e Send Ctrl-Alt-Del, in this case, the actions of the virtual machine will be similar to the action of a real computer when the keyboard keys of the same name are pressed, i.e. the task manager will start, the appearance of which depends on the operating system used. Using the Task Manager, it will be possible to shut down the entire guest operating system or individual threads. After the guest operating system is shut down, the virtual machine will shut down automatically.
4. Select a menu item: Machine -\u003e reboot, after which a window will open (Figure 26), warning about the loss of all unsaved data in applications running in the guest operating system, if you continue to reboot. If you click the "Restart" button, then the further actions of the virtual machine will be similar to the actions personal computer when you press the "Restart" button on the "system unit".

5. Select the menu item: Machine-\u003e shut down, this will open the shutdown window, the appearance of which depends on the operating system used. Using this window, you will be able to shut down the guest operating system in a regular manner, and after the guest operating system and the system are shut down, the virtual machine will shut down automatically.
I would like to draw your attention to the fact that in the version of VirtualBox used in this program, regardless of your choice in the shutdown window of the operating system, in a few seconds after selecting the menu item "Machine-\u003e shut down", the virtual machine is shutting down.
4.4. Connecting removable devices to a virtual machine.
Let's consider the connection of removable devices using the example of connecting and uSB disconnect- drive.
To connect a USB storage, select the menu item: Devices-\u003e USB Devices and in the list that opens (Figure 27) select the USB device you need. In my case, the USB drive was identified as "Generic Mass Storage".

After selecting the "Generic Mass Storage" menu item, the USB storage will be connected as if you had connected a flash drive to a real computer, and in the list (Figure 27) the selected device will be marked with a tick. Further actions are determined by the operating system you are using. To disable USB stick uncheck the checkbox in the same menu. As you can see, everything is very simple.
ATTENTION! When a removable device is connected to a virtual machine, it is disabled in the host operating system, which may result in the loss of unsaved data. Therefore, before connecting a removable device to a virtual machine, make sure that you do not perform any actions with it in the host operating system.
4.5. Switching between host and guest operating systems.
When working in a virtual machine, the keyboard and mouse are "captured", that is, all keystrokes or mouse actions are processed by the virtual machine and ignored in the host operating system. In order to switch to work with the host operating system, you must press the "Host" key or a combination of keys. For different versions virtual machines and, depending on their settings, the "Host" key can be different, but the name of the key is displayed in the lower right corner of the virtual machine window (Figure 28).

When this key is pressed, the processing of all events from the keyboard and mouse will again be processed by the host operating system. In order to return to work with the virtual machine, it is enough just to click with the mouse in an arbitrary place in the ritual machine window.
This is quite enough to start working with a virtual machine, and in the future, if you like the new tool, and you will certainly like it, you can easily explore all its capabilities, and I will try to help you in one of the following articles.
Description of how to install and run the full version Windows XP from under Windows Vista or Windows 7 using the program Oracle VirtualBox... In this windows case XP is installed on a virtual machine and runs as a standalone application in Windows Vista, Windows 7, or any other operating system, including various linux distributions... Thus, you can solve problems with the compatibility of various programs and drivers with Windows Vista, Windows 7 or with another operating system.
Small introduction
Probably many of you, my dear readers, have already managed to install and try Windows Vista and Windows 7. It seems that all systems are good, but some programs and old games do not start in the new operating system, and drivers for some devices do not work. What to do in this case? Refuse charms new version Windows?
There are actually several ways to solve this problem. The most obvious is to install Windows XP on a second system with a choice of which to include at boot. This method is described in this article:. But this is where inconveniences arise. For the sake of some kind of program, you need to restart the laptop, turn on Windows XP, work with the program, restart the laptop and turn on Windows 7, eg. Inconvenient, right? But what if your favorite USB modem only works in Windows XP? Reboot the system and turn on Windows XP in order to surf the Internet?
Fortunately, there is a solution. Windows XP can be installed on a virtual machine and run under any operating system as a separate program. This is how it works Microsoft Windows 7 XP Mode. Good technology, but for it to work requires support for laptop virtualization, and it only works in Windows 7 Professional, Windows 7 Ultimate and Windows 7 Enterprise. What to do if windows laptop Is Vista worth it?
And then comes to the rescue great program VirtualBox from Sun... It is completely free, allows you to create virtual machines on a laptop, on which you can install many operating systems. The advantage of this utility compared to Microsoft Windows 7 XP Mode is support for 3D graphics for virtual machines, you do not need it to work hardware virtualization, as well as the fact that it can be run on any version of Windows, Linux, etc. The downside is that it is formally needed licensed Windows XP, although given our realities ... :)
This article will walk you through the process of installing Windows XP on a virtual machine. The whole process can be broken down into the following stages:
If you have any problems or questions about working with the Virtual Box virtual machine, then you should contact this topic Forum:.
1. Creating a virtual machine
First of all, you need to install the utility VirtualBox (/). It is important to check these options during installation:

System devices will also be installed. The corresponding installation requests must be allowed.
When the installation is complete, run the utility and click on the button Create a:

Should start:


Go to the next window. Since we do not have a virtual hard disk, we need to create a new one:


We select the type of virtual hard disk. I recommend :


That's all. The virtual machine is created. Now you can proceed to setting it up.
2. Setting up a virtual machine
Before setting up, prepare a Windows XP disc or iso image with it, and then select the created virtual machine in the VirtualBox window and click on the button Properties:

Let's start with the tab The main... Optionally, you can position the virtual machine menu on top. It's more convenient:

Go to the tab System:

Here you can change the amount of RAM that is allocated to the virtual machine, change the boot order virtual devices, enable or disable the IO-APIC option (needed if you plan to use multiple processor cores for a virtual machine), as well as enable or disable EFI (needed for some operating systems, such as MacOS). Go to the tab CPU:

Here you can specify how many processor cores the virtual machine can use, as well as enable or disable PAE / NX (some operating systems support PAE. This mode allows 32-bit virtual system use up to 64GB of RAM). Go to the tab Acceleration:

On this tab, you can enable or disable hardware virtualization. If you are going to install a 64-bit operating system, then you need to enable it, you also need to support virtualization from the laptop. If your laptop does not support this feature, then it doesn't matter. To run 32-bit operating systems in a virtual machine no hardware virtualization needed.

VirtualBox supports 2D and 3D acceleration (OpenGL / DirectX8 / DirectX9). It's worth turning it on. Go to the tab Net:

When VirtualBox was installed, another network card appeared in the system, which is virtually connected to network card our virtual machine. Setting up a virtual network adapter as shown in the picture above and go to the tab USB:

At the beginning of the article, it was said that using virtualization, you can get around the problem of incompatibility of drivers for USB devices with new operating systems. So here VirtualBox allows redirection to make any USB device that plugs into your computer or laptop connect not to the main operating system, but to the system that runs in the virtual machine. Then, on Windows XP, drivers are installed on a virtual machine on a new USB device and it fully runs under Windows XP. The main system is the device will not see... Since there are many USB devices in the system, a filter system was invented so that when the virtual machine was turned on, they would not be disconnected from the main one and connected to the virtual one. Filters specify which USB devices should be disconnected from the main operating system and connected to Windows XP on a virtual one when it is turned on.
To add a new filter, click on the plus sign and select the desired USB device from the list. Then it appears in the list. Go to the tab:

Since there is no sense in Windows XP on a virtual machine without the ability to work with files on the main one, you need to organize shared access to certain folders on the hard drive. To do this, click on the plus sign and select the folder on the hard drive of your computer or laptop, with which Windows XP will work in a virtual machine:

Enter its name and click OK... So she appeared on the list:

Now there is still the last very small touch. You need to install Windows XP somehow :) Go to the tab Carriers:

We have two options: to install Windows XP from the .iso image or from regular disk... In the first case, click on the arrow icon and click on the button Add to:

We indicate where the image with Windows XP is located and add it to the list:

We click on the image with Windows XP and click on the button Choose.
If you just have a disk with Windows XP, then put it in the drive and select your drive from the list:

We click OK... Now you can proceed to the installation Windows XP.
3. Installing and configuring Windows

A normal Windows XP installation should start:


I will not describe it in detail. The installation is described in detail in this material:. Drivers are not needed in this case. Everything you need is already included with Windows XP.
After installation, we get a working Windows XP in a virtual machine. Now you need to install Guest OS add-ons... To do this, select the appropriate menu item Devices:

Important note:since the keyboard and mouse in a laptop or computer are often one, the main operating system and the operating system that is running in the virtual machine are forced to somehow share it. For this, a capture mechanism is used. In other words, if a virtual machine is in the foreground, then everything that is entered from the keyboard will be addressed to it. You can also manually switch. For this, the default is right Ctrl... When the virtual machine is working with keyboard and mouse, it is lit green arrow in the lower-right corner of the virtual machine window.
The installation of the guest OS add-ons should begin:

Possible questions:if the installation has not started, then manually add the image VBoxGuestAdditions.iso in the folder with VirtualBox in virtual drive as was done when installing Windows XP, and then run the disk in the virtual machine.


Check the box next to Direct3D Support:

During installation, similar warnings will appear several times:

Push Continue anyway... After installation, it is advisable to restart the virtual machine:

To expand the virtual machine window, in the menu Car select the item:

The frame has been removed and it has become much more convenient to work with:

Now we still have to deal with shared folders. AT Windows XP launch Command line:

We connect the previously created shared folder as a network drive. To do this, enter the command net use x: \\\\ vboxsvr \\ Documents (Documents here title shared folder):

AT My computer disc appeared x: \\which we just connected:

The contents of this drive correspond to the contents of the shared folder that we created earlier.
That's all.
If you have any questions about working with the VirtualBox utility, then we present them in this forum thread:. All questions related to the installation of Windows XP, please state in this forum thread:
Detailed guide on installation Windows XP from a flash drive or from a memory card to any laptop, netbook or computer.
A detailed description of how to solve the problem with the blue screen of death or BSOD for newbies.
Guide how to find and remove all viruses and others malware from a laptop or computer.
Complete and detailed description of several installation methods Windows Vista or Windows 7 from a flash drive or memory card to any laptop, netbook or computer.
A detailed guide on how to install Windows Vista on a laptop or computer.
Virtualization is a generic term that encompasses resource abstraction for many aspects of computing. Some of the more typical examples of virtualization are given below. In turn, a virtual machine is an environment that appears to the "guest" operating system as hardware. However, it is actually a software environment that is simulated by the host system software. This simulation must be robust enough for the guest drivers to work stably. When using paravirtualization, the virtual machine does not simulate hardware, but instead offers to use a special API.
Terms used:
- Host system (host) - the computer running the virtualization platform
- Guest operating system - an operating system running inside a virtual machine
- Virtual machine, virtual environment - virtualized computer hardware that can run the guest operating system and applications. Several virtual machines can be running at the same time
- Virtual application - a virtual machine with a pre-installed guest operating system and fully configured applications, aimed at solving a specific task
In this guide, I'll talk about the new virtualization capabilities of the Windows 7 operating system. Virtual PC Windows is a new optional system component that can be used to deploy and migrate application compatibility support in Windows 7 that can be managed on legacy operating systems. This component is available when downloading the service pack.
Virtual PC Windows provides an easy way to windows management XP and application compatibility support that must be run on that particular operating system. Can be used to refer to virtual image Windows XP, which is ready to provide user-specific compatibility settings. You can even use Windows XP Mode and Windows 7 to launch applications directly from Windows 7 when the applications are, in principle, installed on a virtual windows machine XP. Windows Mode XP Mode is available on Windows 7 Professional, Windows 7 Enterprise, and Windows 7 Ultimate.
Other 32-bit operating systems can also be used with Windows Virtual PC under Windows 7. Namely:
- Windows XP - only Windows XP Service Pack 3 (SP3) Professional is supported;
- Windows Vista - only Windows Vista Enterprise and Windows Vista Ultimate are supported;
- Windows 7 - only Windows 7 Enterprise and Windows 7 Ultimate are supported;
In this guide, I will describe several options for using Virtual PC - installing Windows XP Mode, as well as installing another operating system. To provide management of the operating system in both cases, virtual machines are used. Windows XP Mode is more fast waysince it provides fewer steps and effort. After the test operating system environment is installed, we will look at a few key features Windows Virtual PC - such as sharing physical resources: uSB devices, printers, and hard drives.
Before installation
To install Windows Virtual PC, you must download and install a specific system update. Before you install Windows Virtual PC, you need to consider the requirements that will help you determine if your computer can run Windows Virtual PC. Windows Virtual PC requires Windows 7 hardware virtualization support. Virtualization support is available for processors that include a virtualization option — namely, Intel Virtualization Technology (Intel VT) and AMD Virtualization Technology (AMD-V) processors, as well as some VIA processors. You can enable hardware support for virtualization using the BIOS. For more detailed information regarding hardware support for a specific virtualization processor, it is best to visit the hardware manufacturer's website.
In order to find out if hardware virtualization is supported in Intel processors, you need to do the following:
- Download, install and run Intel Processor Identification Utility;
- Go to the "CPU Technologies" tab and read the value in the "Intel Virtualization Technology" field
To find out if hardware virtualization is supported in aMD processors required to download, install and run AMD Virtualization Compatibility Check Utility
The following list shows some models intel processorsthat have hardware virtualization support:
- Pentium 4 662 and 672
- Pentium Extreme Edition 955 and 965 (not Pentium 4 Extreme Edition with HT) Pentium D 920-960 except 945, 935, 925, 915
- Core Duo T2300, T2400, T2500, T2600, T2700 (Yonah)
- Core 2 Duo E6300, E6400, E6320, E6420, E6540, E6550, E6600, E6700, E6750, E6850 (Conroe)
- Core 2 Duo E7600, E8200, E8300, E8400, E8500, E8600 and some versions of the E7400 and E7500 (Wolfdale)
- Mobile Core 2 Duo T5500, T5600, T7100, T7200, T7250, T7300, T7400, T7500, T7600, T7600G, T7700, T7800 (Merom)
- Mobile Core 2 Duo SU9300, SU9400, SU9600, P7370, P8400, P8600, P8700, P8800, P9500, P9600, P9700, T8100, T8300, T9300, T9400, T9500, T9600, T9800, T9900 (Penryn)
- Core 2 Quad Q6600, Q6700 (Kentsfield)
- Core 2 Quad Q8400, Q8400S, Q9300, Q9400, Q9400S, Q9450, Q9550, Q9550S, Q9650 and some versions of the Q8300 (Yorkfield)
- Core 2 Extreme X6800 (Conroe_XE)
- Core 2 Extreme QX6700, QX6800, QX6850 (Kentsfield_XE) Core 2 Extreme QX9650, QX9770, QX9775 (Yorkfield_XE) Xeon 3000, 5000, 7000 series
Atom Z520, Z530, Z540, Z550, Z515 (Silverthorne) - all Intel Core i7 processors
- Pentium Dual-Core E6300, E6500 and some versions of the E5300 and E5400 *
- Celeron E3000 series
This section of the guide describes the process of installing Windows Virtual PC as well as installing the virtual machine itself. Additional configuration and technical details in the examples.
Installing Windows Virtual PC

After installing Windows Virtual PC, you need to install the virtual machine. You can use Windows XP Mode or create your own virtual machine. If you plan to use Windows XP, you can download it using the Windows XP Mode installation package mentioned in the section "Before you begin"
A little about integration components
Integration components make the virtual machine easier to use by improving communication between the physical resources and the virtual machine environment. They are installed automatically with Windows XP Mode. For other operating systems, they must be installed manually after installing the operating system itself. Integration components are included with Windows Virtual PC and provide access to the following resources:

Installing Windows XP Mode
Installation process:

Attention
- You should not uninstall the package if you will no longer be using it. If you remove it, then the package windows component XP Mode will no longer be available and you may lose important data. Uninstalling the package deletes the virtual machine, and also stops access to data that was stored in the virtual machine;
- Microsoft recommends that you keep a backup copy of the Windows XP Mode package (WindowsXPMode_xx- XX.exe, where xx-XX is the system language) as a backup, in case you need to restore windows environment XP Mode. For example, you can burn the .exe file to a CD or DVD disc... It is highly recommended to have a backup copy because Windows XP Mode has 2 virtual hard drive - parent virtual hard disk and differential disk. Differential disc cannot be used without parent. If the parent disk is removed or damaged, the existing Windows XP Mode should be updated. In this case, you need to use the same parent hard drive that was previously used if you will reinstall Windows XP Mode
The installation process is as follows:


After installing Windows XP Mode, you might want to create new accounts for this component. If you create accounts, you will need to add them to the Remote Desktop User and Administrators groups. Accounts can be either domain or local.
Installing a virtual machine manually
This method can be used if you don't want Windows XP to be your guest system. In this section, I'll show you how you can create a virtual machine and install the guest operating system that you plan to manage in Virtual PC. You can use the New Virtual Machine Wizard to create a virtual machine. A wizard will guide you through configuring a virtual machine with basic settingswhich you can configure as you need to use the virtual machine. For example, you can specify a specific amount of memory that the virtual machine will use. The amount of RAM to allocate should be the same as you would allocate to a physical computer. It is desirable to provide the virtual machine with enough memory so that you can easily manage the operating system and applications installed on it. You should also pay attention to how you will install the guest operating system. For example, to install the operating system, you can use network server for installation or physical CD or DVD drivein which just put installation disk with the system. If you are installing a supported Virtual PC guest operating system, you will need to install the Integration Component Pack after installation.
- You need to open the virtual machine folder. To do this, go to the menu " Start", Choose" Windows Virtual PC". If this item is not immediately in the menu, you need to click in the menu " Start" on " All programs", Left-click on the folder" Windows Virtual PC", And then select" Windows Virtual PC»

- The folder " Virtual machines". From the menu area, click on "".

Folder " Virtual machines»Provides detailed information about all virtual machines created current user, and from this folder you can share, create and modify virtual machines and virtual disks.
- The New Virtual Machine Wizard will open. After going through the dialogs of the wizard, you select the required settings for installing the guest operating system.

The first step is to name the new virtual machine and specify its location.
At the second step, the wizard for creating virtual machines offers us to specify the memory parameters for the virtual machine.

At the third step, you need to specify the settings for the virtual machine disks.
- When the wizard finishes, the virtual machine will be displayed in the list of files in the folder " Virtual machines».

- Installing the guest operating system. If you are using a network installation server, you can safely skip this step. If you are using a CD or DVD, then insert it into the drive carriage and proceed to the next installation step. To use the .iso image, you need to do the following:
a) Click right click mouse on the created virtual machine and select " Parameters»;
B) In the left pane, select the drive that contains the image. In the right pane, select " Open ISO image". Click the button OK.

- Start the virtual machine. In the list of files, select the virtual machine and click " Open". Windows Virtual PC will open the system installer for the virtual machine. The virtual machine will search for the installation disc. The installation will start after a bootable disk is found.

- After the installation is complete, you need to install the integration components. Click on the menu " Service"In the virtual machine window and select" ". If the installation does not start after a few seconds, go to the virtual machine desktop and open the CD in it. After that, you need to left-click the file 2 times IntegrationComponents.msi.


- Proceed through the installation using the Integration Components Installation Wizard.

- Reboot the virtual machine. From the menu " Act"Of the virtual machine window, select" Reboot»

Closing the virtual machine
Before you start performing some actions in the virtual machine, you might want to know how you can exit the virtual machine. When you close a virtual machine, it may hibernate, shutdown, or shut down. When a virtual machine comes out of hibernation mode, it does not boot the system sequentially, so this option is much faster than shutting down and shutting down.
Attention
When you open a virtual machine, Windows Virtual PC provides it with memory and processor resources. The length of time it takes to open a virtual machine depends on which method you used to close it at the time of the last session. The amount of memory that you allocated when you created the virtual machine also matters. By default, when you click on the "Close" button in the virtual machine window, the Windows XP Mode virtual machine goes into hibernation mode and prompts you to select the same action for the rest of the virtual machines. You can change this option yourself.
Changes to the default close virtual machine action

Shutting down a virtual machine
- In the virtual machine window, click on Ctrl + Alt + Del... Or you can press the key combination CTRL + ALT + END.
- In the appeared window of the guest operating system, click on " Shut down».
- The operating system will be shut down, the resources consumed by it will be returned to the host system.
Attention! If you want the installed software was displayed on the desktop of the host operating system, you need to log out of the account and only then you can close the virtual machine.
If you are running certain versions of Windows XP, Windows Vista, or Windows 7 in a virtual machine, then you have the ability to access the application directly from the desktop on the host computer when the application is installed in the virtual machine. Thanks to this feature, you can run Windows 7 on the host machine existing applicationsavoiding problems that can arise if they are not compatible with the host operating system.

Line-of-business applications that run on the Windows XP operating system are great for testing this feature. However, Windows Virtual PC does not support applications that require stereo sound or 3D graphics. It means that custom applicationsgames, for example, cannot be launched in this case.

Using USB devices in a virtual machine.
Windows Virtual PC supports USB 2.0 devices, it is also possible to share the device or write from the device to a virtual machine. The method you will use depends on the type of USB device you are using. If the integration components are installed and they are allowed to the guest operating system, storage devices and smart card readers are automatically shared between the virtual machines and the physical computer. No additional steps are required for these types of storage devices. For other types, it is possible to use them by attaching them to a virtual machine. For example, you can attach the following types USB devices:
- Digital cameras;
- USB CD drive;
- MP3 players;
- Phone / PDA / mobile device;
- Webcams / video cameras;
- Wireless network adapters.

Printing from a virtual machine
There are several ways to make a printer available in a virtual machine. The methods you can use are influenced by several factors: whether a printer driver is available on Windows 7, and whether the printer is connected locally or over a network. You can also use XPS format if your computer supports this printing method.
Using local USB printer
Attention! This method is suitable if drivers are available for both systems - the Windows 7 host system and the guest operating system. You only need to go through a few steps to install the printer on the virtual machine. The following steps assume that you have already printed to the printer using the host operating system.
Make sure the printer is turned on and available to install drivers. For example, you can install drivers on it using a CD.
- Connect the printer to the virtual machine. To do this, in the virtual machine window, click on " USB"And then on" Device_name Share».
- Install the printer driver on the guest operating system. You can install the driver from the Internet or use the CD.
- Disconnect the printer from the virtual machine. To do this, from the virtual machine window, click on " USB"And then on" Device_name Release».
- Reboot the virtual machine. To do this, from the virtual machine window, click on " Act"And then on" Reboot».
- The printer will be available on both systems, both host and guest.

If you are using a Windows XP guest system, you must manually install the driver for the printer to be used.

Printing from a virtual machine
- Go to the virtual machine and go to accountif necessary (you log in automatically if the option related to saving the password is set).
- Do the following:
a) On the desktop in the virtual machine, right-click on the file and select the option “ Printing»
b) Open the application that has the print option available and use the print command. - All printers that are available in the virtual machine are in the list of printers. Select the desired printer and click on the OK button
You can also use Print to XPS Document from your virtual application or virtual session to save a printed file to the host, and then you can print the file using a printer installed on the host computer. This option is useful when drivers are not available for the guest operating system or you do not want to install a printer on it. This method requires the following configuration:
- Microsoft XPS Essentials Pack installed on the guest operating system. Microsoft XPS Essentials
The pack can be downloaded from the following link: Windows Hardware Developer Central site. - The virtual machine is configured and has access to disks and partitions on the host computer, so you can simply save the file (By default when installing Windows XP Mode system configured to allow access to disks and partitions of the host system. For other virtual machines, you need to install integration components).
- A working printer must be installed on the host operating system.


