Mac OS X software is designed for Macintosh computers. This system has a unique branding and convenient appearance. In this regard, many are trying to find various loopholes for installing Mac OS X on a regular PC. For this purpose, experts developed a step-by-step strategy.
1) According to programmers, Mac OS X has a lot of advantages. Hackers rarely use system bugs, so it is much less likely to be attacked by viruses. Several processes can act in it at once, which will not affect the productivity. It was under Mac OS X that many quality applications were developed. On this system there are games, intended for Windows. Mac OS X users claim that the system is very high-quality, it rarely fails.
You protect what is important
This does not mean that you need to monitor whether you have already installed updatable updates. As a parent, you want your children to enjoy their time in front of the computer.
It archives automatically and easily connects
Archiving has always been one of the things that you know, what you need to do, and you do not have time. And automatically connects you to any network. The information required to establish a connection is automatically accepted. If this does not happen, the configuration assistant comes to the rescue, which will help you and simplify the connection.2) Mac OS X is quite difficult to install on a regular laptop. To do this, your computer must have details compatible with it - certain types of processors, video cards, chipsets, etc. Practice has shown that Mac OS X can only work on a laptop with a processor that supports SSE3 and graphics cards Core Image, Quartz Extreme, GL. Partitions in NTFS format should be converted to FAT32. If this translation is not implemented, the file system will simply fail.
Just select it, enter the password, if required, and are already ready to browse the Internet. 
If you do not use the screen reader, but have difficulty reading the text, you can make your poppy read text that you marked. The annual income of the company is about 32 billion US dollars. Others were interested in such beautiful devices with a unique design and innovative features that are increasingly around them. They bring the graphical interface to operating systems.

3) If you are going to install Mac OS X, select 10 .4 .6 or 10 .4 .7. These systems are established very easy. Download the system from the Internet in the ISO format - just write the image to disk. Also you can download it in DMG format. In this case, you will have to convert system in the previous format using the utility DMG2ISO. Then copy the program to the media. Now you have a CD with the software, and you can start the installation process.
This is already a fact! Hardware is now much cheaper and affordable for everyone, and these computers are spreading more and more every day and hour. So you can use everything you need from one computer! The operating system is customized to your liking in a matter of minutes. You probably want everything to be accessible with one click. The company produces literally "for everything" and has forecasts that the company will grow more and more.
Their products are of high quality, and it's normal to be more expensive than their "Chinese counterparts." After you upload one of the files, you will be redirected to the last download page where you will see the widget sharing.
- In the top pane, select the utilities and select disk utility.
- Click to delete and confirm.
- After successful completion, we close the utility and click "Next".
- We agree with Niresh's terms.
- We choose a disc, set our own and set up.

4) Insert the disc into the drive and restart the laptop. Press the "F8" button. After a few seconds, enter the letter "Y". This will allow you to enter the text format of the installation. You can work with graphic, but text is more convenient. If you see that the program does not is established and a message appears on the screen about the pending installation of the parts, which means that some elements of the computer are not suitable for Mac OS X. If another message appears on the screen, try to find another version of the system, since this one in all likelihood does not fit.
If necessary, delete the startup disk
We close the pop-up window with the configuration and select the installation or more. . Delete the boot disk permanently deletes all data stored on it. If you need to clean the boot disk, perform the following procedure. This is a long-term trend with which users can access additional utilities.
However, his site clearly states that this is an inappropriate and cruel decision, which is not recommended because of a decrease in security. Users who want to upgrade have three options. The third option is to completely disable the security function of signed controllers, thereby exposing the system to a risk. Switching off only for this particular controller is not possible.

5) If the system has started to run normally and the screen has turned blue, you can proceed to further installation items. Select the language and format the partition in which you plan to install Mac OS X. Remember that the section should fit Mac OS Extened Journaled. If you fail format section, resort to the help of the Acronis program. Set the manual mode of the program and create the necessary area in FAT32 format. Open the context menu and set the partition type to "OxAFh".
What you need to install
Depending on how the disk controller itself manages disk management without operating system support, the performance may drop by 30-50% over time. The size of the individual compartments is also determined in advance. This is useful when you need to use the computer's power without restrictions, especially in complex applications.
However, it has limited performance and overall comfort. The virtual machine does not take too much disk space, because its virtual disk expands as needed. It always depends on the specific use.

6) Agree with the rules, select installation section and main elements. Select only those patches that suit the program. Remember that they must be approached by SSE2 or SSE3. Install the software and restart the laptop. If you receive an error message after startup, load the Hiren's boot disk, then use Acronis to activate the partition from Mac OS X. Reboot the laptop again. Problems should not arise.
Check for updates and backups
Thus, the two operating systems do not start simultaneously on the computer, which makes it ideal if you need to run computer-based computer applications that do not work on virtual machine. If necessary, download and install them.
Creating partitions on the hard disk
Then make sure that no additional updates are available software no. Repeat this procedure until all the updates are installed. Then click "Continue". When the download is complete, save the files to the hDD or write them to disk. At this point, you will see a slider that matches your hard drive. After partitioning hard drive, as you like, click "Split". Previously, this method included a serious compromise in performance, but using this application, all of your system resources will be used by the operating system that you use in the foreground.
Now you know that you can install Mac OS X on a regular PC. If you are well versed in technology and utilities, problems should not arise. But remember that Mac OS X is designed only for Macintosh, so if you get intermittent from time to time - be prepared for this.
Is it worth it at all?
Select the language you want, the language if you want it 32 or 64 bits, and after a few seconds you will be able to download it. You will be confirmed that it's okay if the operating system name is recognized correctly, as in the above image. You can enter the serial number, if you have one, in the next step of the installation wizard.
This step is more appropriate than you think at first glance, especially the first and last option. There is no wrong answer, and you can change your mind later. Depending on the hardware configuration of your system, it takes no more than 15-20 minutes. The machine will reboot several times, but you do not need to do anything again. In principle, the installation process is not difficult, if you have the right tools, a little patience and attention to follow the steps described above. From my point of view, you can also install only if you can need it at some point.
"Hackintosh": how to run Mac OS X on PC
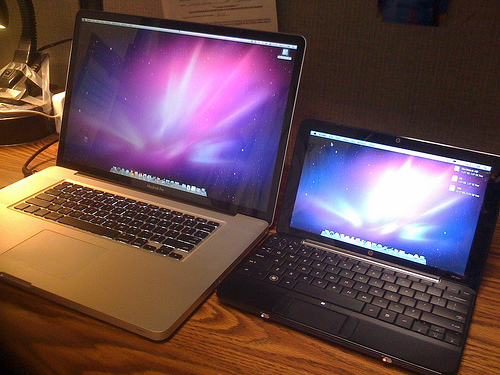
Modern "Poppies" consist of the same components as personal computers. Then why can not Mac OS work on a PC? In fact, the "apple" operating system can be installed on most modern computers, and it's not as difficult as it seems
The company's products in Cupertino are emphasized by their appearance and quality, especially on the quality of the materials used. Performs system setup. After sending the license, you should ask about the destination in which you want to install the operating system.
The next step is to ask the components that you want to install. Their number and variety depend on the distribution you have chosen, but it is very important that you do not check two drivers in the same category when choosing drivers. It is very important to choose the right drivers, otherwise you risk to choose only a mistake or a gray apple on the screen.
⇣ Contents
We remind you that this material is provided for informational purposes only. If you are going to reproduce the actions described below, we strongly advise you to carefully read the article to the end at least once. The editors of 3DNews are not responsible for any possible consequences.
⇡ Introduction
"Hackintosh" is an ironic name for Mac OS X, not installed on an Apple computer, but on an ordinary PC. This phenomenon became possible when the company from Cupertino in 2005 started the migration of its machines from the PowerPC platform to x86 and the "Macs" began to be equipped with the same processors and Intel chipsets that are used in personal computers. Since the first modest victories, the so-called project OSx86 from the entertainment of a handful of enthusiasts has turned into a mass movement with a growing user base. Today, when Apple officially released new version its operating system, Lion, it's time to talk about "Hackintosh" to everyone who does not have "Mac", but there is interest in Mac OS X and the desire to experiment.
Installation process for me took about 30 minutes, after which I was asked to restart the computer. My desktop when writing this article. Artifacts when moving windows caused by. To install such a driver it is required to use the command line, but there is also a graphical utility for the most convenient wires. The following commands are listed below. To start the driver, you need to reboot the operating system.
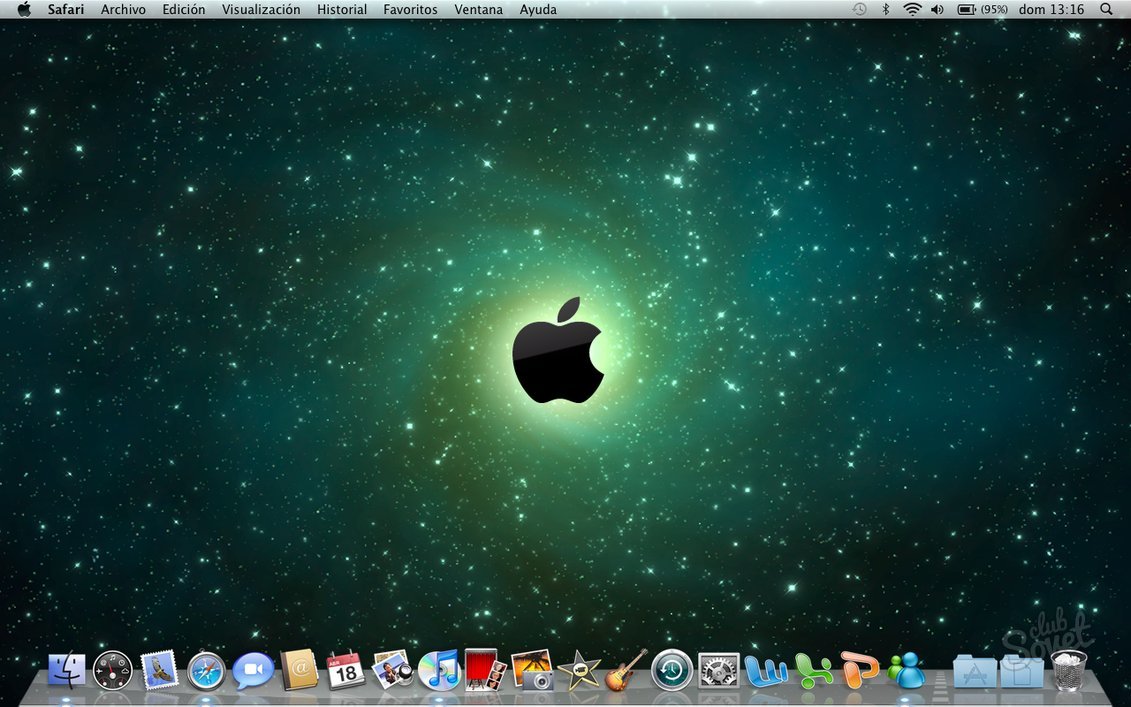
Then the menu bar of each application is located at the top of the screen. These are those smiling faces that are visible as frontal, and others on the profile. You guessed that in the Applications you will find a list of applications in the system. The names of many of them are pretty suggestive, but in other applications there are names that are usually hilarious. The first red button actually does not close the application, but simply hides the window. The application continues to run in the background, which is visible through its presence in the dock and marks it with an arrow.

The first questions a person asks when he sees the Mac OSk on PC: "Is it difficult to install?" And "Does everything work normally?". The answer to both is negative. Installation is now simplified to the extreme, so you can play with Mac OS X on almost any modern computer, but full functionality is not available to all - a fair share of users either do not earn hardware acceleration graphics, or fall off the network, sound or anything else. The "Hackintosh" also has big problems with the sleeping regime. All these difficulties can be overcome, but certainly have to spend a few sleepless nights. In general, the situation completely copies what was happening with Linux desktop distributions a few years ago. However, this is a very flattering comparison for both the hacker community and Apple itself: despite the fact that Mac OS X has never been prepared to work with non-native hardware, things could have been much worse. Yes, some pieces of iron will never be released under the Mac OS, others for this will require dancing with a tambourine and a hare's foot. But at the same time a huge fleet of accessories either works "out of the box", or is started after easy manipulations. And the software for Mac OS in all cases is installed and works exactly the same as on the real "Mac". It turns out that he is not that scary, this Hackintosh.
To close the application, you must access the menu named after the application, and then select the "Exit" option in the menu bar at the top of the screen. Neither the green button, which initially makes you think that it maximizes the window, does not remain normal: this button only resizes the window from the standard window to the custom one.
The only button that does "right" is orange to minimize it. If you're wondering where the taskbar is, it's in the bottom dock. Running applications is represented by their icon and the arrow below it. The mined windows are displayed on the right, after the splitter is displayed along the vertical line.
For those who are not indifferent to the legal side of the phenomenon: of course, Mac OS X can be legally installed only on a computer under the Apple brand, and any other options violate the license agreement. Modifying the components of the OS is also prohibited, not to mention the use of pirated distributions from "torrents." However, Apple does not accept any persecution of the OSx86 community (although it sues companies that make money on Hakintosh), and the means of protection against unauthorized use are in embryo, and ways to overcome them have long been found. Mac OS X does not even require input license key or online activation. In the end, hakintoshniki free of charge advertise this OS and secretly dream to get a real "Mac". And the most dedicated red-eyed experimenters, who basically prefer Hakintosh, are still lost as potential buyers.
Most applications come in the form of disk images, when they are opened they are mounted on the desktop. Installation of the application consists only in dragging its icon into the folder of the "Applications" folder. As a personal opinion, I really liked the response speed of the GUI and the operating system itself. But the superficiality of the operating system disgusts me.
It's done simply, so simply that it makes me feel stupid. Then the close button does not work. It was simple, very simple. We decided to go through the steps necessary to create a hackintosh, calculating the cost of such a computer. Now all the parts must be assembled according to the specifications in the box of each component.
If there is no difference, then why pay more? Or is there?
So, if a small offense does not bother you, and technical difficulties only cause a healthy excitement, let's try to install Mac OS X on a PC together. In this article we describe two simple ways installation of the previous, but still popular version of the OS, Snow Leopard (10.6), and one way for the novelty, Lion (10.7). To put Leopard (10.5), and even more so Tiger (10.4) there is no sense. If you like the result, these instructions will be the starting point for the independent development of the "Hackintosh". The last section gives links to popular resources of the OSx86 community, where you can learn from the experience of other users and find solutions for specific problems.
Once you collect all the items, connect to the computer monitor, connect the keyboard and turn on the computer. If the computer does not start, check again that all cables are correctly inserted in the box. This can be downloaded for free from the manufacturer's website.
Since we did not test this configuration, we are not 100% sure that it will work smoothly, but the user of the hackintosh who suggested this configuration told us that he had no problems. Your address email never published.
One-time shopping at the office. Look at the following screenshots and do not ignore the descriptions. Installation process If we exclude some strange and separating stages, all that follows will not miss us. See the screenshots and read the descriptions below. Needless to say, these scripts are run once after installation, and not every time the operating system is started. Of course, there is a case where you can boot into one of the two modes of operation without changing the option on the boot disk. This will give you a menu in which you can select the function you want to start.
⇡ Preparing "Hackintosh"
Actually, why can not Mac OS X just work on a PC and how to overcome these obstacles? The number one reason is that in Macs, not the good old BIOS but EFI is used as a layer between the OS and firmware of the equipment, and in order for the Mac OS to launch, EFI is emulated at the level of a special "hacker" bootloader (by the way , this achievement we owe the Russian hacker under the nickname Netkas). The most popular and rapidly developing bootloader today is Chameleon and its derivatives, for example Chimera.
The second reason: Mac OS X has a cfest (from kernel extension, remember this term) called Dont Stealth Mac OS X. It is required to decrypt applications that make up what looks like an operating system for the user (Dock, Finder, loginwindow, SystemUIServer and others), based on the keys from the SMC chip, which is only on real Macs. Well, if "there are no legs, then there are no cartoons." The help comes FakeSMC, which successfully simulates SMC Device, for which again thanks to Netkas. The special loader and FakeSMC.kext is all that is needed to boot Mac OS X, if the hardware does not differ much from the real Macs by hardware.
And this is exactly the third reason. For unsupported hardware, there are no drivers for Mac OS X, or there are built-in drivers, but the system can not use them because it does not recognize hardware with unknown identifiers.
The hardware requirements for Hackintosh are the same - you need a processor with support for SSE2 instructions, best of all - Intel Core 2 Duo and older. AMD users will have to replace the OS kernel with a "hacked" version, as a result - there will be problems with updating the system from the Apple server. The same goes for netbooks on the Atom platform. It is highly desirable to support the AHCI mode from the SATA controller side. To install Mac OS X Lion, you need 2 GB random access memory, Snow Leopard is enough and one. The first rule of iron selection: the more a computer is like the real "Poppies", the less problems. The second rule: the newest and most advanced devices may not work despite any effort, because the hardware support depends primarily on the Mac OS itself (there are no "heavy" hardware drivers for the "Hackintosh"), and Apple has nowhere to hurry. The site wiki.osx86project.org, which contains HLC (Hardware Compatibility Lists) for different versions of Mac OS X, will help evaluate the chances of success.
To install it is best to use a separate drive with a SATA interface, and a drive with Windows, from a sin away, turn it off. If it's not terrible to experiment on one HDD with a working OS, you'll have to create it on it new section with the help of some disk utility (for pure Mac OS X, 10 GB is enough). Just keep in mind that during the installation on the HDD, the "Hackintosh" downloader will be recorded, and then you can get to Windows only through it. There is nothing threatening the existing data, but backup also does not hurt. The disk should be connected to the port of the south bridge motherboard, The SATA controller in the BIOS must be set to AHCI mode. It is recommended to remove the overclocking, remove all expansion cards, except graphics adapter in the upper PCI-E slot, turn off the periphery, in addition to the keyboard and mouse, the amount of RAM is reduced to 4 GB (if installed more). If the installation with minimal functionality is successful, then all this can be returned step by step. Too many conditions? Then you can practice on cats, that is, in a virtual machine. The web even has ready-made images for various hypervisors, although the experience in creating "Hackintosh" will not bring them.
We warn readers: although "Hackintosh" is quite harmless entertainment that does not break the computer and is unlikely to spoil any data, all the manipulations described in the article are done at your own peril and risk. In addition, you need to be with the computer on you and know what the bootloader is, the OS kernel and the layout of the hard disk. Well, when you master "Hackintosh" perfectly, do not agree in any way, if friends ask you to install it on your PC, otherwise you will have to marry an honest person to support the work of this miracle.
⇡ Installing Snow Leopard from iATKOS 10.6.3 v2
The simplest and most universal option - installing mac OS X with a special image of the modified distribution. Since the release of Snow Leopard, these hacker assemblies have given way to a more elegant solution - installing from a copy of the original drive using a separate boot CD, and about it is written below. But without assembly, users of CPU from AMD or Intel Atom can not do. the original core of Mac OS X (which our English-speaking friends call vanilla kernel) supports only Intel processors with a Core architecture and older, and the assembly allows you to immediately select the "patched" version. And after you have penetrated the world of "Hackintosh" with the help of assembly and have gained knowledge, you can make a clean installation, the components of which you completely control.
iATKOS 10.6.3 v2 is one of the latest released builds, and despite the fairly old version of the OS (Snow Leopard has already updated to 10.6.8), all the "hacker" software on it is quite modern. Downloading the image (we will not suggest where), write it on the disc. Boot from the iATKOS disk and wait for the hacker loader to work and start the OS.
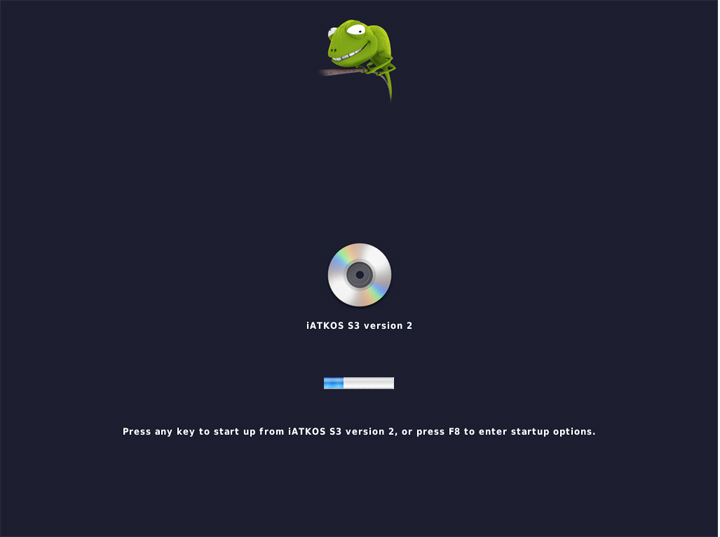

This process takes several minutes, but if it suddenly drags out beyond reasonable limits or gives an error message, it means that something went wrong.
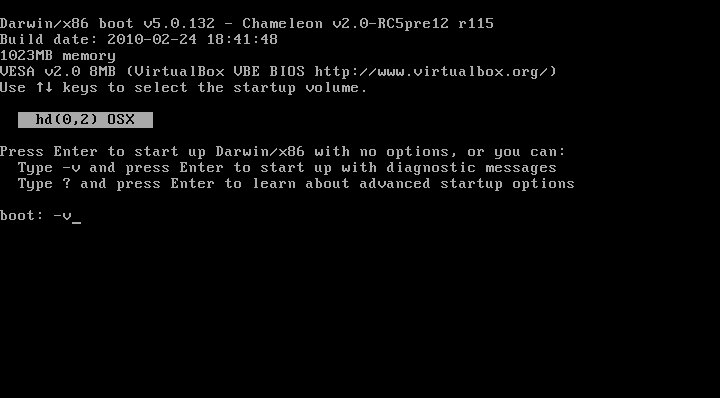
In this case, you need to boot from the DVD again, but on the loader screen with the green chameleon, press F8, highlight optical disk, type "-x" from the keyboard and press Enter. This is the so-called safe mode, but if it's not lucky, you need to boot with the "-v" argument, which will allow you to watch the boot log. At the moment when the process is stuck or the phrase Kernel Panic has appeared, you can take a photo of the screen and then in a calm atmosphere try to understand what is happening, with the help of thematic sites, Google and the tips of experienced "hackers".
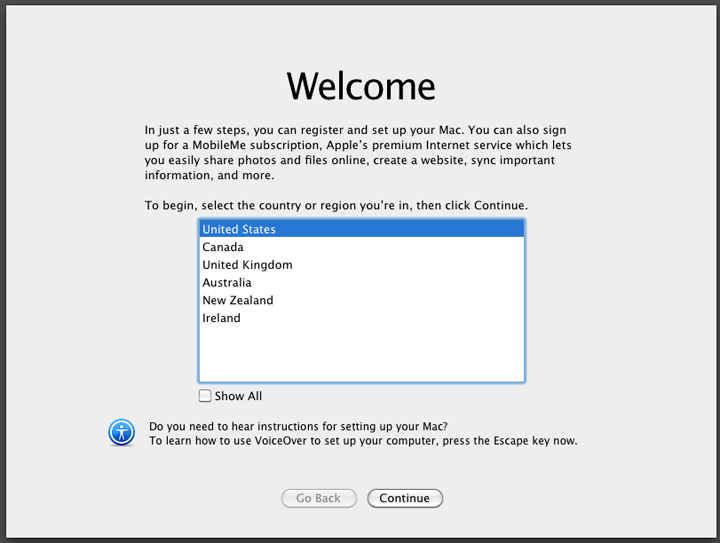
The appearance of the window with the choice of language indicates that the download was successful and your system is able to run Mac OS X. We recommend that if possible choose the language of Shakespeare, since most of the instructions and analysis of problems on the Internet are written on it.
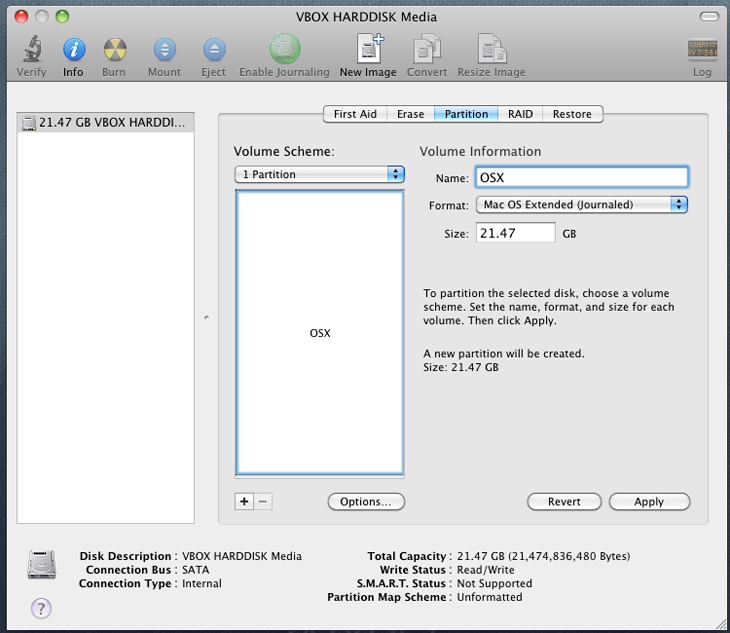
Scroll through the installer pages until the pop-up window appears.
![]()

Open the Utilities menu and run Disk Utility. If you gave a clean disk for "Hackintosh", then with this program it should be "broken" (the Partition tab). To be installed in a partition next to Windows, the partition is simply formatted in file system HFS + (Erase tab). For reliability, it's better to choose the HFS + Journaled option, and the Case Sensitive option will not be needed for most users.
After the HDD is ready for installation, you can close the disk utility and specify the partition in the installer window. And now the crucial point is the choice of drivers and settings that allows Mac OS X to work fully on your hardware. The list opens the Customize button. All users are advised to look at the Bootloader branch and select the Chameleon v2 RC5 option instead of the default option. Holders of AMD processors, as well as Intel Atom should choose a modified kernel in the Patches, Modified Kernels section.
Do not choose any "drivers" for the graphics adapter in the Drivers, VGA section. It's better to put a checkmark in front of the Graphics Enabler option in the Bootloader Options section - in this case, the loader itself will try to activate the hardware acceleration. Be that as it may, in 2D mode, the OS is almost always loaded, and if the Graphics Enabler method does not work, you can try your luck with individual "drivers". By the way, these are not drivers, but only injectors, which allow drivers built into Mac OS X to work with unfamiliar video cards, and therefore are quoted.
Select the appropriate package for network card in the section Drivers, Network - there is a good collection. For the laptop, the contents of the Drivers, Laptop Hardware section come in handy. You can take any driver for the power-saving functions of the CPU from the Drivers, Main Hardware, CPU Power Management section. The "native" extension of the kernel called AppleIntelCPUPowerManagement.kext, which carries this function, is prudently blocked in the assembly, because it is suitable only for Intel processors, and even not for everyone, and in case of errors it does not allow the system to boot.
Do not mark the Sleep Enabler in the Patches section - if you need hibernation, then after the OS upgrade, this extension still has to be replaced.
The Language Translations section has got into iATKOS from an official distribution and contains localization packages for the OS interface, including Russian.
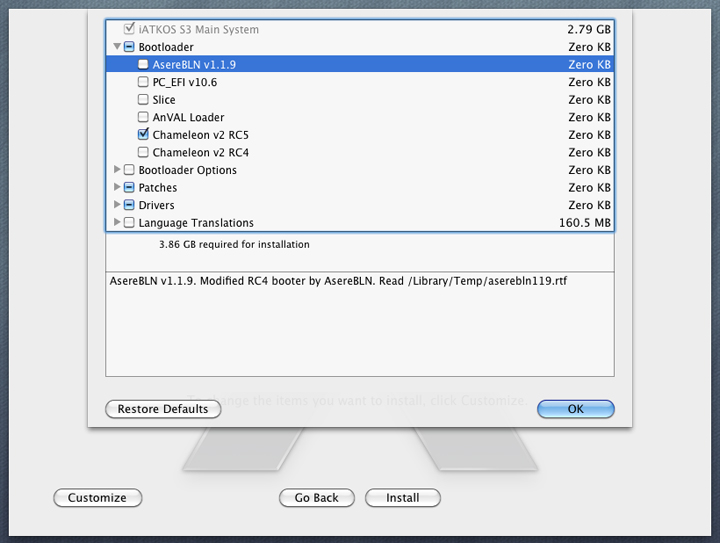
It is advisable to write out the list of options that you have chosen, in case the newly installed OS does not start and will have to search for the culprit. When the selection is made, you can click OK and then Install. Go!
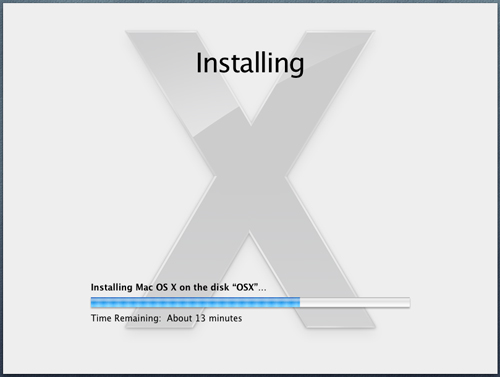
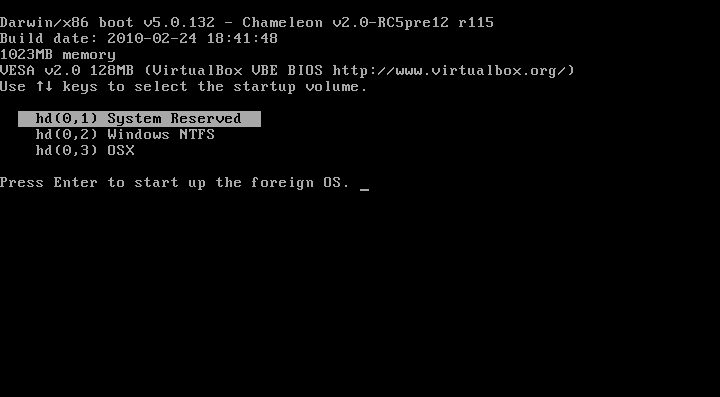
At the end of the installation, the computer will restart. You can remove the disk from iATKOS and boot from the hard drive to which we "rolled" Mac OS X. While the Chameleon loader counts seconds before the default OS starts, you can press any key and see the list of partitions from which the download is available. If there was already Windows on the hard drive, it starts from the service partition called System Reserved, or directly from its root partition, if the service part is missing for some reason.
But we can not wait to see the Mac OS, right? In this case, we are just waiting, and if the options were selected correctly during the installation, the registration window will appear on the screen, and if the option of the Graphics Enabler is triggered, the video will also be shown.
What should I do if the OS gets stuck during the download phase or does it display an error message? The first advice in this case is to log in with the log view. To do this, stop the loader while it counts down the time before starting the OS, select the partition with it, enter the argument "-v" and press Enter. According to the messages on the screen, you will be able to find the component causing the failure. Then you can try to boot into safe mode with the argument "-x", and if it succeeded, then it's likely that the case is in any driver or device injector that you marked in the Customize menu the installation disk, and it needs to be replaced. How to work with kekstami, is told in a special section of the article.
⇡ Installing Snow Leopard from a branded distribution
"Hackintosh" can be created with the help of the "native" image of Snow Leopard, which you can even buy to calm your conscience. In this case, all the software that makes Mac OS X compatible with PC, is written to a separate disk. But this method is suitable only for owners of Intel'ovskih CPU, tk. and the distribution CD, and a copy of the OS that will be installed from it, use the original kernel without AMD support. In addition, the unmodified Snow Leopard installer will not allow the system to be rolled onto a hard drive that is broken using MBR, and supports only the GUID partitioning scheme. Therefore, the disk with the MBR will have to be repartitioned.
If Windows is already there and you are not ready to say goodbye forever to the most popular operating system, then there is an unobvious solution: using Disk Utility to first partition the GUID disk, create a "windows" partition and install Windows, and then in the second section - Snow Leopard. The key word here is Disk Utiliy. This program, which, as you already know, runs from the Mac OS X installation disk, creates a hybrid markup with synchronized GUIDs and MBRs. A MBR is required to install Windows.
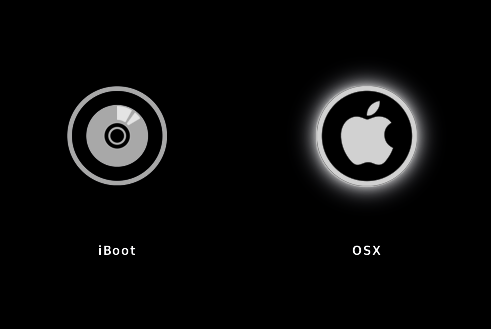
So, first, we need an image of an iBoot boot disk and a MultiBeast driver package - latest versions both are available at www.tonymacx86.com/viewforum.php?f=125 (registration is required for download). We write the ISO image of iBoot to the blank and boot from it. When the window with the choice of the partition for downloading appears, you need to replace iBoot in the drive with the "native" distribution with Mac OS X, press F5, select the DVD and press Enter.
![]()
The rest of the procedure is completely analogous to what is written about the iATKOS build, only in the Customize menu there are no "left" drivers, but only standard Snow Leopard packages - interface localization, fonts, etc.
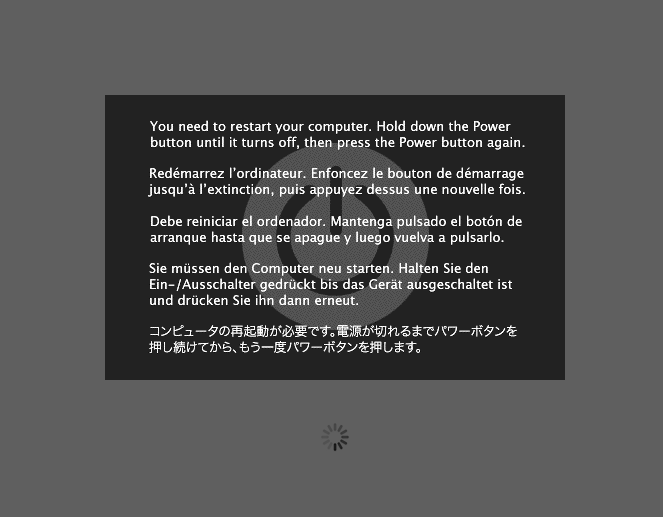
It's only after the installation is complete that you can not boot directly from the hard drive, because a copy of the OS is pristine and clean, and does not differ from anything that exists in real Macs. Therefore, you need to boot from the iBoot disk and select a partition with Snow Leopad.
If an error occurs, you already know what to do: boot with the "-v" argument and run diagnostics, then try to start the OS in safe mode with the "-x" argument. The tonymacx86 site also recommends the PCIRootUID argument = 1, which can be combined with "-x" and "-v".
If Mac OS X showed a registration window, then it's time to accustom it to the PC. We need to run MultiBeast from the archive, which we downloaded in advance, and scroll through all the installer pages up to the menu of selecting components. Here, all users should mark the item EasyBeast Install - which sets the minimum set of caches. To enable support for specific hardware, you should look at the individual branches of the list and select the required extensions. At the end of the procedure, the computer will be rebooted, and you can boldly boot from the HDD.

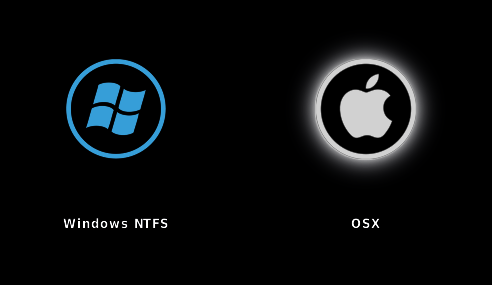
In addition to the files on the disc, the Chimera boot loader is installed, and if Windows was previously installed, then it is loaded by selecting the appropriate partition.
⇡ Installing Lion
Here is the most delicious - a fresh version of Mac OS X. It is only appreciated by Intel users. At the time of writing, Apple has not yet laid out the source code for the Lion kernel, which means that there are no modified kernels. But most of the caches written for Snow Leopard work with Lion.
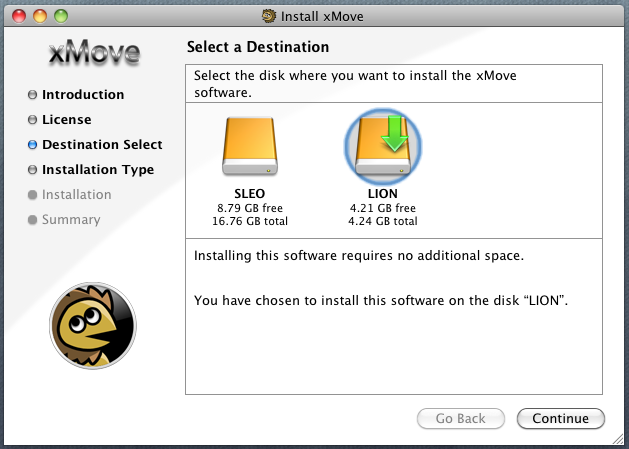
To install the "Lion" we need a running Snow Leopard version no lower than 10.6.6, a free partition on the hard drive of 5 GB for installing the installer files, the Lion distribution (available for $ 29.99 in App Store and you know where for free), the xMove utility and the already familiar MultiBeast package.
The Install Mac OS X Lion program runs directly from under the operating system, and as the installation partition, you must select the one from which Snow Leopard is running, which will not affect the OS in any way. After the files are copied, you can agree to restart and enter Snow Leopard back.
![]()
Now it's up to the xMove utility. Running it, you need to note the empty section, which we prepared in advance for Lion, and xMove will transfer files there, unpacked by Install Mac OS X Lion. If Snow Leopard is installed using the iBoot + MultiBeast method, then it's enough to boot from the hard disk and select the partition with the "Lion" in the boot menu of Chimera. If iATKOS or other solution was used for the installation, but the bootloader and the files are also not the first freshness, you will have to boot from the iBoot disk. The further procedure completely repeats the process of installing Snow Leopard from the company's distribution. And as a goal, you can choose a partition with the already running Mac OS X, and then it will be updated painlessly.
⇡ Installing and Removing Key Figures
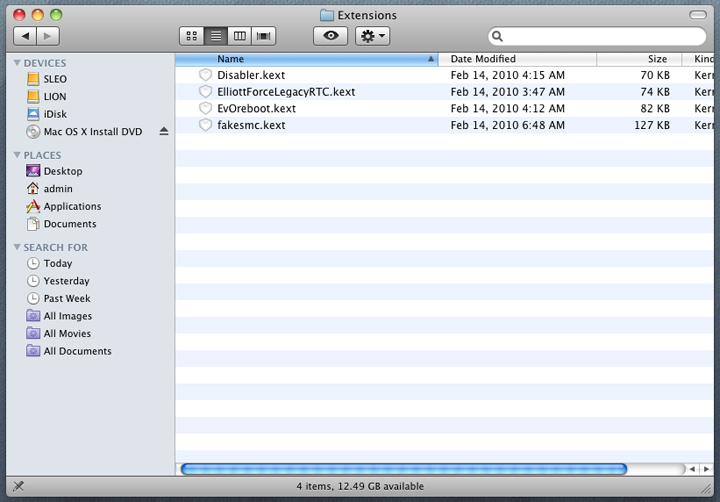
How to remove a problem driver, injector, or add support for devices that did not start after the initial installation? The repository of kernel fonts (kernel extensions) on Mac OS X is the / System / Library / Extensions directory, and they are loaded from a single cache at /System/Library/Caches/com.apple.kext.caches/Startup/Extensions.mkext, where OS places only the required extensions. But the modern Hakintosh loader (Chameleon and Chimera already familiar to us) can load additional caches from the / Extra / Extensions directory, and from them a small cache /Extra/Extensions.mkext is formed. In MultiBeast and iATKOS, this is the only scheme used, only in the latter case the / Extra directory is hidden. Display hidden files is activated by the command in the terminal.
defaults write com.apple.finder AppleShowAllFiles TRUE
killall finder
To install many caches, just copy them to / Extra / Extensions. But some will not be able to resolve the dependencies (there are no necessary extensions in the cache /S/L/C/c/S/Extensions.mlext), and you will have to create in the / Extra directory a single cache from all the "native" and "third-party" extensions, which the OS can not remake. It is produced by the following command:
sudo kextcache -m /Extra/Extensions.mkext - / System / Library / Extensions / Extra / Extensions
Before these files in / Extra / Extensions, you need to assign the necessary permissions. Commands:
sudo chown -R 0: 0 / Extra / Extensions
sudo chmod -R 755 / Extra / Extensions
And one more nuance: if even with the correct permissions the cache does not enter the cache and does not load, you need to open it with the Show Package Contents option in the context menu file and view the Info.plist file in the Contents folder. This xml-file, and at its end, before the closing tags should be the following entry:
Otherwise, you need to add or change it.
In Mac OS X 10.7, everything is a bit different. Lion uses a different cache format - prelinked kernel. By default, Chameleon does not read it and scans the entire contents of the / Extra / Extensions directory, which slows down the download. The only thing that can be done so far is to create a shared cache in the system directory /System/Library/Caches/com.apple.kext.caches/Startup. Command:
sudo kextcache -c /System/Library/Caches/com.apple.kext.caches/Startup/kernelcache -v -t -K / mach_kernel - / System / Library / Extensions / Extra / Extensions
And in order for the loader to hook up kernelcache, you need to use the argument "UseKernelCache = Yes" at startup. But unlike the contents of / Extra, this file is subject to operating system, and from time to time it will update it, forgetting, of course, about our "hacker" extensions. The solution is to move the caches from / Extra to the / System / Library / Extensions directory and assign them the necessary permissions by the commands:
sudo chown -R 0: 0 / System / Library / Extensions
sudo chmod -R 755 / System / Library / Extensions
⇡ OS update
"Hackintosh" can be updated from the server Apple with the built-in utility Software Update. But at the same time, you should be prepared for the fact that after the update any kaksts will stop working or they will start to cause failures and they will have to find a replacement for them. Fortunately, developers of popular extensions respond quickly to the release of new versions of Mac OS X. In addition, after the upgrade, you need to rebuild the cache of the caches, preloading the system with the argument "-f". Users of AMD processors before updating the OS, you should make sure that a new version of the modified kernel has appeared, or you can leave the old version.
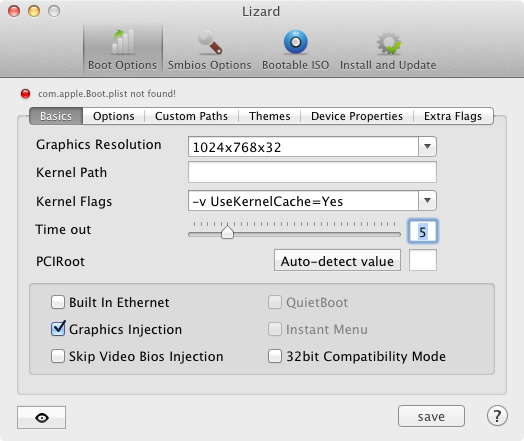
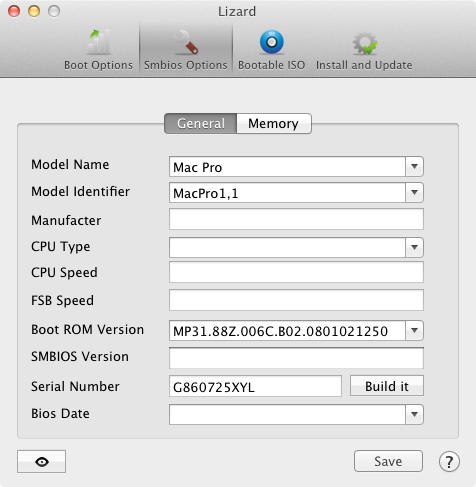
⇡ Boot Loader Configuration
The work of the Chameleon loader or its analogs is controlled by the com.apple.boot.plist file in the / Extra folder. It can be modified manually, but there is also a special utility with graphical interface - Lizard, which can be downloaded from darwinx86.net/software/darwinx86_software.html. In the configuration, it is desirable to enter the screen resolution, the arguments to load (for example, the above-mentioned "UseKernelCache = Yes"), and the owners of "non-standard" processors - the name of the modified kernel file. In iATKOS it is a custom file (look, it lies in the root partition of the disk). Also mark the Graphics Injection, if this option helped you enable 3D acceleration.
The 32bit Compatibility Mode option will cause the kernel to boot in 32-bit mode, which may be necessary for some of the caches. At the same time, large amounts of RAM are supported, and applications can run in 64 bit mode independent of the kernel. A similar argument command line - "-x32".
In the list of arguments, there may also be special options for individual caches.
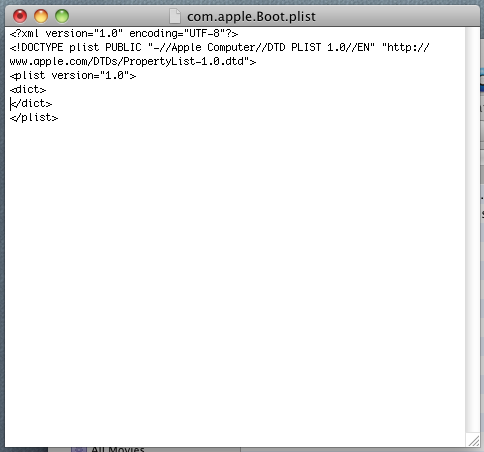
The program automatically opens the file /Extra/com.apple.boot.plist, and in case of absence it will create it when you try to save the changes. This is what will happen with iATKOS. this default assembly stores the bootloader configuration in the system file of the same name /Library/Preferences/SystemConfiguration/com.apple.boot.plist. This is not right, so it's best to clear the file after creating the file in / Extra system file, leaving only those lines that are shown in the screenshot.
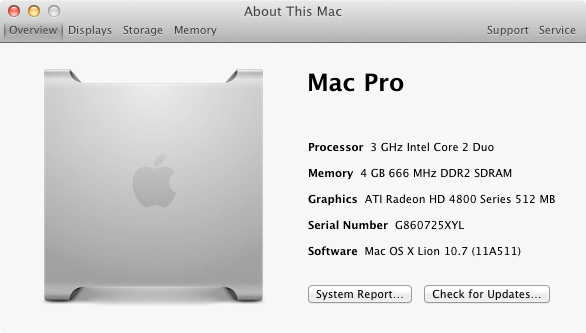
Another function of Lizard is editing the file /Extra/SMBIOS.plist. It contains information about the computer model and installed hardware and helps to present the computer as any "Macintosh" in the System Information program.
⇡ Apple peripherals
A question that worries many, but I do not want to spend money on the experiment: are the "Makovsky" devices - Apple Cinema Display, Mouse Magic Mouse and Magic Trackpad working with Hakintosh? So, the monitor is compatible with any video card equipped with DisplayPort (suitable for the DP Mini or full-size version of the port with an adapter), and both the light sensor and the brightness adjustment in the System Preferences work. For the mouse and the touchpad, you need a Bluetooth USB adapter-some work directly out of the box without any additional dummies, and the connection process again does not differ from that on the real Macs.
⇣ Comments


