Many users want to try Linux. However, the need to abandon the familiar operating system leads the majority to quickly abandon this idea. But in order to try Linux, you do not need to uninstall Windows, you can install Linux on a virtual machine and test the new system for you in a safe environment.
In this article, we'll show you how to install Linux on a virtual machine. For example, we will use the Virtual Box virtual machine and Ubuntu, a popular Linux distribution.
To get started, you need an ISO file with a Linux distribution. To do this, go to the site and download the latest version of Ubuntu, at the time of this writing, it is Ubuntu 12.10.
We also need the Oracle Virtual Box program. You can also download it absolutely free from the official website.
Launch the Virtual Box program and click on the "Create" button.

After that, a window will open with which we will create a new virtual machine. We indicate the name of the machine, the type of operating system and click "Next" in order to go to the next window.

In the next window, we indicate the amount of RAM that will be available for your virtual machine. The amount chosen should not exceed the amount of real RAM in your computer. Typically, 1,024 megabytes is sufficient.

The next window suggests creating a new hard disk for the virtual machine. We leave everything as default and move on.


In the next window, you need to select Dynamic or Fixed disk. Here we also leave the default value and click "Next".


That's it, this completes the process of creating a virtual machine, you can start installing Linux.
In the Virtual Box window, select the created virtual machine and click on the "Start" button. After that, the "First Start Wizard" will open, here you need to specify where the ISO file with the Linux distribution is located. To do this, click on the button with the folder image and select the ISO file.

When the distribution is selected, the virtual machine will reboot and the Linux installation will begin. Wait a few seconds until the screen prompts you to install Ubuntu.

In the window that appears, select the Russian language and click on the "Install Ubuntu" button.
Since our task is simply to install Linux, we will take the path of least resistance, and will not make our life difficult by fine-tuning during installation. In the window that appears, click on the "Continue" button.


Everything, the installation has begun. While the installer is copying the files, we can configure the time zone, keyboard layout, and other settings.

In the window for creating an account, enter your name and password. Here you can also select the item "Log in automatically", in this case you will not have to enter a password when loading the operating system.

After that, you need to wait a little more until the installation is complete.

After the installation is complete, the virtual machine will reboot and the operating system will be ready for use.
Installing an operating system on a virtual machine usually means the ability to familiarize yourself with this operating system without physically installing it on a real computer. In this article, we will walk you through the process of installing the Linux operating system on a virtual machine. This will help you understand the operating system itself as well as the installation process. For example, we will take the popular Linux operating system build Ubuntu.
Step 1
To install a Linux operating system on a virtual machine, you first need to download and install a software package called virtualbox and an image of the ubuntu operating system.

Step 2
Open virtualbox and create a new virtual machine. To do this, click on the sun-shaped button on the toolbar.

Step 3
The New Virtual Machine Wizard starts. In the first window, you will need to enter the name of the virtual machine, as well as the type of operating system and its version. We expose "Linux - Ubuntu" and click "Next".

Step 4
In the next window, you will need to set the amount of RAM that you need to allocate for the virtual machine. We recommend that you install at least 512 megabytes, and preferably 1 gigabyte. After setting, click "next".

Step 5
The system will offer to create a new hard disk or select an existing one. We choose to create a new hard drive and click next.

After that, the wizard will offer to choose the type of hard disk: dynamic or fixed size. You can choose any of these options. The only difference is that a dynamic hard disk resizes as it fills with files. Select and click "next" again.

Step 6
In the next step, the installation wizard will prompt you to select the size of your hard drive. You can set any size, but it is desirable that it be at least 10 gigabytes.

Step 7
at the last stage, you will be asked to check the correctness of all settings again. If you have installed everything correctly, click "Finish".

The virtual machine will immediately appear in the list.
Step 8
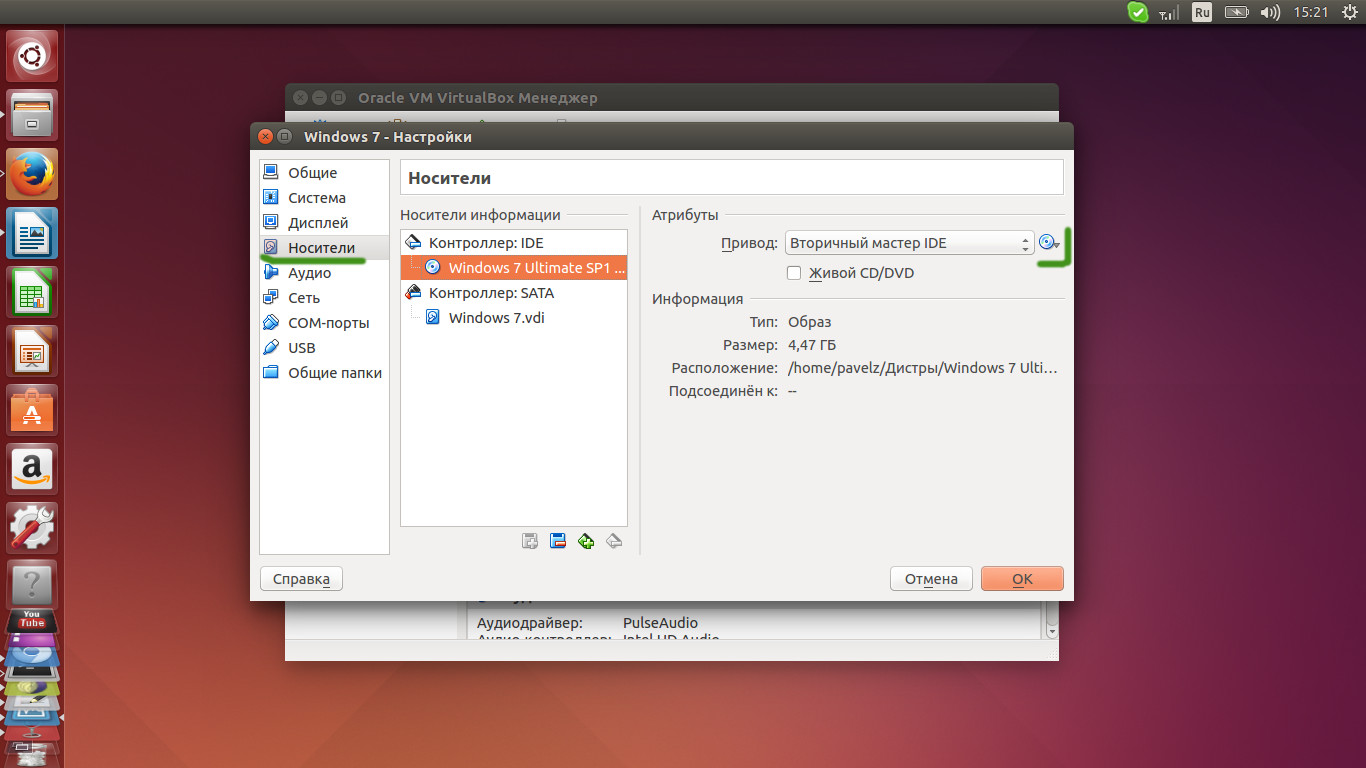
Before starting the virtual machine, you need to mount the Ubuntu installation disk image. To do this, open the virtual machine settings and go to the "media" tab. Select ide controllers and click "add optical drive". Specify the path to the image. Click “OK” to confirm.

Step 9
Start the virtual machine. Run the Ubuntu Installation Wizard. Select your language and keyboard layout and then click Next. Do not forget to check the download update checkbox during installation.

Step 10
This will launch the Disk Partitioning Wizard. Here you will need to specify the size of the partitions, as well as their file system and create a swap file. The recommended filesystem is ext3 or ext4.

Note: make sure to specify the mount point as "\\" in the disk layout. Otherwise, the installation will fail.
Step 11
After you finish marking up the sections, you will be prompted to write the changes. Click the Burn button. You can now start the installation. To do this, click the Install Now button.
Step 12
The installation process will begin and will take some time.

During the installation process, the program will prompt you to set some settings, such as account name, account password, time zone, keyboard layout, and so on.
Step 13
After the installation is complete, you can reboot the system by clicking the "Reboot Now" button. The system will reboot. Don't forget to eject the virtual optical disc media.
Step 14
This completes the installation of the Linux operating system on the virtualbox. On first launch, you will be prompted for a username and password. After that, you can configure the system and install the required applications.
Installing Linux Mint in Virtualbox
Today we will talk about installing LinuxMint on a Virtualbox virtual machine... In the last issue I talked about how to install Windows Xp, 7, 8 in Virtualbox
This article will touch torrents, so I recommend subscribing to the mailing list.There you will learn more about torrents and learn how to work with them
It is no different from installing Windows Xp, so if you decide install in Virtualbox OS LinuxMint, then with the help of me you will learn how to do it.
If you do not know what Virtualbox is, then go to the Virualbox section and see from the very beginning what Virtualbox is, why you need it and how to install it.
First, we need an ISO image, I suggest installing a linuxMint image. For two years now, the distribution has been ranked 1st in the popularity rating due to its simplicity, etc.
Download LinuxMint-17.1-XFCE

We will choose a 32-bit OS. If you need, then select 64. I need a 32-bit OS.
After downloading LinuxMint 17 (I downloaded to the desktop), you will have a file with the name linuxmint-16-kde-dvd-32bit.iso - that's what we need! 
Now let's open our Virtualbox and make some settings. First - Let's create a new car... Set the parameters for your configuration. I recommend installing RAM - at least 1042. Better than 2048. Winchester 8GB and\u003e. 


Now we wait 5-7 minutes while our fixed disk is being created. After that, go to the LinuxMint settings, we need to set a couple more settings before installing on Virtualbox. 
Set in processors - Enable PAE / NX. 
In the graphics, set the support for 3D acceleration and set the video in MB as desired. The more, of course, the better. 
Now it remains to add the image so that the installation of LinuxMint will start when our machine boots. To do this, go to Media. Where is the IDE Controller, right click, select Add an optical drive - Select an image, select the ISO image of our LinuxMint 


If you succeed, approximately as in the picture below, then everything is correct 
Now we launch our newly created system 
After the appearance, Automatic boot ... press Enter and select the first option 

Now we wait 2-7 minutes until the graphical interface appears. After downloading it, select Install Linux Mint 
After that, set your parameters. I put mine like that. 


Now we are waiting 20-30 minutes for our LinuxMint to install. Here is your time, which you can spend over a cup of coffee, hug your mom or tell your dad a joke \u003d) 
After the installation completion window appears. Select the cross on top and close the car 
After that, delete the iso drive in the settings so that our LinuxMint does not start constantly loading from it. 
Everything. Our Linux is ready! Use and be sure to comment to raise my morale \u003d) 
Oracle VM VirtualBox is a program that allows you to create operating systems on virtual machines. This will allow you to use Windows programs in Linux in a 100% working way. If the Windows program does not work under, then it will work in its native Windows environment. Using VirtualBox would be an easier and better alternative than installing on a separate Windows partition on a Linux machine as.
First install VirtualBox
VirtualBox acts as a "stand-alone computer" on which operating systems can be installed.
I assume that you already have a Windows disk on CD or DVD, and possibly a file in the form of a virtual optical disk format.
- Open the main VirtualBox window, click the "Create" button.

Using the launched wizard, to create virtual machines, we enter the name of our future machine Windows 7 or Windows 8, and perhaps someone wants to install Windows XP. Depending on the input of the operating system name, VirtualBox automatically selects the pre-installation details for the future virtual Windows machine, which can be changed a little below for your own purposes. For example, choose the 64-bit version. In accordance with the choice, the wizard for preparing virtual machines, prepare the required number, which can also always be corrected in the direction of increasing or decreasing system resources. - The next window allows you to allocate a certain amount of RAM from the real RAM of your computer.

Do not allocate too much RAM, the more you give RAM to the guest system, in our case, the installed Windows, the less RAM will be left to the host system, which will lead to the failure of the entire system. - Create a new hard drive. After clicking "Next" you get to the step "Selecting a hard disk". This step will allow you to select the hard disk size, dynamically expanding or fixed size for your virtual machine. Here I will draw your attention to the fact that it is better to choose a dynamically expanding disk, since this will save you space on the real hard disk of your computer.

Easier to put it this way: stick to the already established selection of the wizard for creating virtual machines. After clicking the "Create" button, the wizard finishes its work. - Now it remains to select the disk image for the Windows being installed by clicking on the "Configure" button. Select the "Media" section on the left side of the window. Click on "Empty", which says a blank CD, DVD environment.
Opposite the word "Drive", click on the disk icon, which will allow you to select the existing disk drive of your computer or a disk image that was previously saved on the computer. Click OK. - Now everything is set up for the Windows installation! You can start a virtual machine and perform a standard Windows installation.

After installing Windows in VirtualBox, disconnect the installation media so that VirtalBox starts from the virtual hard disk. You also need
Dedicated to free software ...
In real life, from time to time, I have to communicate with people who would like to try Linux OS, but are afraid in some unpredictable way to influence the work so dear to their heart Windows.
Then I explain to them that there is a painless way to install Linux on their computer, without in any way affecting the already installed operating system and without allocating special partitions on the disk for it. To do this, you just need to install a special program called a virtual machine on Windows, and then install Linux into it.
Some of them consider it difficult and this, although it would seem that it is easier and safer. Therefore, I decided to write a small instruction on how to do it all.
However, before creating a virtual machine, you need to decide what kind of operating system we will install on it. Today there is a huge mass of the most different Linux distributions. The most popular today is Ubuntu, so I'm taking it as an example, but it doesn't matter, you can take any other distribution kit available to you.
If you already have it, that's good, but if not, then you need to download it. Insofar as Ubuntu it is a free operating system, then just download it from the Internet. To do this, go to the ubuntu.ru website and download the latest version of the system. There you can download a CD or DVD image, choose depending on the speed of your Internet (I usually take a CD), and from the options offered, choose the one where the name contains the symbols "desktop-i386". It is best to download using a torrent client, but if you do not have one and are too lazy to install, you can download from Yandex using the direct link ftp://mirror.yandex.ru/ubuntu-releases/1 1.10 / ubuntu-11.10-desktop -i386.iso, but keep in mind that by the time you want to do this, the version of the program may have already been updated and this link will lead not to the latest version, which in general is not important. The size of the CD image is about 700 megabytes.
So, we believe that we already have the distribution kit, go directly to the virtual machine.
A virtual machine is a program within which you can create a virtual platform (roughly speaking, a computer) with specified parameters and install various software on it. All actions that you perform inside the virtual machine do not affect your main operating system in any way, except that it takes resources from it, however, like any other program.
There are a lot of virtual machines, like any other type of program, but I use VirtualBox, so I will give examples using this program. Why exactly on it? Because it is free and has a simple understandable Russian-language interface.
So, go to the site VirtualBox"and download the latest version of the program https://www.virtualbox.org/wiki/Downloads (naturally, we are interested in the one that for Windows hosts). The size of the program is about 90 megabytes, quite a bit by now.
After downloading, we begin the installation, which is no different from installing other programs.
1. There is no need to change anything in the installation settings. Just click "Next" and "Install". We also install all the services that the installer offers. 
2. After the installation is complete, launch the program. 
3. As you can see, so far we have only one button “Create” active, with which we can create one or several virtual machines. 
4. So, press the "Create" button, after which the wizard for creating a new virtual machine will start. In the window that opens, give the machine any name (I was not original and called it Ubuntu), select the operating system (Linux) and its version (Ubuntu) from the drop-down list and click "Next". 
5. In the next window, we need to select the amount of RAM that will be allocated for the virtual machine. What is the best volume to choose? If you choose small, then your virtual machine will turn out to be low-powered. But it is also undesirable to choose a very large volume, since the virtual machine takes memory from the real machine (do not worry, only for the duration of its work), so I, as a rule, choose the amount of RAM for the virtual machine in half the real amount of RAM. If someone does not understand what it is about, then just put the slider in the middle in this window. 
6. In the next window, we select the virtual hard disk. In our case, we just create a new one. 
7. In this window, leave everything unchanged. 
8. In this window, select the dynamic hard disk. 
9. Here we select the volume of the disk. Decide for yourself which size to choose, I usually choose from 8 to 20 gigabytes. 
10. Let's see what we've got and create a virtual disk by clicking the "Create" button. 
11. Check the parameters of our virtual machine and create it using the "Create" button. 
That's all, the machine has been created, all that remains is to install the operating system on it.
12. Let's get started. Select the virtual machine we need (in our example it is one, but in general there may be several of them) and press the "Start" button. In all cases, the installed OS will immediately start loading, but at the first start several additional dialog boxes will open. 
13. Here we carefully read and click "OK". 
15. And here, attention, as a medium, you must select the image of the Ubuntu distribution we downloaded (click on the yellow folder with a green arrow and select the image file). 
16. It should look like this. 
16. We read and click on "Ok". 
17. Linux started. When we see such a window with a small keyboard and a little man at the bottom, press the "Enter" key.
18. Then we get to the menu for choosing the installation language, where we select the language we need. As you can see, Linux has many localizations. However, in order for it to pass completely, the Internet must work for you, since the corresponding packages will be downloaded from the network. I choose Russian and press "Enter". 
19. Then we get to the installation menu, where we select the second item "Install Ubuntu" and press "Enter". 
20. After that, the installation of the operating system of our choice will begin. Linux is no more difficult to install than Windows, so I will not describe the installation. Although, if there are corresponding wishes, I will make a description in the next part. Keep in mind that in the virtual machine window, you can experiment fearlessly, in the most extreme case, the virtual machine we created can be deleted and a new one created.
21. In conclusion, I would like to note one more important point. After installing any system, it will open in a small window. To be able to switch to full screen mode you need to install the guest OS add-ons. To do this, go to the "Devices" menu and select "Install Guest OS Add-ons". 
That's all. As you can see, you can get involved in free software without any special sacrifices and risks.