Random access memory or RAM is one of the most important components of a personal computer. Malfunctioning modules can lead to critical errors in the system and cause BSODs (blue screens of death).
In this article, we will look at several programs that can analyze RAM and identify bad bars.
GoldMemory is a program supplied as a bootable image with a distribution kit. Works without the participation of the operating system when booting from a disk or other media.

The software includes several modes of memory check, is able to test performance, saves the check data to a special file on the hard disk.
MemTest86
Another utility that is distributed already recorded in the image and works without loading the OS. Allows you to select test options, displays information about the size of the processor cache and memory. The main difference from GoldMemory is that there is no way to save test history for later analysis.

MemTest86 +
MemTest86 + is an enthusiastic revision of the previous program. Differs in faster testing speed and support for the latest hardware.
Windows Memory Diagnostic Utility
Another representative of console utilities that work without the participation of the operating system. Developed by Microsoft Corporation, Windows Memory Diagnostic Utility is one of the most effective solutions for detecting errors in RAM and is guaranteed to be compatible with Windows 7, as well as newer and older systems from MS.

RightMark Memory Analyzer
This software already has its own graphical interface and works under Windows. The main distinguishing feature of RightMark Memory Analyzer is its priority setting, which makes it possible to check RAM without loading the system.

MEMTEST
A very small program. The free version only knows how to check the specified amount of memory. In paid editions, it has advanced functions for displaying information, as well as the ability to create bootable media.

MemTach
MemTach is a professional grade memory testing software. Conducts many tests of RAM performance in various operations. Due to some peculiarities, it is not suitable for an ordinary user, since the purpose of some tests is known only to specialists or advanced users.

SuperRam
This program is multifunctional. It includes a module for testing memory performance and a resource monitor. The main function of SuperRam is RAM optimization. The software scans the memory in real time and frees up the amount not currently used by the processor. In the settings, you can set the boundaries at which this option will be enabled.

Errors in RAM can and should cause problems with the operating system and the computer as a whole. If you suspect that the cause of the failures is RAM, then you need to test using one of the programs listed above. If errors are found, sadly enough, you will have to replace the faulty modules.
There are situations when, in order to diagnose malfunctions of a PC or laptop, you need to test the RAM. This operation becomes especially relevant if the computer reboots itself or displays BSOD screens and errors like Memory could not be read on its display. The best program for testing RAM is MemTest86. How to use it, read the article.
Symptoms of a defective RAM
You should test RAM to identify a faulty PC component in the following cases:
- spontaneous computer reboots;
- frequent occurrence of BSOD;
- crashes of applications that use a large amount of RAM (3D games, compilers, complex office suites);
- the appearance of artifacts on the display, although the video card is fully functional;
- computer refusal to turn on (possibly with sound signals).
In the latter case, it makes sense to familiarize yourself with the instructions that came with the motherboard to determine which specific device is preventing it from turning on.
Description and operation of MemTest86
Only one person was involved in the development of the first versions of the application - Chris Brady. The program for testing RAM is launched in DOS mode using its own bootloader, so the operability of the OS and hard disk does not affect its functionality in any way. MemTest86 can work with multi-core CPUs and almost all modern motherboard models.

During RAM testing, the application writes the same data to the RAM cells. After they are completely filled in, the information is read and checked against the sample. The operation is repeated twice. The first time the MemTest86 program fills the memory, starting from the lowest addresses. In the second - from the elders.
After each cycle, the sample is changed to another for the most efficient error detection. All operations can be repeated indefinitely (until the user completes the work) or a specified number of times (configurable before testing).
Utility versions
The program is distributed in several versions: Free Edition, Pro Edition, Site Edition. For home use, the capabilities of the free version of the Free Edition are quite enough. MemTest86 Pro and Site are designed for professional use. They have added the functions of automation, compiling custom reports, downloading the program over the network.
There is also an application called MemTest86 +. It was created by another person. The last version was released in 2013, after which the development of the application stopped. It is not recommended to use Memtest86 + for testing modern equipment.
MemTest86: instructions for creating a bootable USB flash drive
How to create a USB flash drive?
Many different versions of the MemTest86 program are distributed on the web. The application is not available in Russian. It is best to download the utility from the official site. The latest version of the application is always available on it, and the risk of infecting the computer with a virus with this approach is minimal.
This article focuses on creating both a bootable USB flash drive and a DVD drive. The first option is the most popular in the modern world of information technology. The second method is suitable for those users who do not have a USB drive at hand.
A detailed guide comes with the MemTest86 application. The developer's manual is written in English. It is preferable to use it, rather than materials from third-party sites.

Creating a bootable flash drive will not take much time, and even an inexperienced user can handle this operation. Follow these steps:
- Unzip the downloaded archive and run the imageUSB.exe file.
- At the top of the window that opens, select your USB drive and click on the "Write to UDF" button.
- After the process is complete, a bootable USB drive will be created.
Before writing a program to a USB flash drive, be sure to copy all the data stored on it to another drive.
Create bootable DVD
If you don't have a flash drive at hand, you can create a MemTest86 boot disk. Windows must be functional, so you won't be able to perform the operation on a failed computer. It doesn't matter if you have a CD or a DVD, it will take several tens of megabytes to write files to the drive.

Follow these steps to create a bootable disk:
- Download the ISO image from the official website of the software developer.
- The file comes in a ZIP archive, so unzip it to any directory before proceeding.
- Download and install UltraISO software. After installation, it is recommended to restart your computer.
- Unpack the image.
- In the main window of the program, click on the icon with the image of a folder and an arrow. In the dialog that opens, select the image file.
- Then click on the "Burn Image" icon. A burning disc is drawn on it.
- If there are several recording drives in your computer, select the one that will be used at the moment.
- Check the box next to "Check".
- Insert the DVD into your drive and click on the "Burn" button.
- Wait for the process to finish.
BIOS setup and program launch

Before starting the utility, you will need to change the BIOS settings, for this:
- Insert the USB stick into your computer's USB port and reboot.
- Enter the BIOS Configuration Utility by pressing the DEL key as soon as the PC turns on. The button to launch the utility may differ depending on the motherboard used.
- Move the cursor to the "1st Boot Device" line. Set the switch to "USB". Instead of "USB" in some BIOS versions, the device may display the full name of a flash drive or "USB-HDD". Sometimes, to perform this operation, you first need to enter the "Advanced Features" or "Boot" submenu.
- Exit BIOS and save settings. To do this, press F10, and then answer in the affirmative to the utility's question. The computer will automatically restart and then the program will start.

If the BIOS version allows you to boot from the selected device without preliminary configuration, just press the F8 key, and then specify which drive to use as the boot drive.
If you are using a laser disc, follow the same instructions, but set the floppy drive as the first boot device. If it is not possible to configure your PC, read the instructions that came with the motherboard. It can be found on the manufacturer's official website.
MemTest86: how to use the utility
After starting the program, RAM testing will start automatically. The user will only need to wait for the verification to complete. The test time depends on the performance of the RAM and the presence of bad cells on it. Diagnosis usually takes several hours. Professionals working in service centers recommend testing RAM for 3-4 hours, regardless of the diagnostic speed.

At the top is the percentage of completion of the check. The second line contains the number of the test currently running. In the third, the percentage of completion of the current test. As mentioned earlier, the application runs tests with different samples one after the other. There are 9 of them in total, but after the end of the last one, the program will not end, but will continue diagnostics. This will continue until the application is turned off.
After passing all nine tests for the first time, the message "Pass Complete" will be displayed and the number of errors detected by MemTest86 will be displayed. How to use this information? Even if only one error occurred during the diagnostics, it means that the RAM modules need to be replaced.
If your computer has several strips of RAM, you can check if they are all out of order. To do this, you need to leave only one module in the PC and perform diagnostics. Then you need to disable it, install the next one and start testing again. Those modules, during the diagnostics of which no errors occur, are in good order.
It so happens that the tests of each RAM strip individually pass without errors, but after installing all the modules on the motherboard, MemTest86 still fails. How to use memory modules in this case? The RAM strips are likely to operate at different frequencies. It will not work to use them in one computer. One or more modules need to be replaced.
Memtest86 freezes during operation also indicate a RAM malfunction.
Methods for restoring ramps
If the program for testing the RAM detected errors, this does not always mean that the RAM modules are faulty. Sometimes failures begin due to contamination of the contacts of the memory strips themselves or the slots of the motherboard.
Try cleaning the shiny contacts of the modules with a regular eraser and then rubbing them with alcohol. The same procedure should be followed for the slots on the motherboard. After cleaning, start testing again. If errors still occur, it means that you need to replace the RAM brackets to restore the computer.
I am glad to welcome you to the site! In this article I will tell you everything about diagnosing the RAM of a computer / laptop.
Let's talk about the symptoms suggesting that there may be some errors in the "RAM", as well as how to check it for operability and "integrity".
So, let's begin!
Random access memory, or RAM (random access memory) is the "temporary" memory of a computer. This is the so-called "buffer" between the hard disk, which permanently stores your programs and data, and the processor that processes this data. This memory is volatile, i.e. it is reset to zero each time the computer is restarted or powered off.
RAM is a small bar that fits into the motherboard connector. Like any component of a computer, this bar can fail.
In general, all these symptoms do not necessarily indicate a malfunction of the RAM strips. Freezes and errors during Windows installation are more likely to occur due to the hard disk, BSODs - due to OS errors, viruses. It is possible to say for sure whether there are broken blocks or errors in the RAM only by conducting memory tests using the methods that I will describe to you below.
If you better perceive information in video format, you can watch a video clip on my YouTube channel:
How to check the RAM [Video]
How to check your computer's RAM
The easiest way to check RAM is the exclusion method. Most often, the computer has 2-4 RAM modules. Therefore, you can take them out in turn and check if the problem is gone. If, without one of the memory modules, the freezes stopped and the errors disappeared, then it is faulty.
But, quite possibly, you have one memory module.
To find and remove the RAM from your system unit - carefully look at the picture below. I think everything will immediately become clear to you. You need to bend the latches on the sides of the memory - and it will "pop out" by itself. 
And here is how the RAM looks and is removed from laptops:

Checking RAM for errors using Windows
If your system boots normally, but it produces various failures and errors in operation, then you can use standard Windows tool for checking RAM.
It is called that - " Diagnosing problems with computer RAM.»
This tool is built into the Windows 7 and Vista operating systems, and we just have to find and use it:
- Push the button Start, and in the field “ Find programs and files»Enter the part of the name of the program that we need to find. I entered operative. Among the list of programs we find “ Diagnostics of problems of computer RAM ":

- In the window that appears, you can choose when the check will be performed - right now or the next time you turn on the computer:

We close all open programs, save the documents, and run the first item to restart the PC and start checking the RAM right now. - After reboot will automatically start and start a memory check. We are waiting for the check to be performed, you do not need to touch anything.

On my configuration (i5-4460, 16 Gb DDR3), testing in normal mode took about 15-20 minutes.
By pressing the F1 key, you can select other test options (Basic and Wide), as well as the number of passes. Optionally, you can check with Wide a set of tests, but it will take several times longer, so first do Usual test.
- After the test completes, Windows will continue to boot.
- To see the result of the Windows RAM test, you need to go to Event Viewer -\u003e Windows Logs -\u003e System -\u003e MemoryDiagnostics-Results:

Memory tester - memtest86 +
It is best to use a special program to check the memory - memtest86 +.
Its advantage is that it can be used even if Windows does not boot, or there is no hard disk in the PC at all.
Download the program for checking RAM you can from the official website memtest.org, or right here on my blog (files checked for viruses): the memory test will start. It looks like this:

The test runs automatically, you don't need to change anything, just watch. He will go endlessly. If after 1-2 passes (Pass) no red bars with errors appear in the field below, and the "Errors" counter is equal to zero, then your memory is almost certainly clean!
Many are probably wondering what the test of a "broken" RAM looks like? To see it - watch the video below.
Memory test memtest86 + - 1.5 million errors [Video]:
By the way, subscribe to my youtube channel ... There I show the whole process of diagnostics and repair of computers and laptops in real time in video format.
The need to check random access memory (RAM) is dictated by the frequent occurrence of the following situations in Windows 7:
- The emergence of the "blue screen of death" (BSOD).
- Computer freezes.
- Unstable or abnormal computer operation.
- Critical errors when running applications.
In all such cases, the most likely culprit is RAM and needs to be checked. There are several ways to test RAM in Windows 7.
Windows 7 Integrated Test
Unlike previous versions of the OS, which required the use of third-party applications to analyze the health of this computer node, the seven have a built-in tool for this. It can be started in two ways:
- From the command line.
- From the control panel.
To run this tool from the command line, you need to click "Start", type mdsched into the search bar, press Enter. The following window will appear:
This window shows two options for running the on-board RAM test:
Which option to choose depends on the user's intentions. Needless to say, when choosing the first option, you must save your work and terminate running applications, which is what the message displayed in the window reminds of.
To run this tool from the control panel, select "Administrative Tools" in it, and in the list that appears on the right side of the window, select "Windows Memory Checker":

Further actions of the user and the computer are the same as when starting the test from the command line.
Built-in Memory Checker Settings
We recommend that you first run this tool with default settings. If no problems with the RAM were found, then a more detailed analysis can be carried out. To do this, you need to run the built-in test again and press the F1 key during its execution, after which the settings menu is displayed, through which you can navigate with the arrow and Tab keys. This tool provides three modes of analysis, differing in the set of tests and completeness and time of passage:
- Basic - duration of several minutes.
- Standard - takes about an hour.
- Extended - up to several hours.
With default settings, all tests are performed in two passes. This value can be changed in the range from 0 to 99. If you set 0, then testing will be performed indefinitely until the user stops it, which can be done by pressing the Esc key.
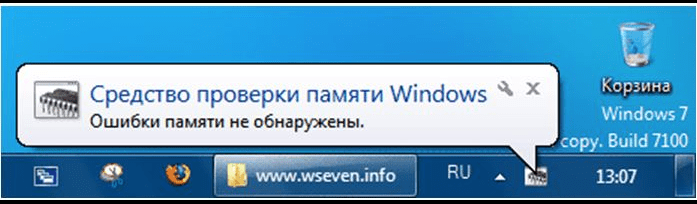
The successful completion of the RAM test is indicated by the appearance of a window of the following type:
Check memory at boot
This is another option for running the built-in test, which is used when, due to problems with RAM, it is not possible to even boot Windows. To start it after turning on the power of the computer, use the F8 key to achieve a menu with additional boot options, then press the Esc, Tab and Enter keys in sequence:


The built-in diagnostics will start:

Upon completion of the test, Windows 7 will automatically restart and begin its normal operation.
Checking RAM with Memtest86 utility
Many third-party utilities have been developed for RAM tests, but Memtest86 is deservedly considered the "king" among them. It differs from many similar programs in that it has its own bootloader and runs from bootable media (for example, from a USB flash drive or CD). This allows her to more thoroughly diagnose the operability of the RAM. Unfortunately, this utility has two drawbacks:
- The need to obtain bootable media from the distribution iso file. This can hardly be attributed to disadvantages - that is why the program does not require any OS, and does not depend on it.
- Quite long test execution time (over 1 hour).
When should it be used:
- Of course, the first and most common case is that the OS does not boot, or a BSOD appears.
- When the PC is unstable.
- Diagnostics of purchased and non-working RAM modules.
- For fine-tuning the timings when overclocking system components.
What to do if tests find problems
If, during testing, errors were detected in any way, or the tests could not even be completed, then this is a clear sign that one or more RAM strips are faulty. What to do in such cases:
- Don't rush to buy new planks. First, remove all strips from their slots and reinsert. Just remember to turn off your computer before doing this and discharge static electricity from yourself by touching the computer case.
- If it takes a lot of effort to remove and install the planks, then either you forgot about the plank latches, or you are inserting them incorrectly.
- Gently wipe the strip contacts with an eraser to remove plaque from contact with air and subsequent oxidation.
- Install the brackets into the slots of the motherboard, turn on the computer and repeat the test. It is possible that the test will end successfully.
Greetings, blog readers! In this small lesson, I would like to tell you how you can test the computer's RAM if you do not have special programs installed for this purpose. Not every novice user knows that the Windows 7 operating system can be checked for errors thanks to the built-in program. In most cases, errors that occur in RAM affect the operation of the system as a whole.
As a result, the computer does not start or notifications with various critical errors constantly appear, the system periodically freezes, and in some cases the computer also. Therefore, when the above symptoms of malfunctions appear, you should use the built-in program ... Moreover, programs for testing memory can be either built-in in Windows or additionally installed. If you do not know what RAM is for what it is intended and where it is located on the computer motherboard, then I recommend that you read this article - "Computer device".
For the first time, the built-in verification program was introduced in the Windows Vista operating system. I also want to say that in addition, it is advisable to also perform a RAM test.
RAM test
I suggest you consider some ways to test RAM.
Method 1 - Click on the "Start" button and type the command "mdsched" in the search bar, and then press "Enter" to open the program.

You can also open the program to check the RAM in the following way, for this, run the following command: "Start" - "All Programs" - "Administrative Tools" - "Windows Memory Checker". Then the program window will open, where you will need to select one of the presented actions (with or without reboot).

After you have chosen one of the methods for testing the RAM, the computer will start testing.
Let's say we chose the RAM test with restarting the computer. And when testing is over, the computer will restart. Then, when the operating system boots, the test results will be shown, namely, a notification about the result of the memory check for errors will appear in the tray (in the lower right corner of the taskbar). In the event that the program detects errors in memory, then it will be necessary to replace this RAM with a new one.
Method 2 - You can also check the RAM of your computer through the "Advanced Boot Options". To do this, when turning on the computer, press the function key F8, as a result, this menu will open.

Then click on the "Esc" key, after which the "Windows Boot Manager" will open and, using the "Tab" key, go to the "Memory Diagnostics" parameter, then press "Enter". As a result, it will start .

Method 3 - Another test of RAM can be carried out using the installation distribution of Windows 7. Install the installation disc into the DVD drive, then restart the computer and when a notification appears that the disc is loaded, press any key on the keyboard.

Then the "System Recovery Options" window will open, select the Russian language and click "Next". In the next window, select the first method and click "Next".
Then, in the new window that opens, click on the "Windows Memory Diagnostics" link and select the first method for testing RAM.
In some cases, you can carry out rAM testing by setting the schedule using the job scheduler. Namely, to set a schedule so that the RAM test is carried out at a given time. By doing so, you will carry out the so-called system diagnostics from preventing the occurrence of various errors. In previous lessons I already wrote about the task planner, you can familiarize yourself with it.
So, open the task scheduler with the command: Start - All Programs - Standard - System Tools - Task Scheduler. After the program window has opened, select “Create task.

Then, in the window that opens, in the "Name" line, assign a name to the created task, for example, "RAM test".

Then click on the "Triggers" tab and go to the "Create" tab. Then we set the time for testing the RAM.

Now we just need to go to the "Actions" tab and create a script for the RAM test. Click "Create" and in the window that opens, enter the following commands: in the "Programs or script" line, enter the bcdedit command, and in the "Add arguments" line, enter the / bootsequence (memdiag) / addlast command.

Thus, the RAM test will be performed in accordance with the specified schedule.
Let's summarize: in this lesson I told you about the methods of testing RAM, with which I had to check the RAM for errors. In practice, I have repeatedly encountered such situations that the reason for the inoperability of the computer was caused by the presence of errors in the RAM.
In some cases, testing helped to eliminate errors in memory, while in others, the RAM simply had to be sent to the trash. What methods of testing RAM do you use?
Well, dear blog readers, for today I have everything.
In this lesson, we examined some of the techniques for testing RAM without using third-party utilities. I hope you will now know in what ways you can do it.


