Apparently, all users at least once accused their computer of slow work, while completely not thinking about the fact that there is a lot of opportunities to speed it up. Many believe that improving the performance of PCs is complicated and accessible only to advanced users, but this opinion is not entirely true. Yes, there are methods of improving performance that require nehily skill in working with the computer, but there are many very simple possibilities to "disperse" the PC. Each user should know about these methods. In this article we will tell about them on the example of the most popular version of Windows today - you will learn, how to Speed Up Windows 7.
Disable Windows 7 visual effects
Disabling visual effects Windows 7 - the most simple and affordable option to increase the speed of the system. To perform this procedure, follow the instructions:

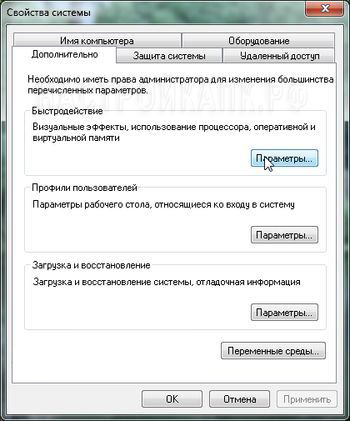
3. Before you open a new window, click on the "Advanced" tab and in the "Performance" section, click the "Options" button.
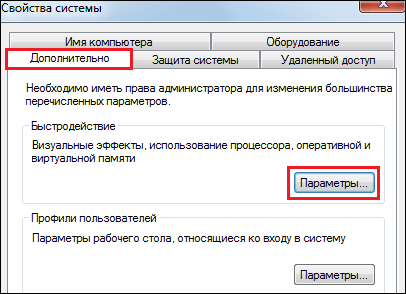
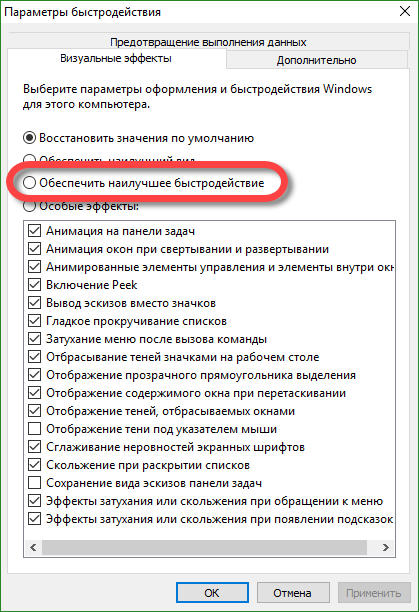
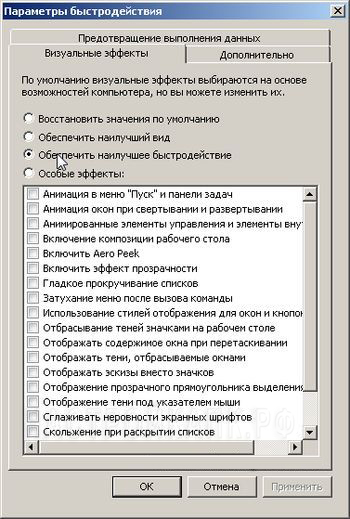
4. In the "Options" window on the "Visual Effects" tab, you will see how much visual effects there are in Windows 7. Of course, thanks to them the platform looks more interesting and pleasant, but they are not slow to slow down its speed.
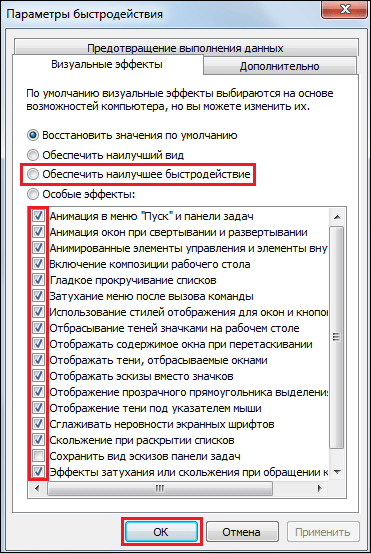
5. To turn off all at once visual effects - set the "point" in the "Provide the best performance" box, and if you want to disable the effects selectively, uncheck the desired windows.
6. All, for the changes to take effect, you must click "OK" and restart the PC.
Disabling unnecessary audio
Along with visual effects, in order to make it more enjoyable for a user to work with a PC, Microsoft also created system sounds. You will be surprised, but they also require certain resources, and their disconnection can positively affect the performance of Windows 7.
To turn off visual effects:
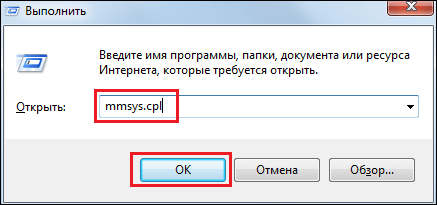
1. Press Win + R combination, in the appeared window write "mmsys.cpl" and click "OK".
2. Before you open a new window, select the "Sounds" tab, set the sound scheme "Silent", press "OK".
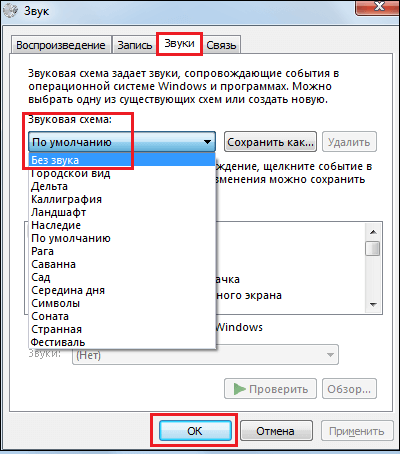
3. Restart the PC for the changes to take effect.
Disabling the Search Indexing option
For users who often search for something on the system, Microsoft has provided a very convenient option of indexing the search, thanks to it, the files are found easier and faster. However, if you rarely use the search engine, this option is completely useless and only "steals" the performance of Windows 7. To disable it, do the following:

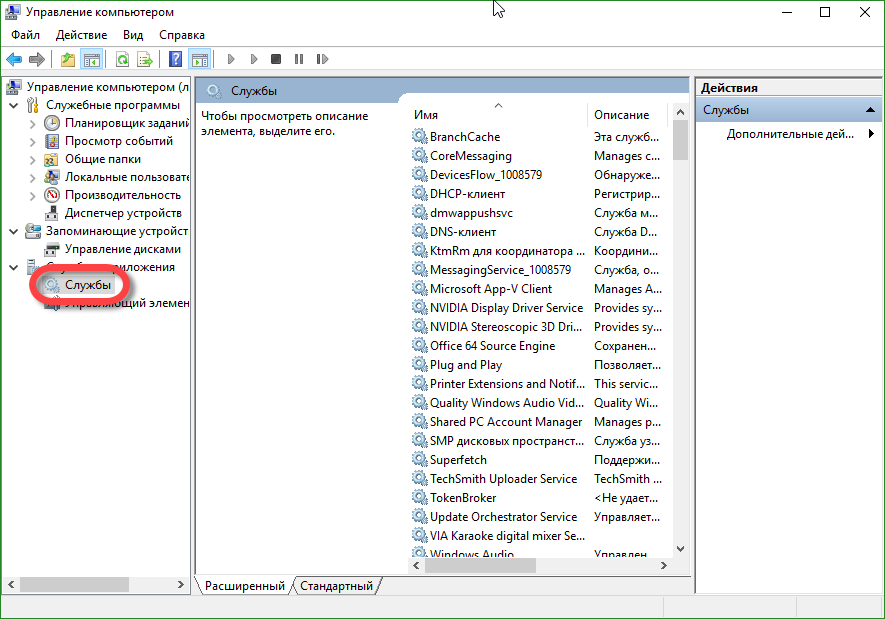
2. Expand the list of "Services and applications", click on the line "Services" and in the list on the right you will find windows service Search.
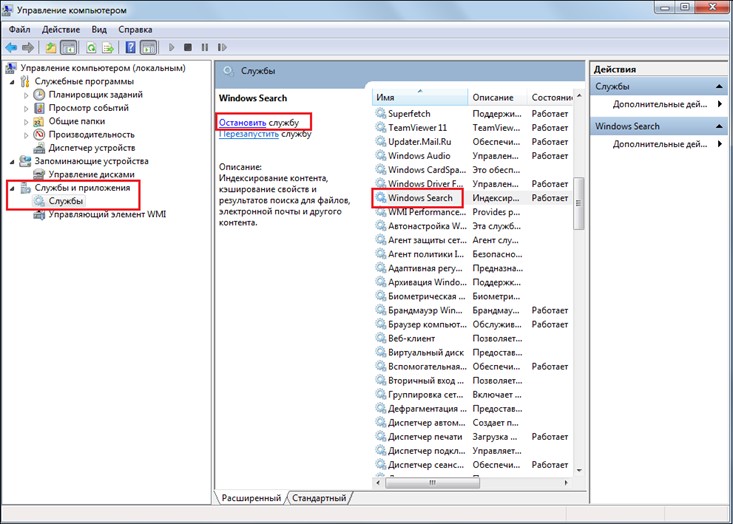
By default, you can also disable the following services [screenshot below], as practice shows, they rarely benefit the average user of a home PC.

Removing "superfluous" programs from startup
In Windows, there is an option to autoload. It is responsible for launching a number of programs simultaneously with system startup. These programs are, as a rule, various services and applications, without which the correct operation of the PC will be impossible. But, unfortunately, quite often unnecessary third parties are added to these programs.
The thing is that third-party software developers include in their products the function of autoloading, thus making their program more "intrusive". However, when it comes to launching with the antivirus system, this makes sense. However, there are many programs that run with Windows when there is no need for it. Of course, this affects the speed of the PC.
To uninstall the program from startup, you must:
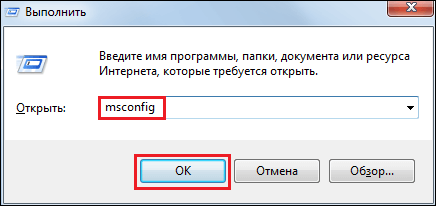
1. Press the combination of keys Win + R, in the appeared window write "msconfig" and click "OK".
2. A window opens, select the "Startup" section in it.

3. Remove the checkmarks from the windows of those programs that you do not need to boot up.
Remember! Without some startup programs, the system will not be able to function correctly, so uncheck only those programs you no longer need to be useless.
4. Click OK and restart the PC.
Optimizing the Hard Drive
At the beginning of the article, we mentioned that we will talk about simple ways improve the performance of Windows 7, and, for sure, after reading this header, you thought that we have already gone into the jungle, but it is not. We will talk about the simplest optimization hard drive and try to explain easily why it is required.
The fact is that all files that are written to hDD, beat the fragments according to a certain law. This is required to maximize the use of PC resources. However, it turns out that when a user accesses a particular file, the system has to collect its "pieces" on the entire hard disk. If your disk has a lot of unnecessary files, this, of course, significantly slows down the process. That's why, hard drive optimization is a necessary procedure, if we talk about how to speed up Windows 7.
The first and most logical way to perform optimization is to delete unnecessary files and programs. Each user on the PC stores a lot of "garbage" and it is important to get rid of it regularly. Of course, anyone, even the most "zero" user knows how to delete files, but with programs sometimes there are problems, although this task is not difficult. To uninstall a program from a PC:

4. Before you will appear a list of programs you use, decide which ones you no longer need and delete them - to delete, click once on the "unwanted" program and click the "Delete" button.

5. After removing all unnecessary programs, restart the PC.
Another necessary for optimization of hard disk procedure - its defragmentation. A complex word, but it is simple:
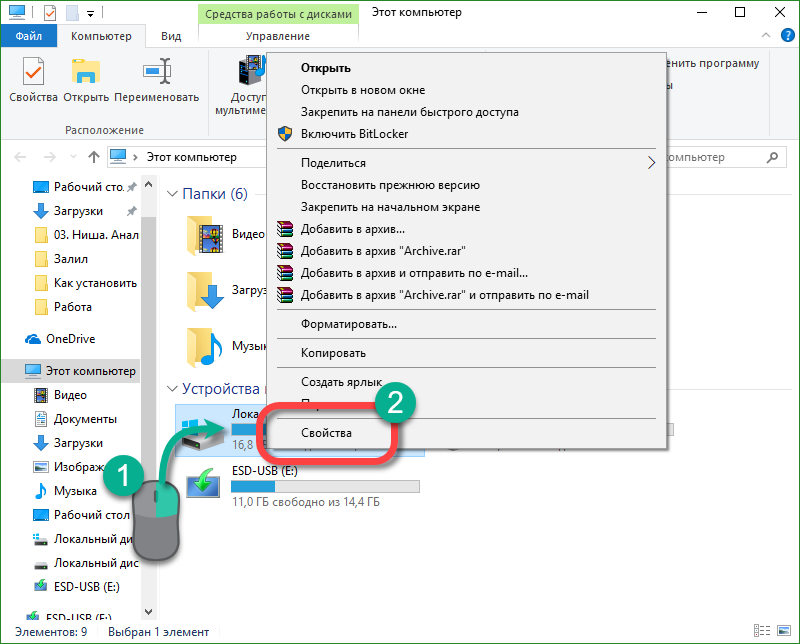
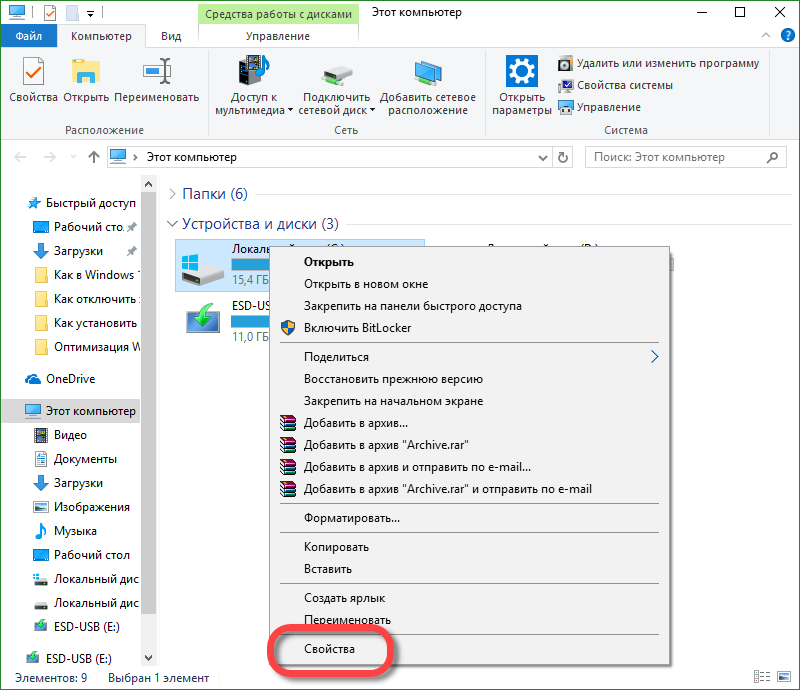
1. Go to "Computer", right-click on the disk, select "Properties" in the drop-down menu.

2. In the window that appears, select the "Tools" tab, then click the "Run Defragmentation" button.

3. After defragmenting, restart the PC.
If your system is split into multiple disks, defragment each one. Important! The defragmentation procedure, as well as the procedure for deleting unnecessary files, should be done regularly.
Optimizing the nutrition plan
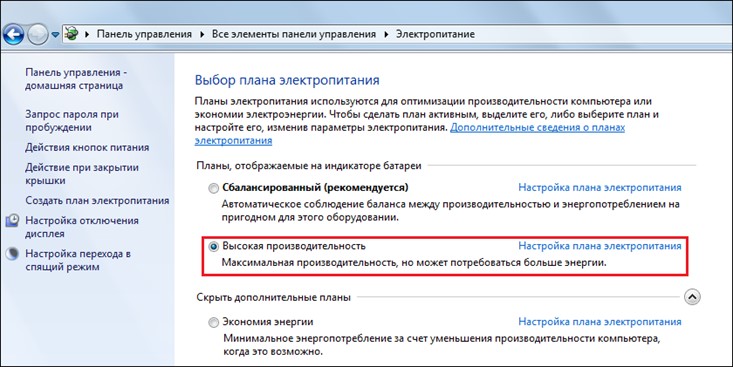
This method windows acceleration 7 is relevant for laptop users. Very often, disconnecting from the network, laptops automatically switch to a reduced mode of power consumption, which, of course, corresponds to the minimum performance. That is why it is very important to return to the high performance mode when returning to the network. No one, of course, does not prohibit the use of this mode and in standalone operation, however, please note that the laptop in this case will be discharged faster.
To switch to high performance mode:
3. Select the "Power" section.
4. Set a point in the High Performance window.
Changing the Boot Settings
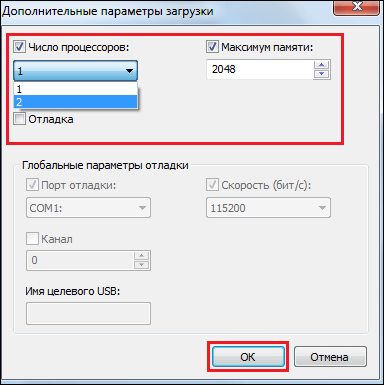
By default, when you start the system does not use all of its resources, it is necessary that the "cold" iron is not loaded to maximum. However, if your PC has more than 2 GB of RAM and more than one core in it, you can change the boot settings, thereby greatly accelerating it. For this:
1. Press the Win + R key combination, in the appeared window write "msconfig" and click "OK".
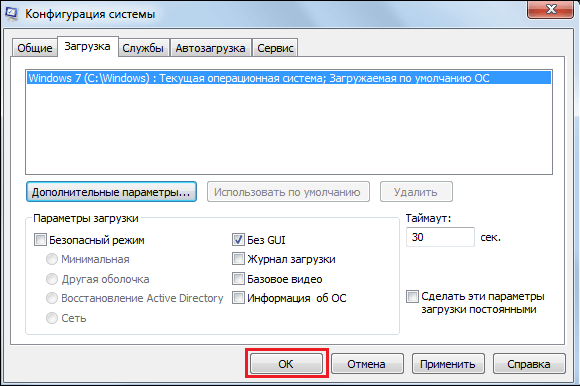
2. Select the "Download" tab, tick the "No GUI" window.
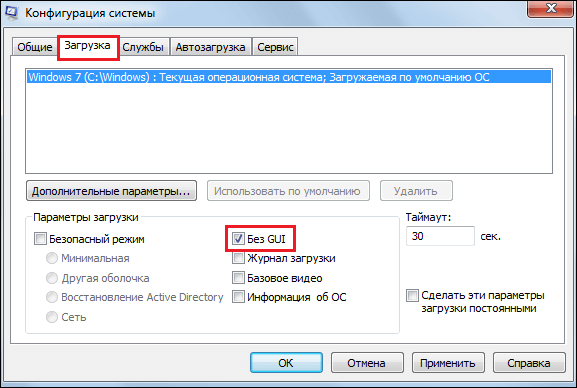
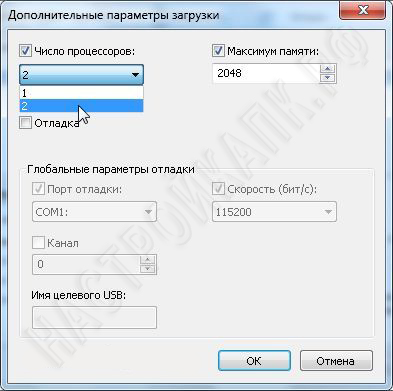
3. Then click the " Extra options", In the" Number of processors "and" Maximum memory "boxes, tick, set the maximum value and click" OK "first in the" Advanced boot parameters "window, then in the" System configuration "window.

Outcomes
A relatively new operating windows system 10 is constantly gaining popularity. And even those users whose computers are not very productive. That's why the optimization of Windows 10 became topical. Microsoft is constantly improving its OS and making their settings more flexible every time. Their correct configuration in conjunction with the use of third-party software will allow us to achieve maximum performance, even on not the newest PCs. Optimization of any operating system, including Windows 10 - an integrated process that implies a correct, consistent approach. The configuration and optimization of Windows 10 will be described in detail in this article.
How to Speed Up Your Computer on Windows 10 with an Update
"Ten" appeared recently, it is clear that initially it was quite "raw", but the developers are constantly working on their product and release updates that make Windows more productive, reliable and safer.
Update drivers
This method significantly increases the performance of the computer. It is especially important to update the drivers for all devices after the Windows update from 7 to 10, and not after the "clean" installation. Many drivers are suitable for both operating systems, but with some there may be difficulties, up to the termination of the device. For example, your sound card may completely stop working.
Here are a few signs that you can understand that some drivers do not work as they should or do not work at all:
- keyboard multimedia keys do not work;
- the brightness of the screen has ceased to be adjusted on the laptop;
- some system settings have disappeared;
- the display resolution has changed;
- the auxiliary keys of the mouse ceased to function.
Applications for automatic driver updates
It is not always convenient to look for drivers manually. First, we do not have confidence in the reliability of the resource on which the download will be conducted, secondly, it's good if the driver is one, and if there are 10 of them, the update can take a long time.
Consider several programs that make the process easier:
- Driver Pack Solution. The main advantage of this utility is the possibility of updating even without connecting to the network (offline version). The application scans your PC, and then provides a list of drivers that need to be installed or updated. During the upgrade process, an informative progress bar is displayed that shows how much is left until the end of the update. When the process is completed, the computer will require a reboot and new drivers are applied;

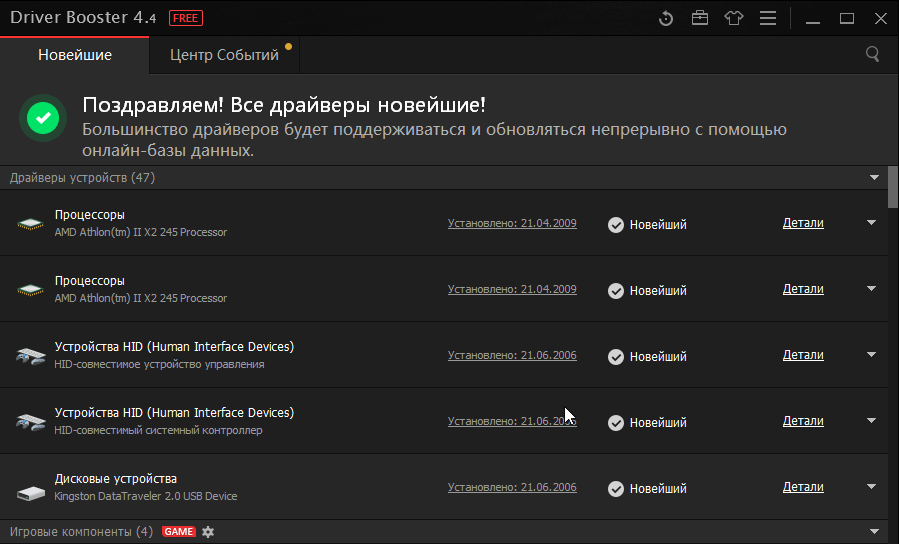
- Driver Booster. This program has no shortcomings except its cost. In all other respects this is a set of advantages, the work is done quickly and qualitatively, and the probability of downloading an erroneous driver is missing. In the same way as the Driver Pack Solution, the application scans the system and installs new versions of the drivers. Before you start making changes to Windows, backup, so that its state can easily be returned to its original position;
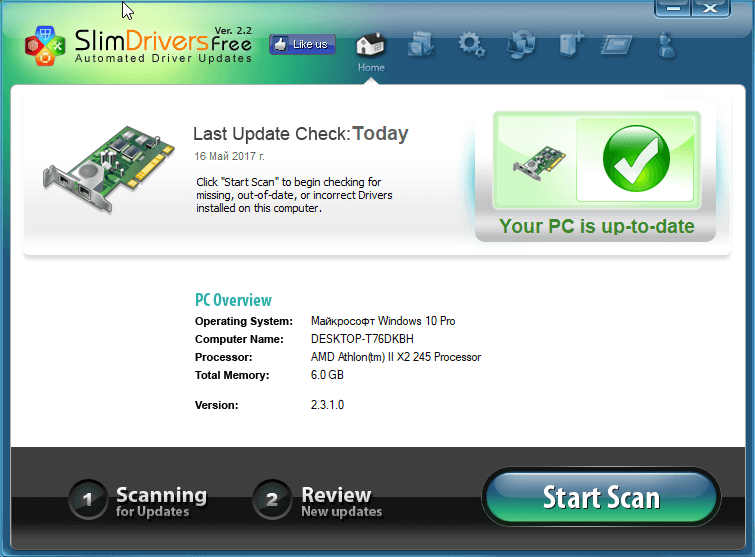
- Slim Drivers. An important advantage of this program is the scanning of drivers. It can even find the software that was skipped by the previous utilities. Impressive and fast overall check of all devices (it took us about 30 seconds).
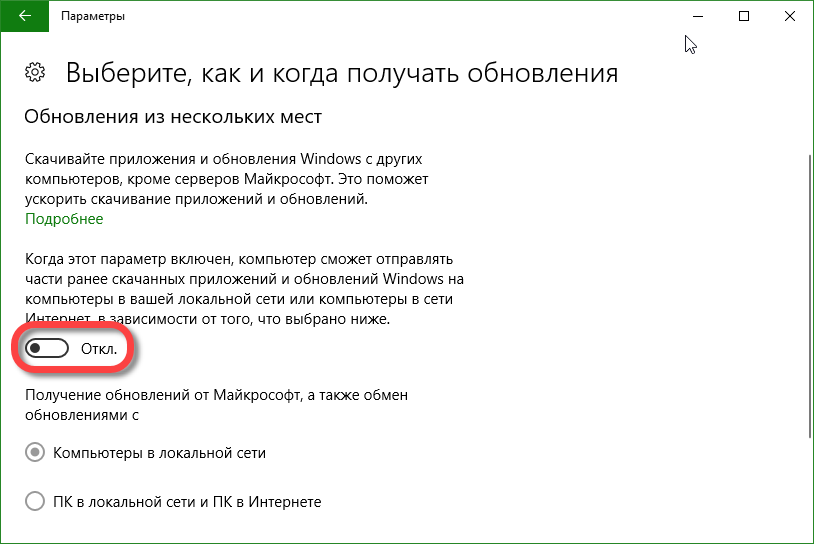
This is one of the most important moments in the work to improve the performance of Windows 10. "Ten" is designed in such a way that after receiving updates, it begins to "give" them to other PCs, respectively, we consume the speed of the disk subsystem, the speed of the CPU and the Internet. The distribution of updates on torrent technology is working, and the archives with updates that have already been unpacked and installed are stored on the computer's disk, taking up unnecessary space.
In order to disable the distribution of updates do the following:
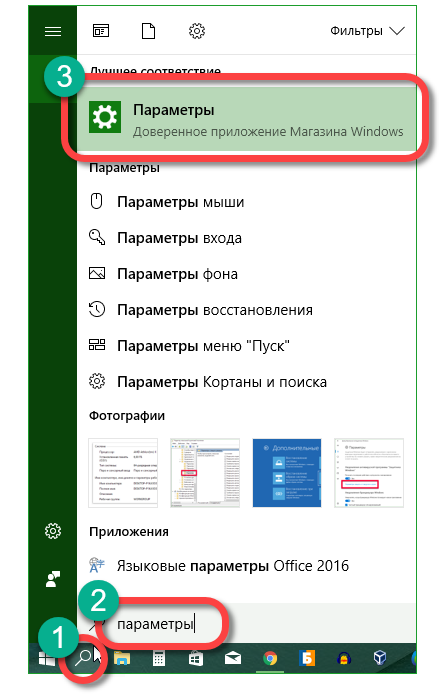
- Open the menu windows Settings 10 (can be found through the search).
- Go to the "Update and Security" section.

- In the left part of the window click on the inscription, which we marked with a red rectangle, and in the right "Additional parameters".
- Scroll down the contents of the silent window and select the item indicated in the screenshot.
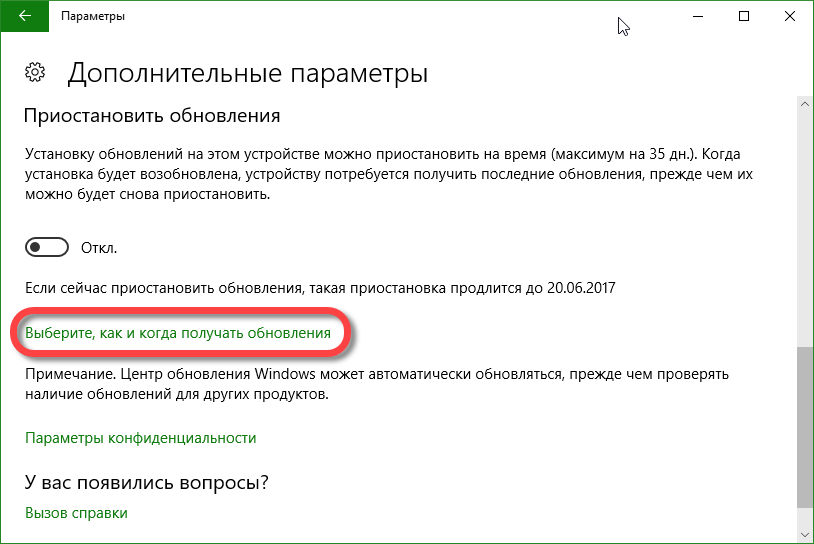
- It remains only to switch the trigger to the "Off" position. Done, the system update will be downloaded, installed and immediately deleted.
Accelerate Windows 10 by disabling OneDrive
Microsoft closely linked cloud storage OneDrive and the tenth version of its operating system. This is a very useful service that automatically synchronizes any of your data with your server and allows you to restore them at any time. But if you do not need this technology, you can safely turn off the cloud and, thus, save some more traffic and CPU processing power.
There are at once two ways to disable OneDrive. While the first simply turns off the program, the second completely removes it from the PC. For example, if the storage is still interesting for you, but you do not have time to deal with it yet, you can turn off the cloud and try later, and if you do not plan to work with OneDrive at all, safely remove the program.
Disabling OneDrive on Windows 10
In order to remove the OneDrive cloud storage, you need to bring up the context menu by right-clicking on the cloud in the system tray.

Select the item "Options".
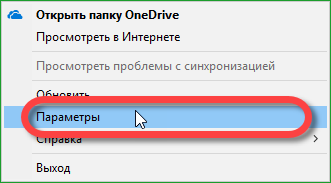
Go to the "Options" tab and remove both icons from the items indicated in the screenshot. Then click "OK".

Again, click on the cloud in windows tray 10 with the right mouse button and click on "Exit".

After that, the cloud from Microsoft will be turned off and will not disturb you with your presence.
Completely remove OneDrive
This method will erase all cloud files, you can restore it only by downloading the program again.
- To remove OneDrive from a PC, we need a command line. Run it on behalf of the administrator. We will use search engine Windows 10 (icon in the left part of the taskbar). Enter the word "cmd" in the search field, click on the result with the right mouse button and select "Run as administrator".

taskkill / f / im OneDrive.exe
We kill the system process.
\\% SystemRoot% \\ SysWOW64 \\ OneDriveSetup.exe / uninstall
We launch the standard utility for deactivating OneDrive. If you have an x86 system, write
% SystemRoot% \\ System32 \\ OneDriveSetup.exe / uninstall
rd "% UserProfile% \\ OneDrive" / Q / S
Delete the directory with the user settings.
rd "% LocalAppData% \\ Microsoft \\ OneDrive" / Q / S
Delete the system settings directory associated with the cloud.
rd "% ProgramData% \\ Microsoft OneDrive" / Q / S
Erase the leftovers in ProgramData.
rd "C: \\ OneDriveTemp" / Q / S
We clear temporary files.
This algorithm can not work on all PCs, it should be used selectively, try to determine whether it will work for you. At least, harm to the disconnected OneDrive you already will not bring.
Accelerate the computer by disabling the sending of reports
Why do you need such reports? The point is that to improve the system, developers take into account information about the errors of all users and on its basis create updates that correct the situation. This feature can be disabled, this will not only save you from annoying alerts, but will also speed up Windows a little. In the article on we described how to disable the sending of such reports even during the installation, now consider how to do this on a running system.
Follow our instructions:
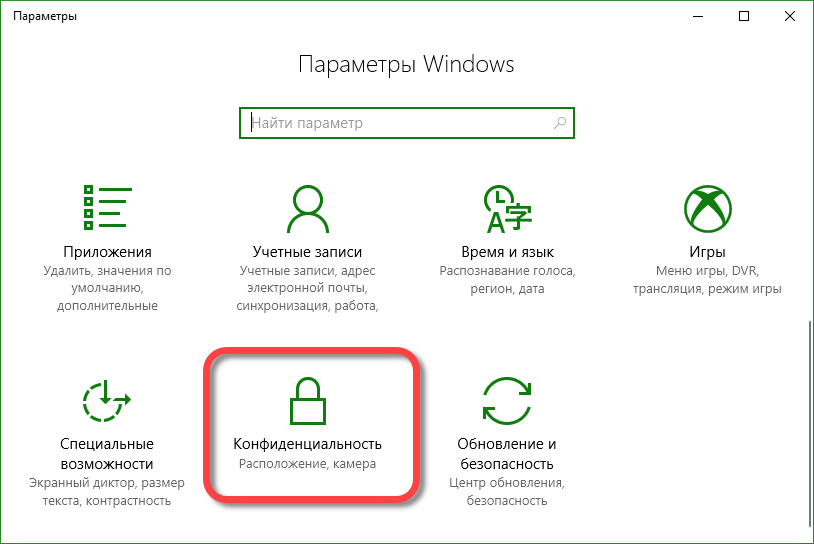
- Open the system settings you can do it through the notification panel). Click on the notification icon in the system tray and select the "All parameters" button.

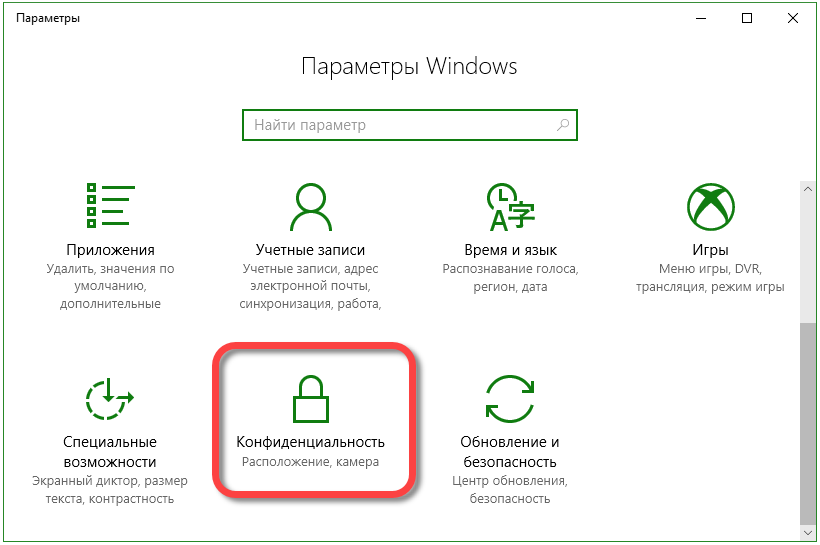
- We pass to the section "Confidentiality".
- In the left part of the window we find "Reviews and diagnostics", and on the right side we disable the trigger, indicated in the screenshot.

After that, data about the system will not be sent to Microsoft.
Turn off background tasks to improve Windows 10 performance
In Windows, there are applications and their background processes that load "hardware" even when the program itself does not work. For example, the same Xbox that users do not need from the word "absolutely". Nevertheless, the program works and takes away from the PC some part random access memory and the CPU speed. Let's restore justice and turn off unnecessary processes, working in the background.
We do the following:
- Open the computer settings through the Windows 10 search in the way indicated in the screenshot.

- We click on the tile with the inscription "Confidentiality".
- On the left, click "Background applications", and on the right we can individually disable unnecessary programs or deactivate everything at once.
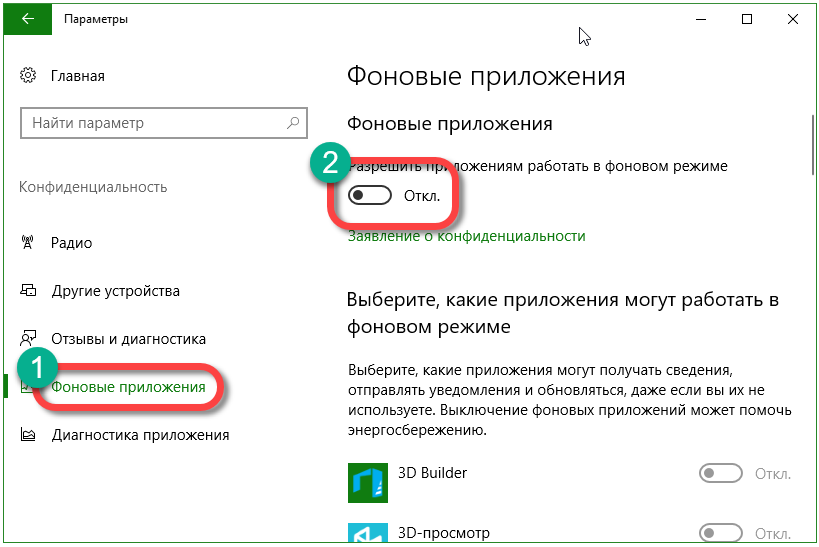
Note: the applications themselves will not stop working. The background service, which is responsible for the quick start and receipt of notifications, will be disabled.
Optimizing the operation of the hard disk
Monitoring the status of the hard drive was relevant in all versions of Windows. In Windows 10, new, improved media algorithms are implemented, including full support for SSD ( solid state drives on chips). Accordingly, after the increase in the performance of the hard drive, the system load time is reduced and its overall performance is increased. By default, the HDD is defragmented once a week or a month (you can not defragment SSD), but it's better to disable the automatic mode and perform the process yourself.
To do this, let's take the following steps:
- We open windows Explorer and click the right mouse button on the disk we need. Choose "Properties".
- Go to the "Tools" menu and press the key with the inscription: "Optimize".
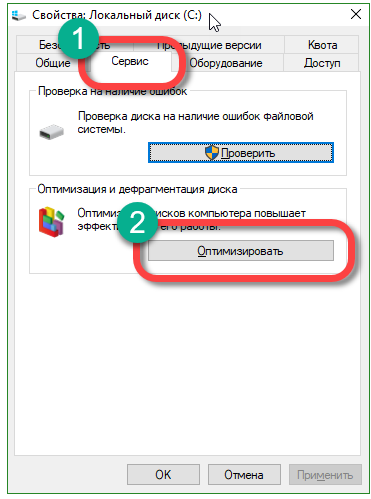
- The "Optimize" button is needed to start the defragmentation process.

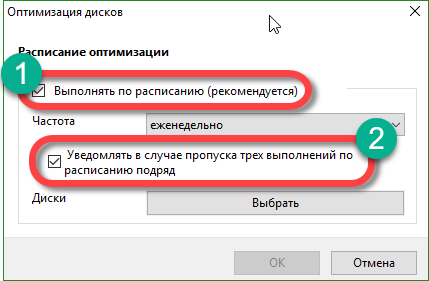
- Let's disable the defrag scheduler. To do this, click "Change Settings".

- In the opened window, remove the checkboxes opposite the inscriptions: "Run on schedule" and "Notify if you miss three consecutive schedules".
Accelerate work by disabling unnecessary services
Disabling unnecessary background processes in Windows 10 optimization for games and not only is an important component. As soon as the operating system starts, a lot of services start working together. Many of them are important for the OS, but there are also those that consume CPU performance in vain.
It's simple, the developers decided not to be cunning, they provided users with a full set of services on the principle - some, but useful. We are not going to put up with this state of affairs and disable those processes that we do not need at all. In order to customize services as we need, we right click on the "Start" key. In the new menu, select the "Computer Management" section.

What services can I disable in Windows 10?
But which services can be disabled - you ask. Do not rush, we'll tell you everything in order. Initially, it would be superfluous to create a system restore point. If something goes wrong, you can always undo the changes.
Here is a list of services that you can disable:
- printer manager (if you are not going to print);
- Windows Search. You can disable if you do not need a search (the service requires a lot of system resources);
- windows Update. Updates can be installed manually, so you can save PC performance;
- application services. Many programs, for example, Google Chrome leave the work in service even after they are closed. Such a service is needed for automatic updates and accelerated startup programs.
Attention: the list may vary depending on the equipment you use and the OS version. For example, if the printer is not connected, then there is no need in the print service either.
Optimizing the system registry
The operating system Windows, due to the specifics of its work, constantly accumulates in the registry various information, sometimes even erroneous, and from this gradually slows down. Since the "Ten" is a fairly new OS, users have not yet been able to fully experience all the hardships to which lead 2 - 3 years of work without reinstallation.
The registry needs to be defragmented and cleaned of unnecessary records. For this we need additional programs. There is one more way - manual. To do this, the system tool "regedit" is started and an experienced user makes changes to the registry by finding the desired directory and key. This may be necessary, for example, when any driver is installed incorrectly, and because of this it is impossible to install a new one. That's when you have to manually clean the remains of the old software.
Consider several applications that can cope with the task of cleaning the registry:
- Reg Organizer. A convenient and functional utility that does an excellent job. In the free version there is no registry optimization function;

- CCleaner. Completely free tool not only for cleaning and optimizing the registry, but also for cleaning the system as a whole. The program has many functions, a clear interface and quality of work;
- Windows Cleaner. Clears the system of garbage and scans the registry for errors. Is completely free.

Improving Windows 10 Boot Speed
Some applications, after installing them, are registered in the system startup, and during its next launch, they are included with Windows. As a result, the program, which we do not need today, can hang up running all day and all this time consume a large amount of RAM. In order for this not to happen, you need to edit the startup list.
- Go to the "Startup" tab and see what we have here. To disable unnecessary program, select it and click the "Disable" button.
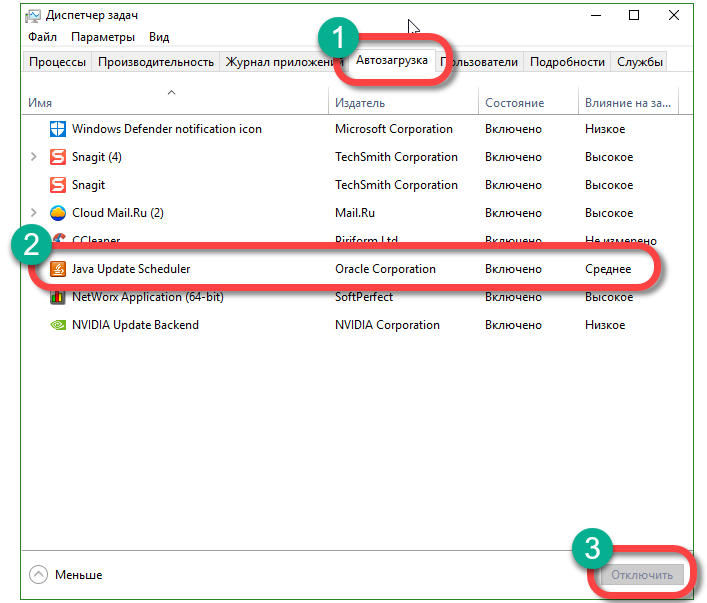
As a result, the program will no longer run with Windows.
Attention! If you are not sure of the purpose of this or that application, before using it, use the regular function and read the information on the Internet.
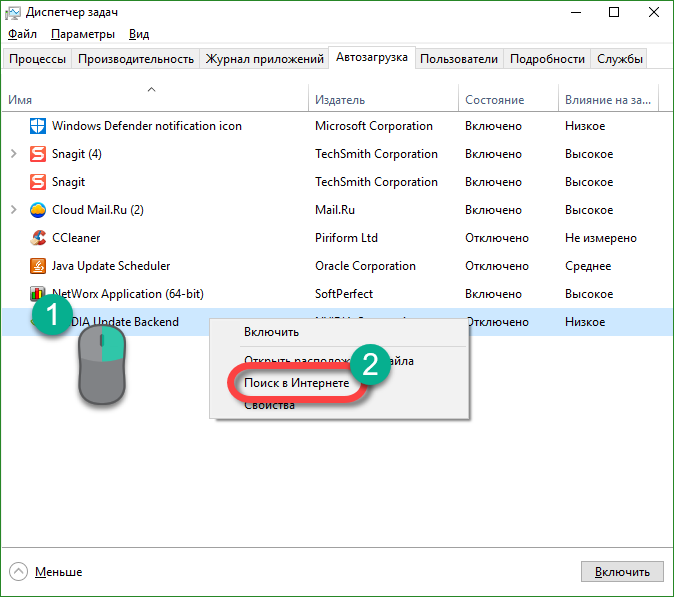
Autorun programs are carried out not only from the folder "Startup". Applications can also be written in the registry. In order to remove them from there, you need to use a special softwareabout which we will talk later.
Applications to work with startup in Windows 10
With autorun it is much more convenient to work through specialized software. A very convenient tool is AIDA 64. In general, it is needed to obtain detailed information about the PC and optimize it, but there is also a convenient tool for working with autoloading.

Another one good way edit startup list, this is the CCleaner that we described. In order to use it, go to the "Tools" tab and select "Startup". Here you can not only disable programs, but also delete them.

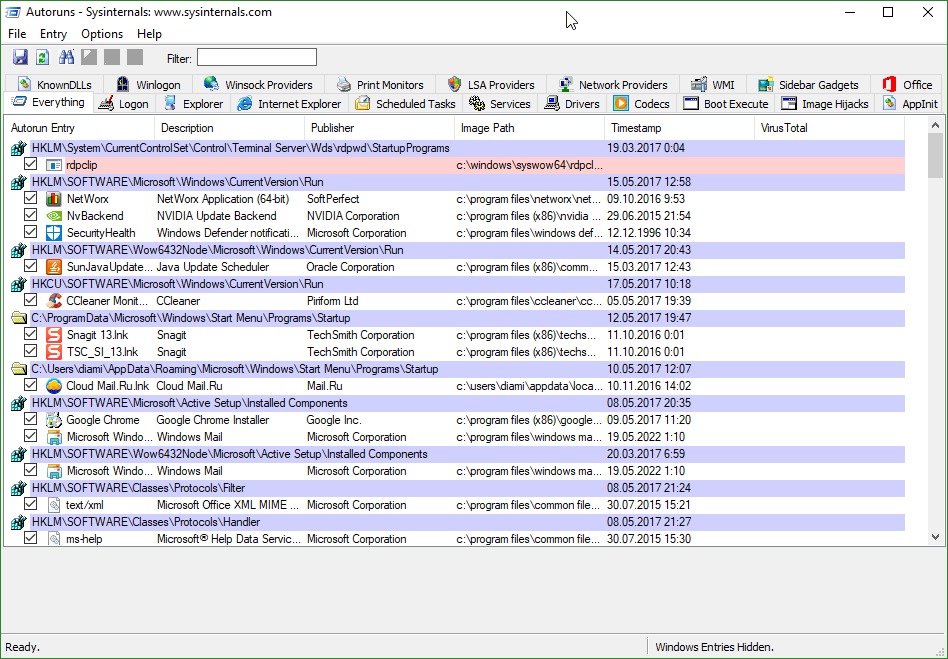
Microsoft has released its own tool for editing the list of applications that are downloaded with the system. It's called Autoruns. The program comes in the archive, where there are 32 and 64-bit versions that do not require installation. Autoruns features the highest functionality among its competitors. Here you can remove from the startup even background processes that are registered in the registry.
Task Scheduler in Windows 10
Some programs in the Windows operating system can be started only for a specific event. That's why we'll touch upon the task scheduler.
You can access the utility integrated into the system as follows:
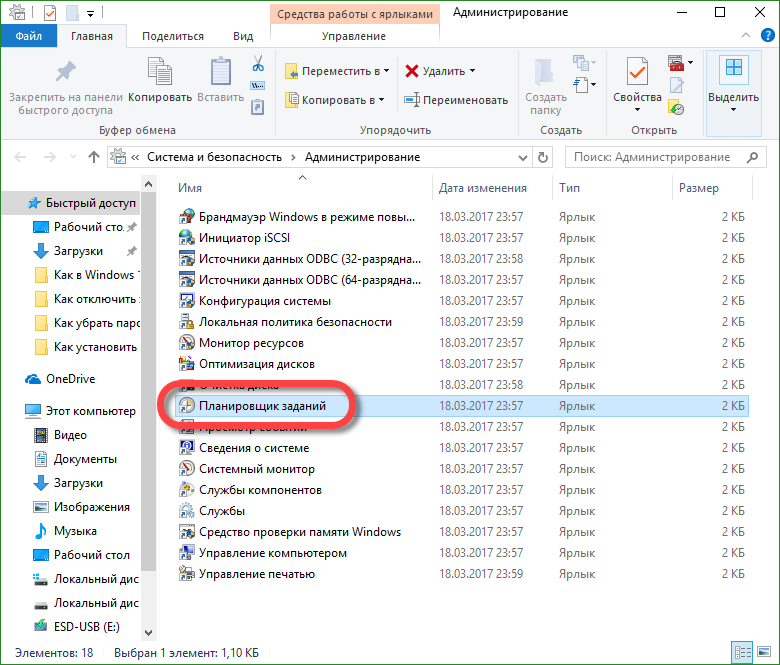
- We open the "Administration" program, registering her name in the search for "Dozens."

- Start the Task Scheduler.
- We pass along the path indicated on the left side of the scheduler. Here are the nearest events. If necessary, you can turn them off by opening the context menu.

Take care to remove programs carefully. You can easily damage the system by disabling the desired service.
We work with the speed of Windows 10
The creators of Windows took into account all the preferences in the development of the system and gave users the tools that allows you to customize the visual design of Windows and, accordingly, change the demands on resources.
We do the following:
- Right-click on the "Start" icon and select "System".
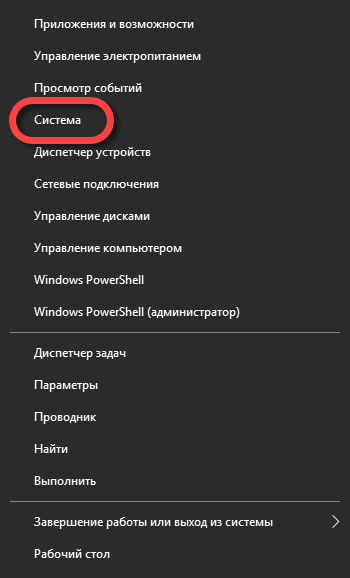
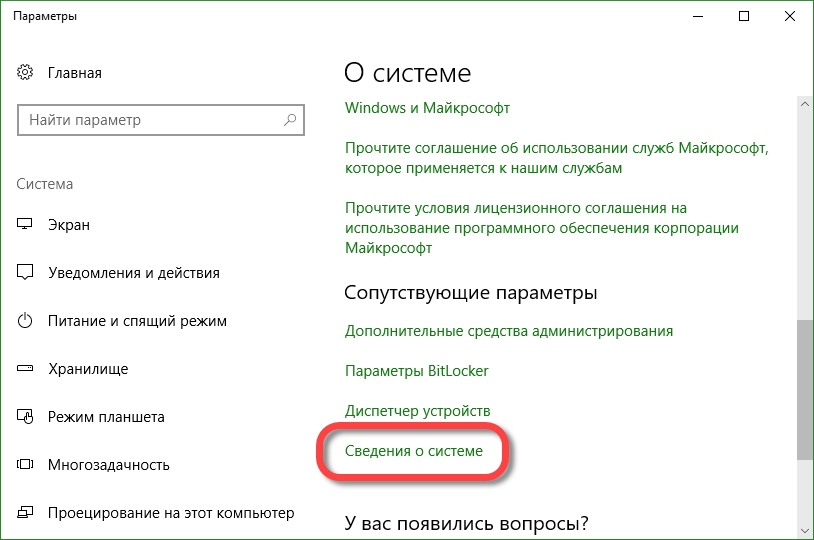
- Select the "System Information" item.
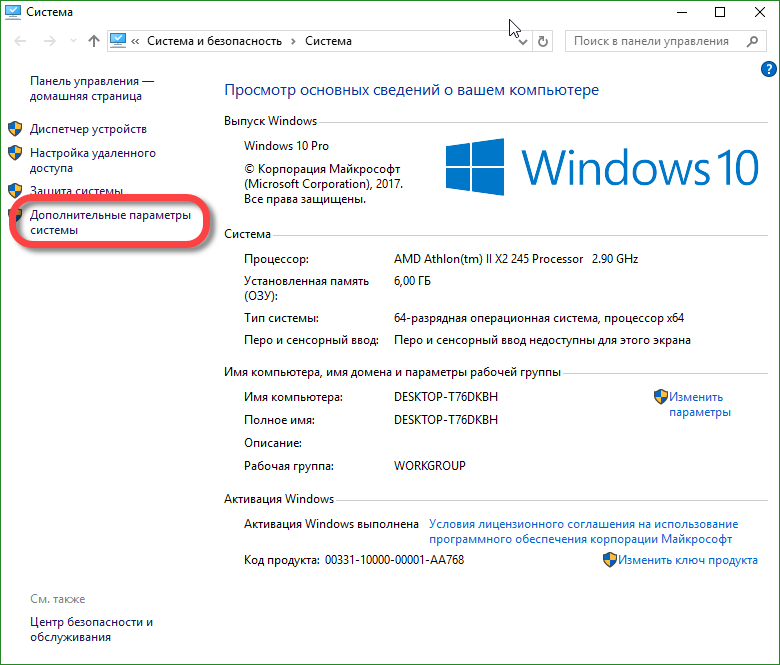
- Go to the menu "Advanced System Settings".
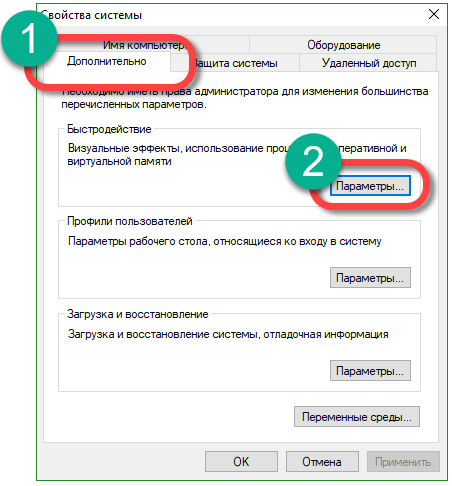
- In the "Advanced" tab, click the "Options" button.
- Next, just switch the trigger to "Ensure the best performance" and click "OK".
After that, all the animations, effects and other beautifulities will be disabled, which will significantly save the use of RAM and CPU resources.
Clean the hard drive of garbage
Performance and quantity free space on the hard disk may fall due to so-called junk files, which accumulate during the operation of the system. Optimizing Windows 10 involves removing such files and cleaning the disk. In this case, you can use both standard Windows tools and third-party software.
In "Ten" there is a tool "Disk Cleanup", which we will now try. In order to start it and start cleaning the hard drive, do the following:
- Open Windows Explorer and click on the disk you need right mouse button. In the context menu that opens, select the "Properties" item.

- In the next window press the key with the inscription: "Disk Cleanup".
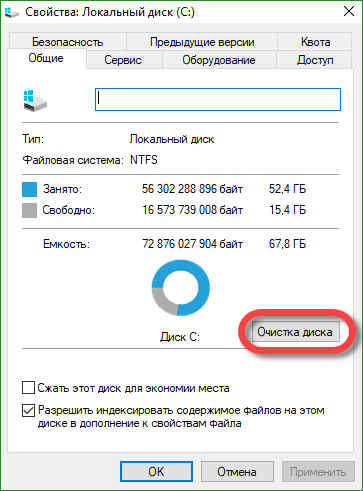
- In the next step, check the items that should be cleaned and click on "Clear system files".

After that, the cleaning process will begin. Do not forget to save all the data and close the running programs.

How to speed up Windows 10 by using the correct defragmentation
Defragmentation of magnetic carriers is an important part of increasing the speed of the system. There are several ways to do this. In the beginning it is worth noting the built-in features.
The following procedure is envisaged:
- Open the explorer and right-click on the desired disk. In the menu that opens, we need the "Properties" item.
- In the opened window, select the "Tools" tab and click "Optimize".

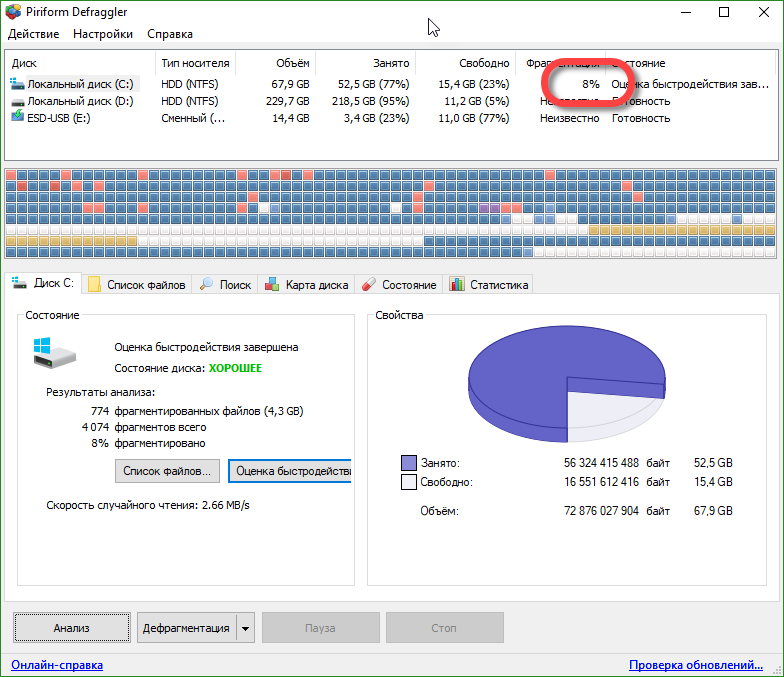
- Here you can see how fragmented the disk, in our case everything is fine, since automatic optimization works, which once a week defrags.

- To start optimization, click the "Optimize" button, and if you want to set the automatic mode, click on "Change parameters".

If, as in our case, the percentage of fragmentation is 0 - 15%, no work is needed, if more, you can optimize the disk. It is important to remember that for the utility to work you need to have as much free disk space as the most large file On him. By the time the process can take from 5 minutes to several hours. Everything depends on the degree of clutter of the carrier.
It is strictly forbidden to use the defragmenter for SSD-drives. Instead of use, you get only a dozen times more wear and tear, which in the end will lead to faster damage to the device.
Defragment using third-party programs
The built-in utility of Windows 10 is good, it has significantly stepped forward, compared to 7 and 8, however, there are better solutions in the form of third-party software.
Consider several programs that can optimize the Windows 10 hard drive and eliminate the fragmentation of its files:
- PiriformDefraggler is the "relative" of the famous CCleaner. The tool is "smarter" than the regular utility, it can analyze much more data. Also, its worth is full free. The interface is understandable and does not cause any difficulties. As you can see in the screenshot, the program found fragmentation where "Ten" assured us of zero problems.
- Auslogics Disk Defrag. Another one powerful program, similar to the previous one. The tool is distributed free of charge, and its functionality goes far beyond the scope of conventional defragmentation.
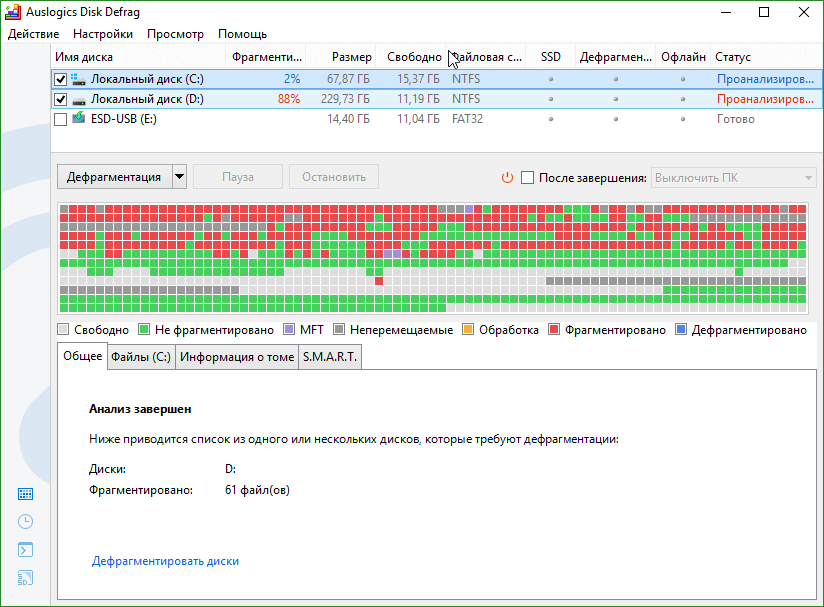
In the operating mode of the program there are several levels of defragmentation. The first, superficial, is designed for rapid scanning and correction of the main problems (you need to do it once a week). There is also an in-depth analysis, it requires much more time, to conduct it more than once a month.
Download Auslogics Disk DefragOnly one antivirus!
Without an antivirus, no computer can manage. It is important to use a quality software that can cope with most threats. But sometimes users make a gross error and install 2, or even more, antivirus software. Programs begin to scan each other, conflict and slow down the PC, sometimes the latter just hangs. For effective testing, you can use different programs, but at the same time you should install only one.
Note: Windows 10 uses built-in antivirus, the functionality of which is enough for all occasions, but if you still decide to replace it, do not worry about the conflict, Microsoft has provided everything and when you install a new defender, the built-in disconnects automatically.
Programs for improving PC performance on Windows 10
Above we considered some applications that allow you to get a performance boost in the operation of Windows 10. There are whole tool packages for fine-tuning the system and speeding up its operation. Consider two such programs.
Glary Utilites
This is one of the most famous and favorite programs for speeding up the operating system. The utility includes: cleaning discs from garbage, searching for duplicate files, searching and removing unwanted software, optimizing the operation of the disk subsystem, cleaning and defragmenting the registry, optimizing RAM and many more useful features.
A little lower there is a screenshot, which shows that the program, not having time to start, has already analyzed the download speed of our system and suggested disabling the elements that slow it down.
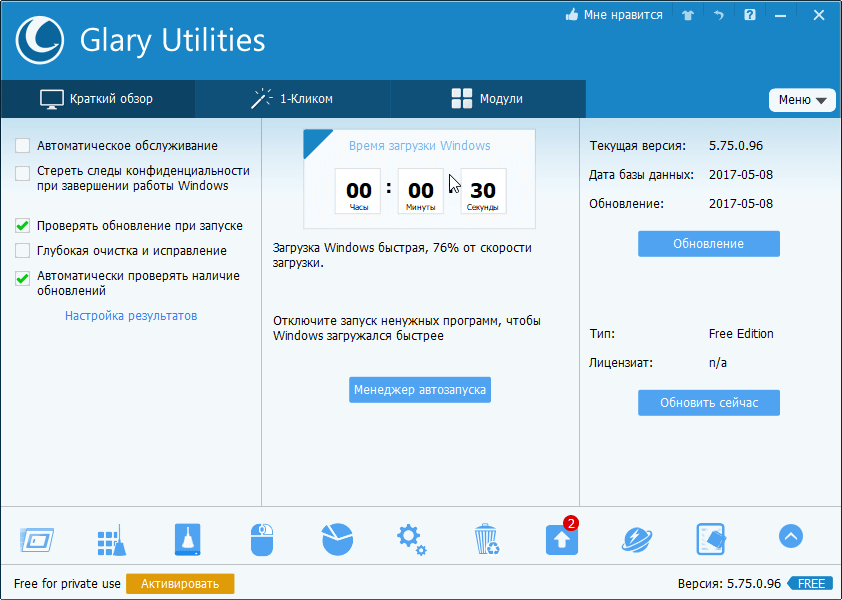
There is also a one-touch cleaning mode, you click on the button, and as a result, the program scans your PC with different tools and at different levels. The result of the cleaning is worthy of the highest praise. The simplicity of the interface, ease of operation and good performance make GloryUtilities the best choice for today.
Download Glary UtilitesAdvanced SystemCare
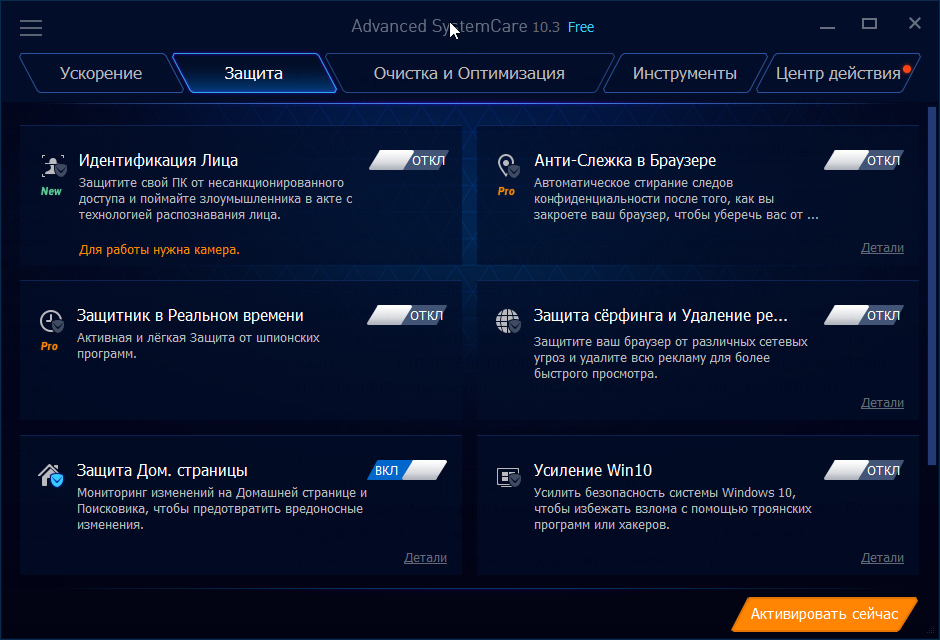
Another powerful application, or rather, a set of programs for cleaning, optimizing and securing Windows 10, is Advanced SystemCare. This software is able not only to improve PC performance, but also to answer the question - how to speed up the Internet in Windows 10. Here the emphasis is on maximum convenience and ease of operation.
Download Advanced SystemCareBut there is also functionality for advanced users. You can enable advanced mode, and you will have access to much more flexible and functional settings. The application interface is very convenient and looks great. The screenshots show the basic functionality of Advanced SystemCare.


TweakNow PowerPack
Another great package of utilities for optimizing Windows 10 or earlier versions of the operating system from Microsoft. Due to the availability of a number of fine tuning, requiring some knowledge, the program is more suitable for advanced users. Screenshots can be seen below.
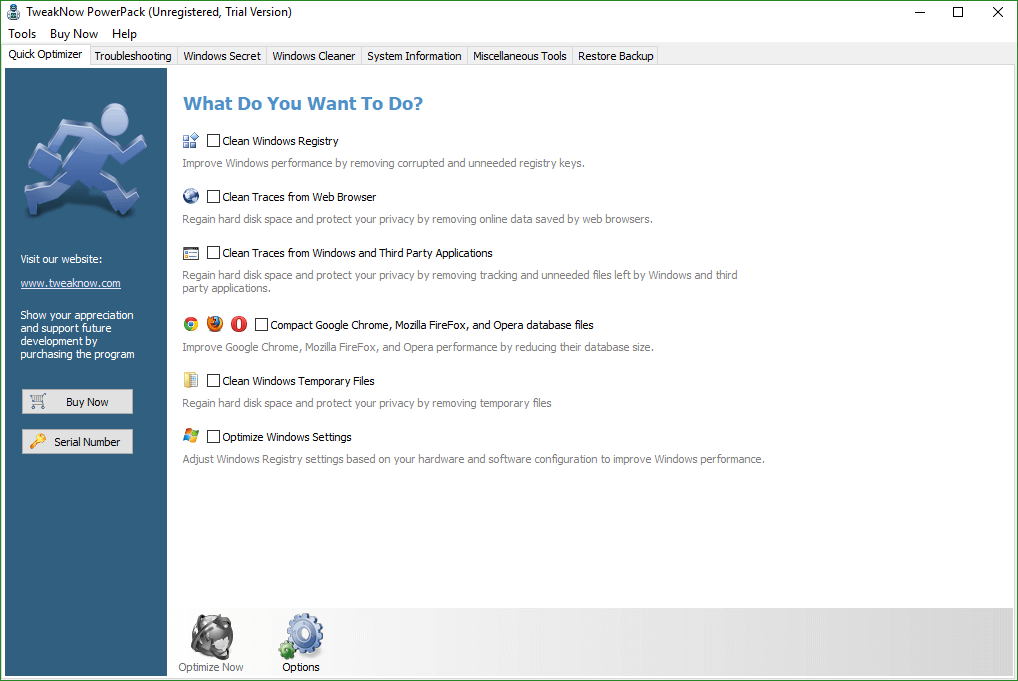
Thanks to the above instructions, you already know how to speed up the operation of a computer or laptop with Windows 10. It is not necessary to talk about the need for such a procedure, because even on modern PCs the load becomes so high that the machine starts to blunt. Only the timely implementation of all the above recommendations will allow the "Ten" to live without glitches and brakes.
Download TweakNow PowerPackOptimization videos for Windows 10
The operating system Windows 7 can work much more quickly and efficiently, but for this it is necessary to take certain measures. The main activities in terms of optimization should be considered.
Disable visual effects
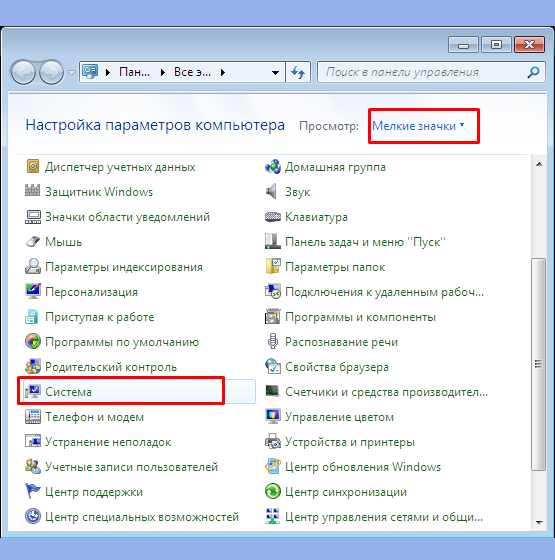
There is a very attractive design. If you want to speed up the system, you need to understand that the visual effects provide for an extra expense of resources. It is required to proceed along the specified path: Start -\u003e Control Panel -\u003e System -\u003e Advanced System Settings.
When the settings window opens, the following actions are performed: Advanced -\u003e Performance -\u003e Options
In the design, the developers have tried to simplify the optimization task as much as possible. You should only select "Ensure the best performance" and the settings will be set automatically. This greatly simplifies the implementation of the tasks. The result is a classic look. All this is presented in the screenshot below.
Not always the new appearance can suit and it requires some additional actions. You can easily choose any suitable option from the available list, taking into account the speed of the OS. You should right-click on any free area of the desktop and click "Personalization".

Aero Glass can be accelerated by turning off transparency. This implies that the translucent effect will disappear. All in the same section of personalization, you need to select the "Window Color" option, where you can uncheck the "Enable Transparency" checkbox. 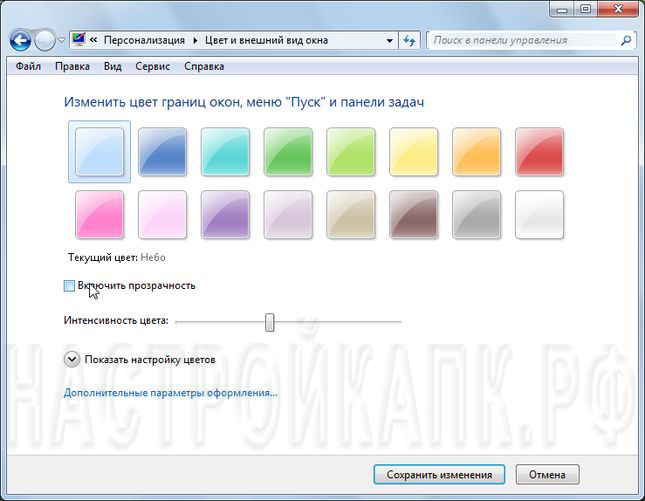
For powerful devices, this will not give any appreciable increase, but in the case of a weak video card it can provide a visible result.
Disabling unused components
During the operation of the OS, one has to deal with the situation when a large number of services are used. The difficulty lies in the fact that not all of them provide for efficiency. It is for this reason that it is important to pay attention to this factor during optimization. Disabling certain components will not harm the OS.
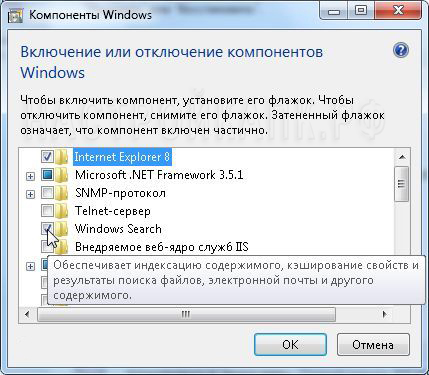
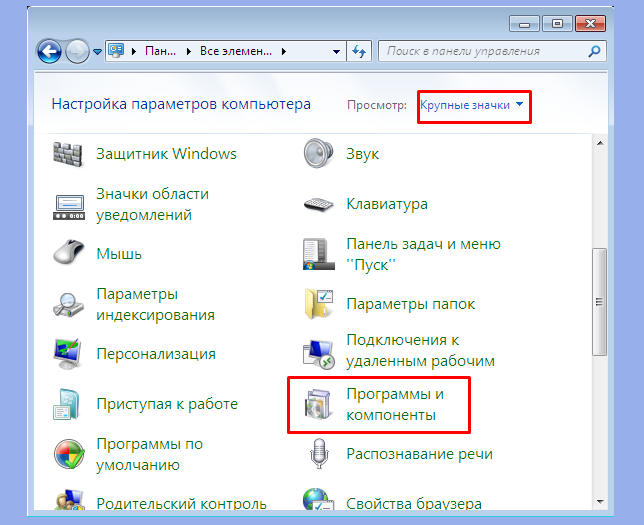
We go along the proposed path: Start -\u003e Control Panel -\u003e Programs and Components -\u003e Enable or Disable windows Components. A window with the contents displayed in the screenshot will be displayed. 
We review the list of issued components and remove the tick from those that we do not use. For more information, you should point the mouse at the item of interest.
During the shutdown of certain components, a system message of the following type will be displayed:
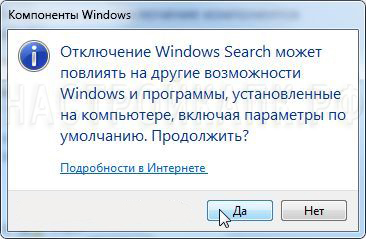
Confirm and continue the optimization activities. It is necessary to list what can be safely turned off:
- Browser by default IE, if you use other programs to access the Internet
- Telnet server
- Built-in search engine, in the case when it is not necessary
- Telnet and TFTP clients
- Tablet components personal computer, since the setting is for a laptop or stationary device
- System gadgets OS, when there is no desire to use this opportunity
- Unix software subsystem
- Microsoft Message Queuing server
- Operating System Activation Service
- Print service when the printer is not connected to the device
In order for all the changes to take effect, you must reboot the operating system.
Optimizing boot for computers with multi-core processors
If you use a multi-core processor, you can perform some activities aimed at speeding up the entire operating system. In most cases, Windows itself can determine a similar point, but the check will never be superfluous. It is required to enter msconfig through the "Run" window. 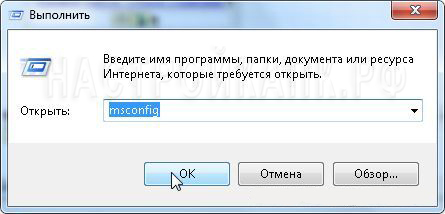
Now you should go: Download -\u003e More options 
The appeared window indicates the number of processors, as well as the amount of memory. It is necessary to make changes only when the parameters do not coincide with the real ones.
If adjustments are specified, a reboot is performed to begin the action.
Restore the Quick Launch toolbar
If you are used to older operating systems, you may be uncomfortable with missing the Quick Launch toolbar. In order to return, the following list of actions is required:
- Right-click on the icon "Toolbar"
- Panels -\u003e Create Toolbar
- A field opens where you need to register a new path
- % appdata% \\ Microsoft \\ Internet Explorer\\ Quick Launch

When you click "Select Folder", you can see Quick Launch. To return to the usual place, you need to press the left mouse button and then move to the "Start" button. You should right-click on the "Quick Launch" panel, where the "Show signatures" and "Show title" checkboxes should be removed.

After all the performed procedures, the panel will have the same appearance as in the XP predecessor OS. This is clearly shown in the screenshot below.
Disabling UAC
This innovation was in Windows 7 from Vista. We will not talk about the need for such a solution, since this is one of the most criticized elements. It is important to say that it can be turned off without a serious loss for OS security. The main thing is to use another antivirus. It is required to consider various options for action in this situation.
It is possible to make settings for the frequency of issuing notifications or to completely disable the specified process. To perform the tasks you need to go through the path: Start -\u003e Control Panel -\u003e User Accounts -\u003e Edit User Account Control settings.
However, if necessary, you can set the notification frequency or completely disable. Perform the following: Start - Control Panel - User Accounts - Change User Account Control settings
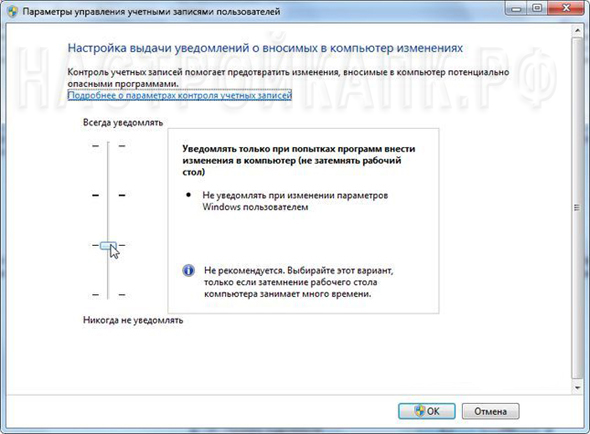
As you can see in the screenshot, there are several gradations of work. You can set the slider on the most attractive option.
Power Management System
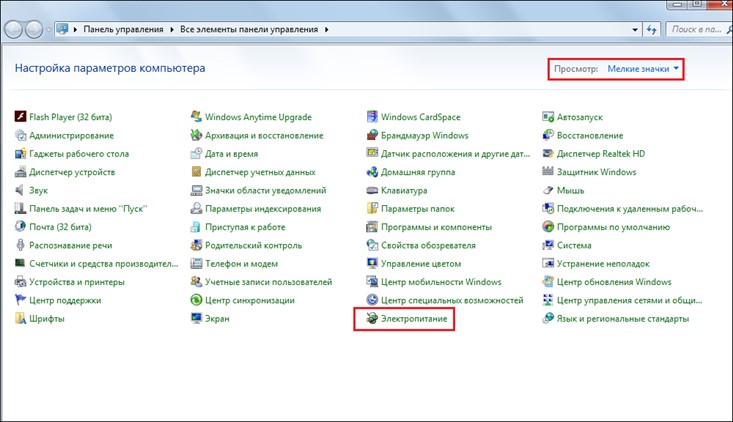
Operating system Windows 7 allows you to control the power supply within certain limits. The consumption of electrical energy by the device is set through a special section of settings. You can put the most economical or productive option, as well as choose a balanced mode. To access the corresponding window, you need to go to the path: Start -\u003e Control Panel -\u003e Power. If nothing is touched, then a balanced version is given. Below is the appearance of the settings window:
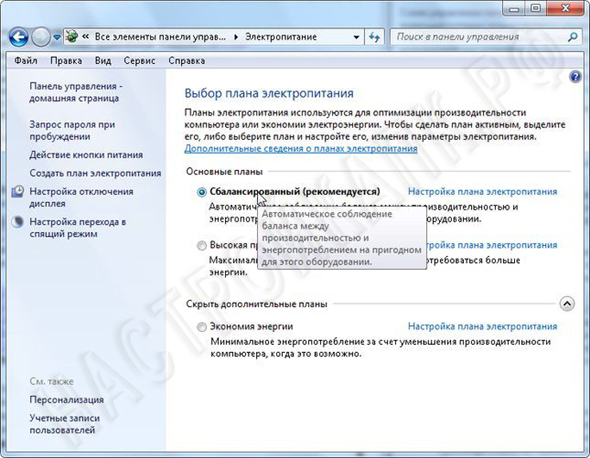
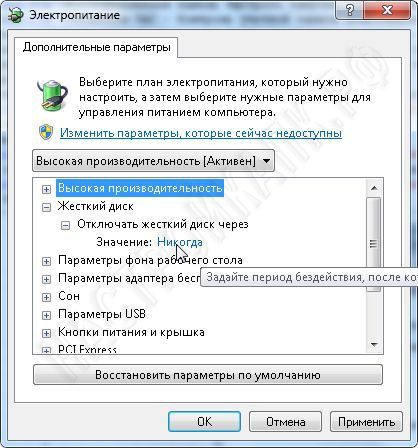
After its job, you should proceed to use additional settings. To do this, click on "Change additional power settings". 
A window will be displayed where suitable settings are selected. When they are selected, it will only be necessary to confirm this.
Optimizing the functioning of the browser
This item should be enabled if you use the default browser - Internet Explorer. To speed up the work, some measures should be taken:
1. Start -\u003e Programs -\u003e Accessories -\u003e Command line
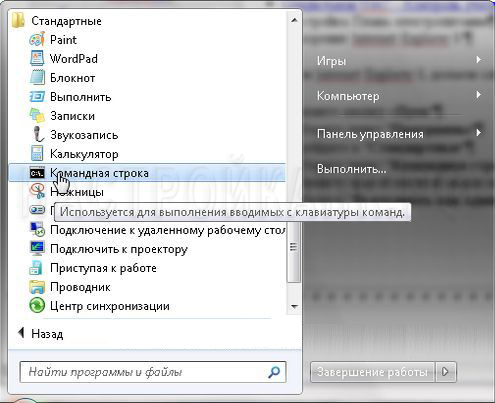
2. Right-click and select "Run as administrator"
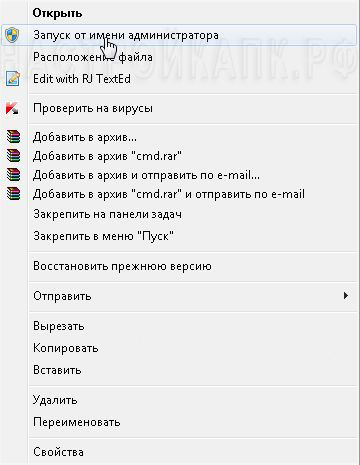
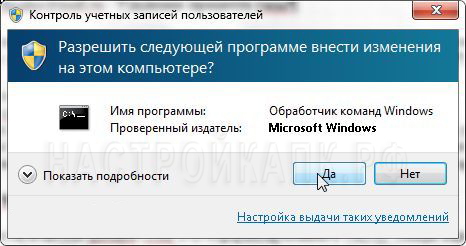
3. In some cases, a message is sent from the User Account Control. You need to confirm the launch.
4. In the displayed window command line regsvr32 actxprxy.dll is introduced 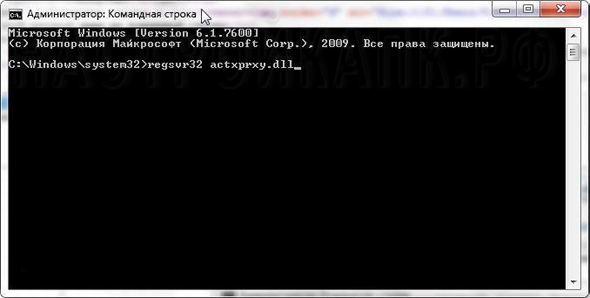
5. You must press enter. When the task is executed correctly, the following message should be output.

After that, you can start the IE browser. In the process of work, it should become much faster than before.
Accelerating animation when windows pop up
It is possible to significantly speed up the process of windows pop-up on the operating system. The following working procedure is envisaged:
- Run Registry Editor. You need to use the following Start -\u003e Run -\u003e regedit path
- A special key HKEY_CURRENT_USER \\ Control Panel \\ Mouse
- The key is opened and the MouseHoverTime parameter is detected there. For optimal system operation, it is recommended to set the value to 150.
- Now we are interested in another key. You must find HKEY_CURRENT_USER \\ Control Panel \\ Desktop. It should contain the MenuShowDelay parameter. Its value should be set to 100.
- For all changes to take effect, you must reboot the device.
Automatic logon without the need for a password
Significantly speed up the time of operation such as entering the system automatically, without the need to use an access code. For this, the following sequence of actions is envisaged:
- You should go to the Start -\u003e Run
- In the window, enter control userpasswords2 and confirm
- The corresponding menu is displayed, where we are interested in the "Users" tab. In it you need to find your account and uncheck "Require username and password".
- In the displayed window you need to confirm your access - you enter the password.
- To accept the changes, the system is rebooted.
Acceleration of device shutdown
In some cases, when you turn off the computer, this process may take several minutes. When you consider the time to complete the operation too long, you can take certain actions.
Go to Start -\u003e Run, where in the window that appears, enter regedit with further confirmation. We are interested in the key HKEY_LOCAL_MACHINE \\ SYSTEM \\ CurrentControlSet \\ Control - this is what you need to search for. Upon detection, the WaitToKillServiceTimeout parameter is changed. Its new value should be 500 or so. The default is 12000.
Delete arrows from shortcuts
It all starts with the standard Start -\u003e Run -\u003e regedit path. In HKEY_CLASSES_ROOT \\ lnkfile you need to find the IsShortCut parameter and delete it. For the arrows to return to their place, the parameter must be restored. To accept changes, the device reboots.
Hardly you can doubt that the best performance of Windows 7 is immediately after its installation. The system disk is practically newborn, there is nothing superfluous in it, therefore the system "flies". Yes, Windows 7 manufacturers tried to impress their future users, especially those who are replacing their previous system with Windows 7. At first everything is fine. The seven starts up, shows decent speed, which makes the user happy, but then she begins to upset him with her "stupidity".
Unfortunately, the developers of Windows 7, probably working on super high-speed PCs, did not think much about the set of tuning parameters responsible for system performance, in the expectation that the main mass of users will be housewives with their laptops and tablets. And not every more educated user, especially if he has problems with English, is available that information on setting the system parameters to increase its performance, which is placed on the Microsoft website. The article tries to tell users what optimization Windows 7 is possible, to introduce them to its techniques to increase the speed of the operating system and the computer in general. A complete list of functions and sections of the seven that can be configured and optimized is quite large. Let's dwell on the main ones.
Accelerate Windows 7 Startup
It is unlikely that any user will like it, if the operating system has to wait for several minutes. Although the computer boots from Windows 7 previous versions OS, many users do not mind to speed it up with some tricks.
Using multi-core
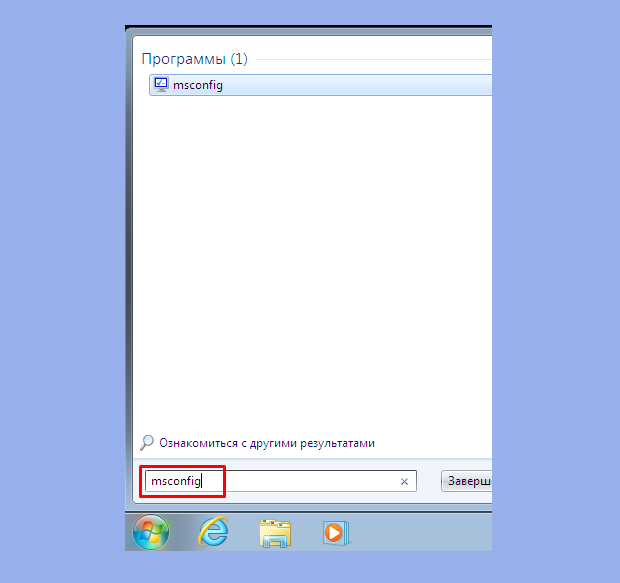
To enable multi-core support during boot, you must enter search line the word msconfig. Then you need to go through the "Download" - "Additional parameters" - "Number of processors" tab, mark it, set the value equal to the number of cores in the installed processor, and finish everything by pressing "OK".

Then you need to restart the computer and make sure the OS download speed is increasing.
Turn off apps from Auto Backup
The OS load speed also depends on the number of applications that are loaded at the same time as the Windows startup. Their list can be seen by the same command msconfig, but on the "Startup" tab:
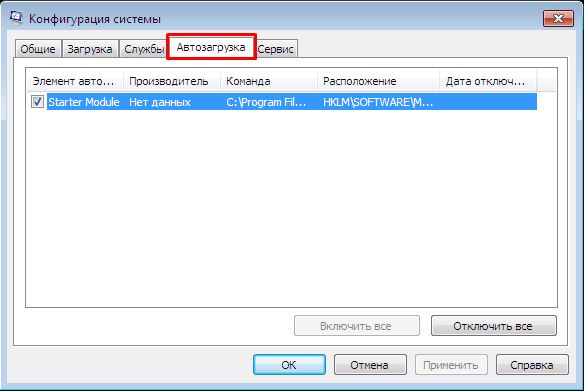
Often this list gets (unnoticed by the user) applications that do not need to be downloaded at all, but they increase the load time. To optimize Windows, you should exclude such applications by unchecking them and clicking "OK". After that you should reboot.
Accelerating PC shutdown
You can also speed up computer shutdown if you decrease the time interval for the completion of active programs. If at the same time they do not manage to finish on their own, Windows will stop them forcibly. To reduce the shutdown time, you must edit the registry. Without going into the details of this process, it should be said that in the registry you need to find the WaitToKillServiceTimeout parameter and change its value from 12000 to 2000.
Accelerating applications from the Start menu
If you do not use the classic view of this menu, then optimize it, that is, increase the speed of its work can be as follows:
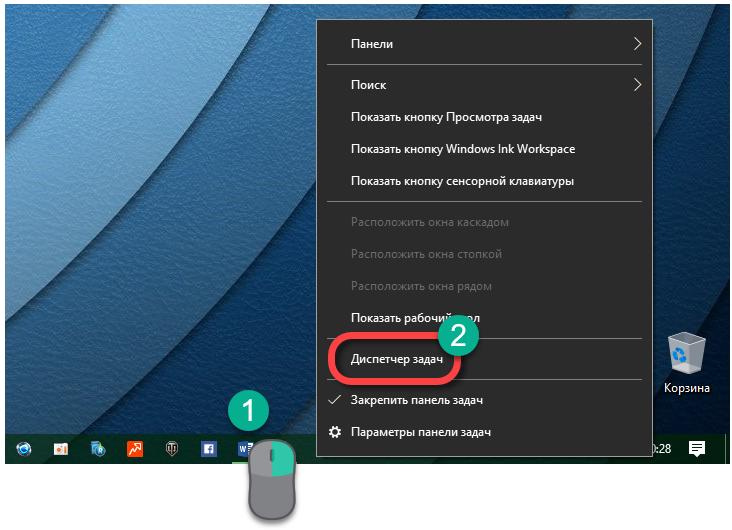
- Click RMB on the taskbar or the Start button.
- Of context menu select the sub-item "Properties".
- In properties open the "Start Menu" tab.
- On the tab, click Configure.
- Remove the checkbox from the "Select recently installed programs" item.

Accelerating graphics
In the event that the PC does not have a sufficiently powerful graphics adapter (is cheap or integrated in motherboard video adapter), the AERO interface can cause a significant decrease in the speed of the system. Optimize the graphics system in this regard by disabling some AERO functions, but without losing the main advantages of this mode. What functions of AERO can be turned off and which ones can be left, and how? And this is done like this:
- In the control panel (PU), we find the "System" section and click on the "Additional system parameters" line.
- Open "Advanced" and click on "Options".
- Open the tab of visual effects.
- We remove the jackdaw from all the parameters, except for those shown in the following figure, and click "OK".
Increase the speed of copying files
In the seven there was a new function - the so-called "remote differential compression". It is used when copying and moving files and is to calculate the differences in the source and receiver files. This is done to reduce the amount of overwritten data, but it takes additional time to calculate their differences. You can disable this function as follows:
- We select the section "Programs and components" in the PU.
- We click on the line "Turning on and off Windows components".
- In the built-in list of system components, we remove the dummy from the element "Remote Differential Compression".
Enable ReadyBoost
The developers of Windows 7 optimized the new feature - ReadyBoost. The purpose of this function is to virtual expand the RAM of the computer, through the connection of external USB-drives and Flash-cards. The OS will use them as a cache, thus speeding up read / write operations and increasing the speed of the entire system. Only it is required to include it, and for this you need:
Optimizing the registry
The computer registry files with Windows 7 are a kind of database about the configuration and settings of the OS itself and installed applications. This database, unfortunately, tends to litter and fragment over time. And since it is accessed very often, this can cause a significant decrease in the speed of the computer. Therefore, the registry should be periodically cleaned and defragmented.
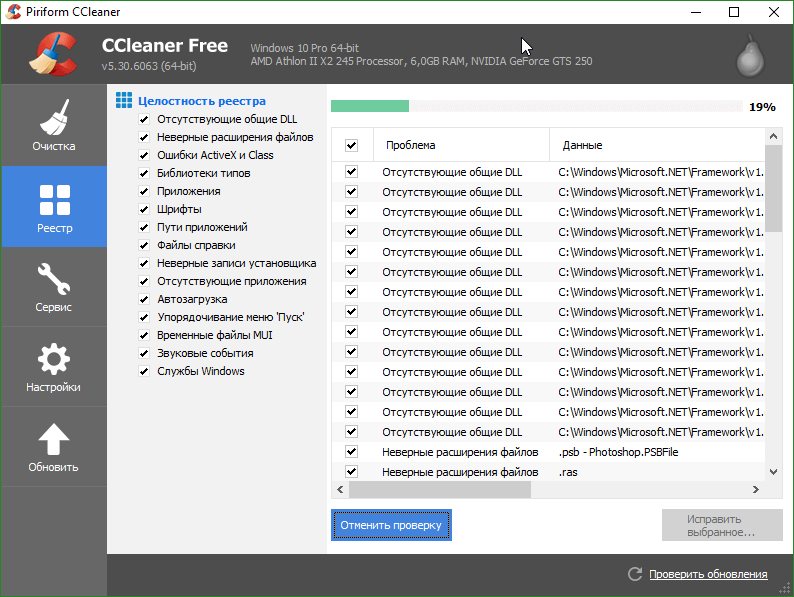
Built-in Windows tools defragmentation are not designed to work with the registry, so its optimization is usually performed using a third-party utility. As an example, the well-known to many users the CCleaner program. After you run it, select "Register" from the menu. In the window that opens, click the "Find problems" button and wait for the results of the registry status analysis. If you find any problems, then you need to click the "Fix" button.
Defragmenting hard drives
Strong fragmentation of hard drives can also cause a slowdown of the computer. This is especially true for system disk, since it is used almost constantly during the operation of the system. To defragment it, you can resort to the built-in Windows tool - the Defrag utility. To run it, you should:
- Click "Start".
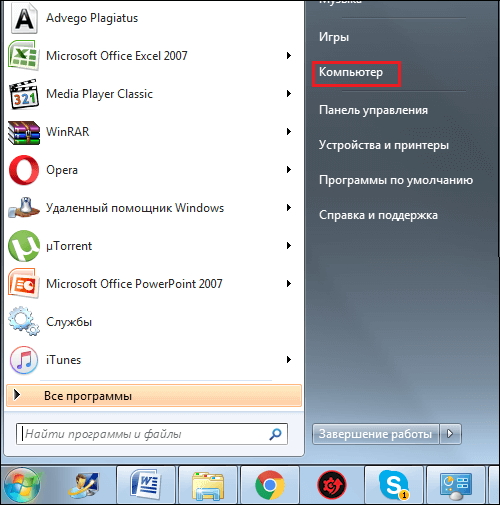
- Click on "Computer".
- In the opened window, click the PCM on the system disk and select "Properties" from the context menu.
- In the Properties window open the "Tools" tab and click the "Perform Defragmentation" button. A window appears that looks like this:

As you can see, defragmentation can be performed in two modes - according to a schedule and manually. With manual defragmentation, you first need to determine whether it is necessary to run the disk analysis. If after it is determined that the disk is heavily fragmented, then it is necessary to start its defragmentation by clicking the appropriate button.
Disabling UAC
Function UAC (Control accounts) is one of the most important means of ensuring the security of the system. You should carefully weigh the pros and cons of disabling it. And yet, many users turn it off, entirely relying on high-quality anti-virus protection. The UAC function can be disabled completely or the protection level lowered. In any case, this requires administrator rights. The level of protection is changed in this way.
As you know, Windows 7 received more significant improvements in the loading and response time of the system compared to its predecessor Windows Vista . Substantial changes were made, which allowed the system not to spend all system memory when you open a large number of Explorer windows, system services and processes are optimized.
In this article we will consider:
- optimization of start menu operation
- optimization hard work ROM in Windows 7
- optimizing the speed of copying and moving files in Windows 7
- optimization of work with windows drivers 7
- time optimization boot Windows 7
- speed up the process of viewing thumbnails of images
- acceleration completion windows Workflows 7
Please note that some of the methods considered for accelerating work Windows 7based on the disabling of any kind of tasks, simplifying or improving the functionality of the system for more convenient use. Those. in fact, you choose between convenience and performance.
Ways to Optimize Windows 7
1. Acceleration of the start menu.Definition recently established programs, as well as highlighting these newly installed programs takes the system for a while each time the start menu is opened. You can save this time.
To do this you need to go to setting up the start menu: in the properties "Taskbar and Start Menu" (to activate, go to the control panel Windows 7: Start -\u003e Control Panel). Go to the bookmark «Start Menu» and click on the button "Tune".
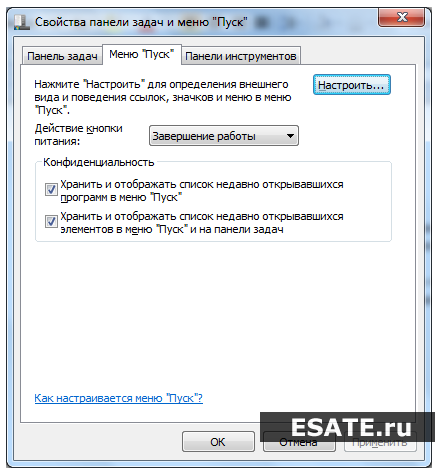 Figure 1. Setting up the Start menu
Uncheck "Highlight newly installed programs", then press "Apply".
 Figure 2. Disabling highlighting of recently installed programs
In order to reduce the pause, when the start menu window appears, go to the Registry Editor (command "Regedit" in the dialogue "Find programs and files").
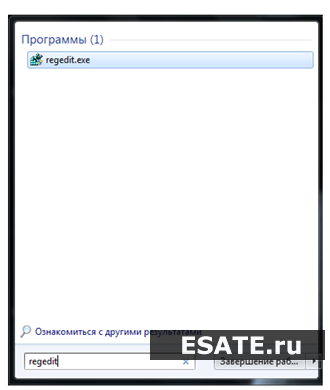 Figure 3. Run Registry Editor
After starting the Registry Editor ( regedit.exe) go to the branch HKEY_CURRENT_USER -\u003e Control Panel -\u003e Desktop (Figure 4).
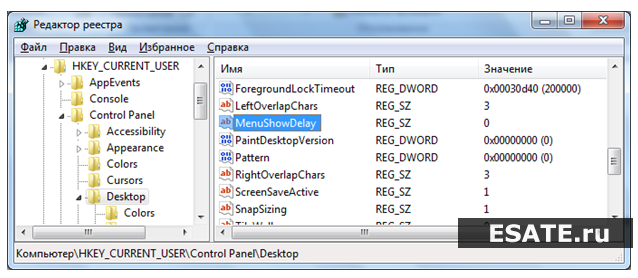 Figure 4. Select the required registry branch
Change the key value MenuShowDelay from "400" on "50". The pause will be significantly reduced.
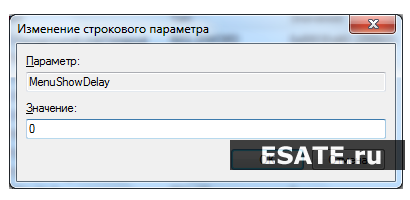 Figure 5. Changing the pause when the window is displayed
2. Optimizing the operation of the hard disk in Windows 7
This option is familiar from the times Windows XP, but if in XP it was initially included, then in Windows 7 optimization hard disks considered unnecessary and by default it is disabled. Now we will consider the method of including this option.
We go in Start -\u003e Control Panel -\u003e Device Manager -\u003e Disk Devices -\u003e (choose your hard drive) -\u003e Properties -\u003e Policy ... and put a tick in front of the item "Disable clearing the cache buffer windows Records for this device ».
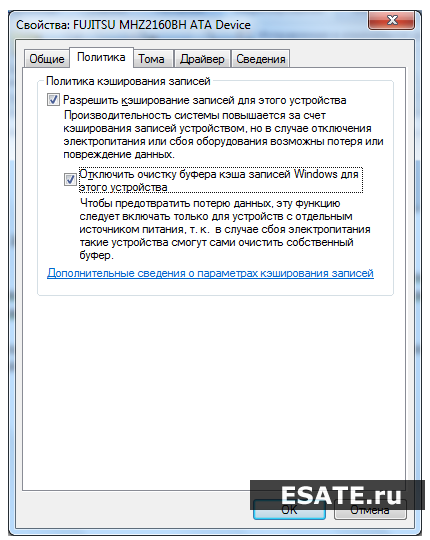 Figure 6. Disabling Windows Write Cache Buffer Clearing
Now in the same "Device Manager" open another branch - "IDE ATA / ATAPI Controllers (IDE ATA / ATAPI Controllers)", then in the properties of all channels ATA (ATA Channel 0, ATA Channel 1 etc.) in the tab "Advanced Settings" check whether the check mark is "Enable / Enable DMA (Enable DMA)".
 Figure 7. Enabling DMA mode
If there is no tick, install it.
3. Accelerate the copying and moving of files in Windows 7
Windows 7 has received one more interesting feature - remote differential compression.
On the one hand, this option calculates and transfers the difference between the two objects, minimizing the amount of data transferred, but on the other - it takes time to calculate.
You can disable this feature. To do this, go to Start -\u003e Control Panel -\u003e Programs and Features -\u003e Turn Windows Components On and Off -\u003e Remote Differential Compression (tick off).
 Figure 8. Disabling differential compression
4. Turn off the digital signature verification driver
This action can also slightly increase the speed of the system (when installing new drivers). To disable this option, Windows 7 follow these steps:
Execute in Puske gpedit.msc.
 Figure 9. Running the administration panel
Then go to the following path:
User Configuration -\u003e Administrative Templates -\u003e System -\u003e Driver Installation -\u003e Digital Signature of Device Drivers. In this window, you must select the mode "Disconnected".
 Figure 10. Disabling Digital Signature Driver Verification
5. Accelerate Windows 7 Boot
We can win a few more seconds, but this advice applies to those users who work on multi-core processors with Windows 7 as an operating system.
So, do the following:
Enter the MSCONFIG in the menu search field "Start" and press «Enter».
In the window that opens, go to the tab and click on the button «Advanced options».
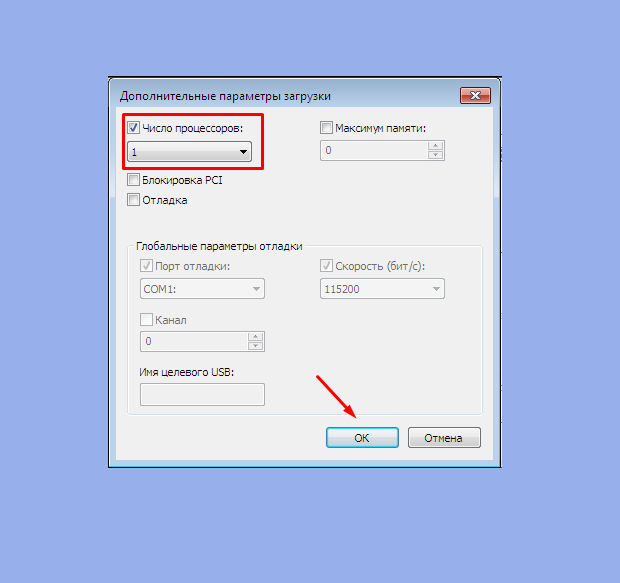
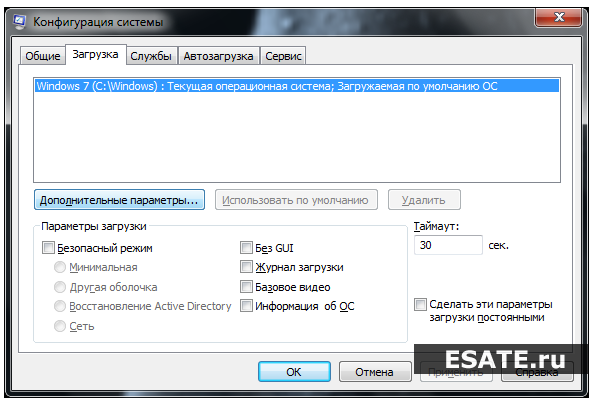 Figure 11. Additional system optimization options Check the box next to "Number of processors" and in the drop-down menu under this item, select the maximum number of your cores (2 or 4).
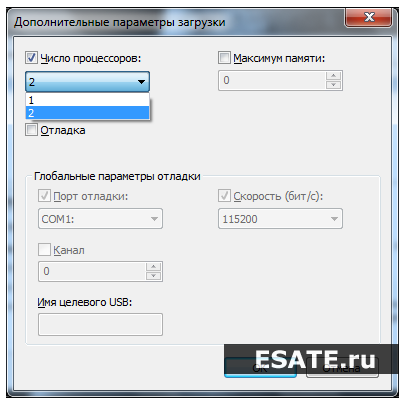 Figure 12. Setting the number of processors for systems with multithreaded processors
Click "OK" and reboot the system to see a fairly noticeable difference in download speed Windows 7.
6. Accelerate the preview of thumbnails (thumbnails).
You can increase the speed of viewing thumbnails in Windows 7. To do this, you need to do the following:
Enter the regedit (without quotes) in the menu search field "Start" and press «Enter».
Go to the branch "HKEY_CURRENT_USER -\u003e Control Panel -\u003e Mouse".
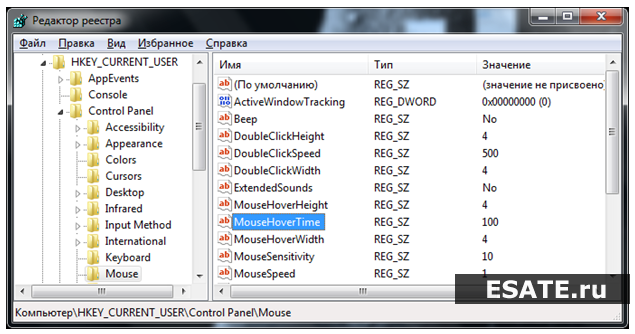 Figure 13. Selecting the desired registry branch to optimize the pause when displaying thumbnails
Double click on the parameter MouseHoverTime and change its value to 100
.
 Figure 14. Setting a new value
7. Reduce the shutdown time of Windows 7
Time for completion of work Windows 7 can be significantly reduced. However, this is a rather barbarous way: we reduce the time that is assigned to the process to terminate the program, after which the program will be completed forcibly.
Enter the regedit in the menu search field "Start" and press «Enter».
Go to the branch HKEY_LOCAL_MACHINE -\u003e System -\u003e CurrentControlSet -\u003e Control.
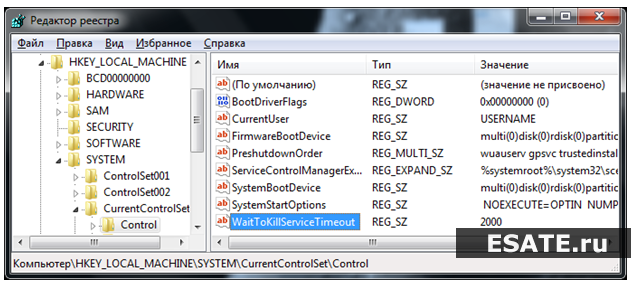
Figure 15. Select the required registry key
Change the value of the parameter "WaitToKillServiceTimeout" from the 12000
(12 seconds) at 2000
(2 seconds).
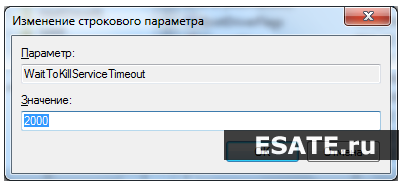 Figure 16. Changing the value.


