A hard disk in a computer and a hard disk in the “My Computer” window are different concepts. For example, a computer may have one hard disk installed, while in My Computer there may be several. The reason for such a strange discrepancy is that the hard disk can be divided into so-called partitions. This is called logical disk layout.
I will talk about why such a markup is needed, how to do it correctly (and whether it should be done at all), and also talk about free programs for such a delicate procedure.
1. Why do I need to divide the hard disk into sections
There are several reasons to divide the hard disk into sections:
- Partitions on the hard disk are primarily needed for competent storage of information. For example, some users prefer the following division: the operating system and programs on the same disk (usually this C), documents - on the second ( D), archive of photos on the third ( E) and so on. In this case, the hard drive may well be one.
- If you have one hard drive, but you want to have two or more operating systems, you will have to divide the hard drive into partitions, since Windows and other operating systems can be installed only on different partitions or hard drives.
- Laptop makers (and some well-known computer manufacturers such as Acer) have their own reason for dividing sections hard drive: on a partition that is visible as a disk C, installed Windows, the second ( D) is absolutely empty, and the third (which is not visible in the “My Computer” window) keeps a compressed copy of the section C. This hidden hard disk partition is called recovery partition. If something happens to the operating system (“Windows has flown” - as some users like to say), then when you turn on the laptop, just press the key combination (see the instructions for the laptop) and a special program will clear the disk C, then unpacks the contents of the hidden section. As a result, the user will receive a laptop with programs that were on it initially, at the time of purchase in the store. Disk D it will not be changed. The conclusion suggests itself: if on a laptop with such a recovery system all documents are stored not on drive C, but only on D, it will be possible at any time to restore damaged Windows to a new one, without losing important data for yourself. By the way, any advanced user can make such a recovery system for himself, but I will tell you about it some other time.
- Operating theaters windows systems 7 and Windows 8, when installed on a clean, “unshared” hard disk, create a hidden partition of 100–350 megabytes in size. In this small section is stored bootloader, designed, oddly enough, to boot Windows. There will be no this section or its contents will be damaged - and the computer will not start the operating system by displaying “Boot fail”, “Cannot find boot device”, “Boot error” on the black screen, or a similar one, the meaning of which is not found. boot disk with the operating system. In fact, the bootloader can be stored on disk. C:and / or hidden hard sectors disk (outside partitions), but the developers decided to use a separate hidden partition in Windows 7/8 to somehow protect the bootloader from damage by other programs, viruses or the user.
- There are other reasons for partitioning a hard disk. For example, for correct operation of the GNU / Linux operating systems, several sections should be created, but this is the topic of a separate article; we will not discuss them here.
So, the main reasons for partitioning a hard disk are:for the convenience of storing information, for installing multiple operating systems, for the operation of the recovery system, for storing the Windows 7/8 bootloader.
2. A bit of theory: file systems, partition types
Information about partitions (i.e., logical disks) is stored in a “partition table”. Each logical drive can have its own file system. You can read more about all this in the Wikipedia articles: Disk partition, Logical disk, File system. A novice user just need to know the very minimum:
- If you divide a hard disk into logical drives (partitions), disk capacity will not increase - free place to take just nowhere! You can create partitions of any size, but in total they cannot be larger than the size of a real hard disk. Here is less - please. Then you will get unallocated free space, not visible in My Computer, from which you can get one or more new partitions. This is a question I often get from newbies, so I place it in the first place.
- Exist primary (main) and advanced (optional) sections. There can be no more than four main partitions on one hard disk (why so - by the links above), so they invented an extended partition - this is the primary partition, which can include as many partitions as you like. As a result, thanks to the extended partition, there can be any number of partitions on the hard disk - tens, hundreds.
- Each partition can have its own file system. At the moment, only NTFS can be used to install Windows Vista, 7 and 8, and outdated Windows XP can be installed on FAT32 discs. However, I do not recommend doing so, as this imposes too many restrictions. Do all partitions in NTFS - everything will work as it should.
- Any hard drive must be partitioned one way or another. In one or more logical drives - you decide. When buying a hard drive is usually already marked up in one section - the manufacturer decided. If you are satisfied with this way of organizing information - do not touch.
- It is very undesirable to partition the disk in laptops - most of them have hidden recovery partitions that can be damaged (see paragraph 3 of the previous chapter).
- If you bought a 2 terabyte hard drive and “only” 1.86 terabytes (1860 gigabytes) in My Computer, then do not rush to run back to the store. The thing is, according to the volume of manufacturers and Windows. Read more about this in the Wikipedia Hard Drive article. The larger the size of the hard drive, the more clearly it can be seen that the real gigabytes are smaller.
- Sections can delete, create, shift (change their physical position on the disk), resize, format, convert file systems on partitions from one to another. And many programs are able to do this with the preservation of all data. There are other operations, but novice users most often need the above.
- In the event of an error in the process of changing sections (see clause 7), information is almost always lost. Yes, it can be restored (or part of it) with special programs with the participation of specialists, but it is best to save all important information in advance to other disks (not logical, but real disks) or flash drives in order not to pay money for data recovery.
3. "Disk Management" in Windows
Windows has a standard partitioning tool - “ Disk Management". Depending on the windows version, the capabilities of this program vary slightly, but in general over the past years (if we talk about Windows Vista, 7, 8), there have been no major changes. Windows XP looks more modest in this respect - apart from formatting and changing the drive letter, there is little that can be done.
As an example, take " Disk Management"Windows 7. You can open this program in several ways:
- The simplest - right-click on the line Computer on the menu Start - choose item Control - in the new window choose Disk Management.
- Open up Control Panel – Administration – Computer management – Disk Management.
- Push Start – Run (or the key combination Win + R) - enter in the window that opens diskmgmt.msc - click OK.
Disk Managementlooks like that:
Here you can see both physical disks (including DVD drives, flash drives and other devices for storing information), and logical, i.e. virtual - hidden partition boot loader Windows 7 drives C and D. On your computer, the number of disks may be different.
Basic actions are available by right-clicking on the desired section:
Disk Management - context menuThe list of actions is rather meager:
- Items Open, Conductor allow you to see the contents of the disks
- Make the partition active - indicate on which disk (partition) is the bootloader. In Windows 7 and 8, this is a system-reserved partition. It is impossible to make another partition active - the operating system will stop loading.
- Change drive letter or drive path - you can change the drive letter displayed in the Computer window or display it as a folder. Yes, partitions can be displayed not only as disks, but also as folders on any disk.
- Format - about this you can read in the article Formatting Wikipedia. Item opens a window with which you can run high-level formatting.
- Expand tom - If there is space on the hard disk that is not marked as a partition, then you can expand the size of the partition with this free space.
- Compress tom - This item allows you to reduce the size of the partition. The result will be the formation of unpartitioned space, which can be put into action - to expand the volume of another section (see the previous paragraph).
- Delete volume - delete section. Do not click on the item without thoroughly considering the consequences. If you delete a section, then the information on it will be possible to save only with the help of special programs, and even then not always.
- Properties - A property window will open with information about the selected disk (partition).
Of course, this is not a complete list of possibilities. Disk management. You can create dynamic disks, for example. However, novice users do not need this article is designed just for them.
So, to create, delete, resize partitions through Disk Management, we need only three menu items: Expand Volume, Compress Volume, Delete Volume.
All operations take place in real time, i.e. after pressing the desired item and an affirmative answer to the question - whether we want to do it - the actual action takes place.
Do not forget that there is a risk of failure, because of which we can lose both one section and all. This applies primarily to computers with a large number of unnecessary programs - each of them may be responsible for deleting all data. Moreover, the script when you need to change the partition from which Windows is running (usually it is a disk C), is the worst - most often users have problems when trying to change the system partition.
To minimize the risk of failure, There are three methods:
- Insert the hard drive into another computer and change partitions from it by running Disk Management or any other program to change sections. Due to the fact that Windows will be launched from another disk, no programs will crawl onto a foreign disk, interfering with the responsible operation.
- Booting from the Live CD disk - the operating system and programs will not be run from the hard disk, but from a CD or DVD, flash drives - again, nothing will prevent the partition from changing.
- Use a program that can work in Native mode to change partitions. For example, check disk C always works in this mode - black window with white text before loading the desktop. In this mode, running a minimum of programs, the risk of failure is minimal.
The third option is the easiest, because the user doesn't need to do anything at all - just restart the computer and wait a few minutes. This can the following two programs review.
Free for home use program to change the hard disk partitions.
It can do everything a novice user needs: delete, create, resize partitions, copy both partitions and entire hard drives. It has a tool for recovering deleted partitions - useful for those who have unintentionally deleted a partition and want to return it from non-existence. The program has only one minus - it is on english language, Russian is not expected.
At startup, a window appears asking you to read the help. If you know English - I recommend reading. No - well, uncheck Show at startupso that it no longer appears on the eyes, then click on Go to main screen. The main program window will open:
By clicking on the section (it does not matter - in the list above, on the image below), you can see the menu (both pop-up and on the panel on the left) with all the required actions:
Resize / Move partition - resize the partition and / or shift its physical position on the disk. By the way, the official site says that EaseUS Partition Master Home version (free) does not support changing partitions. It is not so - everything works great.
Copy partition - copy the partition to another disk with all the information available on it.
Merge partitions - Merge two or more sections. Conveniently, if you need to save information on your hard drive, but reduce the number of partitions. Convert to logical / primary - conversion to a logical (extended) / primary (primary) partition.
Change label - change the disc label.
Change drive letter - change the drive letter.
Defragment - launch standard program Windows to defragment the disk.
Check partition - check disk for errors using again the standard windows programs.
Hide partition - make the section not visible in the “Computer” window.
Delete partition - delete section.
Format partition - section formatting.
Wipe partition - clear the contents of the section. All folders and files will be deleted, the section will remain. Information deleted in this way will not be recoverable.
Explore partition - see the contents of the section.
View properties- see how much space is taken on the partition, what file system it has and find out other technical information.
The list of actions changes depending on where to click. In the screenshot above, I clicked on a non-system section. Clicking on the system partition (where Windows is running), there will be no points for deleting, hiding, cleaning. If you click on the icon physical diskThe list of actions will be completely different:
I will list the points:
Copy disk - copy the contents of the entire disk: partitions, information in them. For this you need a second disk of the same or greater volume.
Upgrade disk - the function is primarily needed for windows Transfer on a new hard drive larger. There is a copying and increasing the size of the partition in proportion to the size of the new hard disk.
Delete all partitions - delete all sections.
Wipe disk - the same as the previous item, only with special removal algorithms, due to which it will be impossible to recover information.
Surface test - check the surface of the disk (physical). Allows to detect bad sectors (so-called "bedy", "bad blocks").
View properties - display information about the disk.
Yes, knowledge of English is clearly required here, especially considering that almost every item brings up a window with settings for the action being performed. After you make the necessary manipulations, you need to apply the changes by pressing the button Apply(Apply):
Only then will the partition change begin. This process can take some time - from a couple of minutes to several hours.
Depending on whether the system partition is affected or not, operations are performed either immediately in the window, or a computer needs to be restarted and the partition is started up in Native mode:
The program has a lot of functions, do not list everything. I recommend to familiarize with help to EaseUS Partition Master. It is in English, unfortunately, but you can use Google translator. The translation is quite understandable.
Pros of EaseUS Partition Master Home Edition:
- A lot of features.
- All actions are “virtual” before clicking the Apply button. This means that you can cancel operations to this “point of no return” and try to do something else with partitions. Or not to do at all, if you change your mind.
- It works stably and predictably. For example, in the testing process during the change of sections, I started copying files to the section that needs to be changed. Bottom line - a window appeared stating that the partition could not be blocked, all operations were interrupted, the data did not disappear.
- The program is free for home use.
Cons EaseUS Partition Master Home Edition:
- The interface is only in English.
- There are probably too many opportunities - this can confuse newbies.
- A serious failure during the operation process will lead to serious consequences.
- For example, if you turn off the computer at the time the partition is changed, the data from the partition will disappear. However, this is a minus of absolutely all programs for changing sections.
Conclusion:the program is good. It is possible and necessary to use, there is no alternative among free programs.
5. Paragon Partition Manager 11 Free
Free program to change sections from a company based in Russia. Unfortunately, the program is in English. What made the developers take such a step is unclear. And the paid version of the program is Russian.
The main window of the program is no different from the window of the hero of the previous review, except that the buttons have changed their order:
Special mention deserves Express mode(Simplified mode). By clicking on this button, we get a window with a list of the most frequent actions:
One could say that this is the ideal mode for beginners, if not for one “but”: everything is in English. And I had a suspicion that English was somehow wrong, as if the person was translating not the person, but the car.
Pros of Paragon Partition Manager 11 Free:
- Many windows have a clear enough view to understand the functions.
- Some operations are carried out immediately in the program window, part (if required) in Native mode. That is, the program does everything to reduce the chance of data loss.
- The program is free to use at home.
Cons Paragon Partition Manager 11 Free:
- English-language, and due to the strange construction of phrases is rather difficult to perceive.
- The simplified mode Express Mode works exactly the opposite: first, the descriptions of operations and the operations themselves have more technical subtleties than is required; secondly, this mode is very capricious and does not really work, giving out meaningless errors.
- The program is too slow. For example, it took me about 5 minutes to remove a 38 GB hard drive partition — long enough for such a simple operation.
Conclusion:the program works, but somehow unpredictable. I do not recommend using this program, since there is an alternative in the form of EaseUS Partition Master Home.
6. Changing partitions during the installation of Windows Vista, 7, 8
This tool also deserves a mention.
Take any installation disk With Windows Vista, Windows 7 or Windows 8, we start the installation of the disk, we reach the selection of the partition and click Disk tuning:
It seems that everything is simple: you must click on the section in the list, then the action button. Unfortunately, there is little action here: delete, format, create a partition and expand.
You can, for example, delete a partition and, at the expense of the free space, increase the size of another partition or sections (by selecting the necessary partitions, you must click the Delete and Expand buttons in turn).
Alas, a very popular operation - reducing the size of partitions - is not here. You can delete a partition, then re-create a new one with a smaller partition, but, unfortunately, we will lose the data.
All operations take place in real time, i.e. after pressing the button, the action takes place.
Total:editing partitions during the installation of Windows is an extremely primitive tool. It works, but performs only a limited list of actions, among which the only one that saves data is an increase (expansion) of the partition size. If you need to install Windows and do not need to save data to partitions, then the tool is useful.
If you accidentally delete a partition during the installation of Windows or through any program, do not despair - the partition recovery function is in EaseUS Partition Master Home Edition.
In order to recover a deleted hard disk partition, do not touch sections, immediately boot into Windows (or insert the hard drive into another computer if you delete the system partition and windows boot impossible), then run the aforementioned program, click on the line with the word Unallocated (“Unallocated”), then click Partition recovery.
The rest, as they say, is a matter of technology - the action wizard will tell you where to click, where to put the checkmarks, then restore your deleted disk.
8. Tip 2: Installing two or more Windows operating systems on one hard disk
All that is needed is several sections. If the hard disk already has a second partition, which is visible in the " Computer"- make sure that there free space at least 20 GB (more - better), then during the installation of Windows, simply specify this second (third, fourth, etc.) disk. After installation, you can select Windows using the menu that appears when the computer is turned on.
If you have one disk ( C), I propose the simplest option: Through Disk Management first give section WITH the team Compressby reducing by at least 20 gigabytes (or better, more, because besides Windows you will also install programs):
Specify 20 thousand megabytes (this is about 20 gigabytes). And better is more.After pressing a button Compress disk size Cdecreases, unallocated (free) space appears in the partition map:
Then, run windows installation. We put, during the installation, we indicate what needs to be installed in the free space:
After installation you will have two operating systems. You can make more unallocated spaces or empty disks, specify them for installation.
Thanks to the reader Vladimir, that raised this topic.
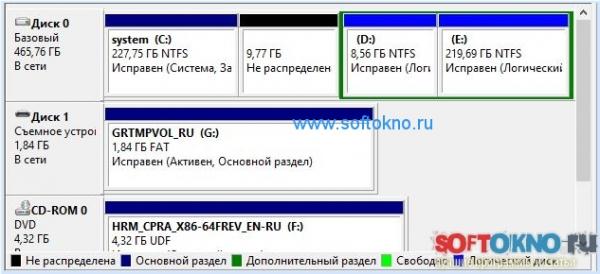
You may have noticed that in the screenshots of the Disk Management window all partitions are marked with a blue bar. You may have sections with green stripes. What is the difference between blue and green sections?
The green bar in Disk Management is a sign of an extended (additional) section. As I already wrote above, inside there can be “nested” sections, which from the user's point of view are no different from the main (primary) ones. The nested partitions have one feature - if you reduce their size, then due to the appeared free space it will not be possible to simply expand the main partition. You must first compress the extended partition itself (which stores the free space and reduced partition) so that free space is formed outside of any partitions, only then you can expand the disks.
Standard Disk Management does not know how to work normally with extended disks, so if you see green labels instead of blue, it’s better to use the free programs above - they will reduce the extended partitions, move the free space to the right place and expand the primary disk.
The hard drive is designed to keep constantly the information used when working with a computer. They are also called winchesters or hard drives. The abbreviation HDD also stands for hard disk in computer terminology. Hard disk is one of the fastest devices for recording and reading information, not counting the RAM.
Most often, the hard disk is not comfortable to use as a single storage of information, so the majority of PC and laptop users for hard disk partitioning.

Hard Disk Partition Concept
A partition (often defined as a volume) is an area of the hard disk that can be formatted for a specific file system. A partition or volume is designated by a letter of the Latin alphabet, for example, F, E, H, Z, or other letters that are not currently used on this hard drive.
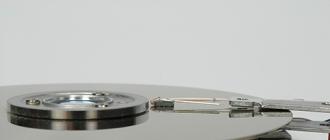
View of computer hard drive
Types of hard disk partitions
Specialists in modern computer terminology related to hard disk partitions distinguish three main types of volumes on a hard disk:
- Primary (Primary partition);
- Extended (Extended partition);
- Logical (Logical partition).
The primary partition of the hard disk usually stores user data, programs, and operating system files. There can be more than one primary partition on a hard disk, but there can be no more than four of them. It is impossible to install more than one operating system in one primary hard drive volume, so if you want to use multiple OSes on one PC, split the hard disk into several partitions. And since there cannot be more than four primary partitions on one hard drive, then the installed OS cannot be more than four either.
During each computer session, only one primary partition is active, the one from which the operating system was loaded. Many operating systems have the ability to boot only from the active volume on the hard disk.
Extended partition combines logical disks, which are also called logical partitions. Create a logical drive in the extended section can be a huge amount. They can be stored various information, such as user data, applications, programs, personal photos, videos and documents, even operating system files that can be downloaded not only from the primary partition.
Logical partitions are almost indistinguishable from the extended partitions. Any logical drive is simply an area of an extended partition.
Computer hard drive
Partitioning a hard disk
Many owners of laptops and personal computers think about the problem of partitioning a hard disk after purchase. The essence of this breakdown is to divide the computer's hard drive into two or more sections. In most cases, create a local drive C containing the operating system and system folders, as well as the local D drive, which mainly stores your favorite movies, music, photos, text documents etc. But for storing personal data not one, but several local disks can be used and can be called any letters of the Latin alphabet.
Hard disk division only takes place formally.
The benefits of partitioning the hard drive
Breaking the hard drive into several sections has many advantages. For example, the most weighty advantage of this procedure is that personal files, such as videotapes, photos and documents, will be stored on a separate disk. Because if there is a need to reinstall the operating system, and formatting the disk with the OS is simply inevitable in this case, then all your personal files and folders will be saved.
There is, of course, another solution to this problem. Before reinstalling the operating system, move all the important data to removable media, but this exercise is rather laborious, especially if the amount of information that needs to be stored is in the tens or even hundreds of gigabytes. And when a situation arises when an emergency reinstallation of the operating system is necessary, access to personal files stored on a shared local disk with the OS is no longer possible, important information will simply be lost.
It looks like a computer hard drive when you buy in the store
Storing system and personal files in different sections of the hard disk will be more convenient. It will be easier to find the information you are interested in, since each section will be less cluttered and you will easily find the necessary files or folders. In addition, the obvious advantage hard breakdown disk partitioning is that operating system it is easier to work with a less loaded partition, that is, the speed of the OS increases significantly.
Another advantage of partitioning a hard disk is the ability to use multiple operating systems on one computer. For example, Windows 7 and Windows 8 or Windows XP can be installed on the same hard disk, but for this the hard drive must be partitioned. In the event of a failure in one of the operating systems, you will have another operating system installed and ready to work.
To summarize it is worth highlighting the main advantages of partitioning a hard disk. So, the advantages of such a procedure include:
- ensuring the security of personal data even in case of failures in the OS;
- high efficiency of the organization of information stored on the hard disk;
- increase in operating speed of the OS due to the smaller section load;
- the ability to install and use on a computer multiple operating systems.
A hard disk is a very complex device that provides quick access to stored information.
The division of the hard disk into sections built-in means of Windows
Since we found out the main reasons for which the hard disk is being divided into sections, we got acquainted with the main advantages that this decision has in consequence, we should consider in detail how to perform the hard disk partitioning into local drives. Moreover, the algorithm for performing this procedure will be described in relation to the most popular operating systems - Windows 7, 8 and 10.
Hard disk partitioning in Windows 7
If the operating system Windows 7 is installed on your computer or laptop, then to divide the hard disk into sections, follow these steps:
Step 1. On the “Computer” icon on the desktop or in the “Start” panel, right-click on the icon and open the context menu and click “Manage”.
Right-click on the Computer icon.
Step 2. In the window that opens, select the Disk Management utility in the menu. After that, you have to wait for a few seconds until the window opens with the structure of the hard drive.
Select the item Disk Management
Hard disk partitions
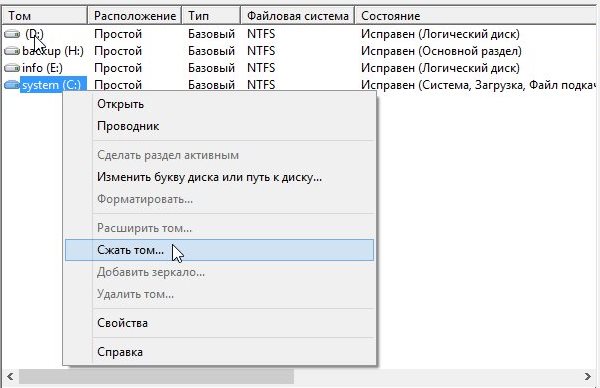
Step 3. To partition a hard disk, you need to select a volume that has enough large space, but it should be remembered that, if possible, it is better not to compress the system partition. On the selected volume, right-click and context menu select item “Compress tom”. A small window will open and you will need to wait some more time.
Select Compress Disk and wait a few seconds.
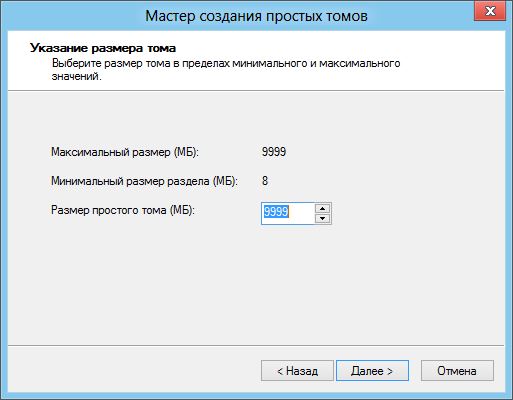
Step 4. System offer available compression options. The maximum values will be indicated, but it is not recommended to use them, therefore reduce a little to the size required for you. This will be the size of the future. logical drive. Enter the required values in the boxes and click on the "Compress" button. Then we wait again until the compression process is complete.
Maximum Values for Volume Compression
Step 5. Upon completion of the process in the "Disk Management" window will appear new section. On top of it will be visible a black bar and the words "Not distributed." To convert it into a hard disk volume, click the right mouse button, then the "Create a simple volume" item.
Unallocated hard disk space
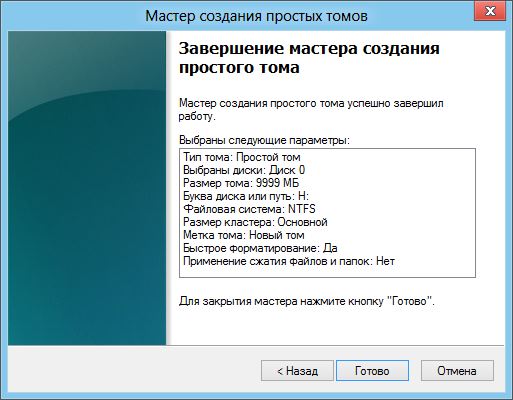
Completing the Simple Volume Creation Wizard
Step 10. And the new hard disk partition is ready!
Ready new section
So without the use of additional software, you can easily and easily partition the hard drive on a computer or laptop with the Windows 7 operating system installed.
Hard disk partitioning in Windows 8
Owners of the Windows 8 operating system can also partition the hard disk into partitions using the Disk Management utility, but to open this window, you need to simultaneously hold two Windows + R keys. As a result, the Run window will appear, command line you need to enter "diskmgmt.msc" only without quotes and press the Enter button on the computer keyboard.
Next, the “Management” window will open the same as in the operating system discussed earlier. In order to create a new partition on your hard drive, you need to consistently perform the same steps as in the algorithm described in Windows 7. That is, you do all the manipulations described in steps 2-10.
Hard disk partitioning in Windows 10
Winchester on computers and laptops with the installed Windows 10 operating system can be divided into sections using the same built-in utility "Disk Management". You can open this utility in Windows 10 by opening the “Start” menu. We type "Control Panel", click on it with the left mouse button and select the item "System and Security".
Search Control Panel in Windows 10
Control Panel in Windows 10
Hard drive structure
In the window that opens, scroll down the scroll bar and find the item “Administration”. At this point, you need to find "Creating and formatting a hard disk", click on it and wait a couple of seconds, after which the window with the "Disk Management" utility opens. Further steps are performed in full accordance with the hard disk division algorithm in Windows 7, again we are doing steps 2-10.
Other ways to create a new volume on the hard drive
It is worth mentioning that the "Disk Management" utility also allows you to delete partitions on your hard disk. You will need this if, for example, there is no more free space left, and you just need to create a new volume. To do this, you can right-click on the hard disk partition to be deleted and select the item “Delete Volume”. An unallocated volume will appear in place of the deleted partition, which can be formatted to the required parameters.
Deleting a volume using Disk Management utility
The steps described in the algorithm show how to create a new partition using the compression method. But there is a way to create a new volume from an unallocated space, which may appear after deleting a partition, as described in the paragraph above, or after previous divisions on the hard disk could simply remain unallocated space from which you can create a new volume by following steps 5-10 of the algorithm described above .
In addition, it is possible to expand one more of the existing volumes to the free space after deleting the old volume or a partition can be expanded to unused unallocated space. To do this, click on the "Expand Volume" item in the context menu, select "Next" and "Finish".
Hard disk partition when installing Windows
After starting the operating system loader, select a language, accept the terms of the License Agreement, and select the “Full installation” option. The loader prompts you to select a partition on which the operating system will be installed later. Next, a window opens where the “Disk Setup” button will appear. By clicking on this button, you will have access to all the tools that allow you to work with disk space.
In this window, using the buttons, you can format a disk or disks, delete partitions, create new disks and select the desired size for them. Any changes you make will take effect only after clicking the "Apply" button.
External hard drive
Hard disk partitioning with special programs
In addition to built-in tools, such as the Disk Management utility, special programs are also used to divide a hard disk into partitions; they are also called volume managers. At the moment there are so many of them. The functionality of these programs allows you to perform many functions, not only dividing the hard disk into partitions. Among the most popular programs that have received a large number of positive reviews, the following should be noted:
- Acronis Disc Direktor;
- Paragon Partition Manager;
- AOMEI Partition assistance;
- Norton Partition Magic;
- EASEUS Partition Master
- Ranish, etc.
Most of these programs can be downloaded for free on the Internet, in addition, many of them are available in Russian.
Tough management program acronis Disk Disc Direktor
Program management hard drive Paragon Partition Manager
Conclusion
The above described in detail how to quickly and simply divide a hard disk into partitions using the built-in tools of the Windows operating systems in versions 7, 8 and 10. Also considered is how to split the hard drive initially when installing the operating system on a computer or laptop. The list of the most best programs to manage hard disk partitions according to user opinions.
The described benefits derived from dividing a hard disk into partitions are simply undeniable. After all, so you not only efficiently use disk space, but also increase the operating system speed.
MiniTool Partition Wizard - a functional program for working with your hard drive. Despite the fact that the program is free, it has a number of opportunities and its functionality is almost as good as paid counterparts. The program can easily perform almost all operations with a hard disk, for example, you can easily create an additional partition on the disk (if, of course, there is free space for this). Also, you can format hDD even if an operating system is installed on it. The utility allows you to change the disk size and perform any operations with partitions, including changing the letter ...
16/03/2016
Active Disk Editor is an advanced text editor that allows you to edit or simply view the file table of your hard disk. The program allows you to easily view all the data you need, including the contents of the boot sectors, or the contents of other areas of the disk. The program displays information in binary code, which allows you to easily make the necessary changes to almost any file, or to change something in the disk structure. Also, the program has a built-in search that allows you to find the desired area of the disk. When editing a hard disk, note that any file changes can be disastrous ...
01/07/2015
Partition Logic is a rather necessary utility that allows you to manage the hard disk space. Through this application, you can instantly divide the entire hard disk into the desired number of partitions. In addition to splitting and creating new partitions, the functions of erasing, formatting, deleting and defragmenting parts of the hard disk are available. Partition Logic allows you to copy any data from one hard drive to another similar device. The program works fine under the operating environment Visopsys. Runs from any external device (disk or drive). Through this application, you can change some a ...
23/04/2015
EaseUS Partition Master - free program for working with hard drives. Features of the program allow it to work with any hard drives. The program can delete a section, create a new one, or change an existing section, etc. But the main function of the program is the ability to share a disk or change the structure of its partitions without data loss. This is necessary when you have to divide the disk into several parts, but you do not want to lose all the data. For example, if the shared disk partition is the only one. The second possibility of the program is the formatting of any sections, and ...
27/10/2014
The program EASEUS Partition Recovery is designed to recover hard disk partitions. EASEUS Partition Recovery is able to cope with almost all the problems that arise during data recovery. For example, in 90% of cases, the program will be able to recover your data, even if a hard disk partition failure is caused by hardware problems. The interface of the program EASEUS Partition Recovery is nothing superfluous, because the product is aimed at inexperienced users who are not familiar with various concepts and terms. The program dialog itself consists of several windows. The very process of launching recovery them ...
30/12/2013
A utility that provides the ability to expand the section system disk, free up disk space, change it, its letter and graphic cover, defragment the disk and much more. In addition to the main functions, this program allows you to manage free space on the hard drive, as well as has advanced technology to timely shut down the PC power, disaster recovery files and protect them. The developers of the program claim that Macrorit DPE is the only software that has a unique data protection technology and the best data movement algorithm. Thanks to this you will never have to worry ...
02/08/2013
Parted Magic is a data recovery package designed as a bootable CD. This program, like many others, is based on the build of the Linux operating system. The assembly itself includes, in fact, the operating system, as well as tools for working with hard disks. For example, you can format your hard disk using any file system, delete a partition or create a new partition. However, the purpose of this assembly is somewhat different. With it, you can copy all your important data to another hard disk if your operating system stops loading. Distinctive feature ...
Very good news for owners of the Windows 7 and 8 operating system is that users can not download various programs for partitioning the hard disk, because thanks to the built-in disk management feature, we can do it for free. I want to remind that in the XP operating system, you can not do this, because one of the main functions of this application is missing.
To quickly launch the application disks, right-click on the desktop icon "My Computer". In the menu, select the item Management

In management, click the "Disk Management" section. On the right side of the program we will see a list of our hard drives.

Now you need to select the hard drive, which will be divided into sections. In my case, a single hard disk is installed on the laptop, which is divided into two sections E and D. The program clearly shows where the main disk and where its sections are.
I will create another partition in 10 gigabytes. To do this, right-click on the C: drive and select "Compress Volume" in the menu.
In a small window, I fill in a compression size of 10,000, which is equal to 10Gb, and I press the squeeze button.

Everything was done correctly? Please note, we have a non-distributed partition, the size of 9.77GB. It now remains to create a new volume from it.
We right-click on an unallocated area and right-click on it, select "Create a simple volume".
Now follow the instructions as in the picture. Changing the letter of the volume, or its name is not necessary, everything can be left as in the pictures. Let's go.

![]()
After formatting windows disk will report that the disc is ready to go.
As you understand, such a breakdown can not cause any difficulties. I also want to note that programs like Partition Magic, or similar, will no longer be needed. First, many packages are paid, secondly, they do a partition 10 times longer than the built-in windows application 7 or 8.
Good luck!
AOMEI Partition Assistant Pro - reliable, stable, very simple and easy to use, and at the same time, a powerful and really very effective program in Russian, which can be called one of the most successful to date solutions designed to create, delete, merge, resize and comprehensive partition management hard drives on the computer without data loss.
official russian version
- Program update: September 27, 2015
- New Russian version - AOMEI Partition Assistant Professional Edition 5.8.0 Rus
Program Overview
By downloading posted a new official Russian version of this wonderful program for the full management and administration of hard disk partitions personal computer. Partition Assistant allows you to quickly, easily and conveniently create new and delete old partitions, resize, merge and divide, helps to easily restore lost or deleted partitions for any reason, and, if desired, all operations can be performed as yourself , and using the step-by-step wizard built into the program, which certainly will not let you make a mistake and help you perform all operations on hard disk partitions without losing data and in just a few steps.
In addition, the program has full support for partition alignment mode and support for SSD drives, the program has full support for DDM, allows you to fully manage dynamic volumes without problems, you can create your own bootable CD directly with the built-in AOMEI Partition Assistant, you can rewrite the MBR, support GPT to MBR conversion without data loss, and much more ...
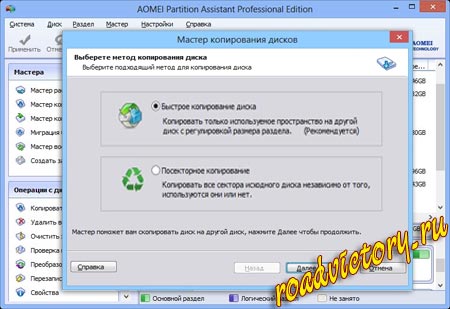
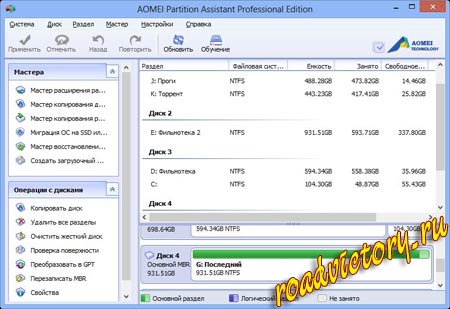
an example of working with the "Master" AOMEI Partition
The program is really very high quality and successful, and perhaps it is one of the few that is constantly being compared with such recognized leaders as Partition Magic, Paragon Partition Manager and, in terms of usability and many other parameters, cite as an example and set AOMEI Partition Assistant even higher marks!
Main features of the program
Simply put, if you need a high-quality, efficient program, analogue of Partition Magic or, but easier to use and with improved compatibility with new devices of PC hardware, capable of solving such tasks as:
- The ability to expand the system nTFS partition without restarting the computer and without losing data.
- Merging adjacent sections into one without losing data, combining unallocated space into one section.
- Splitting one large section into two or more sections
- Create as many partitions as you need, without the use of free disk space.
- Copying and restoring partitions for Windows migration or when back up important data.
- Fast full hard disk cloning.
- The rapid distribution of free space from one partition to another for the full use of disk space.
- Convert GPT to MBR without data loss.
That is exactly AOMEI Partition Assistant can be the best solution for the tasks you set. Download the latest official Russian version of the disk partition manager AOMEI Partition Assistant Professional Edition is available on the links below:
Download AOMEI Partition Assistant Professional Edition Rus + s / n
(powerful disk partition manager in Russian)
Download Portable AOMEI Partition Assistant Pro Edition Rus + s / n
(official Russian version from the manufacturer)
- Size: 8.83 mb / 4.24 mb.
- Program interface: in Russian
- License: serial number (attached)
- OS: Windows 10, 8, 7, Windows XP (x86 / x64)