How to check the hard drive for errors and broken sectors
Hello friends! Today you are waiting for an excellent article on the health of hard drives. The thing is that hard drives are often out of order, it happens suddenly. For example, after a fall and a blow. (In notebooks, this is generally an eternal song). And there are also for natural reasons, for example, because of wear and tear. In this case, the hard drive promises painfully long dying rales.
The number of revolutions of the hard disk is fixed and can not be changed. This is just an indication of the performance of the hard drive. High-performance hard drives for the business area often provide up to 000 rpm, while conventional hard drives are usually much lower than this value. A higher number of revolutions does not automatically mean higher wear - but the risk can be higher, especially with heavy use.
What is also interesting to note about this: the storage density and speed of work have developed unevenly on the latest hard disks. Since the 90s, the capacity of hard drives has increased about 1000 times, while productivity has increased a hundred times over the same period. In general, older hard drives were much more powerful than modern hard drives. Only the development of new storage technologies can again raise this collapse. Each hard disk in practice works as fast as data through the interface.
So how do you prevent and know for sure that your hard drive is already on the brink and he needs urgent repair or replacement !? After all, no one wants to lose all of their files on the computer overnight. And it's okay if you do back up to the cloud, but many do not. Therefore, I recommend at least once every six months to check all hard drives for errors and broken sectors.
Checking the hard drive for errors
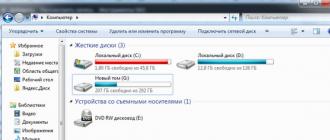
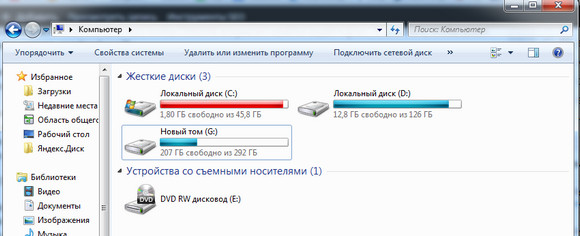
1) We go in the " My computer"(Or for those who have 8.1 in" This computer"). Right-click on the disk to open the properties.
2) Go to the tab "", click " Check».
3) Check the hard drive for errors, upon completion it will be known whether they have it or not. I have everything in the pack.
Testing the functionality of the hard disk
However, as a rule, these are not variable variables, but it is nevertheless interesting to check the performance of the interface. A simple error check on the hard disk is already possible through the operating system, as well as the speed of fragmentation. With a quick start, all parts of the selected data memory go through the X-ray and are checked for data integrity and integrity. The so-called "health status", which is returned by the user, can use different parameters according to the type of connection.
Check the hard drive for broken sectors
With errors everything is clear, but what are the broken sectors, I'll try to explain now. The matter is that the hard disk consists of set of cells in which the certain quantity of the information is written down. For example, on my hard drive 1953525167 sectors.
To test each sector, a special program should refer to each cell and measure the response time from it. The ideal is 3 milliseconds (this is about one thousandth of a second). The critical result is 600 milliseconds or more. The last will mean that the cell is covered with a copper basin. That is, the lower the value, the better. With the theory figured out, let's go to practice!
You should think about this when checking. Many programs also use only the display when certain thresholds or thresholds are exceeded - this is often not enough for a comprehensive assessment of the status of the hard drive. Parameters can also be used to distinguish between irrelevant parameters and purely informative ones that are not directly related to possible failures. However, a really good picture of the state of the hard drive always leads to a combination of both types of parameters.
Check the hard drive for a defect, but conscientious
If the hard disk is to be tested with a tool, the user is obliged. This makes little sense if this tool is used only sporadically. The hard disk should be tested at regular intervals so that there is no sudden damage. It is recommended that the tool for testing the hard disk starts with the operating system at the very beginning. Thus, the user can no longer be forgotten.
1) To diagnose the hard drive (hard disk), we will use the time-tested program Viktoria. You can download it either.
Or with attachments:
Victoria 4.46 Free.rar
2) Unzip it into a separate folder and run the file vcr446f.exe through administrator rights.
3) This is how our program looks. Do not be scared of the English language !!! Now together we'll figure out what's what. First of all, we need to select our hard drive in the right upper column, in this case it is my one.
However, this operation will also be possible before the operating system is shut down. An alarm can also be output if the hard disk temperature is too high. All technical data of the hard disk are monitored. Sometimes the current state of the hard drive can be displayed even by one percent. It is important that the user can be prepared for him when an action is required. If you need to trade, you need to make one of the data of the old hard drive. It's also very fast and easy to transfer data from backups to a new hard drive.
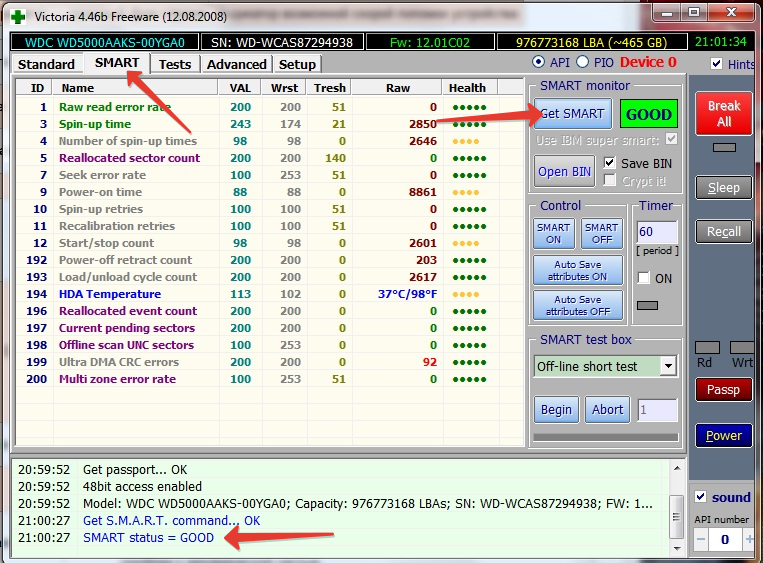
4) Then go to the tab " SMART », where we click on the button " Get SMART ».
5) We will not go into the details of all these parameters, the main thing we need to pay attention to is the average result, in my case this GOOD, that is good. If you have BAD or something else, it means that something is wrong with your hard drive and it's time to think about buying a new one.
Especially if the operating temperature of the hard drive is often too high, a threatening defect is indicated. Also, there are often errors when writing and reading data from the hard disk. If the hard disk becomes too hot, it can be assumed that the power supply or case list is already defective.
Hard disk checker for bad sectors
Summary: Repairing and Repairing Corrupted Hard Drive Sectors Software can scan and repair corrupted sectors and recover data from the hard disk. Try this tool to repair damaged sectors and remove bad sectors without formatting or data loss.
Also, pay attention to the temperature, in my case the temperature is 34 ° C within the norm. If you have this parameter will be above 40 ° C, then it would not hurt to improve the cooling system of your PC.
6) Attention! : Before you start checking the hard drive for broken sectors, you need to perform some preparations:
First, read this completely and 7 point to the end and remember the sequence of actions.
Secondly, turn off the Internet.
Third, turn off all running programs, including antivirus. This is necessary for the verification to be most reliable, otherwise the results may be distorted.
Fourth, I recommend creating a shortcut on the desktop or in a notebook with a link to this article, so that you do not have to search later.
After all these actions, you can start checking. To do this, go to the tab " Tests ». Be sure to check that the switch is on " Ignore », as in the screenshot. Then click " Start ».
Why do you need software to repair damaged sectors?
A large number of unusable sectors can lead to problems with disk space. And files on bad sectors become unreadable, inaccessible or even damaged. To avoid all these problems, you are recommended to find reliable hard disk recovery software to scan and remove bad sectors on the hard disk.
Checking bad sectors with disk checking
Disk check. To open the context menu, right-click the disk that you want to check. Click the "Check now" button to start the disk check. Check the disk audit settings. Select the checkbox.
- Click "Properties" in the context menu.
- Click Properties.
- Click the Tools tab.
7) During the scan, do nothing on the computer, do not turn off the program window. By numbers I'll sign that there is something.
- Current verification progress in percent.
- Remaining verification time.
- A green box is the response of a cell in 200 milliseconds. Orange - 600 and so on. Blue is a completely non-working sector.
- Stop the scan.
Ideally, at the end of the test there should be no green, orange, and even more so the red and blue sectors. Norm - a pair of green sectors, no more. If the bad sectors (3 number in the screenshot above) will be a dozen, then after a while the hard disk will start to slowly tilt the legs. The blue sectors are already a dying state.
Then there are some bad sectors that restore the software, which allows you to remove all the bad sectors on the disk and store all the data? Do I need to change the record? However, they warn only about exceeding the limit values, i.e. at accumulation of certain events. However, it may be that only certain sectors are corrupted on your disk.
To check the plate for defective sectors, it is best to remove them. However, make a backup as a precaution. It is important that you choose one of the extended or long-term tests - it may take several hours, depending on the capacity of the disk. If you find defective sectors, the above tools can fix the errors, but you must write them to disk - the saved data will be lost.
Attention! : If the orange, red and blue sectors are already in the first five minutes of the test, you can safely turn off the check - your hard drive is definitely in bad condition and needs to be replaced!
In conclusion
That's all, now you can always find out everything with your screw in order. Of course, the results of the test should not be trusted 100%, because it is affected by too many factors, but in the worst case, this is an occasion to think about, if not about a new hard disk, at least about backing up all important files to an external medium.
Well, it's time for me. See you later!
However, regardless of whether happiness depends, depends on what is the original cause of the problem: sectors could be damaged by a sudden power failure during access to the recording. However, this may also indicate a creeping defect in the equipment inside the plate. Then only the plate replacement helps.
This is one of those tools that we particularly like: it concentrates only on one, very specific task, but it does it perfectly! All available volumes are displayed in the pop-up menu. At this point, you can also connect external hard drives. Select the volume you want and click "Rebuild" in the lower right corner to start the recovery.
You do not have the required permissions to view the files attached to this post.
If you suspect that the hard drive is out of order, then you can dispel any doubts with a few simple software tests. Below you will find details on how to check the hard drive and identify possible malfunctions - you will only have to choose the most suitable option.
If this step passes without problems, the repair can not be too big. The length of the repair depends, of course, on the size and condition of the hard drive; usually 9 steps are completed within a few minutes. A somewhat long comparison of the old and new catalog in step 9 can be easy, if necessary, simply by pressing the "Skip" button.
Several errors are always found, which is absolutely normal and does not cause concern - messages about "incorrect" flags or error message "Incorrect values in volume information have been repaired" are displayed on almost every hard disk even if it is not faulty.
You can check the hard drive in various ways, including both using the built-in tools of Windows, and using special software. Testing the hard drive for errors we are tools of Windows:
- Utility
- Standard disk check.
With these built-in functions, the system checks and fixes errors on the hard disk by itself. As for testing for broken sectors, we will use the following programs:
However, you should look at the log to be able to assess how badly the directory is corrupted and whether all errors can be fixed. If you click "Replace" in the lower right corner, the new directory will be irrevocably written to the hard drive. If you want, you can still save a copy of the log as a text file. Access for reading and writing.
Where do the broken sectors come from?
Therefore, it never happens that, for example, For example, the first two problems are repaired, but on the third something went wrong, the repair fails, and the stove is still broken. In the preview, you have the opportunity to check how the contents of the volume will look after repair - you have a "virtual" access to a new directory, so to speak.
- Ashampoo HDD Control 2.
- HDDScan.
- Victoria.
More information about removing the broken sectors you can learn from our article on how to restore the hard drive. Here we will only touch upon the process of checking the surface of the hard drive.
The CHKDSK application is launched via the command line in a Windows environment or using a boot disk if there is no way to log in. First, we'll deal with a simpler, first option.
Only after clicking "Replace" is there write access to the disk. What are the folders "Saved items" and "Damaged items"? It is necessary to look at the contents of both folders accurately - they can contain important files. If found in files that belong to the installed program, it is possible that the program does not work properly and should be reinstalled. The hard drive can still be fixed, you have to do, but some effort.
Why does not the hard drive appear in the selection menu? The volume is not connected locally to the computer. Recover important files using the preview function. This feature should be especially used always, if it is especially important, an indispensable and time-critical files or a record, perhaps, behaves unstably when it is repaired. Because despite the fact that almost never happens in practice: writing a new catalog always entails a certain risk.
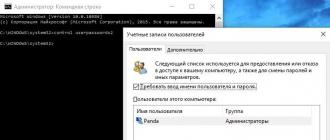
- Press Win + R to start the "Run" menu.
- Type "cmd.exe" and press Enter to open the command prompt.
- Enter an operation command of the form "chkdsk c: / f".
A brief explanation of the syntax of the command. By default, the CHKDSK utility does not check the surface and does not correct errors. To force an application to do this, you need to specify the volume that you want to check (in this case, C), as well as the / f or / r flag.
However, the likelihood that there may not be an entire hard drive, but only some areas are broken is quite large - it is entirely possible that only system or program files depend on the defect. The system and programs can not be replaced at any time, personal data. In case of doubt, it is always recommended that you back up important data before writing a new catalog.
Both directories are read-only, of course - it would not be very useful in fact to write data to the hard drive that is being repaired. A target for backing up data anyway, a second hard drive is needed. It appears in the pop-up menu as soon as the system detects it.
The / f flag triggers error correction, the / r flag means searching for the broken sectors.
The duration of the command depends on the amount of media and the number of errors on it. If you run a system disk check, it will only be performed after a reboot.
If the computer constantly restarts and you can not get into your account, you can run the CHKDSK utility through the command line that is located among the recovery tools (on Windows XP, the recovery console is used for this purpose).
What if you think that the hard drive is not working properly, but there are no bad sectors?
Now in the bipartite window on one side of the source, and on the other hand, it causes the target display. Select the desired file in the preview and copy to another plate by clicking on the "Copy" button. You can exit the preview by closing the window easily.
Error message: "Speed decreases on the fault disk". Sometimes it happens that this step takes a long time: the error message appears under the progress indicator after a while: "The speed is reduced on the fault disk". Most often this error, unfortunately, is a sign of a hardware failure - the data can not be read, because the disk is not properly installed. But you should not give the same hope. In some cases, the list is so badly damaged that it takes a very long time to read the data.
Standard disk check
Another way to test a hard disk for performance is to use a standard check that runs in the properties of the hard disk partition.
If the tested volume is currently being used (for example, if the program is running, the files are stored in this section), you will be asked to stop it. Click Disable to start the partition scan. The length of the test depends on the volume of the disc and the amount of information recorded on it.
If you want to check for errors on the system partition on which Windows files are stored, you will be asked to run the test after rebooting. To do this, click the "Disk scan schedule".
After the computer restarts, a black (blue) screen appears. Do not press anything - after 10 seconds, a series of tests will start, after which the machine will reboot and start to work in normal mode.
HDDScan
The program for diagnosing HDDScan hard disk allows you to quickly and visually obtain the necessary information about the status of the hard drive and, if necessary, correct errors.
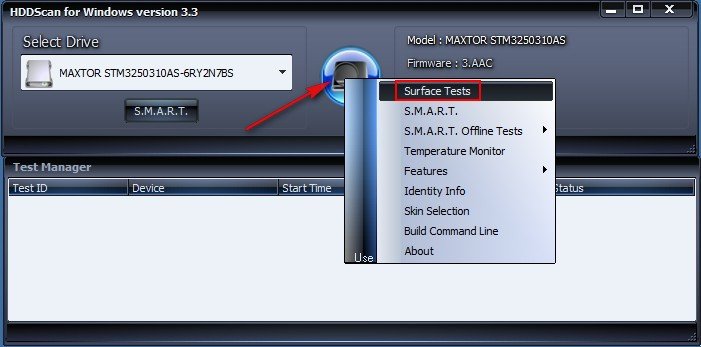
For clarity, go to the "Map" tab. On the right, you will see several values for the scanning speed of sectors.
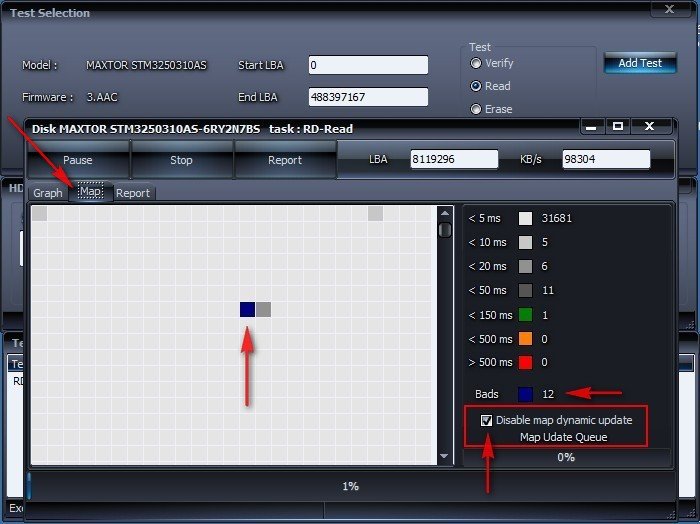
After the scan is over, you will receive a complete report on the state of the disk surface. If there are any problems, it is recommended that they be fixed immediately using our tips on how to restore the hard drive.
Victoria
This program is one of the most popular utilities for checking the hard drive for serviceability. The convenience of it is that, if necessary, Victoria can be started, even if there is no way to log in - for this purpose a special boot disk is used. We'll see how Victoria works in a Windows environment. Therefore, first a little familiar with the interface of the program:
- The tab "Standard" - contains the main characteristics of the hard drive: model, number, size, number of cylinders, etc.
- Tab "SMART" - view the current status of the hard disk.
- Tab "Tests" - contains a series of tests to check the condition of the surface of the media.
Now we'll figure out how to work with these tabs in order to get full information about the hard drive's performance and, if necessary, fix the broken sectors:
Ideally, all sectors should be gray or light gray. If after testing you see a lot of red and orange rectangles, then this is an occasion to think about the state of the surface of the hard drive.
If you find blue sectors signed as "Err x", then run the test again, marking the "Remap" item.
Ashampoo HDD Control 2
Finally we'll look at another convenient utility with which you will quickly check the disk for errors - Ashampoo HDD Control 2. The program is paid, but it has a trial period, so you can use it for testing your hard drive for free. Ashampoo HDD Control 2 has many functions, from defragmentation to removing Internet traces, but we'll only review the "Testing" tab - you can read the rest of the sections yourself.
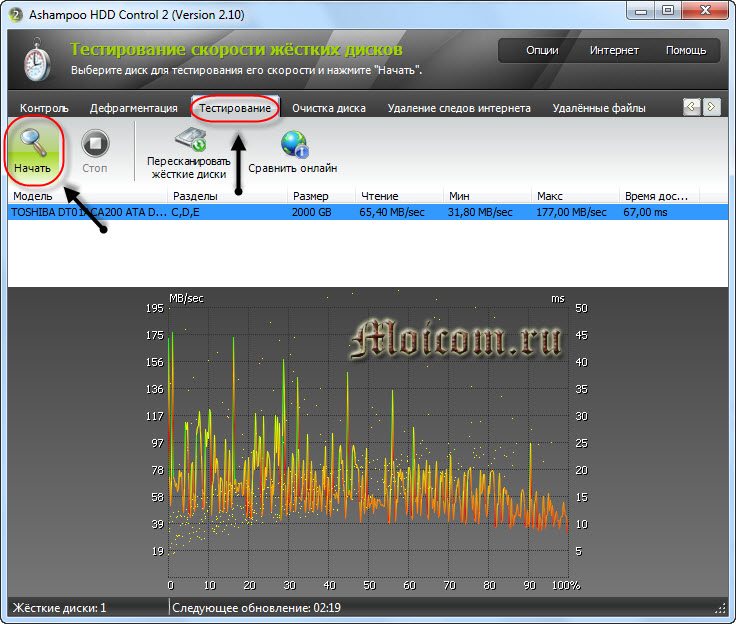
To check the surface of the hard drive, go back to the "Control" tab and run the "Surface Testing" tool. 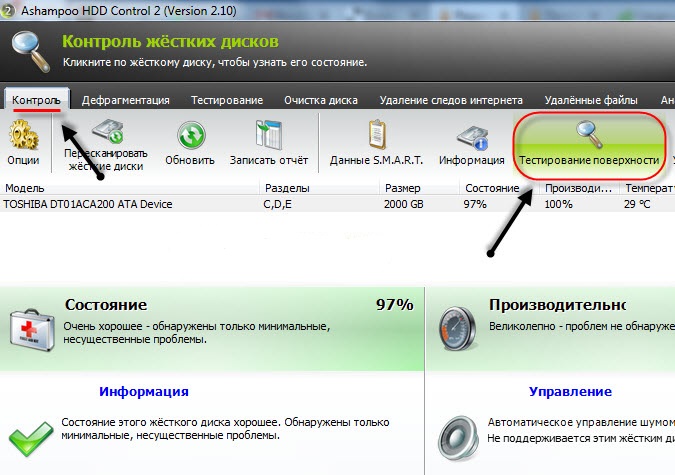
During the course of testing the surface you can observe in the appeared window, where the whole process will be presented in the form of colored notation:
- The blue square - the sector has not yet been verified.
- Green square - no errors detected.
- Red square - at least one bad sector is found.
The duration of testing as usual depends on the volume of the carrier under test. If you have a large disk, it's better to find another occupation for a while - you'll have to wait a long time, but after checking you will know exactly what condition your HDD is in.