Hello! Certainly, when you open My Computer, you have often paid attention to the local disks located there. Typically, the C: drive stores Windows files and it is better not to "disturb" it. Disk D: is more often used for putting there information of a personal nature. Do you know that there can be any number of virtual disks? And today we will tell you how to make one more! So,
Create - create a new partition. Delete - to delete a specific section - all data on this section will be deleted! Format - to format a specific section - all data on this section will be deleted! Expand - expand the partition beyond the physical disk barrier and span the partition on more than one physical disk. This is useful when you have exhausted space on this physical hard drive and have made a new physical hard drive that you want to use. However, unlike using this new disk as an entirely new partition, this disk becomes part of the partition located on the first disk.
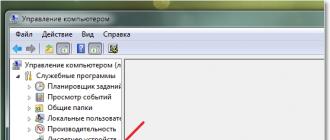
Proceeding the path: Start - Control Panel - Administration.
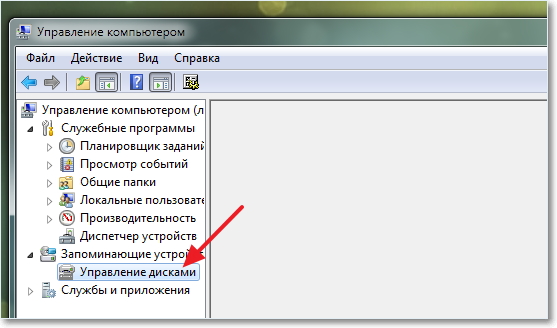
After that the window will open, it will be "Computer Management", there, we will find "Disk Management". Does the computer stop? There is nothing terrible in this - the machine processes the information, it is not worth it.
In the "Size" field, enter the size for the new section. The installer will tell you that it will create an additional partition on that drive. This section will by default be hidden and contain the necessary files to boot the computer. Note. Now you can see the partition you created and the hidden boot partition.
Click Format to format the new partition. You will be warned that all data will be deleted. This should not cause a problem, because the partition has just been created, and it is empty. Installation will begin as usual. This command is very useful for creating, expanding, expanding, compressing and performing other tasks on partitions and disks. A Command Prompt window opens.
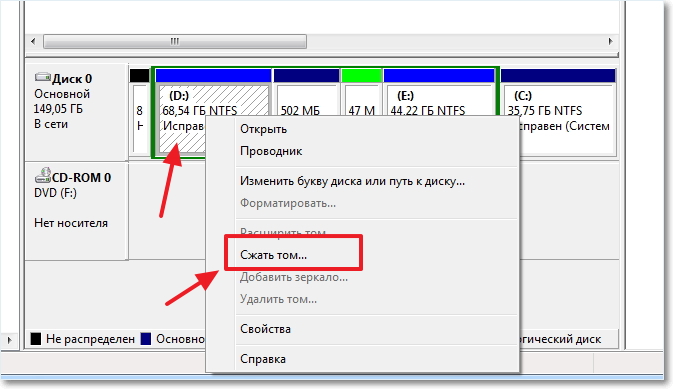
On the screen we will see all the sections created earlier. We need to create a new one. We select a local disk that we want to "steal", click the right mouse button and find " compress a volume».
It looks like this:
« Requesting location ..."- such a window will appear on the screen. We need to wait a little.
An interactive command is displayed. Remember that you can always change the size of the system partition, but there is no need for proper planning! We will see how we can access this tool and how quickly and easily complete the process of creating a new partition.
Thus, we get access to the context menu in which the image is displayed, and select "Management". Then the window opens, the Administration panel of the equipment. In the menu in the left part of the window, select "Disk Management" in the "Storage" section.
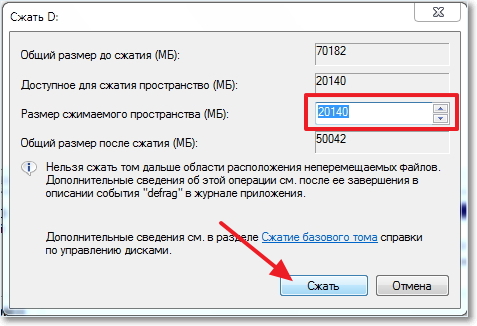
In another window that opens, we will see the size of your partition before compression, the amount of space available for compression.
It looks something like this:
You will see " FROM place "- it glows with a green color. Click the right mouse button, select in the menu " Create a simple volume ". We will see " Creation Wizard ... ».
How to correctly set up a network drive
Then in the right part of the window we will see our installed disks, as well as their size and the partitions that it contains. Select the panel that corresponds to the hard drive that we want to partition, and right-click on it. We select the "Reduce volume" option, since we usually do not have unallocated space.
We recommend defragmenting the hard drive before it detects the largest free space available from this partition. In this window we will choose the size that we want to release from our current section, and we will compare it as much as possible with the size that we want for our future section.
We continue to solve the problem "".
Now follow the wizard, specifying the parameters at your discretion - size, drive letter. When you reach the section " Fornamentation ", It is desirable to specify such parameters.
With the built-in "Disk Management" (Disk Management), you can add a new volume to the hard disk to create a new logical partition. In the article "" I told how to compress the existing volume of the hard disk. In the released space, you can create a new volume and a new logical partition for the operating system. Here's how to do it.Disk Management
After freeing up the disk space, two different bars will be assigned to our disk. The first corresponds to the space already divided, the second to the free space. On the second one, we right-click and select the New Simple Volume option. Then a new Partition Wizard will appear.
The next step is to assign the size of the new device. We will choose the entire size that we released, if we want one partition, if we want more partitions, we choose the required size. The third step is to assign a letter to the new device we created. Then we choose the type of disk format and the name of what we are going to create.
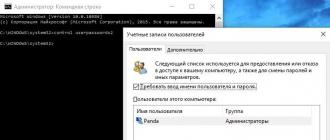
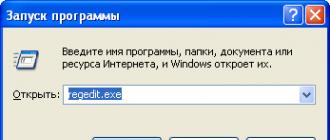
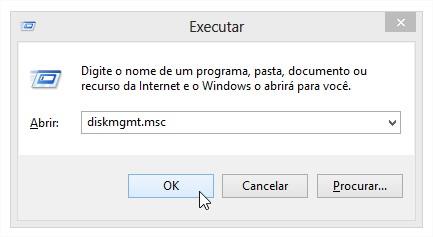
To start, you need to run the Disk Management tool with administrator rights. Open the Start menu, type "diskmgmt.msc" in the search bar without quotes, click the "diskmgmt" link in the search results with the right mouse button and select the "Run as Administrator" option from the context menu (Figure A).
Figure A. Start Disk Management with administrator rights.
Click "Done", and in a few seconds we will have our new unit ready. As you saw, it is not difficult, after a few minutes we can have new sections. To create more than one partition, once the released space is released, we will repeat the process of starting the wizard to create a new partition for each of them that we want to create.
By creating these separate environments, you can more conveniently, safely and efficiently manage various operating systems, programs and data sets. The "Computer Management" application is launched. Determine how many megabytes will be divided on the hard disk and become part of the new partition that you create. Then click "Decrease" to complete the separation of this space.
The window shown in Fig. B. As you can see, after compression of the volume on the disk, a free unallocated space was formed.
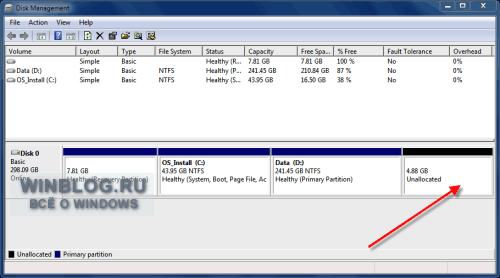
Figure B. There is free space on the disk.
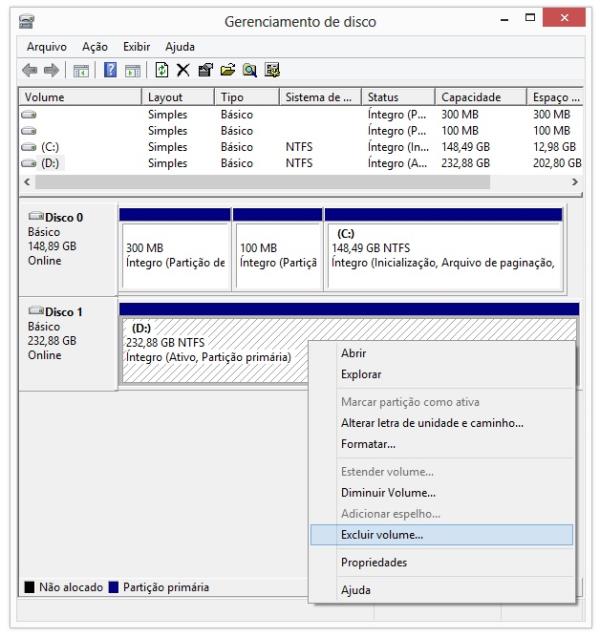
Click on the unallocated space with the right mouse button and select the option "Create a simple volume" (New Simple Volume, Figure C) to start the New Simple Volume Wizard.
A five step wizard will be started to complete the partition by dividing the space on the selected hard disk and creating a new entry for the destination for that part. Select the amount of megabytes to allocate, and click Next. Select the letter indicating the partition created, presenting it as a new hard disk and proceed to the next step by clicking the "Next" button.
Save the same formatting options that are already configured, and go to the completion step by clicking "Next" and then "Finish". In addition, let's show you how easy it is to create partitions and format your storage devices. Forcing disc recognition.
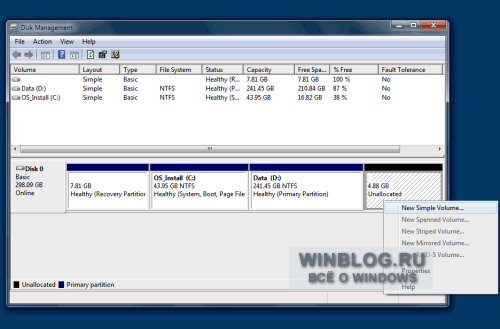
Figure C. Start the Create Simple Volume Wizard.
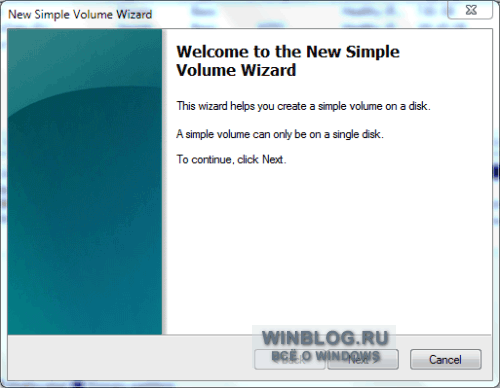
Figure D. The first page of the Simple Volume Wizard.
In unallocated space, you can create several partitions at once, but I'm going to use all available space to create a new simple volume (Figure E).
To work around this problem, simply
You should have the same situation as on the screen below. Select the section that you want to change, and right-click it. Then click "Decrease volume" and finally specify the amount of space in which you want to reduce the partition.
As shown in the figure below, there is no free space to expand the system partition. So, first you need to reduce one of the sections to get the unallocated space. Drag the panel from left to right to the size of the partition you want when the mouse pointer changes to a double arrow.
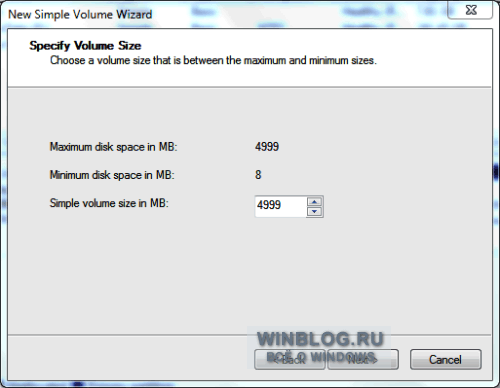
Figure E. Specify the size of the volume.
On the next page, you are asked to assign a drive letter for the new volume or specify the path to it (Figure F). There are three options:
Assign the following drive letter. By default, Windows offers the first free letter, and as a rule, this is the best option.
Now you have free space behind the system partition. Drag the panel from left to right to increase the size, and click "Confirm". If you are satisfied with this operation, you will see the operations that you perform in the pending operations. Here's a tutorial that will help you change the size of the partition.
Typically, partitions are created when the hard disk is ready for use for the first time. What will you do to break the hard drive without formatting the hard drive? If you want to expand the system partition, there must be some unallocated space behind the system partition.
"Mount the volume as an empty NTFS folder" (Mount in the following empty NTFS folder). Instead of assigning a drive letter, you can mount the volume as a folder - in that case it will look and work as a simple Windows directory.
"Do not assign drive letters or drive paths." (Do not assign a drive letter or drive path). In the future, the drive letter or path will still need to be specified so that the volume can be used for data storage.
It can split a hard disk into its hard disks without formatting, including: resizing and relocating partitions, partition conversion, partition partition, partitioning, changing the size of the dynamic disk, etc. Do you think this software for hard disk partitioning is useful?
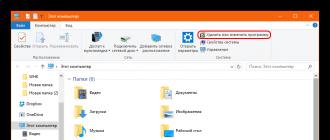
How to create a new partition on the hard drive without formatting?
This is a problem that really needs a solution. You can perform the following steps to format the disk with this free tool. Enter the control panel in the search field. Click "Control Panel". Click Administration. Click on "Computer Management". Click Disk Management. Right-click the disk or partition that you want to format, and click Format. Select the file system and set the cluster size.
For example, leave the default option selected and assign the disk to letter "E".

Figure F. Assign the letter to the drive or specify the path to it.
The next step is to specify the formatting options for the volume (Figure G). Typically, it is recommended that you format the volumes, but you can also select FAT32. The other option by default is not to be touched, unless you have specific reasons for changing the cluster size.
Mount the virtual drive
Enter the desired label in the section label field. Reducing the size of the cluster will save disk space. The smaller the cluster size, the more the file allocation table will be. Click "Apply" to confirm all current operations. If the above answer helps you, you can try this now. If not, you can start the following recommendations to manage the partition on your external hard drive.
Right-click My Computer and select Manage. In the application window that appears, select "Disk Management" in the left pane. You will see something like this. At the top you will see all logical disks of your system listed in alphabetical order by default labels, and below you will see a graphical representation of all known physical disk drives in your system. more than one partition, these partitions will be displayed together on the physical disk.
It's worth tagging to make it easier to distinguish it from other sections. If you select a quick format, the operation takes less time, but the system does not then notice the bad sectors on the hard disk, which in the future can lead to problems.
NTFS has a built-in compression system that acts imperceptibly for users and can come in handy if there is not enough free disk space.
Delete an existing partition
You have to right-click on the disk in the bottom panel, and you should see this menu. Click Delete Partition. The drive representation will change from "healthy" to "unallocated". Again, right-click the disk, and the "Delete Partition" option is now "New Partition". Click this button to set up a new partition.
Then you will be asked to select the "primary" or "advanced" section. Primary is enough, except that you plan to place on this hard disk more than 4 partitions. You will also be asked how much space to allocate to the newly created partition.
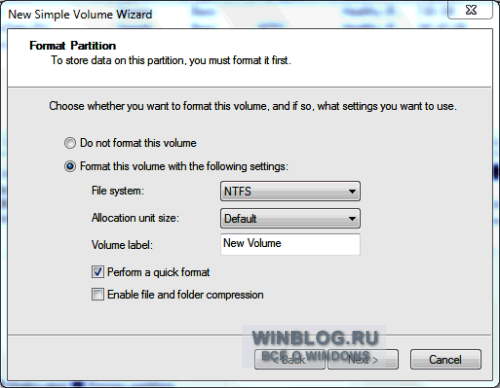
Figure G. Setting the formatting options.
The last page of the wizard lists the selected options with the option to go back and change them if necessary (Figure H). If you are satisfied, click the Finished button.