The Windows operating system stores the Desktop folder with the program shortcuts in it on the disk of its installation (usually drive C). In the event of a serious failure, the user may lose a conveniently configured desktop. To avoid this, it can be transferred to another disk.
Sponsored by placing P & G articles on the topic "How to transfer the desktop to disk D" How to install Windows XP to another disk How to move the desktop to another disk How to return the My Documents folder
Instruction
If Windows is installed on drive C, the desktop path will be: C: Documents and SettingsAdmin Desktop. In this example, the username is Admin, it may be different for you. To move the desktop to another drive, use Windows Explorer. Click “Start”, then open “All Programs” - “Standard” - “Explorer”. Next, open in Explorer: C: Documents and SettingsAdmin and select the "Desktop" folder. In the menu, select "Edit" - "Move to folder ..." and specify the location where you want to move the desktop - for example, simply select drive D. The folder will be moved. After that, be sure to restart the computer. Please note that you can only move the desktop through windows Explorer and nothing else. Do not move the Desktop folder. simple drag and drop using the mouse or using various file managers. When you move your desktop through Windows Explorer, the operating system remembers its new location, so in the future you will not have any difficulties. It is possible to move the desktop by editing the registry, but this option is much more difficult, so it does not make sense to use it, it is much more convenient to use Windows Explorer. In addition to the desktop, on another disk it is useful to store the My Documents folder. In this case, you can save files in it without fear of Windows crash, since your data and operating system will be located on different disks. To transfer this folder, click "Start", right-click on the menu line "My Documents". In the opened context menu select "Properties". The properties window will open, click the “Move” button in it. In the new window, select drive needed and create a folder "My Documents". Click OK, you will be asked to confirm the file transfer. Agree by clicking "Yes", and the transfer of files will begin. After it finishes, restart the computer. Please note that when transferring files, all applications must be closed. How simple
Other related news:
When reinstalling the operating system, it is important to restore the selected settings. This may include the installation of the desired software, design the desktop and screen savers, as well as the restoration of files and folders in the system folders "Desktop" and "My Documents". You
operating system Microsoft Windows provides the ability to transfer the component "Desktop", which is part of the user profile, to another partition of the computer disk. This operation is carried out using standard system tools. P & G Placement Sponsor Related Articles
What could be more familiar than saving fresh data in the folder “My Documents” or duplicating files from a “flash drive” to a “Desktop”? To do this, these folders (after all, “Desktop” is also one of the directories on the disk) were developed by the creators of the operating system.
However, not all users take into account the fact that the “default” user directories are located in the system partition - on the “C” drive. And in the case of force majeure situations (“falling” of the system, mass infection with viruses), which require, in addition to reinstalling the system, formatting the partition, all data on the “C” drive is destroyed.
Those who lost their course or family photo archive together with the “lost” system try not to go to the “C” drive anymore, but create their own folders in other sections. However, few know that it is possible to combine data security with an ingrained habit and user burden to “My Documents” and “Desktop”. To do this, the user directories are transferred to disk “D” by directly editing the registry (in Windows XP) or reconfiguring settings via dialog boxes (in Windows 7).
Turning to windows registry Xp
In order to open the registry editor, you must activate the "Run" command (it is launched from the "Start" menu or by pressing the "Windows + R" keys together).
In the text form of the window that opens, type the command regedit.exe without errors.

After witnessing the command entry with the “OK” button, the registry editor itself will open.
Registry -this is a kind of database with data that stores all the information about system settings, programs and devices, user profiles, etc. The registry has a tree megastructure, composed of the root sections (also called keys), subsections and parameters, which are characterized by name, type and value.
It should be noted (and this is important!) That any careless or illiterate reconfiguration of the registry can lead to disruption of the system, therefore, direct editing should be resorted to only as a last resort. Or, as in our situation, for the prevention of these very "extreme cases."
So, opening the registry editor, follow the path below:
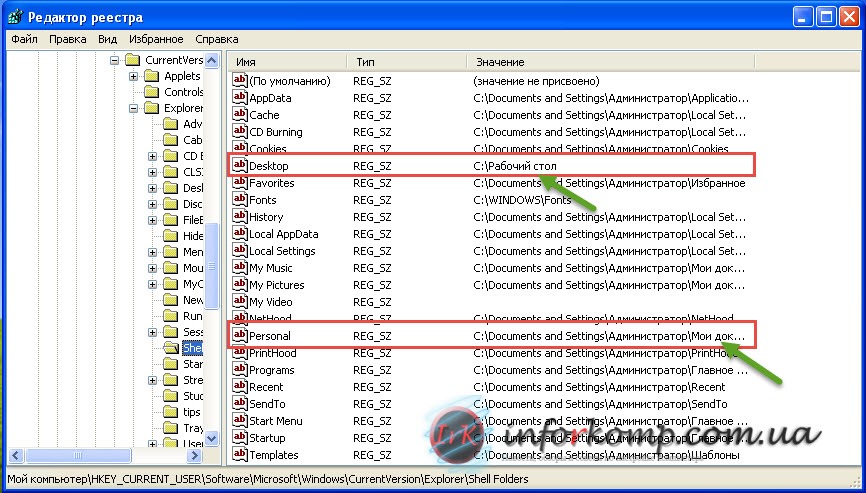
HKEY_CURRENT_USER \\ Software \\ Microsoft \\ Windows \\ CurrentVersion \\ Explorer \\ User Shell Folders
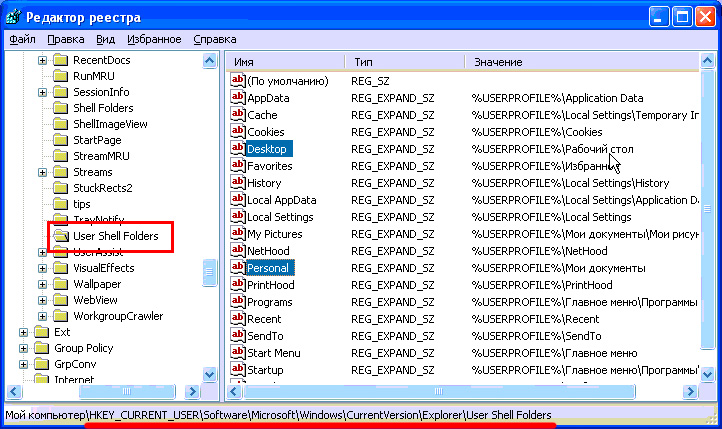
Selecting the “User Shell Folders” section, in the right part of the window we will see a list of parameters, among which there is a “Desktop” responsible for placing the “Desktop” folder and “Personal” that stores the path to the “My Documents” folder.
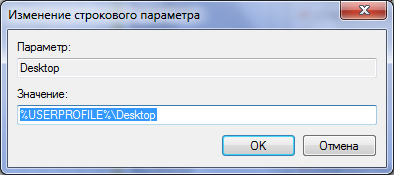
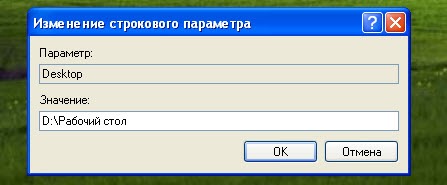
Clicking the left mouse button twice on one of these parameters, in the line “Value” we will print the path we need.
If there is no such path on the disk, the appropriate folders will be created at the next system boot, that is, it is certainly clear that after editing the registry, the computer will need to be rebooted.
Now move the user directories to windows environment 7
Opening the disc "C", follow the path:
C: / Users / (User folder) /
or in the Russian version of this:
C: / Users / (User folder) /
Clicking the right mouse button on the “Desktop” folder, we open the “Properties” dialog box and go to the “Location” tab.
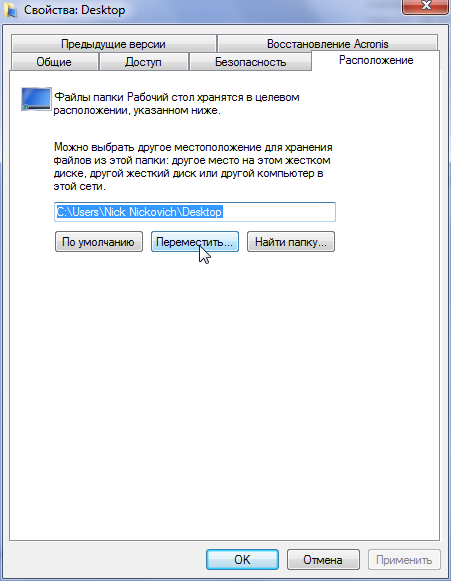
Here we see a text field containing the current path to the "Desktop". In principle, in this field you can enter the path we need and click on the "Apply" button. Or, by clicking on the “Move” button, select a new path manually. As we can see from the explanatory text, the “Desktop” folder can be placed not only on another partition, but also on another hard drive and even on another computer on the local network.
Selecting a new location, we confirm the transfer of all available in the new folder. In this case, we take into account that the disk "D" should be decent free space for new files, since different users sometimes have several gigabytes on their desktops.
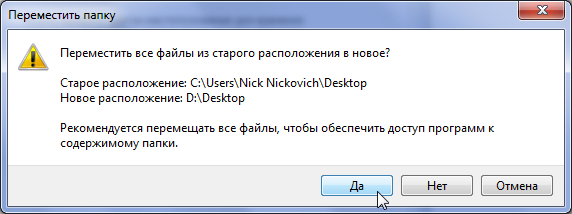
To move the “My Documents” folder to the “D” disk, the operations described above must be performed with the “Documents” folder, which is located in the same folder as the “Desktop” folder.
It is necessary to add that in the Windows 7 environment move system folders it is also possible with the help of direct registry editing, that is, using the method described in the previous section of this article.
Now, opening the folder "My Documents", you will get on the disk "D", and everything that is on the "Desktop" will be saved in case of force majeure formatting or other problems in the system partition.
As you guessed, today we will again talk about setting up a computer and an operating system. To be more precise, I want to tell you about how you can move, in various types of Windows, the folder in which is saved " Desktop"And" My documents"To disk" D: \\».
Perhaps you may wonder why this is necessary? There are so many reasons for this that you don’t need to think for long. Every day, for someone and for-for or such Windwos or flies file systemwhich leads to or.
Such cases often lead to the loss of important files that were stored on the “C:” drive, in desktop folders and documents. Of course, you can try, which were lost, but, after their recovery, they can be damaged. Well, disappointed users are beginning to reinstall the system with sadness in their eyes.
In this article, I will show you how to prevent yourself from losing important files when Windows is damaged. And also, I will show in detail how to move the folder "Desktop" and "My Documents" for storage, on the “D: \\” disk, so that later, after installation, do not worry about losing them.
Moving Desktop and My Document Folders in Windows XP
So, to change the location in Windows XP, we need how to do this, you can look here. Now, in the opened registry, go to the following branch:
HKEY_CURRENT_USER \\ Software \\ Microsoft \\ Windows \\ CurrentVersion \\ Explorer \\ Shell Folders
Pressing " Shell folders"Appears on the right big list various properties and values. Here, we are looking for the folders in which we want to change their storage location. So, we move the "Desktop" and "My Documents", respectively, we find the items "" and "".
Clicking on "" twice, in the window that opens, enter a new value, namely the path where our desktop will be stored.
Do the same with "", open and enter the folder address. For example, I will store folders at once in the root of the “D: \\” disk, respectively, I will write the following value: D: \\ My Documents. If this is some other folder on the disk, then the path will look something like this: D: \\ Folder name \\ My Documents.

By clicking " Ok», save the changes. And in order for them to fully take effect, you need to restart the computer. After that, everything that you will save on your desktop will be automatically duplicated in the above specified folder on the “D: \\” disk.
Change the storage location of the desktop on Windows 7 and 8
In a situation with Windows 7, everything is much simpler. To do this, we do not need to enter the registry or manually change the storage location of user folders. All we have to do is just select all the folders and cut them.
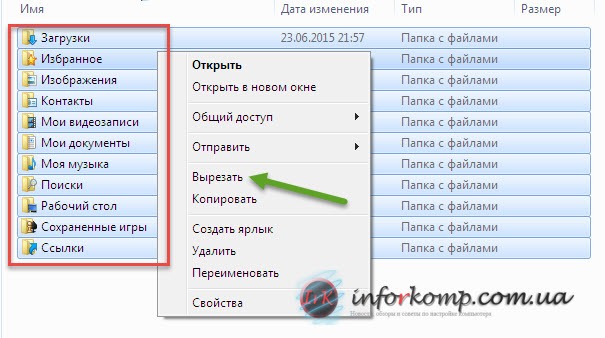
Then, go to the desired folder on another disk and paste them there. After the end of copying, we restart the computer and check the result. To do this, creating any file on the desktop, it should appear in the copied folder. If so, then everything was done correctly.
![]()
Due to the fact that we transfer the folders to another local disk, we can protect ourselves from losing our files. And we will not bother with this next windows update. By the way, I regularly use the transfer of user folders at work, and I want to say that this has saved me more than once in various situations. Due to the fact that I transferred the desktop to another drive, I saved a huge amount of time that I could spend on recovering files. So, think, whether to cost you to change the storage location or not?
Automatic desktop wallpaper change
The desktop is an important part of the Windows operating system, which occupies almost the entire space of the computer screen and is in our field of vision for a considerable part of the time. Therefore, it is very important that his appearance evoke positive emotions. This is achieved largely due to the placement on the desktop of beautiful background images (wallpapers).
The article will discuss how to configure the automatic change of the background image of the desktop with a certain periodicity.
 How to change the wallpaper (background) of the desktop
AT operating system Windows provides the ability to change the desktop background. At the same time, it is possible to use both images pre-installed in the system, as well as photographs created by the user independently, downloaded from the Internet or obtained from other sources.
At the same time, the standard means for changing the wallpaper is not in all versions of Windows. For example, in Windows 7 Starter, you can change the desktop background image only with the help of third-party software or by manually editing the system registry. Learn more about changing wallpaper in Windows entry-level versions.
Well, how to change the background of the desktop in other versions of Windows will be discussed in this article.
Change your desktop wallpaper in Windows entry-level versions
There are many limitations in Windows 7 Starter, as well as in some other initial versions of Windows. One of them is the lack of regular tools for changing the desktop wallpaper.
In the "trimmed" versions of Windows, changing the background image is possible only with the help of additional software or by editing the registry.
How to flip the image on the monitor
Many computer users sometimes get into a situation when the image on the monitor is turned over. This may be due to the pranks of children, accidentally pressing a certain key combination, the activity of joke programs, etc.
For obvious reasons, working with an "inverted" monitor is very inconvenient and the problem must be solved. The order of actions required depends on windows version computer.
 How to install Windows 10 gadgets
Many windows users 7 are used to gadgets - small handy tools that you can add to your desktop and quickly get up-to-date information about some important points: current date, weather, CPU load, random access memory and etc.
There are no gadgets in Windows 10. The developers refused to include them in new versions of Windows because of the possibility of their use by hackers.
Nevertheless, you can still install gadgets in Windows 10.
 How to make a screenshot of a computer screen
Screenshot ( english screenshot - screenshot) - this is a photograph of a picture displayed on a computer monitor, or a specific part of it.
To take a screenshot of the screen, it is convenient to use special programs, which exist quite a lot. A good option is the program Screenshot Creator. It does not require installation, is very easy to use, has low system requirements. There are similar programs that are not inferior to Screenshot Creator.
I want to note that you can create a screenshot of the screen without any programs at all, using only standard Windows tools. But this method will not provide the user with as many options as suggested in this article.
I present to you the way in which you can move the Desktop and My Documents to another disk. Why do you need it? Yes, because these folders usually contain a lot of all the "necessary stuff". On the one hand, these files may not be necessary for you, but they will be needed for the operation of the system. Or you want all your necessary data to be at hand (on the Desktop), but often they weigh too much, and the space on system disk better to leave for programs. What good is this way? That will not be involved here and all operations will be performed standard windows tools without third-party programs.
I already wrote in an article about Windows XP, but a script was used there and it was necessary to edit the registry.
Immediately I warn you. It is desirable that everything was beautiful and comfortable, to create on another local drive folder Documents. So that after performing the actions described below, you do not have junk or incomprehensible folders.
We move the folder with documents in Windows XP
1) Open the Start, click on it PKM on My documents and choose Properties.
2) A window will open in which we press the button Move and in the next window select the created folder for documents on another disk.
3) Click OK, then Apply, agree with the message windows xp, click Yes and OK =)
Moving the desktop to Windows XP
1) Follow the path C: \\ Documents and Settings \\ (Folder with your profile)
Find out what your folder and its name can be in the Start menu in the title
2) Find a folder there Desktop and cut it into the folder Documents to another drive.
Before moving, be sure to close everything that is open from the Desktop.
You can test your actions by deleting or adding a folder or document in variable folders and see the changes on the desktop and in my documents.
We move the folder with documents in Windows 7
1) Same as for Windows XP
2) Click Add folder and select the created folder on another disk
3) Click on the newly added folder of the RMB and select Set as default location.
Or simply select it and press the button. Set the save folder
The rest of the folders can be deleted right in this window, but if you are afraid, do not touch
4) Apply OK
Moving the desktop to Windows 7
1) Start -\u003e choose your profile (top right)
2) We are looking for a folder there Desktop (Desktop), click on it with RMB and select Properties.
3) Tab Locationbutton Move
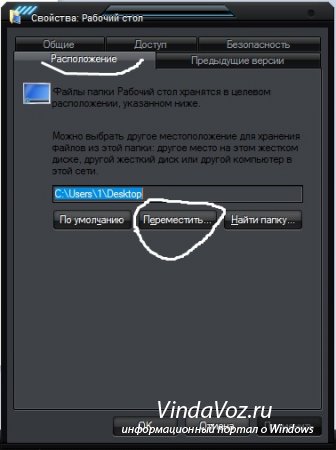
4) Select the created folder on another disk.
5) We agree with all the curses windows
That's basically it. Sorry that there are so few pictures, but I think it's clear where to click.