Every user knows and necessarily got into situations when something broke in the computer, wrong or bad work. There is nothing more irritating than a badly thinking technique, which sometimes hangs or for some unknown reason controls itself. Of course, all the details can break down, but the surviving modern computers mechanical parts. These include the hard drive.
In this review, not only theory will be considered. The authors at hand was a bad disk, the operating system which was loaded for about 20 minutes. It was decided to fix this and quite successfully!
What can go wrong
In order to prevent damage and to fix the hard drive in time or at least to save the necessary information, you need to regularly monitor the status. To do this, it is recommended to carefully monitor the "health" of your computer. Here are the moments that you should pay close attention to:
- watch out for mistakes. Technology, like man, has the property of making mistakes. There was one incident with hard drive - it's okay, but if errors appear all the time, you need to urgently contact the master.
- friction or beating. Since reading occurs with the help of a head, there is a chance that it will shift and begin to spoil the main disk with information. If you hear a suspicious knock on the system unit, this may well mean that there is a problem with the hard drive.
- analyze the work. If your computer does not save the file or if a recently saved document suddenly disappeared, you need to go to the wizard. If the long-term memory of the computer does not work well, the hard disk is guilty.
- recognition. The computer did not see the disk? Bad, most likely, this is the problem with the disk, not with the software, although this can be. Try to put the part in another system unit. If it works, it's all right.
- failures. Are you trying to download a document, and the technician is stubbornly unwilling to do this? Problems with downloading long-memory files are taken from breakdowns of the same part.
- long loading. If you open each photo half an hour, you can not remove a little weighing text Document, then this is also a hard disk problem.
It is not necessary to sit at the system unit all the time while the computer is working and listen to the "problem" detail of the problem. It's enough just to listen periodically and carefully monitor the state of the entire computer, then everything will be in order.
How to check the hard disk for errors in the table of contents
In general, if your hard drive is OK and does not need emergency help, you can conduct a preventive check for errors. This will speed up the computer and keep your nerves. Let's look at the algorithm for the actions of this useful procedure under the Windows 7 operating system.
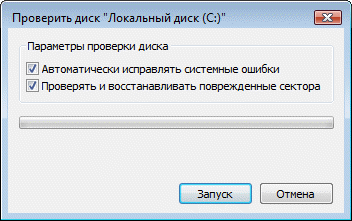
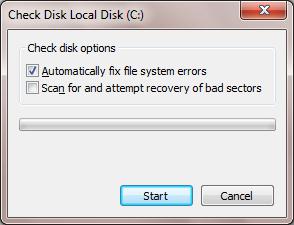
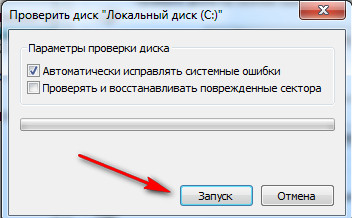
- in order for the computer not only to find problems, but also correct them, tick the "Automatically correct system errors" box.
- if you want to try to restore the physical structure of the disk itself, you need to select the function "Scan and repair corrupted sectors". Please note that this procedure will take a lot of time.
- did you have any doubts? Select both parameters and perform prophylaxis.
Another little advice. If you decide to "cure" a drive that is system-wide for a computer, do it right away before shutting down.
To any technique worked well, and you were easy to manage it, you need to monitor and care. Moreover, when it comes to the device, which is much more complicated than the stove and to understand it yourself, it is sometimes quite difficult. Do preventive work, and if necessary, call the master and then with your computer, and, therefore, your data will be all right.
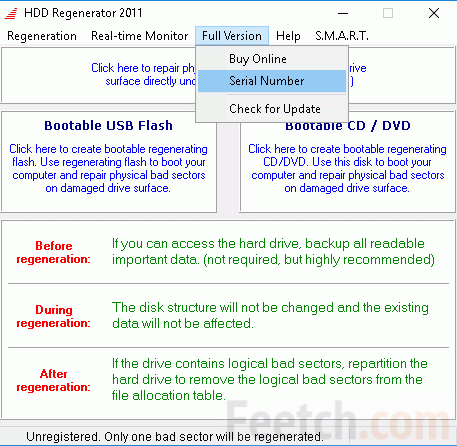
HDD Regenerator
This program is best downloaded from the portal (softportal.com). Run the installer.
If you leave the dock in the last window, the program will start immediately. We will not be postponed and will begin.
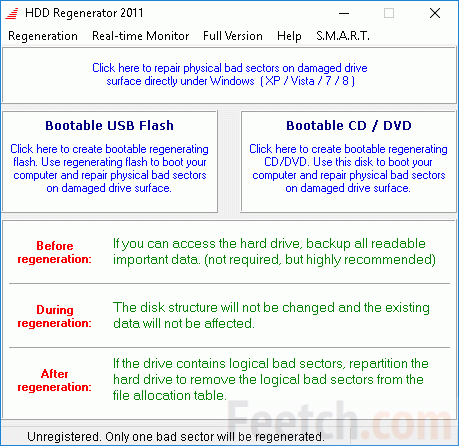
And what is that for the Full Version menu? It turns out that the program is paid, and our compatriot requires $ 90 for the key. In addition, when removed, it behaves worse than the virus. Requires reboot operating system and thinks for a long time.
R.tester
A certain free utility to check hard drives for errors, rather shake it. All executable files are put in the archive, run the program.
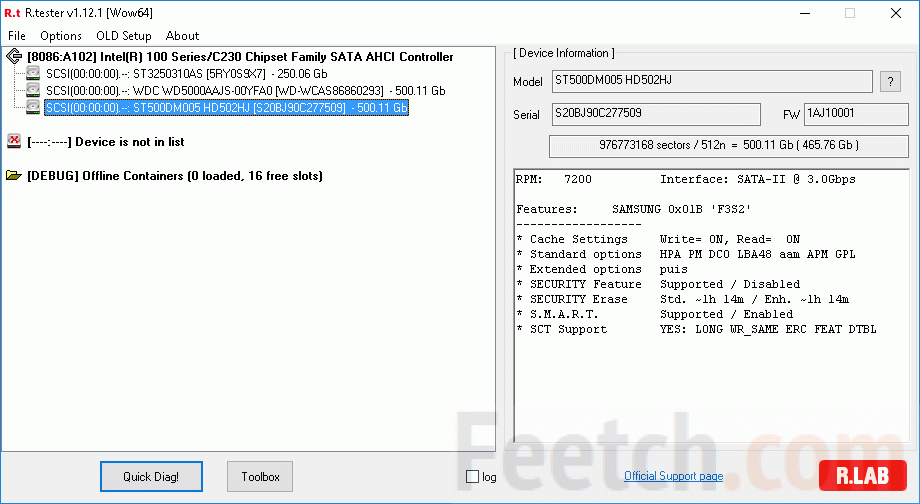
All hard disks are arranged in a column, select the checked, click the Quick Dialog to set the parameters.
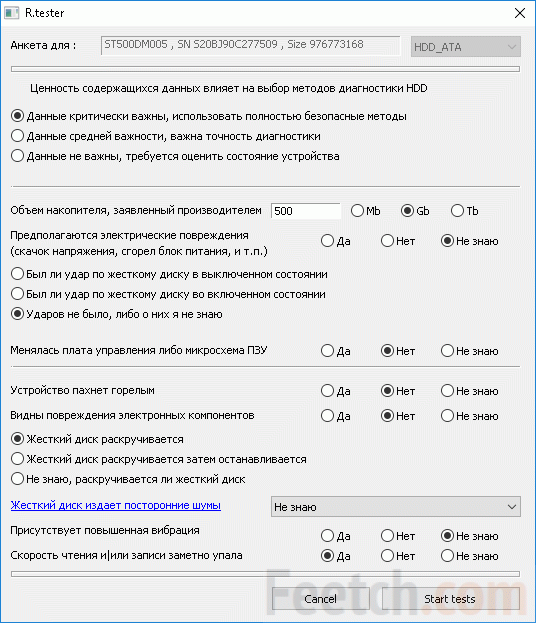
Everything is written in Russian, so comments are unnecessary.
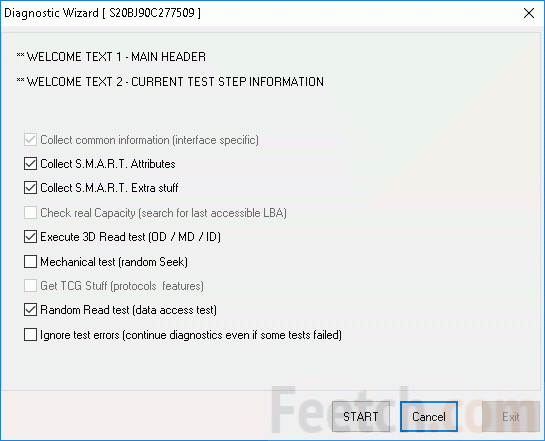
We expose the last daw. This means that the tests will continue even if one of them fails to pass. After pressing Start, the hard disk starts to hum, and we are waiting for the results ... And that's what they are:
The question is what to do now ... Most likely, the utility read SMART information. But the question is not this. R.tester will allow you to test drives, but how to recover them? Damaged sectors can be noted and not used for reading. What program does this?
What to do with the old hard drive
In today's world, there are two types of work with damaged media. Such a hard disk carries the so-called bad sectors. They can not be read by the system due to disk corruption, viruses or software errors. In this case, two methods are used:
- Mashing the faulty sector. If only the CRC checksum is invalid in it, this can save the area. To do this, information is intentionally overwritten. It looks like low-level formatting one sector.
- Remapping marks bad parts and gives the controller a command not to contact them any more. The information here is irretrievably lost.
Remapping Software
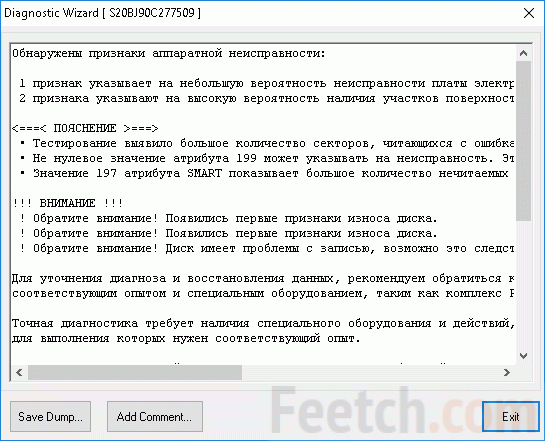
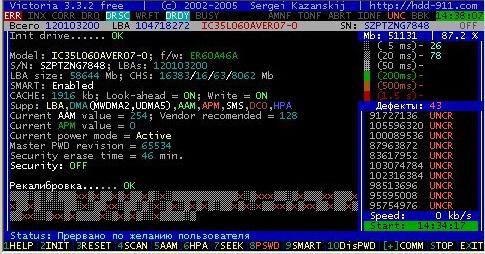
Many recommend that you use the Victoria software package to restore the disk. Run this application on behalf of the administrator. In addition, you often have to copy to system folder the program driver. The main actions are performed from the test window. It is here that there are two jackdaws, erase and remap, which attempt to restore the functioning of the equipment. For starters, it would be nice to get acquainted with SMART information. Here is an example for a healthy carrier.
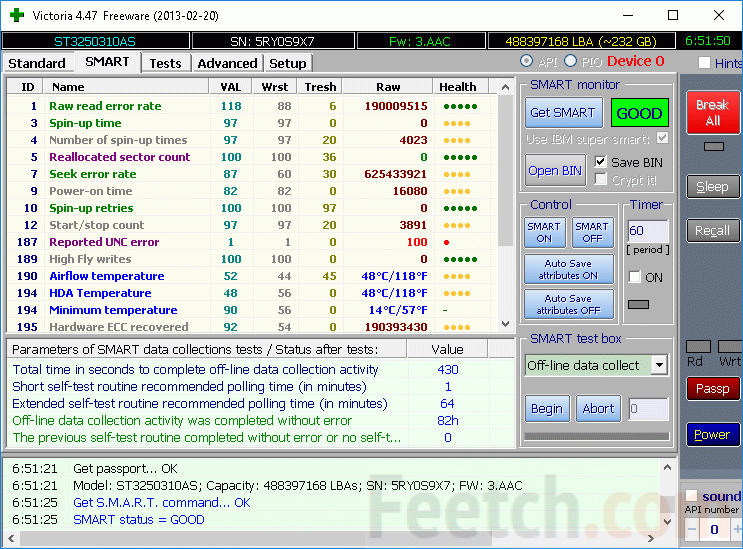
Health is normal, but there are problems with unrecoverable errors. Nevertheless, this disc works pretty well, given its solid age. But another example, where the system does not load, we will restore it.
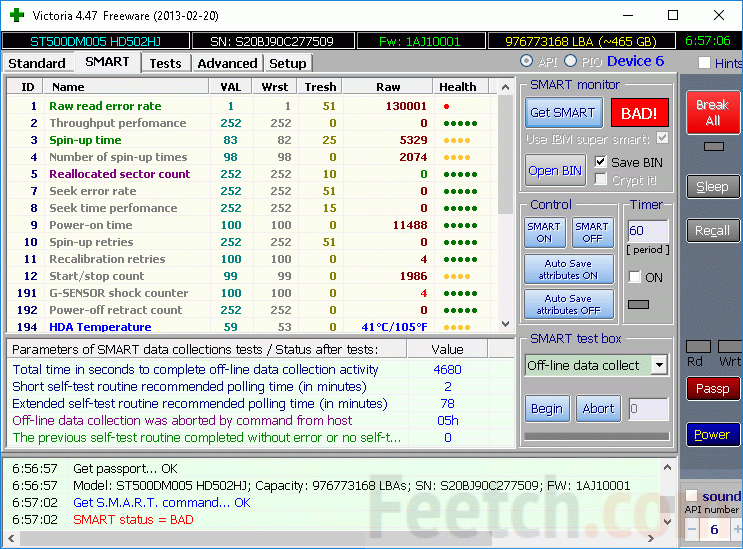
The problem in the first line should be solved. We will test it with a test with mashing bad sectors to understand how good the program is.
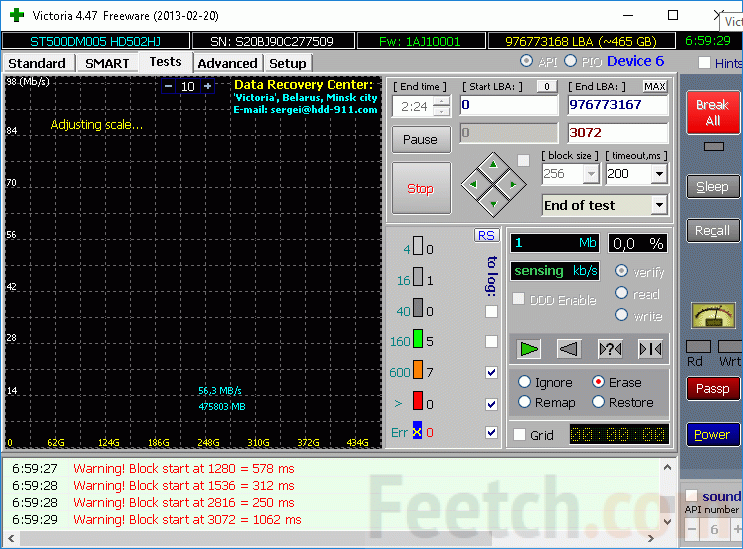
At the moment of starting the mashing, the interface informs you about the procedure being performed. See the bottom line of the report.

Depending on the success of the operation, the log can be of two types. Complete and Fail. The first means that the cluster managed to be brought back to life, the second one needs a remapping.
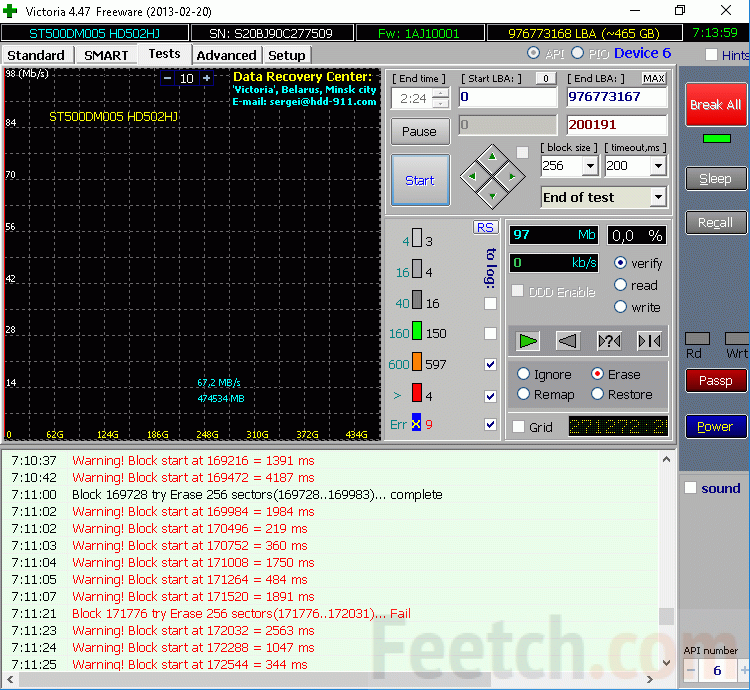
In our case, the first 600 clusters produced about 9 errors, of which only two were eliminated by overwriting. This means that about 8 GB of space is faulty, 2 of which can be recovered. But then you still need to remapping to reassign the addresses. Unfortunately, the program does not support continuations after a pause, the process begins again. This is a big drawback. But you can set a starting point for scanning (after the end of the previous session, write down the address of the last used block). The selected Verify checkbox means that only verification is performed without information transfer.
Remapping kills the entire cluster at once. The unit will no longer be read, but will be replaced by a spare one, and, therefore, will not cause the disk to run slowly. There is a certainty that a small part of the data will be lost in the sections, but let's wait for the result. However, from recent versions Windows this procedure does not work, errors are returned. Only possible way recovery sectors. So you can save something. Most likely there is no need to bother with searching for other programs, because the limitations are imposed by the operating system.
Conclusion: hard drive remapping should be done from under DOS. To do this, create a bootable media.
Creating bootable media Victoria
To work from under DOS, you need a medium. Let it be a flash drive. The kind administrator of the resource (remontcompa.ru) uploaded a ready image to Yandex.disk at yadi.sk/d/GpbxFHQed77nz, for which we all should thank him. Creation of a flash drive the mentioned resource suggests to conduct by means of tools WinSetupFromUSB, but we will use this time command the Windows string. Because this is a proven and reliable method.
- We launch command line on behalf of the administrator.
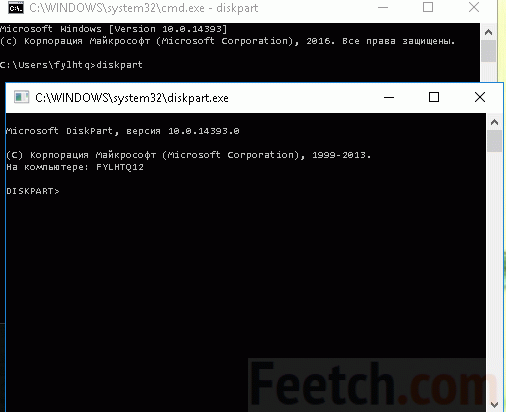
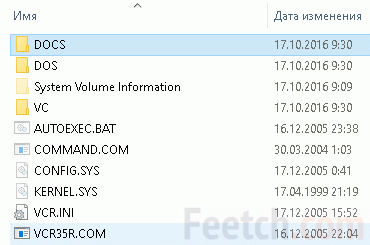
You can close the windows of the utility and the command line. Then unpacked iSO image Victoria, and the content is moved to the root directory. Across BIOS computer must be configured to boot via USB port. After that, you can restart in order to start the planned disk remapping. The image is not simple, but it is opened by the 7-zip archiver. After copying the flash drive looks like this.
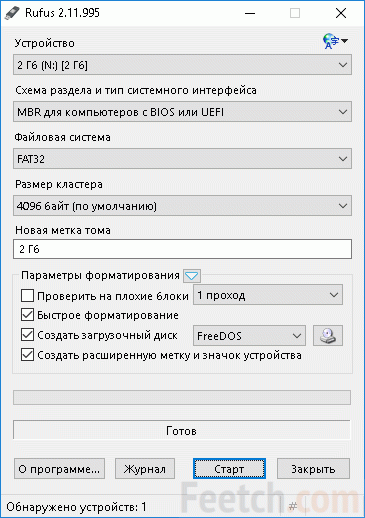
If it does not work out
Not everyone can create a flash drive from the command line. In this case, download the program from rufus.akeo.ie/. Under the instructions given there, create a medium. A type file system choose FAT32. After the process is completed, copy the unpacked image of Victoria there with the replacement of all the same files.
How to work…
Subject
At hand was a disk with a suspicious virus. As it turned out later, malicious software erased several dozen clusters at the very beginning of the media. And they were read through time and with difficulty.
The disk barely hired for 4 years, of which half it was not exploited at all, and discarded? After processing under Windows, which consists in correcting sectors by mashing, as expected, the system on it stopped loading.
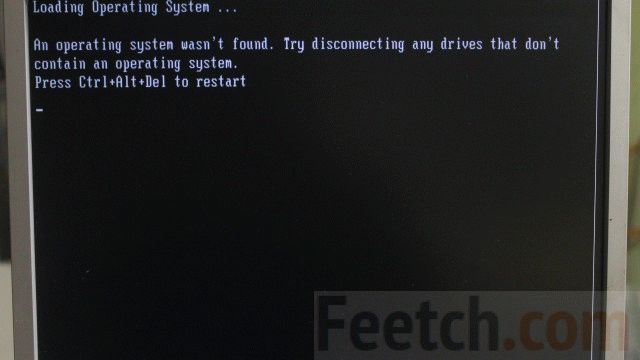
Let's try to fix the situation ...
Physical connection
Feature of the program Victoria is that it can only work with old IDE disks. Those who want to use a modern system unit, you need to find a good controller on the PCI bus, simulating the presence of IDE. In our case, the drive was connected to one of four SATA ports, as shown in the picture.
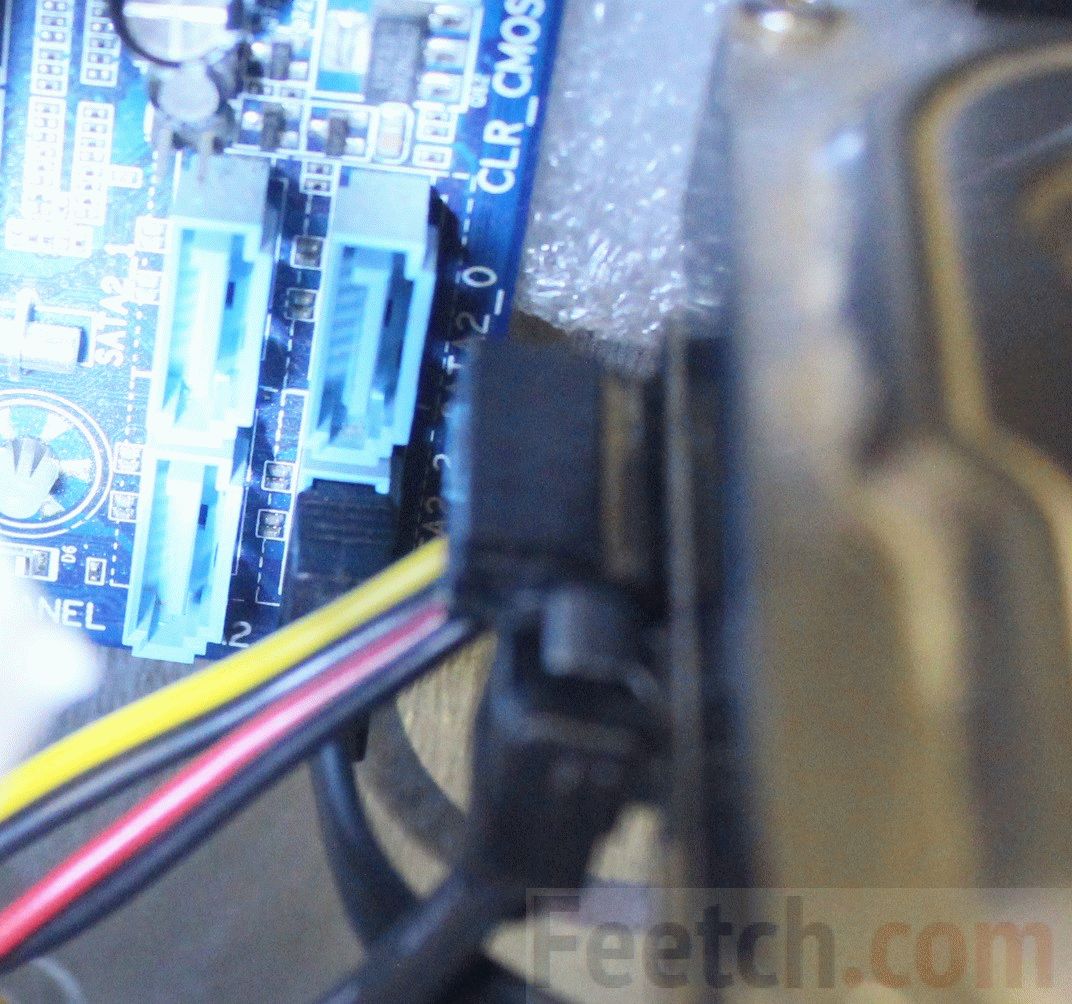
This motherboard was released in those days, when still remembered that in the world there are hard iDE drives. Although physical interface not available, there is the possibility of emulation for compatibility with the old software, which was useful to us this time. To enter the "legacy of a difficult past" it was necessary to set a couple of settings (see photo).
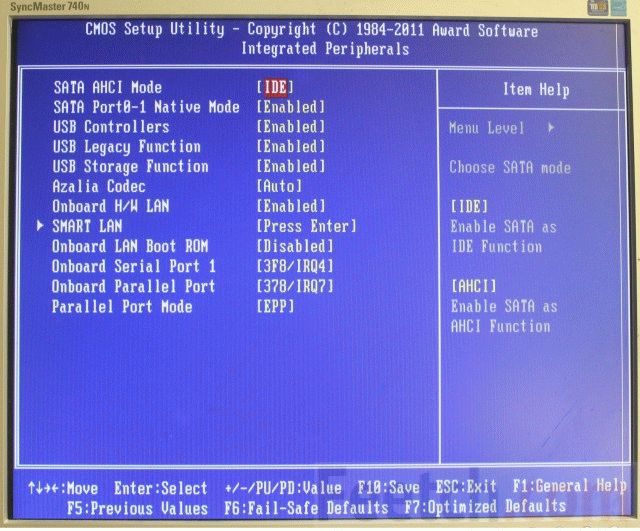
After that, four ports acquired values:
- Master of the first channel
- Servant of the first channel
- Master of the second channel
- Servant of the second channel
Our hard drive was at number three. And he was able to see Victoria.
Loading
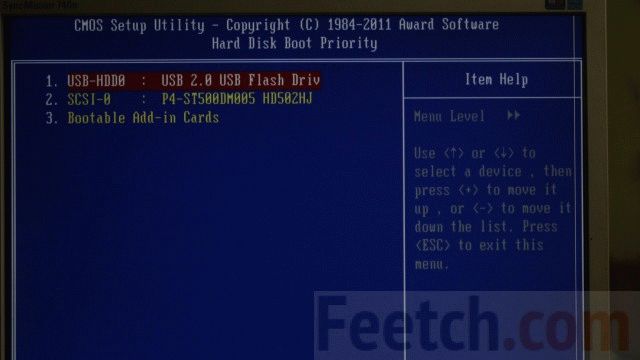
To flash a boot device, you need to report it to DIOS. To do this, press DEL and set the media polling sequence.
The interface of the program
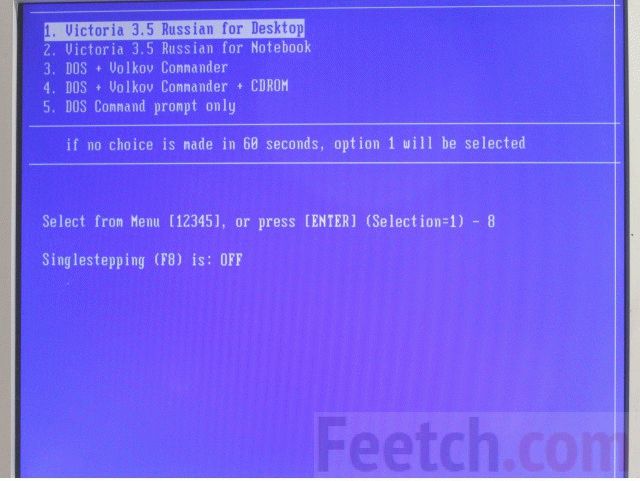
After booting from the flash drive, a menu will appear. You do not need to touch anything, or press the option you like, if it does. The working window of the program appears.
After a while, the main program window will appear.
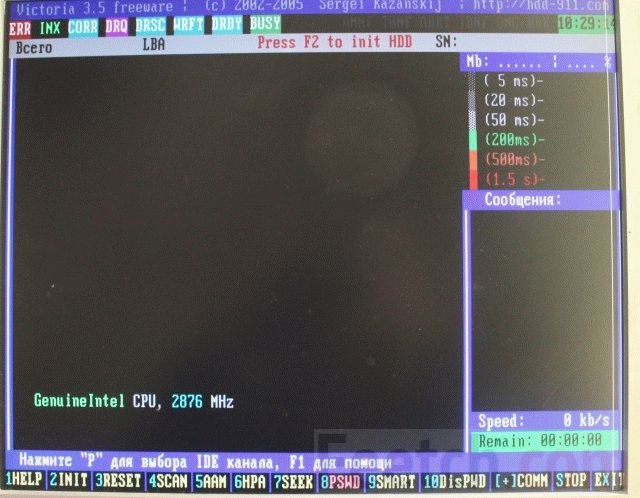
Using the Latin P on the keyboard (Russian letter "z"), select the media. In this case, the controller motherboard is seen by the program as a PCI bus extension.
![]()
We lead the arrow to the fifth menu item and select it. A table appears with a list of virtual IDE channels, where at number three (after three hours of torment), our disk finally appears.
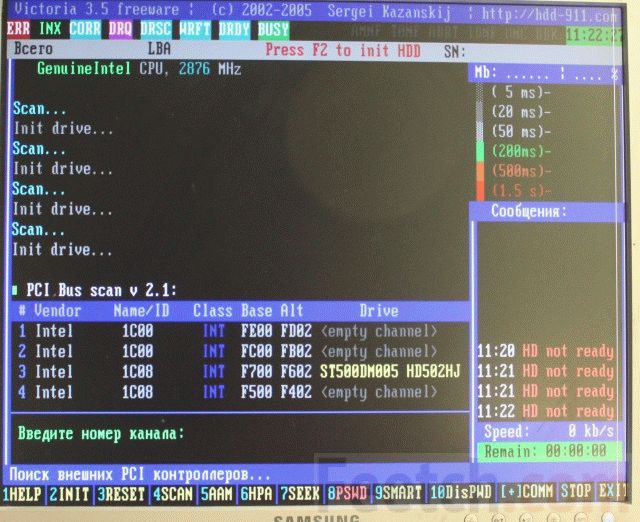
Rather, press the number 3 on the keyboard and ENTER. The hard disk is connected to the program.
Remapping
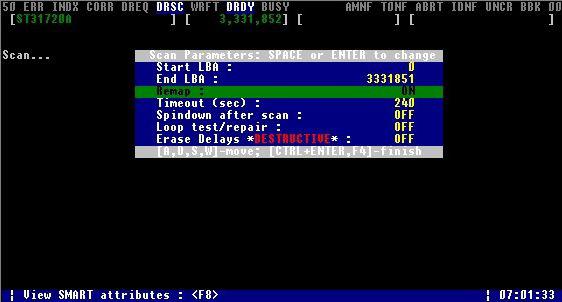
To start the test, press F4, and the scan options appear. The first two digits - the initial and final sectors, we do not touch them. Linear reading is left. Change the fourth position with the arrow keys to the left and right until Advanced REMAP appears (an advance estimate of the damaged area with the lock of only one cluster with the longest access time).
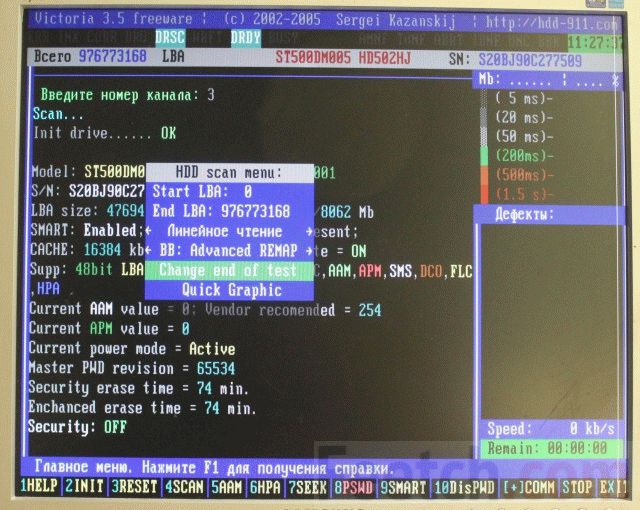
Press ENTER to start scanning. In the last line about the chart, it is recommended to set not Quick Graphic, but Off. So you can watch the digital data:
- In the upper right corner - the number of sectors with the specified access time.
For health hard drive, as well as any other component of the computer or laptop, you need to monitor, so it did not go out of order ahead of time. In this article we will get acquainted with the hard disk scan utility built into Windows chkdsk. With its help we will perform HDD diagnostics and correct existing errors.
A hard drive is an integral part of the computer and a non-respectful attitude towards it can disable it, in this case everything that was on it will be lost all its working time and it is unlikely to help here on its own. And to not bring to such a case, you need at least occasionally to check hDD for errors. Today I will not talk about powerful utilities, such as Victoria or MHDD, about them some other time. In today's article, let's look at the built-in utility in the Windows operating system - chkdsk, which is intended for testing the hard drive and fixing problems on it.
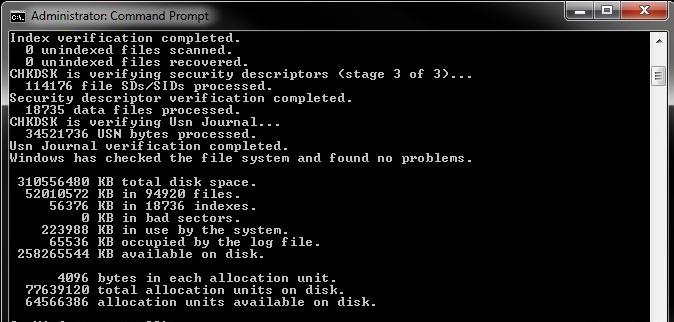
And so, you need to open the command line. It is possible through Start - in search cmd, or use "Win + R", the "Run" dialog box will open, in the line enter - cmd and press OK. The Windows command prompt opens.
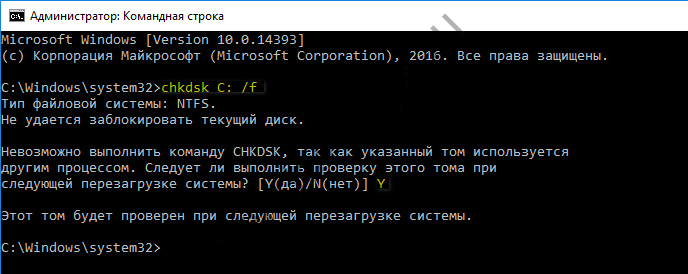
There enter the command: chkdsk c: / f / r
Where chkdsk is the hard disk check command
c: - the letter of the hard disk, if there are more than one disk or partitions on the computer and you need to check the other one, just type in the desired letter, for example d: or e:
/ f - sets the correction of errors on the HDD.
/ r - fixes errors on the disk and restores a piece of data that can be read.
There are other commands to familiarize with them you need to enter the command: chkdsk /? Where will the full list of chkdsk commands be displayed.
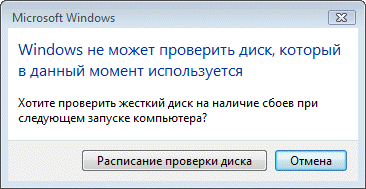
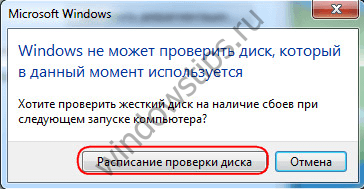
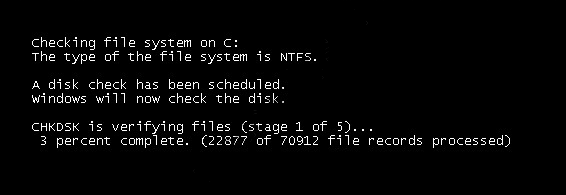
After entering the command, the utility should start scanning. As the scan ends, it displays its results. If you want to scan system disk or partition (C), then the following message will be displayed on the command line:
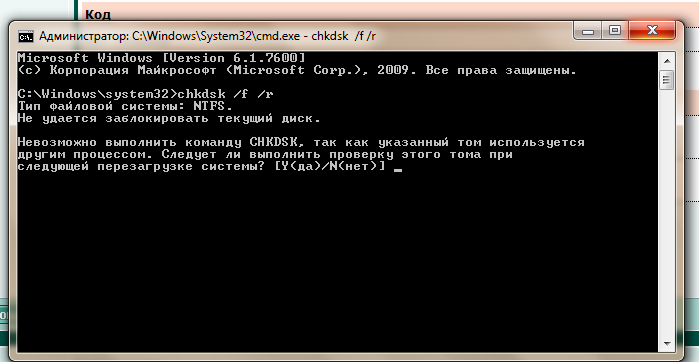
The program will not be able to scan the system drive while it is running, so you must restart the computer. And in order for the scan to begin immediately before the OS is loaded, at the bottom of this message at the command prompt, enter Y and press Enter. The computer restarts and the disk is scanned.
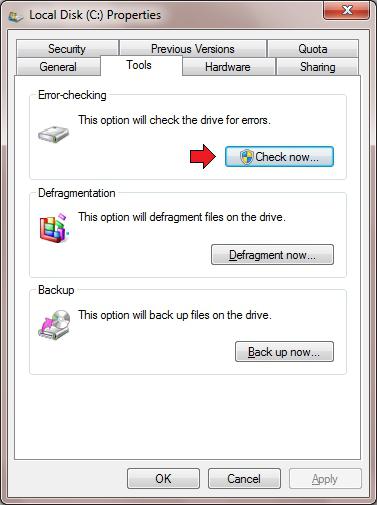
Built-in utility in Windows for hDD Checker you can run it without the command line, it has a graphical mode. In order to start the test in graphical mode, you must enter My computer, select desired disk, for example C: / click on it with the right mouse button, select "Properties" in the drop-down list of the context menu. Next, on the "Tools" tab, under the "Scan Disk" item, click on "Run Scan".
In the window that opens, click Start.
If you check the system disk (C), the computer will ask you to reboot (the Disk scan schedule) and only then start the test before loading the OS, if you want to scan any other disk or partition, the scan will begin immediately.
How to disable chkdsk scan on startup?
Sometimes users encounter such a problem when the chkdsk utility automatically starts scanning the HDD when the computer boots. This is because hard disk errors are found and the system automatically tries to fix it. It is not recommended to disable automatic scanning of chkdsk, it can damage the hard disk. If nevertheless decided to disable, then you can do so: enter the command line - chkntfs / x c: d: and press Enter.
Where "c" and "d" are the letters of the disks (partitions). And after that, automatic scanning of chkdsk at startup will be disabled.
This review is built into the Windows programs CHKDSK for checking and fixing errors on the hard drive comes to an end, if you have any questions about this topic, then please contact.
There are errors. Checking the drive for errors can be performed both in-built by OS programs and by third-party programs. Often errors on the HDD accumulate gradually and for the time being do not create any inconvenience. When their number becomes large, the OS can begin to be capricious, and in the most neglected cases, all information stored on the drive can be lost.
Causes of errors
Errors on the HDD in the vast majority of cases arise due to:
- incorrect operation of the software;
- incorrect power failure with the operating system running;
- the computer hangs while recording on the HDD.
To ensure that the consequences of errors do not lead to the most unfortunate outcome, from time to time the disk must be checked for errors.
Chkdsk utility
Any operating system of the Windows family includes its own tool - chkdsk. It can be run both from the graphical shell and from the command line. The second case is very convenient if the OS does not boot, and all manipulations are performed from the Recovery Console.
Graphical interface
Open the explorer by double-clicking the "Computer" icon on the desktop. (Hereinafter: PCM - right mouse button, LMB - left button mouse.)
- Click on PCM on any logical disk, which must be checked.
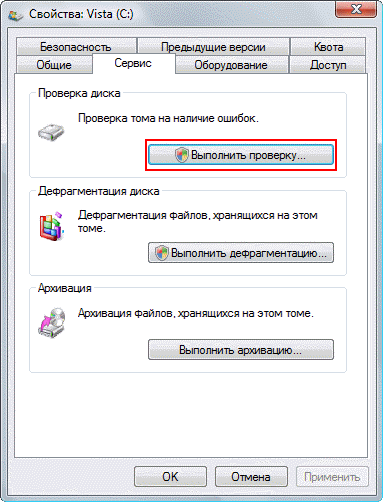
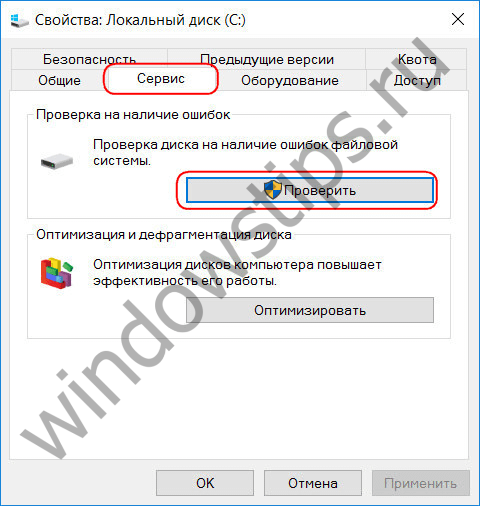
- In the menu that opens, click on the "Properties" line.
- At the top of the properties window, click LMB on the "Tools" tab.
- Click on the button "Execute verification".
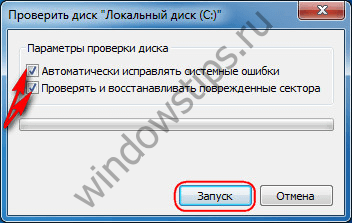
- Here put both checkboxes in the checkboxes and click on the "Run".
If the selected partition is not a system partition, the disk check for errors will start immediately. If you want to check the C: drive, the OS will notify you that the operation can not be performed at this time. Do not consider this behavior of the OS a failure. Since the partition contains all system data, it can not be disabled while Windows is running.
Simply click the "test schedule" button and reboot the computer. After turning on the PC, the disk check for errors will begin even before the operating system boots.
Command line
To run the chkdsk utility from the command line, follow the steps below.
- Click PCM on the desktop and in the context menu select Create Shortcut.
- In the window that appears, you will be prompted to select the executable file, but the easiest way is just to write into the input line "cmd" and click "OK."
- Now click on the PCM for the shortcut you just created and select the line "Run as Administrator". The command prompt opens.
- Type: chkdsk [the letter of the section]: / f / r.
As when starting from the graphical shell, checking the disk for errors indicates that the program can not be executed if you specify a system partition. At the same time, the screen will ask: "Do you perform the task after rebooting the PC?" Press the Y key to answer in the affirmative, or N, if you do not want to check the HDD.
If the OS does not boot
If due to a file-related problem windows systems refuses to start, hard check disk for errors can be started from the Recovery Console. Open the BIOS by pressing the DEL key on the initial boot screen of the computer. Set as boot device (First Boot Device) disk drive for laser discs. Insert the Windows Installer CD.
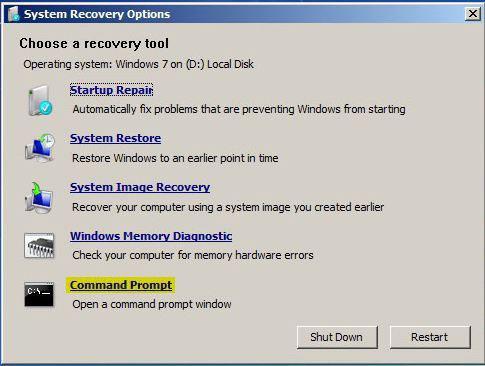
After downloading from the DVD, the language selection window opens. At the bottom of it will be located the item "System Restore". Remember that when there are errors on the HDD to roll back to the early recovery point is meaningless, overwriting data can lead to even more problems.
In the window that offers a choice of recovery options, click the "Command Line" button. The syntax of the command remains unchanged - chkdsk [drive letter]: / f / r. In this case, the disk check will start immediately without rebooting.
Third-Party Software
If the utility chkdsk does not result in a positive result, and critical errors due to the HDD continue to occur, you should perform a more thorough check with the help of special programs. Manufacturers themselves hard disks produce special tools for testing their equipment. In addition to this software, you can use the Victoria and MHDD applications.
Be prudent! Checking the disk for errors by a third-party application should be performed only after backups of all important data have been created. And you need to save the copies of the data in the external storage.
Tools for HDD diagnostics can be found on the CD-ROM that came with the drive, or on the official website of the manufacturer. Important: always use such tools only for testing those brands of "hard drives" for which they are intended.
Victoria
The Victoria program can be downloaded from the official website for free. In this case, it is desirable to download not an application for Windows, but boot image, which can be written to a CD using, for example, Daemon Tools.
After recording the image, reboot, enter the BIOS and select the CD-ROM as the first boot device. After starting the program, press the F2 key to read the drive's passport and make sure that the program can access it. If several HDDs are installed on your computer, you must first select the one you want to work with by pressing the P button. The hard disk will be checked for errors after pressing F4. All information about errors will be displayed in the "Messages" area.
MHDD
The MHDD utility, like the previous one, needs to be written to a CD-ROM, and then downloaded from it. On the main screen, you need to select the device with which the program will work. In this case, for selection, you have to press the key with the digit opposite to which the name of the drive is located.
To check the hard disk for errors, click on the F4 button. A list appears on the screen. additional parameters. Do not change anything, press F4 again. During the test, statistics will be displayed in the right part of the window, if a number other than zero appears opposite the X and S signs, then there are bad sectors on the disk.
So, the disk check for errors has been completed, the program has found a lot of problem sectors. How can I fix them? To get rid of the bad sectors on the drive, press the F4 key again, but this time in the additional parameters window set the value of On to the parameter Remap.
The failure of any component that is part of the computer, an unpleasant thing, resulting in a loss of time and money to replace it or repair it can happen to any computer, be it a regular PC or a status laptop of the apple brand. In most cases, you will have to look for a workshop where you will take macbook repair or a conventional laptop. It is much more unpleasant when a hard drive goes out of order. To replace one "piece of iron" the other is not difficult, but with the loss of data stored on it, sometimes, it is difficult to reconcile. On how to prevent the failure of the hard drive, check it and assess the risk of failure and go further speech.
Means for verification
None software can not pre-warn of a sudden breakdown of the mechanics, engine failure and similar problems. Here you have to rely on the culture of production, the name of the producer and the good work of the departments of the output control.
With other adversities, such as: the degradation of the surface of the disk, easier to understand. In time noted problems in the work of the disk, sudden slowdowns, errors and a test drive test will tell whether it's time to order new disk and urgently rewrite the data to another storage device, or the drive ahead still has a long life.
Consider how you can check the disk staffing windows tools, and also we will understand with such popular means of testing of drives, as Ashampoo HDD Control 2, HDDScan and Victoria. The built-in validation tools will find and fix errors in the file system. Third-party utilities will show the status of the disk surface, the presence bad sectors, will cure them if there is such an opportunity.
CHKDSK utility
You can run this program using the command line or the boot disk. For this:
- You must press the key combination "Win" + R or "Start" -\u003e "Run".
- Enter the command: "cmd", press Enter.
- Enter the command: "chkdsk c: / f".
Let's explain the commands: "c:" is the letter of the disk that you want to check, the "/ f" option checks and corrects errors. If you add the "/ r" option, the program will search broken sectors.
Let's make an explanation. "Bad sectors" are areas of the disk, you can not read data from which. The very appearance of them is a bad sign, but admissible, but a constant increase in their number suggests that the disc is probably already "not a tenant." We must think about its replacement, and for a long time not to delay the decision.
So, the chkdsk program will check the disk, the scan time depends on the disk volume and the number of files on it. The system drive will be tested only after reboot. Have patience and wait until the end of work. When finished, a report will be displayed.
If you can not log on to the system, you will need to use the recovery tools and run the program from there.
Standard Windows Validation
Another way to check the drive is to use the built-in OS check. For this you need:
If the selected hard drive is used by some program, then it must be stopped to check it. Click the "Disconnect" button and the test will continue. The scan time depends on the size of the disk and its fullness.
To check the system partition in this way, the system will report that the testing will continue after the reboot. Agree with this, after restarting the computer, wait until the validation is complete.
With all due respect to Microsoft, detailed information about the health of the disk can only be provided by third-party programs. If you need laptop repair, in Lyubertsy there is a good workshop where you can check your hard drive. Moreover, they will do this using third-party software, which we will discuss further.
Ashampoo HDD Control 2
This program is paid, but a trial free period will give an opportunity to check the drive. The program is multifunctional, with its help you can perform many actions with the disk, including defragmentation, cleaning the disk, etc. Now we are interested in the modes "Testing" and checking the surface.
To run the scan, you must:
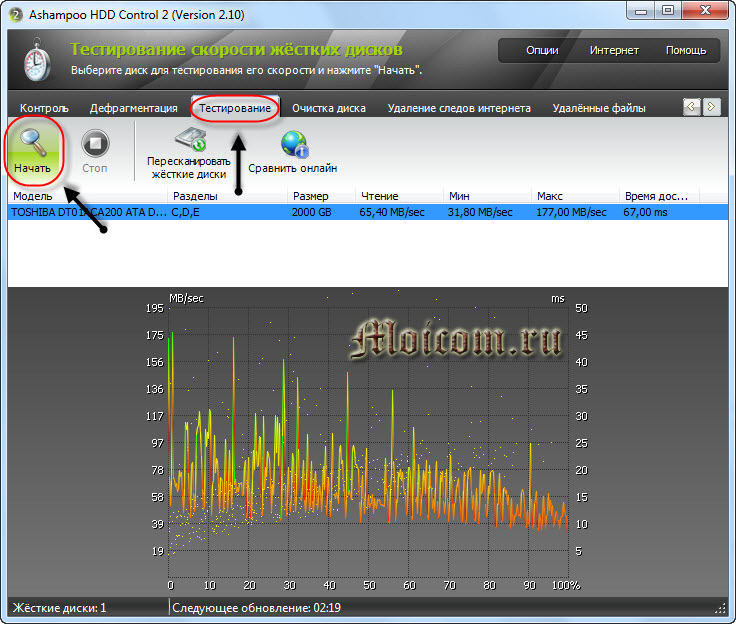
To determine the state of the disk surface, go to the "Control" tab and click on the "Surface testing" section.
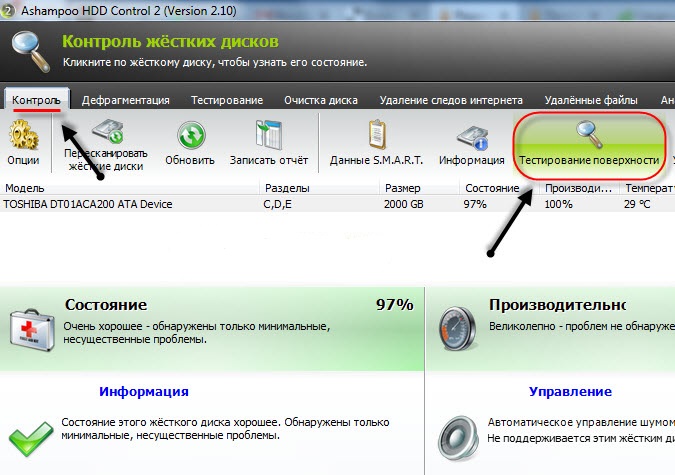
You can see the progress of testing in the window that opens. To indicate the state of the surface of the disc, color marking is used:
- Blue - sector is not checked.
- Green - no mistakes.
- Red is a bad sector.
If the disc is large, the check may take a long time.
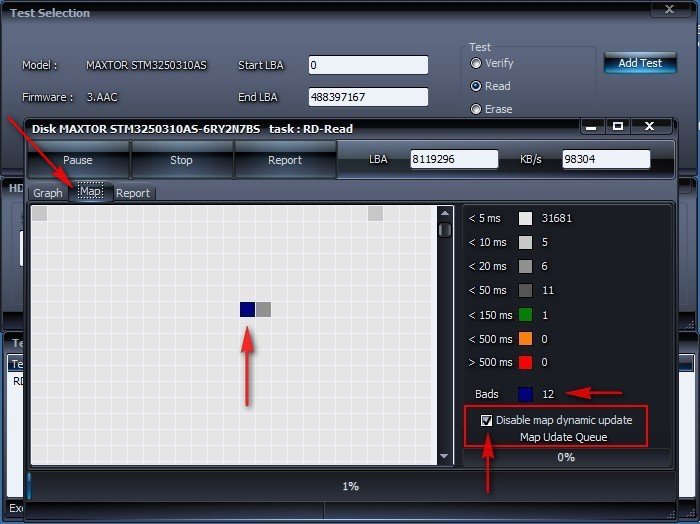
HDDScan
A popular program for obtaining information about the disk, its verification and correction of errors. To start testing, you need:
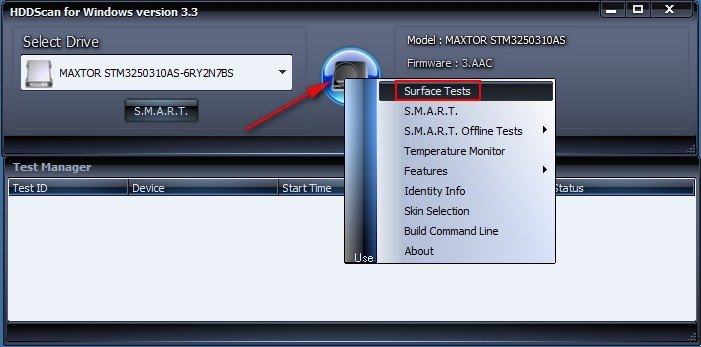
To view the status of the disk, go to the "Map" tab, where you will find all the information about the surface of the disk. The sectors are marked with squares different color. They mean:
Victoria
Perhaps the most popular utility for determining the health of a hard drive. It can be run both from Windows and from the bootable media, if there is no possibility to start the operating system. Consider working with the program running from Windows.
After launching in the main window of the program, you will see several tabs, the most important of them:

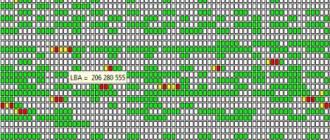
In order to start the test, you must press the "Start" button and wait for the end of work. First of all, you should pay attention to a column of colored rectangles with numbers near them. With the help of color coding, information about the reading speed from disk sectors is displayed. Ideally, the values should be near the rectangles with different shades of gray.
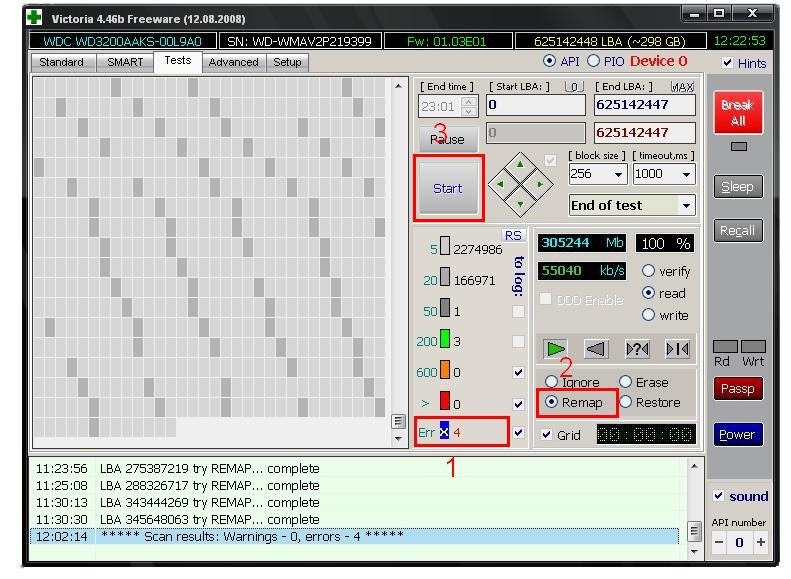
Figures near the green or orange rectangles show the number of sectors, which you have to spend more time reading. The red rectangle shows that there are sectors on the disk, you can read the information from which, but you have to spend a lot of time for this.
Most likely, these "red" sectors are candidates for bad ones. You should remember their number, and after some time to re-scan. An increase in their number indicates a degradation of the surface of the disk. Moreover, that soon there may appear areas that are marked in blue.
You can try to restore these "broken" sectors. To do this, set the "Remap" mode and start the test again. If possible, the program will restore these areas of the disk. If the "blue" blocks are left, you should think about replacing the hard drive.
Failures in windows operation, emergency power off of the computer, experiments with the software for control disk space, the consequences of the penetration of viruses - these and other problems can lead to automatic start a regular utility Windows Chkdsk, designed to fix errors in the file system of hard disks. Incorrectly completed operation of the operating system with files leads to errors of the file system, and sometimes to its damage at all. In emergency cases, the Chkdsk utility turns itself on before running Windows, scans disk partitions and corrects errors. However, the fact that there are problems with the file system may not have anything to do with the usual use of the computer and only when you try to manage the disk space. So, for example, when trying to reduce the partition of a disk with standard Windows tools, we can receive the following notification: "It is possible that the volume chosen for compression has been corrupted. Use the Chkdsk program to troubleshoot problems, and then try compressing the volume again. "
In this case, the disk check does not automatically start. How to start Chkdsk manually in Windows 7, 8.1 and 10? How to fix disk errors with Chkdsk, if this problem caused the inability of the operating system to boot?
Inside Windows, you can run the Chkdsk utility in several ways.
1. Starting Chkdsk using the Windows GUI
To start Chkdsk, in the system explorer on drive C, right-click and open "Properties".

In the window of the opened properties of the disk partition, go to the "Tools" tab, and in it we press the "Check" button (or "Check" for Windows 7).
In the versions of Windows 8.1 and 10, if everything is in order with the disk file system, in the next window that appears, we will see a notification that a check is not required. But if you want, you can start the disk check by the Chkdsk utility by clicking "Check Disk".
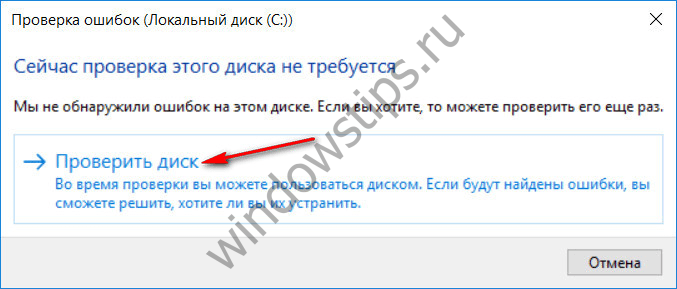
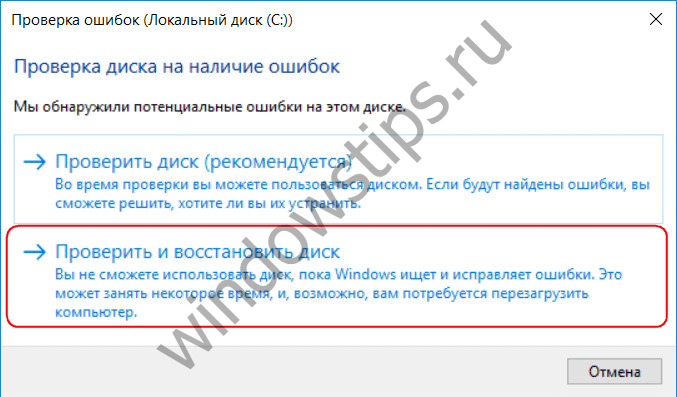
If the system suspects that there are file system errors, this window will have a button to start the scan and restore the disk.
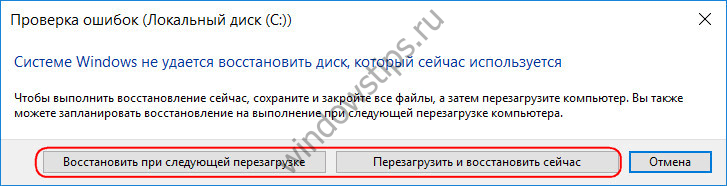
For Chkdsk to work with the C drive, you must restart the computer. You can do this immediately or postpone the start of the scan until the next reboot.
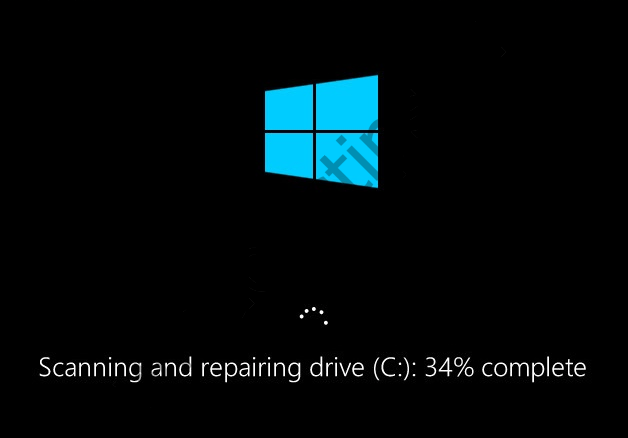
After restarting the computer, we can observe the work of Chkdsk.
In Windows 7, running Chkdsk is slightly different: to the pre-installed option of automatic error correction, you can add another possible option - check and restore damaged sectors hard drive. When activating this option, it should be noted that in this case the Chkdsk operation may take longer.
As in the case of Windows 8.1 and 10, in version 7 the system drive C can not be checked within the operating system. You must restart the computer to start the test. Click "Schedule disk check".
When checking the non-system partition of the disk, if it is used by some programs, the situation is simpler than with the system partition. In the window with the notification that the disk is currently in use, you just need to click the "Disconnect" button to, accordingly, disable this section for the duration of the scan.
2. Running Chkdsk using the command line
To start Chkdsk using the command line, first, respectively, start the last one.
In the command line, type the command by type:
In this command, instead of the C drive, each time we substitute the letter of the desired section on which verification is required. If Chkdsk should check the system partition C, as with the graphical interface, you will need to restart the computer. After the message appears on the command line that you can not lock the specified disk, you must enter "Y", then restart the computer.
In addition to the / f parameter responsible for correcting disk errors, Chkdsk can be started with the / r parameter, which is used to search for bad sectors and restore data. As a result of Chkdsk's work with this option, hard disk clusters with unreadable sectors will appear as corrupted (bad blocks) with the transfer of their functions to a new cluster. Therefore, it is recommended to run Chkdsk with the / r parameter only when the usual error correction - running the utility with the / f parameter - did not bring the required results. On the example of the same drive C, the command will look like this:
3. Running Chkdsk in an unloading Windows
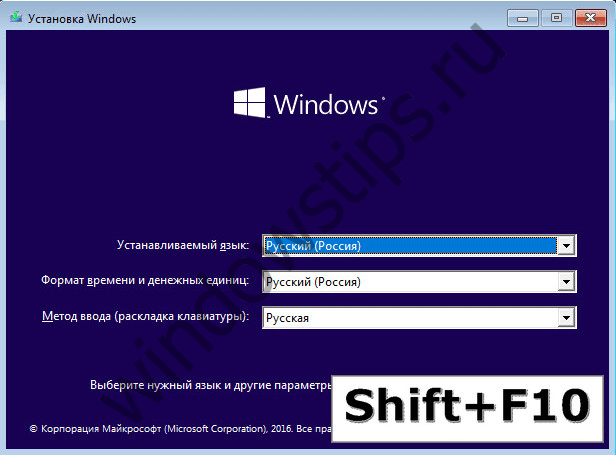
If Windows hangs at a certain stage of the download, one of the possible causes This problem is file system errors. In this case, you need to start Chkdsk by booting from the rescue media. As such, you can use a regular installation media with versions of Windows 7, 8.1 or 10. With its help, the Chkdsk utility will run inside the command line. At the first stage of starting the installation process, press the command line launch keys - Shift + F10.
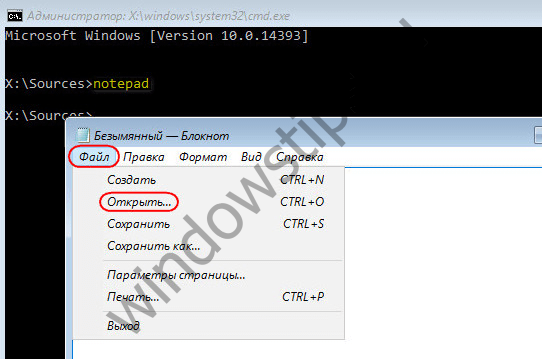
In the opened command line, before you start the Chkdsk command, you need to specify what letters the disk partitions are defined. This is easy to do with a notepad. Running it with the command:
We press the menu of Notepad «File», then - «Open».
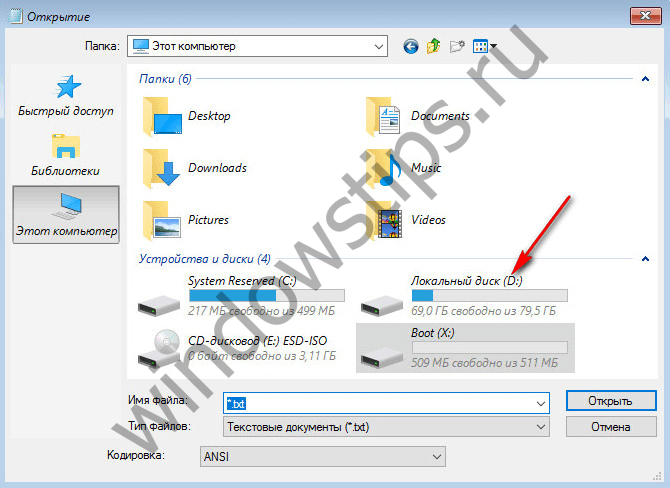
In the opened guide, we memorize the new notation for disks. As a rule, in Windows 8.1 and 10, the partition of drive C (as it is inside the running operating system) is listed as D, since the letter C is given to the first technical section of the system. And all the other sections go with a shift to one letter of the alphabet.
After defining the letters of the disk partitions, we close the notepad, then, returning to the command line, enter the command according to this type:
![]()
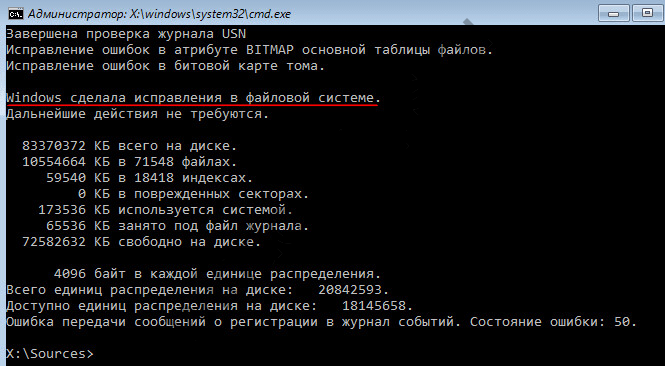
As with working with Chkdsk inside Windows, you first need to try to fix the disk errors by running the utility with the / f parameter. And only if the problem is not solved, only then run the command with the / r parameter, as indicated in the previous paragraph of the article.
For cases of the failure of Windows to boot, you can pre-record an emergency Live-disk with a selection of various tools to restore the operating system. Among such, for example, AdminPE based on WinPE. Its image for recording on a disk or a flash drive can be downloaded on the official website of the project Adminpe.Ru. Using AdminPE, you can run the command line and enter the above commands to run Chkdsk. But in this Live-disk, the Chkdsk utility has its own interface and is launched using a script. A shortcut to launching the utility is rendered directly to the desktop.
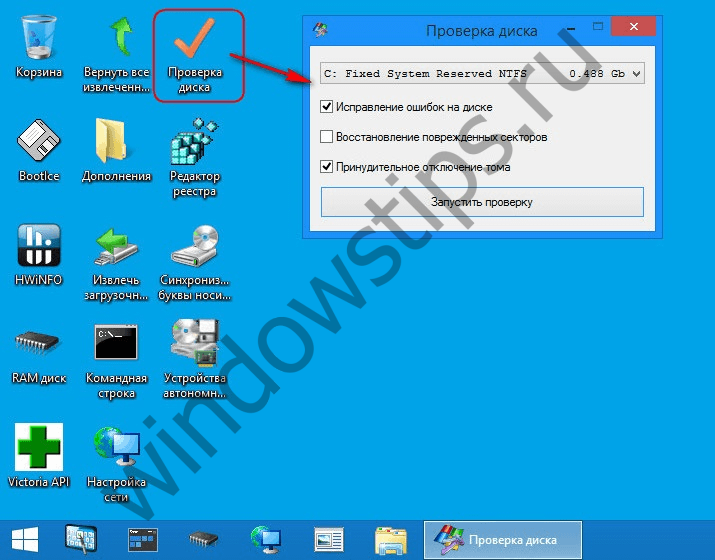
In the drop-down list, to check the disk, select the desired partition of the disk. Next, activate the checkboxes to restore the damaged sectors and forcefully disconnect the partition (volume). Runs the test.
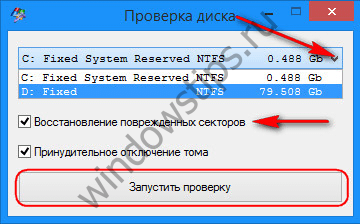
Among the tools AdminPE - a number of other utilities for working with hard disks, as well as well-known programs Hard Disk Sentinel and Victoria.
Have a great day!