How to install a virtual machine to your computer and most importantly, which virtual machine to choose? Before asking you this question, I surfed the Internet and realized that the easiest to install and configure are VirtualBox and Virtual PC, but there is also Hyper-V and VMWare. I understand that now you will ask me: "Why do I need a virtual machine?" My answer: "I want to install different operating systems and experiment with them, I am very interested in this: Windows XP, Windows 7, but especially Windows 8!" My Windows 7 installed works fine with all applications installed in it, but the hype is around new windows 8 is only growing and I do not want to stand aside, so you have already written two dozen articles about the eight on your website and continue to write. So I'm thinking of installing a virtual machine (just not choosing which one) to install Windows 8 into it and slowly study it, and then you look in October, when the final version of Windows 8.1 comes out, I'll install it with the second operating system. Mark.
Hello admin! on the Microsoft website and wanted to install it on my virtual virtualBox machine, but the installation gets an error " VT-x / AMD-V hardware virtualization features are enabled but not functional". What to do?
How to install a virtual machine
Friends, if you have never dealt with a virtual machine, then I will explain to you in a nutshell what it is. A virtual machine is a real computer created inside your main operating system and in this computer, you can install other operating systems (several!) and not only Windows. You can, however you want to experiment with the operating system installed in the virtual machine, go online, install various softwarewithout fear of infecting your computer with a virus, in short, connect your imagination and you will find a use for it.
For example, one friend of mine learned to reinstall the operating system and divide the hard disk into several partitions only using a virtual machine.
As for the choice of a virtual machine, an article will be written about each of the existing ones on our website. Recommend you install a virtual machine VirtualBox, its capabilities are enough not only for a beginner, but also for an experienced user, moreover, it is free. Start with her. Simple and intuitive settings, stable work, made it one of the most popular.
What virtual machines are there?
Virtual PC is free, very easy to install in Windows 7, follow the link to the Microsoft website, download and install.http://www.microsoft.com/ru-ru/download/details.aspx?id\u003d3702
paid, costs 222.53 €, but there is a 30-day trial period. You need this virtual machine primarily for system administrators and software developers.
So it is decided, install the VirtualBox virtual machine. We go to the site https://www.virtualbox.org/, click "Downloads", select
VirtualBox 4.2.16 for Windows hosts x86 / amd64.

The installer of the virtual machine is downloaded, we must run it as an administrator, otherwise in the future you will be haunted by various errors when working with the virtual machine. Right-click on the installer and select "Run as administrator"

The program is very easy to install on our computer.


We start the virtual machine as administrator.

Click on the "Create" button.

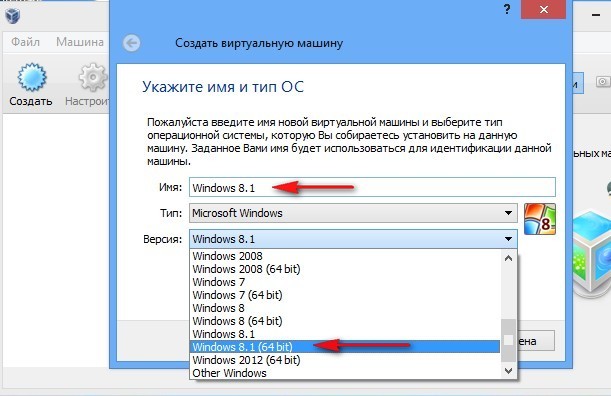
First of all, I would like to draw your attention to the fact that if you decide to install Windows 7 64-bit on a virtual machine, choose windows list 7 64-bit. If you decide to install another operating system, for example Windows 8.1 64-bit, then be sure to select Windows 8.1 64-bit in the drop-down list and enter the invented name of the virtual machine, for example Windows 8.1, then click Next.

In this window, you need to specify the amount of memory that you can allocate to the virtual machine. Friends, you must understand that a dedicated virtual machine rAM will be inaccessible to the operating system installed on your computer. If you have only 2 GB of your own RAM, then you cannot allocate more than 1024 MB to a virtual machine, your operating system, when working with a virtual machine, will be very slow. If you are installing Windows 8, the optimal size for it is just 1024 MB. As you can see, my computer has 8 GB of RAM, which means I can allocate more than 1 GB, for example 2 GB.

Create a new virtual hard disk.

Select file type VDI

At this stage, we need to specify the format of the virtual hard disk... If you check "Dynamic virtual hard disk" This means that the space on your hard disk allocated for the needs of the virtual machine will not be occupied immediately, but as files accumulate in your virtual machine. I recommend that you use this option.

We indicate the size of the virtual hard disk. If this is your first time creating a virtual machine, specify 50 GB, this is enough to install Windows 8. But I will personally indicate a larger volume for myself. Why? In the process of working with the virtual machine, I will be installing many operating systems, so I will indicate the amount of 240 GB.
You can create virtual disk different from system disk, it's very simple, click on the yellow daddy and the explorer will open, in it specify any partition on your hard drive to place the virtual hard disk.

We see the result. So, we have created a virtual machine, now you need to configure it and finally install Windows 8 in it.
Select our virtual machine and click "Configure".

System. Uncheck the "Floppy" item. We leave first boot device CD / DVD-ROM, since we will boot the virtual machine from the installation disk or Windows 8 image, we leave the Hard disk as the second device.

Leave the "Processor" parameter as it is.

"Acceleration" Hardware virtualization must be enabled, most likely you will be installing a 64-bit operating system.

Display. Video. Enable 3D Acceleration and Enable 2D Acceleration
Video memory 128 MB

Carriers. A little of your attention!
Your physical drive will be available in the virtual machine, in my case, Drive "I" and if you have a Windows disk, you can use it to install the operating system, check the Live CD / DVD box.
There is also a virtual floppy drive here, let's connect an image with an operating windows system 8 that we downloaded in yesterday's article. In the "Media" option, select "Drive" and "Choose an optical disc image"

an explorer will open in which you can select the downloaded windows image 8, then click Open.

The Windows 8 image will attach to the virtual disk drive.


What is a USB filter? Imagine this situation, all USB devices connected to your computer will be detected in the operating system installed on your virtual machine. Naturally, you don't need this. USB filters will determine which USB device should be determined in the virtual machine, and which in your main system. To see how all this works in practice, you first need to install the Windows 8.1 operating system in our virtual machine, and then everything will become clear to you, read on.

For all connected USB-2.0 flash drives to work normally in your virtual machine, install yourself plugin VirtualBox 4.2.16 Oracle VM VirtualBox Extension Pack, download it at the office. website https://www.virtualbox.org/
Now we will try to set up the well-known VirtualBox virtual machine and tell you how to use it, but first, let's figure out for what purposes it can be useful. This emulator is designed to deploy multiple operating systems that you install (Windows, Linux, Mac, or Android) without affecting your main system. It can be used for various experiments, software and software testing.
VirtualBox virtual machine, a good emulator for companies and private use. The free product with open source code, has various functions. The distribution kit of the program is on the official portal, where you can download it. There is a paid virtual machine for more advanced users called VMware, but we will cover this topic in another post.
Download and install the VirtualBox emulator

Go to and download the distribution kit of the program to your computer. Download distributions for your Windows or Linux operating system.

Unzip the file, right click and launch the VirtualBox emulator from "Administrator name". A welcome window will open, click "Next".

In another window, you will be prompted to select a directory for installing the program components, we advise you to leave the standard parameters and click "Next".

Then they will offer to install program shortcuts, you can leave nothing and continue to install the emulator. During the installation of the program, a notification will pop up that the network may be disconnected. If you download any files from the Internet, wait until they are downloaded and continue installing and configuring VirtualBox.


At the time of installing the program, windows about installing software for the USB controller, network services and network adapters will pop up, click "Install".

At the end, click "Finish"
How to set up VirtualBox
Setting up the VirtualBox virtual machine implies the following: after you have installed the program, run it from "Administrator name" and change the interface language in case it doesn't suit you or leave the default parameters.

In the program panel, click "File" - "Settings" select your preferred language on the right and click "OK".

Let's start installing the emulator. At the top of the panel, click "Create"... In the "Create a virtual machine" window, write the name that will be displayed in VirtualBox, select the type and version of the OS.

Assign the required amount of RAM (random access memory) for the emulator. Then this parameter can be changed. In another window, click "Create a new virtual hDD" .

We mark the type of file that will serve HDD disk for your emulator, we advise you to set "VDI"... Choose a storage option, it is better to put "Dynamic virtual hard disk".

Specify the volume required for your disk with the slider, as a rule, the standard is the smallest volume. In case you later need to change the characteristics, mark your virtual machine and in top panel click "Configure":

Menu "System": tab "Motherboard" - you can change the size of the allocated RAM (random access memory). "Boot order" - remove the mark from the item "Floppy disk".

Tab "CPU" - allocate the number of processors for the VirtualBox virtual machine, as well as the CPU (processor) load limit. Check the item "Enable PAE / NX".

Tab "Acceleration" check the items "Hardware virtualization".

On the menu "Display": You can accelerate video memory and enable 2D and 3D acceleration.

Menu "Carriers": select iso image your pre-downloaded operating system from the Internet. In case you are installing an OS from a disk, check the box "Live CD / DVD".

Please select Optical Disc Image.

In the left menu "Net": it is possible to set the number of internet adapters and connection type. Check the item "Enable network adapter" - connection type "NAT".

Menu USB: We mark "Enable USB controller" - "Enable USB EHCI Controller"... The USB filter determines which USB device itself will be connected to the virtual OS and which to your system. For normal work all your USB-2.0 drives in a virtual OS, you need to install the plugin, you can download it on the official website.

Shared folders: This setting is important to configure because the virtual OS will communicate with your system through shared folders. Press plus and type the full path to the directory shared folder located on your PC, for example, drive D: \\ Disk. The Disk folder must be created in the directory of the D: drive on your PC. Check the item "Auto connect" and click "OK".
Running and installing the operating system in VirtualBox

Now it remains to launch the VirtualBox emulator and install the OS as on a real PC. Click "Run".

And install the operating system.
VirtualBox - demon paid program, allowing you to run an operating system inside another, through virtualization. For example, having installed this program on Windows 10, you can run other versions of Windows, Linux, Android and others in it. It works like this:
The program reserves part of your PC's resources (CPU, RAM, video memory, storage space for the OS) for the operating system.
Installing VirtualBox
First you need where you can find latest versions programs for different OS. I'll download the Windows version.
There are no difficulties in installation, everything is as in regular programs... It is not recommended to change the installed components.


If you wish, you can uncheck some of the checkboxes, but I recommend leaving the second and fourth ones. Next, you will receive a warning that network connection the Internet will be interrupted to install the virtual driver, we agree. Click "Yes".

After we press "Install".

The installation process will go, where you will be prompted to install the driver, for all such offers, click "Install".


This completes the VirtualBox installation process. Click "Finish".
Creating a virtual machine on VirtualBox
There shouldn't be any difficulties in creating a virtual machine. Run the program and press the "Create" button.

In the next window, you will need to specify the name and type of OS you will install.

Next, we determine the size of the RAM to be allocated to the virtual machine. For Windows XP, I will allocate 512MB of RAM. It all depends on the amount of memory you have installed. If there is enough, then much more can be allocated.

In the next window, you are asked to select the location and size where the OS will be installed. Since this is the first time we are setting up a virtual machine, we need to select "Create a new virtual hard disk". Click "Create".


In the next window, you need to select the type of disk, fixed or dynamic. It depends on your preference, I will choose fixed.

We choose how many GB of memory you want to allocate for installing the OS and its programs. I will allocate 5GB. And also the place where the created disk will be stored, choose where there is free memory. Click "Create".

The process of creating a virtual disk will go.

This completes the creation, and you will see that you will have a virtual machine with the name that you gave it earlier, I have it Windows XP.

Addition:
If you click on the "Configure" button, then you will see sections in which you can customize the properties of the machine in more detail.

For example, how many cores you want to give and their load limit. And in the "Display" section, you can increase the amount of video memory for the video card.
Installing an operating system on VirtualBox
To start the installation, click on the green button (arrow) "Run". You will see a window asking you to select the path to the installation disk image.

We indicate the path to the previously downloaded OS image.
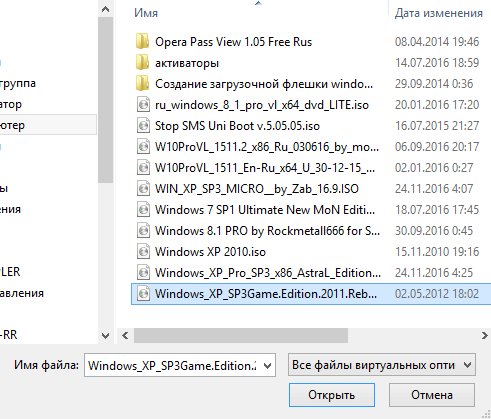
Click "Open". After that press "Continue". The usual for everyone will go normal installation OS. You will also need to create one or more local drives. When the installation is complete, you will need to remove the installation image. To do this, click on the "Devices" tab,

select the sub-item “ Optical discs"And click" Remove disk from drive "there, and restart the newly created OS. That's all for now, good luck.
This method can be used if you do not want Windows XP to be your guest system. In this article, I'll show you how you can create a virtual machine and install the guest operating system that you plan to manage in Virtual PC.
You can use the New Virtual Machine Wizard to create a virtual machine. A wizard will guide you through configuring a virtual machine with basic settingswhich you can configure as you need to use the virtual machine. For example, you can specify a specific amount of memory that the virtual machine will use. The amount of RAM allocated should be the same as you would allocate physical computer... It is desirable to provide the virtual machine with enough memory so that you can easily manage the operating system and applications installed on it.
You should also pay attention to how you will install the guest operating system. For example, to install the operating system, you can use network server for installation or physical CD or DVD drivein which just put installation disk with the system. If you are installing a supported Virtual PC guest operating system, you will need to install the Integration Component Pack after installation.
Creating a virtual machine
- You need to open the virtual machine folder. To do this, go to the menu "Start", choose "Windows Virtual PC"... If this item is not immediately in the menu, you need to click in the menu "Start" on "All programs", left-click on the folder "Windows Virtual PC"and then select the item "Windows Virtual PC".
- AT windows Explorer folder will open "Virtual machines"... From the menu area, click on "Create a virtual machine".
Folder "Virtual machines" provides detailed information about all virtual machines created current user, and also from this folder you can open general access, create and modify virtual machines and virtual disks.

- The New Virtual Machine Wizard will open. After going through the dialogs of the wizard, you select the required settings for installing the guest operating system.
Installation process
Step 1
The first step is to name the new virtual machine and specify its location.
Step 2
At the second step, the wizard for creating virtual machines offers us to specify the memory parameters for the virtual machine.
Step 3
In the third step, you need to specify the settings for the virtual machine disks.
- When the wizard finishes, the virtual machine will be displayed in the list of files in the folder "Virtual machines".
- Installing the guest operating system. If you are using a network installation server, you can safely skip this step... If you are using CD or DVD disc, then insert it into the drive carriage and go to the next installation step. To use the .iso image, you need to do the following:

- Start the virtual machine. In the list of files, select the virtual machine and click "Open"... Windows Virtual PC will open the system installer for the virtual machine. The virtual machine will look for the installation disc. The installation will start after a bootable disk is found.
- After the installation is complete, you need to install the integration components. Click on the menu "Service" in the virtual machine window and select the item Install Integration Components... If the installation does not start after a few seconds, go to the virtual machine desktop and open the CD in it. After that, left-click the IntegrationComponents.msi file twice.


- Proceed through the installation using the Integration Components Installation Wizard.
- Reboot the virtual machine. From the menu "Act" virtual machine window, select "Reload".

Closing the virtual machine
Before you start performing some actions in the virtual machine, you might want to know how you can exit the virtual machine. When you close a virtual machine, it may hibernate, shutdown, or shut down. When a virtual machine comes out of hibernation mode, it does not boot the system sequentially, so this option is much faster than shutting down and shutting down.
Attention!
When you open a virtual machine, Windows Virtual PC provides it with memory and processor resources. The length of time it takes to open a virtual machine depends on which method you used to close it at the time of the last session. The amount of memory that you allocated when you created the virtual machine also matters.
By default, when you click on the button Close in the virtual machine window, the Windows XP Mode virtual machine goes into hibernation mode and prompts you to select the same action for the rest of the virtual machines. You can change this option yourself.
Changes to the default close virtual machine action

Shutting down a virtual machine
- In the virtual machine window, click on Ctrl + Alt + Del... Or you can press the key combination CTRL + ALT + END.
- In the appeared window of the guest operating system, click on Close.
- The operating system will be shut down, the resources consumed by it will be returned to the host system.
Attention!
If you want the installed software to appear on the desktop of the host operating system, you must exit account and only then can you close the virtual machine.
Computer users are sometimes faced with a situation where it is necessary to work with old programs that functioned successfully on previous versions of Windows. It is not always convenient to manage two computers at once. But it is possible to install a different edition of the operating system on a working laptop. Parallel operation of two systems can be provided by a virtual machine for Windows 7 (VM). From this article you can find out:
- what is VM;
- what programs exist for this purpose;
- how Windows 7 is installed and configured in a VM.
The second computer is real
Virtual machine - software. It creates a copy of a real computer with:
- hard virtual disks;
- optical software drive;
- analogue of network adapters;
- BIOS, etc.
A virtual laptop with its operating system runs in a separate window and takes up a certain amount of space on the physical hard disk. It looks like this:
The example shows how in a real operating system with installed Windows 7 Professional, the program works with the virtual operating system Windows XP. And it performs the same actions as on a real device.
VM tasks
Almost everyone is faced with a situation when downloaded from the network and installed program pulls a train from unnecessary applications... That is why more advanced users prefer virtual system install the downloaded application and check it, both for performance and for unexpected surprises.
In addition, other tasks are being solved:
- The ability to test the program.
- Avoid harmful effects from suspicious programs.
- Emulate a second computer network.
- Check the consequences of changing the settings in the system.
- Safely perform autosurfing over the network.
- Reduce the likelihood of infection of a real laptop with computer viruses.
- Running programs incompatible with the real operating system.
Most popular emulators
You can find many programs with which it is possible to create a virtual Windows. But it's best to check out the most popular ones.
This is the most widely used free program that emulates the most popular operating systems:
- Windows (with support for different versions).
- MacOS.
- Any operating system from the family Linux.
- Interaction with VM from paid version emulator VMware Workstation .
Windows 7 and the created virtual machine can be easily configured by an ordinary user. The program differs in both performance and stability. In addition, despite its free-of-charge, it has ample opportunities and an intuitive interface. It is best adapted for home use.
VMware
Also known and popular program... Found its main application in large corporations.
There are two versions of this product:
- Workstation;
- Player.
Version Workstation will be able to fully satisfy the needs of the user, but this is a paid program. Regular users can use free analogue Workstation - VMware Player.
The paid version supports work with systems 32 and 64, sees USB 3.0, various operating systems work quite successfully. VMware Workstation - an advanced version of a computer emulator, but because of its cost, it found its application mainly among large companiesrather than ordinary users.
Microsoft Virtual PC
A similar virtual machine for working in Windows 7. It has a wide range of functions and a clear, convenient and practical interface. But there is also a significant disadvantage - it can work only with operating systems of the Windows family. Other operating systems, such as Linux or Mac OS, will not run on it.
In that brief overview the three most popular virtual machines are described. Now you can see that it is best to use the program for home needs. Next, we will consider the procedure for installing and configuring it.
Mounting Windows 7 in a VirtualBox virtual machine
The process of installing a virtual operating system can be divided into several stages:
- Install the program .
- Download the Windows 7 image file for VM.
- Installation virtual windows 7.
Let's consider all these processes separately.
Install VirtualBox program
First of all, you need the virtual machine itself. As already mentioned, there are several of them. We are interested in . You can download it from the official website https://www.virtualbox.org. From the proposed list, select VirtualBox 5.1.14 for Windows hosts.

The process of how to install a virtual machine is described in other articles, but there are a few points:

After the Internet connection is restored, you can start downloading and installing the finished VM file in Windows 7.

Finding a finished VM
Microsoft for testing various internet versions Explorer (8, 9, 10, 11) specially prepared several options for downloading a VM with preinstalled Windows versions (7; 8.1; 10) https://developer.microsoft.com/ru-ru/microsoft-edge/tools/vms/. If this link is not available, the browser will automatically redirect to the English version of the site https://developer.microsoft.com/en-us/microsoft-edge/tools/vms/

So, first you need to select a Windows 7 image with any version of IE (8, 9, 10, 11).

Choose from the drop-down list the item which virtual machine will undoubtedly be used. In our case, it is.

And click on the Download .zip button. The zip file download process will begin.

It remains to install and run the virtual machine on Windows 7.
Virtual Windows 7 Adjustment
The virtual Windows file itself is extracted from the "IE10.Win7.For.Windows.VirtualBox.zip" archive. 
After the file is extracted, click on it right click mice  and from the drop-down list we choose “ To open with».

In principle, nothing needs to be changed in the import parameters. You can leave it as it is and click the Import button.

The configuration process starts. The "" window looks like this:

After the process is over, the new 7 and VM will appear in the program list. To start it, you just need to either double-click on the VM itself, or click on the button with the arrow “ Run". The process of starting the operating system will begin immediately. If you install it for the first time, it will take a little longer, however, the same happens when installing a real OS. As soon as the installer has completed all the necessary steps, a desktop appears with working system Windows 7.

Windows 7 on english language and the created virtual machine is ready to start.

Configure a virtual system
All VM controls are intuitive. But if you have any questions, you should carefully read the pop-up tips in Russian. You can turn to help for help, where you can find answers to all questions.
Usually, both the mouse and keyboard work only in the VM and are blocked in real Windows. But it is possible to switch between the two systems using the Right Control host key.
Now that the virtual machine is installed and running, you can configure Windows. The first step is to install software components (drivers) for all virtual devices... The process is simple enough. You need to go to the main menu and in the line “ Devices" click on " Install guest OS add-ons».
After completing the installation, the VMs are rebooted. Now the picture has become clearer, the VM window can be dynamically changed, support for mouse integration will be connected, and access to the Internet will open.
It also has the ability to expand the function of the displays. In this mode, the windows that open in the VM will be displayed on the real desktop, and not in an independent program window. This makes it possible to facilitate access to all controls and installed VM programs.
Shutting down virtual Windows 7
As in real laptop in a VM, the installed Windows requires a certain order to be completed. You can quit by pressing the button to quit. A menu will open, which will offer three options for closing the VM.

« Save machine state"- before disconnecting, the machine will save all running applications at the time of disconnection. When the VM is turned on again, work in it can be continued from the moment it was turned off.
« Send shutdown signal»- all applications can be closed, and the machine will turn off automatically.
« Turn off the car"- in the same way as if a real computer were de-energized.
Conclusion
From this small overview, it can be seen that working with virtual machines, such as, makes it possible to connect several different operating systems at once on one device. Naturally, the more powerful the real device (RAM and CPU), the faster it will work and virtual computers... Disabling the antivirus on your own machine or if the list of exclusions will help speed up the work antivirus software add a virtual directory.
Related Videos


