In Windows 10, there are two types of accounts - Microsoft accounts (which require e-mail addresses and online synchronization parameters) and local user accounts that are not different from those that you might be familiar with earlier versions of Windows. One account you can always "turn" into another (for example,). The article will consider creating users with both types of accounts.
Creating a User in Windows 10 Settings
The basic way to create a new user in Windows 10 is to use the "Accounts" item of the new settings interface, available in the "Start" - "Options".
In the specified settings item, open the "Family and other users" section.

In the "Other users" section, click "Add user for this computer". In the next window you will be asked to specify an email address or phone number.

If you are going to create a local account (or even a Microsoft account, but have not yet registered an e-mail for it), click on "I do not have data to enter this person" at the bottom of the window.
The following window prompts you to create a Microsoft account. You can fill in all the fields to create a user with this account or click "Add a user without a Microsoft account" at the bottom.

In the next window, you will be asked to enter your user name, password, and password hint to new user Windows 10 appeared on the system and an entry was possible under his account.

By default, the new user has the rights " ordinary user". If you want to make it a computer administrator, follow these steps (you also need to be an administrator for this):

Login under a new user can be by clicking on the name of the current user at the top of the start menu or from the lock screen, after exiting the current account.

How to create a new user on the command line
To create a user using the command line of Windows 10, start it on behalf of the administrator (for example, through the right click menu on the "Start" button), then enter the command (if the username or password contains spaces, use quotes):
net user username password / add
And press Enter.

After the command is successfully executed, a new user will appear on the system. You can also make it an administrator using the following command (if the command did not work, and you do not have a Windows 10 license, try writing Administrators instead of Administrators):
net localgroup Administrators username / add
The newly created user will have a local account on the computer.
Create a user in Local Users and Groups Windows 10
And one more way to create a local account using the Local Users and Groups control:

To make the created user an administrator, right-click the user name, select "Properties".
Then, on the "Membership in Groups" tab, click the "Add" button, type "Administrators" and click "Ok".

Done, now selected windows user 10 will have administrator rights.
control userpasswords2
And one more way I forgot about, but I was reminded in the comments:
If you have any questions or something does not work out as easily as described in the instructions - write, I'll try to help.
Accounts. General information
By type of authentication, all accounts can be divided into local and deleted (they are Live ID, they are microsoft accounts). Authentication of local users passes locally. In other words, the account password is checked by your computer. Authentication of remote accounts is performed by the Microsoft server. The advantage of a remote account is that using this type of account synchronizes your data. Quite convenient - you can go in with different computers, and personalization settings will remain the same.
Previously, this was possible only on a corporate network where all computers are members of a domain, and authentication is performed on a domain controller. Now such an option is available to all comers, and the role of "domain controller" is the Microsoft server. Your settings are stored on the remote server and synchronized with it when you change them.
By "importance" user accounts are divided into two groups: ordinary users and administrators. There must be at least one administrator in the system, otherwise who will manage it? But there can be as many ordinary accounts as possible - at least not one, though a hundred.
The administrator can manage the computer, change the parameters affecting the entire system, to all users, can install and uninstall programs, can create and delete other users. He can create a normal user and include for him the so-called "family security", which will monitor which sites the user visits, what programs it launches, how much time it takes to get to the computer. As a rule, family security is activated for accounts of under-age members of the family.
In previous versions of Windows Account management, including their creation, was carried out using the control panel. In Windows 8, you can not create an account in the classic control panel. To create a user account, you should now use the Computer Settings.
Creating a local account
To create a user account:
Options Click

The window opens. Computer Settings, choose Accounts

In the window Accounts push Other accounts


The window shown below will appear, since we are creating a local account, then we select Sign in without a Microsoft account (not recommended)

In the next window click Local account

In the window that opens, you will need to fill in a simple registration form: specify the user name, password and password hint, then click the button Further

In the next window, check the box if this is your child's account and click the button Done

The account has been created.

Create a Microsoft account
If you do not already have your own Live ID, then you need to register the Microsoft account.
To create a Microsoft account, the computer must be connected to the Internet, and you need to do the following:
Press the + I key combination, in the opened panel Options Click Changing Computer Settings
The window opens. Computer Settings, choose Accounts
In the window Accounts push Other accounts

Quite often, two or more users work at one computer. Typically, these users work with different files and programs, which makes it harder to work. To solve this problem, you need to create a separate account for each user who is running on this computer. In one of the last articles, we talked about how this is done in. Here you will learn how to create an account in Windows 10.
So, in order to create an account in you need to open the Options window. This can be done using the "Start" menu. Open it, and select "Options."
After that, the "Options" window opens before you. Here you need to go to the "Account" section.

After that, you will see the settings page of your account. Here you can manage a Microsoft account, set avatars, etc. Then you should go to the "Family & other users" section. The link to this section of settings is in the left side menu.


After that, you will see a window for creating a Windows 10 account. If you want to add a user who has an account with Microsoft, simply enter his email address in the Microsoft service and click on the "Next" button. Then follow the instructions that appear on the screen.

If the user you added does not have an account microsoft records, but you want to create it, just click on the "Register a new email address" link, then follow the instructions that will appear on the screen.

If you want to create a Windows 10 account that is not associated with a Microsoft account, you need to click on the "Sign in without a Microsoft account (not recommended)" link.

After that, a window appears in which you need to click on the "Local account" button.

After that, a full inoculation window will appear to create an account in Windows. Here you need to enter a user name and, if necessary, a password with a prompt. After entering these data, click on the "Next" button.

After that, the Windows 10 account will be created and you will only have to click the "Done" button.
Today we will touch on the topic - how to add a Windows 10 account different ways. In Windows 10 there are two types of accounts. The former are tied to a Microsoft account and require you to enter a password from this e-mail, the latter are local, similar to those that were in earlier versions operating systems. In the future, any type of account can be converted to the opposite or. We proceed.
In the new OS from Microsoft, new settings have appeared, it is with their help that we will now create the user. A little lower and throughout the article the material is presented in the form step-by-step instructions, each stage of which is accompanied by screenshots.
- First open the Windows settings To do this, go to the Start menu and click on the gear icon, which can be found in the lower left side of the window.

- In the opened window click on the tile, which we marked in the picture with a red border.

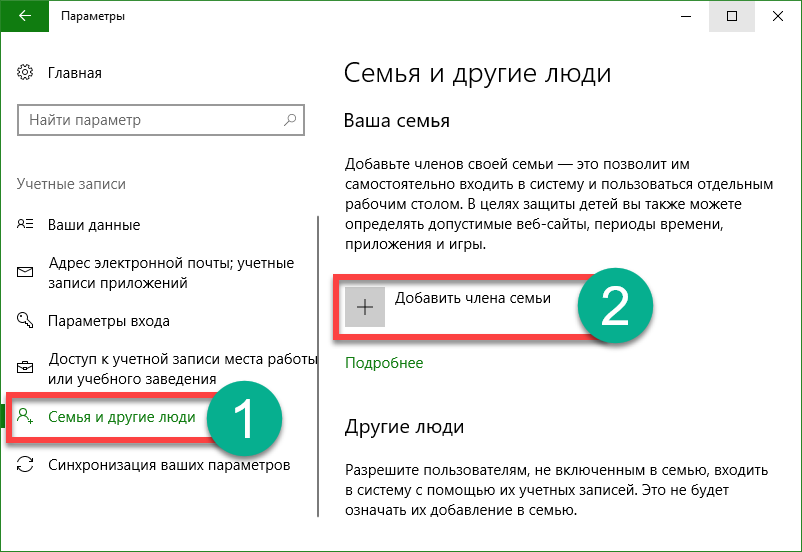
- Another window will open, in its left part there are sections, select "Family and other people". In the right half you will see the inscription of adding a family member, we marked it with the number "2". This mode is used, for example, when you need to use one PC by several family members and in order not to be confused, each of them creates its own account. Click on the marked button.
- After the button is pressed, you will be taken to the next screen. Here you can choose who owns the account you are creating, a child or an adult. Also, you need to enter the email address for password recovery. We do this and press "Next".

- We are asked to confirm the intention of creating an account, we do it by clicking on the corresponding button.

After that, the invitation will be sent to the specified e-mail and the user, can become a member of your virtual family.
Below, you can create a new user who will not be a member of the family and monitored by Windows 10. Consider how this is done.
- In the left side of the window, which we opened a step earlier, we click on the inscription: "Family and other people", and in the right click the item indicated in the screenshot with the number "2".

- Next, we will be offered to enter the e-mail of the new user, but if you want to create an account without binding to Microsoft, click on the item indicated in the screenshot with the number "3".

- We will create the local user, so in the newly opened window click on the inscription, circled with a red rectangle.

- Now you need to specify the name of the new user, the password to his account and the hint that will be needed in case the password is lost to restore it. After completing the data entry, click "Next".

After that, a new account will appear on the system.

The user we created does not have administrator rights. Consider how to give it to them, remember, in order to do this, you yourself must have such authority.
- We move along the same path that was used to create a new user. We find there an account, which we will edit and click on it with the left mouse button. The "Change account type" button appears, which is what we need.

- In the next box, select the desired item from the drop-down list and apply the changes made.

As you can see, the user became the administrator. That's all, now with the new account you can work by completing the current session and selecting the user on the start screen.
![]()
How to add a user on the Windows 10 command line
In order to make another user using the OS command line, you must start it with administrator rights. This is done as follows:
- Click on the icon of the magnifying glass on the taskbar and enter into the opened line the command cmd, then press Enter. When the desired result appears, right click on it and select the start point for the utility with administrator rights.

- When command line open, enter the operator in it: net user username password / add (replace with the desired nickname of the future account and specify the password for it), then press Enter.

- After a couple of seconds of waiting, the system notifies us of the successful completion of the operation, and the user will be added to the system. If you want to make it an administrator, write one more statement (if the command does not work, try to specify the English administrators instead of the Russian word "Administrators"):

Now the user created by us will appear in the system and will not just appear, but will receive administrator privileges.

Create a new account across " Local Users and Groups »
There is another option for specifying a new user in Windows 10, let's look at it in more detail.
Important: the method is applicable only to Windows 10 Pro and above, there is no homegroup editor of Group Policy.
- Initially we run the utility itself, we will do it through the "Run" program, in order to start it, use the combination of Win + R hot keys. When the window opens, enter the command in it msc and press Enter.

- When local users and the groups are opened, select the "Users" folder in the left part of them, then right-click on the empty place and select "New User".

- Specify the name of the new user, his password and repeat the password, and then click on "Create".

As a result, the user will be created, you can see it right here.

- If we want to grant the administrator privileges to the account, we right click on its name and select the "Properties" item.

- We go to the tab "Membership in groups", select the user whom we want to make the administrator and click the "Add" button (it is indicated in the screenshot with the number "3").

- In the opened window, in the empty field marked with the number "1" we enter the word Administrators and click "OK".

Done. The user now has administrator privileges.
Use control userpasswords2 to add a new user to Windows 10
For completeness, let's look at another method for creating a local account windows records 10. We take the following steps:
- As in the previous case, run the "Run" utility with the Win + R keyboard shortcut, enter the words in the opened window: control userpasswords2 and press Enter.

- In the next window click on the button with the inscription: "Add", its name speaks for itself.

- Here you can select the type of account to create. We, similarly to the previous versions, will make a local academic record, you can optionally bind it to Microsoft. When the choice is made, click on "Next".

- In the next windows screen 10 compliments accounts from Microsoft and scolds local accounts, you still have a chance to change your mind. In our case, the answer is negative, we select a local account.

- Enter the name of the account, its password and a hint to it, and then click on "Next".

- The user is created, we just need to click on "Done".

- By tradition, we'll tell you how to grant the new account administrator rights, to do this, select it and click on the "Properties" button.

- We go to the tab "Membership in groups" and switch the trigger to the position marked in the screenshot with the button "2". In the end we press on "OK".

As you can see, the new user is now the administrator of the computer or laptop.

In the article, we considered how to add a user in Windows 10 in different ways, but if you have any questions about the topic, put them in the comments, we will give an exhaustive answer in the shortest possible time.


