Hello, dear visitors of the site site!! Have you decided to reinstall Windows 7 on your laptop or computer? Our detailed instructions to reinstall Windows 7 should come in handy. It is calculated for any user level, even for teapots. What is to reinstall Windows 7 correctly?
Some want to know how much it costs to reinstall Windows 7. You can perform a free reinstallation yourself, using our instructions. To reinstall windows 7 quickly and without consequences for important information, you need to prepare data and hard disk for installation new system. Let's do the whole reinstallation of Windows 7 in steps together. Let's start with the old operating system, which is installed on your laptop or computer now.
Preparing to reinstall Windows 7
 Our instruction is universal and suitable for laptops ASUS, Acer, Compaq, DELL, HP, Lenovo, MSI, Samsung, Sony, Toshiba, as well as other manufacturers and desktop computers. In the article, about that, we already told that before you start to reinstall any Windows operating system, you must first prepare. How does it work, how to reinstall Windows 7 correctly?
Any complete reinstallation of Windows 7 on a laptop, netbook or computer should begin with saving important information to another separate medium. For example, on a flash drive or an external hard drive. Surely you have important information to keep, in order to avoid losing it.
Here it is necessary to proceed from what OS is installed on the computer now. For example, if you want to reinstall XP on Windows 7, it is possible to search for your information in other places than in Windows 7. In any case, double check all possible logical drives, all folders. The most common places where most users store information are:
- Desktop.
- My Documents folder
- CD "C:"
Of course, we can not talk about all the important places for storing information on your laptop or computer. But we recommend that you double-check everything, because our goal is to reinstall Windows 7 to clean, formatted logical disk. Why do we recommend reinstalling Windows 7 on a blank media?
First, many users had several viruses during the old system. Even if you do not know about it, then the probability that somewhere there is a file infected with a virus is quite high. By the way, many people decide to completely reinstall windows 7, just because of viruses. This is the last measure, you can always try or try.
Secondly, installing Windows 7 on an unformatted logical drive will only add problems in the future. After all, it will have all the programs that still have to be reinstalled, as well as a folder from the old Windows.
Selecting the Windows 7 version
Before we begin to describe the installation of the new OS, a few words about the distribution of your Windows 7. This OS, however, like the previous Vista, and subsequent generations, has two branches: 32-bit and 64-bit. 32-bit version of the system does not allow using more than four gigabytes random access memory. This is due to the peculiarity of architecture. How to reinstall the licensed Windows 7? There are several versions of the operating system:
- Windows 7 Starter (Initial). This version of Windows 7 can hardly be called a full-fledged OS. Virtually all the functions in it are blocked by Microsoft. Windows Starter was put on some laptops. The maximum possible amount of RAM that this 32-bit version of Windows can use is equal to 2 gigabytes.
- Windows 7 Home Basic (Home Basic). Has a very limited set of functions. Also distributed as an OEM version with laptops. The maximum amount of memory is 8 gigabytes.
- Windows 7 Home Premium (Home Premium). Suitable for most users, allows you to use most of the necessary functions.
- Windows 7 Professional (Professional). Almost complete set of functions.
- Windows 7 Enterprise (Enterprise) and Windows 7 Ultimate (Maximum) . Top versions, one of which is for business, and the other for home use. More details are described in the table.
| Function / Revision | Initial \\ Starter | Home Basic \\ Home Basic | Home Premium \\ Home Premium | Professional \\ Professional | Corporate \\ Enterprise | Maximum \\ Ultimate |
|---|---|---|---|---|---|---|
| Sale only on OEM-licenses | (only in emerging markets and Russian) | Retail and OEM-licensing | Retail sales, OEM and corporate licenses | Sale only under enterprise licenses | Retail and OEM-licensing | |
| End of support | 14.01.2020 | 14.01.2020 | 14.01.2020 | 14.01.2020 | 14.01.2020 | 14.01.2020 |
| Presence of 64-bit version | - | Template: Yes (OEM license only) | + | + | + | + |
| Maximum memory size for 64-bit versions | 2 GB (for 32-bit version) | 8 GB | 16 GB | 192 GB | 192 GB | 192 GB |
| Centre restore Windows 7 | No domain support | No domain support | No domain support | + | + | + |
| The Home Group function (creating and joining a group) | Connection only | Connection only | + | + | + | + |
| Windows Aero interface | - | Basic theme only | + | + | + | + |
| Multi-monitor support | - | + | + | + | + | + |
| Fast switching between users | - | + | + | + | + | + |
| Ability to change desktop wallpaper | - | + | + | + | + | + |
| Desktop Dispatcher | - | No support for WinFlip 3D | + | + | + | + |
| Windows Mobility Center | - | + | + | + | + | + |
| Multitouch and improved handwriting recognition + | - | - | + | + | + | + |
| Windows Media Center | - | - | + | + | + | + |
| Additional Games | - | - | + | Disabled by default | Disabled by default | + |
| Windows XP emulator | - | - | - | + | + | + |
| EFS (Data Encryption System) | - | - | - | + | + | + |
| Print with location information | - | - | - | + | + | + |
| Ability to act as a remote desktop host | - | - | - | + | + | + |
| Connecting to a domain | - | - | - | + | + | + |
| Downgrade capability to Vista or XP | - | - | - | + | + | + |
| Support for multiple physical processors | - | - | - | + | + | + |
| AppLocker | - | - | - | - | + | + |
| BitLocker and BitLocker To Go | - | - | - | - | + | + |
| Branch Cache | - | - | - | - | + | + |
| DirectAccess | - | - | - | - | + | + |
| Multilanguage user environment + | - | - | - | - | + | + |
| Download from VHD (Microsoft Virtual PC image file) | - | - | - | - | + | + |
| Launching snap-ins | - | - | - | + | + | + |
We also do not recommend using non-original assemblies, which are full on the Internet. Especially it concerns owners of laptops. The matter is that similar assemblies can contain errors, disabled windows services 7, and just surprises in the form malware. Now, the seven is not that expensive, and you can buy Windows 7 by becoming a licensee.
Reinstalling Windows 7 with a USB flash drive
To reinstall Windows 7 from a flash drive, you need to have at hand one of the versions presented above in the table (the main thing is not Starter). Today DVD-drives are not used so widely. Instead they replaced the flash drive. Reinstalling Windows 7 with a flash drive, without a drive, more convenient. USB flash drive can always be taken with you, without worrying if there will be a DVD-drive on the computer or not. In addition, not all laptops are equipped with drives.
To make a bootable USB flash drive with Windows 7, just write ISO image Your new system is a special program. The process of creating a USB flash drive with Win 7, we described in detail in the article "". The program for windows installations 7, mentioned in the article, should help. We hope that difficulties will not arise.
After you burn the image on the USB flash drive, save important data, you can start reinstalling Windows 7. Reinstalling Windows 7 through the BIOS is not as complicated procedure as it might seem at first glance. For this, you need to reboot and, after that. Next, we exit the BIOS by saving the parameters. The computer will choose the drive and start installing Windows 7.
How to reinstall Windows 7
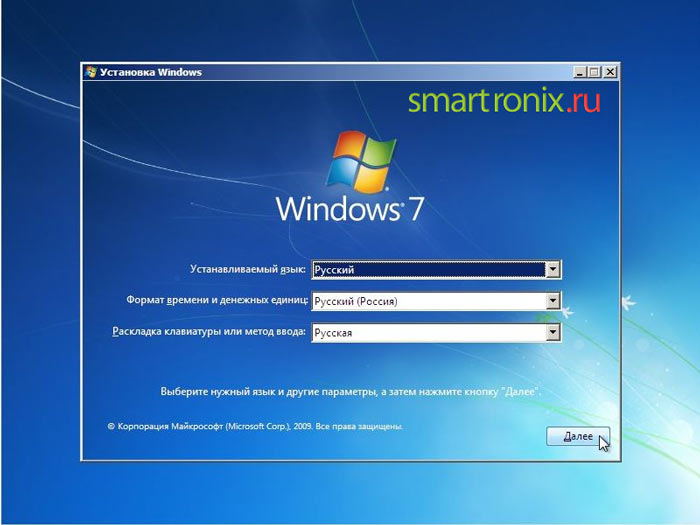
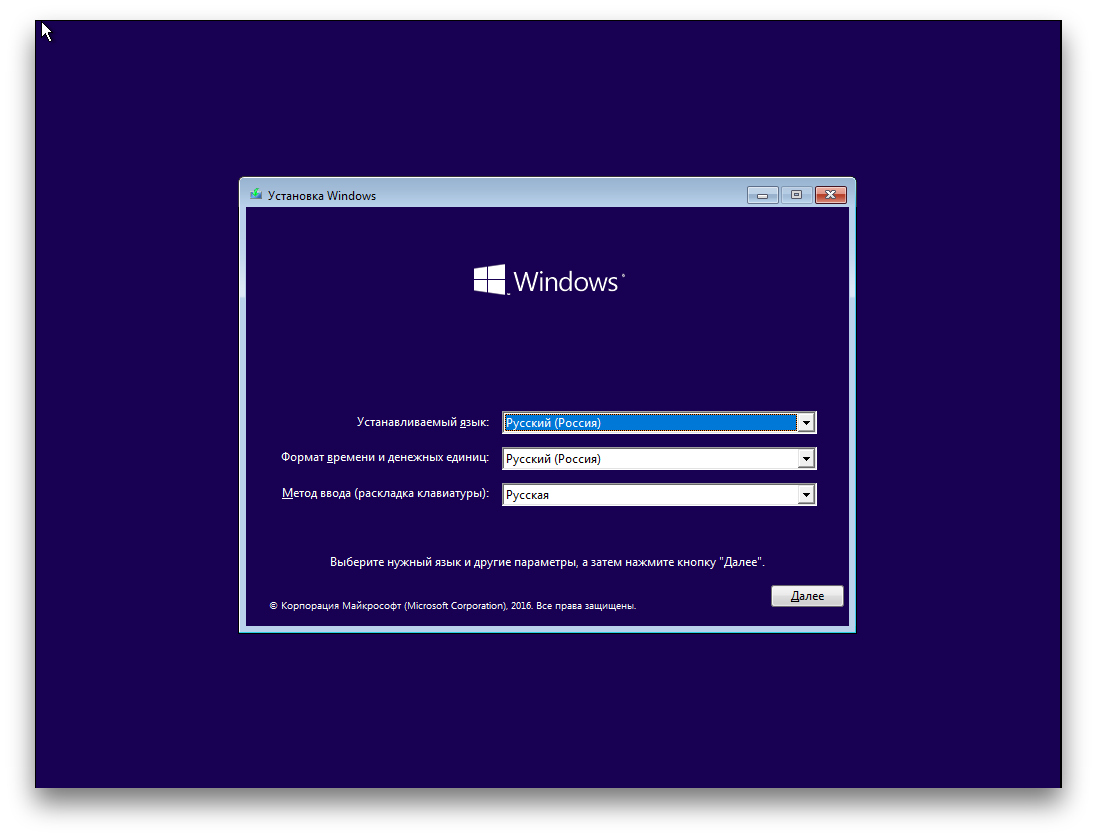
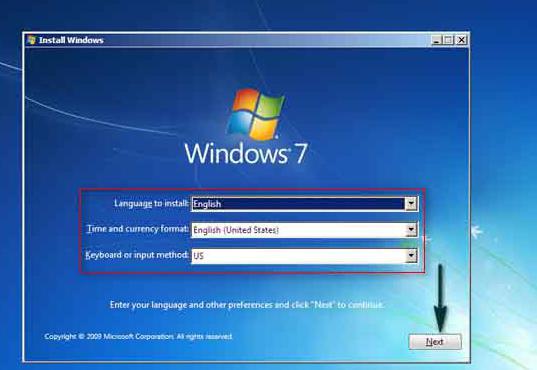
Let's proceed to step-by-step reinstallation and learn how to reinstall Windows 7. After loading the installer, we get into the system of step-by-step installation. In the first step, choose the language of the time format and keyboard settings, here you can leave everything by default, and click the "Next" button.
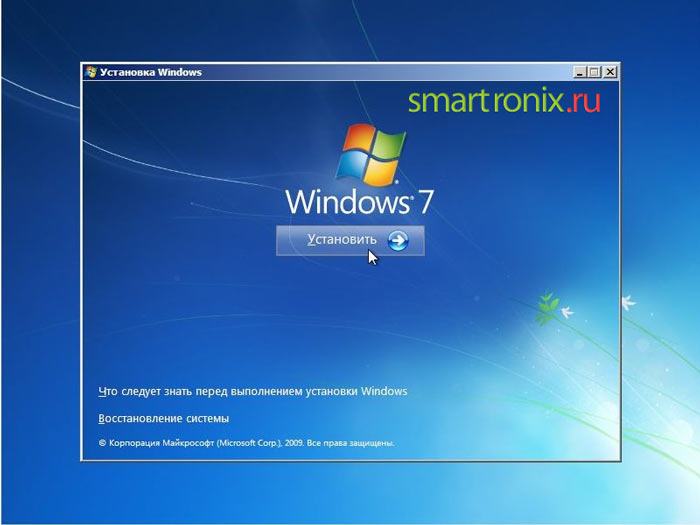
The next step is to start installing Windows 7 by clicking on the cherished button.
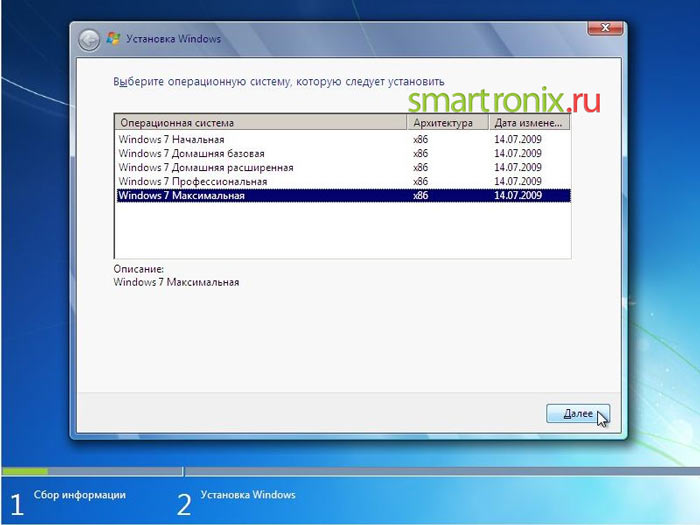
Choose the version of Windows 7 for which you have a license key.
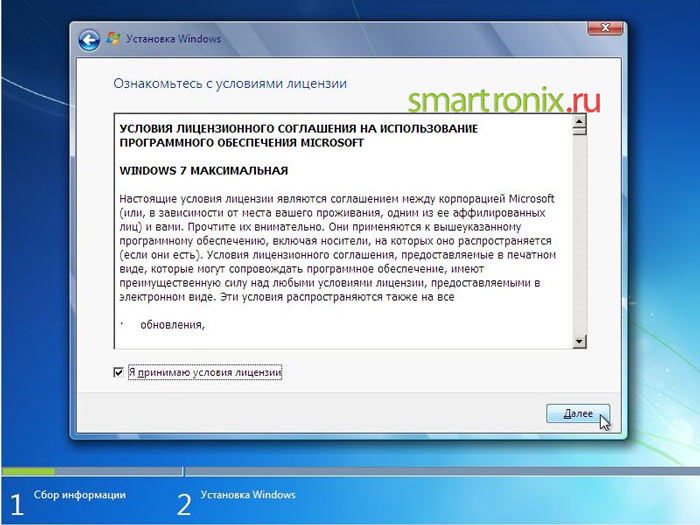
Accept the license agreement by ticking and proceeding to the next step.
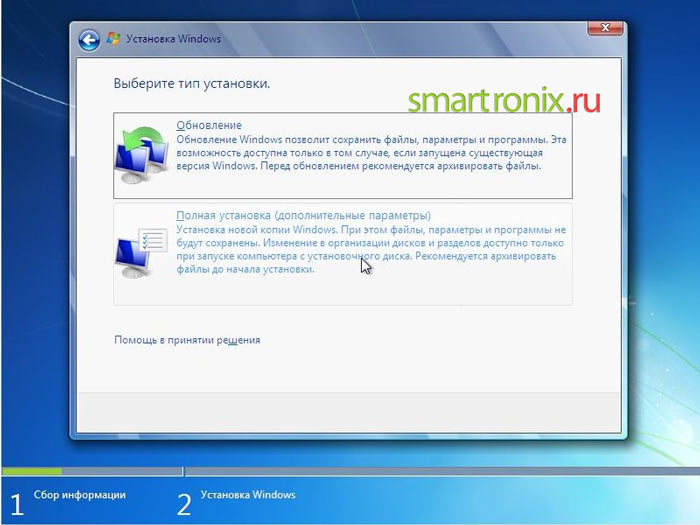
At this stage, you need to select the "Full installation" item, because, as we said earlier, it's better to put Windows 7 from scratch.
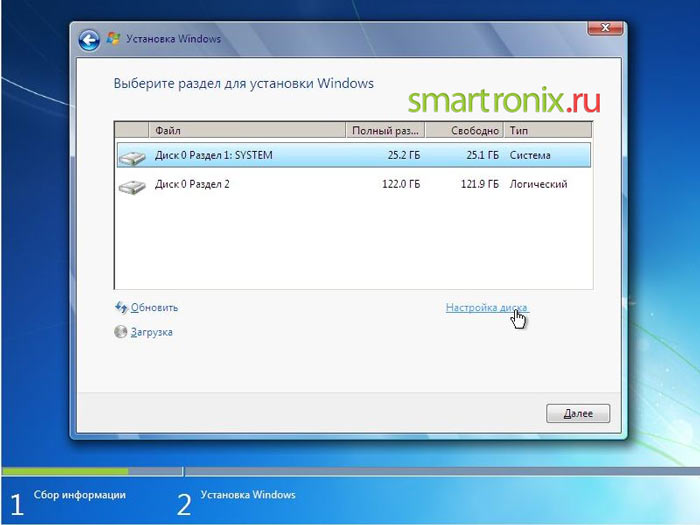
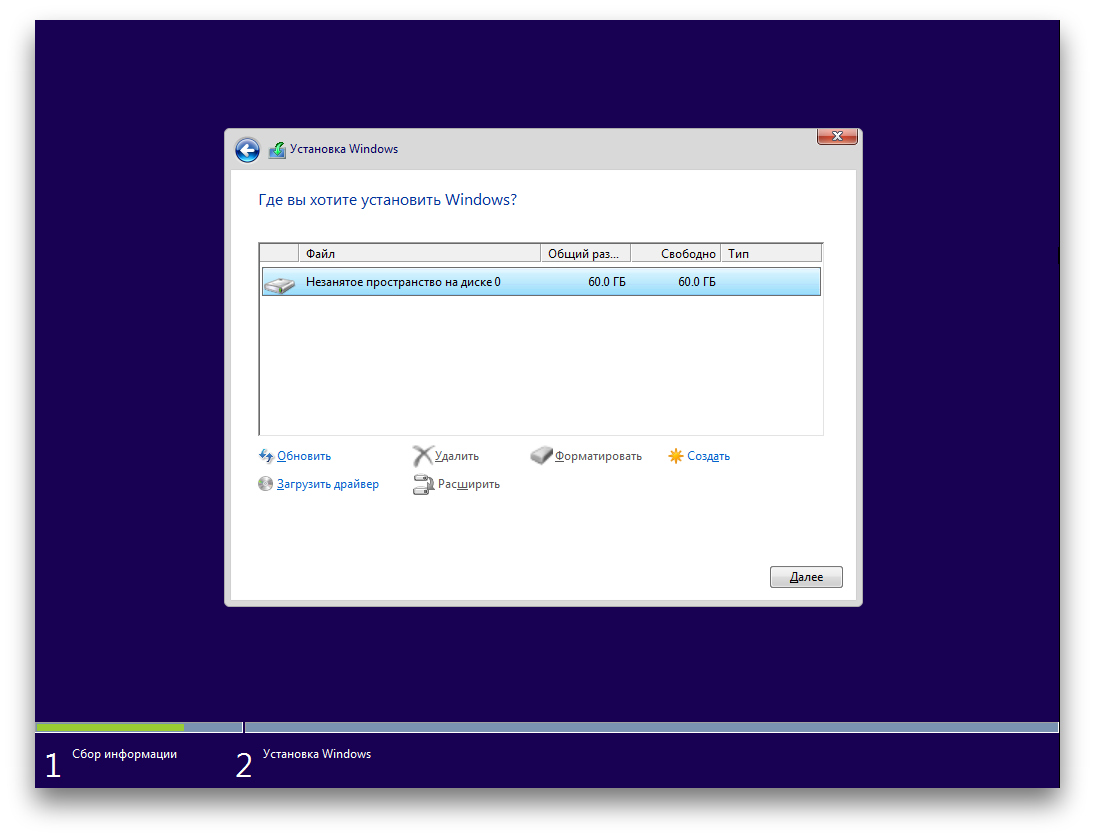
Next, we get to the important stage of installing Windows 7. Here you need to select the partition on which to install the new operating system. Remember, we asked you to keep all important information? It's time to format the logical drive, with the old Windows. For this, proceed to the next stage of the installation.
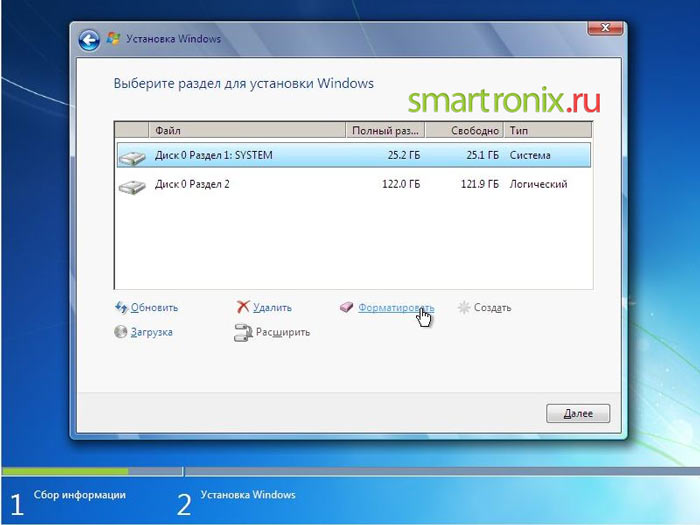
Select the desired partition of the hard drive and click on "Format". This is the reinstallation of Windows 7 with the formatting of the logical drive.
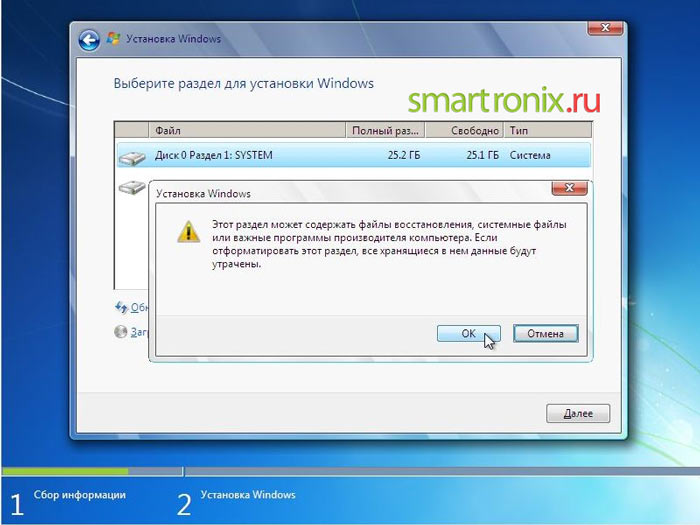
If you have saved all the important data, feel free to agree. If not, then there is still an opportunity to do this by rebooting the computer and pointing to the BIOS hDD.
Our CD for almost reinstalled Windows 7 is created. Those who need to increase or decrease its volume can use the "Expand" button.

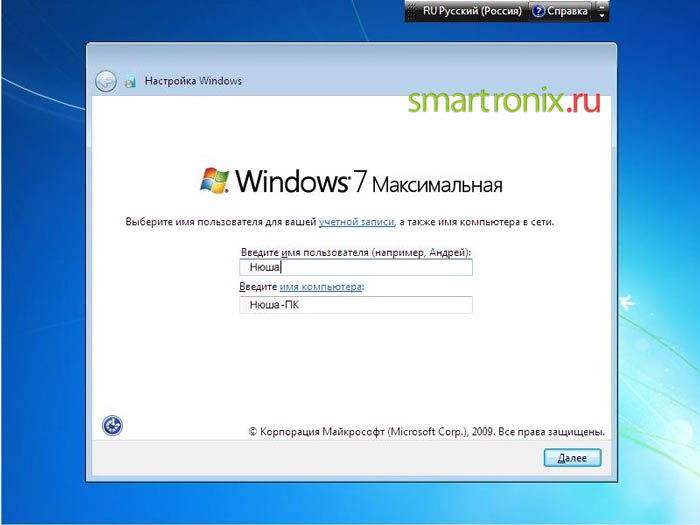
After a short installation, the installer will prompt you for your name or nickname, as well as the name of the laptop or computer.
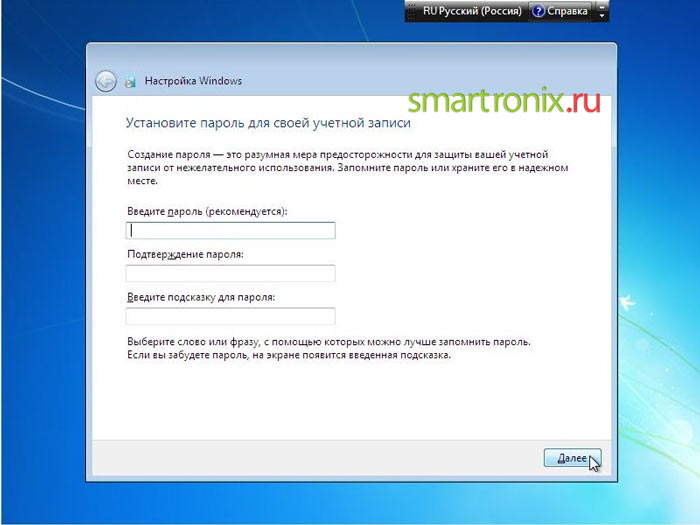
At the next stage of reinstallation, you need to enter a password. This can not be done if only you use a laptop or computer, and a stranger can not access it.
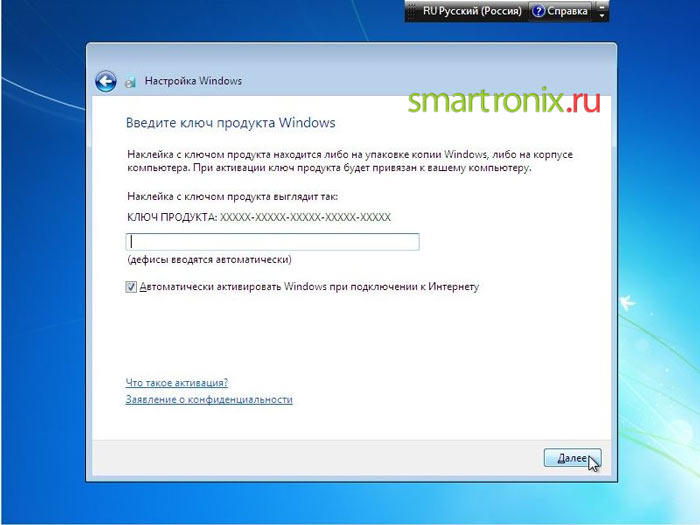
The long-awaited input of the serial number of the licensed copy of Windows 7. You have it, too?
In the next reinstallation point, you will be asked to install the built-in Windows protection. This is certainly not a full-fledged antivirus, but it will save some types of attacks. True, a firewall can become a problem when you connect a laptop or computer to a network. Therefore, the ideal option is to install a strontium antivirus, and disable Windows 7 protection after this.

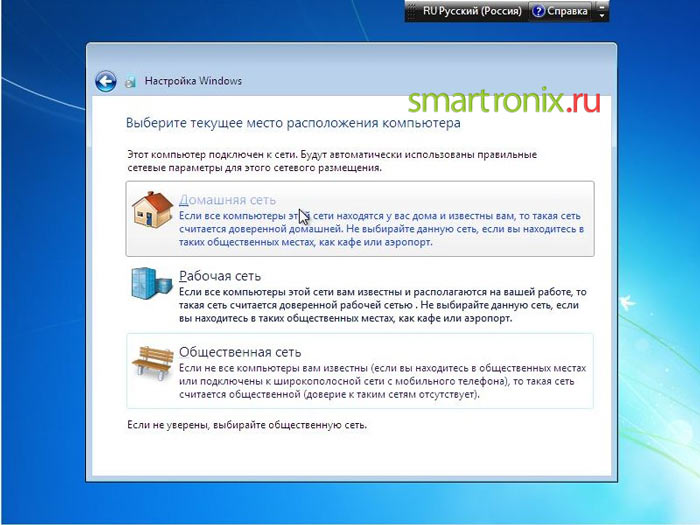
The last step in reinstalling Windows 7. If your computer or laptop is at home, then choose a home network. For most users, this is the option for setting up the network in Windows 7.
After selecting the type of network, Windows 7 will finally boot.

Hopefully, our instructions how to properly reinstall Windows 7 on a laptop or computer, helped. The next step in reinstalling Windows 7 will be installing the drivers. You can start.
In the process you will be formatting local disk, which is the current version of Windows. Simply put, before installing a new system, you have to erase all the old data from it. The contents of the remaining disks should remain unchanged. But it's better to be safe and pre-copy to the cloud or physical medium absolutely all the data from the computer, which you are afraid to lose.
If the computer is installed paid programs, do not forget to read in their documentation the rules of working with licenses when reinstalling Windows, otherwise you can lose them.
2. Create a boot disk or USB flash drive
If you want to install / reinstall the licensed version of Windows, make sure that you have the appropriate activation key. Even if you are already using an activated system and just want to install the same version again, the old activation key may come in handy again.
- If you already have a bootable USB flash drive or a disk with the version of Windows that you are going to install, you can proceed to step 3. Otherwise, you need to download windows image from the Internet and write it to any of the listed media following the instructions given below.
- Decide on the version of Windows that you will install, and check that the computer meets its system requirements. This information can be found on the official Microsoft website or on the disk with the purchased Windows. Do not forget to also check that the computer supports the bit depth new version: 32 or 64 bits. In order not to miscalculate, you can install a version with the same capacity as your current version of Windows.
- To create a bootable USB flash drive with any Windows image found on the Web, you can use the program (with UEFI support) and go to step 3.
And below I will tell you how to create boot disk or a flash drive with the official image of the system on the example of Windows 10.
3. Boot the system from the disk or USB flash drive
Now, when you have a physical medium with the right Windows image, you need to go into a special BIOS environment and select a disk or a USB flash drive here as the source of the download.
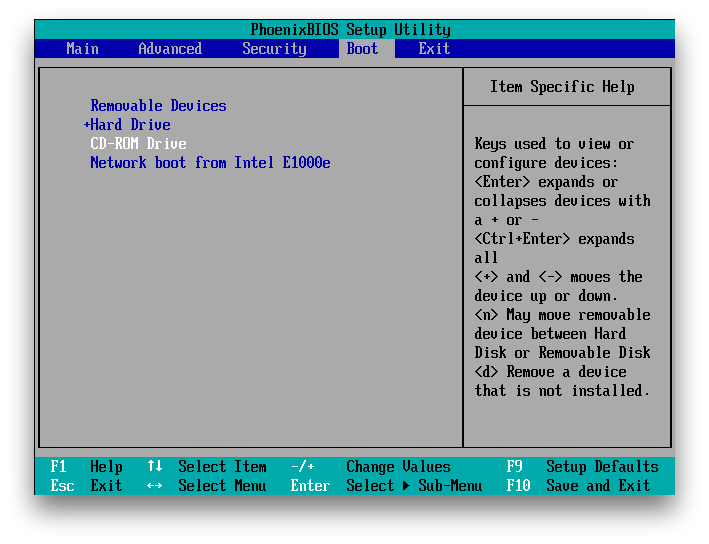
Perhaps, instead of the classic BIOS, you will see a more modern graphical interface. In addition, even in various older versions BIOS settings may differ. But in any case, the order of actions will be approximately the same: go to the boot menu, select the source of the desired media and save the changes.
After that, the computer should boot from the selected disk or USB flash drive.
4. Run the Installation Wizard
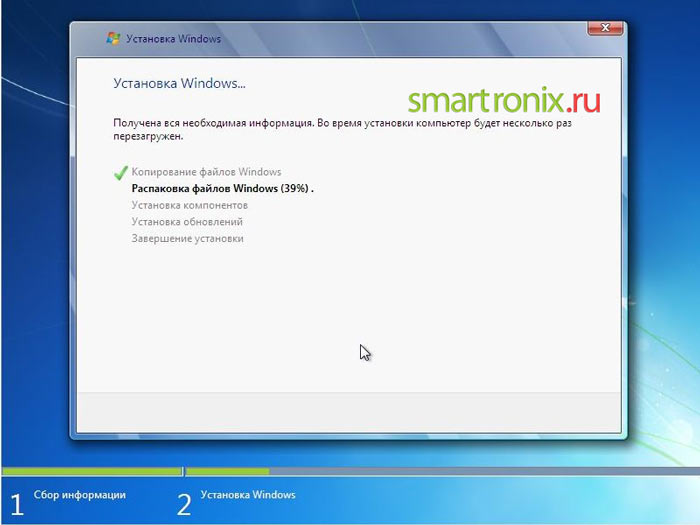
 If you did everything correctly, the Windows Setup Wizard will appear on the screen. Further actions do not exceed the complexity of the installation of ordinary office program. You can only follow the prompts of the system and wait for the files to be unpacked. Unless you have to select a local drive to install the operating system and format it.
 In addition, in the process, be prepared to enter the activation key. But if you reinstall already activated on your the Windows computer 10, then you can skip step with the key.
After the installation is completed, the computer should boot into the normal operating mode.
5. Install the drivers
Modern versions of Windows download the drivers on their own. But if after reinstalling the system you notice that the video card, speakers or something else is not working correctly, you can use the utility to automatically load the drivers. Suitable, for example, a free Driver Booster.
Having completed all the above, you can start working. The computer must be ready.
How without a disk? This topic is relevant for today. Especially since it appeared not so long ago new developments of the OS. And now more in detail! Windows 7, or just the "seven" - is one of the latest OS from Microsoft, and at the same time the most successful of them. At least, so many experts believe.
What does it mean to install from a bootable drive?
7 without a disk? The installation of any operating system is from a hard drive. And besides the disk, it can be a storage device. The option to install from the USB flash drive is quite reliable. As in the case of a disk, the host system is installed at a lower level of the computer software hierarchy. In other words, "from under the old system". In addition, this method of loading a new "operating system" allows you to format the hard drive on which the old system was located. This will protect the OS from old programs that may be malicious, as well as from "under-deleted" parts of files that are invisible at first glance, but remain in the system and interfere with its normal operation. Such "scraps" of unnecessary documents make the system's performance much more difficult. There may be a malfunction. You should consider how to reinstall Windows 7 without a disk and without a USB flash drive.
If there is no flash drive or disk
A standard installation method is not always possible. For example, if there is no disk, but there is an OS file on the computer or laptop itself. What to do in this situation? How can I reinstall Windows 7 without a disk and a USB flash drive on my computer? The system file can be represented as an image, an archive, or just an installer. To install the system from the image, you should run a special program. It is necessary for reading / writing this kind of format. For example, Daemon Tools. After running the image in the program, after mounting it, select the installation file. If the OS is in the form of an archive, then you do not need to unpack it. How can I reinstall Windows 7 without a disk and a USB flash drive on my computer in this situation? Click on the archive and select the installer file in It has the permission ".exe". This file is located mostly near the end of the list of contents of the archive. It will not be different for the installer to start even if the operating system simply lies in a folder.
What do you need to remember?

If the installation of the working system is performed for the first time, some rules should be taken into account. They need to be known if you need to answer the question of how to reinstall Windows 7. Without a disk, this will be done or with it - does not play an important role.
First, the installation of a new OS can occur because of the virus infection of the computer. This is a useless process if it is not accompanied by formatting. The matter is that the infected files with such type of installation of the basic working environment do not disappear anywhere. They are stored in the previously installed system. Subsequently, they will simply switch to a new shell.
Secondly, the best, and most importantly, the most safe way Installation will still use hard media. Reinstalling Windows 7 without a disk in this situation is easy. It is enough to have a bootable USB flash drive. If it does not exist, then it is created using simple actions. Especially for this, there is a program that writes images to the medium. For example, Ultra ISO. Accordingly, if the files are not in the disk image format, this should be created. Usually, the same Daemon Tools is used for this.
How to reinstall Windows 7 without a disk on a laptop or computer? Remember that when installing a new system, you should always use only checked files. The fact is that with modern progress, artisanal assemblies are found everywhere. Downloading Windows 7 from the Internet, no one can say with certainty that malicious software is not "sewn up" to it.
First actions

How to reinstall Windows 7 without a disk on a laptop or computer? Consider how to do this most simple way. We find the folder with the operating system, we start installation file. After that, the installation window will be opened. It will show the ability to configure the following settings:
- select the system language (this is the language of the displayed names of folders, files, disks, and so on);
- keyboard layout (input language);
- time format (country, time zone).
For our country, of course, everywhere you should choose a variant with the Russian language.
After clicking the "Next" button, a window with the "Install" button opens. Clicking on the installation, go to the Accept it by ticking next to the corresponding inscription.
The most popular types of systems
The installer can contain several variants of systems. The most commonly used are:
- home - for an inexperienced user;
- standard - for those who work confidently with a computer;
- professional - for an experienced person; it offers extensive capabilities, necessary modules and large file access;
- maximum - provides full access to all the functionality of the operating system.
If you are wondering about how to reinstall Windows 7 without a disk and a USB flash drive on a laptop or computer, you should understand that this is an incomplete list of possible systems.
Do not forget about the bit depth
All programs of this type differ in their bit depth, that is, 32-bit (X86) and 64-bit (X64). This parameter is specified after the system name. For example, Windows 7 Maximum X86.
Select the category of the installed system should be made, guided by the capacity of the computer resources. If the laptop or PC is relatively weak, it is recommended to install the OS X86 (32-bit version). Installing Windows 7 X64 is best if the RAM size exceeds 4GB. The thing is that the 32-bit version is simply unable to "see" such a volume.
What should I do when formatting is required?
Let's return to how to reinstall Windows 7 without a disk. The next OS installer window will offer a full version to your computer and update. It is necessary to make a choice in favor of a complete installation. Otherwise, only the existing operating system will be updated.
After selecting the preliminary parameters, a window appears with a choice hard drive. With this method it will not be possible to format it. This is due to the fact that the installer was started from the running system. If you need to format the disk, which is desirable when installing the OS, then this point can be bypassed. There is it as follows. Before installing the new "seven", take any other part of the disk and clear it of the files (move if necessary, and just do not touch them if you do not need them). After that, format the partition. Change the drive letter in this situation should not be. When answering the question how to reinstall Windows 7 without a disk and a USB flash drive on a laptop or computer, it should be borne in mind that when you boot a new system, the drive letters will change automatically. The formatted partition should be selected to install the system.
If cleaning is not needed

If formatting is not necessary, you can simply select the disk to install the new system and continue. In this situation, the old system will remain in the "Windows old" folder. It will be located on disk "C". It can also be started and run. But this is not recommended, since two identical operating systems on one disk can "conflict". This, in turn, will cause a malfunction. The old OS can be deleted or moved to another media. There is one other very important point to keep in mind when answering the question of how to reinstall Windows 7 without a disk on laptop Asus, Lenovo, HP, and others.
If there is not enough room for two operating systems in the partition on which the new OS is installed, the installation process will not start. This is due to the fact that the old shell is not removed and continues to occupy space. It is important to remember that frequent reinstallation "Operatsionki" leads to the destruction of the disk. This can be avoided by using different types defragmenters. For example, the program Victoria.
This problem is not so terrible for computers. There's nothing easier than buying a new hard drive and installing it. It's easy to accomplish on your own. However, if the hard drive broke on the laptop, then, apart from the cost of the drive itself, you will have to pay for repair services. This should be known if interested in the question of how to reinstall Windows 7 without a disk from a USB flash drive.
What do you need to enter after installation?
After selecting the disk (partition) for installation, click "Next", which will lead to unpacking and subsequent installation new Windows 7. This process is fully automated. It will last for 25-30 minutes, depending on the power of the computer (laptop). After completing the installation, you need to enter the following parameters:
- The username (your own name or the desired alias).
- Computer name (any name in Latin or Russian letters).
If the input is incorrect, the system will tell you this and ask you to fix the symbols, indicating an error.
Enter password and key

During the installation, you will be prompted to assign a password and a hint, in case it is lost. After that, a window appears in which to enter the key to activate the operating system. In case of its absence, simply click "Next", after unchecking the box next to "Activation when connected to the Internet". Then there will be an opportunity to activate the system by any convenient way. This is done as follows:
- It is necessary to find a folder "My computer".
- You need to open it by clicking the right mouse button.
- You need to click on the "Properties" tab.
- You should select the item "Change product key".
You need to protect your computer from external threats
Let's return to the question of how to reinstall Windows 7 without a disk on a computer or laptop. The next step is the security settings. You can use the recommended service, or you can postpone the solution and configure later. Computer protection is one of the most important moments in the installation of the operating system. The fact is that the security of the equipment will depend on how well you restrict the access parameters from other people's devices. This menu is nothing more than an offer of a choice of a data protection set, formed by Microsoft specialists. It should be understood that the recommended parameters have already been provided and established in them. By skipping this point, many people forget to manually configure the settings later, exposing their files to danger.
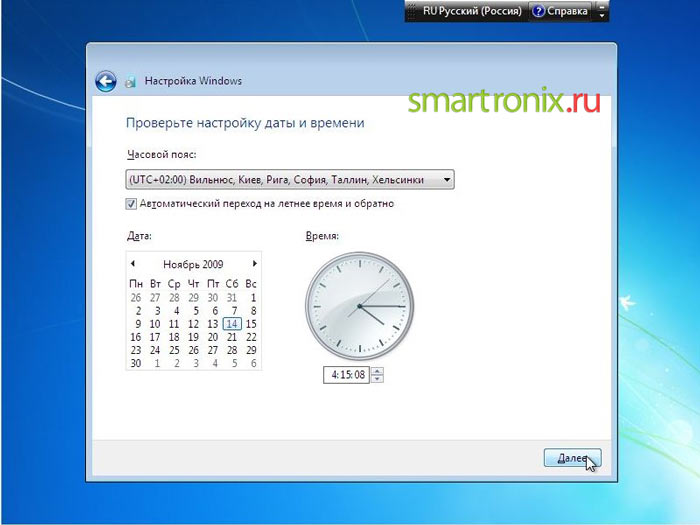
So, after determining the security, click "Next" and configure in a new window the time and date (time zone and the like).
Next, the installer displays the network settings window. It can be either domestic or public. Due to this, the parameters in the browser properties change. With respect to a common understanding, home network looks more conservative with respect to configuration. The public network, on the other hand, provides greater access to the resources of a laptop or computer.
What can I change after installation?

This was the last step, after which you will get an almost empty desktop of the newly installed operating room windows systems 7. Basic settings (for example, add the folder "My computer" or user files to the desktop) can be done by left-clicking on the desktop space and selecting the "Personalization" tab.
There you can put another wallpaper, change the default theme (usually Windows 7 Aero), change the screen resolution and much more.
Standard licensed Windows 7 goes without additional programs. However, among the numerous assemblies, one can find variants that include many additional elements, software, and so on.
Conclusion
This article describes how to reinstall Windows 7 without a disk and a USB flash drive. On a netbook, laptop, computer you will install it - does not play a big role. The principle of the installation process of the new system is the same.
After reading this article, any user can install the operating system via the Internet independently and for free on a desktop computer, laptop or even a netbook.
This work on reinstallation is not very complicated and consists of several stages.
It should be noted that these steps can be performed various methods, each user can choose his own liking.
At the first stage from the Internet, you need to copy an image of Windows 7 to your computer and use a special program to write it to a laser disc or an external storage medium via USB.
At the second stage, you need to boot from these media and start reinstalling Windows 7.
At the third stage, proceed to install the necessary software (if required).
How to find Windows 7 in a global network?
First, you need to pick up a system image on the network that corresponds to the parameters of the computer and download it. On the vast majority of resources it will be completely free.
In case the RAM in the PC is more than 4GB, then x64-bit Windows 7 will do, otherwise you will need to download x86. For downloading Windows 7 there are several other excellent resources on the Internet:
- http://fost.ws/;
- http://nnm-club.me/;
- http://torrent-soft.net/torrent-windows-7/.
The process of copying the system image from the Internet
There are other options, such as: "vipfiles", "depositfiles", "letitbit", etc. But it is not recommended to take the image of Windows 7 from them, because without having VIP privileges, it will take considerable time to copy it.
How to save the image to disk?
It is required to use a special software. There are freely distributed utilities, for example, "Ashampoo Burning Studio 6 Free", "UltraISO", "Nero Burning ROM". The amount of memory used by the drive should not be less than 4.7 GB. Recording guides:
How to save the image on the USB flash drive
It is necessary that the amount of memory of the flash drive is not less than 4 Gb.
Attention! However, all information on it will be deleted.
Before recording it is required, for example, using the application "HP Format Tool".
In the event that an external hard drive is used, it is not necessary to format it with the specified program.
Starting a PC from a disk or external memory
To start the computer from the newly made disk or external storage you must specify the appropriate option for the PC. Probably, the PC will immediately start downloading from them, but otherwise it will be necessary to perform several manipulations beforehand.
You must enter the BIOS and specify the boot path, for example, from DVD, from a USB flash drive, etc. Enter it by pressing a special key during system boot. For different models and manufacturers, they are different, so you need to know how to enter the BIOS from the instructions that are attached to the computer. Then you need to enter the "Boot" tab and in the "Boot Option Priorities" part of the "Boot Option # 1" line specify the boot path, for example, hard disk, flash drive, DVD. If the PC is not started from the specified device, it is required to set "UEFI / Legacy Boot" to "Legacy Only" in the "Startup" tab. Determine the required boot path and click the "Enter" key. When exiting the BIOS, it is required to save the changes made using "Save and Exit".
Some videos to help:
The process of installing Windows 7
Starting from an external media, you need to reinstall Windows 7. The necessary steps to install or reinstall the system are almost identical. The only difference is that when reinstalling, you do not need to partition the areas on the hard drive of the computer, but only format the disk where the reinstallation is performed. It is recommended that you save your personal files on another media before.
How to activate the operating system
Reinstalling the system, you need to activate it. Official Windows 7 this operation is carried out using a specially provided program via the Internet. Unofficial Windows will need to be activated using the applications developed for this.
You can use the special application "RemoveWAT". It is required to perform the actions specified in the manual attached to it (usually downloaded from the torrent in conjunction with the program).
Open the Start menu of the operating system, enter Recovery in the search bar and press Enter. This will open the System Restore window. Click the Advanced Recovery methods link. In the next window you will be offered two options:
Use this system to recover your computer from a previously created image. At the same time, all your data and programs installed on your computer will be restored from this image.
- Reinstall Windows (requires Windows installation disc) - this option provides a complete reinstallation of the entire operating system. In this case, the information on the computer will need to be restored from the backup copies, and the programs must be reinstalled.
To start the reinstallation procedure, select the second option. You will be asked to create a backup of the data available on the computer. Click the Buck up now button and select the medium on which the information will be recorded. In the next window, click Restart to restart the computer.
In the System Recovery Options window, select the input method from the keyboard and click Next, and then confirm the start of the recovery by clicking Yes. Insert into the drive installation disk Windows 7 and click Yes, the installation process will take several minutes. If you want to protect your account, enter the password in the appropriate window and click Next. In the next window, select Use recommend settings, then set your time zone and click Next again. At the end of the installation, select the type of network you will use (Home network, Work network or Public network).
At this reinstallation of the operating system is completed. Upon its completion, you will be asked to restore data from the previously created backup. If you want to perform this procedure, click the Restore my files button.
When reinstalling the operating system in a similar way, windows folder will be moved to the Windows.old folder. This folder can be useful if you want to return the system to its previous state (before reinstalling). In addition, it contains data (for example, documents or photographs) that were stored in the previous version system. If you no longer need this folder, you can delete it and free up, thus, the hard disk space.
To delete the Windows.old folder, you can use the Disk Cleanup service, in the window of which you need to check the Previous Windows Installations check box. To start Disk Cleanup, open the properties of the C drive (or the drive on which Windows 7 is installed), go to the General tab, and click the Disk Cleanup button.