Often computer users under windows management 7 face health problems operating system... Problems with a computer usually appear when it slows down a lot and programs do not open. Also, the computer may not start at all or do it every other time.
The reasons for the problems in the operability of the operating system can be very different. For example, if the computer gets virus, it can damage system files. Also, difficulties with a PC may appear during installation low-quality softwarewhich can damage the structure system files... To solve the problem with the health of your computer on Windows 7, you need to roll back to the previous restore point.
To protect the OS, Windows 7 uses restore points that the system periodically creates. Basically, restore points are previous state of Windows 7 system files... To help a Windows 7 PC user, we have prepared a material that will describe a detailed system recovery process in various ways.
Restoration of performance in a loaded seven
If your Windows 7 computer boots, but the system does not behave stably, then it's time to roll back to the previous restore point. First of all, we need to get into the window in which you can call the system recovery options. To do this, open the program "" by pressing the Win + R key combinations, through which we enter the following command: systempropertiesprotection
A window should open before us " System properties"On the" System protection". You can also get to this window in the standard way through the menu " Start"... Further action will be pressing the button Recovery ....

After clicking, the system restore window will open. It will ask you to restore the system using the recommended access point or select another. We will focus on recommended restore point.

This window requires confirmation for the selected restore. Press the Finish button to confirm.

This button will bring up a message warning that after the recovery procedure it will be impossible to return to the previous parameters of the seven... By clicking on the message Yes, we will start recovery windows systems 7.
If the process of returning to the previous state has occurred without errors, a corresponding message will be displayed.

If you cannot roll back to the previous parameters using the recommended point, then you should select the point that was created later than the selected restore point systems Windows 7. I would also like to note that to perform this operation you will need special privileges... That is, when logging in, you must select account admin and enter a password for it.
We return the performance of the computer at the start of the OS
In case your PC is running seven at all is not downloading, then you can start the operating system in safe mode ... After the BIOS start window appears, press F8 on the keyboard (for laptops, there may be another key, for example, Del or one of the function keys). This action will cause menu of alternatives loading sevens.
In this menu, select the item " Safe mode”And continue by pressing Enter, after which the system will start in safe mode.

If the system successfully started in safe mode, then start the recovery of the seven, as shown in the previous example. In this mode for maximum safety disabled many functions OS, including graphical interface Windows Aero. It will look like this running program "" With the command " systempropertiesprotection»On a system running in safe mode.

We return the performance of the computer using an installation disk or a bootable USB flash drive
If the two previous examples do not help you, then you will need to restore the seven installation disk or flash drive... For computers that do not have an optical drive, you need to use a bootable USB flash drive with an OS. A bootable USB flash drive can be created using special utilities... The most popular utilities for this purpose are Windows USB / DVD, Download Tool and Rufus.
Boot from the installation disk or USB flash drive. In the start window of the installer, click Next and go to the next window.

 After searching, select the OS you want to restore and click Next.

In the window that appears, select the same item " System Restore».

This action will launch the seven repair utility. In the utility, click the Next button. This action will take you to restore point list... Let's choose a suitable point and continue.

A window will appear in front of you, as in the first example. Therefore, we press the Finish button and reply to the message, after which we will start the recovery.
After a successful rollback to the previous state, you will receive this message.

Windows 7 disaster recovery with antivirus
If your PC is infected virusesinterfering with the correct operation of the computer and the first three examples considered do not help you, then a good recovery method in this case would be an anti-virus life disk from Dr.Web. With this disc you can clean the system from all types of dangerous software... In addition to cleaning, Dr.Web LiveDisk can cure infected objectsthat are required to recover Windows 7.
Dr.Web LiveDisk image can be used both for recording on optical disc, and on a USB flash drive. To use Dr.Web LiveDisk on a USB drive, you need special program... You can download the program for writing to a USB flash drive and the image itself on the official website by going to www.freedrweb.ru/livedisk.
Run the recorded image on the disk, putting it in the BIOS first in the boot.
In the bootloader start window, select the first item of Dr.Web LiveDisk and press Enter. These actions will start downloading Dr.Web LiveDisk.
 After downloading Dr.Web LiveDisk, we will get a full-fledged operating system on linux based... As mentioned earlier, the main purpose of Dr.Web LiveDisk is to clean and disinfect virus software. Therefore, this OS has a built-in antivirus Dr.Web CureIt!... This antivirus runs along with the OS.
Click in Dr.Web CureIt! the Start scan button, which will start a scan, clean the system and disinfect it from viruses.

After verification, Dr.Web CureIt! deletes or disinfects infected objects.
Since the system will no longer have malicious code, you can safely restore the system in three ways, which are described above.
If, after checking the system files, you cannot restore the Windows 7 system, then the only reasonable solution would be to make a full backup of the information and reinstall the system again.
How to make an image of the system in seven
Another recovery feature in Windows 7 is system imaging... In this image, you can save all information on your hard disk, including the operating system. Having restored this method, you will receive an OS with the same parameters as on the day the image was created.
Run " Control Panel"And go to the tabs" system and safety», «»

In the window that opens, to create an image, indicate the location to save it and click Next.

In the window that appears, it remains only to click the Archive button, which will start the image creation process.
 Restore the created image with Windows 7 and all information on local drives using the installation disc. The principle of recovery is shown in the second example, only when choosing a recovery method, you need to select " System image recovery»And indicate its location on the saved drive.
Alternative methods of recovering the Windows 7 operating system
Besides the standard recovery methods, there are alternative software that does the same function. The most interesting solution that allows you to perform system recovery is the program Acronis True Image 2016 ... This is a proprietary software package from Acronis.
First of all, download and launch Acronis True Image 2016 from a shortcut on your Desktop. At startup, the program will ask for a name and password.
Now let's configure Acronis True Image 2016 so that he can do full disk backup with Windows 7. This setting should be done immediately after installing the OS so that while using Windows you can restore functionality from several backup copies of the system created in a certain period of time. So, let's get started with the setup. To do this, select the storage type by clicking on the "" link.

In the window that opens, select the storage " Acronis Cloud».
 Now let's create a schedule for our backups. To do this, press the button " Options”And go to the storage parameters settings. On the first tab, select the schedule you like for creating backups of our system.

As you can see, the whole computer is selected as the source for backups. Therefore, in the schedule set by us, a backup copy of the system will be created in the cloud storage " Acronis Cloud».
For an example of recovery, let's take an archive copy not from cloud storage "Acronis Cloud", and with hard disk... If a backup has been created on the computer, then Acronis True Image 2016 he will find it himself.
Therefore, we press the button Repair your computer, after which the program will completely restore the system to the state that was when the backup was created. Also, if you cannot implement windows start 7 on the computer, at Acronis True Image 2016 there is a boot image for this that can be written to disk.
 You can download this image on your account page. You can get a password and login on the official website www.acronis.com. The operating principle of the bootloader is the same as with the desktop version. Load disc from Acronis True Image 2016 on a computer, you can put it in the BIOS first at boot.
The example shows that the utility allows full control over the creation of PC recovery copies and do backups the entire system in the cloud.
An example of starting Acronis True Image 2016 bootable disk
To start the disc Acronis True Image 2016 when the system starts, you must set the boot mode from optical drive the first in BIOS. For example, for motherboard MSI A58M-E33 these parameters in BIOS mode look like this.

Another boot method is to use hotkeys to call the boot menu for drives in BIOS. For example, for MSI A58M-E33 motherboard hotkey is the F11 button. By pressing this button, we will launch a special mode in which, when the system is started, it will open drive boot menu in BIOS.

After booting from the Acronis True Image 2016 disk, we will get to such a menu.

In this menu, you must select Acronis True Image 2016, after the selection, the program will start.

From the example you can see that starting the boot disk Acronis True Image 2016 using the desired BIOS mode is not at all difficult.
Summing up
In this article, we have analyzed almost all the methods and parameters. system recovery... We also looked at ways to restore the seven with an alternative software and with the help of antivirus. Which method to choose to restore Windows 7, depending on the situation, is up to you.
Summing up, I would like to note that they mainly disrupt the operation of the OS viruses and experiments with various illegal software... Therefore, so that you do not have to constantly restore the system, use only verified and licensed software, and also use reliable comprehensive anti-virus protection.
I would also like to note that the examples considered in the material will work not only on Windows 7, but also on more modern operating systems, such as Windows 8 and 10 ... And we, in turn, hope that our material will allow you to correctly restore windows health 7 and you can confidently say that I can do system restore.
Related Videos
Good day!
No matter how reliable Windows is, sometimes you still have to face that the system refuses to boot (for example, the same one pops up), slows down, is buggy (note: all sorts of errors pop up)etc.
Many users solve such problems by simply reinstalling Windows (the method is reliable, but rather long and problematic) ... Meanwhile, in most cases, you can quickly fix the system using windows recovery (fortunately, there is such a function in the OS itself)!
In this article, I want to consider several options for recovering Windows 7.
Note! This article does not cover issues related to computer hardware problems. For example, if after turning on the PC nothing happens at all (note: more than one LED is off, the sound of the cooler is not heard, etc.), then this article will not help you ...
1. How to roll back the system to its previous state (if Windows has booted)
If Windows has booted, that's half the battle :).
1.1. With the help of specials. recovery wizards
By default, system checkpoints are enabled in Windows. For example, you install new driver or some program (which may affect the operation of the system as a whole) - then "smart" Windows creates a point (ie remembers all system settings, saves drivers, a copy of the registry, etc.). And if after installing new software (note: or during a virus attack) problems arose, then you can always return everything back!
To start recovery mode - open the START menu and in search string enter "recovery", then you will see the desired link (see screen 1). Or in the START menu there is an alternative link (option): start / standard / service / system recovery.

Screen 1. Start Windows 7 recovery
Note! OS recovery does not affect documents, pictures, personal files, etc. Recently installed drivers and programs can be removed. Registration and activation of some software may also "fly off" (at least for the one that was activated, it was installed after creating a checkpoint, with the help of which the PC will be restored).

Then comes the most crucial moment: you need to choose a point to which we will roll back the system. You need to choose the point at which your Windows worked as expected, without errors and failures (it is most convenient to navigate by dates).
Note! Also enable the checkbox " Show other restore points". For each restore point, you can see which programs it will affect - for this there is a button " Search for affected programs«.
When you select a point to restore - just click "Next".

After that, you will only have the last thing - to confirm the OS recovery (as in screenshot 4). By the way, when restoring the system, the computer will be rebooted, so save all the data you are working with now!

After restarting the PC, Windows will "roll back" to the desired restore point. In many cases, thanks to such a simple procedure, it is possible to avoid many problems: various screen lockers, problems with drivers, viruses, etc.
1.2. Using the AVZ utility
A great program that you don't even need to install: just extract from the archive and run the executable file. It can not only scan your PC for viruses, but also restore many parameters and settings in Windows. By the way, the utility works in all popular Windows: 7, 8, 10 (32/64 bits).

Screen 4.1. AVZ: file / restore.
By the way, the list of restored settings and parameters is quite large (see the screen below):
- restoring startup parameters for exe, com, pif files;
- reset Internet Explorer protocol settings;
- restoring the start page internet browser Explorer;
- reset Internet Explorer search settings;
- removing all restrictions for the current user;
- restoration of Explorer settings;
- removal of debuggers of system processes;
- unlocking: task manager, system registry;
- cleaning hosts file (responsible for network settings);
- removing static routes, etc.

2. How to restore Windows 7 if it does not boot
This is a difficult case, but we will fix it :).
Most often, the problem with loading Windows 7 is associated with a damaged OS bootloader, disruption of the MBR. To return the system to normal work - you need to restore them. More on this below ...
2.1. Troubleshooting Computer Problems / Last Known Good Configuration
Windows 7 is quite a "smart" system (at least compared to previous Windows). If you did not delete hidden partitions (and many do not even look or see them) and your system is not "Start" or "Initial" (in which these functions are often unavailable), then if you press several times when turning on the computer f8 key , you will see additional options download .
The bottom line is that among the boot options there are two that will help restore the system:
- first of all try the item “ Last Known Good Configuration". Windows 7 remembers and saves data about the last time the computer was turned on, when everything worked as expected and the system was booted;
- if the previous option did not help, try running " Troubleshoot computer problems«.

2.2. Recovery using a bootable USB flash drive
If nothing worked and the system still does not work - then for further Windows recovery we will need installation flash drive or a disk with Windows 7 (from which, for example, this OS was installed). If it's not there, I recommend this post, it tells you how to create it:
To boot from such a bootable flash drive (disk) - it is necessary to properly configure the BIOS (details about bIOS setup -), or when turning on the laptop (PC), select the boot device. Also, how to boot from a USB flash drive (and how to create one) is described in detail in the article about installing Windows 7 - (especially since the first step in recovery is similar to the installation one :)).
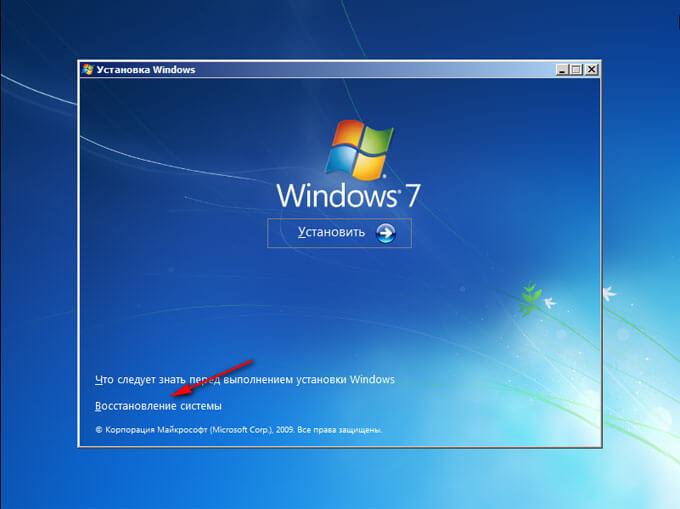
Window windows installations 7 appeared ... What's next?

In the next step, we choose not to install Windows, but to restore! This link is in the lower left corner of the window (as in screenshot 7).

After following this link, the computer will search for the OS that was previously installed for some time. After that, you will see a list of Windows 7 operating systems that you can try to restore (usually there is one system). We choose the desired system and click "Next" (see screen 8).

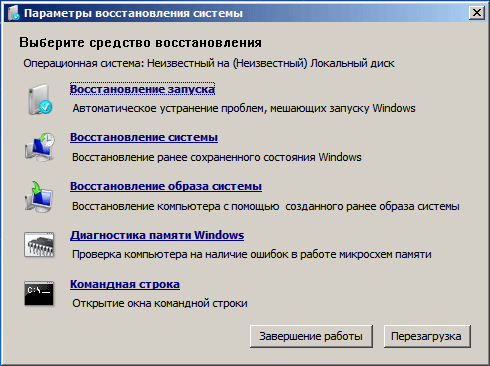
- Launch recovery - recovery of Windows boot records (MBR). In many cases, if there was a problem with the bootloader, after the work of such a wizard, the system starts to boot normally;
- System Restore - rollback of the system using checkpoints (discussed in the first part of the article). By the way, such points can be created not only by the system itself in auto-mode, but also by the user manually;
- System image recovery - this function will help restore Windows from a disk image (if, of course, you have one :));
- Memory diagnostics - testing and verification random access memory (useful option, but not within the scope of this article);
- Command line - will help to conduct manual recovery (for advanced users. By the way, we will also partially touch on it in this article).

Let's consider the steps in order to help return the OS to its previous state ...
2.2.1. Launch recovery
See Screen 9
This is the first thing I recommend to start with. After starting this wizard, you will see a search box for problems (as in screenshot 10). After a certain time, the wizard will inform you whether the problems have been found and resolved. If your problem is not resolved, go to the next recovery option.

2.2.2. Restore a previously saved state of Windows
See Screen 9
Those. roll back the system to a restore point, as in the first part of the article. Only there we ran this wizard in Windows itself, and now using a bootable USB flash drive.
In principle, after choosing the bottom option, all actions will be standard, as if you had launched the wizard in Windows itself (the only thing, the graphics will be in the classic Windows style).
The first point - just agree with the wizard and click "Next".

Screen 11. Recovery Wizard (1)

Screen 12. Restore point selected - Restore Wizard (2)
Then you confirm your intention to restore the system and wait. After restarting your computer (laptop) - check the system to see if it boots.

Screen 13. Warning - Recovery Wizard (3)
If the restore points did not help, the last thing remains, rely on the command line :).
2.2.3. Command line recovery
![]()
See Screen 9
Command line - there is a command line, there is not much to comment on here. After appearing " black window"- enter in sequence the two below-presented commands.
To repair MBR: you need to enter the command Bootrec.exe / FixMbr and press ENTER.
To repair the bootloader: you need to enter the command Bootrec.exe / FixBoot and press ENTER.
By the way, note that on the command line, after executing your command, the response is reported. So, both teams above should have the following answer: “ Operation completed successfully". If you have a different answer from this, then the bootloader has not been restored ...
PS
If you do not have restore points - do not despair, sometimes you can restore the system like this:.
That's all for me, good luck to everyone and a quick recovery!For additions on the topic - thanks in advance.
Windows 7 Boot Loader Repair - Performing actions to restore the operating system after problems with Windows boot. Due to a system failure, the user may lose data, personal files on the computer.
At one point in time, the operating system will not be able to boot on the computer. Various messages appear on the screen (not always in Russian), which indicate a problem with booting Windows.
The main causes of problems with the Windows 7 bootloader:
- user actions: an attempt to use hidden system partitions, incorrect changes to the boot files using EasyBCD, etc .;
- system failure;
- exposure to malicious software;
- the appearance of bad blocks on the hard disk of the computer;
- the operating systems are installed on the computer in the wrong order;
- hardware problems.
The problem with the bootloader must be solved, otherwise you will not be able to use Windows, because the system does not start on the computer. Problems can be fixed in a radical way: again on a PC.
If there is, created by the system tool, or using third-party programs you need to restore from a previously created Windows backup image. Many users, unfortunately, do not pay due attention backup systems, so these methods will not work for them.
How to repair Windows 7 bootloader? To restore the operating system boot files, use the built-in Windows tools: automatic startup recovery, as well as using the BootRec and BCDboot utilities included in the operating system, run in the command line.
Before using the operating system tools, you need to know the layout of the hard disk. Modern computers have a hard markup style gPT disk and the new BIOS is UEFI, and in windows times 7, the discs used mBR markup, and the now outdated BIOS. Some computers, Windows 7 64-bit, installed on UEFI and GPT disks, but mostly Windows 7 PCs use MBR markup (main boot record).
In this article, we will look at instructions on how to restore the bootloader in Windows 7 using system tools: first, we will perform an automatic recovery, and then we will try to restore the bootloader from command line.
To perform boot loader repair operations, you will need either an installation DVD with the operating system or a bootable Windows 7 USB flash drive. Bootable media are needed to be able to boot to personal computer Windows RE Recovery Environment ( Windows Recovery Environment), with which you can try to solve the problem with the inability to start the system.
Performing Windows 7 recovery automatically by system tool
The easiest way: automatic recovery of the boot partition on the hard disk using the operating system tool. This action takes place without user intervention, it is only necessary to boot on the computer from the boot disk.
Immediately after starting the computer, using the keyboard keys, you need to enter boot menu (Boot Menu) to select external device For loading: DVD disc or USB stick. Which keys should be pressed depends on the manufacturer of the equipment, check in advance. Another way: you can enter BIOS and set the boot priority from the connected device there: USB stick or DVD disc.
In this example, I use the Windows 7 installation disc, all actions from the bootable USB flash drive are performed in a similar way.
In the first window of the Windows setup program, click on the "Next" button.
In the window asking you to start installing the operating system on your computer, in the lower left corner, click on "System Restore".
In the "System recovery options" window that opens, a search for installed systems will start.
After a while, a message will appear stating that problems have been detected in the boot parameters of the computer.

Click on "Details" to view a description of the fix.

To start automatic troubleshooting with system boot, click on the "Fix and restart" button.
After restoring the bootloader, the Windows 7 operating system will boot up on the computer again.
Automatic troubleshooting by means of the system can be started in a slightly different way:
- In the System Recovery Options window, activate the option Use recovery tools to fix problems when windows startup... Select the operating system to recover, "and then click the" Next "button.

- In the window for selecting recovery tools, click on "Startup Repair".
- Wait until the end of the operation to automatically eliminate problems that prevent the system from starting.
If the issue is not automatically resolved, go to the following methods, which will require the user to manually enter commands at the Windows command prompt.
Repairing the Windows 7 bootloader using the Bootrec utility
The next method involves restoring the Windows 7 bootloader via the command line. For this we use the Bootrec.exe utility. This method only works with disks that have an MBR.
From the boot disk, you need to enter the Windows recovery environment as described above.
In the "System Recovery Options" window, click on the "Command Prompt" option.
The Bootrec.exe utility uses the following basic commands:
- FixMbr - the parameter writes the master boot record (MBR) to the system partition of the disk, compatible with Windows 7, the existing partition table is not overwritten
- FixBoot - using the command, a new boot sector is written to the system partition, which is compatible with Windows 7
- ScanOS - performs a search on all disks of installed systems compatible with Windows 7, displaying entries that are not in the system configuration store
- RebuildBcd - search all disks of installed systems compatible with Windows 7, select systems for adding data to the boot configuration store
The FixMbr command is used to fix the Master Boot Record as well as to remove invalid code from the Master Boot Record.
The FixBoot command is used under the following conditions: the boot sector is damaged, the boot sector has been replaced with a non-standard boot sector, an earlier version of Windows (Windows XP or Windows Vista) was installed on a Windows 7 computer.
The ScanOS command searches all disks of operating systems compatible with Windows 7. As a result, all entries related to other operating systems installed on the computer that are not displayed in the boot manager menu will be displayed.
The RebuildBcd command allows you to discover and add to the repository the boot configurations installed on the system computer. This parameter is used to completely rebuild the system boot store configuration.
In the command line interpreter window, enter the command (after entering the commands in the command line, press the "Enter" key):
Bootrec / fixmbr

If the problem persists, you may need to enter the following command:
Bootrec / fixboot
The rest of the commands are used if the computer has multiple operating systems.
Close the command line, and in the "System Recovery Options" window, click on the "Restart" button.
How to repair Windows 7 command line bootloader using BCDboot utility
Using the bcdboot.exe utility, you can restore the Windows 7 boot loader on computers with MBR or GPT styles hard disk layout.
Boot from the removable device, go to the window with the choice of a system recovery method, and then run the command line. Another option: in the very first window, press the Shift + F10 keys on the keyboard to enter the command line window.
In the Command Prompt window, enter the command to run the DiskPart utility:
Diskpart
To display information about the disks on your computer, enter the following command:
List volume
We need to find out the drive letter (volume name) on which the operating system is installed.
The volume name (drive letter) in Diskpart utility may differ from the drive letter in Explorer. For example, in my case, in Explorer, the system partition has the letter "C", and in diskpart it is indicated by the letter "E".

To exit the diskpart utility, enter:
Bcdboot X: \\ windows
In this command: "X" is the letter of the drive where the operating system is installed. In my case, this is the letter "E", you may have a different volume (disk) name.

Close Command Prompt.
In the "System Recovery Options" window, click the button to restart the computer.
Conclusions of the article
If you have problems with the Windows 7 boot loader, you need to restore the system boot files by booting on the computer from the boot windows disk... You can restore damaged or missing files using the operating system tools: automatic troubleshooting of Windows boot problems, using the Bootrec and BCDboot utilities, run from the command line in the recovery environment.
Windows 7 can't always heal standard ways without using additional bootable media. The most convenient option is to use a bootable USB flash drive as the last, which is written both by the OS's own means and by third-party utilities. Also, before carrying out the recovery procedure, you must properly prepare the BIOS.
Creating a bootable USB flash drive Windows 7
The easiest way to make a bootable drive is offered by Microsoft in its windows utility 7 USB / DVD Download Tool. It is downloaded from the company's website and requires the installation of Microsoft .NET Framework 2.0 and an OS ISO image. To create bootable media using this utility, do the following:
This is just one way to create a USB stick to solve system problems. It can also be recorded using the UltraISO program - although paid, but with a trial period.
Using UltraISO for a bootable drive
After installing and running the program, the user will need to do a minimum of steps to burn the installation media:

Preparing a laptop or PC to work with a USB drive
Modern devices allow inexperienced users not to get into the BIOS in order to be able to boot from a hard drive. For this, there is a boot menu, which is usually invoked with the keys F12, F10, F8, etc. (depends on bIOS version and board manufacturer) immediately after switching on. F12 is most often used on laptops.

If this mode is not available to you, you will have to change the BIOS settings.
You can usually enter the configuration change window by pressing the Del key before starting Windows. In the window that opens, you will need to select an item that may be called Boot, Boot Menu, Boot Manager, etc., and then change the boot priority from HDD to USB.
Recovering Windows 7
After downloading the information from the USB drive, the OS installation window will open. You can reinstall the system, but this method should be reserved for the most extreme case, since part or all of the user information on the disk after that may not be saved, and a lot of time will be spent on reinstalling. So first try to restore Windows meansthat you have:

Several tools are presented here that often help to cure the system, even in very severe failures.
Launch recovery
This tool also works in automatic mode and is often unable to provide full-time work. However, it often manages to solve such malfunctions that may arise during installation previous versions OS, for example, XP as a backup along with the "Seven".

In this case, the MBR boot record is overwritten and the newer OS simply does not boot. After running this utility, if a malfunction is detected, the user will see a window offering to fix it. After rebooting, the system can be started as expected.
System Restore
This item assumes the return of the OS configuration to one of the previously saved states, that is, it can be used to roll back to the last or earlier checkpoints. For this:
- Open the appropriate item, after which a new window will appear. It will display the last point that Windows was able to create.
- You can select an earlier one if you check the box to show all points.
- Click "Next", in the next window - "Finish", after which the OS will roll back to the restore point you selected.
If there is not only boot disk, but also the system image that you store on a separate media or in another section hard disk, you can use the item "System image recovery". With its help, you can not reinstall Windows, but deploy the image along with all the drivers, programs, etc. installed at the time of its recording. To do this, you just need to specify the location of the image and the disk to which you want to deploy it in the appropriate windows.
Repairing the Windows 7 bootloader
If you are having problems starting the OS and you suspect that a corrupted Windows bootloader is to blame, here you will find a way to fix this problem manually.
Restoring the Windows 7 bootloader may be required (or at least worth trying) in the following cases: when Bootmgr is missing or Non system disk or disk error errors occur; In addition, if the computer is locked, and a message asking for money appears even before Windows starts booting, MBR (Master Boot Record) recovery can also help.
- Open the Windows Recovery Tools list and select Command Prompt.
- Enter the "Bootrec" command and see a list of all available prompts.
- Try to enter two commands in sequence - "Bootrec.exe / FixMbr" and "Bootrec.exe / FixBoot". Remember to hit Enter after entering each command.
- Write "Exit" to shutdown and restart your computer.

With these commands, you will overwrite the MBR and create a new boot sector. However, if these steps do not help, you can try another method:
- Open Command Prompt again through Windows Recovery Tools.
- Enter the command "Bootrec.exe / RebuildBcd".
- When a system is found, press "y" to add it to the boot list.

After exiting the command line with the "Exit" prompt and restarting your computer, you should find your system working correctly.
Windows Resuscitator
WinPE 10 Sergei Strelec x86 / x64. This reanimator can be used to restore Windows, diagnose your computer, install Windows, create backups, remove viruses and much more. In addition, it can be written to a disc or USB flash drive / media. For more information on WinPE 10, please visit http://sergeistrelec.ru. There is also a FAQ where you can get all the answers to your questions about the resuscitator.
On the site you can find various versions of this developer's resuscitators with detailed instructions on how to use it. Versions differ not only in software versions, but also windows version... Choose carefully and I strongly recommend that you read the instructions and frequently asked questions before using.
List of programs already integrated into the resuscitator:
Backup and restore
Acronis True Image 2017
Acronis Universal Restore
Active Disk Image Professional
R-Drive Image
StorageCraft Recovery Environment
Ghost
TeraByte Image For Windows
AOMEI Backupper
Drive SnapShot
Macrium Reflect
HDD
Disk management, system
Acronis Disk Director 12.0
EASEUS Partition Master 10.8 WinPE Edition (Russian version of WYLEK)
Paragon Hard Disk Manager 15 Premium
MiniTool Partition Wizard Server
AOMEI Partition Assistant
Macrorit Disk Partition Expert
IM-Magic Partition Resizer
Eassos PartitionGuru
Defraggler
Auslogic Disk Defrag
HDD Low Level Format Tool
HD Tune Pro
Check Disk GUI (Rus)
Victoria
HDD Regenerator 2011 (Eng)
HDDScan
Hard Disk Sentinel Pro
Active KillDisk
Western digital Data LifeGuard Diagnostics
CrystalDiskInfo
CrystalDiskMark
Other programs
AIDA64 Extreme 5.75.
BlueScreenView
Active password changer
Reset Windows Password
UltraISO Premium 9.6.5
Total Commander 8.52
Registry Editor (x86 / 64) (Rus)
Registry LoaderPE
Autoruns
FastStone Capture
IrfanView
STDU Viewer (Rus)
BOOTICE
Unlocker
7-ZIP (Rus)
WinNTSetup
Check Device
Double Driver
Imagex
GImageX
Opera 34 (Rus)
Opera 12 (Rus)
QtWeb Browser
Download Master
Qupzilla
PENetwork
Media Player Classic (Rus)
EasyBCD 2.3 (Rus)
SoftMaker Office (Rus)
MInstAll
TeamViewer
BurnInTest Professional
PerformanceTest 8.0
USB Safely Remove
Ammyy Admin
Fab's AutoBackup 4 Tech
ATTO Disk Benchmark
RWEverything
Far Manager
CPU-Z
Disk2vhd
PassMark MonitorTest
HWiNFO32 5.36
BitLocker
Windows Recovery Tool with DaRT Tools
Data recovery:
R-Studio 8.0
Active File Recovery
Active Partition Recovery
O&O DiskRecovery 9.0
MiniTool Power Data recovery
Runtime GetDataBack for NTFS
Runtime GetDataBack for FAT
DM Disk Editor and Data Recovery
UFS Explorer Professional Recovery
Hetman Partition Recovery
EaseUS Data Recovery AdvancedPE
Antiviruses have also been added to the reanimator, which can be very necessary when the entrance to Windows is blocked by viruses. SmartFix Tool 1.3.4, Kaspersky Rescue Disk, Dr.Web CureIt! , Kaspersky Virus Removal Tool.
Having such a resuscitator is always in stock - you will no longer be afraid of any Windows crashes and glitches.
Windows 7 cannot always be cured using standard methods without using additional bootable media. The most convenient option is to use a bootable USB flash drive as the last, which is written both by the OS's own means and by third-party utilities. Also, before carrying out the recovery procedure, you must properly prepare the BIOS.
Creating a bootable USB flash drive Windows 7
The easiest way to make a bootable drive is offered by Microsoft in its Windows 7 USB / DVD Download Tool. It is downloaded from the company's website and requires the installation of Microsoft .NET Framework 2.0 and an OS ISO image. To create bootable media using this utility, do the following:
This is just one way to create a USB stick to solve system problems. It can also be recorded using the UltraISO program - although paid, but with a trial period.
Using UltraISO for a bootable drive
After installing and running the program, the user will need to do a minimum of steps to burn the installation media:

Preparing a laptop or PC to work with a USB drive
Modern devices allow inexperienced users not to get into the BIOS in order to be able to boot from a hard drive. To do this, there is a boot menu, which is usually called by the F12, F10, F8 keys, etc. (depending on the BIOS version and the manufacturer of the board) immediately after switching on. F12 is most often used on laptops.
If this mode is not available to you, you will have to change the BIOS settings.
You can usually enter the configuration change window by pressing the Del key before starting Windows. In the window that opens, you will need to select an item that may be called Boot, Boot Menu, Boot Manager, etc., and then change the boot priority from HDD to USB.
Recovering Windows 7
After downloading the information from the USB drive, the OS installation window will open. You can reinstall the system, but this method should be reserved for the most extreme case, since part or all of the user information on the disk after that may not be saved, and a lot of time will be spent on reinstalling. Therefore, first try to restore Windows with the tools that you have available:

Several tools are presented here that often help to cure the system, even in very severe failures.
Launch recovery
This tool also works in an automatic mode and is often unable to provide regular operation. However, she often manages to solve such malfunctions that may arise when installing previous versions of the OS, for example, XP as a backup along with the "Seven".
In this case, the MBR boot record is overwritten and the newer OS simply does not boot. After running this utility, if a malfunction is detected, the user will see a window offering to fix it. After rebooting, the system can be started as expected.
System Restore
This item assumes the return of the OS configuration to one of the previously saved states, that is, it can be used to roll back to the last or earlier checkpoints. For this.


