Windows does not see the hard drive - what to do?
Hard disk "eng. hard disk drive, HDD ”is one of the most reliable and fastest storage devices. With the help of a "hard drive" we can transfer terabytes of data from one computer to another, if it is not possible to use network technologies... But, like any other device, some problems may arise with the hard drive. What to do if Windows does not see hDD... We will try to answer this question in our article.
Note!!!
Reasons why the operating system may not detect the hard drive:
- The disk is not connected.
- Winchester is in the wrong mode.
- Lack of logical drives.
- File system crash.
Let's try to analyze each problem and find a solution for them.
1. The disk is not connected to the computer.
The reason is quite banal, but in life it occurs very often, the reason for this may be that the power cable or Data cable is not fully inserted.
Correct connection of SATA cables.
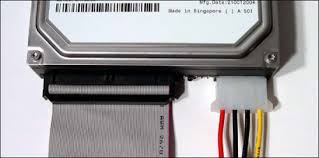
Correct connection of IDE cables.
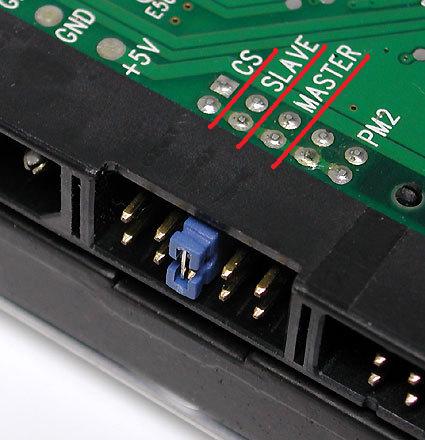
2. The hard drive mode is not set correctly.
An incorrectly selected operating mode of the hard drive can become a problem when booting and detecting a hard drive in the system. It is necessary to carefully study the jumper on the hard drive and select "Master", on which the main one (from which the operating system is loaded) and "Slave", on the one that is the disk for transferring information.
3. Lack of logical drives.
In the case when a new hard drive was connected, it may not have any partitions at all, but it will simply have free space. At the same time, in the BIOS and "Device Manager" we will see the "screw" as a device, but we cannot save anything to it. Such programs as Partition Magic and Acronis Disc Director will help us with this problem. These programs allow you to create, delete and resize a hard drive partition. An analogue of these programs in the environment of the operating system Windows 7 and higher is the "Disk Management" utility as part of programs for computer management.
For example, let's try to create a partition on a hard disk using Acronis Disk Director
When starting the utility, we will see a window on the right side of which our hard drives, and in the left operations that we can perform with them.
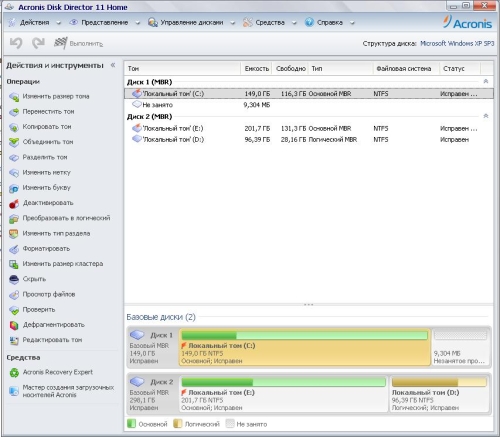
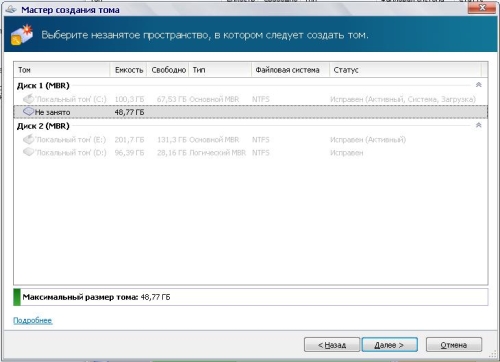
Let's select the hard drive on which we are going to perform the operation and try to create a logical volume with the size we need. To do this, select the unallocated space and click "Create Volume".
Launched "Volume Creation Wizard"; will offer us a couple of steps to create a local disk, in which we will need:
Select the type of volume to create.
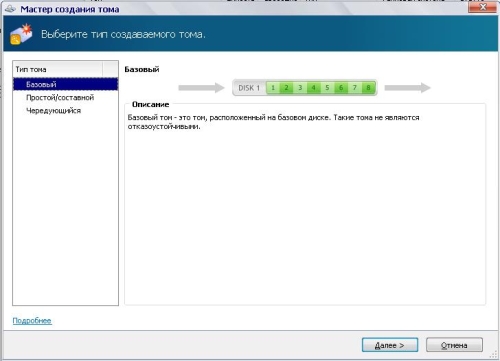
Select unallocated space in which to create the volume
Specify the size of the volume to be created
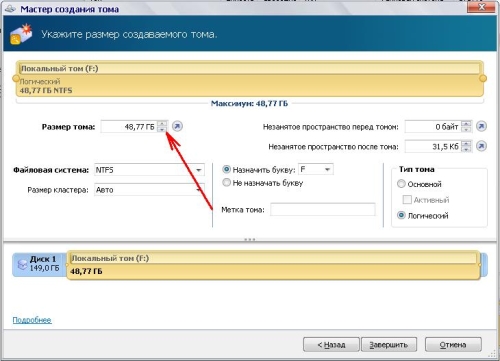
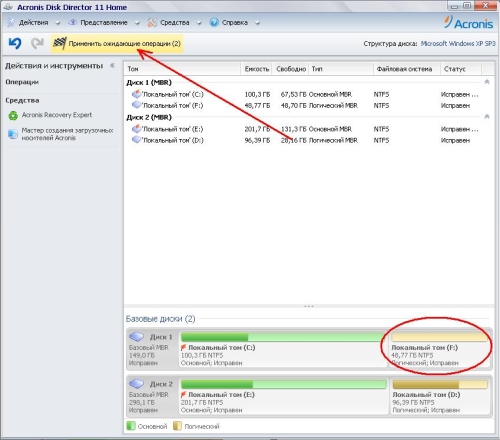
After completing these steps, we press "Finish" and in the main window of the program we can see how our sections will look after creation. Click on Apply Pending Operations to create our section.
4. Restoring the file system of the hard drive.
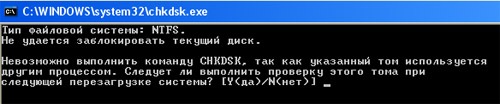
The "crash" of the file system on the hard drive is one of the most difficult software errors... The cause of the occurrence can be both incorrect transportation when transferring the hard disk, and the robot malware... But there is still room for recovery. To help us with this comes a standard utility in the family of Windows operating systems - CHKDSK (check disk-check disk). The job of this program is to check our disk for errors and fix them.
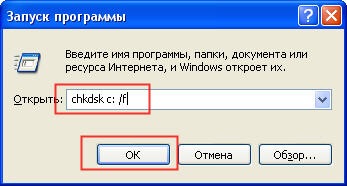
To run this utility, you need to write the following command in the "run" window: chkdsk c: / f, where C: is the drive to be checked.
At the same time, the program will remind us that the check is possible only with an unused partition, and will carry out it on the next reboot.
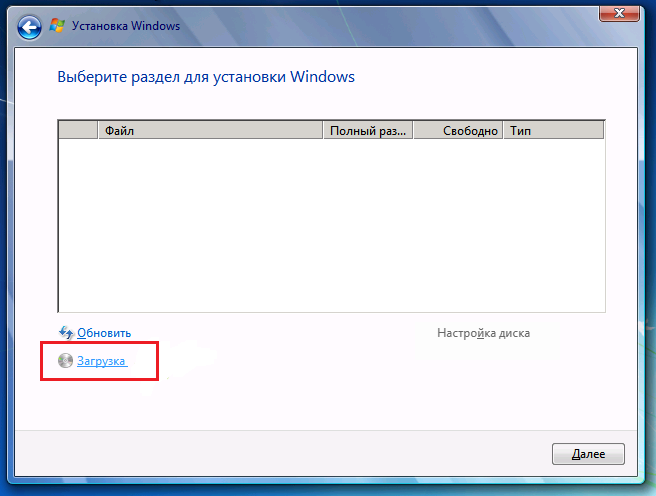
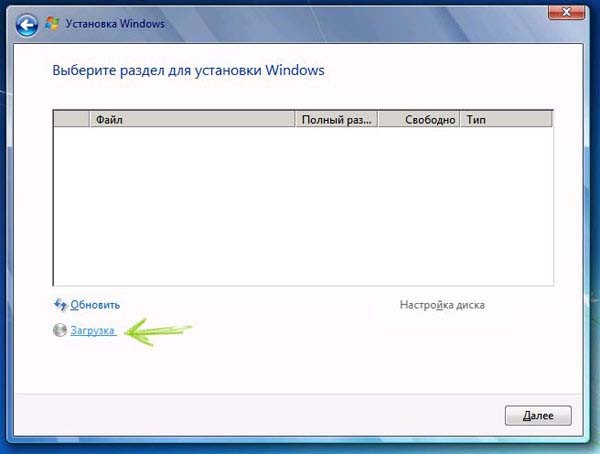
It doesn't matter if you are installing Windows 7 for the first time, or you have already done it many times, sometimes there are situations when the system crashes, which does not allow the installation process to continue. So, for example, one day you may notice that when you select a disk partition on which you want to install Windows, you will see ... nothing, not a single disk in the list. This error does not happen by accident and it can be corrected, if, of course, you know how to do it.
Let's take a look at the reasons for missing disks during the installation of Windows 7 and consider the steps that will help fix everything.
Today we will look at:
Causes of the problem
The problem with the loss of partitions during the installation of Windows 7, as a rule, is relevant for computers, laptops and ultrabooks with processors from Intel and AMD. The fact is that the build of Windows 7 you have selected may not have an integrated driver for working with the Intel RST storage system (for Intel processors) or SATA / RAID (for AMD processors). Hence, in this case, you have several options:
- loading windows image 7 with the necessary drivers;
- hand-written driver integration for Intel RST or SATA / RAID configuration.
Where to look for a worker windows assembly 7, if you are an opponent of the official Microsoft website - your problems. We will not give links to unofficial assemblies. But if you settled on the option of installing the missing drivers, then you can read the instructions on how to do it correctly.
If your PC or laptop has intel processorthen you need to go by this link and download the same driver.
For owners of devices with aMD processors write a key phrase in any search engine « SATA / RAID driver * laptop model or motherboard* » , then follow the appropriate link and download the driver.
Driver Installation
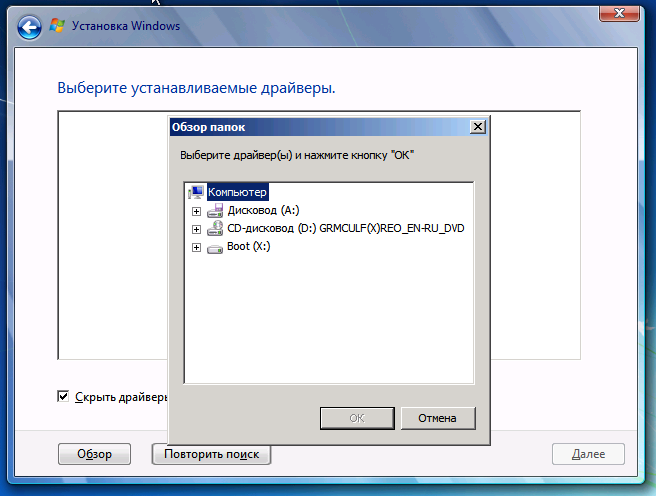
After the driver has been successfully downloaded, you will need to unzip it to ... If you use a disk to install Windows, then still unpack the archive with the driver onto a USB flash drive, which you then connect to a laptop (it is advisable to do this even before starting the device, since otherwise there is a possibility that the flash drive will be unrecognized).
Restart the installation of Windows 7 and when you reach the partition selection window, click on the button.
In the window Browse folders specify the path to the driver (you need to specify the path to the flash drive). Then press OK.
When the driver is installed, all available partitions will reappear in the list, after which you can proceed with the installation of Windows 7.
Outcome
Summing up this topic, we can say that the process of fixing this problem is quite simple. The main thing here is to download the correct drivers, so be very careful at this stage. Otherwise, we are always ready to help you if you have any questions or problems. Feel free to ask for advice in the comments, and we will definitely help you.
One of the rare but very unpleasant installation problems operating system is the impossibility definition of hard disk by the installer. Often, if, users simply do not know what to do next and where to look for the roots of this problem. Usually the question arises - Can he do what? We want to say right away that everything is not always so serious and, as a rule, this situation is quite solvable, and with minimal computer skills you can cope with it on your own. So why when installing windows 7 can't see the hard drive?
Lack of hard drive connection
The first reason may be that the hard drive is not connected to the computer. Perhaps, before installation, the user for some reason turned off the power of the hard drive and simply forgot to plug it back in, or the plug did not fully enter the connector. This version, of course, is banal, but you should never discount the human factor. Therefore, first of all, it is worth checking the correctness and reliability of the cable connections from the motherboard and power supply to the hard drive.
Hard disk failure
The second reason is the failure of the drive. You can confirm or deny this option if you go to Computer BIOS (by pressing Del, F1, F2 or other keys - depends on the specific motherboard) and see if the hard drive is detected there. If the desired hard drive is not in the list of connected drives, then it most likely does not work. If it is in the BIOS, but Windows Setup does not see it, then you need to move on to other methods of solving the problem.
Hardware conflict
The third reason is the hardware conflict on the motherboard side. In this case at windows installation 7 does not see the hard drive and asks for a driver. To fix such an error, you need to download the SATA / RAID drivers for the motherboard on another computer (accordingly, having learned the exact name of its model) and write them to the media where the Windows distribution is located. After that, in the operating system installation window, when the hard drive selection window appears (where, of course, it will not be displayed), you must click the link Download and specify the path to the SATA / RAID driver.
The driver will be installed, after which the installer will be able to detect the hard drive.
The same problem can be corrected in a slightly different way: write the driver to a floppy disk or USB flash drive, insert the drive into the appropriate drive and press F6 during the installation of the operating system. The installer will then see the hard drive without any problem.
You can also use an unofficial Windows build with integrated drivers and applications. Such an assembly will automatically load everything required drivers and recognizes the hard drive when installing the OS.
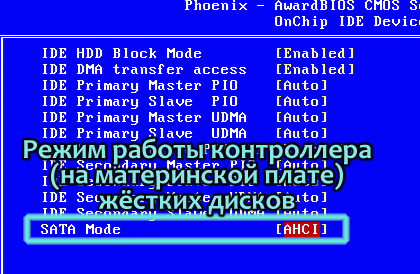
Connecting in AHCI mode
The fourth reason is that the hard drive is connected to aHCI mode... Because of this, in some cases, the computer does not see the hard drive when installing Windows 7. To fix it this situation, you need to enter the BIOS (by pressing Del, F1, F2 or another key) and go to the section responsible for managing drives. There you need to find a menu that allows you to change modes connect hard disk - this can be, for example, Configure SATA As, SATA Mode, AHCI Mode, and so on. Here you should switch the mode from AHCI to another available one, and then restart your computer.
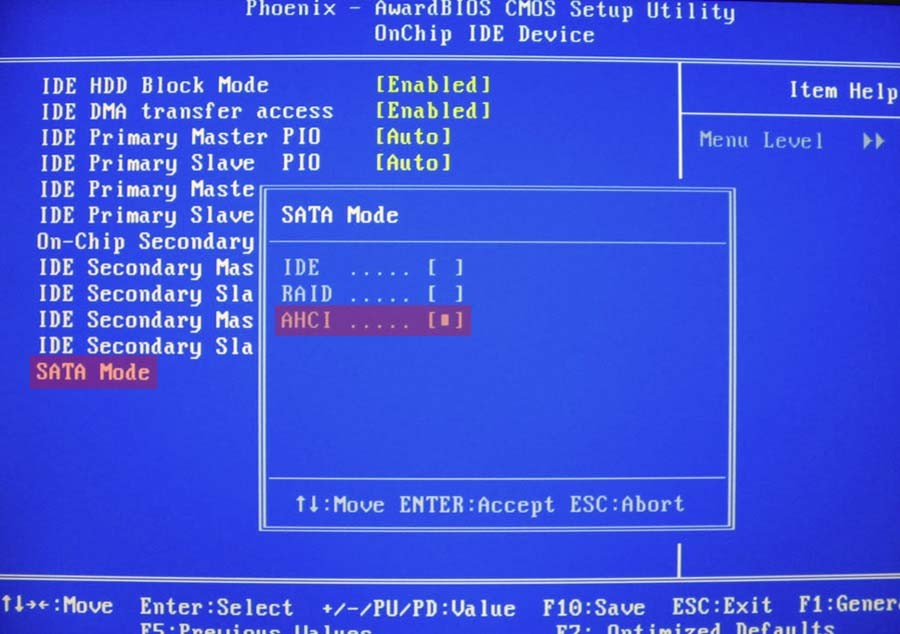
If everything is done correctly, the installer will detect the hard drive and be able to install the operating system. The problem the user is facing if when installing Windows 7 does not see the hard drive, in most cases enough easy solvable... Having corrected it with the above methods, you can proceed with the further installation of the operating system.
By the way, if you want to install the system not from a disk, but with USB stick, then we suggest reading the article. This article covers 3 best programs for these purposes, and also demonstrated the process of creating a bootable USB flash drive.
When buying a computer, few users ask themselves how much hard disk they need, can not predict in advance what files and how much will be stored on the computer. Over time, the PC turns into a "file bin". It's a pity to delete everything, but, in fact, there is not so much needed. However, in work or for certain needs, additional volumes are needed. disk spacewhich can be extended by connecting additional HDD or an SSD drive.
Why do I need a second hard drive?
Often, users want to keep the operating system, programs, and user personal files separate. In addition, installing the system and programs on a separate fast (albeit not so capacious) SSD or HDD can significantly speed up system boot, improve responsiveness and increase work productivity. Saving time is a significant factor.
How do I connect an additional disk drive?
Any computer, even an ancient one, has the ability to connect multiple drives at the same time. All modern computers support the installation of drives with SATA1, SATA2, SATA3 interfaces. If your motherboard has a SATA2 interface, and the hard drive complies with the SATA3 specifications, then the connection is possible (compatibility in terms of connectors and signals), but maximum productivity disk will be limited by the interface of the motherboard, that is, the data exchange rate will not be higher than in SATA2.
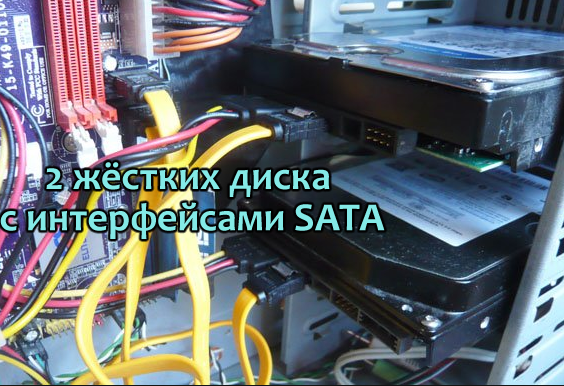
To install an additional hard drive, you need to connect 2 connectors - power and data. All operations must be carried out with a completely disconnected power supply. After installing the second disk and starting the computer, new disc will be initialized, and then it will need to be formatted and split into sections (or leave 1 section). However, the additional hard disk does not always start working. Why?
Why can't my computer see the second hard drive?
There may be several reasons for this phenomenon. These are software or hardware hardware failures, missing drivers, outdated operating system, wrong connection and setting the parameters of the HDD.
The old computer does not see the second hard.
For old computers where the connection is via the IDE interface at all disk drives there are jumpers for setting the operating mode of the disk - Master (main, main master), Slave (secondary, additional, slave). In this case, for the first one (for the old disk from which the operating system is loaded), it is necessary to set the jumper to the Master mode, and for the new one - to the Slave mode. If 2 disks are connected with one data cable, then the Master disk should be closer to the motherboard (by connector) than the new disk.
The new computer does not see the SSD
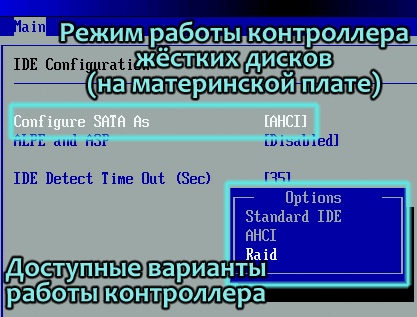
For modern computers from sATA interfaces the new drive may not be visible when you plug in the SSD drive. SSDs have built-in controllers that are not always compatible with the controllers installed on the motherboard. If the disk is not detected, you can plug it into another SATA connector on the motherboard (if it has several different controllers). Also, the new HDD may not be seen due to the incorrectly set operating mode of the controller hard drives... This mode is configured in the menu Motherboard BIOS boards. The available operating modes and their names may differ for each BIOS manufacturer and motherboard model.
The computer does not see the new HDD. How to fix?
To fix the situation when the computer does not see the second hard drive, you should check bIOS settings, connect the drive to another data connection and power connector. If that doesn't work, then other methods will come in handy.
Most often, all equipment is properly and correctly configured, there are just a few points that you should not forget about. The new hard drive may not have an assigned letter or be formatted. The computer sees the disk during testing and booting to the operating system (white letters on a black background when turning on the PC), but windows Explorer no new disk. This often happens. AT windows system can be fixed very easily even without using additional programs.
We format the new disk and assign a letter to it - Windows 7
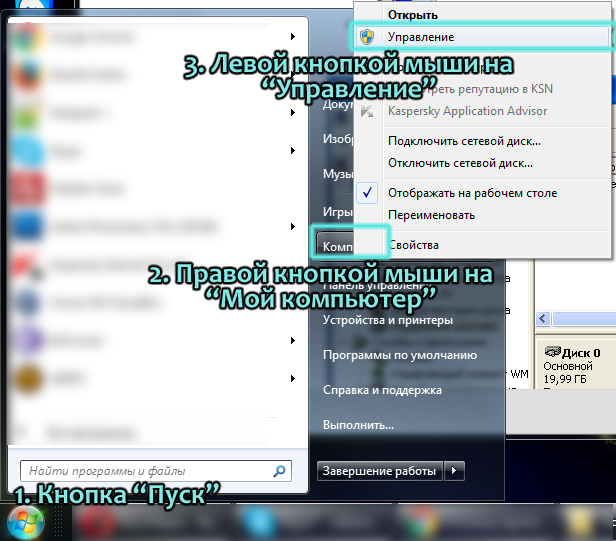
We go to START. Right-click on "My Computer", select the item context menu "Control".
First, you need to define a hard disk. Hard disk or "hard drive", also known as HDD, is used to save data. All computer files are located here (with only minor exceptions). It contains Windows 10, as well as all the information. Thus, if the hard drive is not displayed, information from it will also be unavailable.
HDD diagnostics
If the system does not detect the hard drive, then it is necessary to determine the reason.
Find out if the problem is in the hard drive itself or in the operating system.
It is required to connect the hard drive to the system unit. If the device is successfully detected, there may be a problem in software, otherwise the hard drive is defective.
Working with software
If after updating Windows 7 / 8.1 to Windows 10, the operating system stopped seeing second hard disk, the following are the best steps to take to fix the problem. This instruction will also help if the user has set system unit HDD or SSD, but only BIOS sees it, and does not display the operating system explorer. And if the BIOS does not show it, then it is required to analyze the correctness of the equipment connection.
"Turn on" the second hard drive correctly
It is necessary by pressing the + R keys to call the "Run" menu, type diskmgmt.msc. Then press Enter. The Windows 10 Disk Management utility will start. At the bottom of the window there will be an area where the disks are listed, study the following information about them:
- “There is no data. Not initialized "- this will be written if it is not displayed physical hard disk or SSD;
- Are there parts on the disk where "Not allocated" is written - this is if there is no partition on a virtually partitioned space;
- In the absence of the above, the RAW section is displayed and nTFS partitions or FAT32, they are not visible in Windows and no volume letter is assigned. You need to click on it with the right mouse button and click "Format" (if RAW) or "Assign letter".
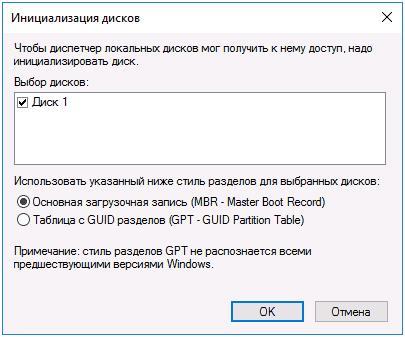
- Right-click on the name of the area and click "Initialize".
![]() In the menu that appears, define the partition structure - MBR (in Windows 7), or GPT (GUID). For Windows 10, GPT is better.
In the menu that appears, define the partition structure - MBR (in Windows 7), or GPT (GUID). For Windows 10, GPT is better.
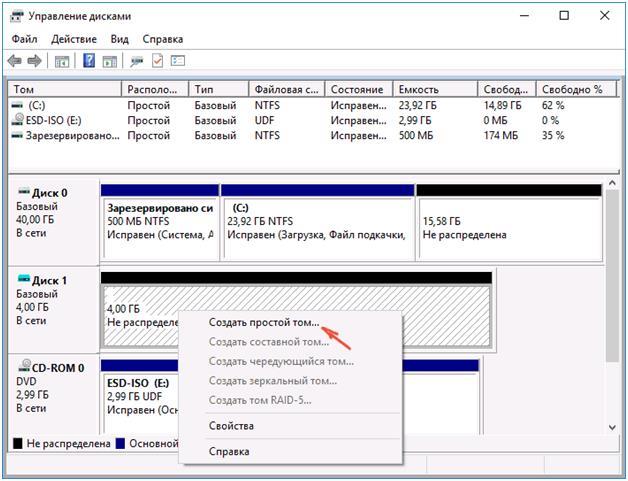
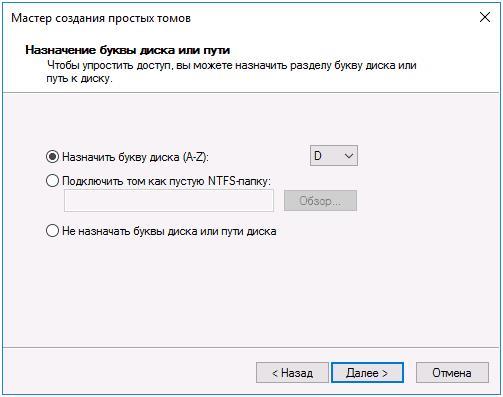
 Next, you need to right-click on the unallocated part, select the "Create simple volume" item.
 To follow step by step instructions volume creation: select a letter, define file system (better NTFS) and the number of gigabytes of space. If you do not specify how many gigabytes there will be, then it will take up all the unallocated space.
 After completing these steps, the second drive appears in Windows 10, ready for use.
Using the command line to make the second disk visible
This option is provided for information only and is not recommended. If you do not have a positive result after following the steps above and if you do not know the essence of the steps below, then it is strongly not recommended to use them.
It is required to display a command line with administrator privileges, then enter the following commands in sequence:
- diskpart
- list disk
Write it down on a sheet of paper or remember the number of the not displayed disk (hereinafter - X). Execute the command select disk X by pressing the Enter key.
If the second hard drive is not visible, then use the following commands. Caution! Files will be erased! If you need to save files on a partition that is not displayed, you cannot perform the above actions. So, sequentially enter the commands in the console:
- clean (removes all files);
- create partition primary (it is possible to set size \u003d S, the size of the area in MB, if multiple partitions are required);
- format fs \u003d ntfs quick
- assign letter \u003d D (prescribe - D).
Through command line you can do more complex operations, but it is recommended to use it only if you have the necessary knowledge in this area. Also, before doing this, you should save the necessary information in advance.
Alternative way to built-in windows capabilities is to use special applications to recover partitions.
Related entries: