Out of habit, or out of ignorance, some computer and laptop users use the BIOS or UEFI menu to boot from the device on which the Windows installation files are located, to launch a LiveCD or a system backup. But for this you can use the Boot Menu, especially since this option is more practical and simple. It is enough to call the menu with a special key and select the device (hard disk, USB flash drive, DVD drive) from which the download will be carried out.
You can learn how to enter the Boot Menu on laptops and computers from this guide.
Since manufacturers do not have a specific rule for assigning a button to call the Boot Menu, each of them chooses the one that they think is ideal for this task. This manual lists the keys that in most cases display the boot menu. In addition, here are mentioned the nuances of calling it on laptops with pre-installed Windows 10 and specifically given examples for Asus, Lenovo, Samsung and others laptops, as well as motherboards from Gigabyte, MSI, Intel, and so on.
General information on entering the BIOS boot menu
Both for entering BIOS or UEFI, and for calling the Boot Menu, manufacturers provide special keys. In the first case, it can be Del, F2, or the combination Alt + F2... The second can be used Esc, F11 or F12, but there are also exceptions, which are listed later in the article. Usually, the prompt for the key to enter the Boot Menu is displayed on the screen during computer startup, but this is not always the case.
Features of Boot Menu Boot on Windows 10
On Windows 10 laptops and computers, the above keys may not work. This is because shutdown in this operating system is not exactly that. This process is more like hibernation. Therefore, when using F12, F11, Esc and other boot menu keys may not appear.
In this case, one of the following methods can help to enter the Boot Menu:


How to call Boot Menu on Asus
In the case of Asus motherboards, you can enter the Boot Menu using the key F8 immediately after turning on the computer. Actually, as when trying to enter BIOS or UEFI with the keys Del / F9... On ASUS laptops one of the options can be used - entering the Boot Menu by pressing F8or Esc.

How to enter the Boot Menu on Lenovo laptops
Almost on all monoblocks and laptops from Lenovo, the key is responsible for launching the Boot Menu F12... It, like on other devices, needs to be pressed when turned on. There are also models where a separate small arrow button is provided to enter the boot menu. It is often located near the power button.

How to open Boot Menu on Acer laptops
Acer laptops and all-in-ones have a single key to enter the Boot Menu - F12... However, you can enter this menu only after enabling a special option. To activate it, when you start the computer, you need to get into the BIOS using the key F2 and change the state Disabled on Enabled opposite point F12 Boot Menu in the main BIOS parameters.
Other models of laptops and motherboards
Below is a list of keys for entering the Boot Menu on laptops and PCs with motherboards from different manufacturers.
Motherboards:
- Gigabyte - F12.
- MSI - F11.
- Intel - Esc.
- AsRock - F11.
- American Megatrends - F8.
Laptops and all-in-ones:
- HP - F9, or Esc, and then the F9 key.
- Dell - F12.
- Samsung - Esc.
- Sony - F11.
- Toshiba - F12.
- Packard Bell - F12.
Instructions
There are two options for opening the boot menu: as part of the BIOS or separately. If you open the boot menu in BIOS, you can change the startup order of devices. If you open it separately, you will be able to select the source of the computer start at the moment. Both cases will be considered below.
Turn on your computer. Immediately after pressing the power button on the keyboard, press the Del button, which will open the system BIOS menu. If yours, it is possible that this key will not work, as depending on the model, other keys may be used to enter the BIOS. You can find out which key is used to enter the BIOS on your model, either on the website of the laptop manufacturer, or by looking at the manual for it.
Once you're in BIOS, just look for the Boot option. Regardless of the motherboard model and BIOS version, it is mandatory. Select Boot and press Enter. Now go to the Boot device priority section. You will see that each digit is assigned a different device. This is the boot order. First, the device is numbered 1, then 2, etc. By clicking on a number, you yourself can assign it a device to start. Select the device boot sequence that you need. Then select Exit in the main BIOS menu, then Save and Exit in the window that appears. The computer will restart.
Now you need to consider the boot menu itself, in which you can simply select a device to start. Turn on your computer. After that press the F8 key (if it doesn't work, then F5). As a rule, these keys are used to open the boot menu on stationary computers. Although other options are not excluded. As a last resort, try pressing F8 and F5 alternately. B, depending on the model, the boot menu can be opened with different F-keys. You can also try the brute force method. When you press the desired key, the boot menu will start instead of the normal computer boot.
Sources:
- how to enter the boot menu
Modern mobile phones support the function of replacing the inner shell: themes, menus and other graphic elements. This gives you the ability to customize the look of your phone system to suit your preferences.
You will need
- - a computer connected to the Internet;
- - phone;
- - cable;
- - files of icons and menus for the phone.
Instructions
Download icons and menus for your phone to your computer. To do this, follow the link http://www.topse.ru/files/cat65.html. Then connect the phone to the computer, go to the system folder using the Far Manager program, for example, in Sony Ericsson this is the tpa / preset / system / menu directory.
Copy the downloaded icons and the menu file (usually menu.ml) into this folder. Confirm the copying process by clicking on "OK".
Install the flash menu to your phone. To do this, you need a menu file in swf format. It needs to be tied to your topic. You can accomplish this using the Easy Flash application. You can download it at the link http://www.topse.ru/files/file6343.html. Download and install the program on your computer.
Run Easy Flash to bind the file to the theme and install the menu on your phone. Go to the "Subject" field, specify the path to your theme, it must be in * .thm format. Next, in the "Flash menu" field, specify your menu in swf format.
Click on the "Create It!" Button. Open the folder with the program, in it find the created archive with the name of the theme. Run the program to connect the phone to the computer, go to the "Misc files" field, select the created package to add a menu to the phone.
Click the Flash button. Turn off the phone and press "C", insert the cable. The message detached will appear on the screen, it means that the process is finished. Close the app, disconnect the phone, remove and re-install the battery, turn on the phone.
Bind the theme to the menu file using Themes Creator application (http://www.topse.ru/files/file632.html). Open the theme with it, select the Tools menu, run the Edit Xml command. Enter the following text into the file:. Click OK. Install the theme and menu to your phone in the same way as in the previous paragraph.
Related Videos
There are many versions of the main software for the popular Sony Playstation Portable game console. They are divided into 2 classes: official (branded) and custom (they are also modified). An important difference between the latest firmwares is the so-called VSH menu, which makes it easier to work with the console.

Instructions
To gain access to the VSH menu, the first step is to reflash the game console - that is, install the modified software on it. The thematic resources describe this process in detail, where you can also familiarize yourself with the options for custom firmware, find out the pros and cons of each and choose the PSP you need for your model. After installing new software, you need to enable the ability to enter the VSH menu. To do this, you will have to completely turn off the device. It is best to remove and insert the battery back. Then you need to turn on the console, keeping the R button pressed (at the end on the right).

My computer won't boot, what should I do? In the operation of the system, this is possible due to the action of various viruses, your errors in using Windows or the use of incorrect drivers. But do not despair, I propose to learn how to get out of such situations with dignity.
You can always try to fix such sudden problems with the F8 key and the windows 7 advanced boot options menu.
During computer startup, after loading BIOS press F8which will bring up a menu for managing additional boot options for windows 7.
About boot modes: "Safe Mode", "Safe Mode with Loading Network Drivers" and "Safe Mode with Command Line Support" you can find in the article
Let's consider the rest of the parameters:
Boot logging - here Windows will keep a log of loading all drivers and services by writing it to the ntbtlog.txt file located in the Windows folder. After unsuccessful system startup, using this mode will view the boot log from the System Restore console and find the driver or service responsible for the boot error.
Enabling low resolution video mode (640x480)... Loads the computer with a screen resolution of 640 x 480. This allows you to eliminate the incorrect setting of the monitor and video adapter, for example, if your monitor cannot support the set parameter.
Last Known Good Configuration (optional) - when booting in this mode, the saved data of the computer state after the last successful boot of the system is used, which cancels the changes made in the settings after this save. This allows you to cancel the installation of a driver or change the settings of services or the operation of the installed equipment. Use this mode to cancel installed drivers or unsuccessfully change settings in the operation of services.
Directory Services Restore Mode - This option works on server systems and restores the directory service on a domain controller.
Debug mode used by professional programmers to debug the system. When using this mode, debug information is sent to another computer via the serial port.
Disable automatic restart on system failure - In the default settings, in case of a critical error during the boot process, the system automatically reboots. When you select this item, the automatic reboot mode will be disabled, which will help you to study the error message in detail.
Disable mandatory driver signature verification - this option allows you to disable the verification of the system of digital signatures for drivers when loading. Sometimes this check can be the source of a boot problem. This option will also install an unsigned driver. However, to use such drivers, you will need to constantly select this item when Windows starts.
Want to boot your computer from a USB stick or disk? You don't have to go to BIOS settings for this. Especially if you don't understand much about this. There is an easier way. In this case, just enter the Boot Menu and change the boot priority of devices. This is done in 10 seconds. And most importantly - no shamanism in BIOS.
What do users usually do to reinstall Windows? As a rule, a licensed digital copy is recorded on, and then executed.
Boot Menu (or boot menu) is an extremely useful BIOS option. It can be used to quickly set the boot priority of devices. Simply put, launching the Boot Menu brings up a small window in which you can immediately put a USB flash drive (or DVD) in first place, and a hard drive in second. In this case, you will not need to enter BIOS.
In addition, changing the settings in the Booth Menu does not affect the BIOS settings. That is, this option is triggered once - for one activation. And when you restart your PC, Windows will boot from your hard drive (as usual). If you need to start the Windows installation from a USB flash drive again, call the Boot Menu again.
If you remember, when changing the settings in the BIOS, it was necessary to go into it again and change the boot priority of the devices back (i.e. put the hard drive in the first place). And in the case of Booth Menu, this is not necessary.
How to call the Boot Menu
It's very simple - to click one key when Windows starts. Which one? It depends on the:
- bIOS versions;
- motherboard;
- laptop models.

That is, the situation is exactly the same as with BIOS. For example, so that you need to press the Del or F2 button, and to open the Boot Menu, you need to click another.
Most often it is Esc or F12. Although, as mentioned above, the call button may differ on different PCs.
Therefore, below we will consider how to run Booth Menu on popular brands of laptops and personal computers.
How to enable Boot Menu on Lenovo laptops
Lenovo laptop owners shouldn't have any difficulties. After all, the Boot Menu on Lenovo is launched very simply - by pressing the F12 key when Windows boots.

Plus, many models have a special button with a curved arrow on the case. You can click it if you want to select additional. download options.

Launch Boot Menu on PC with mat. Asus board as easy as shelling pears
You must press the F8 key when it boots (at the same time when you usually enter the BIOS).
And with Asus laptops there is a bit of confusion. It seems that the manufacturer is the same, but there are several buttons to launch the Booth Menu. After all, the launch of the Boot Menu on Asus laptops is carried out using one of two keys:
Most often this is the Esc button, although it can be F8. However, there are only 2 keys.
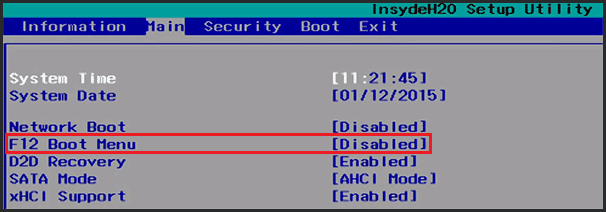
Boot menu on Acer opens by pressing F12
But there is one small nuance here. The fact is that usually the launch of the Boot Menu on Acer laptops is disabled. And when you press F12, nothing happens. To make it work, you need to do the following:
- Go into the BIOS (when booting the laptop, press the F2 button).
- Go to the "Main" tab.
- Look for the line "F12 Boot Menu" and change the value "Disabled" (disabled) to "Enabled" (enabled).
- Save the changed parameters and exit the BIOS.

The system will reboot and you can enter the boot menu on your Acer laptop using F12.
How to enable Booth Menu on Samsung laptops
On Samsung, press the Esc key. But owners of Samsung laptops need to know one peculiarity. The fact is that to call the Booth Menu, you need to click the Esc button once! If you double-click, the window will simply close.
Therefore, you have to get used to knowing exactly when to press the Esc key. Although there is nothing complicated here - just a couple of attempts.
HP also has its own specifics
Launching the Boot Menu on HP also has its own specifics. After all, the opening of the Booth Menu is carried out somewhat differently.
- When you turn on Windows, immediately press the Esc key.
- The startup menu will be displayed - press the F9 button.
- Done.
After that, the boot menu of the HP laptop will open, and you can set the priority of turning on the devices (using the arrows).
Boot menu on Windows 10 or 8
If Windows 8 or Windows 10 is installed on your PC or laptop, then you most likely cannot turn on the Booth Menu.
The fact is that these operating systems have a small peculiarity - by default, they have Quick Start enabled, so they are not completely turned off. This is called hibernation (kind of like sleeping). Therefore, when you boot your PC or laptop, you will not be able to open this menu on Windows 10.
There are three ways to fix this:
- Hold Shift when turning off your laptop or PC. After that, it will turn off normally (in the usual sense of the word). And then you can launch it on Windows 10 by pressing the desired key.
- Instead of turning off your PC, you can restart it. And at the moment of switching on, simply press the specific key corresponding to your brand of laptop or motherboard.
- Disable Fast Startup. For this:

 That's it - now you can easily enter the Boot Menu on Windows 10 or Windows 8.
For your convenience, below is a screenshot showing the keys to launch the Boot Menu for popular laptops and PCs
For example, for computers running on a mat. on the MSI board, this is the F11 button. And the launch of the Booth Menu on Sony VAIO laptops is carried out using F12. In general, you will figure it out for yourself - the table is simple and straightforward.

Also, for convenience, buttons for entering the BIOS are written. If for some reason you cannot open the Boot Menu, you can always change the boot priority of devices in the standard way - through BIOS.
Each computer / laptop has its own firmware (BIOS) and its appearance and functionality depends on the manufacturer, model and software version of the device (year of release). The boot menu is part of the BIOS and may look different. Also, the method of calling the boot menu depends on the device model, but usually it is constant (so as not to miss) pressing a certain button immediately after turning on the computer.
Consider the most common boot menu keys from various manufacturers of laptops and motherboards:
| Motherboard | Key |
| AsRock | F11 |
| Asus | F8 |
| Intel | Esc |
| Gigabyte | F12 |
| MSI | F11 |
| Notebook | |
| Acer | F12 |
| Asus | Esc |
| Dell | F12 |
| HP | Esc\u003e F9 |
| Lenovo | F12 |
| Packard bell | F12 |
| Samsung | Esc |
| Sony Vaio | F11 |
| Sony Vaio | Assist |
| Toshiba | F12 |
As I said earlier, the boot menu looks different for everyone, but the logic is always simple:
 Usually the choice of where to boot is made with the "up" and "down" keys, and the final choice is "Enter".
 The new Windows 8 operating system is installed on new computers and laptops, and along with it, hardware manufacturers have found a replacement for BIOS - UEFI. More sophisticated firmware with an interface that can rightfully be called graphical, and sometimes even cute. By default, "fast boot" is enabled on such computers, which in most cases does not allow you to get to the boot menu in the usual way, and indeed to the BIOS settings themselves.
The easiest option is to resolve the issue from the operating system: you need to hold down the "Shift" button and send the machine to reboot. The Windows 8 service menu should appear.
 By the way: sometimes the function of calling the boot menu is disabled by default in the BIOS. An excellent example would be Sony Vaio laptops: to boot from a USB flash drive, you must enable a special option in the BIOS - "External Device Boot". Also, when booting from a regular flash drive, it is sometimes defined as a hard drive - this is the norm


