If you experience a significant computer problem, you may need to log in through safe mode. When launched correctly, this function will enable you to boot a PC with a set of basic drivers - mouse, monitor, keyboard, video adapter, and disks. Standard services are also included to help the system run. Using this method, as a rule, it is possible to eliminate most of the failures associated with computer work. Learn how to carry out this procedure correctly.
What is windows safe mode
Safe mode is inherently diagnostic; it helps identify problems with device drivers. If you experience problems during normal PC startup, you should try to enable it with the basic set of services. If the device works normally with such parameters, the essence of the failures must be sought in the recently appeared additional elements. Such loading of Windows allows you to remove software that impedes the adequate functioning of a laptop or desktop PC.
If the computer turns on immediately in safe mode, then there is a problem that prevents the launch of the operating system. As a rule, the programs that you have installed recently affect this. To fix the problem, you can use the "System Restore" function, which can be found in the "Start", "Control Panel" tabs.
How to download windows 7 in safe mode: instructions
Two methods are used to start in safe mode, they differ fundamentally from each other. In the first version, the procedure occurs at boot, and the installed Windows 7 does not start, so you can easily make changes to the operation of the devices. In the second case, the inclusion of the basic set of services comes from the environment of the OS, which imposes some restrictions and does not make it possible to fully carry out repair procedures. However, both of these methods can solve some problems that arise during work. Read more about them below.
Entering windows 7 safe mode at OS startup
If you encounter problems in the functioning of the PC, you need to know how to enter the safe mode of windows 7. If the device is turned on, click the "Restart" button in the "Start" tab. You must go into special mode when the computer is turned off. Before the icon indicating that Windows is starting up appears, you must click the F8 key several times. Try not to miss the moment, otherwise the OS will start, and you will have to restart the device again. A window should appear on the screen with the following connection parameters:

- Safe mode. With it, you can start using a set of standard driver programs. Only those services that are needed to start and operate the computer are included.
- With the loading of network drivers. You will need to choose this method if you want to use the Internet or connect via a local network.
- With command line support. The familiar desktop interface will not start. Choosing this option involves the appearance of a command line instead.
In addition to the tabs described above, you will see other features. For example, enabling boot logging creates a special file that records all the drivers that are in Startup. This helps to detect a broken program. Launching VGA helps you adjust your monitor to the perfect resolution. Choosing the last successful configuration will allow you to restore windows with the settings that were during a healthy boot. The remaining options (restoring directory services, debugging) are for IT professionals.
Use the arrow keys to select the tab that is optimal for solving the problem. After the selection is made, press the Enter button on the keyboard. Then you can enter windows and figure out the causes of the problems. Using this method, you will be able to restore the system by rolling back to the point where the device was working fine, remove virus programs, broken drivers, and much more.
Possible problems when turning on:

- A window starts, indicating the inclusion of Windows. This can happen if you press F8 too slowly or insufficiently. Repeat the procedure by restarting the computer.
- The buttons F1 through F12 are disabled. If this happens, you need to know which key turns them on. Hold down the Fn button, and then press F8, and the device will boot.
How to get into safe mode from the OS environment
In some cases, a system login may be made using the minimum number of services from the operating system environment. This method is able to assist in solving many problems, although it is less popular. If the malfunctioning of windows is too serious, switching on from the OS may not bring the proper results. How to get into the mode you need (safe) using the operating system:
- Locate the Win key on the keyboard (the Windows icon that appears when it is turned on may be displayed on it). Hold it together with the R button.
- A command line will appear. Enter the following letters without the quotation marks “k”. Press the OK key.
- So you can call up the settings window. Among the tabs, open the section called “download.”
- Select the desired operating system. As a rule, most computers have one OS - in your case, windows 7, loaded by default.

- Below you will see a section called “Boot Parameters”. Select “Safe Mode”, check the box next to “Minimum”.
- Click Apply, then OK.
- A small window will appear next, where you will see two tabs “Reboot” and “Exit without rebooting”. If you want to restart your computer now, select the first option. In the second case, the next time you turn on the PC, the device will start the basic set of programs.
What to do if safe mode does not start on a laptop
On some laptop models, there is a problem that prevents you from turning on the device with a minimum set of services. Then, with a few presses of F8, the window where you can select such a function does not appear, and the operating system starts to start. This may be due to the default keyboard shortcut, which involves simultaneously holding down the Fn + F8 button. If this option does not work, the problem may be due to a broken keyboard.

With normal loading of the operating system, you can enable the minimum set of services necessary for operation using the command line:
- To do this, press "Win + R", enter the combination of letters "msconfig" without quotes. Click OK.
- Then you can go to the tab where you need to select "Download", mark the desired OS.
- In the “Boot Options” section below, find “Safe Mode” and select “Minimum”. In conclusion, click "Apply", "OK."
- Select “Reboot” or “Exit without rebooting” if you need to start with a minimum set of programs later.
Video: how to enable safe mode on windows 7
If you have never entered safe mode using the operating system, the first time you may not understand how to do this according to the instructions. Check out the step-by-step video of an experienced PC user below to help you resolve this issue and fix the problem. In a few minutes, the host of the video tells how to turn on the basic software suite effortlessly. The method is simple, even those people who have never encountered such a problem will cope with it. Watch the step-by-step video tutorial:
Safe mode in Windows is a kind of “cure” for ailments that plague your computer. Its essence is to load the operating system, and preferably, nothing more. All programs from the automatic start, all services, drivers, and also, possibly viruses will not start in safe mode so that you can install and fix the cause of the malfunction of your computer. In Windows 10, developers removed the convenient function for entering safe mode using the F8 key, so I decided to tell you how to enter Windows 10 safe mode in other ways:
- Through the reset button;
- Through the system configuration utility (msconfig);
- Advanced way using the command line;
- Using special boot options;
- Using the installation disk with Windows 10.
Attention! If you do not understand how to perform these methods, then there is a video below that will help you deal with this issue.
Safe mode with the reset button
This method is convenient and simple, so I decided to talk about it in the first place. You need to click on "Start", then on the button "Shutdown". A menu pops up in which there are three ways to complete the work, hold down the Shift key and select the Restart item.
The image on the monitor turns blue and “Wait” appears. After loading, we will see three possible options for further action. The first allows you to continue working on the computer, the second transfers to a further selection menu, and the third terminates the operating system. You need to choose the second option “Diagnostics”.

The Diagnostics menu appears. Now you should click on "Advanced Options".

If you click on it, then we will see a menu with many icons, select the "Boot Options" item, which will allow us to configure Windows boot options to get into safe mode.

Here are the system boot options that allow you to select safe mode. Now you need to click on "Reload":
After a quick reboot, you will see a blue screen with boot options. We are interested in the options that are under points: 4,5 and 6. They differ from each other in downloadable drivers and services that can allow network mode or command line. But we need to select the mode under the number 4, to do this, press the F4 key.
Starting safe mode with msconfig
The utility is a very useful tool in working with the operating system. With it, now we will start safe mode in Windows 10.
To run this program, you need to press the key combination “Win” + “R” on the keyboard and enter “msconfig” in the window that appears, click “OK”. You can also launch the Run window in a simpler way - right-click on Start and select Run.
The system configuration window has appeared. It contains five tabs, each of which is responsible for a specific functionality. Go to the "Download" tab, it contains settings for safe mode. The first step is to choose an operating system that will boot safely.
In the group of elements called “Boot Parameters” you need a checkmark opposite the item “Safe Mode”, under it you can use the switch to select the type of boot, the minimum - standard mode, another shell - allows you to use the command line and network - allows you to work with the local network and the internet. We also set the parameter defining the timeout, i.e. the time delay before choosing the type of boot before starting the operating system.
If such boot settings for this OS should be made permanent, then you can check the box next to the corresponding item. Done, it remains to click apply and the next time you reboot, you will be asked to choose in which mode to start Windows 10.

After you enter safe mode and do all the necessary actions, you can go into msconfig and do a normal system boot.
Using the command line to enter safe mode
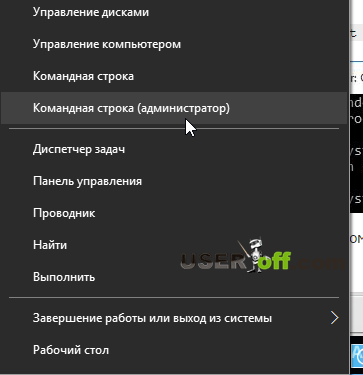
I consider this method quite advanced and interesting. We need a command line to start it, click on the "Start" with the right mouse button and select "Command line (administrator)" in the menu that appears.
A small black window appeared in which you can enter various commands that the program will execute with the specified parameters. We introduce the following line: bcdedit / copy (current) / d Safe Mode(or any other name) and press Enter. Now you can close the command line.

The command introduced above will create a new parameter in the msconfig program (we previously examined it with you). In the "Download" section there will be a new opportunity to launch the operating system, which will be called "Safe Mode".
When you go to "System Configuration" and go to the "Download" tab, you need to click on the second item - "Safe Mode (C: / Windows)" and check the box next to "Safe Mode". Also, note that the timeout is at least 10, since if it is less, then you may not have time to choose the parameter you need.

Now this option will always be present on your system, if it interferes and creates some inconvenience, then this function can be disabled. To do this, run the utility - press the "Win" + "R" keys and enter "msconfig" and press Enter.
A familiar window will appear, go to the "Download" tab. To delete, select the desired item with the left mouse button and click on the “Delete” button.

Now when you turn on the computer everything will happen without delay.
Special boot options
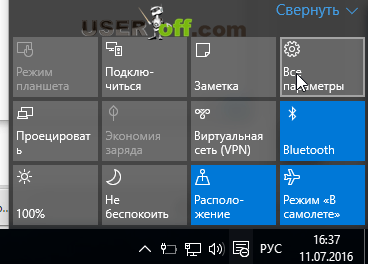
To use this method, click on the notification icon in the lower right corner of the desktop. And select the item “All parameters”.

The next stage and all subsequent ones are the same as in the first method described in this article, we confirm the reboot.
The computer will start shutting down; before starting Windows, a window will appear to select a boot method. Options 4,5 and 6 correspond to the keys F4, F5 and F6. All of these modes are briefly described in the first method discussed in this article.
Bcdedit / set (default) safeboot minima l and press Enter. Now restart your computer and you will automatically enter safe mode. If you need to return to its original state (as it was), then enter bcdedit / deletevalue (default) safeboot.
You can also use another method, enter bcdedit / set (globalsettings) advancedoptions true at the command line and then reboot the system. Next, the system will show boot options where there will be a safe mode. To disable this option, you need to enter bcdedit / deletevalue (globalsettings) advancedoptions.Attention! This command can be entered in normal Windows mode.
Any computer running Windows can be started in safe mode. In this mode, only the most basic components of the operating system are loaded. This allows you to start the computer even in the event of serious software conflicts or malfunctions. From safe mode, you can remove programs that block the operation of the operating system or cannot be removed during normal operation.
If you have any problems and need to start the computer in safe mode, then this material should help you. Here you can find out how this is done in the Windows 7 operating system, as well as the new Windows 8 and Windows operating systems.
How to start a computer in safe mode (Windows XP or Windows 7)
If you are using Windows XP or later, starting up your computer in safe mode will be quite simple. To do this, you need to restart the computer (if the computer is turned off, just turn it on) and at the time the computer starts to boot, press the F8 key on the keyboard. You need to press the F8 key until a list of Windows boot methods appears on the computer screen.
In this list we are only interested in the first three points. Consider them in more detail:
- Safe mode - standard safe mode. In this mode, the computer will start using only the most necessary components. In most cases, it is this option of safe mode that is used.
- Safe mode with loading network drivers - Safe mode similar to the previous one, but with loading network drivers. When loading in this mode, you can work with the local network and the Internet.
- Safe mode with command line support - safe mode without a graphical interface. After loading in this mode, a command line appears on the screen with which you can interact with the system.
Please note that the F8 key must be pressed immediately after starting the computer. If you are a little late, the list of download methods will not appear and the computer will start in normal mode.
How to start the computer in safe mode (Windows 8 and Windows 10)
If you are using Windows 8 or, then starting the computer in safe mode using the method described above will fail. The computer simply will not respond to the F8 key. In this case, you need to start safe mode using the MSCONFIG command or using the Windows boot disk. Further we will consider both of these options.
Option No. 1. Starting the computer in safe mode using the MSCONFIG command.
If your computer is operational, then you can use the MSCONFIG command. Press the Windows-R key combination and in the window that appears, enter the MSCONFIG command.

After that, a window with the name "System Configuration" will open in front of you. In this window, go to the “Download” tab and check the box next to “Safe Mode”.

After that, close the window by clicking on the “OK” button and restart the computer. The next time you boot your computer, Safe Mode should start. In order for the computer to boot in normal mode again, you need to go to MSCONFIG again and uncheck it.
In principle, this option to start the computer in safe mode works in both Windows XP and Windows 7. But, using it is not as convenient as starting via the F8 key.
Option number 2. Starting the computer in safe mode using a boot disk with Windows.
The second option is to start safe mode using a boot disk with Windows. This option will be useful if your computer does not start at all, and it is not possible to use the MSCONFIG command.
For this boot option, you need the version of Windows that is installed on your computer. If it is Windows 8, then you need a boot disk with Windows 8, if it is Windows 10, then Windows 10.
Insert the Windows boot disk and boot from it. At the very beginning, a window appears with a choice of language. Here, just click on the "Next" button.

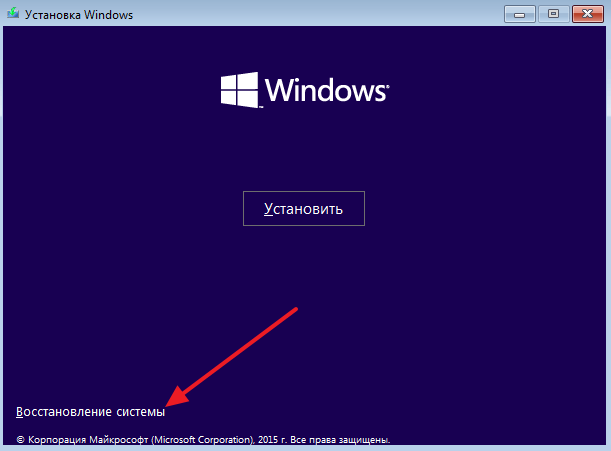

And open the "Advanced Options" subsection.

After that, open the command line.

As a result, you should appear. In this line you need to enter the command " bcdedit / set (globalsettings) advancedoptions true". After entering this command, simply close the command line by pressing the button with a red cross.

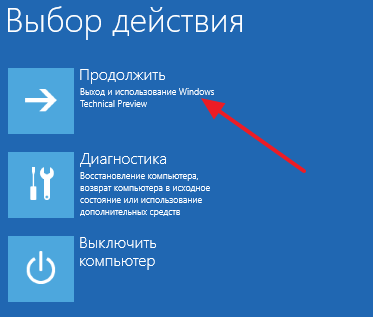
After closing the command line, the “Select action” menu appears. Here we select the option “Continue”.
After that, the computer should restart. After the reboot, we boot the computer in normal mode (not from the boot disk). As a result, when you start your computer, a list of Windows boot methods appears on the screen, with which you can start safe mode.

It should be noted that now at each start of the computer a list of boot methods will appear. In order to disable it, you need to boot from the disk again, go to the command line and execute the command “ bcdedit / deletevalue (globalsettings) advancedoptions».
Lenovo currently ranks fourth in the top five global PC manufacturers. In the arsenal of the company there are desktop PCs, laptops, mobile phones, smartphones, netbooks and even servers, monitors, tablets, video cards. And this is despite such additions to all of the above, such as mice, keyboards, memory modules, optical drives, power supplies, software and accessories, as well as covers, laptop bags. The range of the company is impressive, and filling the consumer market with Lenovo electronics requires serious support. Lenovo specialized service center implements it in many cities, especially in large centers of the country.
Today, the tendency to go not to specialized service centers, but to little-known "but very understanding" equipment repairmen is quite common. When making such a choice, it is worthwhile to understand that the Lenovo service center is directly engaged exclusively in this type of equipment and electronics and one hundred percent knows the subtleties of this particular company. Moreover, the Lenovo service center has the ability to quickly cooperate with other specialized companies that supply the necessary original parts for Lenovo equipment.
It is worth noting that most of the gadgets that are manufactured by this company have a wide range of non-standard and unique parts that can be found in few places. This is a well-known Lenovo device problem, but everything is solved thanks to specialists. Only the Lenovo service center is able to get such necessary parts for a laptop as, for example, a matrix or original lamps for backlighting. In any case, if you have any problems with the electronics of this company, you should contact the Lenovo service center, and here's why:
1. Only specialists can guarantee the quality of the work performed, with a complete diagnosis and with the determination of the exact cause of the problem.
2. Only in the Lenovo service center, if necessary, you will be offered to replace the non-working part with an original one. You can get the original part only by specially ordering it somewhere in advance, or from another phone, and in the center it comes directly in the shortest possible time.
3. Lenovo service centers carry out maintenance of all the company's equipment, as specialists are selected and trained in them directly to service Lenovo.
4. After purchasing this or that Lenovo gadget, the buyer acquires a warranty card or check, with which you can get free service. Such a service is provided exclusively in the Lenovo service center. Such a right is lost if the device has already been opened before the service specialist.
5. Service for any products of the manufacturer of Lenovo can occur in any of the services after the warranty period.
On the Lenovo service center website, you can check the list of gadgets that are to be repaired, as well as see the pricing policy (if the repair is not warranty) and the location of the nearest service outlet. Among them, you will see the repair services for tablets, laptops, netbooks, monoblocks at low prices. Repair masters not only replace parts, but also carefully understand the essence of the problem, doing everything possible to prevent a recurrence of the incident.
In the Lenovo service center you will be offered a wide selection of services for the repair and determination of the cause of failure:
testing the entire system for damage, the correct operation of all functions;
diagnostics of the gadget, including the operation of internal systems, heating, the operation of each part, which contributes to the exact determination of the cause of failure, and also prevents new device breakdowns;
replacement of parts, including the matrix of the electronic device. The size of its diagonal is not important, since the Lenovo service center works directly with the company's suppliers;
repair of a matrix and other elements of equipment. Masters take repairs only after a thorough study and diagnosis of the problem, when the cause is discovered, and the repair decision becomes obvious to them;
complex repair of the entire device, which may be necessary in case of large breakdowns, for example, after the gadget falls from a high height, etc.
Repair of individual parts, not to mention comprehensive repair, requires the intervention of a true professional, and given the originality and originality of some of the company's electronics designs, only the Lenovo service center can perform this work in a high-quality manner. In their daily work, craftsmen regularly use high-class repair equipment that allows them to perform the most delicate tasks. Among these working tools, mention should be made of:
specialized digital microscopes that allow for accurate diagnosis;
bGA soldering stations;
necessary for the implementation of a complete repair and diagnostics of the hardware-software complex.
Moreover, each Lenovo service center also offers simpler services, for example, expert advice to customers who wish to purchase electronics and equipment from this manufacturer. Specialists in the center have experience working with many devices, as well as deep knowledge in each of them, therefore consultations on the correct operation, use of certain functions of the device, etc. also provided directly by Lenovo service centers. Among other offers there is also a change, software update for laptops, netbooks or desktop PCs.
Thus, the decision to use the services of the Lenovo service center is the most correct in the event that your gadget began to work incorrectly, or if specific functions do not respond, as well as in the event of absolutely any problems or questions in the field of equipment of the Lenovo company.
Sometimes you need to run the laptop in safe mode on windows 7, windows 8, Vista or XP. The differences are only in the eight, the rest are almost the same.
To enable safe mode on laptops samsung (samsung), asus (asus), acer, hp, sony xperia, lenovo, sony vaio, msi or Packard bell, you can use one of the following three methods.
Why three? Anything can happen - suddenly one does not work - try the second. In general, safe mode, this is the same as usual, only some services / programs on the laptop do not work.
I turn on safe mode on the laptop mainly to disable (remove) antivirus applications and non-removable programs.
The first way to start a laptop in safe mode on windows 7
To download, go, open, call, install, get, transfer, select, restart or switch to safe mode, click the restart option and immediately after switching on (while there is no Windows logo) click the f8 button.
In rare cases, you may need to press another key: from f1 to f12. Then you have to experiment or go directly to the second method.
Starting Windows in safe mode: second method
You can start safe mode in Windows (I write about windows 7) through the "control panel", by clicking on "administration", clicking on "system configuration" and moving to the download tab, and that just put a tick in the appropriate place (see picture below).
You can do differently using the utility "msconfig". Paste it into your laptop search (without quotes). It appears at the very top - click once, and then do as described above.
The third way to enable safe mode on laptop on win 7
This method is for the lazy - just shut down the laptop. For example: remove the battery and disconnect the network.
It can be easier. Press and hold the shutdown button for a few seconds (until everything goes out).
Next, just turn it on and you will see a menu for 30 seconds in which you can choose various ways to start the laptop - the very first one on the list that you need.
That's all, I think one of the three options will definitely suit you. Successfully solve problems.
Categories: Uncategorized