Author:
HDDSCAN GB
License Type:
Cranked
Languages:
Windows 8, 8 64-bit, 7, 7 64-bit, Vista, Vista 64-bit, XP, XP 64-bit
Downloaded:
Victoria HDD
The Victoria HDD program is used for complex monitoring of drives. Victoria HDD performs a high-quality HDD test and, if any defects are found, can eliminate them.
Main Features
- detection and elimination of defects in the operation of hard disks;
- Providing full technical support. information about storage devices;
- fast and accurate evaluation of the status of hard drives;
- built-in file manager, as well as a help system;
- detection of defects in the loop by testing the interface;
- automatic detection of controllers;
- various modes of testing the surface of storage devices;
- evaluation of drive performance;
- full or partial disk cleaning;
- sector-by-sector data copying;
- detection of faults on the surface of the drive, etc.
Advantages and disadvantages
Pluses:
- simple interface;
- work with IDE controllers, SATA;
- works without installation;
- high speed of work.
Disadvantages:
- work from DOS;
- for a long time there were no updates.
Similar software
HDDScan. The program for diagnostics and testing different drives. HDDScan detects various errors and malfunctions, displays information about the drive, as well as can edit certain parameters for hard drive.
HDD Regenerator. Software designed for hard recovery drives that have bad sectors. HDD Regenerator can repair damaged sectors and thus restore the hard disk.
MHDD. The program for testing hard disks. It performs low-level diagnostics, it can detect even the smallest failures that negatively affect work. The detected problems are stored in the log, the program is able to completely clean the hard drive and restore the damaged sectors.
Work principles
To check your drive for availability damaged sectors and faults, start the program and go to the "SMART" menu. To evaluate the status of the hard disk using self-monitoring, click on the "Get SMART" button.

A report with the main characteristics will be displayed.
Report on state of hard disk
This test is not informative, for more detailed analysis it is necessary to run a test to detect and repair the damaged sectors. Go to the "Test" item and click "Start".
Performs hard drive testing. Upon completion of the work, he displays a detailed report.
Information on the state of sectors
If errors were found, select them on the grid, click "Restore". If the restore does not help, then click on the "Clear" button.
Victoria HDD will detect all the malfunctions in the operation of hard disks and, eliminate them, will increase the performance of your PC.
The program is aimed at a wide range of PC users, and is designed for testing, servicing and helping with the recovery of information from any hard disks with IDE and Serial ATA interfaces.
The program is a fully-ready solution for a comprehensive, deep, and at the same time the fastest possible evaluation of the real technical condition of the HDD.
This program combines both professional and household functions, and allows you to test the hard drive to users without special knowledge.
It should be noted that Victoria shows only the physical condition of the disc.
Defects of file systems will remain unnoticed - for their detection there are system utilities (for example, SCANDISK, NDD).
At the same time, if the PC periodically lost or corrupted the data, and on its hard drive revealed obvious physical problems - it is reasonable to assume that they are the cause of the failures.
Main features of the program
Reading the drive's passport and displaying full technical information about the drive;
. Determination of the controllers installed in the ATA / SATA system (including additional controllers);
. Controlling the level of acoustic noise;
. Browsing S.M.A.R.T. drive parameters, quick evaluation of its state by pseudo-graphic scales and by status register;
. Work with Host Protected Area: change and restore the physical volume of the disk;
. 5 surface testing modes: verification, reading and writing, counting and displaying addresses of defective blocks;
. 2 modes for plotting the surface: full and estimated (similar to how it was done in the HD Tach program);
. Defectoscope: analysis of the surface state by 3 types of tests, with calculation and display of unstable areas, indicating the exact addresses of each unstable sector and automatically entering them into the text file;
. Testing the buffer memory and the interface for the presence of "glitches" and distortion of information when receiving and transmitting;
. Measurement of the rotation speed of the HDD shaft, including on new disks without the INDEX field;
. Hiding surface defects by remapping sectors from the reserve (remap) in any of the 3 tests;
. Measuring hard disk performance (benchmark function):
Measuring the speed of linear, non-linear and random reading from HDD;
. . Measuring the positioning speed of the HDD heads and access times to sectors;
Measurement of reading speed by graphic methods;
. Cleaning the disk (or part of it) from the information - "low-level formatting";
. Management of security options: setting a password on the HDD, removing the password, quickly erasing information without the possibility of its recovery, etc.
. Ability to stop and start the spindle motor HDD;
. The HDD positioning test (similar to how the OS does for intensive work), in order to identify the reliability and thermal stability of the disk subsystem of the PC (leads to the heating of the HDD);
. Sector-by-sector copying of an arbitrary HDD area to a file, with skipping of defective areas (it can be useful for saving information from a damaged disk);
. Sector-by-sector copying of files to HDD;
. Viewing information about logical partitions of HDD with partition boundaries (without HDD definition in BIOS);
. Indication of HDD operation modes, register contents, and visualization of error codes by indicator lamps;
. Built-in context-sensitive help system.
Installing the program and launching it
1. Installing the bootable version for FDD:
Unpack the archive, insert the floppy disk into the floppy drive, and run the file makedisk.bat .
A boot diskette is created.
To use the program, you must download the computer from this diskette, after which everything will be ready for use.
2. Installing the bootable version for CD:
Unzip the archive, and burn the ISO image to CD.
Boot the computer from this CD, then everything will be ready to go.
3. Installing the non-bootable version on the PC hard disk:
The program consists of a single executable file and an auxiliary configuration file vcr.ini .
File vcr.ini is not necessary and serves to fine-tune Victoria for certain working conditions, which allows to achieve maximum convenience (for example, it is possible to register addresses of external PCI ATA controller, so that each time you do not select the necessary screw through the menu), turn off the sound, .P. (for details on how to configure the ini file here).
You can run the program directly under Windows, and it will work fine, but you need to do one of the following:
Disable ("Control Panel" - "System" - "hardware" - "hard disk controllers") is the IDE channel of the controller to which the test drive is connected.
This is necessary so that the program can access directly to the HDD ports.
. You can not disable the channel in the system, but then windows Startup To this channel nothing should be connected (or else the OS, having found the ATA device, will block the ports).
If you chose this option, then you need to connect the hard drive after the system is booted.
Or, as an option, to include in the test drive power only after the full boot of the OS (not all cheap power supplies are "tolerated").
. It is absolutely pointless to disconnect the hard drive in the BIOS, because modern multitasking operating systems do not use the BIOS to check for HDD on the channel.
The driver does it for him.
But if you have a "clean" DOS - turn off the HDD in the BIOS "e will be useful, so that DOS itself does not see this disk (and so that it does not use ports that theoretically can lead to conflicts between the OS and the program).
When running from under Windows NT kernel systems, you must install the "UserPort" driver.
For this you need:
Download UserPort .
. Copy the userport.sys file to the folder WINDOWS / SYSTEM32 / DRIVERS
. Start userport.exe .
Before us, a panel with 2 windows will appear.
The left window refers to the program's work in the DOS window, the right one on the full screen.
By default, LPT port numbers are assigned to them - all of them can be deleted.
In both windows, you need to enter the port numbers of the secondary HDD controller:
170h-177h
376h-377h
. Add them to the "Add" list);
. Press the "Start" button;
. Click the "Update" button, then "Exit";
. Launch Victoria.
Everything should work both in the window and on the full screen.
Keep in mind that under NT systems will not work searching for hard drives on external controllers.
These theses are the main ones when working with other similar programs that access equipment via ports.
Note:
A bootable Windows XP floppy disk is not suitable for running the program! (because of glitches EMM386.EXE);
. Very useful will be some kind of file manager, for example Volkov Commander (for "clean" DOS) or FAR (for Windows).
It should be noted that inside Victoria there is a small built-in file manager.
After starting the program, its interface will appear on the screen, consisting of the following main parts:
The topmost line: information about the version of the program and its author.
. The second line: indicator lights of HDD registers, allowing to judge what the drive is currently busy with.
. The third line: it displays the name of the model of the tested HDD, its serial number and some other information.
. The lowest line: prompts for function keys.
. The second line from the bottom: "Status Box" - displays the most current system events.
For example, error messages or waiting for the hard drive to be ready.
. The third line from below is empty.
. Everything else is the desktop of the program.
It shows the entire process of working with the drive.
Program Management
The PC keyboard is used for control, while there is no support for other input devices.
Interface Selection
Selecting an IDE / SATA hard drive on a standard port
Perhaps the first time you start, you will need to select the hard drive that you want to test (and not the one that is registered in the file vcr.ini - in the distribution there it is specified Secondary Master).
To do this, press the [P] key.
A menu will appear with the names of the channels.
The choice is made by the cursor keys "up" and "down".
When the cursor is moved, the indication (light bulbs) is displayed in real time, which indicates the readiness of the HDD.
A working hard disk will always burn 2 light bulbs: DRSC and DRDY (some may also have INX).
In the error registers a red light can be lit AMNF, and the rest must be repaid.
For more information on setting indicators, see below.
After setting the cursor to the desired item, press ENTER.
Selecting the hard drive on an external (optional) PCI / ATA / SATA / RAID controller
It is carried out in the lowest point of the menu.
After pressing ENTER, the search for external controllers and hard drives will begin.
Identify only real and working hard drives in the MASTER position, the rest of the system "will not notice".
When each additional port is found, the table will be given:
Name of the manufacturer of the ATA controller (or its Vendor Code);
. The name of the controller (or its ID Code);
. Class: EXT / INT / RAID (external, internal, RAID);
. The port address (or a dash if it could not be determined);
. The name of the connected hard drive, if it is on the channel, and is working;
. All found ports will be numbered.
You only need to select the desired one by pressing the appropriate key.
Note: the program may not find the hard drives on some models of Promise controllers.
Reading the drive's passport
Passport HDD - this is the factory-made information that characterizes the HDD family and its individual characteristics.
It includes the family name, model name, unique serial number, firmware version, logical parameters (geometry), interface parameters and much more.
Passport is necessary for the correct identification of the device.
If the hard drive's passport is lost for some reason, HDD becomes unusable, because no program can use it for its intended purpose.
Passport is given when you press a key.
Here's what we get from there (from top to bottom):
Full model name and firmware version;
. Serial number HDD;
. Number of available physical sectors (LBA);
. Disk capacity in bytes;
. Parameters CHS (number of cylinders, logical heads, sectors (actual only for hard drives< 8,4 Гб).
. SMART (status).
Enabled / Disabled - Indicates whether SMART monitoring is enabled in the drive itself.
. Errlog - Internal error logging.
. Selftest - internal self-test (usually a test of the surface at a time when there are no external requests to the screw).
If something is present in the drive, the message "[...] present" appears in the passport.
Keep in mind that on some hard drives, self-test can be disabled in the passport, but it's real to be present and work.
. Disk cache status.
The program attempts to determine its size, if it fails, reports "unknown size";
. Look ahead - pre-selection of reading.
Can be turned on or off.
Turned off pre-selection indicates that either the hard drive is very old (does not support this function, or it is disabled by utilities / buggy).
The Winchester with disabled prefetch works very slowly, and usually it is immediately noticeable when working with files.
. Write - write caching.
Delayed writing of the buffer to disk, to speed up file operations.
Can be turned on or off.
All modern hard drives are enabled by default.
. Supported modes. This is the most interesting part of the passport.
It indicates the technical capabilities of this HDD model.
Here is the explanation of the abbreviations:
. . HPA - Host Protected Area: the hard drive supports the ability to change the physical volume.
. . CHS - Cylinder / Head / Sector: addressing mode disk space (derived from FDD drives and the first HDD), which allows you to access separately to heads, sectors and tracks.
In modern drives, the logical CHS geometry is left for compatibility with older programs and the BIOS.
. . LBA - Logical Block Addressing: the hard drive supports addressing by logical blocks, which is the de facto standard for modern HDD, OS and BIOS.
. . PIO - Programmable Input / Output: program input, the mode of data exchange between the hard drive and RAM, implemented with the participation of the central processor of the PC.
It is characterized by ease of implementation, reliability and versatility, however it takes CPU time, which makes this mode unsuitable for multitasking systems.
. . DMA - Direct Memory Access: the hard drive supports direct access to the memory, which allows to unload the CPU of the PC during exchange with the disk.
Like LBA, this mode is the norm, and not an exception for modern HDDs.
In brackets are the limiting modes in which the hard drive can use DMA.
. . AAM - Automatic Acoustic Management: the hard drive allows you to programmatically control the level of acoustic noise.
This is achieved by changing the positioning speed of the heads.
. . APM - Advanced Power Management: the hard drive has built-in power management tools, which makes the system more economical and, in some cases, increases the reliability of the screw (due to less heat and parking of the heads).
For desktop systems is not very relevant.
. . DLMC - Download Microcode: the hard drive allows you to update yourself "firmware" by downloading an external microcode (distributed by HDD manufacturers and branded PCs as firmware updates).
. . FLC - Flush Cache: the hard drive supports the command of forced reset of the cache to disk.
Probably, this command is designed to reduce the risk of data loss due to a sudden power outage.
. . SMS - Set Max Security Support: too lazy to describe this garbage.
If interested, read the ATA standard.
. . DCO - Device Configuration Overlay: The hard drive supports configuring a set of some ATA functions as desired by the user.
These include turning SMART on and off, 48-bit addressing support, AAM, changing DMA limit modes, etc. (see also "Restoring the Disk Configuration" section).
. Current AAM value: The current value of the set noise level. 128 means that the level is minimal, 0 maximum.
The program allows you to change this value arbitrarily, adjusting the noise.
The AAM status is remembered even after the power is turned off.
Nearby is the manufacturer's recommended value.
. Current APM value: The current value of the power save mode.
Like AAM, 128 means minimum power consumption, 0 maximum.
In hard disks for desktop computers, it is almost always equal to 0, for mobile devices it can have different values set by power saving utilities.
Unfortunately, the APM value is not saved after the power is turned off, so in Victoria its adjustment is not provided.
However, many branded utilities for HDD are able to switch APM "forever" with the help of technological commands.
. Current power mode: Current power consumption mode.
Actually it says whether the HDD is rotating at the moment.
Convenient for quiet hard drives, especially the program allows you to stop the shaft at any time.
. Security erase time: The time for which the disk security subsystem is capable of erasing all information and removing the password.
Usually it is commensurable with the time of verification, i.e. information is erased without the participation of the interface and with the maximum possible speed.
Interestingly, some HDD models in the passport at this point recorded 0.
In this case, the erase time is not displayed on the screen.
It will not be displayed if there are no security options for the tested HDD.
. Security (status).
. . ON: the hard drive is password protected by ATA (the presence of the password set on the screw also indicates the PWD lamp at the top of the screen);
. . OFF: the password is not set on the hard drive;
. . High, Maximum: privacy level the set password (see the chapter on passwords);
. . Frozen: the hard drive is in Freeze-lock state (the password system works, but it is temporarily blocked);
. . Expired: the password was unsuccessfully removed five times.
As a result, the HDD blocked the password system before the power was turned off;
. . Locked: the password is set, there is no access to information.
. . Unlocked: the hard drive is open, there is access to information.
In this case, the password can be set if the HDD is temporarily opened with the UNLOCK command.
. . Not supported: the hard drive does not have a password protection system.
Software Reset Disk
It is executed by a key.
This operation stops the internal operation of the HDD (if it was busy processing the command or self-test) and brings the interface to the default state (clears the registers after the previous command and is ready to receive the next one).
It is necessary to diagnose the drive, interrupt the hung firmware of the hard drive, etc.
It is executed immediately after pressing the button.
It also works directly during operations with the disk (for example, reading).
A sign of a successful reset will be the indicator on AMNF.
Work with HDD surface
The program includes a powerful HDD surface scanner, which allows you to diagnose the HDD for the presence of bad sectors, floating defects and interface errors.
The program is able to test most HDDs at the maximum speed, regardless of the type of ATA controller and interface cable.
A special feature of the scanner is the use of exclusive algorithms not found before in other similar utilities.
These include automatic recognition of supported standards, and setting the timer in accordance with the speed of the tested HDD.
This allows you to effectively check both slow and fast disks.
And the original method of measuring time intervals allows you to work under virtual DOS machines WINDOWS practically without reducing the accuracy.
The surface scan works in close relationship with the HDD passport, getting all the necessary parameters from it.
LBA 28 and 48 bit modes are supported, which are recognized automatically.
All that could be automated - successfully implemented, and does not require any customization by the user.
In order to test the hard drive surface, press the "Scan" key.
At the same time, a menu appears on the screen, the purpose of which is clear from the text displayed in it.
If you want, you can click for help.
Consider the third above item - it has 6 states that can be switched by the space bar or by the arrow keys "right" and "left".
Linear reading (prior to version 3.1 was "verification")
Surface testing in LBA addressing.
It is designed for the fastest and most accurate diagnosis of the surface condition.
During testing all the address space of the hard drive is divided into conditional sections of the same length blocks.
The size of one block is equal to 256 sectors.
The program measures the access time to each block by the verification command, and a rectangle of the corresponding color is drawn on it.
The data is physically read from the disk, but not transmitted through the interface, so this is the fastest way to test the surface, with it can only be compared to working in limiting UDMA modes (except Seagate Barracuda IV, V and 7200.7 with microcode versions 3.xx.
For these HDDs, the verification speed of ~ 28-32 Mbit / s is normal).
If the hard drive crashes due to a fault during scanning, the program waits for about 16 seconds, then it moves to the next block, displaying the icon T (Timeout) in the scan field.
Continuous delays indicate that the HDD is not responding to commands - you can try to issue a reset command to its controller by pressing (Reset) directly during the scan, sometimes it helps.
Random reading:
Testing the surface when the block addresses are issued by the random number generator.
The range can be set as LBA boundaries in the scan menu.
This also measures the access time to each block, but unlike the linear reading, it will be more because consists of the time of positioning the head on the desired cylinder and actually reading (perhaps, that of the efficiency of the caching algorithm [the author's assumption]).
The obtained result accurately reflects the overall speed of the disk in real problems, when the hard drive has to perform many cycles of reading data from different places (during the operation of the OS, not only fragments of the file are read, but also part of the service tables of the file system located far from the file body).
Indeed, the average reading speed of about 8 Mb / s coincides with the readings of other programs (for example, FAR) when copying files.
Also, this speed depends on the settings that affect the positioning speed (Acoustics management).
BUTTERFLY - reading:
Testing the surface using the "butterfly" algorithm, when the beginning and the end of the disk space are alternately read, each time with a shift of 1 block (256 sectors), resulting in the heads at the end of the test in the middle of the working area of the HDD.
This algorithm combines positioning at different distances, as well as direct and reverse reading, and is used in professional utilities, including the factory testing of hard disks using means of self-wielding.
The difference from random reading is that butterfly is a test of the entire surface with positioning, scanning all sectors of HDD by a certain law and having an ending.
Random reading is an aggressive test that has no end and regularity, and it is almost not predicted by pre-selection algorithms.
Both tests create a heavy load on the head unit and electronics, so take care of the HDD's good cooling in order to avoid spoilage.
It should also be noted that Butterfly performs the check slower than linear reading, and on a 10 GB hard drive can last about 30 minutes.
The reason - the loss of time to move the heads, and the constant waiting for the rotation of the disk package to the desired angle.
As in the previous tests, the range can be set as LBA boundaries in the menu.
It is acceptable to use a reset and to call up help during the test.
All 3 types of tests can work together with a flaw detector and remaps - they are selected in the 4th menu item.
PIO - reading (in the version before 3.1 was "Reading")
Unlike verification, real reading of sectors from the hard drive is used.
It differs by a lower speed - about 2-8 mb / sec (1 Gb reads 2-7 minutes), so it is advisable only for small areas.
It is used not for measurements, but mainly for catching "glitches" of the hard drive, checking the efficiency of the reading channel and the interface.
In actual conditions, the computer works with a hard drive in DMA mode, where the speed is much higher (and manufacturers optimize the HDD for DMA mode).
With PIO-reading, you can select the fastest HDD model for installation in a system that does not support DMA mode.
Such systems are still encountered, such as cash registers, medical diagnostic and musical equipment, various robots (for example, automatic nodes of FTN networks).
Note:
To increase the speed of the PIO, you must force the maximum mode in the BIOS.
Usually there is "Auto" by default, replacing it with PIO-4 will allow you to increase the speed more than 2 times.
It also depends on the overall performance of the PC and the chipset (the highest speed was on the I430 TX / VX - about 13 MB / s).
PIO - reading to file (in the version before 3.1 was "Reading into a file")
Unlike "just reading" the data from the hard drive is written to the file in the current directory.
The program correctly processes the bad blocks, not "flying out" on them, all the rest of the information sector after sector is written to the file (zeros are inserted instead of defective areas).
Beginning with version 3.1, an algorithm is applied from a professional program that provides a sufficiently high speed in PIO-4 and a dynamic transition from block to sector-by-sector, depending on the errors.
The number of attempts to read the sector on an error is two: the first time with block access, the second with a sector-wide access for more complete extraction of data from damaged drives with an active read prefetch.
Reset for faster error handling and "long reading" in the free version are disabled.
In connection with the practical uselessness of HDD error codes when read into a file, they are not output, although they are processed.
Instead, the program reports "I / O error" and the number of the defective LBA.
The contents of the defective sector are filled with zeros and written to a file.
It has a 2 GB limit, if copying is done on the FAT32 partition, but there are no restrictions in NTFS.
When you enter a file name without an extension, it will automatically be assigned an extension * .trk
The result: to save information from a drive that has defects, it is recommended to run Victoria with the NTFS partition, on which, in addition to the program itself, there is a sufficient amount of free space.
Usually this is a Windows 2000 or XP system.
Before use, it is desirable to set the PIO-4 mode for the SECONDARY channel in Computer BIOS (to increase the read speed), then load Windows with the UserPort driver, and only then feed into the HDD being copied - this ensures that Windows does not access the faulty hard drive.
Recording (erasure):
It performs sector-by-sector erasure of information from a disk, blocks of 256 sectors.
Can be used to eliminate some types of defects (similar to low-level formatting programs from HDD manufacturers).
The speed is comparable with PIO-reading.
It should be noted that there is a faster way to clean the disk from information - erasing through the security subsystem.
Read about this in the "Security" section.
Write from file:
Writes the contents of the file to disk in a sector-by-sector manner, starting with Start LBA and ending with the length of the file.
To select a file, the embedded manager window opens.
The length is calculated automatically, the percent counter is adjusted to it.
The speed reaches 6 Mb / s.
The process is accompanied by a visual scan, time and block errors are processed.
The function can be useful for correcting the destruction of file systems in conjunction with the HEX editor, and for cloning small disks.
The size of the file is limited to 2 GB, more volume is worth writing by other programs (for example WinHEX - it will be 10 times faster).
Checking the interface:
Performs a cyclic recording of the data template in the buffer memory of the hard drive, then reading from there and comparing the read with the recorded one.
This measures the read time from the buffer in the range from 64 to 500 μs.
This test clearly shows what the multitasking of the microprogram built into the hard drive is-the time for reading different cycles turns out different and depends on the HDD model and on its mode of operation.
If there is a discrepancy between the recorded and the read, a message with the clock is displayed.
The presence of such errors indicates a malfunction of the interface or buffer memory of the hard drive, and such a drive is considered potentially dangerous, as it can distort the information stored on it.
To obtain high reliability it is necessary to perform this test long enough, similar to tests random access memory computer.
During testing it is recommended to move the IDE cable to diagnose bad contacts, which will be immediately detected by the program.
Before testing the interface, you can stop the HDD shaft by pressing the [S] key (at the same time, you will see a big joke on the HDD of Seagate).
AMD about future Ryzen
The fact that AMD is currently working on the next iteration of the Zen microarchitecture is not a surprise.
AMD assumes that the Zen 2 architecture will be no less successful than Zen, because with its help the manufacturer intends to raise the processor clock speeds and simultaneously improve the IPC (the number of instructions executed per clock).
The release of a fundamentally new generation of Ryzen processors is logical to expect by the end of next year, when AMD's production partner, GlobalFoundries, can deploy mass production of such processors using 7-nm technology using FinFET transistors.
However, before this, roughly in the spring of next year, Pinnacle Ridge processors based on the second stepping of the current Zeppelin core will come to the market, which, according to the industry terminology, can be described as Summit Ridge Refresh.
These two events are expected to become major milestones in the further development of Ryzen processors for the next year and a half.
AMD representative Don Voligorski confirmed that the microarchitecture Zen 2 will receive a set of improvements aimed primarily at meeting the needs of desktop users.
In particular, in processors based on it, both the specific performance and the clock frequency will increase.
System requirements for Total War
Warhammer 2
Total War Warhammer 2 goes on sale on September 28 - which means that the fans of the series need to imagine how powerful a computer is required to play with the comfort and without "cinematography" a novelty.
Minimum requirements (25-35 frames per second in the campaign, duels and battles of 20 units against 20, on low settings graphics at a resolution of 1280x720) are as follows:
Processor: Intel Core 2 Duo with a clock speed of 3.0 GHz;
- 4 GB of RAM or 5 GB when using the built-in graphics processor;
- graphics card: NVIDIA GeForce GTX 460 or AMD Radeon HD 5770 or Intel HD 4000;
- 64-bit operating system Windows 7.
Processor: Intel Core i5-4570 with a clock speed of 3.2 GHz;
- 8 GB of RAM;
- graphics card: NVIDIA GeForce GTX 760 or AMD Radeon R9 270X;
- 60 GB of free space on the drive;
Optimum requirements (60 frames per second in the campaign, duels and battles of 20 units against 20, on ultra-high graphics settings at 1920x1080 resolution):
Processor: Intel Core i7-4790K with a clock speed of 4.0 GHz;
- 8 GB of RAM;
- graphics card: NVIDIA GeForce GTX 1070;
- 60 GB of free space on the drive;
- 64-bit operating system Windows 7 or more modern.
Fall Update Creators Update for Windows 10 will bring a reworked game mode
Microsoft Corporation recently announced the release of another major update for operating system Windows 10 called Fall Creators Update.
It will be available on October 17. The main innovations in the upcoming update are support for the Windows Mixed Reality platform, on the basis of which a number of VR headsets are being developed from companies such as ASUS, Dell, Acer, HP and Lenovo, as well as a re-engineered game mode (Game Mode).
"In the update of Fall Creators Update, we have redesigned the game mode, which will now allow the games to use all the computing power of your device in the same way as if it were an Xbox game console," the official blog says.
Unfortunately, Microsoft did not disclose details about how the new Game Mode will work or how much better than the game mode that appeared in Windows 10 with the spring update.
The latter did not have a proper effect on the frame rate in games and, according to many gamers, is a completely useless function.
YouTube: new design and logo, changes in functionality
Google introduced an updated video streaming service YouTube, which changed not only the logo, but also the functionality of the mobile application and the web version.
As for the logo, now the brand-new white play button on a red background was placed next to the name YouTube.
The new YouTube design is made in the Material Design concept to simplify the interface and remove all unnecessary.
In the web version of YouTube appeared night mode, which should reduce the burden on the eyes of users in the dark.
It is noteworthy that in YouTube appeared support for vertical video, which will now be played on mobile devices without black bars around the edges.
By double-clicking on the screen, you can activate the fast-forward function, in addition, in mobile version you can change the playback speed.
All these and other changes will be introduced gradually, a full transition will take some time.
(2
votes, average: 4,50
out of 5)
Often happens that the user thinks about the status of the hard drive only when he already understands that the hard disk started to crumble or even refused. In order to protect yourself from losing important data stored on your hard disk, you need to periodically check its status. Checking and recovery of the hard drive process is long, so take a couple of hours of free time and forward.
I propose to consider free program to check the status and restore the hard drive Victoria.
Victoria has the following features:
- providing full information about the status of the hard drive;
- allows you to view S.M.A.R.T. hard drive parameters;
- has several degrees hDD Checker - verification, recording, reading, with a summary mapping of addresses of defective blocks;
- can check the hard surface;
- the utility is able to diagnose the disk's memory and interface for failures and corruption of information during reception and transmission;
- it is possible to change the speed of rotation of the shaft;
- closure bad sectors from access and reassignment;
- low-level formatting of the medium;
- the ability to erase information without the possibility of recovery;
- Setting and removing the password for access to the HDD.
We proceed directly to work with the program
From the official site of the utility download could not be downloaded to download this
Victoria runs and runs under Windows 7, 8 and 10 - 64 and 32 bits - tested.
Download and unzip the program archive. Launch Victoria. 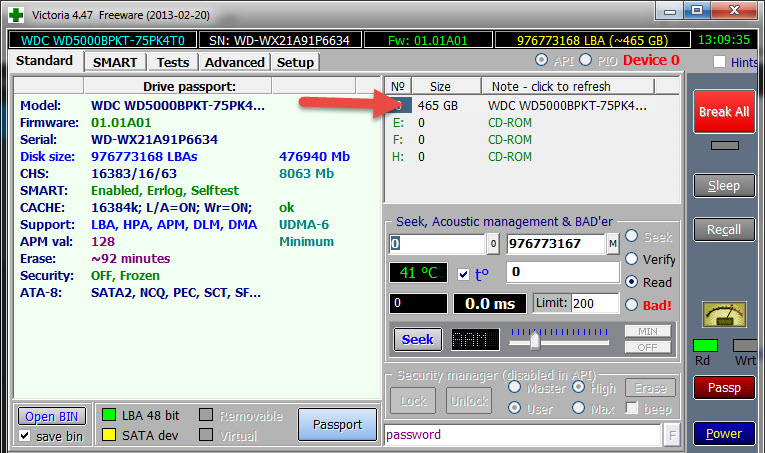
The main application window opens. We are interested in two tabs.
SMART tab
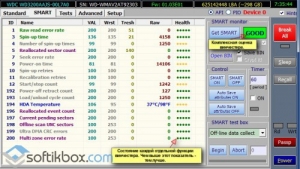
All information about the hard disk is displayed here. The results of tests for reading and writing, working capacity and responsiveness of the hard disk are displayed
Press the button, "GetSMART" and the program will give you information about the status of the HDD.
Here we will dwell in more detail.
This function allows you to test the hard disk for errors and then fix them.
When testing a disk, the program graphically shows the problem sectors and denotes them by rectangles different color. Each cluster will be designated by certain colors depending on its state.
- Gray - well-read sectors.
- Green - respond a little longer than gray, but they also have a good condition.
- Orange - these sectors are read very long. As a rule, they create braking of a hard disk. When testing them there should be no more than 50. They are workers, but they will soon fail. You can not restore them.
- Red - sectors are damaged or can not be read. You can not restore it. The presence of such sectors suggests that you need to think about changing the disk.
- Blue with a cross - sector, reading of which causes a failure. Information from them can not be restored. It is necessary to do the re-partitioning of such sectors, so that the hard disk does not write to them and does not read data from them. Do this with the option "Remap", about which you will read below.
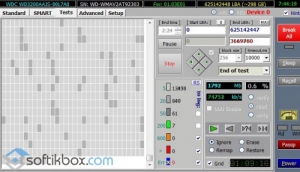
Test options: Ignore, Erase, Remap, Restore
- Ignore - this option indicates that you just need to check the disk, and do not do any restoring with it.
- Erase - when this function is enabled, unreadable sectors will be overwritten during the scan.
- Remap - allows you to redistribute sectors with errors. If an unreadable sector on the disk is found, the program replaces this sector with a readable one.
- Restore - this function works only in the paid version. Allows you to restore non-working sectors.
After you have determined the settings for testing the program, click on the Start button, thereby run the test and you can go to drink coffee. Checking can take quite a long time, so be patient.
The victoria hdd utility was created to solve problems and verify different types hard drives with the ability to apply different parameters. Soft has an expanded functionality that allows you to solve various problems with hard drives that arise under the circumstances.
Utility Features
This utility can be downloaded at 
Download the archive, unpack it and and run the executable file vcr446f.exe
The utility interface is opened. 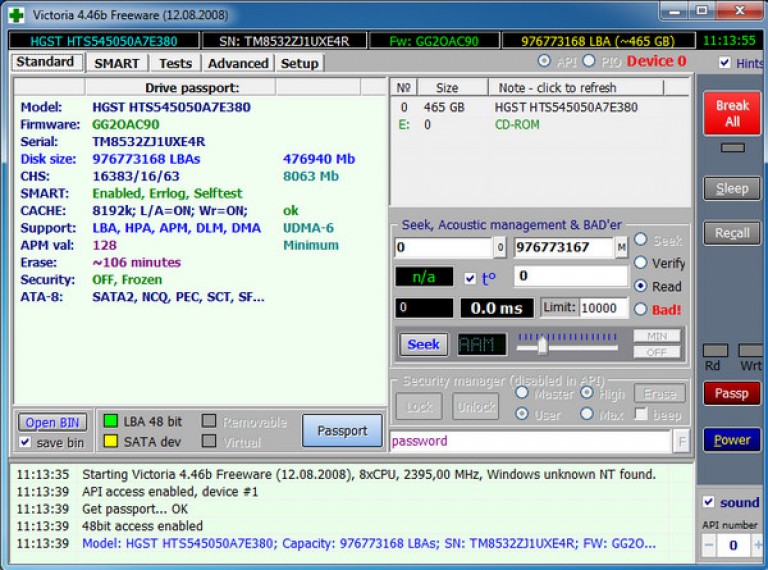
It's free software is endowed with logical and simple interface, where there are various additional software modules for examining hard disks. Even an ordinary inexperienced user can understand the program, because all the items are written in a clear language, and you can even understand the basic and most important functions even at the first start.
The utility victoria hdd (Victoria) will help the user to thoroughly test the hard drive, as a result, information on the status of the hard drive will be provided. In addition, you can perform self-diagnostics in the "S.M.A.R.T." mode, which allows you to determine the period of disk working capacity.
The software victoria hdd has the function of checking the surface hdd drive, for possible damage and other malfunctions. The utility can perform a full scan of the hard drive on defective sectors, after the analysis is provided information on the state of the carrier as a whole. If victoria hdd finds broken sectors, they will be reassigned so that you can later use the drive without losing data.
The utility Victoria for discs can be used by both professional repairers and ordinary users. Depending on skill and skills, the user can configure the software victoria hdd to suit his needs, from which the algorithm of analysis of the hard drive will change.
What is included in the functionality of the utility Victoria:
The utility is able to give a detailed hard work disk and its technical characteristics;
Allows you to define the connected media via the sata / ide channel;
Has the ability to detect flaws in the surface of a hard drive;
It can eliminate the disadvantages of the hard drive, caused by the work, such as encryption of the broken sector and others;
It is equipped with a practical and comfortable smart-monitor that visually gives important vital indicators of the disc;
Has an integrated conductor for working with file system;
A detailed help system for using and configuring the utility victoria hdd;
The utility Victoria is absolutely free;
The utility victoria hdd is created for carrying out of various tests of hard disks, it is more suitable for people with a level of using the computer above average. If you run the utility victoria hdd for the first time, it's better not to change the preset settings if you have no idea about their purpose.
In general, the Victoria utility is very useful and relevant when tracking hard drive problems and successfully eliminating most failures. This software has already been able to recover not one almost "dead" Winchester, and if you are faced with a problem associated with hard drive - The utility victoria hdd will be very handy.
Hard drive check
We open the program, and on the "Standart" tab we see the passport of the disk, which is indicated on the right. 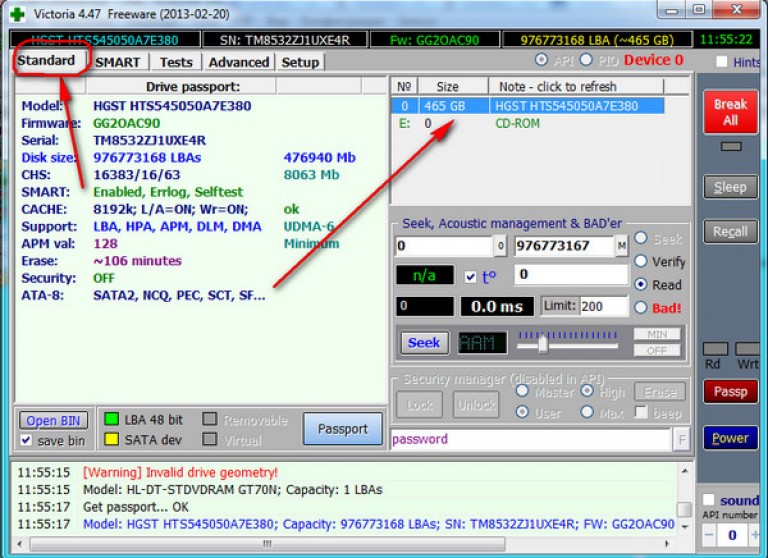
Go to the tab "Tests". Select the "Ignore" test mode. In this mode, the program will make requests to the sectors of the hard drive and if they are faulty or faulty, then it will skip them. 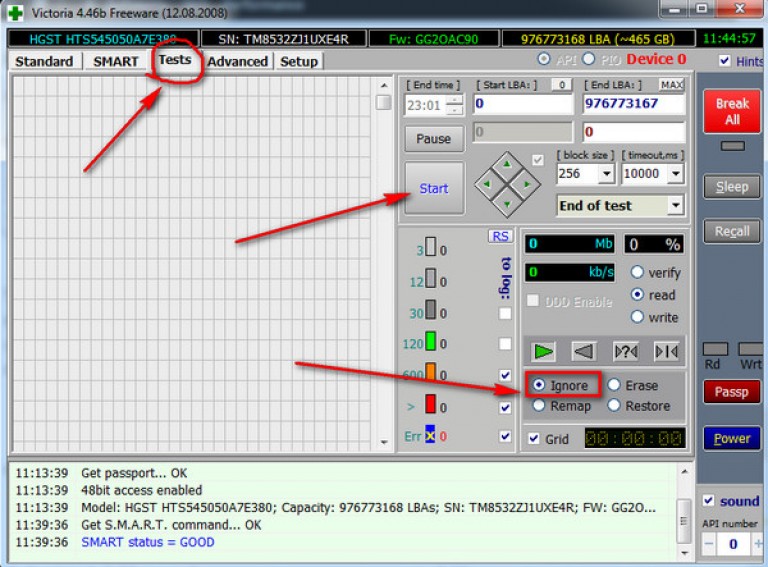
Press the "Start" button. Scanning started. 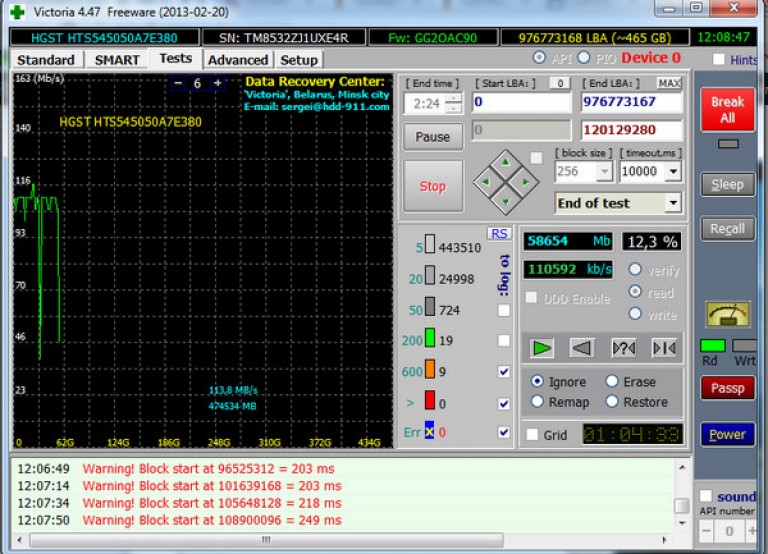
The utility stopped (for a long time checks), but the results (not the whole disk) can already be estimated. ![]() Explanation:
Explanation:
The utility is transferred to the recovery mode and press "Start" 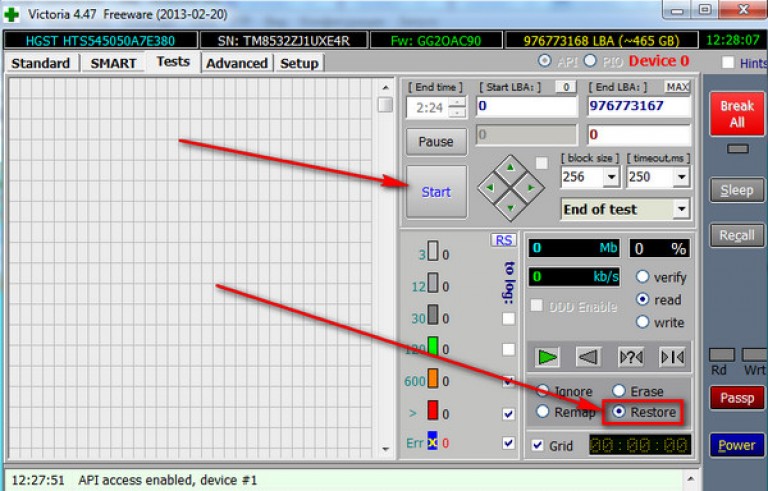
Victoria hdd video:
Sometimes the fall of the operating system (OS) occurs for no apparent reason. This is especially true of the properties of modern hard drives with a high recording density and a SATA interface. Many users for rapid recovery OS use backup copy, but this does not always work.
Sometimes this happens as a result of damage to sectors of the hard drive!
Damaged sectors of the hard drive are called the Bad Sector or Bad Block.
The appearance of bad blocks (Bad Blocks) can make it impossible not only to restore, but also to install a new OS. In any case, unreadable clusters have to be repaired.
What is Remap? - This is the procedure for replacing the address of an unreadable sector with one of the backup ones. It is carried out as a special command of the service software, and automatically - when writing to an unreadable sector. On some models of hard drives this function can be blocked.
The causes of disk surface damage or errors in the file system.
The reasons can be the following:
- Short-term power outages in the electricity network. However, uninterruptible power supplies (UPS, UPS) react to such outages and prevent HDD malfunctions.
- Power failure or forced shutdown of the computer. Sometimes forced power-down is used by the user himself, when other ways to restart the hung OS fail.
- Unreliable contact in HDD connectors.
- Vibration or too strong impacts, which can be transmitted to the hard drive with a hard installation of the latter in the case the system unit.
Symptoms of HDD surface damage or file system errors.
Symptoms can be the following:
- Unable to boot the OS.
- The impossibility of installing in the Repair mode of a new OS over a faulty OS.
- Unexpected disruption of OS or applications. This can manifest as the loss of some settings or functions of the OS and the programs used.
- Too slow launch of applications and the OS itself.
- Missing files and folders.
- Damage to files.
- Slow down the process of copying and accessing files.
- The processor or one of the processor cores is too high for any access to the hard disk.
- OS hangs when you try to copy or open a file.
This page of the site does not aim at the full description and features of the Victoria program.
For this you can see, for example, the articles:
Different versions of the programs can be downloaded from the links on the RU-BOARD computer portal. Please note that versions of the program Victoria 3.5 loaded into DOS, which is important if you can not run Windows on your computer!
Program Victoria 3.5 allows the test to be combined with remapping. That is, if you immediately select options, "Linear Read" and "Advanced REMAP", then you do not need to do anything else. Especially, it is useful to do this if there are too many unreadable blocks.
Victoria 3.5, for example, you can start from a floppy disk that you can create by running the MAKEDISK.BAT file of the V35FDD.zip archive, which you can download. Unpack the archive, insert the floppy disk into the floppy drive and run the makedisk.bat file. A boot diskette is created. To use the program, you must download the computer from this diskette.
You can start the program from the USB flash drive, - see "".
Below we will consider an example of replacing the damaged sectors with workers (Remap) by running the program Victoria 3.5 with a flash drive.
Picture 1
By downloading, by default, the menu shows "Victoria 3.5 Russian for Desktop" - for personal computers. If you do not choose anything, Victoria will load itself in 10 seconds. For laptops with the and ↓ select the item "Victoria 3.5 Russian for Notebook" and press the key Enter.

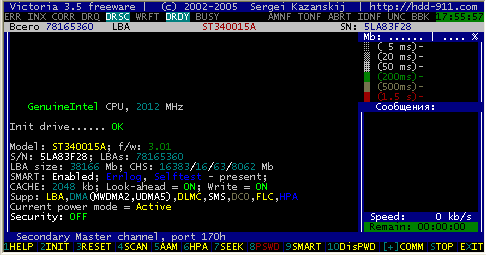
Figure 2
At the bottom of the opened window of the program Victoria 3.5, we are invited to press the key P to select an IDE channel (interface) for connecting a hard disk, or F1 to call the help system. When you press a key F1 the following window opens:
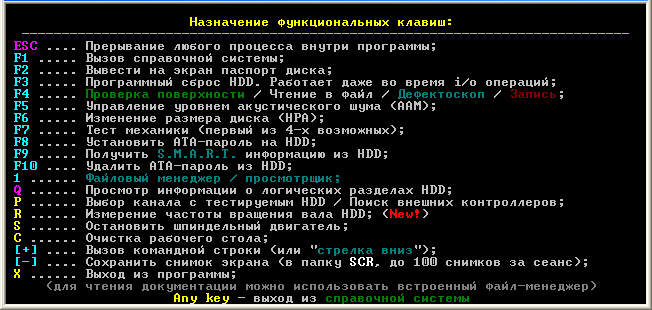
Figure 3
After reading the function keys of the Victoria 3.5 program, - pressing any key, we leave the help system (for more details, see: Assigning all the keys involved).
In the first window of the program Victoria 3.5 (Figure 2), you can immediately press the key F2
to display the passport of the disc. In case the program Victoria 3.5 itself determines hDD, the hard drive's passport will be displayed. If after pressing a key F2, the program itself did not find the hard disk, then it will have to be done manually. To do this, press the key P. The same thing should be done if there are several hard disks and you need to choose one of them.
![]()
Figure 4
By pressing a key P the menu for selecting the HDD port (hard disk) appears. In case you have hard disks with SATA interface, then in the appeared menu "HDD port selection" we choose - "Ext. PCI ATA / SATA. " Move the cursor keys "↓", and confirm the selection by pressing the key Enter.
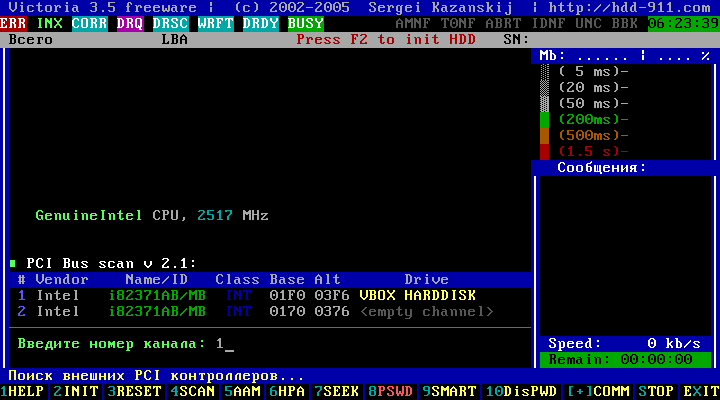
Figure 5
In the table, select the desired channel by the HDD model. For example, - enter the number "1" and press Enter.
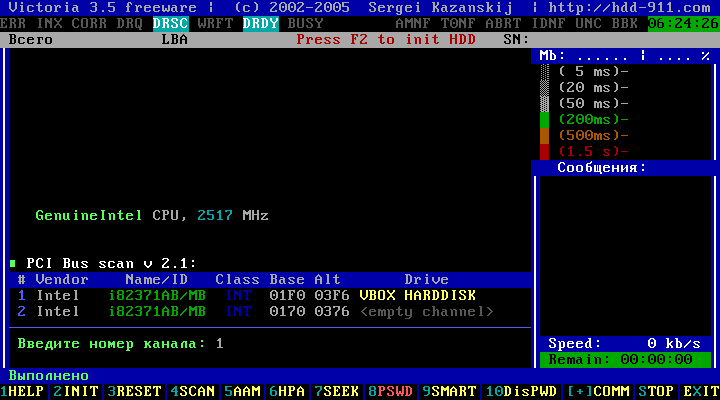
Figure 6
From the left below we will see "Done".
Then, pressing the F2 you can see the passport of the selected hard disk ....
Let's return to the case if you have hard disks with IDE interface.
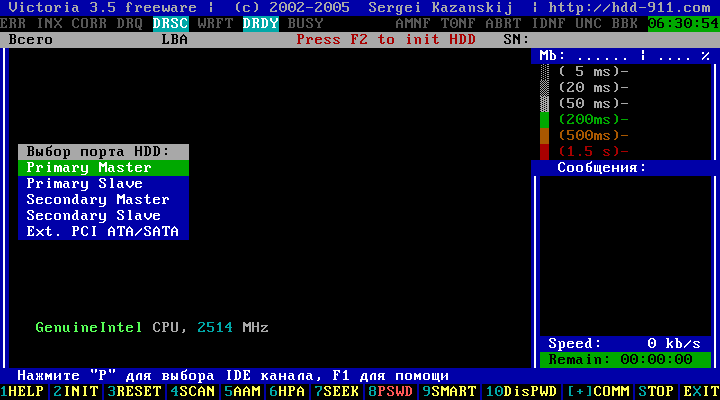
Figure 7
Choose Primary Master; Primary Slave; Seconday Master or Seconday Slave, depending on the position of the jumper (Master / Slave) and the type of connection (Primary / Seconday) of your hard drive.
We choose, for example, - "Primary Master". Move the cursor keys and ↓
, and confirm the selection by pressing the key Enter.
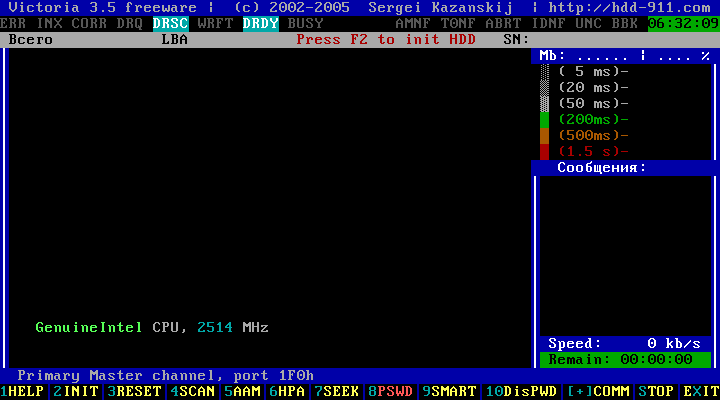
Figure 8
By pressing a key Enter the message about the selected hard disk will appear in the bottom part of the window. Then press the key F2.
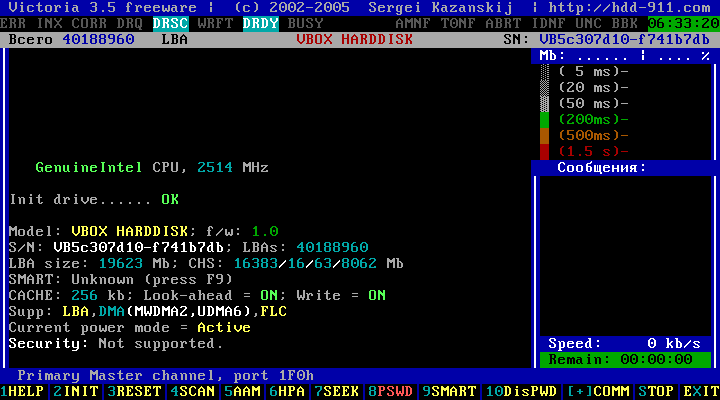
Figure 9
The passport of the selected hard disk is opened.
Next, to adjust the scan (scan) of the disk surface, press the key F4.
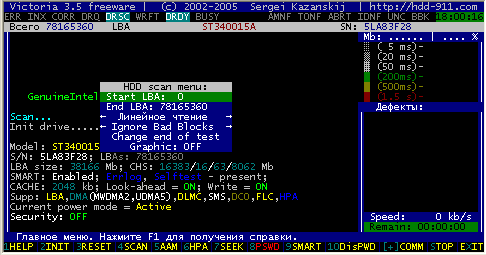
"HDD scan menu:" appears.
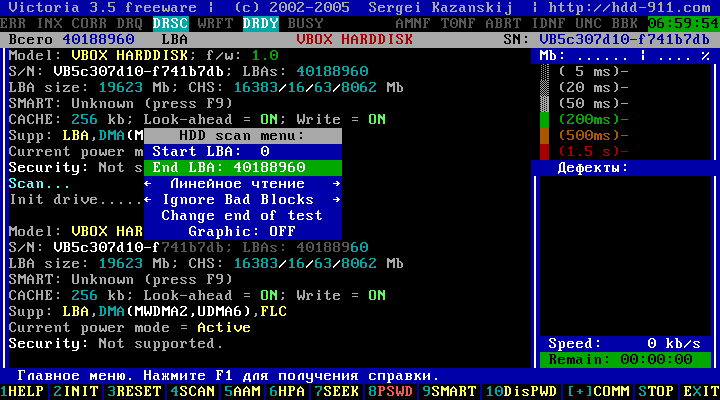
Figure 10
In the opened menu, by default, we offer the parameters for scanning a hard disk:
Start LBA: 0 - the beginning of the scan (the beginning of the hard disk) *;
End LBA: 40188960 - the end of the scan (the end of the hard drive);
Linear reading;
Ignore Bad Blocks;
Change end of test;
Graphic: OFF.
Move through the menu lines with the cursor keys and ↓
, changing the value with the keys Space (space), and confirm the selection by pressing the key Enter.
For more information on the menu items, see "Online documentation: Sergey Kazansky"
* LBA (Logical Block Addressing) - block address. When setting the testing limits in LBA, - 1 LBA = 512 bytes.
You can count: 40 188 960 x 512 = 20 576 747 520 bytes, which equals 19.16 GB.
That is, by default, it is suggested to scan the entire disk "Start LBA: 0" and "End LBA: 40188960" (from the beginning to the end of the disk with a capacity of 19.16 GB). Of course, you need to scan the entire hard drive.
Usually the system partition of the disk is at the beginning of the hard disk (drive "C"). Therefore, sometimes, in order to shorten the time of computer failure detection, you can select a test place on the hard disk that corresponds to the size of the partition on which the operating system is installed.
For such cases, it is possible to set scanning limits not only in LBA, but also in G (gigabytes here are written with the letter G) and in%!
The value of the start and end boundaries of the hard disk scan can be entered here in percent or gigabytes, but only in integer values.
Example: 14G or 73%.
This feature is useful for you when you have a large disk, but the values exceeding the 1 terabyte limit in the Victoria version of DOS should not be set!
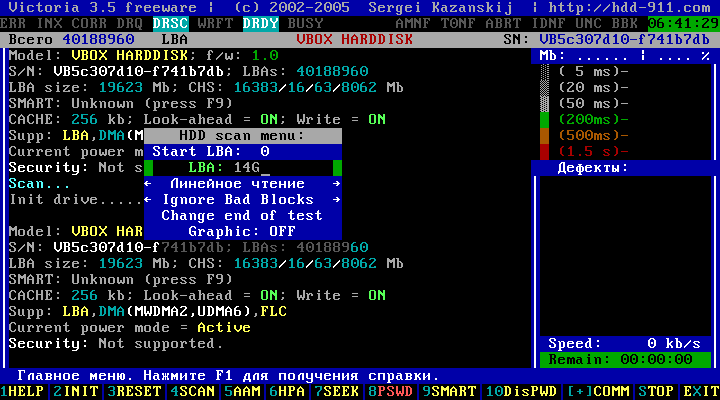
Figure 11
The figure shows an example of setting the start of testing in the line "Start LBA: 0" and the end of End LBA: in 14G (14 gigabytes). To be able to enter a value, press Space.
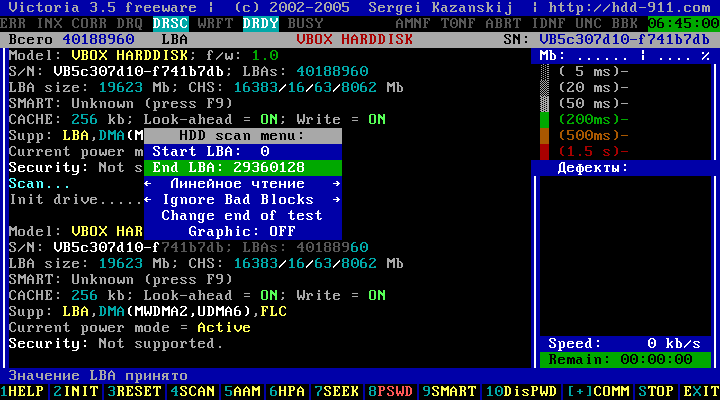
Figure 12
To confirm the action, press the key Enter, the entered values in G or% are automatically converted to the LBA address.
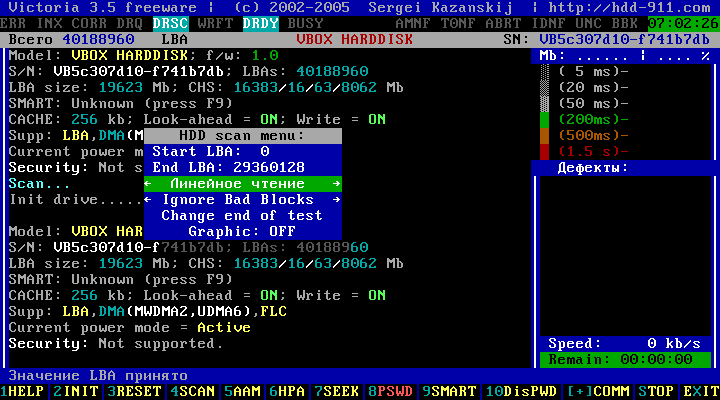
Figure 13
The next line of the menu is "Linear Reading" by default. Pressing the Space key can be selected:
- Linear reading;
- Accidental reading;
- BUTTERFLY reading.
"Linear reading" is better not to change this, although the latter modes allow you to get more reliable data, it is not recommended to use them, since the test duration can increase 12-15 times. In addition, these modes significantly deteriorate the mechanism of HDD, than "Linear Reading".
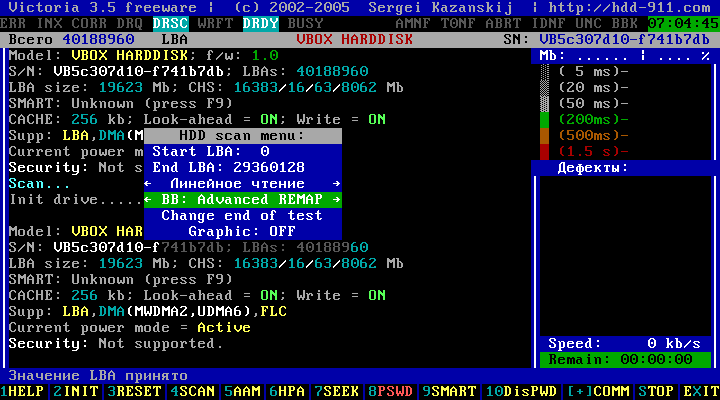
Figure 14
In the next line, pressing the key Space set "BB = Advanced REMAP"
Attention! Here you can set " BB = Erase 256 sect", Which erases the information on the hard drive!
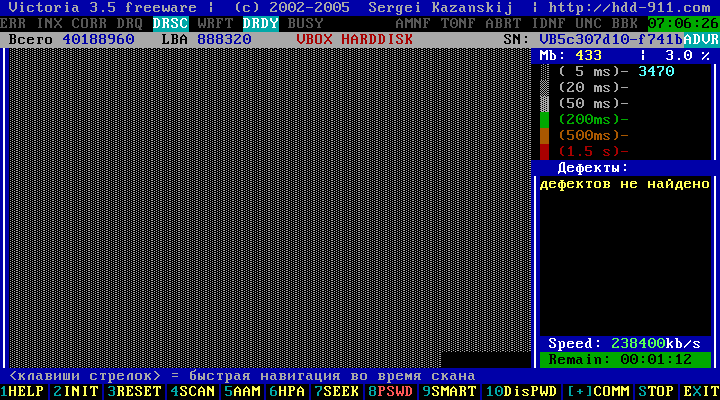
Figure 15
Pressing "Enter" starts the surface testing process, in the right upper part of the interface a report on the number of different clusters of different access time will be generated. The lower right part of the interface displays a list of addresses of the bad blocks in the LBA format. Below is the speed of reading and the time remaining before the test.
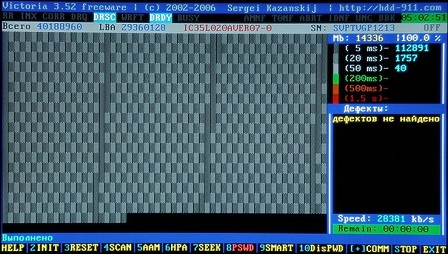
Figure 16
At the end of the test, the speaker of the system unit will emit a melodic signal.
In this test, "Bad Blocks" (damaged sectors) is not found!
In case of their presence,
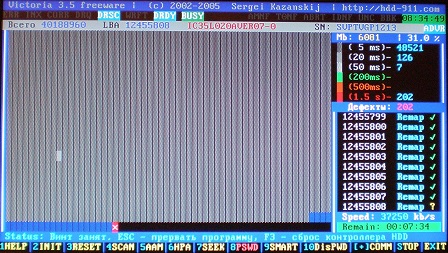
Figure 17
Automatically produced "Remap", - procedure for replacing the address of an unreadable sector by one of the backup ones.
![]()
Figure 18
At the end of the test, information is displayed on the correction, in this case, 210 "Bad Blocks".
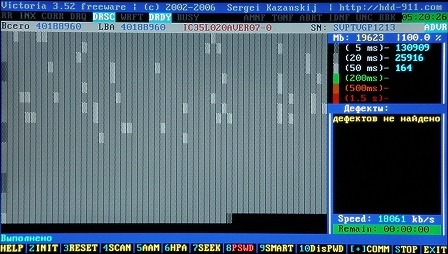
Figure 19
This picture shows the result of a re-test of this hard disk after the completion of "Remap" in the previous one, from zero to the final LBA. Defects in the re-scan not found!
Next, see the forecasts. There is a technology SMART (Self-Monitoring, Analysis and Reporting Technology), which allows you to monitor the main parameters of the HDD and predict the disk's operating time before the failure. Click here F9,
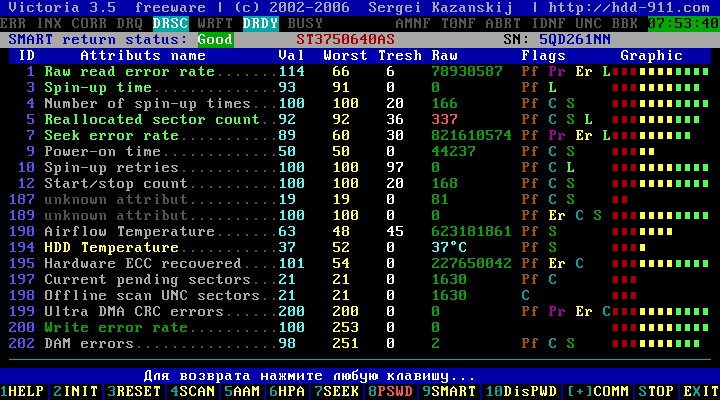
Figure 20
to see the SMART metrics. You can decode the SMART readings according to the table, - SMART readout table. The quality of the disc surface and the reliability of the HDD mechanism can be judged by the color grades located near each indicator. The red color means that the case is moving to the death of the hard drive (except for temperature thermometer).
If the top of the interface says "Smart return status: Good ", Then the forecast is good.
In case of failure of the fix, or a bad prediction, you will have to replace this hard disk.
By "poverty" you can certainly try to "cut off" part of the disk, but this is a separate topic ...
To exit the program, press the "X" key.
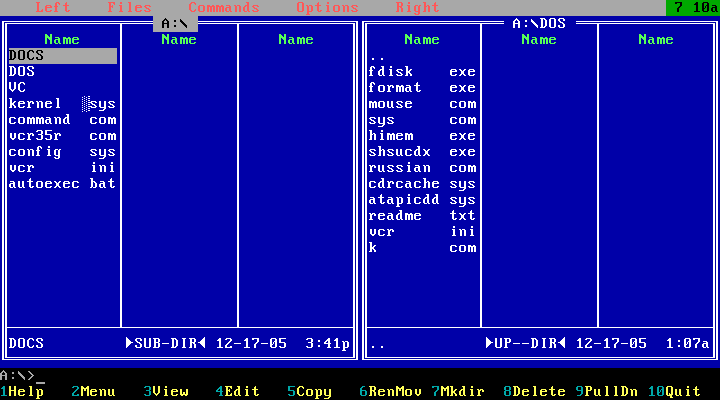
Figure 21
Then three keys Alt + Ctrl + Delete We reboot the computer.