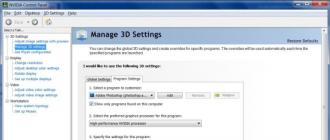
Hosts (domain database) - a small document that lies in the system Windows folders... When you go online and or just go to the site through your browser bookmarks, Windows first deeds addresses him. The main purpose is to match the names of sites (domains) and their IP addresses, written in numbers. You can go to the site by entering domain or ip.
It is vulnerable to viruses and other malware that seek to rewrite it
This is done so that you automatically get to advertising and viral sites or to block the ability to download some Internet services. But fortunately, the content of Hosts is controlled by the user. A notepad program is enough to enter data into the text editor or save it from unnecessary things. How to change hosts in Windows, read on.
How to open Hosts
A host database is included in any OS that can connect to the Internet. And in Windows, and in macOS, and in Linux distributions... But the location is very different. On XP, Vista, 7 & 8, 8.1 & 10, the hosts file is located at C: \ Windows \ System32 \ drivers \ etc. Can be opened directly in the explorer. The system32 folder is right in Windows.
But it's easier to open a command line from the list of standard programs and enter this in the window: notepad C: \ windows \ system32 \ drivers \ etc \ hosts and press Enter.
Run the command line with administrative rights, otherwise only view will open, and the change will be blocked.
It will start in a familiar notebook. If the command line was initiated from the admin, then the notepad will open in the same way and you can make edits.
There is a third way to open the hosts file in Windows 7, 8, 10 - for the curious:
- in explorer go to C: \ Windows \ system32;
- you need notepad.exe;
- right-click on it and click on run as admin.
Further, in a simple way: "File" -> "Open" and look for the desired one. In order for the notebook to see it, you need to enable the "All files" option in the lower right corner of the window. So, we figured out how to open hosts as an administrator, it's time to understand how to edit it and why you need it.
How to change hosts in Windows 8 or 8.1
The hosts content in Windows 7, 8 and 8.1 is the same and looks something like thisIf you know well English, then in the upper part you can read a small text about the purpose of the file, but for sure you will have it in Russian. We will edit the lower part by adding or deleting addresses.
Line 127.0.0.1 localhost is the local machine you are running on. If the http server is not running on your computer, you can use the address 127.0.0.1 to block unwanted sites. Add the line 127.0.01 site.ru (the address of the blocked resource). You can add as many such lines as you like.
Listed sites will not open in any of the web browsers on the local machineThe method is suitable for prohibiting access to sites dangerous for children. For the changes to take effect, you need to save the hosts file. Computer restart required. If you change the hosts file in Windows 7, the added sites will not work until you delete the entries about them and save. On the contrary, if malware, added your entries, you can delete them, thereby opening access to the desired sites or erasing entries about redirection to resources that steal passwords, extort money or infect your computer.
Editing hosts in Windows 7
Changing hosts in Windows 7 is no different procedure. It lies at the same address, edited with a notepad through administrator rights. Sometimes it is not possible to modify the hosts file. The reason is viruses: some overwrite and do not allow changing hosts. Therefore, before trying to overwrite and save, check your computer for viruses. It is advisable to use several programs in turn for an accurate result. There is a large selection of anti-virus scanners on the Internet that do not require installation on a hard drive.
Create a shortcut to edit hosts
- To quickly open the domain database, you can place a launch shortcut on the desktop.
- Right click on an empty desktop.
- Next, you need to select "Create" -> "Shortcut".
It means that the file at the specified address will be opened by the Notepad program.
- Click on "Next" and assign a name to the shortcut so that it opens the desired file with administrator rights.
Now you manage domains and IP addresses on your computer.
WATCH THE VIDEO
Now you know how to change the hosts file in Windows. Ask questions to specialists.
In the process of working with the windows 7 operating system, you may find that the hosts file is missing in the proper place and you do not know where it is. Usually the path to it was like this: C: \ windows \ system32 \ drivers \ etc \, however, when switching to drivers, the etc directory is absent, and there is also no way to create it yourself.
So how do you edit the hosts file?
To do this, you should find Notepad program(yes, this is the same ordinary notepad) in the C: \ windows \ folder and run it as administrator (right-click on the icon and select "Run as administrator").
After starting notepad, open the hosts file in it, for this click "File" - "Open" and enter the following path C: \ windows \ system32 \ drivers \ etc. After going to this folder, the file we need is still not visible, but despite this, enter hosts in the "File name" field and click "OK". The file will be opened for editing.
Remember that the standard hosts file (you can download it from our website by clicking on the link), which has not been modified by computer users or malware, should only contain the value 127.0.0.1 localhost! Also, everything behind the # sign is a comment and does not affect anything.
You may be interested in the following materials
KZNcomputer.ru
How to change the hosts file
The hosts file is designed to match domain names (sites), which are written using characters, and the corresponding IP addresses (for example, 145.45.32.65), which are written as four numbers. You can open any site in the browser not only after entering its name, but also after entering the IP address of this site.
On windows, a query to the hosts file takes precedence over a query to DNS servers. At the same time, the contents of this file are controlled by the computer administrator himself.
Therefore, quite often malware tries to modify the contents of the host file. Why are they doing this?
They do this to block access to popular sites, or to redirect the user to other sites. There, at best, he will be shown advertising, and at worst, a fake page of a popular resource will be opened (social network, service window Email, online banking service, etc.), with a request to enter data from your account to enter the fake site.
Thus, due to the user's carelessness, an attacker can gain access to the user's data and harm him.
Where is the hosts file located?
The hosts file is located in the folder with the windows operating system, usually this is the "C" drive on the user's computer.
The path to the hosts file will be like this:
C: \ windows \ System32 \ drivers \ etc \ hosts
You can manually go through this path, or immediately open the folder with the host file using a special command.
For quick access to the file, press the "windows" + "R" key combination on the keyboard. This will open the Run window. In the "Open" field, enter either the path to the file (see above), or one of these commands:
% systemroot% \ system32 \ drivers \ etc% WinDir% \ System32 \ Drivers \ Etc
Then click on the "OK" button.


This file has no extension, but it can be opened and edited in any text editor.
The standard contents of the hosts file
In the windows operating system, the "hosts" file has the following standard content:
# Copyright (c) 1993-2009 Microsoft Corp. # # This is a sample HOSTS file used by Microsoft TCP / IP for windows. # # This file contains the mappings of IP addresses to host names. Each # entry should be kept on an individual line. The IP address should # be placed in the first column followed by the corresponding host name. # The IP address and the host name should be separated by at least one # space. # # Additionally, comments (such as these) may be inserted on individual # lines or following the machine name denoted by a "#" symbol. # # For example: # # 102.54.94.97 rhino.acme.com # source server # 38.25.63.10 x.acme.com # x client host # localhost name resolution is handled within DNS itself. # 127.0.0.1 localhost # :: 1 localhost
This file is similar in content to operating systems ah windows 7, windows 8, windows 10.
All entries that start with the hash character #, and continue to the end of the line, by and large do not matter to windows, since these are comments. These comments explain what this file is for.
It says here that the hosts file is for mapping IP addresses to site names. Entries in the hosts file will need to be made according to certain rules: each entry must begin with new line, the IP address is written first, and then the site name after at least one space. Further, after the hash (#), you can write a comment to the entry inserted into the file.
These comments do not affect the operation of the computer in any way, you can even delete all these entries, leaving only an empty file.
You can download the standard hosts file from here for installation on your computer. It can be used to replace a modified file if you do not want to edit the hosts file yourself on your computer.
What you should pay attention to
If the file on your computer is no different from this, standard file, then this means that there are no problems that could arise due to the change of this file malware is not on your computer.
Pay special attention to the contents of the file after these lines:
# 127.0.0.1 localhost # :: 1 localhost
Additional records can be inserted into the host file, which are added here by some programs.
For example, in this image, you can see that the Unchecky program has added some entries to the standard contents of the hosts file. Additional records were inserted between the commented lines to perform specific actions. This was done so that during the installation of programs on my computer, this utility rejects unwanted software.

There may be additional lines of this type: first, "a set of numbers", and then after a space, "site name", added in order, for example, to disable advertising in Skype program, or block access to any site.
If you yourself did not add anything to the hosts file, and do not use the program (Unchecky) mentioned in this article, then you can safely remove incomprehensible entries from the host file.
Why change the hosts file?
The hosts file is modified in order to block access to a specific resource on the Internet, or in order to redirect the user to another site.
Usually, initially malicious code is executed after launching the program downloaded from the Internet. At this point, changes are automatically made to the properties of the browser shortcut, and quite often additional lines are added to the hosts file.
To block a site (for example, the VKontakte site), lines of the following type are entered:
127.0.0.1 vk.com
For some sites, two variants of the site name may be entered with "www" or without this abbreviation.
You yourself can block unwanted sites on your computer by adding a similar entry to the host file:
127.0.0.1 site_name
In this entry, the IP address (127.0.0.1) is the address on your computer's network. Next is the name of the site that you need to block (for example, pikabu.ru).
As a result, after entering the name of the site, you will see a blank page from your computer, although the name of this web page will be written in the address bar of the browser. This site will be blocked on your computer.
When using a redirect, after entering the name of the desired site, a completely different site will be opened in the user's browser, usually a web page with an advertisement, or a fake page of a popular resource.
To redirect to another site, records of the following type are added to the host file:
157.15.215.69 site_name
First comes a set of numbers - the IP address (I wrote here random numbers for example), and then, after the space, with Latin letters the name of the site will be written, for example, vk.com or ok.ru.
The scheme of operation of this method is approximately the following: bad people specially create a fake (fake) site with a dedicated IP address (otherwise this method will not work). Next, an infected application enters the user's computer, after which the changes are made in the hosts file.
As a result, when a user types the name of a popular site in the address bar of the browser, then instead of the desired site, they transfer it to a completely different site. This could be a fake page. social network, which is designed to steal the user's personal data, or a site with intrusive advertising... Very often, from such a fake site, there are redirects (redirects) to many other specially created pages with ads.
How to edit the hosts file
You can change the contents of the host file yourself by editing it with a text editor. One of the most simple ways, to be able to change the file, open the hosts file in Notepad by opening the program as administrator.
To do this, create a shortcut to the Notepad utility on the Desktop, or run the application in standard programs that are on the Start menu. To start, first click on the program shortcut with the right mouse button, and then select in context menu the item "Run as administrator". This will open the Notepad text editor window.
C: \ windows \ System32 \ drivers \ etc
After opening the "etc" folder, you will not see the "hosts" file, since the display will be selected in the Explorer text files... Select the All Files preference. After that, the hosts file will be displayed in this folder. Now you can open the hosts file in Notepad to edit it.
After you finish editing, save your changes to the hosts file. Please note that the file type when saving must be like this: "All files".

Conclusion
In the event that a malicious program has changed entries in the hosts file, you can replace the modified file with a standard one, or edit the contents of this file by removing unnecessary entries from there.
How to change the hosts file
vellisa.ru
How to change the hosts file in windows 7, XP, Vista: clearing the hosts file
Many have had problems with the hosts file when working on a computer. In today's article we will analyze what kind of file it is, what information it contains and what actions are possible with it.
First of all, you need to understand that our file is responsible for matching the site names to their IP addresses. For example, using this file, you can register a ban on visiting certain sites. However, first you need to find hosts on your computer. Typically the hosts file is located in the WINDOWS \ system32 \ drivers \ etc \ hosts folder for windows 7, Vista, and XP.
How the hosts file should look
Now let's figure out what the hosts file looks like, what it looks like if you open it. By the way, you should use notepad to open, since the file itself does not have an extension. Usually the contents of the file looks like this:

The last digits (in our case - 127.0.0.1) are the address of the computer on which you opened the file. it normal view hosts file. If, in addition to this information, something else is written in it, then you will have to edit the file to bring it back to its original state.
How to change the contents of the hosts file
If you need to change the hosts file (for example, viruses have sneaked into the file), then this can be done very simply. To view the file itself, open it with notepad, then change necessary information and save the file. Reboot your computer. All changes will take effect immediately.
Remember that to make changes to the hosts file, you must have administrator rights on the computer with which you plan to work. By the way, by editing hosts, you can prescribe in it a ban on visiting certain sites.
Thus, for example, you can protect your child working at the computer from information unnecessary for his age. You can prescribe the ban as follows: 127.0.0.1 site.ru This entry should go below 127.0.0.1 localhost ( next line).
How to clear the hosts file
Now let's consider a situation in which you need to clear the hosts file. This may be due, for example, to the fact that it contains a ban on visiting certain sites. In this case, you will be dealing with restoring your hosts file. The procedure will be very simple and familiar. First you need to open the file using notepad. Further - carefully! - you should delete entries after 127.0.0.1 localhost. And only then can the file be saved. Restart your computer - the changes will take effect immediately.
What if the hosts file is empty (no content)?
It may happen that the hosts file, which you decided to change, turns out to be empty, that is, when you open it with notepad, you will not see anything. There is no need to be afraid. This means that another file called hosts has appeared in the etc folder. And since you do not see it, then it is hidden. The first thing to do in such a situation is to see the file, for which in the folder properties set “show hidden folders, files and disks ". After that, you will see a second hosts file. Your next step will be to open the found file and work with it.
strana-sovetov.com
Editing and protecting the hosts file in windows 7 & Vista
In this article, we will talk about the "long-suffering" system file hosts, which often gets from the network "malware" that has leaked onto the computer. The hosts file does not have an extension, but in fact it is a regular text file and the built-in Notepad editor is enough to edit it. The purpose of this file is to store a list of domains and their corresponding ip-addresses. This is the list that the browser first of all accesses, after you enter, say, the domain name yandex.ru in the address bar, to find out that it corresponds to the address 77.88.21.11 that is understandable to the web browser. Now imagine that a malicious program has changed the "IP address" yandex.ru in the hosts file to the address of the "weedy" site it needs. Those. every time after typing a character in the browser yandex.ru you will find yourself on some XXX.com. Of course, this disgrace must be quickly stopped, for which you will have to go directly to the hosts file. In the article I will announce a guaranteed way to do this, since v latest versions windows developers commendably increased the security of the system, which in practice made life difficult for the users themselves: in some cases, the necessary system folder may not be visible, or the file itself may not be editable.

So, to bring the hosts file into a "divine" form, you should open "Notepad" on behalf of the administrator. To do this, go to the "Start" menu → then "All programs" → "Standard" → right-click on Notepad and select "Run as administrator" in the context menu (first screenshot).
In the emerging top panel click "File" → "Open" → further, in the address bar, specify the path to the desired folder - "C: \ windows \ System32 \ drivers \ etc" (without quotes). If the folder turns out to be empty, in the line "File name" write hosts and click "Open" (next screenshot).

The contents of the file can be compared with the original (in windows 7) and, in case of discrepancies, copied to yourself (see below).
# Copyright (c) 1993-2009 Microsoft Corp. # # This is a sample HOSTS file used by Microsoft TCP / IP for windows. # # This file contains the mappings of IP addresses to host names. Each # entry should be kept on an individual line. The IP address should # be placed in the first column followed by the corresponding host name. # The IP address and the host name should be separated by at least one # space. # # Additionally, comments (such as these) may be inserted on individual # lines or following the machine name denoted by a "#" symbol. # # For example: # # 102.54.94.97 rhino.acme.com # source server # 38.25.63.10 x.acme.com # x client host # localhost name resolution is handled within DNS itself. # 127.0.0.1 localhost
In principle, you can leave only one entry - 127.0.0.1 localhost, or even leave nothing - in any case, this is better than an outrage as in the screenshot below (a real example of editing the hosts file by a villain-virus).

As you can see, the virus blocked the updating of antivirus programs and access to social media sites, leaving them on local computer... To prevent this from happening, it is recommended to protect the file with the "Read-only" attribute by right-clicking on the hosts → "Properties" → on the first "General" tab, put a tick in front of the corresponding attribute.

I will tell you about what else useful you can do with the system hosts file at our next meeting.
Dmitry dmitry_spb Evdokimov
TestSoft.su
What is the threat of changing the hosts file in the windows 7 operating system
The hosts file in windows 7, as well as in other operating systems of the Microsoft family, is designed to assign the domain name of a certain resource to its IP address. This file is a system file, so the request goes through it before going to the provider's DNS servers. Hosts entries can be edited by a user with PC administrator rights.
Why might the system file be changed?
A huge number of viruses consider hosts a "tidbit" and use it to manage denials of access to popular Internet sites. In addition, through the substitution of matches of domains to addresses virus programs direct to fake pages, blocking access to real ones.
With the help of redirect (redirection), attackers achieve the following goals:
- A harmless joke. Used to play a trick on a friend and block access;
- Increasing the popularity of the site. When a search string for a known service is displayed on an unknown page, almost no one notices;
- Infection with viruses. One malicious program, having penetrated and changed the hosts file, directs it to infected sites through which other viruses spread;
- In order to block popular resources and extort money for visiting them through pop-up messages and advertisements;
- Hacking users. The most common goal of scammers is to find out your data from social media accounts and mail servers... This is done through special sites that are outwardly identical to the originals and with very similar addresses;
- In order to block anti-virus servers in order to deny programs access to updates.
To restore the broken site performance, you need to clear the hosts from unnecessary records.
Where to find it?
Many users cannot figure out where the hosts file is located. So, initially it has the following path: C: \ windows \ System32 \ drivers \ etc. However, with the help special programs this path can be modified to improve protection against malware.
In order to see this file, you must be a system administrator, otherwise it will be blocked. This condition is also required in order to edit it. There are several ways to get to the content:
- In the start menu search bar enter the path:% systemroot% \ system32 \ drivers \ etc;
- Open any folder, click on the address bar and change it to: C: \ windows \ System32 \ drivers \ etc and you will be taken to the directory where the hosts file is located;
- Call the search window with the "F3" key and find the hosts file.

How do I open and edit it?
Find a file is not like that a big problem how to change hosts. The fact is that it has no extension, and therefore no binding to a specific program either. It will not work to open it by pressing the button.
The hosts file is the file that is responsible for the correct operation of your web browsers. It maps IP addresses to domain names. It depends on his work which sites and how they will open. Therefore, this file often becomes the target of virus programs that block browsers.
Where this file is located, and how to restore it after damage in Win 7, we will consider further.
In Windows 7, this file is located at the specified address: C: WINDOWS SYSTEM32 DRIVERS ETC. To access it, just enter this path in the address bar and press Enter.

Mostly this file is hidden, so before that you should enable the hidden files view mode. To do this, in the menu windows windows"Service" - "Folder Options" - select the "View" tab and in it put the switch opposite "Show hidden files and folders".

Next, the hosts file does not need to be edited, We open it using the Notepad program and delete all unnecessary. By default, this file should look like this.
Save it and restart your computer. It should be remembered that if extraneous entries appear in this file, then it is imperative to check your operating system for viruses and remove them. If this is not done, then the virus programs will block the operation of your browsers again.
The hosts file is located on the path C: WindowsSystem32Driversetchosts (if C- system disk). You can open it with a regular notepad. If you did not make changes to the hosts file, then the following will be written there:
Windows XP hosts file:
#
#
# space.
#
#
# For example:
#
127.0.0.1 localhost
Hosts file in Windows Vista:
#
# This is a sample HOSTS file used by Microsoft TCP / IP for Windows.
#
# This file contains the mappings of IP addresses to host names. Each
# entry should be kept on an individual line. The IP address should
# be placed in the first column followed by the corresponding host name.
# The IP address and the host name should be separated by at least one
# space.
#
# Additionally, comments (such as these) may be inserted on individual
# lines or following the machine name denoted by a "#" symbol.
#
# For example:
#
# 102.54.94.97 rhino.acme.com # source server
# 38.25.63.10 x.acme.com # x client host
127.0.0.1 localhost
:: 1 localhost
Windows 7 hosts file:
# Copyright (c) 1993-2006 Microsoft Corp.
#
# This is a sample HOSTS file used by Microsoft TCP / IP for Windows.
#
# This file contains the mappings of IP addresses to host names. Each
# entry should be kept on an individual line. The IP address should
# be placed in the first column followed by the corresponding host name.
# The IP address and the host name should be separated by at least one
# space.
#
# Additionally, comments (such as these) may be inserted on individual
# lines or following the machine name denoted by a "#" symbol.
#
# For example:
#
# 102.54.94.97 rhino.acme.com # source server
# 38.25.63.10 x.acme.com # x client host
# localhost name resolution is handled within DNS itself.
# 127.0.0.1 localhost
# :: 1 localhost
Windows 8 hosts file
#
# This is a sample HOSTS file used by Microsoft TCP / IP for Windows.
#
# This file contains the mappings of IP addresses to host names. Each
# entry should be kept on an individual line. The IP address should
# be placed in the first column followed by the corresponding host name.
# The IP address and the host name should be separated by at least one
# space.
#
# Additionally, comments (such as these) may be inserted on individual
# lines or following the machine name denoted by a "#" symbol.
#
# For example:
#
# 102.54.94.97 rhino.acme.com # source server
# 38.25.63.10 x.acme.com # x client host
# localhost name resolution is handled within DNS itself.
# 127.0.0.1 localhost
# :: 1 localhost
As you can see, regardless of the version, the host file is not very different, but if the virus "worked" on the hosts file, various sites and IP-schnicks can be added there. For example:
127.0.0.1 ftp.kаspеrskylab.ru
127.0.0.1 ids.kаspеrsky-labs.com
127.0.0.1 vk.com
127.0.0.1 drweb.com
Such additions in the file prevent you from accessing the specified sites.
1.2.3.4 ftp.kаspеrskylab.ru
1.2.3.4 ids.kaspersky-labs.com
1.2.3.4 vk.com
1.2.3.4 drweb.com
Such additions in the file when opening the specified sites will redirect you to other sites, possibly infected with viruses (IP 1.2.3.4 are fictitious).
If you find out that the hosts-file has changed, you need to fix it. In Windows XP, the file is simply opened with notepad, the necessary changes are made and saved (you must log in as an administrator). On other versions (Windows Vista, 7, 8), it is necessary to give the rights to modify the file. To do this, open the folder containing hosts C: WindowsSystem32Driversetc (if the C drive is system). Right click on hosts and select Properties.
Select the "Security" tab, then select the user under which you work on the computer / laptop (in this example this is pk-help.com) and click the "Change" button. The "Permissions for the hosts group" window will open, select the user again and assign full rights on the file, click "OK", in the "Properties: hosts" window, also "OK".
After that, open hosts with Notepad and return the file to initial state, when finished, save the changes.
This file is a system file and is located in the system partition of the disk in the WindowsSystem32driversetc folder. By its format, it is a plain text file named hosts, but without the name extension. It consists of text strings and can be edited by any text editor. Each of its lines can be either a comment (in this case, its first character is #), or a match, which has the format.
There must be one or more spaces between the address and the name. For example, line 102.54.81.91 rh.com binds host rh.com to its address 102.54.81.91. During its Windows installations 7 forms the standard content of this document, which looks like: How to restore hosts Sometimes a situation may arise when you need to restore the initial state of this file. It can arise either after it accidental deletion or distortion, or as a result of exposure to malware.
It should be said right away that to access this file (including when restoring it), you need administrator rights. Its content can be generated manually in a text editor or downloaded from the Internet. Editing hosts Of course, in order to edit hosts, you need to have administrator rights. You can edit it with any text editor. As an example, we will use the standard Notepad, which is always installed in Windows 7.
It can be launched in two ways - from the command line and by directly calling Notepad: Launching Notepad from the command line. You need to perform "Start" - "Standard" - " Command line» ( right button mouse - "Run as administrator"). A window for entering a command line will open, in which you need to type the command notepad C: WindowsSystem32driversetchosts. A Notepad window will appear with the contents of the file. Direct call to Notepad.
You need to follow the path indicated for the case of the command line, but instead of "Command line" you need to specify "Notepad". An empty notepad window will appear. Through the menu item "File" you need to get to etc folders and open it. If it does not show the hosts name, then it should be set manually in the "File name" field at the bottom of the Notepad window. After any changes to this document, be sure to reboot, otherwise its new content will not be known to Windows 7, since it becomes known only during the reboot.
The benefits and harms of hosts changes Useful changes to this file can be considered, for example, the following: Setting the correspondence between the IP address and the domain in order to speed up access to the site by bypassing the DNS server. Changes to block access to a specific site, for example, to block Windows authentication or the availability of program updates.
To do this, 127.0.0.1 is specified as the IP address, which the operating system perceives as a call to this computer rather than a real site. Changes to "advertise" this computer local server, because DNS service knows nothing about him. Of course, for this to happen, the IP address must be static. Hosts are a prime target for most malware. There are two main, one might say "classic" methods of modifying this file, which are used by cybercriminals in order to take advantage of this.
These are the following changes: Blocking access to the servers of anti-virus programs so that the computer cannot download such a program or update the virus syndrome databases. For example, if a line like "127.0.0.1 esetnod32.ru" appears in hosts as a result of a virus or trojan, then any attempts to enter the site with this antivirus will be blocked. Substitution of the real address of the site registered on DNS server, on a fake one.
Suppose a malicious application that has penetrated a computer writes in this file the line "91.81.71.61 vk.com", where the address of the computer of the author of this program is set. This is done so that attempts to enter everyone's favorite site lead to a call to the attacker's server, whose interface completely repeats its real counterpart, but is used to collect confidential information about site users, for example, their logins and passwords.
Therefore, if you suspect the presence of viruses in the system, you should first check the status of this file, and that is why many antivirus software tirelessly monitor its status and notify the user of all attempts to change it.
Where is the hosts file located?
The hosts file is located in the folder with the Windows operating system, usually this is the "C" drive on the user's computer.
The path to the hosts file will be like this:
C: WindowsSystem32driversetchosts
You can manually go through this path, or immediately open the folder with the host file using a special command.
For quick access to the file, press the keyboard shortcut "Windows" + "R". This will open the Run window. In the "Open" field, enter either the path to the file (see above), or one of these commands:
% systemroot% system32driversetc
% WinDir% System32DriversEtc
Then click on the "OK" button.
hosts file in folder
This file has no extension, but it can be opened and edited in any text editor.
The standard contents of the hosts file
In the Windows operating system, the "hosts" file has the following standard content:
# Copyright (c) 1993-2009 Microsoft Corp.
#
# This is a sample HOSTS file used by Microsoft TCP / IP for Windows.
#
# This file contains the mappings of IP addresses to host names. Each
# entry should be kept on an individual line. The IP address should
# be placed in the first column followed by the corresponding host name.
# The IP address and the host name should be separated by at least one
# space.
#
# Additionally, comments (such as these) may be inserted on individual
# lines or following the machine name denoted by a "#" symbol.
#
# For example:
#
# 102.54.94.97 rhino.acme.com # source server
# 38.25.63.10 x.acme.com # x client host
# localhost name resolution is handled within DNS itself.
# 127.0.0.1 localhost
# :: 1 localhost
This file is similar in content to the operating systems Windows 7, Windows 8, Windows 10.
All entries that begin with a hash # character and continue to the end of the line are largely irrelevant to Windows, as they are comments. These comments explain what this file is for.
It says here that the hosts file is for mapping IP addresses to site names. Entries in the hosts file will need to be made according to certain rules: each entry must start on a new line, first the IP address is written, and then, after at least one space, the name of the site. Further, after the hash (#), you can write a comment to the entry inserted into the file.
These comments do not affect the operation of the computer in any way, you can even delete all these entries, leaving only an empty file.
You can download the standard hosts file from here for installation on your computer. It can be used to replace a modified file if you do not want to edit the hosts file yourself on your computer.
What you should pay attention to
If this file on your computer is no different from this standard file, then this means that there are no problems that could arise due to modification of this file by malicious programs on your computer.
Pay special attention to the contents of the file after these lines:
# 127.0.0.1 localhost
# :: 1 localhost
Additional records can be inserted into the host file, which are added here by some programs.
For example, in this image, you can see that the Unchecky program has added some entries to the standard contents of the hosts file. Additional records were inserted between the commented lines to perform specific actions. This was done so that during the installation of programs on my computer, this utility rejects unwanted software.
Added entries
There may be additional lines of this type: first "a set of numbers", and then after a space, "site name", added in order, for example, to disable advertising in Skype, or to block access to a site.
If you yourself did not add anything to the hosts file, and do not use the program (Unchecky) mentioned in this article, then you can safely remove incomprehensible entries from the host file.
Why change the hosts file?
The hosts file is modified in order to block access to a specific resource on the Internet, or in order to redirect the user to another site.
Usually, the initially malicious code is executed after launching a program downloaded from the Internet. At this point, changes are automatically made to the properties of the browser shortcut, and quite often additional lines are added to the hosts file.
To block a site (for example, the VKontakte site), lines of the following type are entered:
127.0.0.1 vk.com
For some sites, two variants of the site name may be entered with "www" or without this abbreviation.
You yourself can block unwanted sites on your computer by adding a similar entry to the host file:
127.0.0.1 site_name
In this entry, the IP address (127.0.0.1) is the address on your computer's network. Next is the name of the site that you need to block (for example, pikabu.ru).
As a result, after entering the name of the site, you will see a blank page from your computer, although the name of this web page will be written in the address bar of the browser. This site will be blocked on your computer.
When using a redirect, after entering the name of the desired site, a completely different site will be opened in the user's browser, usually a web page with an advertisement, or a fake page of a popular resource.
To redirect to another site, records of the following type are added to the host file:
157.15.215.69 site_name
First, there is a set of numbers - the IP address (I wrote random numbers here for an example), and then, after a space, the name of the site will be written in Latin letters, for example, vk.com or ok.ru.
The scheme of operation of this method is approximately the following: bad people specially create a fake (fake) site with a dedicated IP address (otherwise this method will not work). Next, an infected application enters the user's computer, after which the changes are made in the hosts file.
As a result, when a user types the name of a popular site in the address bar of the browser, then instead of the desired site, they transfer it to a completely different site. This can be a fake social media page designed to steal user personal data, or a website with intrusive ads. Very often, from such a fake site, there are redirects (redirects) to many other specially created pages with ads.
How to edit the hosts file
You can change the contents of the host file yourself by editing it with a text editor. One of the easiest ways to be able to change a file is to open the hosts file in Notepad by opening the program as an administrator.
To do this, create a shortcut to the Notepad utility on the Desktop, or run the application in standard programs found in the Start menu. To start, first click on the program shortcut with the right mouse button, and then select the "Run as administrator" item in the context menu. This will open the Notepad text editor window.
C: WindowsSystem32driversetc
After opening the "etc" folder, you will not see the "hosts" file, since the display of text files will be selected in Explorer. Select the All Files preference. After that, the hosts file will be displayed in this folder. Now you can open the hosts file in Notepad to edit it.
After you finish editing, save your changes to the hosts file. Please note that the file type when saving must be like this: "All files".
In the event that a malicious program has changed entries in the hosts file, you can replace the modified file with a standard one, or edit the contents of this file by removing unnecessary entries from there.
How do I open and modify the hosts file?
The hosts file can be opened with standard Notepad Windows.
This is probably the most interesting part of the article.
First of all, you need to understand, why change this file at all? Yes, in order to deny access to certain sites. Thus, by changing this file and registering the site address in it, the user will not be able to access it through any browser.
In order to change the hosts file, it is advisable to open it as an administrator (How to run a file or program as an administrator) by right-clicking on the file and selecting "Run as administrator". Or open Notepad in this way and open the file in it.
For quick action, you can just click the Start button and select Run (win + r) (What to do if there is no Run in Start) and enter in the line:
notepad% windir% system32driversetchosts
how to open the hosts file
As a result, this file will open in Notepad.
In order to block access to the site (suppose it will be test.ru), you just need to add a line with this site to the very bottom:
127.0.0.1 test.ru
As a result, the file will have the following content:
# Copyright (c) 1993-1999 Microsoft Corp.
#
# This is a sample HOSTS file used by Microsoft TCP / IP for Windows.
#
# This file contains the mappings of IP addresses to host names. Each
# entry should be kept on an individual line. The IP address should
# be placed in the first column followed by the corresponding host name.
# The IP address and the host name should be separated by at least one
# space.
#
# Additionally, comments (such as these) may be inserted on individual
# lines or following the machine name denoted by a "#" symbol.
#
# For example:
#
# 102.54.94.97 rhino.acme.com # source server
# 38.25.63.10 x.acme.com # x client host
# This HOSTS file created by Dr.Web Anti-rootkit API
# 127.0.0.1 localhost
# :: 1 localhost
127.0.0.1 test.ru
Each new site that you want to block, you need to start on a new line and register, not forgetting the local IP address 127.0.0.1
Also, to edit the hosts file, there is the HOSTS EDITOR program, which you can download and read the description from the official website.
The principle of her work is that she helps to edit the hosts file.
From the screen below, the principle of its operation is clear, everything is done in a couple of clicks. Adding is done by clicking on +.
how to edit the hosts file
After editing, do not forget to click on the save button (2 "Save changes" button to the left of the "+" button).
You can also change this file for good purposes, for example, speed up the loading of the site.
How it works?
When you enter the site, you see it Domain name which has letters. But all sites on the Internet have an IP address, and names are already assigned using DNS. I will not go into the details of this process, the article is not about that. But here you need to know that the hosts file has priority when accessing sites, and only after it request is in progress to DNS.
In order to speed up the loading of the site, you need to know its IP address and domain.
The IP address of a site can be found using various services, such as this or this.
Domain is the name of the site.
For example, we will speed up the loading of this site, where you are reading an article, by explicitly specifying the IP address and domain to the file.
Then the added line will be:
91.218.228.14 vindavoz.ru
This speeds up page loading in a couple of seconds, and sometimes can give access if by standard means You cannot enter the site.
You can also redirect to another site using the hosts file.
To do this, you need to know the IP address of the site and its domain (as in the above case), then the added line will be like this:
91.218.228.14 test.ru
And now, after entering the test.ru site into the address bar of the browser, you will be redirected to the site specified in the IP address. In this case, the site vindavoz.ru.
If you want to clean the hosts file, you can do this by simply deleting the content and pasting the original text from the description above (under the spoilers).
Some nuances in the hosts file:
Always check to see if you have a scrollbar on the side and always scroll to the bottom of the window. this is due to the fact that some viruses are registered in the area hidden outside the window.
In some cases, usually if you cannot save the file, you need to enter under account Administrator.
Sometimes, due to viruses, this file can be hidden. Read the article Hidden files and folders.
The two described methods (redirection and acceleration) may not produce the desired result. The fact is that several sites can be located on one IP address, this is especially true for external IP addresses that are provided by services.
Due to the fact that viruses love this file, its attributes can be changed to Hidden and Read-only.
Check the file attributes if the hosts file cannot be saved.
Thus, you can easily and free of charge block access to sites in Windows by edits to the hosts file
I already managed to tell about the hosts file. For example, I wrote about how, for various operating rooms Windows systems... Today I want to talk about how to change hosts. Why is it so important? The fact is that when editing this file, users usually receive an "Access Denied" message. And the thing is that hosts must be opened on behalf of the administrator.
Why open this file at all? For example, you use your favorite social networks like VK or Odnoklassniki. At some point, when you enter your page, you see that the site asks you to send a message to short number- ostensibly to confirm the identity. But in fact, these are the tricks of scammers and a Trojan. Using the hosts file, you can redirect the user to a completely different site, which only outwardly looks like the official site of a social network. In fact, this is another site, and by sending SMS messages to a short number, the user simply enriches the scammers. It is noteworthy that the address of the site itself in the address bar of the browser does not change, so it is difficult for the user to guess that he is on a fake site. In this case, the necessary domains and ip-addresses for redirection, which need to be deleted, are registered in the hosts file. However, this is just one reason why the user may need to change the data in the specified file.
Now let's get down to the process itself. That in the case of Windows 8 (8.1), that in the case of Windows 7, the procedure will be virtually the same. I'll show you an example on Windows 7.
Click on the "Start" button and in the line "Find programs and files" write the word notebook(just like that - without quotes). When you see the notepad shortcut, right-click on it and select "Run as administrator".

A notepad will open in front of you with blank page... This is exactly what we need. Click "File" - "Open".

A folder will open in front of you. At the bottom of the screen there is a line called "File name". Enter the phrase into it C: \ Windows \ System32 \ drivers \ etc \ hosts as shown in the screenshot and then click Open.

After you click the "Open" button, the contents of the hosts file will open, in which you can modify the data and save them. So, if you change any data, just close the document and the system will ask you if you need to save the changes.

If you periodically work with the hosts file and want to have constant access to it as an administrator, you can create a shortcut on your desktop. There is nothing difficult here: you press the right mouse button and create a shortcut.

In the object location field, write the following: notepad c: \ windows \ system32 \ drivers \ etc \ hosts and click on the "Next" button.

The desktop shortcut is created. Go to the shortcut properties (right mouse button on the shortcut - "Properties"), select the "Shortcut" tab. On this tab, click the "Advanced" button.

Check the box "Run as administrator" and click OK.

Now, when you run this object, you instantly get access to the hosts file, and even as an administrator.
The hosts file is responsible for matching site names to their IP addresses. With its help, they often solve some specific tasks, for example, they prohibit access to some sites or give names to virtual sites when developing them on personal computer... However, sometimes problems arise when working with the hosts file. Let's deal with them.
Where is the hosts file in Windows 7?
By default, the hosts file is located in the system folder % systemroot% \ system32 \ drivers \ etc \ which is the same on most computers C: \ windows \ system32 \ drivers \ etc \.
However, it is hidden from prying eyes and if you do not enable in the folder settings "display of hidden and system files”, Then you may not find it there.
How do I change the contents of the hosts file in Windows 7?
You must have administrator rights to edit the hosts file. Otherwise, you can only view its contents.
To change the file, right-click on any text editor, such as notepad, and click "Run as administrator", after which you can open the hosts file, edit it and save it. All changes will start working immediately.
Why is the hosts file not working on Windows 7?
Sometimes the hosts file stops working. He is there. Is in its proper place. There are no mistakes in it. But the hosts file does not work. I have often noticed this behavior on computers with installed antivirus from Kaspersky Lab, as well as when using webserver assemblies for website developers, for example Denwer.
And always the problem turned out to be in the rights to the file. The easiest way to solve this problem is as follows. Copy the contents of the hosts file to any document, delete the hosts file and restart your computer. Instead of the old one, the system will independently create a default file with the necessary rights, and by editing it you can already work with it.