The Windows 7 operating system provides the ability to create multiple accounts: administrator, standard user, and even a guest. For many users who work with this OS, during any operation on the computer (from installing simple games and even to moving files), a window pops up in which you need to give permission for this action. The function is called "Administrator". In some cases, it is necessary to turn it off.
Instruction
The Windows system of the seventh version is capable of simultaneously supporting several accounts for users: regular, administrator, and guest. Once created, they can be removed. The administrator cannot disable and block the account from the user interface on the control panel. The user should know how to disable the administrator of Windows 7.
Detailed instructions on how to disable admin from Windows 7
We need to act as follows:
- When there are several accounts on the same computer, you should log in using the account created under the name “Administrator”. After the final launch of the OS, you need to open the control panel through the start menu.
- In the window you need to enter the viewing column to select the type of small and large icons. This accelerates the search for the desired item. The necessary item is located in the section "System and Security". This window has its own subsections for controlling functions. Here you have to select the "administration" button.

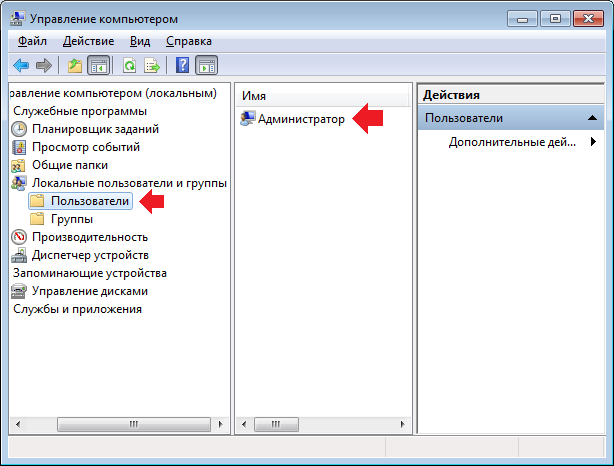
- On the panel, select the computer management that is started by double-clicking the mouse. In the appeared window on the left there will be a section with local users and groups. Among the folders that arise, you need to select the one that bears the name "Users". It stores data about accounts created on the device.
- Next, note the account with the status of the administrator and open it. In the new tab, you can get acquainted with the properties of the account, and disabling the function is carried out by removing the check mark opposite the inscription. It needs to be moved to the account disable field.

- The process of disabling administration is carried out through the command line. There the phrase "Net user Administrator / Active: no" is written. Then press the Enter key. After that, the system sends a message to disable the function.
What to do if you need to connect the Administrator feature?
To enable Administrator rights, you will need to open a utility called “Run” using the Win + R button combination. Then the phrase is entered: control userpasswords2. At the end of this action, a window opens with a user account.
![]()
Here you will need to click on the additional tab and click the button. In the next window, on the left side, click on the item with users and in the middle (twice) - on the inscription "Administrator". After these actions, the tick off the item to disable the account is removed, and to save the settings, the computer will have to restart.
The Windows 7 operating system provides the ability to create multiple accounts: administrator, standard user, and even a guest. For many users who work with this OS, during any operation on the computer (from installing simple games and even to moving files), a window pops up in which you need to give permission for this action. The function is called "Administrator". In some cases, it is necessary to turn it off.
Instruction
If you have multiple accounts on your computer, log in through an account that was created with the “Administrator” status. After the system is fully started, open the "Control Panel". This can be done through the Start menu.
In the window that appears in the column "View" should be selected as "Small or large icons." This will speed up the search for the desired item. If you choose from categories, then the item you need will be in the “System and Security” section. In this window, subsections will appear that are necessary to control all functions of the system. Select "Administration".
In this “Control Panel” item, find the “Computer Management” line. Launch it by double-clicking. In the newly opened window, in its left part, expand the section “Local users and groups”. You will see two folders. Select "Users". It stores information about all accounts that were previously created on the computer.
Select the account that has the status of "Administrator". Open it also with a double click. When a new tab appears, all properties of this account will be visible. In order to disable the "Administration" function, check the box next to "Disable account". After that, click OK.
You can also disable administration using the command line. To do this, open the “Start” menu, then the “Standard” section and the “Command Line” function. In it, write the following text: "Net user Administrator / Active: no". Then press the Enter key. The system will inform you that this feature is disabled. As a result of these actions, the “Administrator” account will be disabled. Exactly the same manipulations can be made to disable any other account.
Attention, only TODAY!
All interesting
The Windows operating system was originally designed for multiple users. In order to save the parameters of a particular user, it is necessary to create individual accounts for each of them. And if necessary, they can be ...
On the computer under control operating system Windows can run multiple users under different user accounts. If the account is disabled, this member will not be able to log in. Instruction 1To enable the account, ...
One of the features of the operating room windows systems Vista version is that the “Administrator” account is disabled by default, i.e. access of the owner belonging to the administrator group remains limited. Changing this ...
Getting user administrator rights in the operating system Windows version 7 implies the inclusion of a built-in, but by default, disabled computer administrator account. Instructions 1Please log in with your ...
The procedure for disabling the built-in administrator account implies a user that is a member of the local computer administrators group. Instruction 1Call context menu element of the desktop "My Computer" ...
Activation of the computer administrator account, disabled by default in Windows vista and Windows 7, may be necessary when executing system commands that run on behalf of the Administrator. Instruction 1Click ...
In some cases, a PC user may need to disable an account of a particular user. Please note that disabling an account is exactly the disconnect, not hers. Today I will show how to do it right.
First way
First we need to get into the control panel. To do this, click on the "Start" button and select the item with the same name.

The second option - click on the keyboard key WIN + R, a window will appear in which you need to write the word control and click OK.

The control panel is running. Here we find the item "Administration" and click on it.

In the new window, we see several different items, but we are only interested in one thing - "Computer Management". We go into it.

In the "Computer Management" window, click "Local users and groups", then click "Users" and select the user by double-clicking on it with the left mouse button.
The user properties window will open. To disable an account, check the box next to “Disable account” and click OK.

Second way
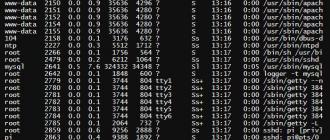
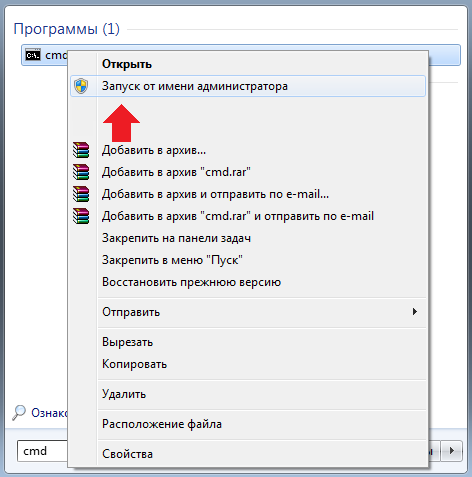
The second method allows you to disable the account using the command line. For this you need to open. Click the "Start" button, in the line "Find programs and files" write the word cmd. A command line shortcut appears at the top of the window. Click on it with the right mouse button and select "Run as administrator".
The command line is running. Now you need to add a command net user Username / Active: nowhere the user name is the account name, for example, net user Administrator / Active: no. After that, press the Enter key.

Be careful. When disconnecting multiple accounts, you yourself may not get into your account if you accidentally disable it.
Instruction
If you are ordinary user PC, and you do not need to greatly delve into the system processes and produce fine tuning operating system, it is best to disable admin computer. This procedure will be discussed on the example of the Windows 7 operating system. Click "Start" and open "Control Panel". In the control panel, select Add or Remove Accounts.
In the window that appears, click on "Create Account". Then in the window that opens, check "Normal access". Enter the name of your new account, then click on “Create an account.” A new account will be created. It will be used to enter the system.
Now open the “Control Panel” again and select the “Administration” component. A window will appear. In it, locate the Computer Management component and double-click it with the left mouse button. Then select the Local Users and Groups option. After that, left-click on the line "Users" and find in the list "Administrator computer».
Then click on this account with the right mouse button and select “Properties” in the context menu. Check the box next to "Disable this account." Click "Apply" and OK. Now restart your computer, after which it will start with your new account.
The procedure for disabling the built-in administrator account implies a user that is a member of the local computer administrators group.
Instruction
Call the context menu of the “My Computer” desktop item by right-clicking and specify the “Management” command to initiate disabling the built-in administrator account.
Expand the Local Users and Groups node in the left part of the application window and select the Users item.
Expand the “Administrator” option by double-clicking the mouse and go to the “General” tab of the dialog that opens.
Apply the checkbox for “Disable account” and confirm the application of the selected changes by clicking OK (for Windows XP).
Call the main menu of the operating system Microsoft Windows 7 by clicking the “Start” button and enter the cmd value in the text field of the search string.
Confirm the execution of the command by clicking the "Find" button and bring up the context menu of the found cmd.exe element by right-clicking.
Specify the “Run as administrator” command and enter the value of net user Administrator / active: no in the text box of the Windows command interpreter.
Confirm the command by pressing the Enter softkey and return to the Start menu for an alternative operation to disable the built-in computer administrator account.
Enter the value secpol.msc in the btrcnjdjt search field and confirm the execution of the command by pressing the Enter softkey.
Click the Local Policies menu in the left pane of the editor and select the Security Settings item.
Select "Accounts: Administrator account status" and select the "Disable" command (for Windows 7).
Return to the Start menu of the Windows 7 Professional operating system and enter the value lusrmgr.msc into the test field of the search string.
Confirm the command by pressing the Enter key and bring up the context menu of the Administrator account by right-clicking the mouse in the Local Users and Groups snap-in window that opens.
Select "Properties" and apply the checkbox in the "Disable account".
Confirm the command by clicking the OK button and exit the snap-in to apply the selected changes (for Windows 7 Professional).
Sources:
- Enable / Disable the built-in Administrator account in Windows 7
Changing user accounts, including changing passwords, is done in Windows through a special control panel applet. To start it, you need to log in to the system with the rights admin, but sometimes it is impossible - the password can be lost irretrievably. In such cases, you can reset the password. admin at the entrance into the system either using third-party programsor do everything manually. The second method is described below.

Instruction
To be able to reset the password admin You need to access the command line interface on the password entry screen when booting the OS. To do this, you must first boot without using the main system to make changes to the registry. Use the option that is available to you - installation disk, recovery disk, second OS, LiveCD or Windows PE disks.