Any amateur photographer and, moreover, a specialist is familiar with such a concept as negative. The word, which comes from the Latin negativus, means the opposite, negative meaning of color: brighter areas on the film turn out to be black, and vice versa. The brightness of the color also changes in the opposite direction, and the paler areas of the image end up being the most eye-catching.
Printing from negatives allows you to take clearer pictures, to correct some areas of the skin or clothing in the direction of their improvement. How do you make a negative out of a photo? The program Adobe Photoshop will come to the rescue.
Question "Photoshop CS3" - 1 answer
Instructions
1
Open the image to be converted to negative.
2
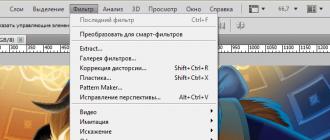
The next move is to invert the color.
Inversion is a change of colors to the opposite, reverse. The keyboard shortcut Ctrl + I will help to do this, or it is possible to perform the operation through the menu: "Image - Correction - Inversion" (Image - Adjustments - Invert). You will notice that the color of the original image has changed.
3
Many stop at the second step, but this is wrong, since the negative is not completely created. At the end of the inversion, it is imperative to desaturate your painting.
This can be done both from the keyboard - Shift + Ctrl + U, and through the menu: "Image - Correction - Desaturate" (Image - Adjustments - Desaturate). As you can see, the image has become completely black and white.
4
Then you need to correct the photo. The menu item "Image - Correction - Color saturation and tone" (Image - Adjustments - Hue / Saturation) will come to the rescue. Here, be sure to check the box next to the "Toning" (Colorize) option.
Then with the cursor change the values of the fields from top to bottom: hue - 209, saturation - 15, lightness remains the same, zero. Press OK.
5
The next move is to work on the ratio of light and shadow: “Image - Correction - Highlights / Shadows (Image - Adjustments - Shadows / Highlights). A new window for image correction will open.
If it's shallow, click on the bottom of "Show More". Change the indicators of light and tone, so that the image is more saturated and high quality. In the item "Shadows" - Shadows, set the following values: number - 0, width of the tonal range - 50, radius - 30 pixels. In the "Lights" menu: effect - 35, width of the tonal range of light - 75, radius - 30.
The values of color correction and contrast of midtones must be minus: color correction must be set at a level of -8, contrast of midtones -10.
6
Quite often, when creating negatives, the image is inverted. This can be done through the menu item "Image - reflection and rotation" (Image - Rotate Canvas).
Any function of the Photoshop program implies application in image processing, but giving a negative effect sometimes seems inappropriate, incomprehensible and remains idle. So, in this tutorial, we'll look at how you can apply the above effect.
We select an image (example). Duplicate the original layer. We apply the actions shown in the figures to it.

Apply the Camera raw filter to the layer that has become a negative. It is necessary to give clarity to the lines, to enhance the transmission of shadows.

Part of the girl's body and her face should be removed from the shadow area, but so that there is no fading. To do this, go to the channels, remove the visibility from RGB and select a more suitable channel with a clear pattern. Next, you need to use the "Color Range" function: the "Selection" tab to select the desired part of the image.

Use the eyedropper to select the part of the image that should be selected on the working background.

Copy the selected part. Return visibility to all channels. Remove visibility from the duplicate channel. Return to the Layers window. Paste the copied part of the image on a separate layer.

We carry out the flattening: select the image with the "Rectangular Region" tool and in the "Editing" tab press "Copy the combined data" and "Paste". Apply the Camera raw filter to the "flattening" layer.

Apply the "Cross-Stroke" filter to the "flattening" layer: "Filter" tab - "Filter Gallery".

Duplicate the "flattening" layer and apply "Gaussian Blur" to it.

Add a layer mask to the layer and fill it with black. In the mask, use a soft white brush to blur the skin area. The layer can be lowered opacity.

Use adjustment layers "Curves" and "Levels" to enhance the shadows and highlights.


Combine adjustment layers into a group. Add a mask to the group and fill it with black. In the mask, reveal some of the adjustment layers. Alternatively, you can apply to the adjustment layer, fill the mask with black and reveal some parts of the layer.

Perform flattening again and in the resulting layer with a hard type brush of white color, carefully, enlarging the image, paint over the areas with dirt.

RESULT

| Italiano | Ελληνικά | Norsk | Nederlandse | العربية | 繁體 中文
negative, In photography, the image is usually found on a strip or sheet of transparent plastic film that reproduces the bright parts of the photographed object in the dark and dark parts as light areas.
The reverse order occurs, since chemicals are extremely sensitive to light, use to capture an image quickly enough that normal photography is darkened rather than discolored by exposure to light and subsequent photographic processing.
Exposing sensitized paper to a negative, done either by placing the negative or paper in close contact, or by projecting the negative image onto the paper, cancels these tones and creates a positive photographic print.
There are two kinds of negatives:
- Black and white negatives: consist of grains of metallic silver, chemically reduced during the development process from silver salts, damaged by light during exposure;
- Color negatives: are composed of three inverse-backed images that are formed along with the silver image at design time.
With a basic understanding of what a negative image is, let's start learning how to make negative photo effects in easy ways.
The best way to create a negative photo with WidsMob Retoucher on Windows and Mac (macOS Catalina included)
WidsMob Retoucher is a professional positive and negative photo effects editor now available in Mac OS X. With it, you can easily add negative effects to your photos.

WidsMob Retoucher
WidsMob Photo Retoucher - helps you remove noise from high ISO, low light, high shutter speed, and more, using custom information for each image and apply saturation, contrast and grain to your digital images of the most legendary grain of the image. analog movies to give your photo a unique look.


Step 1: Add photo to WidsMob Retoucher for negative effect
Click "Open" to add the photo to the program or directly drag and drop the photo into the interface. Download and install WidsMob Retoucher on your Mac and then open this negative effect editing program. Click "Open" to add the photo to the program or directly drag the photo to the interface.

Step 2: Apply negative effect to your photo
Click the FILM PACK button on the top right sidebar. Select Color Negative Film from the Color Gamut Profile drop-down list.
As you can see the negative effect on photography at the same time for your operation, you can also choose Different film effects to change the negative color.
You can also change color modes by adjusting contrast, saturation, and custom tone, and adjust film grain and intensity.

After editing, click the Save button at the top of the main interface to directly save the photo to your Mac. You can change the name and add tags to your photo. You can also choose where to save, format (JPEG or TIFF) and photo quality before saving.

Check out the video tutorial below to make it easier:
Method 2: take a negative photo online with LunaPic
There are many online positive and negative photo editors on the internet, you can choose one of them to make your photo negative. Let's take Lunapic.com, for example, to do negative photo switching online.
1. Enter lunapic.com in your browser and find Negative For more information, see Filters.
2. Click the Select File button to select a photo from your computer, or directly enter the URL of your online image in the Open URL form to apply a negative effect.

You can also use another online video editor like IMGonline.com.ua, which can help you easily take a negative (or positive from negative) photo.
Just select the image on your computer or mobile phone, click the "OK" button on the Page button, then wait a few seconds and you can directly upload the negative photo.

Method 3: create negative photos with Expression Studio on Windows 10/8/7
If you are using a Windows computer, you can use the Invert Photo Negative filter in Expression Studio to invert the colors of an image. This filter is useful for converting a positive image to a negative, or for a positive result from a programmed negative value.
1. Open Expression Studio in Windows and select an image file.
2. Click "Image Editor" in the menu and then click "Undo Photo Negative".
3. Then click OK to invert the image in the Undo Photo Negation window and the negative image was saved successfully.

Method 4: make negative on iPhone / iPad
Step 1. Open "Settings" on your iPhone or iPad. This is a gray app that contains gears and sits on the home screen.
Step 2. Scroll down and tap General. Then click “Accessibility” in the middle of the individual section menu.
Step 3. Click Show Placement and move Invert Colors to On. It will turn purple and the colors on your device will now be inverted.

Instructions
The next step is to invert the color. Inversion is a change of colors to the opposite, reverse. The keyboard shortcut Ctrl + I will help to do this, or you can use the menu operation: "Image - Correction - Inversion" (Image - Adjustments - Invert). You will see that the color of the original image.
Many stop at the second step, but this is wrong, since the negative is not completely created. After inverting, be sure to desaturate your image. This can be done both from the keyboard - Shift + Ctrl + U, and through the menu: "Image - Correction - Desaturate" (Image - Adjustments - Desaturate). As you can see, the image is completely black and white.

Next, you need to correct the photo. The menu item "Image - Correction - Hue and Saturation" (Image - Adjustments - Hue / Saturation) will come to the rescue. Here, be sure to check the box next to the "Colorize" option. Next, use the cursor to change the values of the fields from top to bottom: hue - 209, saturation - 15, lightness remains the same, zero. Click OK.

The next step is to work on the ratio of light and shadow: "Image - Correction - Highlights / Shadows (Image - Adjustments - Shadows / Highlights). A new window for image correction will open. If it's small, click on Show More Options at the bottom. Change the tone and light values to make the image richer and better. In the item "Shadows" - Shadows set the following values: quantity - 0, width of the tonal range - 50, radius - 30 pixels. In the "Lights" menu: effect - 35, width of the tonal range of light - 75, radius - 30. The values of color correction and contrast of mid tones should be minus: color correction should be set at level - 8, contrast of mid tones - 10.