It's no secret that over time, as the computer works, the folder "Windows" filled with all sorts of necessary or not very necessary elements. The latter are usually called "garbage". There is practically no benefit from such files, and sometimes even harm, expressed in slowing down the system and other unpleasant things. But the main thing is that "garbage" takes up a lot of hard disk space that could be used more productively. Let's find out how to delete unwanted content from the specified directory on a Windows 7 PC.
Folder "Windows"located in the root directory of the disk FROM, is the most heavily clogged directory on a PC, since it is where the operating system is located. This is precisely the risk factor when cleaning, because if you mistakenly delete an important file, the consequences can be very depressing, and even catastrophic. Therefore, special delicacy must be observed when cleaning this catalog.
All methods of cleaning the specified folder can be divided into three groups:
- Using a third party software;
- Application of the built-in OS utility;
- Manual cleaning.
The first two methods are less risky, but the last option is still suitable for more advanced users. Next, we will consider in detail the individual ways to solve the problem.
Method 1: CCleaner
First, consider using third-party programs... One of the most popular computer cleaning tools, including folders "Windows", is an .
- Run CCleaner with administrative rights. Go to section "Cleaning"... In the tab "Windows" tick the boxes you want to clean. If you don't understand well what they mean, you can leave the default settings. Next click "Analysis".
- The selected PC items are analyzed for content that can be deleted. The dynamics of this process is reflected in percentage.
- After the analysis is complete, the CCleaner window will display information about how much content will be removed. To start the uninstallation procedure, click "Cleaning".
- A dialog box appears, indicating that the selected files will be deleted from the PC. You need to confirm your actions. To do this, press "OK".
- The cleaning procedure starts, the dynamics of which is also reflected as a percentage.
- After the specified process is completed, the CCleaner window will display information that will tell you how much space has been freed. At this point, the task can be considered completed and the program closed.


There are many other third-party applications available to clean up system directories, but most of them work the same way as CCleaner.
Method 2: Cleaning with the built-in toolkit
However, it is not at all necessary to use "Windows" some third-party software. This procedure can be successfully performed, limiting ourselves only to the tools that the operating system offers.
- Click "Start"... Go to "A computer".
- In the opened list hard drives right click ( PKM) by section name C... From the drop-down list, choose "Properties".
- In the opened shell in the tab "Are common" press Disk Cleanup.
- The utility starts Disk Cleanup... It analyzes the amount of data to be deleted in the section C.
- Then a window appears Disk Cleanup with a single tab. Here, as in working with CCleaner, a list of elements opens, inside which you can delete content, with the displayed amount of freed up space opposite each. By ticking the checkboxes, you indicate what exactly needs to be deleted. If you do not know what the names of the elements mean, then leave the default settings. If you want to clear even more space, then in this case, click "Clean up system files".
- The utility again evaluates the amount of data to be deleted, but this time taking into account the system files.
- After that, a window opens again with a list of elements in which the content will be cleared. This time, the total amount of data to be deleted should be larger. Check the boxes next to those items that you want to clear, or, conversely, uncheck those objects where you do not want to delete. After that press "OK".
- A window will open in which you need to confirm your actions by clicking "Delete files".
- The system utility will run the disk cleanup procedure Cincluding folder "Windows".


Method 3: Manual cleaning
You can also manually clear the folder "Windows"... This method is good in that it allows, if necessary, to point out individual elements. But at the same time, it requires special care, as there is a possibility of deleting important files.


Folder "Temp"
First of all, you can delete the contents of the folder "Temp"which is located in the directory "Windows"... This directory is quite susceptible to being filled with various "garbage", since temporary files are stored in it, but manual deletion of data from this directory is practically not associated with any risks.


Cleaning up folders "Winsxs" and "System32"
Unlike manual folder cleaning "Temp", corresponding directory manipulation "Winsxs" and "System32" is a rather dangerous procedure, which is better not to start without deep knowledge of Windows 7. But in general, the principle is the same as described above.

As you can see, there are three main options for cleaning the system folder. "Windows" on computers with Windows 7. This procedure can be performed using third-party programs, built-in OS functionality and manual removal elements. The last wayif it's not about clearing directory contents "Temp", it is recommended to use only advanced users who have a clear understanding of the consequences of each of their actions.
The state of the computer's hard disk affects the speed of Windows 7, since the system actively uses the free space of the drive for its own purposes. The disk stores installed applications, user data, and temporary and service files. A cluttered drive is slow, slowing down the entire computer. It's time to put things in order and completely clean the disk of debris.
Why do you need to clean your hard drive
Three reasons to clean your disc
- The need for free space. For the user, installed applications and Windows 7 itself requires a significant amount of free space on the drive. Many software manufacturers even list this parameter as one of the most important when describing the requirements for a computer's hardware.
- Stability of work. Non-existent links, "broken" files with reserved names, leftovers remote programs and drivers are often the cause of system and installed application crashes. The digital junk accumulated on your hard drive makes Windows 7 unpredictable.
- Work speed. Empty and useless files clog up the disk and put additional strain on the file system, slowing down Windows 7.
Where does the garbage come from?
- Caching. Web browsers use the hard drive for "caching", that is, intermediate storage of information downloaded from the Internet, as well as increasing the speed and stability of work. Unfortunately, they do not like to erase the recorded information after finishing work.
- Temporary files. Many applications create temporary storage of service information on disk: current settings, clipboard, intermediate copies and much more. They also do not seek to clean up this information on their own - the disk gets clogged.
- Remains of deleted applications. The uninstallation procedure does not always work flawlessly; often incomprehensible files and entire folders remain that are no longer needed by the user.
- Files Windows 7. The operating system creates many temporary, intermediate and work files. Emergency exits, random crashes and software conflicts turn many of them into digital junk.
Manual cleaning methods
Using the Disk Cleanup utility
The system utility for cleaning the hard drive erases temporary and unused files, and also cleans the recycle bin.
To run the utility, press the "Start" on-screen button, then select "All Programs" in the left column. In the list that opens, click "Standard", then the "System" folder.
Service utilities package is located in the "Standard"
Select "Disk Cleanup" from the list of utility utilities.

There is a separate utility for cleaning the disk
You can get to the same window using the search bar. To do this, press the "Start" button and type in search bar Disk Cleanup. Go to the active tab with the same name.

Search helps you find any window in the system
The most fast way to run the utility is to use the Run window: press the Win key combination (with windows icon) and R. In the small window that appears in the input line, type cleanmgr.exe and click "OK".

You can call the same window with a simple cleanmgr.exe command
The utility begins with the appearance of a small window in which we are asked to select one of the available logical drives for cleaning. Select the device and click "OK".

Selecting a device from the list
Windows 7 immediately starts scanning the drive for potential candidates for deletion.

Preliminary analysis
After completing the analysis, the utility offers to select the categories of files to be deleted. Some of them are already marked by default, others do not contain marks. For greater clarity, the window contains a brief summary of why the system perceives this information as garbage.

Choosing file types
Having finished with the choice, we press the “OK” button and confirm the decision. The procedure has started.
Advanced cleaning options are provided by the "Advanced" tab in the same window. However, it will only be visible to users with administrator rights. Therefore, first, we will restart the utility as administrator. To do this, having reached the already familiar "Disk Cleanup" menu item, we press the right mouse button on it, and in the opened context menu select "Run as administrator".

Running as administrator opens up additional options
After selecting a logical disk and completing the analysis, the Disk Cleanup window has acquired a new Advanced tab. We pass to it.

Another tab has appeared
The top "Clear" button leads to the "Programs and Features" system window with a list of applications installed on the computer. One of the ways to increase the amount of free disk space is to remove some applications.

Complete list of installed applications
We select applications that we can do without and remove them from the hard drive.
The bottom button "Clear" offers to free up some of the filled space by deleting system restore point files and shadow copying. Savings in this case come at the expense of safety. Additional restore points can be useful if, for example, the latter was created on a computer infected with a malicious program. Shadow copy files also store old copies of user files, which can help with corrupted core files. Therefore, the utility offers to confirm your desire to delete this information.

Deleting restore points is insecure
Through Windows Explorer
One of the most frequently used and familiar applications to any user is Windows 7 Explorer. Many actions to clean up the hard disk can be done directly from it.
Recycle Bin stores files deleted by the user in case they need to be restored. This is one of the reasons for the system messages about the lack of space on the hard disk, even when a lot of information has just been deleted - everything has moved to the Trash. Let's clean it up.
To do this, in the "Explorer" select "Trash" and click on it with the right mouse button. In the context menu that opens, go to the line "Empty Trash".

Right-click on "Empty Trash"
"Explorer" will ask us again if we are sure of our desire to permanently delete what is in the "Trash", and after confirmation, it will clean up. There will be more disk space.
Now let's move on to the disk itself. The already familiar cleaning procedure can be started from the "Explorer". To do this, first select the one logical drive, which we plan to free from unnecessary information, for example, the main system drive C: \\. Hovering the mouse cursor over it, press the right button, and in the context menu that appears, select the "Properties" line.

Selecting "Properties"
Window "Properties: Local disk (C :) ”contains several tabs. First, go to "General". Here you can see data on the availability of free space on the drive, as well as the "Disk Cleanup" button we need. We press it, we get into the familiar window of the profile utility.

Push the clear button
The "Tools" tab contains buttons that launch other useful functions:
- Run Check - scans the disk and looks for errors.
- "Defragment" - grouping information more convenient for file system way.
- "Archive ..." - the ability to create a copy on another medium important information as an archive.

There are few service utilities
After cleaning the main disk, you need to do the same with the rest of the logical devices.
The system performance will increase significantly if you free up enough space on the system drive (C: \\) by moving, for example, user information to other devices using Explorer.
System settings
To reduce the size of temporary files created by Windows 7, you can change some system settings... However, this should be done by experienced users, as incorrect edits can break the system.
Reduce the size of the paging file. Part disk space used by the system for virtual expansion of RAM. The paging file that is created has a significant size, approximately equal to the amount of RAM. For most applications, volume reduction virtual memory will not lead to negative consequences, so you can reduce it.
Press the "Start" on-screen button, type "System" in the search bar and go to the active line with the same name in the list of search results. In the large "System" window that opens, click on the "Additional system parameters" tab, which is located on the left. In the small window "System Properties", go to the "Advanced" tab, in which we press the upper on-screen button "Parameters" related to the item "Performance". The "Performance Options" window opens.
The window shows the size of the swap file. To reduce it, you need to click the "Change" on-screen button and set a new size or location on other disk devices.
Then you can turn off the hibernation function. This feature is especially useful for laptop owners. In normal sleep mode, the main power consumers of the computer (monitor, processor, hard disk) are turned off, but rAM not de-energized. This allows you to quickly start work from the same place in which it was interrupted, but is fraught with problems, if the battery runs out, the data in RAM will be lost. The hibernation utility saves the contents of RAM to the hard drive and completely shuts down the computer. When resuming work, the data is loaded into RAM again.
The advantage of hibernation over hibernation is energy independence, and the disadvantage is the need to create on the hard disk large file for storing the contents of RAM. Therefore, if the user does not plan to use hibernation, it can be turned off to free up additional free space.
Press "Start" and enter "Power supply" in the search bar. Go to the tab of the same name.

Go to the active line with the desired name
In the power plan selection window, the current mode is highlighted with a radio button. Click the active line "Power plan settings" next to it.

Choosing the setting of the current plan
Now you need to disable putting the computer into sleep mode. To do this, select the "Never" option in the "Put the computer into sleep mode" drop-down lists, and then click the "Save changes" button.

Save changes
In the same window, select the "Change advanced power settings" tab, located just below. A small window "Power supply" appears with a list of parameters in the main part. We find among them "Sleep" and sequentially set the values \u200b\u200b"Never".

Depriving the computer of sleep forever
Now no hibernation file will be created. But you need to erase the one that is already on the disk. To do this, use the "Run" window, which is called by the combination Win + R. In the input line, type the command powercfg –hibernate –off and click the “OK” button.

Erasing the hibernation file
If you later need to revert your changes, you will need to use the powercfg –hibernate –on command.
Special programs for cleaning debris
CCleaner
One of the best care programs for hard disc CCleaner even in limited free version has excellent functionality. The application interface is organized in a convenient matrix form, simple and straightforward. The first tab is called "Cleanup" and contains the Windows and Applications tabs, each of which contains a list of potentially junk file groups that are created by system utilities or applications. The default user is offered the most safe option choosing what to consider as unnecessary information, but everything is quite simple to change: just put or uncheck the box next to the filegroup name

Having decided on the list, you can estimate the potential volume of the freed up space, for which we press the "Analysis" button.

Analysis will reveal hidden reserves
If the results of the analysis do not suit us, you can revise the selection options in the tabs. It might be worth clearing the extra group. Otherwise, click "Cleanup", confirm our intention and start cleaning.

Click "OK" to confirm
CCleaner also provides a handy uninstall tool unnecessary applications... The "Remove Programs" utility has been placed in the "Tools" folder. The list takes up the main part of the window, contains all the basic information about the applications and two options for uninstallation. The "Uninstall" on-screen button launches the built-in uninstall utilities of the applications themselves, "Uninstall" forcibly erases the program and its traces in the system.

Removal of programs is organized very conveniently
The package contains the ability to clean not only the hard drive, but also the registry, startup list, and external media. To erase confidential information without the possibility of recovery, you can use the Erase Disks utility.

Guaranteed erasure is ensured by multiple passes
An additional advantage of the CCleaner package is a flexible system of settings that allows you to set the frequency of automatic cleanings, exceptions from deletion rules, or additional restrictions on the age of temporary files.
Video: how to install and use CCleaner
TuneUp Utilities (AVG PC TuneUp)
The complex optimization package TuneUp Utilities has been partially renamed after the rights to it were sold to a new owner. The application consists of a large set of utilities, some of which are designed to combat digital waste.

The list of functions is significant
For the convenience of the user, the utilities are combined into large blocks, including "Freeing up disk space".

This view is simpler and clearer.
The package is very easy to use, the interface is simple and friendly. To start work, of course, you should start the scan located in the "Maintenance" block.

Let's start with scanning
Then we select the block "Freeing up disk space" we need and run the procedures contained in it.
Basic hard drive cleaning utilities:
- Disk Cleaner. Cleans the hard drive from unnecessary information. These are mainly temporary files of the system and applications.
- Disk Space Explorer. Reveals hidden disk reserves by compiling a list of the 100 largest files on the drive.
- Duplicate Finder. Searches for files in various places on the disk. Clones are found even if they have different names.
- Browser Cleaner. A standalone utility that cleans up damaged and obsolete files created by one of several dozen of the most famous browsers.

There are several tools for cleaning
The disadvantages of TuneUp Utilities include the aggressiveness of the default settings, so it is better not to use them without adjusting, so as not to lose important and required files or programs. It's easy to do, just select the icon in the upper right corner of the screen. In addition, many users complain about the poor performance of the disk defragmentation utility, which is set by default. It is imperative to remove it from the settings, and use other applications for defragmentation.

The settings window is made in a different style
On the other hand, the package has a built-in function for creating restore points, so with due care, you can not be afraid of serious consequences.

Better to guard against random mistakes
The package is paid, providing the opportunity to test without payment for two weeks.
Video: AVG PC TuneUp 2014 - Review and Review
RevoUninstaller
The strength of the Revo Uninstaller package is a set of utilities for uninstalling programs that thoroughly clean the computer not only from executable modules, but also from working folders, temporary files and other traces.

You can uninstall programs in different ways
The package interface is very friendly and straightforward. For the convenience of the user, the recently installed programs are allocated to the "New programs" group. This is necessary, for example, to track "intruders" that are tied to a popular free utility and installed on the computer by default.

Selecting a victim from recently appeared guests
Removal takes place in several stages. First, Revo Uninstaller performs preparatory actions: analyzes the application to be removed, creates a backup copy of the registry and, if necessary, even a system restore point.
Everything is very clear
After completing the removal of the main part, Revo Uninstaller scans the disk, looking for all the remaining folders and files related to the erased application. The results are presented to the user in the form of a list, which by default are marked with deletion. If you want to leave something from the list, just uncheck it.

The program conscientiously scans the entire disk
Then comes the cleaning of the registry from references to deleted items.

The registry is also cleaned up
Among other features of the package, it is worth mentioning utilities for cleaning the history of browsers, Windows and MS Office, as well as guaranteed removal of confidential information.
An additional advantage is that the package is distributed free of charge. The only requirement of the developer is to register for a certain time.
Video: Revo Uninstaller overview
SlimCleaner
The developers of the free SlimCleaner package approached the issue of cleaning the system and optimizing the computer from the standpoint of real democrats: the best settings and programs are determined using polls. The created online community of users shares positive and negative reviews, on the basis of which a decision is made about the usefulness of applications with a final rating.
The settings are very simple
The program works very quickly, the analysis will not take much time.

Analysis times are presented originally
The scan results are presented in a visual form. To get more detailed information about the contents of the file garbage, you need to double-click on the line of interest.

We can assess the potential benefits of cleaning
The program also presents user ratings of programs installed on the computer.

You can not only see the final grade, but also find out what it came from, as well as read the positive and negative reviews of other users.

No, we will not talk about how to disassemble your computer case and shake the dust out of its insides. Although for stationary computers with easily opened system units this procedure not only useful, but should be done regularly. The more complex and functional operating systems become, the faster they fail during operation. No developer tricks help.
System complexity is itself a source of problems. Modern OSes need to be cleaned of debris as often as cars are washed in bad weather.
Clean your computer from rubbish with installed Windows 7 is the same responsible and important procedure as cleaning a high-precision machine in production.
And in the same way it is necessary to prevent clogging of the system, how to prevent dirt and dust from getting into complex optics.
OS modern computer works like a big factory. And how the plant produces a huge amount of pollution. These can be temporary files, the registry swollen from long-unnecessary keys, browser cookie and much more. Cleaning it all up by hand is impossible.
Just as it is unrealistic to sweep away the factory halls with a whisk, so it is unrealistic to remove software waste of a modern OS without using special software.
Like the factory floor, the insides of Windows need regular inventory and sorting of everything. Fragments of files scattered throughout the hard drive do not contribute to normal running Windows, to remove them is also included in our task. Let's discuss the sequence of our actions for cleaning our computer and the Windows operating system from such garbage.
Launching standard tools
As in any decent factory, in windows system have their own departments responsible for cleaning the workspace. Tools that can be used to remove from the computer any useless husk that accumulates in the process. The first such Windows tool is the Disk Cleaner. We type in the command line the command cleanmgr.exe, select windows partition from the proposed list and we get something like this window:
 We are offered to remove very specific types of garbage from the system. Here you can put all the checkboxes, or only those that you like. After you click on "Ok", the computer will rustle hard disk and will try to remove all specified types of system junk. Usually he succeeds, and the whole cleaning procedure takes no more than a few minutes. After that, our Windows will become a little cleaner, but not completely. The whole process will take a little longer, because you will need to defragment hard disk.
Go back to command line Windows and, this time, type: dfrgui. A window like this will appear:
 The disk data optimization utility will not prompt us to delete any data from the computer - it is able to arrange it in such a way as to increase its performance. Select a disk partition from the list and click on "Optimize"... The defragmentation procedure takes much longer than clearing temporary windows files, so it's better to do it in your free time. But this can be done much less often.
Side assistants
Cleaning your computer is possible not only with the tools of Windows itself, but also with programs from other developers. For example, such a well-known utility as "Wise Disc Cleaner" will help to remove unnecessary things from Windows. It can do everything, the same as the Windows tools discussed above, only it does it faster and better. The program has a nice design and is much more convenient to use than its counterparts.
Compared to the built-in tools, "Wise Disc Cleaner" has expanded functionality. Removing extraneous fragments from the operating system with its help is a piece of cake. After applying it, the computer will play like a Stradivarius violin. "Wise Disc Cleaner" offers the user several levels of "polishing" the file hierarchy and a very convenient tool defragment hard disk of the computer. Better to see once than hear a hundred times: 
Prolonged use of the computer affects its performance. No matter how good your package is, junk files, extra programs and dust will affect the operation of the PC, so everyone will have to clean it. If the computer slows down, how to clean it in several ways is described below.
Why the computer slows down
When buying a new laptop or PC, it is always pleasant to work with it: everything opens quickly, it instantly reacts to your actions, applications are loaded in a matter of seconds. Over time, many reasons will appear that will lead to a deterioration in the performance of your computer - it will start to slow down, heat up, and reboot periodically. One or more reasons can lead to this condition:
- body contamination: dust, wool, etc .;
- unnecessary programs load RAM;
- the processor is overheating;
- viruses inhibit windows;
- trash on the hard drive, junk files.
What to do if your computer slows down
When you notice that your PC has become noticeably slower, you can solve this problem in two ways - do the cleaning yourself or call the wizard. If you know for sure that you will not be able to cope, it is better to call a specialist, otherwise you can independently use the options for how to clean your computer so that it does not slow down. The primary task of the user is to determine why the computer is buggy and slow. This will give the direction in which to work:
- clean from viruses, junk files;
- improve cooling;
- clean the body, parts;
- defragment disks.
How to clean your computer from garbage yourself

In order to get rid of the brakes on the computer, you need to clear it of debris. To do this, you need a good vacuum cleaner with a blowing mode, a dust cloth and a set of special utilities for cleaning windows... The latter are the only effective wayhow to clean your computer from unnecessary programs, but you should still start with the usual physical cleaning of the case by hand.
Cleaning your computer from dust
Those who are busy with the question of how to clean a computer so that it does not slow down should start by opening the case. If you are using stationary computer, then you need to remove one side panel from system unit... In the case of a laptop, you need to unscrew the back panel completely to gain access to the hardware parts. A huge amount of dust always flies in the room, and the fans of the cooling system suck it in, it accumulates on radiators, cooler blades and the board. Take a damp cloth and switch the vacuum cleaner to blow out air. You need:
- Shut down the PC, turn it off completely (from the network).
- Wipe the plastic and iron elements of the case with a rag, do not touch the parts (they require a dry cloth).
- Thoroughly blow through all the elements with a vacuum cleaner, process the cooling system of the processor, video card, power supply well. The ideal would be to remove the parts and clean them thoroughly one at a time. It is worth doing this only when you are sure that you can put everything back together, otherwise limit yourself to a simple purge.
A clogged cooling system does not perform 100% of its functions, which is why the computer elements overheat and start to slow down in applications, games, just when working on a PC. This is especially true if you have powerful model - all TOP parts get very hot. In some cases, the problem of overheating lies in the dried thermal paste on the processor chip. In such cases, remove it, wipe off the old paste and apply new layer.
Eliminate viruses
The most common reason the computer starts to slow down is viruses. It is easy to pick them up on the Internet along with program installers - sometimes they disguise themselves as torrent files, and you can't immediately identify them: they start to appear annoying advertising, banners, unnecessary programs in the system startup. Instructions on how to clean the computer correctly so that it does not slow down:
- Buy a licensed antivirus or download free utility DR. Web Cureit... To find it, go to the "Download" section on the developer's official website.
- Next, we will consider the cleaning process using cureit utilities... When installing, agree to all points of the rules of use.
- Open the program and click on the "Start scan" button - the PC scan will start.
- This procedure can take a lot of time (depending on the size of the hard drive). When finished, detailed information by found malicious files.
- Click on the large orange "Disarm" button.
- After removing the viruses, the PC will restart.

Removing unnecessary programs
The next step to make your PC fast again is to clean your laptop of unnecessary programs and files. Some applications run in the background, getting into startup. This loads up the RAM, which is especially noticeable if you have a little of it (4GB). At the same time, half of these programs are not used, they just hang in the task manager, eating up some of the resources. You can remove them as follows:
- Click on "Start".
- Go to the "Control Panel" section and find the "Add or Remove Programs" section.
- You will see a list of applications installed on your PC. Find and remove those you don't use or didn't install yourself.
Check out other ways to.
Launching the built-in Disk Cleanup function
While working, people often install programs, download files from the Internet, and sometimes incorrectly uninstall games and applications. After such actions, it is necessary to clean the system from residual, junk files. You can do it different ways, but the developers have created a tool built into windows called Disk Cleanup. It analyzes files in the recycle bin, temporary directory, removing empty folders and "tails" of programs. To activate:
- Go to "My Computer".
- Click on the desired section hard disk with the right mouse button.
- In the menu, find the item "Properties", click on it.
- In the window that opens, there is a button "Disk Cleanup", confirm the action.
Defragment your hard drive
This is another built-in function of Windows, it is an option for how to clean your computer so that it does not slow down. The PC hard disk has a unique system for recording data in the form of sectors. Users often erase and install games, programs, so the sectors fill up unevenly, which leads to the system slowing down. To defragment a disk, you must:
- Go to "My Computer" and right-click on the desired partition of the hard drive.
- Right-click, in the menu click on the "Properties" item.
- Go to the "Service" section.
- Click on the "Defragment" or "Optimize" button (on Windows 10 version).

Cleaning your computer from unnecessary files and empty folders
If you yourself cannot determine which of the files and folders are needed and which are not, then special software will help to fix this situation. These programs analyze your system, registry, hard drives and suggest removing a certain number of objects that, in their opinion, are of no value. Below we will describe which program to clean the computer so that it does not slow down.
The best programs for cleaning your computer
To clean your PC, use different programs: for example, RegCleaner, Norton WinDoctor, but CCleaner is considered the best, which has wide functionality and a simple management interface. To download, you can go to the official website and click the "Download" button (registration is not required for this). Install the program and run it, then you need to:
- You will see the "Clear" tab, in which you can delete the cache (temporary files) from the browser. In the menu on the left, you can make settings for searching for objects that need to be cleaned, but it's better to leave everything as it is. Click on the "Analysis" button, all kinds of "broken" documents, copies, etc. will be found. After completing the process, click "Clear".
- Next, you should clean the system registry to get rid of errors that cause slowdowns. Go to the "Registry" section in the left menu and click the "Search for problems" button. The utility will find the necessary documents, provide a full report, offer to make a backup copy (agree and save). Then click the "Fix" button.
Read what cleaning Windows 7 means. When to do it. All ways to clean the registry, junk files. Useful programs and simple instructions.
Even the most professional users from time to time have to clean the operating system from garbage. If it is installed on your computer, you must constantly monitor its status. Microsoft no longer releases regular updates for this version (only base security packages are available), so you will have to fix the work of the seven yourself.
Let's consider how you can quickly and without harm to the system clean Windows 7 and significantly speed up the execution of tasks.
Why does my computer freeze?
System freezes are always the result of user actions. The exceptions are those cases when the computer "does not pull" the installed OS: the available hardware components cannot ensure the normal execution of the program code.
If immediately after windows installations 7 everything worked fine and very quickly, but over time, frequent freezes began, programs began to turn off, and the system itself starts very slowly, all this suggests that it is time to clean up unnecessary data and processes.
Hangs appear in such cases:
- A large number of programs are installed on your computer, half of which you do not use;
- Startup Full - in parallel with turning on the operating system, other programs that you did not start on your own begin to work. Because of this, the Windows startup process can take many minutes, instead of a few seconds;
- Damage to the system by viruses. Malicious software can launch processes in RAM that cannot be closed. As a result, the computer starts to get very hot, and other programs run very slowly. Also, there is a danger of theft of your personal data;
- The contents of the hard disk are cluttered with files that are no longer needed. This includes both temporary files that the OS itself creates, as well as user documents, films, a large number of photos. There can be a lot of them, because most users may not clear the PC memory for years.
How to get the system working
A comprehensive cleaning of a computer with Windows 7 will help restore the OS to normal operation. There are two ways to get rid of unnecessary data and processes:
- Manually using standard Windows services;
- With the help of special software for OS optimization.
First, we recommend that you follow the simplest steps for. This is usually enough to bring the system back to normal. If you continue to experience slow performance, try installing third party utilities... They will help not only free up disk space, but also clear the registry, analyze the operation of all system modules and fix errors.
Using the built-in Disk Cleanup utility
The first and easiest way to clean your computer from garbage on Windows 7 is to work with the standard uninstall service files hard disk. It automatically detects and removes temporary files, various error reports, thumbnails, the contents of the Recycle Bin, and other system junk.
To start working with the Disk Cleanup service, follow the instructions:
- Open the My Computer window. All available hard drives will appear in it. By clicking the right mouse button on one of the elements, go to its properties window. Here you can see detailed information about free and used space. If you see that there is less than 20% free space (or less than 1 GB), you need to clean up. First of all, we recommend checking the condition system disk FROM;
- In the properties window, click on "Clear". A window for analyzing the amount of memory will open;
- Then you will see a list of file groups that can be deleted, as well as the amount of memory consumed. We advise you to check all the boxes and perform a disk cleanup.

This service is often very slow. All because of the strong clutter of disk space. Do not cancel the action and wait for the uninstallation to complete. As a result, you can free up several gigabytes at once.
Cleaning up temporary files
Temporary files are entries that are created by all running applications. This data is no longer needed by the computer, so you need to delete it from time to time. To perform the procedure manually, you need to go to the root folder of the C drive. Open "My Computer" and click on the drive icon.
Go to the path C: \\\\ Windows \\ Temp. A directory can contain several hundred files. You can select all elements using the keyboard shortcut CTRLA. Then remove the content and empty the trash. Next, restart your computer and check if it is faster.
Sometimes the Temp folder may not appear on the system. To do this, you need to enable its visibility:
- Go to the start menu "Start";
- Open the control panel window;
- Customize the display of the list items as "Small icons" and find the option "Folder options". Open this window;
- Go to the "View" tab and in the list additional parameters mark the box “Show hidden folders", And also put a tick in front of the item" display compressed and encrypted files ";
- Save your changes and try to find the Temp folder again.

Removing programs
Oftentimes, not temporary files can cause insufficient C drive space, but multiple installed applications or games. If you leave on the computer unused programs, this will result in a popup like this:

Follow the instructions to uninstall programs on your Windows 7 computer:
- Open the Start menu and click on "Control Panel";
- In the window that opens, find the "Add or Remove Programs" field and click on it;
- Wait for the list of all software installed on your computer to load. This can take a long time, especially if the system is slow;
- To remove a program or game, click on the desired name and wait for the process to complete in the window that opens.
Note that using the list of installed applications, you can analyze your work with the software. The "Usage" column displays the frequency of launch (Often, Rarely, Never). Using this information, it will be easier for you to navigate which software should not be stored in the system.

If you are uninstalling the game, we also recommend checking the Program Files folder on the C drive. If after uninstalling a folder with the name of the game remains in it, delete it. As such, developers often leave cached files and mission entries in case the user decides to reinstall the software.
Fixing slow PC boot
The reason may be the load of the RAM. After deleting data from the hard disk, we recommend that you proceed to work with the OP.
All processes that occur in RAM are regulated by the Task Manager. With this system utility users can view a list of running processes and programs that created them. Also, you can manage System Startup and user accounts.
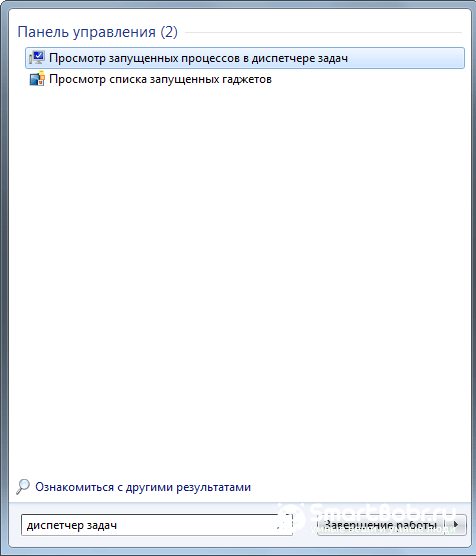
To start Task Manager in Windows 7, open "Start" and enter the name of the utility in the search bar. The system will give the result immediately. Open the field as shown in the picture below:
Another way to launch the Manager is by using the Run window. You can open it using the WinR button combination. In the text box enter the command TASKMGR and click on "OK".

Startup Management
To edit the list of programs and services that are loaded with the OS, go to the "" tab. Uncheck the boxes next to the processes for which you want to disable autostart. This will not harm the system, because in Windows 7 the Task Manager does not display services that are important for the operation of the system. This means that you cannot close the system process by mistake.
Removing from Startup will not harm the program or game in any way. They will remain installed on the computer, only they will stop turning on when the desktop starts. In the future, you can turn on the program yourself using its shortcut.

Closing unnecessary processes
If the computer turns on quickly enough, but after a while after starting work, you encounter severe OS freezes, check the running processes. In the Task Manager, open the appropriate tab and analyze which tasks consume a lot of RAM. Close the most time consuming objects by clicking the "End Process" button.
Advanced SystemCare Utility

Advanced SystemCare is a Windows 7 cleaning program that allows you to perform all system optimization options in one window, from deleting files from your hard drive to adjusting your RAM.
A feature of the application is its ability to monitor system performance in real time. The utility detects errors and allows you to eliminate them in a few mouse clicks.
The application interface is divided into several tabs:
- Speed \u200b\u200bUp - This built-in service allows you to speed up your computer. In simple words, the utility removes from RAM unnecessary processes, thereby shortening the work of the system at the moment;
- Protect is a protection module. With it, you can scan the OS for virus software and remove any malware found. Also, Advanced SystemCare will be able to check the reliability of executable EXE files. A threat notification will appear in the tray;
- Clean & Optimize is the main and most functional tab. By pressing the Scan button, you start the service checking hard disk, system registry, Startup. As a result of correcting errors, all garbage will be removed from the system, shortcuts will be corrected, the registry and RAM will start working in normal mode (without erroneous records and processes);
- In the Toolbox tab you can buy additional tools to monitor system performance;
- Action Center allows you to set the next time to check your computer for errors.
Tweaker is special utility to view and edit all hidden system functions. Typically, developers hide these features so that regular user did not delete important settings by mistake.
The Red Button interface is completely Russified and very easy to use. All tabs are conveniently divided into the main computer modules - CPU and RAM, hard drive, detected junk files and data for cleaning windows registry 7.
Go to each tab one by one and check the box next to the actions you want to perform. Using each of these actions can speed up overall performance. To apply the changes, click on "OK" in the lower right corner.
AusLogics Boost Speed \u200b\u200b- Boost PC Performance

AusLogics Boost Speed \u200b\u200b- Another good program for cleaning windows computer 7. Its features:
- Fast system scan and fix fatal errors;
- Shows hardware failures of the processor and connected buses;
- Built-in Assistant. With its help, you can quickly make a decision about which files need to be deleted and which ones are better not to touch;
- Browser protection and acceleration. Often the reason for a slow Internet is not connection problems, but browser clutter. AusLogics Boost Speed \u200b\u200butility clears cache, cookies and improves the speed of loading pages in the browser;
- Acceleration in real time. With one key press, you can close all unnecessary processes and unused applications.
Disk Cleaner to clean up disk space
The task of Disk Cleaner is to optimize Windows 7 by cleaning junk files and hard disk entries. Unlike the standard cleaning utility, this cleaner will help you find all hidden folders that are inaccessible to the average user.
Among the features of the program, one should highlight the effective detection of registry errors, useless files and incorrect shortcuts. Also, the system analyzes how each of the problems affects fast work Windows.
Pressing the "Fix" button launches the built-in assistant, which independently corrects the system without user intervention. After using the utility, it is recommended to restart your computer.
Outcome
It is recommended to start cleaning garbage in Windows 7 with the standard utility for removing temporary files from the hard drive. If this did not help speed up the work, we recommend that you resort to help third-party software... Before starting the installation of any utility, do not forget to scan its installer with an antivirus.
Which of the programs mentioned above helped you clean up Windows 7? Write your options useful applicationsthat can help solve the problem.


