Almost all modern gadgets can be connected to wifi-networks. This makes it possible to use the amenities of the Internet at high speed almost everywhere. There is an opinion that this applies only to small devices, such as a tablet, phone or laptop (printer, camera, etc.). Many users are interested in the question of how to connect a computer to wifi, is it difficult, and what devices may be needed for this.
A stationary computer is therefore called stationary, which implies summing up all communications to it through various wires to a "permanent place of residence". The PC can be rearranged in another place in the future, but this requires a complete overhaul of cable routes, finding outlets, etc.
A novelty of recent years has been the emergence of wireless networks, thanks to which even a PC can be connected to the Internet through wifi technology.
Below we will figure out what is needed for this and in what order it is recommended to connect a stationary computer to the Internet “wirelessly”.
The outline of the article will be as follows:
Necessary equipment:
- External receivers wifi;
- Domestic;
- Router
Installing devices on a computer and setting them up:
- External receiver;
- Interior;
- Router
Necessary equipment
Since the PC in most cases lacks the ability to find and connect to wireless networks, you must first take care of acquiring equipment that will give it such privileges. Let's consider in detail how it happens.
External wifi receivers
Such devices look very much like a large flash drive: they are small gadgets with a USB plug at one end (see figure 1). In addition, they can have a small antenna that allows you to increase the "collected" signal.

Fig. 1 External adapter (network card) Wifi from Tp-Link.
This device for connecting a PC to a wireless network is quite inexpensive (can be purchased for 10-20 cu). After the purchase, it remains to connect it to the computer via USB, install it from the driver disk included in the kit, make the simplest settings and connect to wifi. We will consider all these operations in detail after we get acquainted with another type of wireless network adapter.
Internal (built-in) wifi receivers
Their name comes from the fact that they are built into the PC system unit. To connect to the "motherboard" they use the PCI interface through which they are connected to a special connector.

fig. 2 Internal receiver (adapter) wifi.
These devices differ little in price from external ones, and installing them on a computer also does not take much time and should not cause special difficulties.
So what type of adapter to choose? External or internal?
- External can quickly disconnect and connect to another PC;
- The internal receiver will not take up free space on the table; in addition, it is less susceptible to damage, as it cannot be touched by the user.
The choice is yours.
Router (router)
A wifi receiver can connect a computer to the network only if it can “reach” it. In other words, the signal source — the router — must be in range.

fig. 3 TP-LINK AC1750 router
It receives a signal from the provider via an Ethernet cable, passes it through itself and “distributes” it to wireless devices (including the computer). Routers are more versatile and easy to use than access points. They allow you to connect multiple gadgets at the same time (laptop, tablet, smartphone, pc ...) to the same network.
Equipment connection
We move on to the promised description of the process of installing a Wi-Fi receiver for a desktop computer.
External Wireless Adapter - Installation and Setup
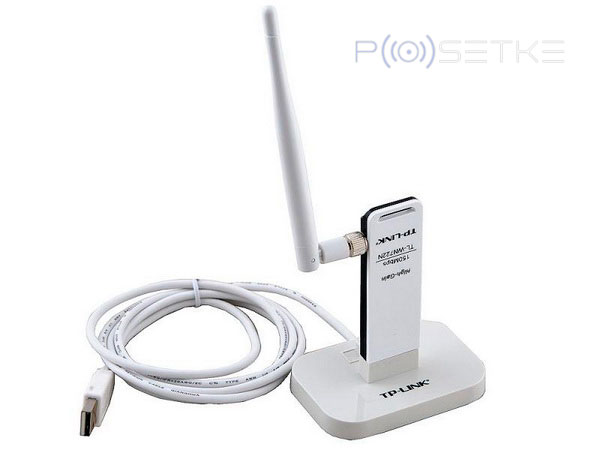
As an example, take the TP-LINK TL-WN721N, which has established itself as a reliable receiver model. It can be purchased for $ 13-18, and it is ideal for Windows 7. In addition, it supports all types of data encryption, and there is the ability to quickly create a connection. The maximum signal reception rate is 150 Mbps.

fig. 4 External wifi network card TP-LINK TL-WN721N.
Step 1
We take the device out of the box and carefully study the equipment, which should include:
- The receiver itself;
- USB cable (you can connect through it and use it as an extension cord when searching for the best signal);
- Instructions in several languages;
- A disk with drivers.
Step 2
We connect the adapter to the PC directly or through an extension cord (it can amplify the signal, acting as an additional antenna) to the USB port. Next, ignore any messages about the successful installation of device drivers. They must be delivered independently from a special disk that we found in the receiver box.
Step 3
We insert the driver disk into the computer, and then run the installation wizard. In the program that opens, select our model and click "Install driver and utility" (see figure 5)


fig. 6 Dialog box of the installer.
During installation, the following messages may appear (Fig. 7 and Fig. 8):

fig. 7 Notification on a 32-bit system about the impossibility of installing the utility. This is not scary, so feel free to click "Yes."

fig. 8 Windows 7 security may warn of an unknown driver manufacturer. This is also not critical, click "Install Anyway ..."
In a minute or two, the process will be completed, and such an icon can be found on the taskbar (see Fig. 9). It signals that the receiver is ready to connect the computer to wifi.

fig. 9 Icon indicating the presence of wireless networks within range of the receiver.
Step 4
Now that the adapter is ready to connect the Internet to the computer, it remains to click on that icon and select the appropriate wifi network.

fig. 10 Selecting the desired network in the list of available connections.
And then enter the password (security key) and click OK.

fig. 11 Indication of the network security key (password).
Everything. Now your computer is connected to the network through an external wifi receiver. You can start using the Internet.
Now move on to the next chapter of the article.
Installing the internal wireless adapter
Step 1
For example, take the TP-Link TL-WN751ND model (approximate price is $ 15).
We take the device out of the box and unscrew the antenna if it is connected to the module (Fig. 12), since it cannot be installed in the system unit with it.

fig. 12 Separation of the antenna from the network adapter (by loosening).
Step 2
Open the system unit cover and look for the slot for the wifi module on the motherboard (one of the PCI slots through which you can connect the Wi-Fi receiver, usually located below, under the sound card) (see fig. 13)

fig. 13 Slot for the adapter on the computer motherboard.
We connect and, after screwing the antenna back on, we get something like this:

Fig. 14 Ready to configure built-in wifi module at your workplace.
Step 3
Setting up the internal wifi card is no different from setting the external: first you need to “install” the driver, then find the network and connect a computer to it. We examined these steps in detail in the previous chapter.
Install and configure the router
For example, let’s analyze the process on the TP-Link TL-WR841N model.

fig. 15 TP-Link TL-WR841N.
Step 1
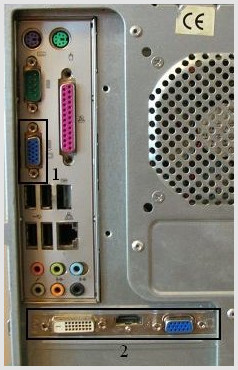
First you need to connect the router to the computer through which it will be configured. Figure 16 shows the connectors through which the router is installed (blue - for power supply; red - for the Internet cable entering the apartment; green - for connecting to the main PC, from where the network will be controlled).

fig. 16 rear side of the router with connectors.
Step 2
We go into the web interface of the router.

fig. 17 entering an IP address to enter the router settings.
To do this, in the browser, in the address bar, enter the ip address of the router with the prefix http: // (as in Fig. 17). This "set" of numbers is different. It can be read where it will be indicated by the manufacturer in 99% of cases - on the back cover of the device.
Step 3
Enter the username / password pair. In 90% of cases it is admin / admin.

Step 4
Once in the settings, we are looking for the “Network” tab, and in it “WAN”. Here you need to specify the type of network. To determine which connection is suitable in your case, you can consult with your provider. Click “Save” and move on.
Step 5
We go to the "MAC Clone" (in the same place, in the "Network") and click on the "Clone MAC Address", then again save the changes (save).

Step 6
We go to “Wireles”\u003e “Wireless Settings”, where we enter all the values \u200b\u200bas shown in the figure below. The only thing you can come up with the name of the network and indicate your real region. Do not forget to save.

Step 7

Now go to the Security tab. Indicate the type of encryption and its algorithm as in the screenshot (you can just fill in the same way as in the figure above). And, most importantly, think up your password for the created network.
Again we save all the changes and complete the installation of the router by rebooting. To do this, look for the tab "System Tools"\u003e "Reboot", in which we press the only button "reboot".
This completes the process of configuring the router. Now you can connect wireless Internet to the computer on which you installed the wifi receiver. You need to go through that PC to “Available Connections” (as mentioned above), select the created network and connect to it.
You have a new computer, and you are ready to install it, but do not know how. It may seem to you that this is a difficult and impossible task for beginners. In fact, everything is very simple. It doesn’t matter which company your computer is, because the connection scheme for all computers is similar.
If you want to connect a computer you just bought, which may still be in the box, then you will probably find instructions in it with a description of the connection process. Even if there is no instruction, you can connect your computer and peripherals with just a few simple steps. In this lesson, you will learn step by step how to do this.
A laptop
If you have a laptop, the connection process is extremely simple: just open it and press the power button. If the battery is not charged, then external power must be connected to the laptop. You can use the laptop while charging.
If the laptop has any peripheral devices, for example, external speakers, then you can read the instructions below, since the wiring diagram of the laptop and desktop computer are basically the same.
Install and connect a desktop computer
Step 1
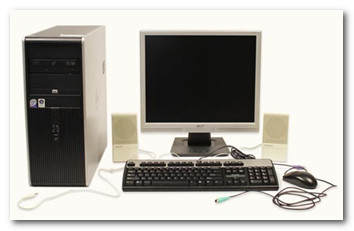
Unpack the monitor and system unit from the box. Remove all plastic protective films. Place the monitor and system unit on a table.

Think about where your workplace will be located, where the monitor, system unit, and peripherals will stand. It is recommended to place the system unit in a well-ventilated place. This will help to avoid overheating.
Step 2

Find monitor cable. Usually this is either a VGA or DVI cable. It may look something like the image, or of blue colors. (If you have a candy bar, then you can go to step 4).
Step 3
Connect one end of the cable to monitor port on the back of the system unit, and the second - to monitor. Firmly tighten the plastic bolts to secure the cable.

Many computer cables only connect to specific ports. Therefore, if the cable cannot be inserted, do not use force so as not to break the connector. Make sure the plug fits into the port, and then connect them.
To understand which cables belong to which ports, study our lesson.
Step 4

Unpack the keyboard and determine which connector on its cable is: USB (rectangular) connector or PS / 2 (round). If you use a USB connector, then connect it to any USB port on the back of the system unit. If you are using a PS / 2 connector, insert it into the purple keyboard port on the back of the system unit.
Step 5
Unpack the mouse and determine which connector its cable has: USB (rectangular) connector or PS / 2 (round). If you use a USB connector, then connect it to any USB port on the back of the system unit. If you are using a PS / 2 connector, insert it into the green mouse port on the back of the system unit.

If your keyboard has a USB port, then you can connect the mouse through it, and not directly to the computer.
If you have a wireless mouse or keyboard, then you may need to connect a Bluetooth adapter to your computer (via USB). However, many computers have built-in Bluetooth, so an adapter may not be needed.
Step 6
If you have external speakers or headphones, then you can connect them to the audio port (on the front or back of the system unit). On many computers, ports are indicated by colors. Speakers or headphones are connected to the green port, and the microphone to the pink. The blue port is the line input that is intended for other types of devices.

Some speakers, headphones, and microphones have USB plugs instead of regular audio. They can be connected to any USB port. In addition, many monitors have built-in speakers and microphones.
Step 7

Take the 2 power cables that come with the computer. Connect the first cable at the back to the system unit and to the surge protector. Then connect the second cable to the monitor and to the surge protector.
Step 8
Finally, plug the surge protector into a wall outlet. You may also need to turn on the surge protector itself, if it has a switch.
If you do not have a surge protector, you can connect the computer directly to a wall outlet. However, this is not recommended, as a power surge can lead to computer damage.
Installation and connection of the computer is completed
Your basic computer devices are now ready for use. Before turning on the computer, spend some time organizing the workplace. A well-organized workplace can increase productivity and improve health.
After building a home Wi-Fi network combining laptops, mobile phones and tablets, the question arises for the owner of a stationary personal computer: how to connect the computer to Wi-Fi. Most often, such a PC was previously connected directly to a network cable, and there is no built-in wireless module on it.
You can solve the problem in Moscow in the following ways:
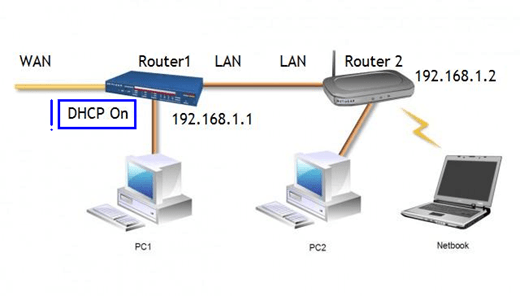
- installing an additional router, followed by a wired connection to a PC. Advantages - the ability to significantly increase and improve the quality of wireless home Internet coverage. The main disadvantages are the high cost of the router, experience with setting up routers of the "bridge" type is required;
- another option how to connect a PC to Wi-Fi is to connect the built-in Wi-Fi module. In doing so, you create a stable PC for your wireless network. The only drawback is the need to dismantle the system cover and the skills to install devices in the PCI bus;
- the best option is to use an external Wi-Fi module, also known as a “flash drive for Wi-Fi” or “whistle”. Its advantages are a budget solution, it does not require special skills, it provides stable computer access to the network.
Select, connect and configure a Wi-Fi adapter

We will figure out how to connect a desktop computer to Wi-Fi with the least chance of problems during the connection process.
We will decide on the type of Wi-Fi module used. The newer the stationary computer and the “fresh” operating system installed on it, the higher the chance that the device will be recognized by the system and will work without additional settings. To exclude the possibility of problems with the drivers, we recommend that you contact your provider, and, regardless of the choice in favor of an external or internal module, purchase a device accompanied by a set of drivers that ensure its operation.
For most situations, using an external Wi-Fi module as a solution to the question of how to connect a computer to Wi-Fi wirelessly is the most preferable. Therefore, we will consider further connection primarily for external modules.
Follow the step by step instructions:
- Connect the external Wi-Fi adapter to the USB port of your PC. We recommend that you select the port located on the back of the computer.
- After the device is detected by the system, it will notify you of the required actions. If, according to our recommendations, you choose a Wi-Fi adapter equipped with drivers for your operating system, insert the disc into the CD / DVD drive and follow the instructions of the autoloader.
- Restart your computer after the driver installation is complete.
- After the reboot, find the icon of the working wireless adapter in the lower right corner of the desktop and double-click on it. In the menu that opens, select your home wireless network by name and enter a password to access it.
- Congratulations! If accessing sites via Wi-Fi is normal, you just made sure that you can connect your computer to Wi-Fi without resorting to the services of a network engineer.
Frequently asked Questions

What are the advantages of built-in solutions for connecting to a Wi-Fi network?
Most computers identify them and find the drivers necessary for the operation, regardless of the operating system. Since such modules are equipped with additional antennas, they can also be recommended for networks in which a stationary PC is located at a considerable distance from the router.
Is there an alternative way to connect a computer to Wi-Fi?
Residents of Moscow and Moscow region using the WIFIRE Internet service provider can instead of independently configure access to Wi-Fi networks from stationary PCs, call a network engineer to professionally install internal or external Wi-Fi adapters, install drivers, configure and connect a stationary PC to a Wi-Fi network .
Call by phone and get a free consultation and selection of an adapter with subsequent installation and configuration of the device in your PC at a convenient time for you!
Tariffs and services of Net Bai Net Holding LLC can be changed by the operator. Full up-to-date information on tariffs and services is in the “tariffs” section or by phone indicated on the website.
Wireless technology is increasingly gaining popularity. It is more convenient than a large cluster of wires lying around the house. Therefore, many users are switching to WiFi communication - it is much more practical and reliable, since the wires can break. And besides a tablet or laptop, connecting a network cable is not the best solution, since these are mobile devices, and the cable will violate their mobility. Therefore, Wi-Fi is now available in almost every home.
But not all devices have a built-in Wi-Fi module, to which you can connect directly to the network, so for personal stationary computers, certain tricks will be needed to make them work through wireless communication.
You can connect your computer to WiFi using several devices. Any way to work with a wireless connection - an adapter or module - will provide reliable, stable communication with the router.
The most convenient option is to buy an adapter for a personal computer. It is quite small - some models do not even exceed the size of the flash drive, it has a low price. And connects via USB.

Such a small Wi-Fi adapter receives the signal, processes it and transfers it to the PC. This is done using special drivers, which are usually supplied with the device. It is enough to install the driver, connect the device itself to the computer and connect to its network.
How to connect?
Everything is elementary. The device is removed from the box, connected to the computer either directly or through a special extension cord. After that, you need to get the driver disk from the package. The system may indicate that the drivers installed successfully - however, this is not the case. If you connect the adapter to the computer, this will not lead to its automatic configuration. So, you will need to install the program from the company disk.
Next, follow the instructions of the installation program. In the case when the PC has a 32-bit system, the drivers may give an error during the installation of the Wi-Fi utility. It does not affect the process, so the installation will still have to continue. After the driver installation is complete, the receiver is ready to work.
How to get started?
After the installation is complete, you just need to find your WiFi network, enter the required password - and you can connect your PC to it and start using the delights of wireless communications.
WiFi receivers internal
A more difficult option for the owner of a personal computer. It will require disassembling the system unit case. But in terms of connecting the receiver itself, it does not carry anything time-consuming. This type of receiver is integrated directly into the system unit. It uses a PCI interface, almost every motherboard has a corresponding special connector.

How to connect?
First of all, to install this device you have to open the system unit. You need to do this carefully, because sometimes in addition to bolts, the structure is also fastened with latches. It is important not to damage anything during disassembly. The unscrewed panel is neatly removed and is now laid aside.
Then the device is removed from the box. An antenna can be screwed to it, which is necessary for signal reception. In the process of integration into the computer, it will only interfere, so it must be removed. It is screwed onto the device for threading, so it can be removed quite easily.
The block is open, the module is removed and ready for installation. It is enough to find a special slot for it and stick a board into it. The connection interface is a PCI slot, most often they are located under the sound card, closer to the very bottom of the unit. The device is stuck there, and its rear part (where the antenna is screwed into) is brought out through the corresponding hole on the rear panel of the system unit case. After that, the antenna from the module is screwed into place.
Now the system unit itself can be closed. This is done as accurately as when disassembling - it is important not to pinch any wire and not to break anything. After the case is closed, you can proceed directly to setting up the receiver to work with the WiFi network.
How to set up the receiver?
Everything is done exactly the same as with an external adapter for a Wi-Fi signal. A driver disk is removed from the box. They must be installed, even if the computer system will report a successful driver installation. You must follow the installation program instructions. Upon completion of the installation, the module is ready for operation.
How to get started?
It is enough to directly find your Wi-Fi network and connect to it using a password.
WiFi connection router
The adapter or module itself, which should pick up the signal, is already configured and ready for operation. But you also need to configure the access point directly. Without proper configuration, even if you hang an unfortunate computer with adapters and modules, nothing will work.
First of all, a router, or router, you must choose. You should choose according to several criteria - the only way you can choose a quality thing that will last a long time.
- You need to look at the characteristics: data transfer speed, WiFi standards, range of operation.
- It is better to take models with external removable antennas - they improve the signal more noticeably than the built-in ones. This is an important indicator - it is the antenna that transfers the signal to the adapter or module. And if it is not removable - in the event of a breakdown or the need to amplify the signal, you will have to change the entire device.
- Physical characteristics of the router - processor power, RAM, etc. The more powerful the router in this regard, the more it will be able to “digest”, which increases the speed of data transfer.
- Reviews of real customers. Advertising is good. But it’s better to read what live people write about the device. Pay attention to the reviews regarding the stability, quality and speed of the connection.

How to configure a router?
After selecting a router, it is configured directly. Before this miracle box begins to distribute wi-fi and let it be perceived through the adapter, it needs to be configured. And this will require wires to connect it to the computer. Since it is through the computer that the router will pass control.

The router itself is connected to the network, a network cable is inserted into the WAN port, and a wire is connected to any of the LAN ports that will lead to the computer. Then you need to find the IP address that will lead to the router settings interface. Each manufacturer has its own, and most often it is located either in the instructions or on the body of the device itself. The address is entered in the format http: // "address" in the address bar of the browser.
When entering the web interface, you will need to enter a username and password. It should be indicated in the instructions for the router, but most often manufacturers do not bother and install the admin / admin pair.

After entering the correct password, the user will be in the interface directly settings. You need to find the “Network” tab, in which the “WAN” section will be located. It will require consultation with the provider - only he can tell what type of connection is suitable for their network and specifically the user’s tariff. After selecting a network, you need to save it, for this you need the “Save” button.
Then, in the same tab, the MAC Clone section is required. In it you need to click on the "Clone MAC Address" button, and save the changes again.

After that, the “Network” tab is no longer needed, now you need to find “Wireless”, and there - “Wireless Settings”. There you will need to enter certain values \u200b\u200bthat are necessary for the router to work:
- Wireless Network Name - this is the desired name for the network. At the choice of the user.
- Region - here you need to indicate your real region of residence.
- Channel - “Auto” is selected from the drop-down list.
- Mode - in the drop-down list you need to find "11bgn mixed".
- Channel Width - the value “Auto” is again selected.
- Max Tx Rate - 300Mbps is enough.
Then there will be three points with the ability to check / uncheck.
- Enable Wireless Router Radio - checkmark should be checked.
- Enable SSID Broadcast - checkmark should be checked.
- Enable WDS Bridging - there should be no ticks.

The next step is to configure the security of the router. To do this, the Security section is located in the same tab; here you need to specify the type of encryption and come up with a password. Preferably complicated to protect your Wi-Fi from other people's raking adapters. It is enough to enter all the data as shown in the screenshot.
All changes must be saved. After that, in the “System Tools” section, you need to find “Reboot” and in this section click on the “Reboot” button. After that, the setup is fully completed, the wireless network is available, and it can be captured through an adapter or module that is already installed on the PC.
In contact with
Most often, a desktop computer connects to the Internet using a wired connection. Moreover, he initially does not have a special receiver, the so-called WI-FI adapter, to connect through a wireless connection. Such a receiver is installed by the manufacturer in mobile devices (smartphones, tablets, laptops) and this is justified by the very concept of mobility. These devices, by definition, should not depend on cable Internet, and can connect to WIFI anywhere where there is such an opportunity.
However, under certain circumstances, the user may ask, “Is it possible to connect a regular, stationary computer to WIFI?”. Such circumstances may be the desire to minimize the number of wires in the room and to be able at any time to rearrange the computer in the right place. In fact, if there is a working WI-FI router, then why not access the network through it?
Disadvantages of WIFI connection
Before parsing the issue of connecting a computer to WIFI, it is necessary to highlight the shortcomings of a wireless connection.
- The biggest disadvantage of WIFI is the dependence of signal quality on the environment and environment. Indoors, walls, partitions, furniture, windows and mirrors can reduce the signal characteristics. In addition, home appliances influence the quality of the connection. A working microwave has a negative effect on the operation of the router.
- If two or more WIFI routers work nearby, then they can interfere with each other, as a result of which the quality of the Internet connection suffers.
Compared to wireless, cable connection certainly benefits, so if you decide to connect your desktop computer to WIFI, think about whether you really can not do without it.
As mentioned above, a regular computer does not have a WIFI signal receiver, but due to its open architecture and the presence of standard and slots on the motherboard, you can connect anything to it if only the connected device meets these standards.
The easiest way to connect a PC to WI-FI is to establish a connection using an external adapter connected to the computer.
Now on sale there is a large number of external WIFI adapters, costing from $ 6 from different manufacturers. The device is called external, because it has a case and is connected to the system unit, and not to the motherboard inside the unit. For a novice user, this is the best solution, because no need to open the system unit or call the computer wizard. Externally, these adapters look like a regular USB flash drive or wireless mouse receiver.

Connecting a computer to a WI-FI router is extremely simple - connect the adapter to a computer, install it from the disk that comes with the device and you can connect to the Internet via WIFI.
Internal WIFI adapters do not have a case and are connected to the connector. To do this, open the system unit case, find a free PCI or PCI Express slot and carefully insert the adapter into it, after disconnecting the antenna from it. The adapter is screwed onto the mounting profile, after which the antenna is screwed.

After turning on the computer, the operating system will determine that a new device has appeared and will try to install drivers for it. If there are no drivers in its database, then they must be installed independently from the disk that comes with the adapter. In general, it is recommended to install the complete drivers, as the manufacturer knows better how his device works and accordingly develops optimal software for him.

Which WIFI adapter is better: external or internal?
Which adapter is best to buy to connect your computer to a WIFI network? In this matter, it is necessary to proceed from such factors:
- The presence of free USB connectors in the system unit.
- Qualification of the user.
- Quality WIFI network indoors.
If there is not much USB in the computer and you plan to connect additional devices or drives (flash drives, external hard drives) to them, then it is better to purchase an internal adapter.
Installation of the internal adapter requires a certain qualification and accuracy from the user. However, if you wish, you can always call a computer specialist who will connect the device.
If the quality of the WI-FI signal in the room is low, it is recommended to use adapters equipped with external antennas, which improves the sensitivity and noise immunity of the WI-FI receiver.
We hope that with this material you can now easily connect your computer to a WI-FI network.
Share.