A router (router) is a specialized network device through which users can connect to the Internet. But there is also the possibility of connecting two different routers located at a remote distance from each other, in one common network. Most often, the need to create such a network is either to expand the zone of Wi-Fi connection, or to use two users of the same Internet connection at the same time.
Ways to connect two routers into a single network
There are four actual and tested (stably working) ways to connect two routers into a single network space:
- use of WDS technology when one of the routers acts as a “repeater”;
- creation of a Wi-Fi bridge using WDS technology;
- connection of the second router in the "client" mode;
- connection of two routers via a network cable.
Each of the methods has both advantages and disadvantages. The router configuration algorithm depends on the connection method selected.
Let us consider in more detail with specific examples all the options for connecting two routers. The “experimental network equipment” will be routers of the famous brands ASUS, TP-Link and D-Link (specific models of routers are not taken, since in this case it does not matter).
ASUS RT-AC86U, TP-Link TL-WR740N 15 and D-Link DSR 150 A2A are presented as an illustrative example.
Connecting routers using WDS technology (option “Base station” - “Repeater”)
To create a single network for two routers, relying on WDS technology, you must configure the operation of network equipment. The first router will act as the “base station” (the source of the Internet signal), the second as the “repeater” (signal amplifier or its “repeater”). This method is intended to expand the existing coverage area of \u200b\u200ba Wi-Fi signal.

Thanks to WDS technology, you can significantly expand the coverage area of \u200b\u200ba Wi-Fi signal by connecting several “repeaters” at once
Connecting a pair of ASUS routers
First, let's configure the “base station”, taking as a basis the ASUS brand router:

Now go to the settings of the second router (“repeater”). A good example is also the equipment from ASUS:

Video: Connecting an ASUS Router in Repeater Mode Using the Quick Setup Wizard
Connect a pair of D-Link routers
Now let's look at how to connect to a single network of D-Link routers. The “base station" is configured as follows:

Now go to the “repeater” setting (also D-Link). For this:

Based on personal experience, I can say that using this method of connecting two routers to a single network (the option “Base Station” - “Repeater”), there are no visible differences (or advantages) in whether you will connect the network equipment of one the same manufacturer or different. In this case, only the operating capacity of the routers themselves will play a dominant role, and not their compatibility.
Connecting routers using WDS technology (“Base Station” - “Client” option)
The second way to connect two routers also relies on the use of WDS technology. However, the option “Base station” - “Client” is relevant only when the user needs to send an Internet signal through a second “client” router to a remote device (for example, to a stationary PC or TV). In this case, the second router will play the role of only a Wi-Fi adapter, i.e. he will not be able to transmit Wi-Fi signal. To connect another device to the Internet through it, you will need to use an Ethernet network cable.

It is important that the second router (“client”) has the functionality of wireless Wi-Fi connection
Connecting ASUS Routers
Configuring routers is not fundamentally different from the configuration process shown in the first method. The “base station” setup algorithm remains completely identical for both the ASUS router and TP-Link. Therefore, we will analyze only step-by-step instructions for setting up a “client”. For a “client” ASUS router, you need to:

Connecting TP-Link Routers
For TP-Link manufacturer's routers, the step-by-step configuration of the “client” is as follows:

Based on my personal experience in connecting “client” routers, I can say that the optimal distance between two points (“base station” and “client”) for stable operation of the Internet connection (without interruptions in the connection and jumps in data transfer speed) is several dozen meters. That is, this connection option is best used within the same apartment or in two adjacent separate rooms.
Connecting routers through the creation of a Wi-Fi bridge
Wi-Fi bridge is one of the options for a local network with which the user is able to create two network points that are remote from each other (the source of the Internet signal). This method of connecting two routers into one network is suitable for those users who need to create a network connection over a long distance (from one hundred meters to hundreds of kilometers). At the same time, both routers (both the “base station” and the “receiver”) can distribute Wi-Fi.
To create a stable-working Wi-Fi bridge over a distance exceeding 70 ~ 100 meters, you need to use specialized network equipment (a certain kind of router).

The quality of the transmitted signal is also affected by various kinds of interference (buildings, radio waves, etc.)
When creating a Wi-Fi bridge, the settings for the “base station” (the first router) are completely identical to the settings shown in the “Base station” - “Repeater” option. So let's move on to the analysis of the settings of the second router (“receiver”). To configure an ASUS router, you must:

As a second illustrative example, take the router manufacturer D-Link. The “receiver” tuning algorithm is as follows:

Video: creating a Wi-Fi bridge for two TP-Link routers
The maximum distance that I was able to configure a Wi-Fi bridge through two ordinary router manufacturers TP-Link was approximately 100 meters. At the same time, the quality of the transmitted signal was far from ideal: the data transfer rate periodically dropped to zero, the Wi-Fi connection itself rebooted (reconnected again). If you decide to create a Wi-Fi bridge, it is better to use specialized network equipment (for example, Ubiquiti Nanostation routers or LigoWave).
Connecting two routers using a LAN cable
This method is the most effective in terms of the quality of the transmitted signal, but it requires additional financial and physical costs (purchase and work on laying the Ethernet cable). This method of creating a single network implies two connection options (LAN-LAN and LAN-Internet modes). Let's consider both types of connection.
LAN-LAN mode
With this connection, the second router will act as a "receiver" of the signal, i.e. all third-party devices will also need to be connected to the router using a network cable.

This connection method is a “wired” analog of the WDS wireless method (“Base Station” - “Client”)
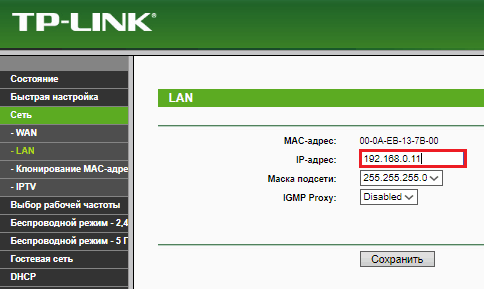
You do not need to configure a “base station”, but in the settings of the second router you need to enable the DHCP server function and manually set a new IP address. For example, for a TP-Link router, this is done as follows:

LAN-Internet Mode
With this connection, the second router will act as the active source of the Internet signal, i.e. All third-party devices to this router can be connected via Wi-Fi.

However, with such a connection, the speed of Wi-Fi Internet on the second router will be relatively lower than that of the “base station”
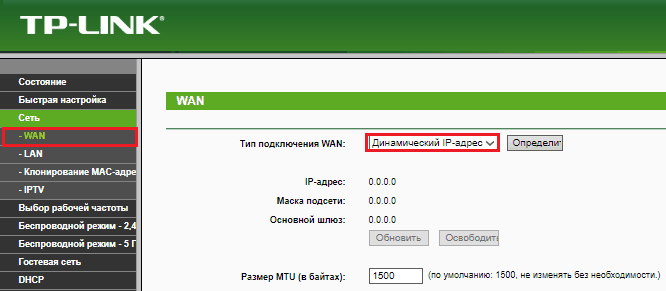
The first router does not need to be configured, and for the second router it is enough to change only one settings parameter, assigning it a dynamic IP address. For example, for a TP-Link router, this is done in the “Network” / WAN parameters of the router interface settings.

After saving the settings, it is advisable to reboot both routers
As you can see, there are many options for connecting two routers to a single network. Moreover, the algorithm for setting up network equipment for any of the methods is not complicated and does not require any highly specialized knowledge in programming.
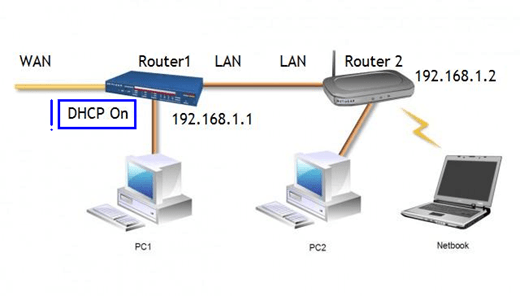
Many users know how to connect two routers with a LAN cable so that the Internet is on both subnets. More precisely, the local network will be the only one - it is organized by a router connected directly to the provider. The second device connects to the first one according to the LAN-LAN scheme and plays the role of a “fancy” switch equipped with an access point or something else.
When setting up such networks, at least one mistake is often made. We are trying to get rid of the most typical of them.
Right and wrong “union”
We will not combine routers according to the LAN -\u003e WAN scheme, since we do not want to get a double NAT translation. The device number 2, in this case, is configured as a “switch” by disabling the DHCP server in it and assigning it an IP address that is included in the “LAN” range of the first router. In this case, it is necessary to take into account several subtleties at once, which we will discuss in more detail.
LAN DHCP Pool
We must assume that the second router is just another device that is included in the local network of the first. What should be its IP address then? Of course, the value of this address will belong to the subnet of the first device. Let “router 1” be accessible from LAN at 192.168.1.1. Well, to the second, having disabled the DHCP server in it, we will take and assign the address 192.168.1.2. Everything seems to be right here, but do not rush!

DHCP Router 1 Settings
We recommend that you do not be lazy before setting up and go to the interface of the first router. You need only one tab, on which you do not need to change anything. Just look at how the options for the local DHCP server are selected. Write down the final and initial values \u200b\u200bof the range (pool) on the leaf.
Choosing a static IP address for any local device, you cannot use the values \u200b\u200bthat belong to the DHCP pool. This rule also applies to router 2.
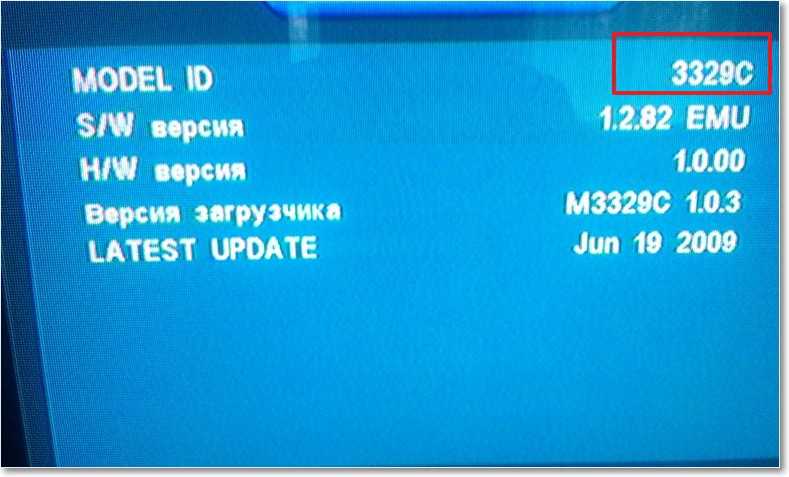
In our example, the pool is “2-100”, the unit is occupied by the first router, which means that for the second we will select the IP address: 192.168.1.101! Glue a sticker on the device’s body where the new value will be recorded.
How to configure a WAN port
We are talking, as you know, about the Internet connection settings in the second router. In general, it is better to disable the WAN port in it. But since not all web interfaces support this option, it is recommended to configure the connection to statics. And now, in such cases, they sometimes make a typical mistake - they set such an IP that belongs to the LAN range.
Let our first router create a home network 192.168.1.1 with a mask of 255.255.255.0. Then, in the connection settings of the second device, you do not need to specify an address from this range! Come up with something new (completely “left”), like this: 66.55.1.200.

Connection setup, second device
As a DNS, it is also better to specify non-existent addresses, or you can leave the fields empty (but this does not work in all web interfaces). The bottom line is clear: WAN and LAN port subnets should not overlap.
DNS Relay, UPnP, IGMP
Since we don’t receive anything from the second router through the WAN port, it means that it cannot be a DNS server. Therefore, in the settings of his local network, we find the DNS Relay checkmark and uncheck it:

D-Link, DNS Relay Option
In some routers, for example, such as TP-Link, the specified option is absent. Then we leave the DNS fields in the LAN settings empty or specify unavailable addresses:

Configure a local DHCP server
Since the DHCP server is turned off, it means that it will not distribute any DNS s anyway, you can not worry!
All of the above can be extended to other options related to the transmission of packets from LAN to WAN or vice versa. I would like to highlight the UPnP option, which is now available on all interfaces. On the second router, we turn it off. The same applies to the IGMP-snooping checkbox, as well as to all options that have the word IGMP in the name.
We list what you definitely don’t need to disable in the second device:
- “Multicast Rate” in the additional Wi-Fi settings - set the parameter to “\u003e 0” if you are going to watch IPTV over Wi-Fi (by the way, the option may be absent altogether)
- The wireless network is configured as if it is a standard router that is equipped with a Wi-Fi module
- Use the WMM option and other additional "improvements" at your discretion (if they give a performance gain, do not disable it).

WMM function, router 2
All options listed in the list relate to wireless settings, and nothing more. And that's right - the wired segment is limited to LAN 1-4 ports, and the built-in switch works by default, unless STB ports have been selected.
In general, guided by the above information, you can get a fully functional "bunch". So, good routing!
VPN secured LAN
Local computer networks can be tiny, consisting of a pair of computers and a smartphone, to huge ones, covering entire areas and hundreds of subscribers. For routing in a small network, you need only one budget router, even a USB 3G matchbox-sized router will do, but dozens are used for large networks of routers, and often they work in different modes. How to connect two routers in different modes - and we will go further.
First mode - peer-to-peer network
This router connection scheme satisfies the following conditions:
- There are two independent networks. For example, neighboring houses;
- In each of the networks in each house there are network printers and network data storage (USB movie hard drives connected to the router);
- One of the computers in the first network has access to the Internet, the second network has no access.
The task is as follows - to connect these two networks with a twisted pair network cable, so that there is a connection between all computers, printers and network storages of both networks, and each computer of both networks has Internet access through that single gateway. In other words, to make a single network with a common Internet connection.
Networking Routers
To implement this scheme, you need to configure both routers. Let's start with the first one that looks on the Internet.
Configure the first router
Go to the router settings menu and configure Internet access. The settings are entered through the web browser to which the router is connected. The IP address of the router is indicated in the instructions for quick installation, you can also see the label under the bottom of the device. As an example of configuration, we give the TP-Link 741 ND router.
We go to the menu item "WAN".

Internet connection setup
The type of WAN connection is specified in the contract with the provider, select it in the list, if necessary, specify the username and password (if the type is PPPoE).

DHCP Enable
Specify a range of addresses by assigning a start and end address.

Wi-Fi setup
In the SSID field, specify the network name, all other fields are left by default. If you need to protect the network, then in the security settings, specify the password for connecting to Wi-Fi.
And, last of all, we assign the IP address to the router 192.168.1.1.

Configure a second router
We also connect the computer to the second router, go to the settings. Go to the LAN settings, and assign the IP address 192.168.1.2 to the router.
Next, set up wireless Wi-Fi. Settings can be absolutely identical with the first router, or they can differ - it doesn’t matter. For convenience, of course, it is better that they match, the wireless network is one, and when searching will be reflected as two networks. Although it is not fatal.
We save the settings, reboot the router.
Attention! Only after setting up both routers we connect them with a twisted pair network cable! Not before setting up!
Both ends of the patch cord should only be connected to the LAN ports of both routers. The port number is not important.
That's it, we launch routers, computers, and enjoy a perfectly functioning computer network.
Bridge Mode Setup
Next, consider another mode that works in bridge mode. The difference between this scheme and the previous one is to configure routers on a wireless Wi-Fi network. Again, TP-Link routers are used again.
In bridge mode, you can combine more than two routers, and, accordingly, more than two networks. The only important condition if other routers are used is that they support bridge mode.
Let's start by setting up the first device.
Setting up the first router
We go into the settings of the first device in which you need to change the standard IP address. This is done in the Network menu, LAN submenu.

Change IP Address
Each of the routers must have its own address, otherwise there will be a conflict of addresses, and the network will not work.
Change to 192.168.1.2. Click "Save."

Bridge Mode Setting
We set the network name, select the channel, and put a tick in front of “Enable Bridges”. In the "Mac of AP1" field, specify the mac address of the second router. The address can be found in the setup instructions or on the label under the bottom of the second router.
We save the settings, reboot the router.
Setting up a second router
Important note - Wi-Fi (Channel) channels must match on both routers! If the first router looks to the Internet, then on the second router we must disable DHCP! The network names (SSIDs) of both routers can be the same, but you can also assign different ones, it doesn’t matter.
A small video tutorial on setting up a bridge:
With modern home appliances getting smarter (and impudent) every year. If only computers and mobile phones needed to connect to the Internet yesterday, today, perhaps, only irons are dispensed with the World Wide Web, and even that is not all. Of course, this is progressive, but how to ensure such a heap of motley devices uninterrupted connection to the network, especially in a large apartment? One router is clearly not enough for them.
Do not rush to buy an expensive multiport router. To solve this problem, usually pairs of simple home routers that will work together in one LAN are usually enough.
F1comp already talked about how to connect two routers to the same network, and today, in the continuation of the topic, we will talk about wired connection methods.
Wifi is good but cable is better

- You need to connect a device to the Internet without a Wi-Fi adapter.
- The area of \u200b\u200bthe room is very large, and the distance between access points is more than 30 m.
- You are about to connect a set-top box or Smart TV to the World Wide Web to watch high-definition movies. A wired connection, especially PLC (Internet via a household electrical network), provides much better transmission of such a signal.
- The room is too noisy or a lot of noise for Wi-Fi.
- You want to reduce the level of electromagnetic radiation from the access point.
When creating a local area network with one Internet source, one of two routers will perform its direct functions - traffic routing. We call it conditionally leading. The second one, the slave, will work as a link that collects and forwards traffic from connected devices to the master router.
Ways to connect routers with a network cable
1 way: LAN + LAN
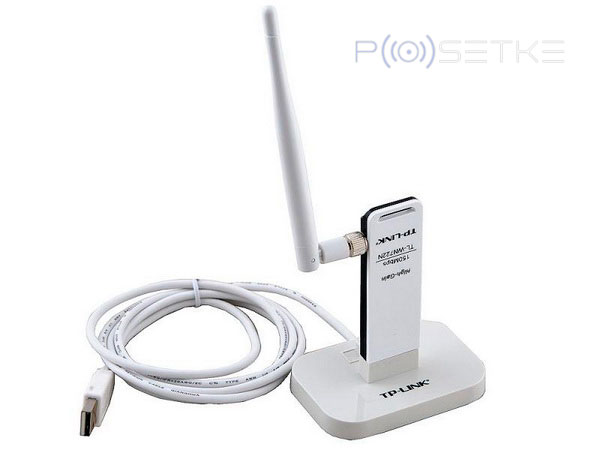
And so, to connect two routers to the same network (for example, take TP-LINK Archer C7 devices) you need a patch cord - a piece of twisted-pair copper cable with RJ-45 connectors on both sides (as in the picture above) . In the first connection option, both connectors are inserted into the LAN ports of the routers - master and slave.
The leading router (1) is connected to the provider's equipment via the Internet or WAN port and configured to work on its network. You do not need to change anything in its settings, except for the activation of the DHCP server (if it was previously disabled).

After that, assign the LAN port of the slave router a different IP address, different from the address of the main gateway, but included in the same subnet. For example, if the IP of the main gateway is 192.168.0.1, you can register 192.168.0.11 instead. Just make sure that this address is not used by other devices connected to the same local network.
If you previously used the slave router as the main one and contains any settings, first restore it to the factory state, otherwise, connection errors may occur.
2 Method: LAN + Internet
In this connection method, one of the patch cord connectors is inserted into the LAN socket of the master router, and the second into the Internet or WAN socket of the slave.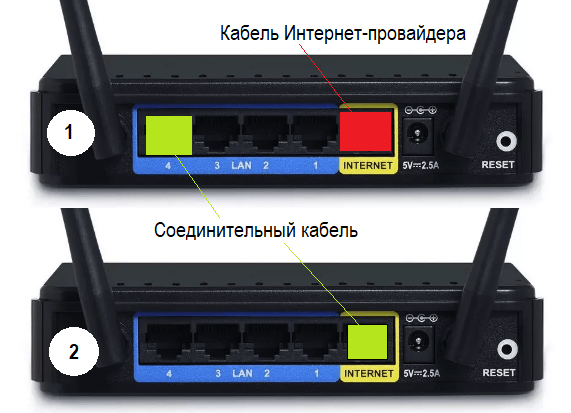
The settings of the host router, as in the previous version, are left unchanged, we enable only DHCP. And on the slave in the section " Network» – « Wan» – « Type of connection toWan"Select" DynamicIP address". After saving the settings, the Internet should appear on it.
If LAN ports are enabled on the slave router, also make sure that their IP addresses do not conflict with the addresses of the master.
After that, a separate access point can be launched on each of the routers. If everything is done correctly, both will be connected to the World Wide Web.
Connection Using PLC Adapters
Plc (Power line communication) - the transmission of network traffic from device to device through a household electrical network - the best way to connect Smart TVs to the Internet (why it was said above), as well as other devices that do not support wireless communication. The main advantage of this method is that its reliability and connection speed are no worse than that of an Ethernet cable network, and there is no need to lay a cable. Another important plus is ease of use: plugging in a wire, plugging it into a power outlet - and you're done, no drivers or settings for you.
What this type of connection is and how it works is shown in the figure below. I think it is clear without explanation.

PLC adapters are sold in sets of 2-3 modules. Outwardly, they look a bit like chargers from mobile phones, but instead of USB sockets, they have 1 or more RJ-45 connectors, where the patch cord connector is inserted. The second connector, respectively, is connected to the device, in our case, the LAN or WAN port of the router.
The electrical cable between the two plugged-in adapters becomes the transmission medium.

To use the PLC, 3 conditions must be met:
- Good wiring in the house.
- Continuous line between connection points.
- The presence of a power outlet near the device (router).
Setting up routers connected to the same network via PLC is no different from setting up a cable connection.
More on the site:
How to connect two routers to the same network using cable updated: December 16, 2017 by: Johnny mnemonic
If the power of the router is not enough for stable Wi-Fi coverage of an apartment, home or office, there is a need for additional devices. There are three ways to amplify the weak signal of the main router: install an additional antenna, repeater, or another router. Each method has its own advantages and disadvantages, we dwell in more detail on the third option.
How to set up a router
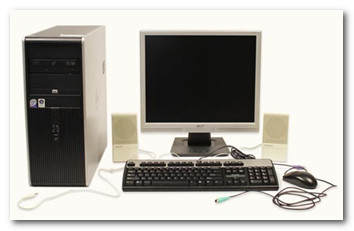
To configure the router, connect to it a computer or other device with a web browser installed:
- you can connect the computer with a cable by connecting the PC network card to a free LAN port of the router;
- you can connect to a router wirelessly via Wi-Fi using a laptop, tablet or smartphone.
By default, the wireless network is assigned a name (SSID) that is identical to the model name of the router, and access to the distributed Wi-Fi network is not password protected.
After establishing a connection with the router, open a web browser in the computer or in the connected wireless device and in the address bar type the IP address of the router. For example, for a TP-LINK router, the address would be: http://192.168.0.1
Entering the IP address of the router in the address bar of the browser will open access to the control panelThe illustrations are taken from the settings of the TP-LINK TL-WR 1045 router, the control panel looks different from other manufacturers, but the general principles, abbreviations and terms will be the same.
The correct IP address, username and password required to enter the control panel are indicated on the plate attached to the bottom of the router.
 The IP address, login and password of the control panel are indicated on the nameplate on the bottom of the router
 The login and password indicated on the plate refer only to the control panel, and not to the wireless network distributed by the router. After entering the login and password, the main screen appears, displaying information about the status of the device and opening access to menu items for setting modes.
Without the need, do not change the factory settings in the settings of the router. After making changes to the settings of the router, reboot the device.
Video: setting up a Wi-Fi router
Two ways to connect routers
Routers are connected to the same local area network either by cable or wirelessly. It is recommended that you use devices from the same manufacturer.
Cable connection
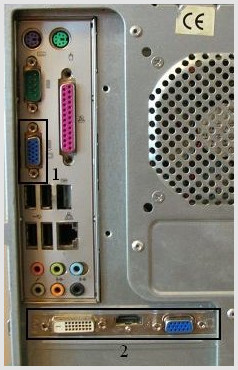
A twisted pair cable (UTP cable) is routed between the primary and secondary routers. In the main router, the cable is connected to the LAN jack, and in the secondary router to the WAN jack (this jack is highlighted and is sometimes called the Internet). With this connection, the additional router will be the network device for the main one, and the main one for the additional one will act as the provider, distributing the Internet and providing a dynamic IP address.
Before installing an additional router, consider how the cable will be laid and carefully measure the length of the future cable channel. When purchasing a cable, buy one meter longer than the measured cable channel, and ask the seller to immediately crimp the ends of the cable into the connectors. If the cable channel passes outside the room and is exposed to natural influences, then purchase a cable with a reinforced sheath.
Advantages of the method:
- reliability and stability of cable connection;
- simplicity of setup of both routers;
- the installation location of the additional router is not limited to the wireless coverage area of \u200b\u200bthe main router.
The disadvantages of the method:
- the need to purchase and lay cable;
- when transferring the router, the cable will have to be reassigned to a new place.
Configuring routers when connected by cable
If the main router is already configured to work with the provider and there are no complaints about the work, then nothing needs to be changed in the settings.
Make sure that the DHCP function in the main router is turned on to automatically distribute IP addresses on the local network. The start and end IP addresses do not need to be changed.
Setting up an additional router
It is recommended to immediately reset the possible changes made to the router settings to the ones pre-set by the manufacturer. To do this, turn on the router, find the Reset button on the rear panel, press and hold for 5–7 seconds. To protect against accidental reset, the button is hidden inside the case and you can press it through the hole with a needle or an unclaimed paper clip.
 An example of the location of the reset button on the rear panel of the router: the button is hidden inside, only the hole for pressing is visible
 In an additional router, two settings are checked and set:

 Making changes to the own IP address of the additional router avoids the conflict of identical addresses on the same network
After changing the IP address of the router for repeated access to the control panel, specify the new address in the address bar of the browser.
There is a cable connection option, in which the cable is connected to the LAN port of the additional router. This option requires complex configuration and does not provide advantages over the connection through the WAN port.
Wi-Fi wireless connection
Advantages of the method:
- does not require physical connection of routers with a cable;
- allows you to easily move the additional router if necessary.
The disadvantages of the method:
- the relative complexity of the settings;
- slowing down the speed of the wireless network.
 The main router receives Internet from the provider and distributes it over the wireless network LAN1; an additional router receives the Internet wirelessly from the main router and distributes it over the wireless LAN2
Configure routers when connected via Wi-Fi
When connecting two routers in a local area network via a wireless channel, a bridge connection is used, in English the Wireless Distribution System (WDS), designed specifically to expand Wi-Fi coverage.
Bridge Connection Overview (WDS)
When you establish this type of connection, the main router works in standard mode, and the additional one functions as a Wi-Fi amplifier, receiving and distributing the signal further.
To connect routers in the “bridge” mode, it is necessary to establish a constant (fixed) communication channel between them and specify the physical addresses of the connected devices in the settings. To configure the "bridge", both routers are turned on, the main router is pre-configured for the provider, receives and distributes the Internet, and the additional settings are pre-reset to the factory settings by pressing the Reset button.
Configuring the main router for WDS mode
The mode of automatic selection of the broadcast channel is changed to the fixed channel mode (for example, to the 11th channel).
Setting a fixed channel number prevents the router from automatically scanning the air and selecting the least loaded channel. Therefore, if extraneous wireless networks work nearby, you may have to manually select the least loaded channel experimentally or use a special program to search for a free channel. The channel number must be changed simultaneously on both routers - the main and the secondary.
Configuring an additional router for WDS mode

On the main page of the router control panel, the line "WDS Status" should be displayed as "running". This means that an additional router is connected to the main router and is distributing the Internet.
Video: how to make a Wi-Fi network between routers (WDS)
Creating a complex network requires knowledge and experience. If you are confident in your abilities, use our instructions. If you doubt your abilities - it is better to seek help.