You will need
- Multiple computers
- 1 free lAN card in every computer
- Wi Fi adapters
- Network cables
- Router
Instruction
Connect via Wi-Fi. This method is good if you do not recognize the wires inside the apartment at all, or you need to connect more computersthan the number of free LAN slots in routere. To do this, buy the right amount Wi-Fi adapters. We recommend using USB adapters, as their connection and setup takes less time. Insert the adapter into the USB port, install the drivers and software included in the kit. After that, connect to the network distributed by your routerohm
Plug in power adapters

In the case of a wireless connection, these inputs are not used. 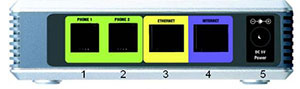
Internet - at a constant light indication, the device receives data from the network. 
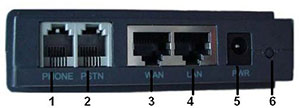
- With a fixed backlight, the phone turns on.
- When the indicator is flashing, a phone call is made.
- If there is no light indication, the device does not recognize the connected phone.
Connection via LAN-ports. To ensure maximum speed of information exchange between computersand and Internet access, it is recommended to use the cable connection of computers to routery To do this, you need a free network card in the computer and a standard network cable. Connect the cable with one end to the network card and the other to a free LAN port in routere. Wait some time while router will determine the new device.
"My Computer" "Properties." Setting up a computer is an important step in troubleshooting Internet problems. When you press the same button again, the contents of the section will be hidden. IMPORTANT: The quality of the Internet service depends on the computer itself. That is why you need to know the functionality and menu of your device in order to properly use the service and solve the problems you have encountered. For this purpose, it is recommended that you familiarize yourself with the user's manual for your computer, which is provided to you upon purchase!
You may need to configure the device in the following cases. When you first install the device; After returning to the factory state of the device; Troubleshoot. The connection between the router and the computer is wireless. This means that your device and computer are not physically connected by cable.
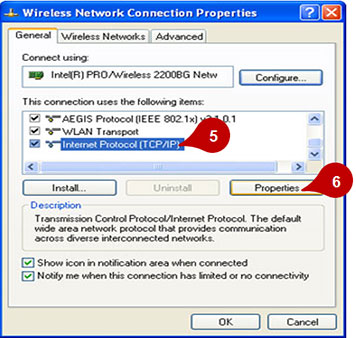
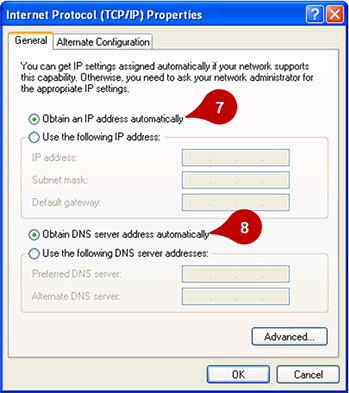
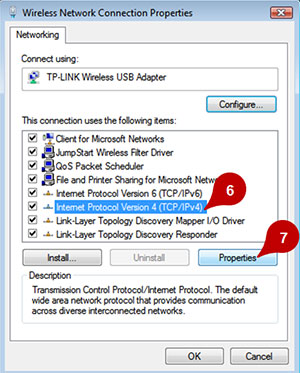
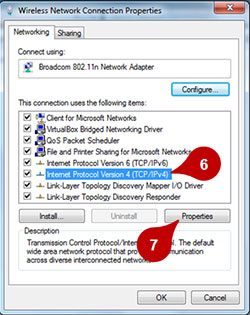
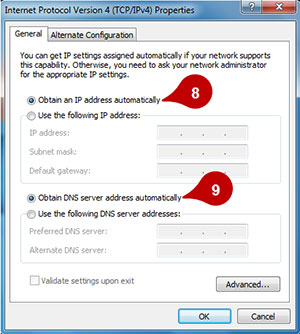
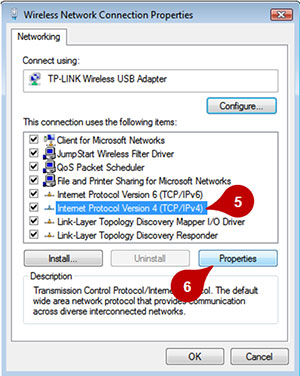
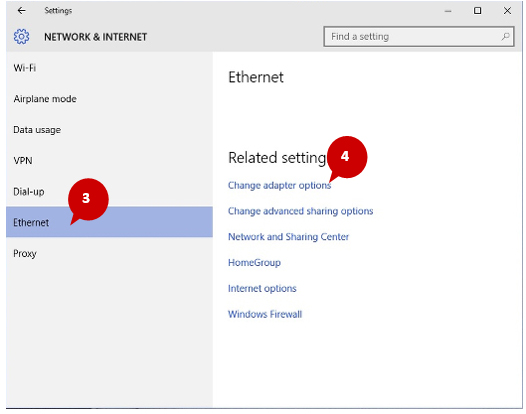
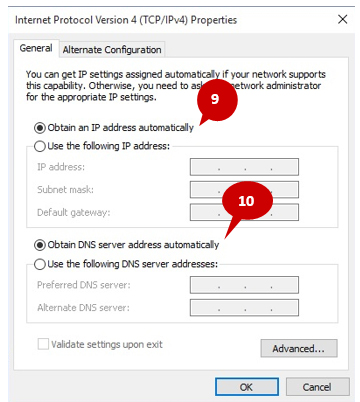
To configure the correct operation of the network and the Internet, follow these steps. Go to the properties of this network connection and open the Internet Protocol version of TCP / IPv4. Select "Obtain an IP address automatically" and "Obtain DNS server address automatically." After completing the above steps, router will be able to determine the IP and DNS addresses for your computers.
For the Internet to work properly, the following requirements must be met. A wireless connection between your router and computer is made via. Important: if you change your network name and password, you must establish a connection through them!
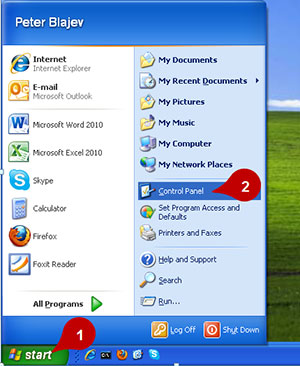
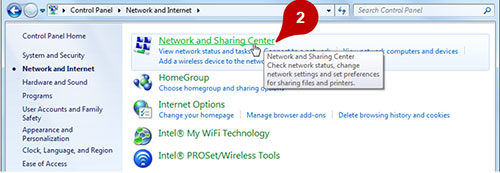
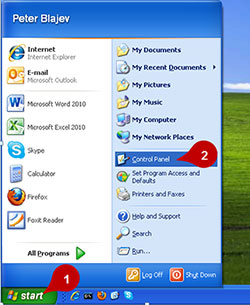
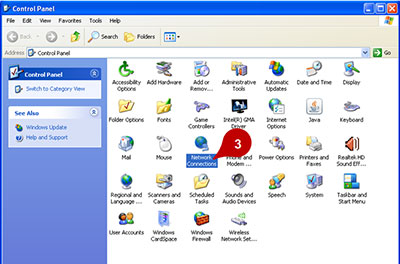
Open the "Start" menu and select "Control Panel"
Step 2: “Network Connections”

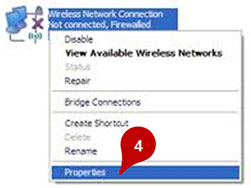
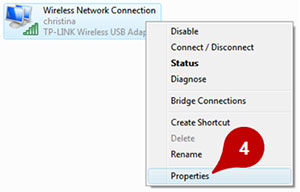
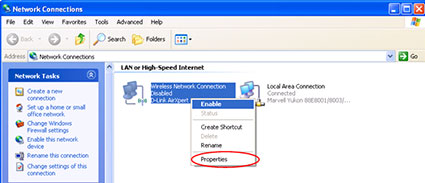
Step 3: Wireless network connection and select Properties.
Step 4: Internet Protocol Version Properties
Setting up a wireless network card
Open the Start menu and select.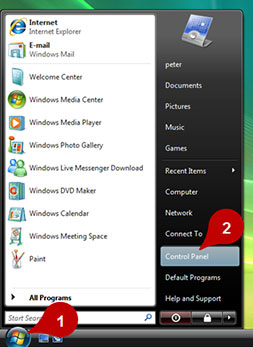
Step 4: “Network Connection” and select “Properties”
Step 5: Click left button Click on and select Properties.

Step 7: Restart the computer to apply the settings that you set.

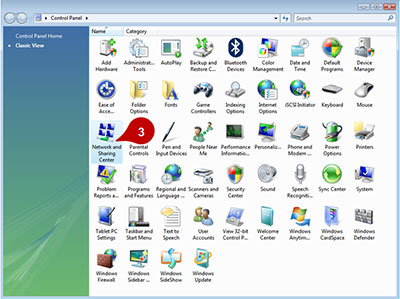
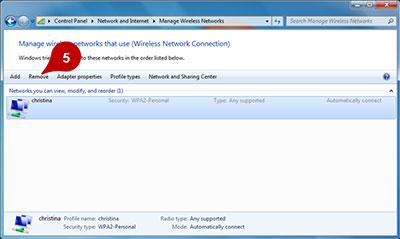
You will see a list of different menus, and you need to select "Network Control Center and shared».
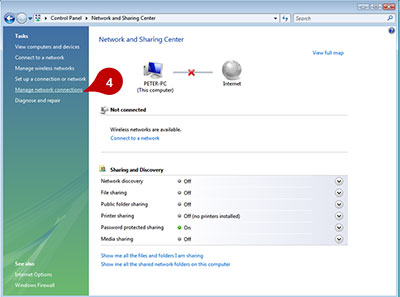
Step 3: Select the menu located on the left side of the screen.
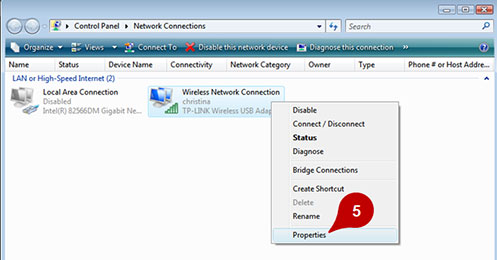
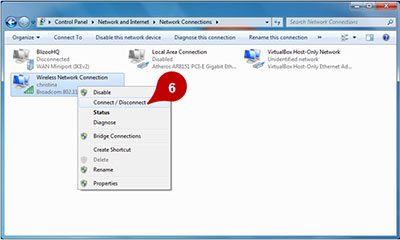
Step 4: Right-click "Wireless Network Connection" and select "Properties."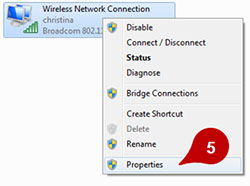
Step 1: "Control Panel"
A list of all detected results will be displayed by clicking the left mouse button on the control panel.

Wi-Fi networks and other wireless data transfer are gradually crowding out so loved by all of us. wired Internet. This is not surprising, because laptops are becoming more popular, and consequently, the need to pull across the apartment cable simply disappears. Unfortunately, not everyone can set up a wireless network at home, and even more so, pick up the necessary equipment for this purpose. The most important elements in this system are router. Without this small, but extremely necessary thing, it will be very difficult to create a high-quality wireless network.
Step 3: Select the "Change Adapter Settings" menu located on the left side of the screen.

Open the main menu and select "Settings"
You will see a list of different menus, and you need to select "Network and Internet."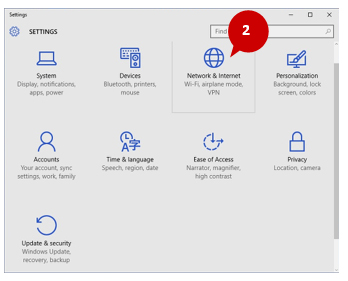
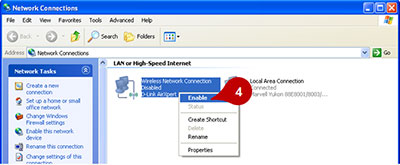
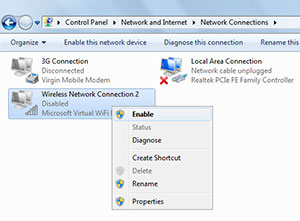
Step 4: Right-click and select "Enable"
Step 5: Right-click on Local Connection and select Properties.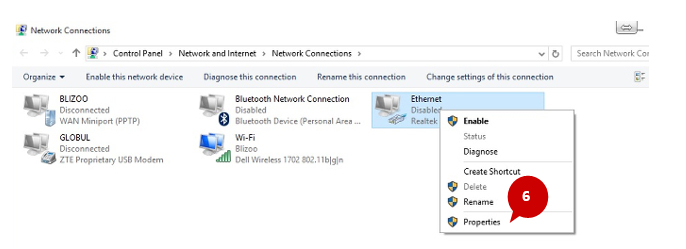
Step 8: Restart the computer to apply the settings that you set.
Additional settings and check the computer. In this section, you can learn how to make the additional settings on your computer necessary for using the Internet.
Instruction
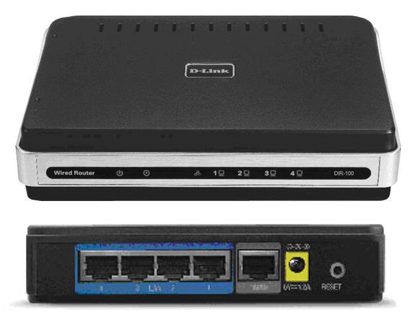
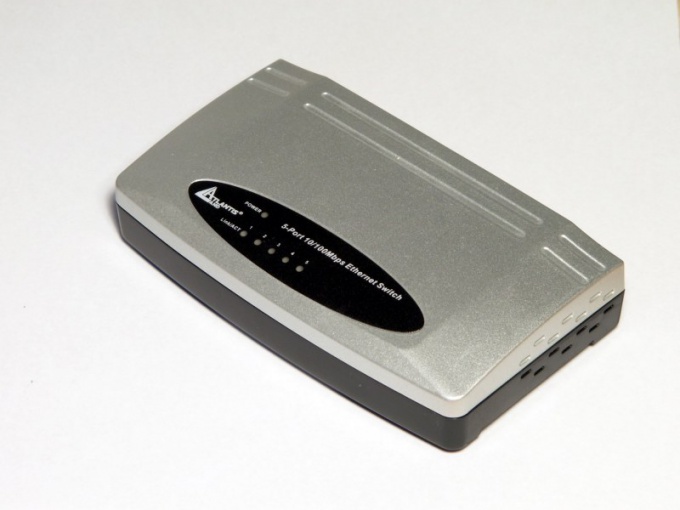
It is difficult to determine the main criterion for choosing Wi-Fi a. It all depends on whether you connect only laptops, or your plans also include a wired connection of computers. Based on this, select router with the required number of LAN ports. This is very important, because in case of an insufficient number of ports you will have to purchase a switch.
You will see a list of different menus, and you will need to select
Choose a setting for your computer for which you are looking. additional information, using the "show" button and the down arrow. You can check what it is by clicking the left mouse button on "My Computer" on the desktop screen, and then selecting "Properties." 

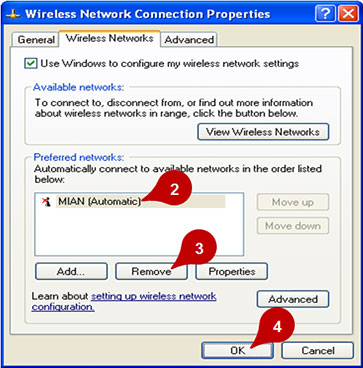
Step 3: Right-click “Wireless” and select “Disable”

Step 4: Wireless connection and select Enable.
You will see a list of different menus, and you need to select "Network Connections"

Step 3: Right-click and select “Enabled”.
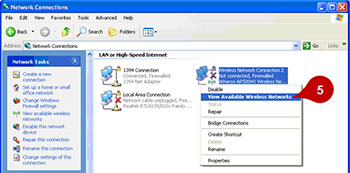
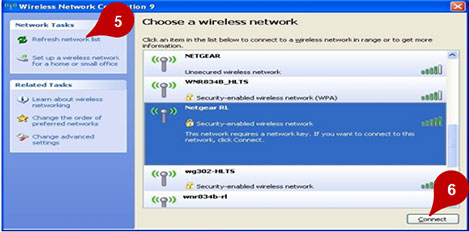
Step 4: Right-click "Wireless Network Connection" and select "View Available Wireless Networks".
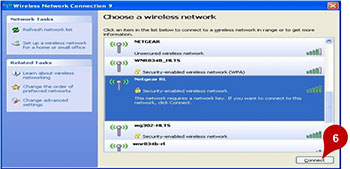
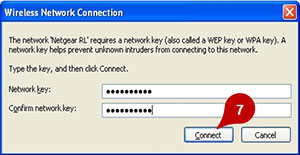
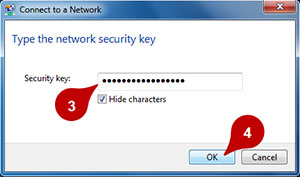
Step 6: You will see the “Network Key” and “Confirm Network Key” fields in which you enter your password, and select “Link”.
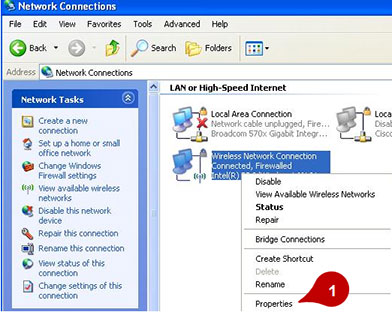
Step 1: Right-click "Wireless Network Connection" and select "Properties"
Re-enter “Wireless Network Connection” and click “Refresh Network List”, trying to reconnect.

Step 2: You will see a list of different menus. Select "Network Connections"
Step 3: Right-click on "Wireless Communication" and select "Properties."

Step 2: Network and Sharing Center
Step 4: Right-click “Wireless” and select “Disable”.
Step 5: Right-click on "Wireless Communication" and select "Enable"

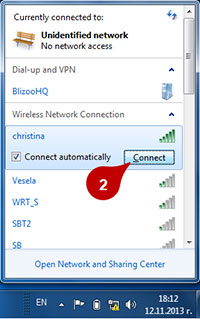
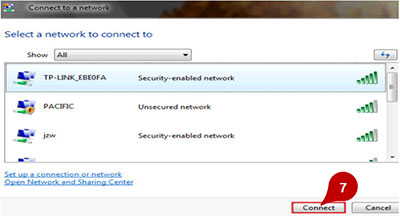
You will see a list of all open wireless networks, and you need to choose your own by clicking the left mouse button and, finally, “Connect”.


Re-enter the wireless control menu on the left side of the screen. Right-click on your own and select Link.
Step 6: you will see a list of all open wireless networks, and you need to select your own by clicking the left mouse button and then selecting “Link”.

Step 8: A message appears saying that you have successfully connected to wireless network and click "Close".


Step 4: Right-click on “Wireless” and select “Properties”


You will find a brand wireless adapter opposite the field "Used connection".
When you have decided on the number of LAN ports, it's time to start considering the Wi-Fi channel. Due to the fact that these systems are still actively developed, there are several leading types of encryption and data transmission via Wi-Fi. These may be the familiar 802.11 channels with the addition of “n” or “g”. Note that “g” is an older channel than “n”. Those. If your laptop only supports the 802.11g channel, do not purchase router with the channel type 802.11n, because Compatibility issues may occur. WPA2-PSK leads among encryption options, but you can safely take routersupporting only WPA. You should not purchase a device that works exclusively with WEP encryption.

Sources:
- how to choose a router for home
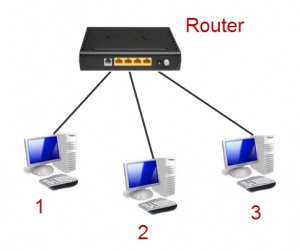
Tip 3: How to connect two computers to the Internet through a router
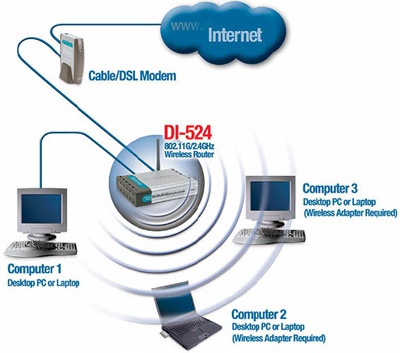
To be able to access the Internet from any computer at home, you need to create local network. And the best option today is to use it for this purpose. router (router). In order not to pull the wires around the apartment, connecting the network devices, it is advisable to have a router with a wireless Wi-Fi interface. This is also true if your computers do not have a Wi-Fi module. It can be purchased as an optional PCI card or USB module. For computers to the internet do the following:

You will need
- - PC;
- - router
Instruction
Connect to the WAN port router cable of your provider.
Connect the computer to the router with a cable, connecting its network card to the router's Lan connector.
Connect the router and computer to the electrical network and turn them on.
Set up a router to get Internet. To do this, enter the address in the browser router, eg, http://192.168.1.1/ and login by entering a username and password. Address router, login and password may be different depending on the device manufacturer, and can be found in the documentation for the router. Set up in accordance with the recommendations of your provider and manufacturer. router. After setting, restart the router. Make sure that the computer connected to it has access to the Internet by accessing a website.
Set up a wireless connection on the router in accordance with the manufacturer's instructions.
Connect the second computer to wi-Fi networks, after making sure that his Wi-Fi module is active. To do this, right-click on the wireless connection icon in the taskbar and select the "Connect" command. Make sure the Internet is available now and from this. computer.
Using Wi-Fi connectionYou can access the Internet for your other devices that have a Wi-Fi interface: smartphones, handheld personal computers, game consoles.
Sources:
- The site of the company D-Link - a developer and manufacturer of network and telecommunications equipment.
- internet connection via a router
You will need
- - network cable.
Instruction
If you already have a configured DSL modem through which the computer accesses the Internet, then disconnect the network cable from this computer. Connect it to the WAN port of the purchased Wi-Fi router. With the second network cable Connect the desktop computer to any LAN connector of the router.
Launch your internet browser and open the web interface of Wi-Fi router settings. Enter the username and password that are required to access the settings. Now open the WAN menu. Select the DynamicIP function. Find the "MAC address" field and enter the physical address of the network card of the computer from which you are configuring the router. Click the CloneMACAddress button. Make sure that the DNS address fields are filled with a value of 0.0.0.0.
Click the Apply button to save the entered settings. Now go to the Wireless menu. Activate the wireless access point. Choose the type of security that suits you. Enter the password you need to connect to the wireless network. Disable the Firewall feature by setting the Disable option in front of it. When working with the network "Akado" it will only interfere.
Now save all the settings of the router and reload it. Log in to the web-based interface of the network equipment. Open the Status menu. Make sure that the value of the “MAC address” field matches the previously specified value of the physical address of the network card of your PC. Check the IP address field. If its value is currently 0.0.0.0, then click the DHCP Release and DHCP Renew buttons. In Russian versions of firmware, they may be called "Update DHCP".
Now connect your laptop to the created wireless access point. Open wireless settings network adapter. Select the TCP / IP internet protocol. Check the boxes next to "Obtain an IP address automatically" and "Obtain a DNS server address automatically." Save the settings.
Almost all modern gadgets can be connected to wifi-networks. This makes it possible to use the convenience of the Internet at high speed almost everywhere. There is an opinion that this applies only to small devices such as a tablet, phone or laptop (printer, camera, etc.). Many users are interested in the question of how to connect a computer to wifi, is it difficult, and what devices may be needed for this.
A stationary computer is therefore called stationary, which implies the summing up of all communications to it through various wires to a “permanent place of residence”. The PC can be moved further to another place, but this requires a major revision of cable routing routes, finding sockets, etc.
A novelty in recent years has been the emergence of wireless networks, thanks to which even a PC can be connected to the Internet using wifi technology.
Below we will figure out what is needed for this and in what order it is recommended to connect the desktop computer to the Internet “without wires”.
The layout of the article will be as follows:
Necessary equipment:
- External wifi receivers;
- Internal;
- Router.
Installing devices on a computer and configuring them:
- External receiver;
- Interior;
- Router.
Necessary equipment
Since the PC in most cases lacks the ability to find and connect to wireless networks, you first need to take care of acquiring equipment that will give it such privileges. Consider in detail how it happens.
External wifi receivers
Such devices look a lot like a large USB flash drive: they are small gadgets with a USB plug at one of the ends (see figure 1). In addition, they may have a small antenna, which allows to increase the "collected" signal.
Pic1 External adapter (network card) Wifi from Tp-Link.
This device for connecting a PC to a wireless network is quite inexpensive (can be purchased for 10-20 USD). After the purchase, it will remain to connect it to the computer via USB, install the driver from the supplied disk, make the simplest settings and connect to wifi. We will consider all these operations in detail after we get acquainted with another type of wireless network adapter.
Internal (built-in) wifi receivers
Their name comes from the fact that they are embedded inside system unit PC. To connect to the "motherboard" using the PCI interface, through which they are connected to a special connector.
rice 2 Internal receiver (adapter) wifi.
These devices do not differ much in price from external ones, and their installation on a computer also does not take much time and should not cause any particular difficulties.
So what type of adapter to choose? External or internal?
- An external one can quickly disconnect and connect to another PC;
- Internal receiver will not take free place on the table; in addition, it is less susceptible to damage, since it cannot be touched by the user.
The choice is yours.
Router (router)
The wifi receiver can connect the computer to the network only if it can “reach” it. In other words, the source of the signal must be in range - the router.
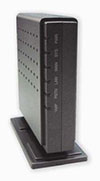
fig.3 TP-LINK router AC1750
It receives a signal from the provider via an Ethernet cable, passes it through itself and "distributes" it to wireless devices (including to a computer). Routers are more versatile and easy to use than access points. They allow you to simultaneously connect multiple gadgets (laptop, tablet, smartphone, PC ...) to the same network.
Equipment connection
We turn to the promised description of the installation process of the receiver wi-fi for a stationary computer.
External wireless adapter - installation and configuration
As an example, take the proven model of a reliable receiver model TP-LINK TL-WN721N. It can be purchased for 13-18 USD, and it is ideal for Windows 7. In addition, it supports all types of data encryption, and you can quickly create a connection. The maximum signal reception speed is 150 Mbps.
rice 4 External network card wifi TP-LINK TL-WN721N.
Step 1
We take the device out of the box and carefully study the package, which should include:
- The receiver itself;
- USB-cable (you can connect through it and use as an extension cord when looking for the best signal);
- Instructions in several languages;
- Disk with drivers.
Step 2
We connect the adapter to the PC directly, or via an extension cord (it can amplify the signal, acting as an additional antenna) to the USB port. Next, ignore any messages about successful installation device drivers. They need to be independently delivered from a special disk that we found in the receiver box.
Step 3
We insert a driver disk into the computer, and then run the installation wizard. In the program that opens, select our model and click "Install driver and utility" (see figure 5)
fig.6 Installer dialog box.
During the installation, the following messages may appear (Fig.7 and Fig.8):
rice 7 Notification in a 32-bit system about the impossibility of installing the utility. It's not scary, so feel free to click "Yes."
rice 8 Windows 7 security can warn you about an unknown driver manufacturer. This is also not critical, click "Install anyway ..."
After a minute or two, the process will be completed, and such an icon can be found on the taskbar (see figure 9). It signals that the receiver is ready to connect the computer to wifi.
rice 9 Icon indicating the presence of wireless networks in range of the receiver.
Step 4
Now, when the adapter is ready to connect the Internet to the computer, it remains to click on that icon and select the appropriate wifi network.
fig.10 Selecting the desired network in the list of available connections.
And then enter the password (security key) and click OK.
fig.11 Specifying the network security key (password).
Everything. Now your computer is connected to the network via an external wifi receiver. You can start using the Internet.
Now go to the next chapter of the article.
Installing the internal wireless adapter
Step 1
For example, take the model TP-Link TL-WN751ND (approximate price - $ 15).
We take the device out of the box and unscrew the antenna if it is connected to the module (Fig. 12), since it will not be possible to install it into the system unit.
fig.12 Separation of the antenna from the network adapter (by unscrewing).
Step 2
Open the lid of the system unit and look for a slot for the wifi module on motherboard (one of the PCI slots through which you can connect a wifi receiver, usually located below, under sound card) (see figure 13)
fig.13 Slot for the adapter on the computer motherboard.
We connect and, after re-screwing the antenna, we get something like this:
Fig.14 Ready for setting the built-in wifi module at your workplace.
Step 3
Setting up an internal wifi card is no different from setting up an external one: you first need to “install” the driver, then find the network and connect a computer to it. We reviewed these steps in detail in the previous chapter.
Install and configure the router
For example, let us analyze the process on the model TP-Link TL-WR841N.
fig.15 TP-Link TL-WR841N.
Step 1
First you need to connect the router to the computer through which it will be configured. Figure 16 shows the connectors through which the router is installed (blue for power supply; red for the Internet wire entering the apartment; green for connecting to the main PC, from which the network will be managed).
fig.16 back side of the router with connectors.
Step 2
Go to the web interface of the router.
fig.17 enter the ip-address to enter the settings of the router.
To do this, in the browser, in the address bar, enter the ip-address of the router with the http: // prefix (as in Figure 17). This "set" of numbers is different. It can be read where it will be specified by the manufacturer in 99% of cases - on the back of the device.
Step 3
Enter a username / password pair. In 90% of cases, this is admin / admin.
Step 4
Once in the settings, look for the “Network” tab, and in it “WAN”. Here you need to specify the type of network. To determine which connection is suitable in your case, you can consult with the provider. Click "Save" and go on.
Step 5
Go to the “MAC Clone” (ibid., In the “Network”) and click on the “Clone MAC Address”, after which we save the changes again (save).
Step 6
Go to “Wireles”\u003e “Wireless Settings”, where we enter all the values as shown in the figure below. The only thing you can think of is the name of the network and indicate your real region. Do not forget to persist.
Step 7
Now go to the tab "Security" (Security). Specify the type of encryption and its algorithm as in the screenshot (you can just fill in everything the same way as in the image above). And, most importantly, create your own password for the network created.
Again we save all changes and complete the installation of the router by rebooting. To do this, look for the tab "System Tools"\u003e "Reboot", in which we press the single button "reload".
This completes the router setup process. Now you can bring to the computer on which you installed the wifi receiver wireless Internet. You need to go through that PC to “Available Connections” (as mentioned above), select the created network and connect to it.