If you suspect that the hard drive fails, then you can dispel any doubts with the help of a few simple software tests. Below will be described in detail how to check hDD and identify possible faults - you just have to choose the most suitable option.
You can check the hard drive different ways, implying both the use of built-in Windows tools, and the use of special software. To test the hard disk for errors, we will be the tools of Windows:
- Utility
- Standard disk check.
With the help of these built-in functions, the system checks and independently corrects errors on the hard disk. As for testing on bad sectors, then use the following programs:
- Ashampoo HDD Control 2.
- HDDScan.
- Victoria
You can learn more about removing bad sectors from our article about how to recover a hard disk. Here we will only address the process of checking the surface of the hard drive.
The CHKDSK application runs through command line at windows environment or using a boot disk, if you can not log into the system. First, let's deal with a simpler, first option.
- Click Win + R to launch the Run menu.
- Type "cmd.exe" and press Enter to open a command prompt.
- Enter an operation command like "chkdsk c: / f".
A brief explanation of the command syntax. By default, the CHKDSK utility does not check the surface and does not correct errors. To force the application to do this, you need to specify the volume that you want to check (in this case, C), as well as the / f or / r flag.
The / f flag initiates error correction, the / r flag implies a search for bad sectors.
The duration of the command depends on the amount of media and the number of errors on it. If you start the system disk check, it will be performed only after a reboot.
If the computer is constantly restarting and you cannot get into your account, then you can run the CHKDSK utility via the command line, which is among the recovery tools (on Windows XP, the recovery console is used for this purpose).
Standard disk check
Another way to check your hard drive for performance is to use standard checkwhich runs in the properties section of the hard drive.
If the test volume is currently in use (for example, the program is running, the files of which are stored in this section), then you will be asked to stop its operation. Click “Disable” to start checking the section. The duration of the test depends on the volume of the disk and the amount of information recorded on it.
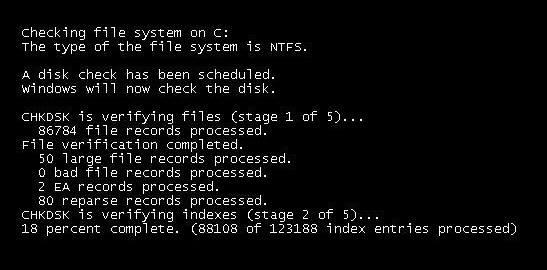
If you want to check for errors the system partition, which stores windows files, then you will be prompted to start testing after a reboot. To do this, click "Check Disk Schedule".
After the computer restarts, a black (blue) screen will appear. Do not press anything - after 10 seconds, a series of tests will start, after which the machine will reboot again and start working in normal mode.
HDDScan
Diagnostic program hard drive HDDScan allows you to quickly and clearly obtain the necessary information about the status of the hard drive and, if necessary, correct errors.
For clarity, go to the tab "Map". On the right you will see several values of the sector scan speed.
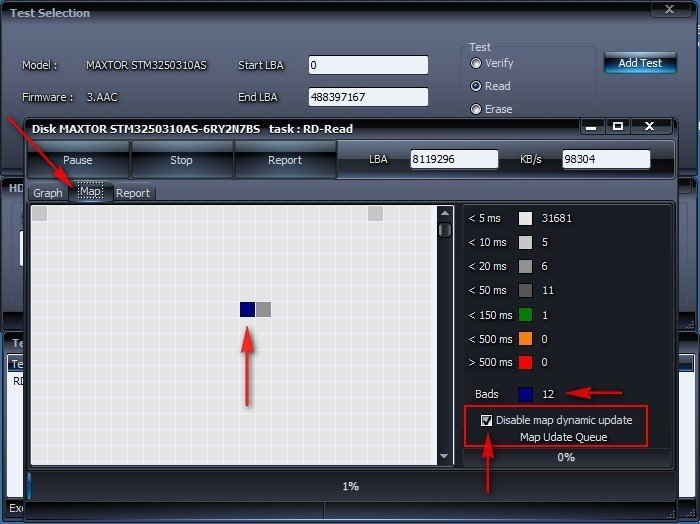
After scanning, you will receive a full report on the state of the disk surface. If there are any problems, it is recommended to fix them immediately, using our tips on how to recover the hard drive.
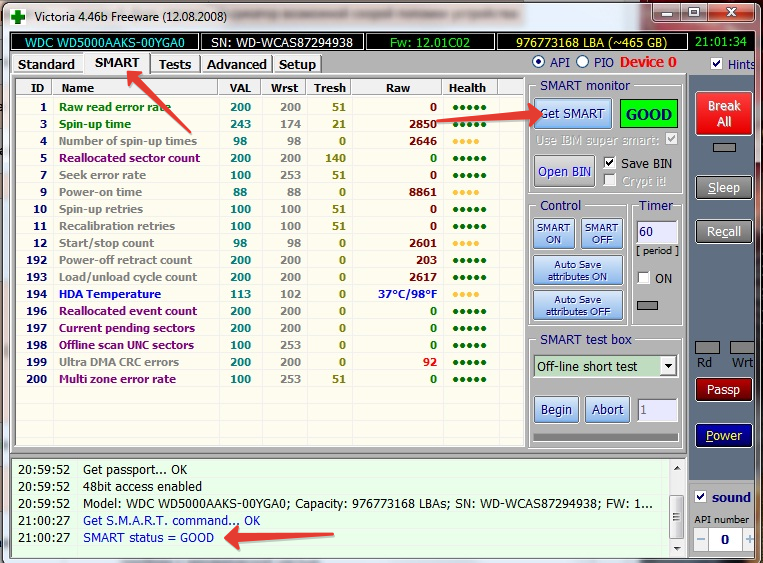
Victoria
This program is one of the most popular tools to check the hard drive for health. Its convenience lies in the fact that, if necessary, Victoria can be launched, even if there is no way to log in to the system — a special boot disk. We will see how Victoria works in the Windows environment. Therefore, first we will get acquainted with the program interface:
- Tab “Standard” - contains the main characteristics of the hard drive: model, number, size, number of cylinders, etc.
- Tab "SMART" - view the current status of the hard disk.
- Tab "Tests" - contains a series of tests to check the state of the surface of the carrier.
Now let's figure out how to work with these tabs in order to get complete information about the performance of the hard drive and, if necessary, fix broken sectors:
Ideally, all sectors should be gray or light gray. If after testing you see a lot of red and orange rectangles, then this is a reason to think about the state of the surface of the hard drive.
If you have found the blue sectors, signed as “Err x”, then run the test again, ticking the “Remap” option.
Ashampoo HDD Control 2
Finally, let's look at another handy utility with which you quickly check the disk for errors - Ashampoo HDD Control 2. The program is paid, but it has a trial period, so you can use it to test your hard drive for free. Ashampoo HDD Control 2 has many functions, from defragmentation to removing traces of the Internet, but we will only look at the Testing tab - you can familiarize yourself with the other sections.
To check the surface of the hard drive, go back to the Control tab and run the Surface Testing tool. 
You can observe the progress of surface testing in the appeared window, where the whole process will be presented in the form of color symbols:
- Blue square - sector is not yet verified.
- Green square - no errors detected.
- Red square - at least one bad sector found.
The duration of the test, as usual, depends on the volume of the medium being checked. If you have a large disk, it is better to find another occupation for a while - you will have to wait for a long time, but after checking you will know exactly what your hard drive is in.
Hard disk is a very important component of any computer. At the same time, it is sensitive and susceptible to various malfunctions. So, bad sectors on the surface can lead to a complete failure of work and the inability to use a PC.
It is always easier to prevent a problem from occurring than to deal with its consequences. Therefore, each user who wants to prevent possible problems associated with incorrect operation of the HDD, it is important to monitor the presence of bad sectors.
Sectors are units of information storage on a hard disk, into which it is divided at the production stage. Over time, some of them can become faulty, inaccessible for writing and reading data. Bad sectors or so-called bad blocks (from English bad blocks) are physical and logical.
Where do the bad sectors come from
Physical bad blocks may appear in the following cases:
- Manufacturing defects;
- Mechanical damage - falling, ingress of air and dust;
- Shaking or hitting while writing / reading data;
- Overheating HDD.
Such sectors, alas, cannot be restored, one can only prevent their occurrence.
Logical bad sectors appear due to software errors caused by viruses or an abrupt power outage while recording to the hard disk. Every time the HDD is checked before recording, it is not performed in problem areas. At the same time, such sectors are physically fully operational, which means that they can be restored.
Signs of bad sectors
Even if the user does not check his hard disk, bad sectors will still be felt:
- System hangs especially at the moments of writing and reading data from the hard drive;
- Sudden reboot and unstable PC operation;
- The operating system gives various errors;
- Noticeable reduction in the speed of any operations;
- Some folders or files do not open;
- The disc makes strange sounds (creaking, clicking, tapping, etc.);
- HDD surface is heated.
In fact, there may be more signs, so it is very important to be attentive to the work of the computer.
What to do if bad sectors appear
If the bad blocks appear as a result of physical impact, such as dust and debris inside the device, or malfunction of the disk elements, then this is very dangerous. In this case, bad sectors not only fail to be corrected, but they also fail to prevent their further occurrence with each system access to the data recorded on the disk. To avoid complete loss of files, the user needs to reduce the use of the hard drive to a minimum, as soon as possible to rewrite the data on the new HDD and replace it with the old one in the system unit.
Dealing with logical bad sectors will be much easier. First, you need to test using a special program that will help you know if such a problem exists on your disk in principle. If it is found, it remains to run the correction of errors and wait for their elimination.
Method 1: Use the utility to diagnose the condition.
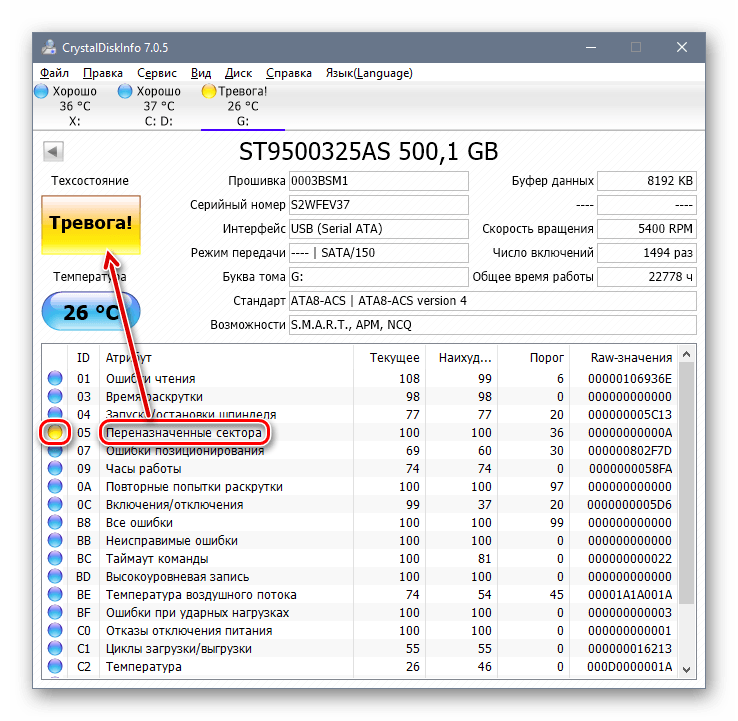
You can find out if there is a problem with your HDD using specialized software. Simple, affordable and free is the program. In its functionality, complete diagnostics of the hard drive, in the report of which you need to pay attention to 3 points:
- Reassigned sectors;
- Unstable sectors;
- Uncorrectable sector errors.
If the disk status is marked as " Good", And next to the above indicators are lit blue light bulbs, then you can not worry.
But the state of the disk - " Anxiety!" or " The bad“With yellow or red lights indicates that you need to take care of creating a backup as soon as possible.
You can also use other utilities for checking. In the article, following the link below, 3 programs were selected, each of which has a function for checking bad-sectors. Choose a specific utility is based on their experience and knowledge for its safe use.
Method 2: use the built-in chkdsk utility
Windows already has a built-in program for checking the disk for bad blocks, which does its job no worse than third-party software.

The hard disk is an important, and far from perfect, component. personal computer. For some users, it works unreliably, “pours”, data from it is lost or can be significantly damaged. One of the most common problems of the hard disk is the appearance on it of the so-called "broken" (bad) sectors, which become the "headache" of many users. In this article I will talk about the reasons for the appearance of broken sectors on hard driveI will list a number of programs allowing them to be recognized, and also I will explain how the hard disk is checked for bad sectors on your PC.
As is known, a traditional hard disk consists of several rotating magnetic disks, over which they move. magnetic heads, magnetizing any part of the disk and recording, thus, information on it (in the form of zeros and ones).
The disc itself is divided into tracks, and the latter, in turn, are divided into sectors into which the necessary information is recorded.
Due to certain reasons (I will list them below), information from a number of sectors cannot be read as a hard drive. Such sectors get the status of “bad sectors” (bad sector), and the system tries to either restore the performance of such a sector (restore), or reassign the address of such a broken sector to the backup sector (remap), or carry out its total cleaning of the broken sector (erase). In the case of remaping (remap), spare working sectors are usually located at the end of the hard drive, and the hard drive spends additional time accessing them, which inevitably affects the speed of the hard drive and the loading of various applications and programs. Next, I will tell you how you can check the hard disk of your computer for bad sectors.

Causes of bad sectors
What are the reasons for the appearance of bad sectors on Hdd drive? Usually they are as follows:
- The gradual "shedding" of the surface of the hard disk due to its wear and tear, due to which bad sectors on the disc is becoming more and more;
- Physical impact on the hard disk due to various external impacts;
- Power surges that directly affect the integrity of data on the hard disk, and leading to the appearance of bad sectors;
- Incorrect shutdown of the computer (improper operation), as a result of which bad sectors appear on the hard drive.
Symptoms of bad sectors
Due to the reasons described, the broken sectors on the hard disk become more and more, which begins to directly affect the work operating system. In particular, you may notice the following:
- The system is loading slowly;
- The system slows down (freezes) when reading and writing data from the hard disk;
- The system generally refuses to boot (quite often - in the middle of the process);
- The computer sometimes reboots for no reason;
- During the operation of the OS, various errors regularly occur.
After we describe the symptoms and the reasons for the appearance of bad sectors, we proceed to the description of how to check the hard disk for bad sectors.
The best ways to check hard disk for bad sectors
So how to check bad sectors (and correct them)? Below I will describe a number of ways that have proven their effectiveness in working with various hard drives.
Method 1. Use the system utility CHKDSK
The easiest and convenient way find and fix bad sectors on the HHD hard drive - this is to use the functionality system utility Chkdsk
- To use its capabilities, launch Explorer, right-click on an inactive volume (on which there is no operating system installed), select “Properties” in the menu that appears.
- In the window that opens, go to the “Service” tab, then click on the “Run check” button.
- Check the checkboxes next to the two check options, click on “Start”, and wait for the process to finish.
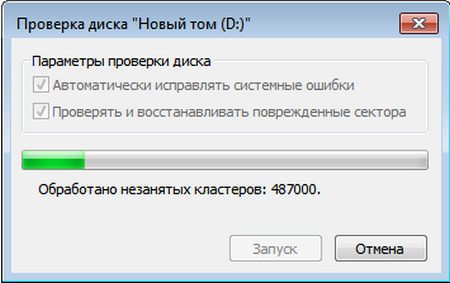
The same can be done with the system volume (on which the OS is installed). The only thing that this may require a reboot of the system, but after the system reboots, it will start checking the disk for bad sectors.
You can also run CHKDSK through the console. To do this, run the command prompt as an administrator, and enter in it:
chkdsk c: / f / r — (instead of: if necessary, specify another letter of the problem disk) press enter and wait until the process is complete.
Method 2. Use the program Victoria HDD to analyze and treat the disk.
Victoria HDD - probably the most popular program for checking the hard disk for bad sectors (and also for restoring the latter). It effectively checks and repairs bad sectors, has good feedback from experts, and can be used in both the classic graphics mode and DOS mode.
One of the wiki's bonuses is the ability to read the SMART index of your hard drive, which allows you to track the degree of its performance in sufficient detail (the SMART tab of the program). In addition, the Victoria program performs "remapping" (reassigning damaged sectors), zeroing bad sectors, conducting a detailed test of the hard drive surface, ranking the sectors into different groups depending on the speed of reading information from them.
- To use this program download and run it.
- Then go to the “Test” tab, select “Ignore” there and check the surface for the presence of broken sectors.
- If such ones are found, it is worthwhile to select the “Remap” mode in the same tab, this will allow you to reassign addresses from bad sectors to backup ones.
- If, after remapping, bad sectors remain, you can try to restore them using the “Restore” function, while the “Erase” function completely erases data in bad sectors by writing zeros there.
In general, the functionality of Victoria is quite extensive, and in order to familiarize oneself with its full description, it is necessary to switch to exactly about the use of the program.
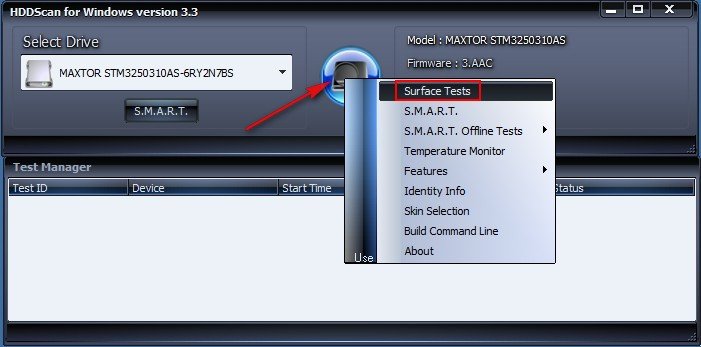
Method 3. Use the HDD Scan program to check the hard drive for bad sectors.
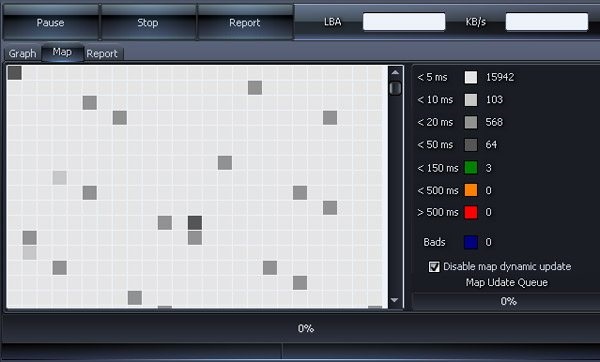
Another program that can perform a hard disk check for bad sectors is HDD Scan. This is a fairly popular utility, offering several different tests (Surface Test, Smart Offline Tests, etc.). Select Surface Test, check the box next to “Read” on the right and start the disk surface check.
The program will analyze the response time of the available sectors, and give us the result in graphical mode.
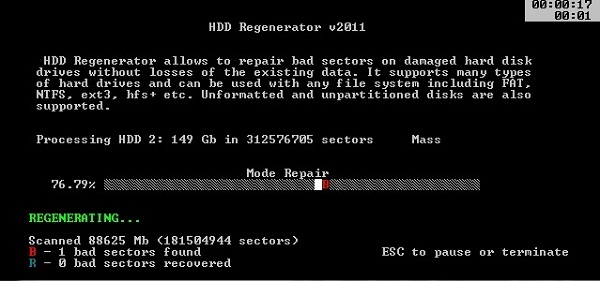
Method 4. Check your hard drive with HDD Regenerator
HDD Regenerator program allows you to check and restore data on your hard disk, the same applies to broken sectors. I note that the program is paid, but those who wish can search its free options online.
- To take advantage of the program's capabilities, you need to start it, select a disk for work, decide on a scan mode (I recommend Normal Scan), and then select the “Scan and repair” option.
- Then it will be necessary to specify the scan boundaries (starting from sector 0) and monitor the scanning process itself.
- In differences from the speed of response of the sector will be marked with different letters and color.
Method 5. Scan the disk with HDD Health for bad sectors.
Another program to check the surface of the disk is a damaged sector. HDD Health analyzes the general state of the disk, provides detailed statistics on the available partitions (using SMART technology, including the general state of the structure, the indicator of the temperature of rotation of the disks, the presence of bad sectors, and so on).
Icon running program is in the system tray, the program itself, as necessary, notifies the user about any problems in the hard disk.

Hard disk recovery, removal of BAD (broken) sectors [video]
Usually, the hard disk is checked for bad sectors using special software tools, Victoria level HDD or HDD Regenerator. The most effective of all the programs listed in the article - Victoria HDD allows not only to check the surface of the hard disk for the presence of bad sectors, but also to restore them, to remap and clean them. If bad sectors began to appear on your hard drive, then I recommend using the functionality of the above programs, they have proven their effectiveness in working with hard disks of many users.
In contact with
How to check hard disk for errors and bad sectors
Hello friends! Today you will find a great article on the topic of health hard drives. The thing is that hard drives often fail, sometimes it happens suddenly. For example, after falling and hitting. (In laptops, this is generally an eternal song). And there are also for natural reasons, for example, in view of wear. In this case, the hard drive promises painfully long death wheezes.
So how can this be warned and know for sure that your hard drive is already on the verge and he needs urgent repair or replacement !? After all, no one wants overnight to lose all their files on a computer. And ok if you do backups to the cloudbut many do not. Therefore, I recommend at least once every six months to check all hard drives for errors and bad sectors.
Check hard disk for errors
1) Go to " My computer"(Or for those who have 8.1 in" This computer"). Right-clicking on the disc opens the properties.
2) Go to the tab "", click " Check».
3) We check the hard disk for errors, on completion it will be known whether they are or not. I have everything in a little boy.
Check hard disk for bad sectors
With errors, everything is clear, but now what is broken sectors, now I will try to explain. The fact is that a hard disk consists of a set of cells in which a certain amount of information is recorded. For example, on my hard drive 1953525167 sectors.
To check each sector, a special program must turn to each cell and measure the response time from it. The ideal is 3 milliseconds (This is about one thousandth of a second). Critical result - 600 milliseconds and above. The latter will mean that the cell is covered with a copper basin. That is, the lower the value, the better. With the theory figured out, go to practice!
1) To diagnose the hard drive (hard disk), we will use the time-tested program Viktoria. You can download it or.
Or from an attachment:
Victoria 4.46 Free.rar
2) Unzip it into a separate folder and run the file vcr446f.exe with administrator rights.
3) This is how our program looks. Don't be scared in English!!! Now let's look at what is what. First of all, you need to select our hard disk in the upper right column, in this case I have one.
4) Then go to the tab " SMART »where click on the " Get SMART ».
5) We will not go into the details of all these parameters, the main thing we need to pay attention to is the average result, in my case it is GOODthat is good. If you have BAD or something else, it means something is wrong with your hard drive and it's time to think about acquiring a new one.
Just pay attention to the temperature, in my case the temperature is 34ºС within the normal range. If you have this parameter above 40ºС, then it would not hurt to improve the cooling system of your PC.
6) Attention! : Before you start checking the hard disk for bad sectors, you need to do some preparations:
First, read the whole of this and paragraph 7 to the end and remember the sequence of actions.
Secondly, turn off the Internet.
Third, turn off all running programs, including antivirus. This is necessary for the test to be the most reliable, otherwise the results may be distorted.
Fourth, I recommend creating a shortcut on the desktop or in a notebook with a link to this article, so that you do not have to search for it.
After all these actions, you can start checking. To do this, go to the tab " Tests ». Be sure to check that the switch is on " Ignoreas in the screenshot. Next, click " Start.
7) During the test, do not do anything on the computer; do not minimize the program window. According to the numbers I shall sign what is what.
- The current inspection progress in percent.
- Remaining checkout time.
- A green square is a cell response of 200 milliseconds. Orange - 600 and so on. Blue - completely non-working sector.
- Stop checking.
Ideally, at the end of the test there should be no green, orange, and even more red and blue sectors. Norm - a pair of green sectors, not more. If there are a dozen bad sectors (3 in the screenshot above), then after some time the hard drive will begin to slowly tilt the legs. Blue sectors are already a death condition.
Attention! : If in the first five minutes of the test the orange, red and blue sectors are trampled, then you can safely turn off the check - your hard drive is definitely in poor condition and needs to be replaced!
In conclusion
That's it, now you can always find out if everything is in order with your screw. Of course, the test results should not be 100% trusted, because too many factors affect this, but in a bad case this is a reason to think, if not of a new hard disk, then at least back up all important files to external media.
Well, I have to go. See you later!
You do not have the required permissions to view attachments in this message.
Good afternoon friends. Today we will return to the topic hard checks disk for errors. I already mentioned free program , which, despite its age, pretty well checks the hard disk for errors.
But, at your request, we will talk about a more functional program that checks the hard drive more carefully. Behind hard drive you need to constantly monitor, prevent its overheating, check it for the presence of bad sectors, carry out its diagnostics.
Program hard drive check
So, I found, in my opinion, the most suitable program for this test. This program is - Ashampoo HDD Control 3. This program paid Price $ 59.
On the other hand, it already has Russian language and there is the possibility of free use for 40 days. I will give you a link to download free software from the torrent.
Ashampoo HDD Control 3 download.
So, install the program. We have the following window. Consider the program in more detail.

System
We look at the left column of the menu. We automatically set the menu "System". Here a small area is displayed, where a general summary of the status of the hard disk is presented.
First of all, the “Health” status of the hard disk is displayed here. In the middle of the window you see a green "OK" button and an inscription - the hard disk has no problems. Which is pretty good. It is bad if the button is red. In this case, there will be another message stating that the disk has problems.
Also, the program shows us that the temperature of my disk is 37 ° C. Which is good too. Bad, if the temperature of your disk exceeds 54 ° C. In this case, you should think about changing the disk, or, about buying a new cooler, which will not allow the temperature higher than the allowed!
In the old version of the program, the percentage of disc wear was shown, which was very convenient. Unfortunately, in the third version of Ashampoo this indicator was removed.
Below, under the temperature line, there is information about the disk: - serial number, firmware version, cache size, etc. Also, here you can see which partitions the hard disk is divided into and how much they occupy.
Information
I advise you to definitely click on the blue button "Information". By clicking on it, you will see information about your disk. Let's take a look at S.M.A.R.T. We are interested in the number of on and off. Also, opening hours. These are very interesting and very important parameters.
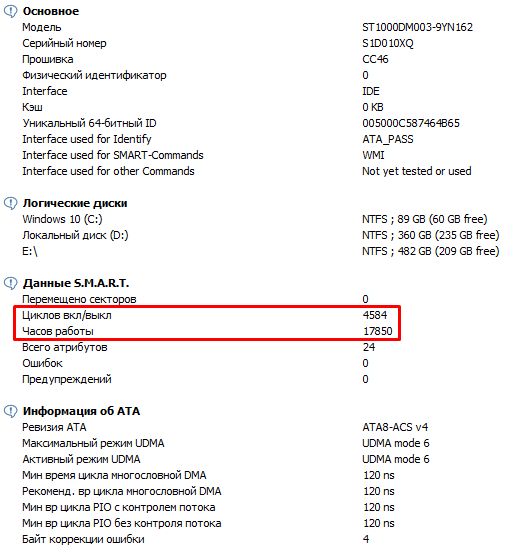
Why? Because the hard disk is designed for a limited number of start-stop parameters! That is, the hard drive engine is designed, as a rule, for 500,000 times of inclusions. Turning off is simply stopping the power supply to the drive spindle.
And the inclusion is the most energy-intensive operation, on which engine wear depends. That is - each new engine start, each new spin-up of disc packs is an additional wear on the hard drive. It is much easier for a hard disk to simply keep the drives moving than to switch on and off each time.
Wear disc from this will flow much faster. If the disc is running continuously, without shutdowns - this is better than when it is often turned on and off. Especially several times a day!
If your computer turns on and off at night in the morning, then this mode of operation can be called ideal! So, my hard drive has been turned on 4581 times - this is not much, but it is desirable that this figure be lower.
I add, in Windows, put the automatic shutdown (sleep mode) no more than every 60 minutes, or disable this feature altogether. Otherwise, in a day you may have a few dozen start-stop. Then, the disk will wear much faster! Turning off the monitor can be installed after 10 - 15 minutes of inactivity, or, as you prefer.
The figure of 500,000 seems big. But, in fact, it is exhausted very quickly, if the disk often turns off during the day! In this way, over the course of several years, I have exhausted my old hard drive, which automatically shut down every 10 to 15 minutes of downtime!
The operating time of my hard disk is 17833 hours - a little over two years. This is normal.
Also, there is one more important detail! If you bought a new hard drive, it’s pretty easy using the Ashampoo HDD Control 3 program to check if it is really new, or if you are deceived. Watch the cycles of inclusions and opening hours, and everything is clear to you!
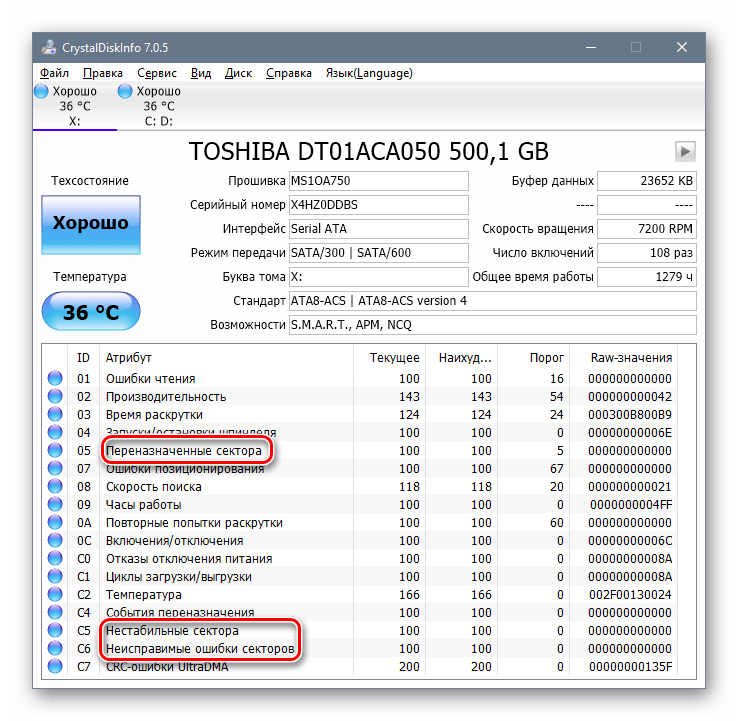
S.M.A.R.T.
This item is very interesting and represents the greatest value in this program. The fact is that quite a few programs that allow you to display hard condition The disk, the so-called S.M.A.R.T. self-testing system, displays this state simply in the form of parameters with numerical values.
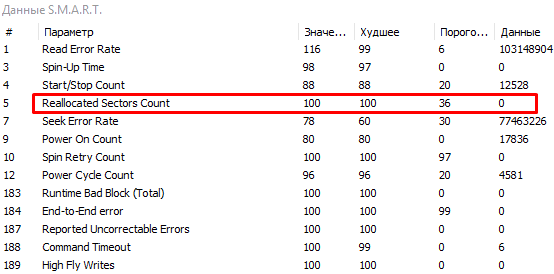
Here everything is much more convenient. Here, about each item there are explanations in a more understandable language. For example, select the first item Read Error Rate, enter wikipedia and find out what this line means - the error rate when reading data from the disk ...

In the previous version of Ashampoo, when you clicked on any of the data stock, an explanation appeared at the bottom of the program window. Unfortunately, in new version This function is missing. Most likely, the programmers, updating HDD Control 3, decided that most people already know everything about these values!
Also note the line Reallocated Sector Count - is the number transferred to the backup area bad sectors, or bad-blocks (look at the number in the "Data" column). This is the most critical parameter of all.
Also, if the hard disk contains at least one bad block, this is already bad. This is a signal to replace the disc! I have this number zero, and this is great!
Function - run test
Choose from the drop-down menu "Run the test surface test." Automatically, the program begins to test the hard drive surface of the selected hard drive. This function shows whether your hard drive has a broken sector.
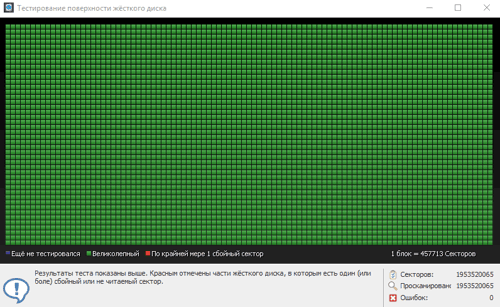
At the same time, the whole field should be green. If at least one sector is red, then it is broken. In this case, you need to get ready to change the disk in the near future. As you can see, after checking my hard drive, the whole field is green! Also, after checking, you should see the inscription.

If there is another - this is a reason to be wary.
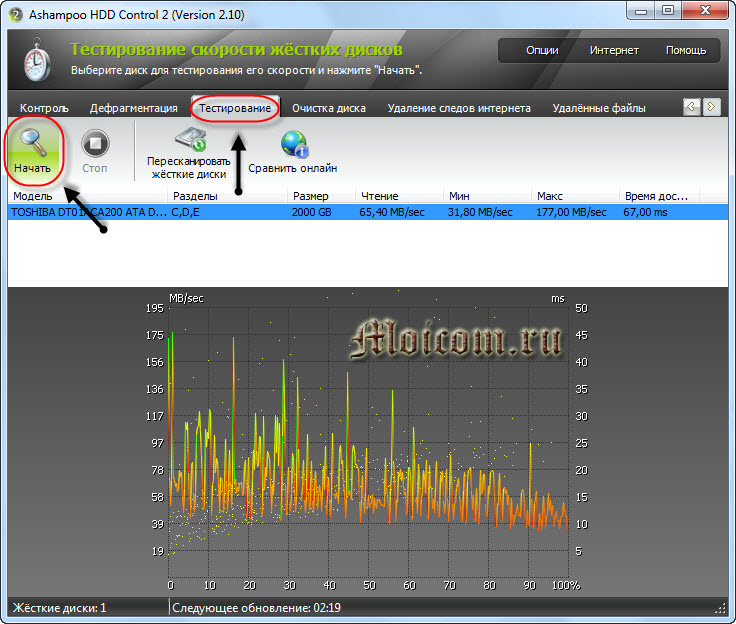
Benchmark
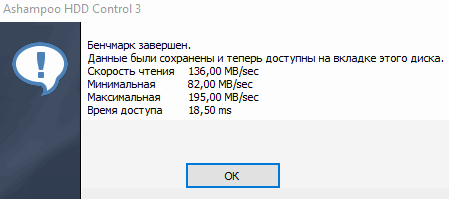
This is a utility for testing your computer at high loads. Gives fairly complete speed information. work hard disk. Let's go through it by clicking “Run benchmark”.
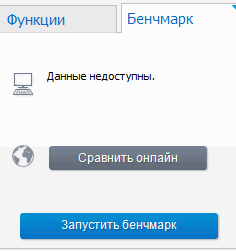
We have a graph of analysis.
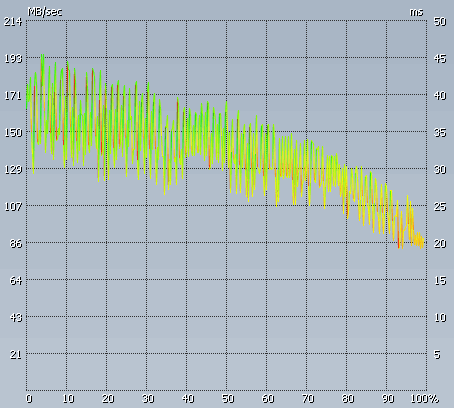
After analyzing, we get data on reading speed under high loads, access time, and so on.
Now back to the left column - Menu Network. Allows you to monitor computers on the network, analyze them hard drives And so on. Useful if you have a similar network.
Service
Defrag - this is defragmentation, Drive Cleaner - hard cleaning disk from temporary files, history (recently used files), logs and so on. As you can see, I have accumulated such objects decently, as many as 945 MB. Click to remove!
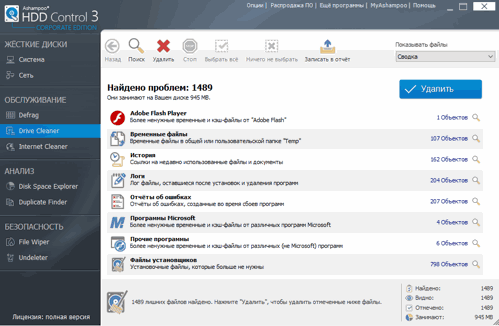
Internet Cleaner is browsing history. You can clear the history with it, but I’m used to cleaning it up. Otherwise, you can delete unnecessary data (there is nothing to worry about, but then you have to re-enter many passwords, logins, etc.)!
Analysis
Disk Space Explorer is a useful feature. Shows which programs have the entire hard disk or a specific partition. Reminds the program. Let's analyze the C drive by clicking on the “Analysis” label.
As you can see from the screenshot, the files on the system disk occupy 33.61 GB. Of these, Windows daddy is 17.4 GB, which is 51.77% of the total disk load. Then, look through all the other folders.
![]()
Duplicate Finder is a clone removal feature on a computer. In other words, duplicate files. When using, do not forget to put in exceptions system files and daddy. And also folders where programs are installed.
For example, I install programs on drive D, not C, in order to load less system disk. Duplicate Finder scanning is rather slow, so I will not turn it on.