1. Open Device Manager. To do this: Click "Start" -> "Settings" -> "Control Panel" -> "System". Select the "Equipment" tab. Click "Device Manager". In the window that appears, expand the "Network adapters" branch by clicking on the [+] to the left of it.
2. Select the wired network adapter with the left mouse button ("Realtek ...")
Click on the right mouse button and select "Properties".

Make sure this device is in use (turned on) and working properly. If it is disabled, enable it ("Applying the device").

3. Select the "Power Management" tab.
4. Uncheck the box next to Allow the computer to turn off this device to save energy. Click OK. Close all tabs.

5. Open the "Start" menu -> "Settings" -> "Control Panel". Double click on the "Network Connections" icon.
6. Right-click on "Connect via local network"and in the window that appears, select" Properties ".

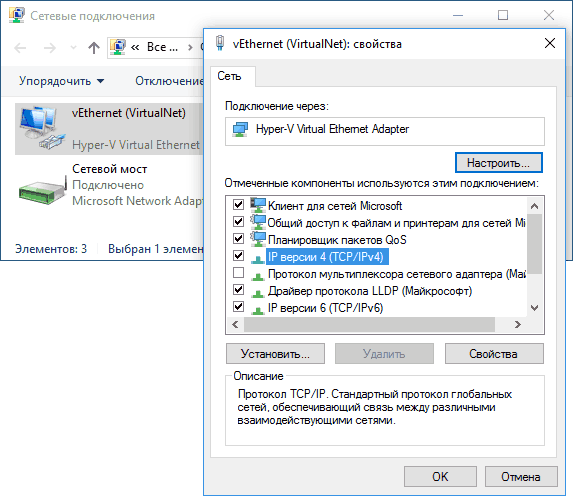
7. Highlight, by clicking on the text, "Internet Protocol (TCP / IP)". Do not remove the check mark in this line.
8. Click on the "Properties" button below.
This article will help you quickly answer your questions. You can also study the entire material to get a complete understanding of network setup in Windows 7.
Quick navigation to find the desired parts of the publication:
Introduction
By purchasing an operating system Windows 7, the user must be prepared for the fact that sooner or later he will be faced with the task of configuring the network in the operating system. For some, this task is not difficult. Typically, installing and configuring the network in Windows 7 is the next step right after installing Windows 7 ( if you have not yet installed Windows 7 and are not entirely sure of the steps you need to take, then you should read this section: Installing Windows 7).The network configuration step is required for the following steps after installation:
- downloading the latest distributions of anti-virus programs from the Internet;
- downloading the latest versions of the video player, web browser;
- if necessary, downloading from the network drivers for some devices on your computer (if they were not downloaded and installed automatically, or if installation discs absent);
- using the XBOX prefix;
- exchange of documents and fast access to the shared resources of multiple computers or laptops. In this case, to use the Internet, you need to set up a wired or wireless network. As a rule, one computer or laptop serves as a kind of Internet distributor for all other units of computer equipment..
The same is the case with MAC addresses and subnet masks. All of these settings have remained the same and have been familiar to users for a long time. Some changes only affected the interface of the Control Panel and its items, which are used to access the network parameters. Everything else is unchanged. This is another undoubted plus of Windows 7. Users who have previously used Windows XP will be able to quite easily understand the new operating system. Typically, setting up a local network on popular operating systems such as Windows Vista, Windows 7, Windows Server 2008/2008 R2, starts with such a configuration component network properties, how "".
This property configurator allows the user to select a network location, set up printer and file sharing, and view a network map. You can also monitor the status of all your network connections. It is very convenient and practical.
How and where to open the Network and Sharing Center component
Before you can use the full functionality for creating network parameters, you need to find and open it. One of the following actions of your choice will help you open correctly active window « Network Control Center and general access »:As you can see, if you are careful and read everything, then with the search for the component "Network and Sharing Center", no problems should arise. It should be noted that in order to expand the ranges of used IP addresses in Windows 7, in addition to the previously existing IPv4 protocol, a new one was added - IPv6. True, providers have not yet used it, and when this will happen is currently unknown. Most likely, the creators of Windows 7 were ahead of the curve. 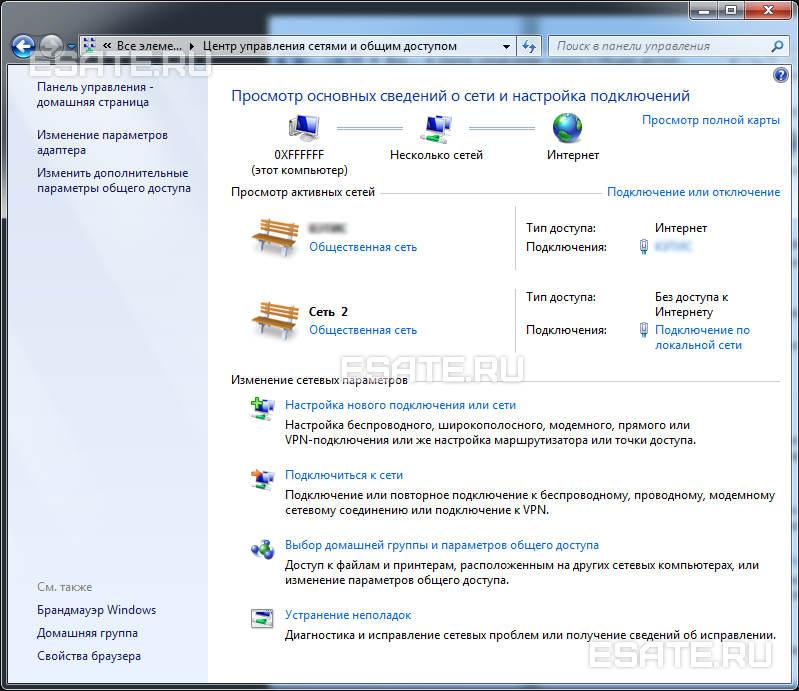 Figure 1. The illustration shows the Network and Sharing Center window.
What does the network location of a computer mean?
Understand what is " Network location", You need to even before you start working with this important component. For all computers, this parameter is set automatically the first time they connect to the selected network. This also applies to the firewall and security settings of the network selected for the connection. All of them are also configured automatically the first time a computer or laptop is connected to the network.
The Windows 7 operating system supports multiple active profiles at the same time. This allows for the most secure use of multiple network adapters that can be connected to various networks.
By the way, Windows Vista uses the strictest firewall profile for all network connections. This may be why Vista is not as popular as Windows 7.
There are four main types of network locations:
| The first type is the home network. From the name itself, it becomes clear that this network location is intended for a computer that is used at home. It is also used in networks where all users know each other well. Such computers can not only create, but also join home groups. Typically, for the convenience of users when using home networks, network discovery is automatically turned on. Home networks provide all computers with quality network access. | |
| The second type is an enterprise or organization network. This type of network location also allows you to find the network automatically. The difference from a home network is that on an enterprise network, you cannot join or create a computer to a homegroup. The network is intended solely for professional activities in an enterprise, organization or office. This type is called an abbreviated form (SOHO), that is, it is used in a small office network. | |
| The third type is the social network. Cafes, airports, train stations and other public places - this is where computers use the third type of network location. By default, the ability to join homegroups is disabled in this location. Network discovery is also disabled. It is no exaggeration to say that this is the most strict arrangement. | |
| The fourth type is the domain network. The domain type of network location is almost no different from the working network. Except that in the domain type, the network discovery configuration and Windows firewall defined by group policy. This also applies to the network card. To existing network received automatically the type of network location "Domain", the computer only needs to be joined to the Active Directory domain. Only in this case the network can become a domain network. |
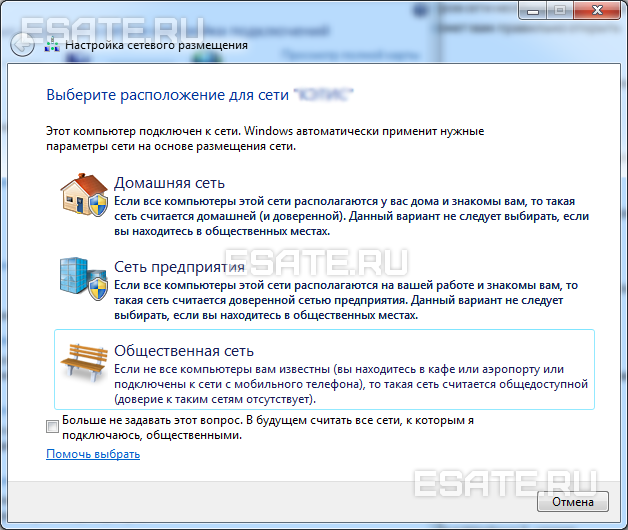 Figure 2. Selecting a network location for the computer.
Network map
In order to see the location of all devices included in a particular local network, a network map is used. This is a graphical representation of the devices on the network and the diagram by which they are connected to each other.The network map can be seen all in the same window "Network and Sharing Center". True, only the local part of the network card is displayed here. Its layout directly depends on the available network connections. In the upper left corner, you can see the display of the computer on which the map is being generated. On the left you can see the display of the rest of the computers included in the subnet.
 Figure 3. An example of a network map.
You can view the network map at any time. True, only for locations such as " home network"And" Enterprise Network ". If the user is curious to view the maps for the "Domain Network" or "Public Network" locations, he will see a message that the network message has been disabled by the administrator by default. The network administrator can enable mapping using Group Policy.
In Windows 7, not one, but two components are responsible for the operation of the network map. it Link layer(Link Layer Topology Discover Mapper - LLTD Mapper). It is this important component that requests the devices on the network to include them in the map.
Network connections
In the window " Network connections»You can see the entire set of data that a user needs to connect a computer to the Internet, local network or any other computer from the home network.This data is available for viewing only after installing all required drivers for each network adapter on Windows 7 and after automatically configuring all network connections on a specific local computer or laptop.
There are several simple and available ways, with which you can easily and quickly open the window " Network connections»: 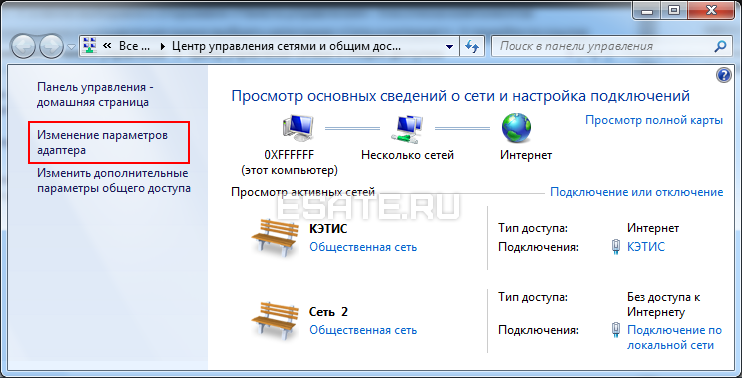
 Figure 5. "Network Connections" window
Window " Network and Sharing Center"Similarly windows window XP. The whole detailed information about the network connection can be obtained by selecting the "Properties" option for a specific network adapter (see Figure 6). On Windows 7 for customization network connection in the "Properties" window, select "Internet Protocol Version 4". In the same window, you can also make the necessary settings for gateways, subnet masks, DNS server, IP addresses, etc. All this information can be obtained from the provider that provides the Internet access service.
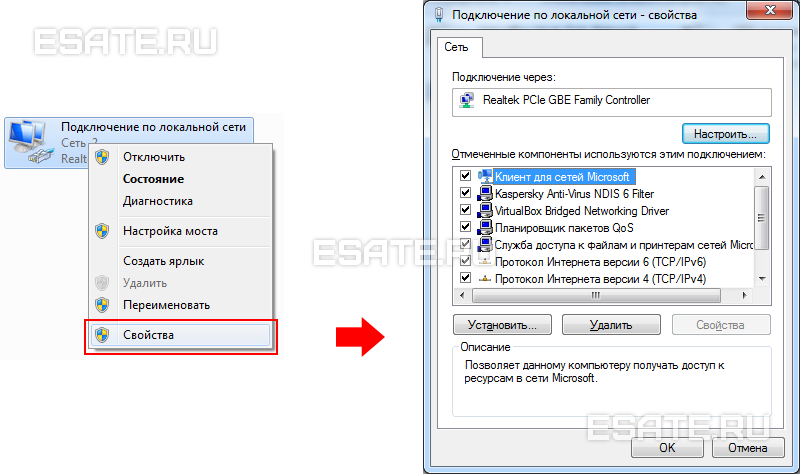 Figure 6. How to view the MAC address of a network card (network adapter).
Renaming a network adapter
Windows Developers 7 made sure that operating system by default, it assigns itself to all network connections the names "Local Area Connection" or another option - "Connect to wireless network". If the user's computer has more than one network connection, the system also assigns a number to the connection. There are three ways to rename the name of any of the connections you create.- The first way. Select a network connection and click on the "Rename connection" button located on the toolbar. After entering a new name, press the key Enter;
- Second way. Using the key F2: press, enter a new name and save with the same key Enter;
- Third way. To rename the network connection selected from the list, right-click on it, select the Rename command from the appeared context menu, rename and save the changes using the already familiar key Enter;
Network status
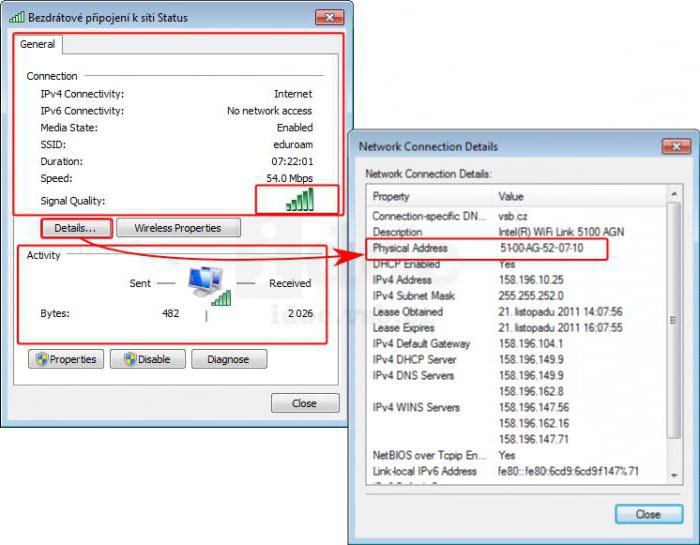
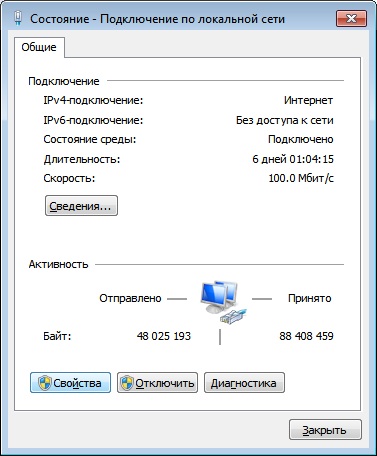
In addition to the ability to rename the connection, you can also check the network status in this window. Using this window, which is called "Network Status", at any time you can not only view any data about the connection network, but also find out such details as MAC address, IP address and many other useful and interesting information.There are providers that open Internet access to users using the MAC address of the network card. If, for some reason, the network card has changed or the entire computer has been replaced, the MAC address will also change, and Internet access will stop. For a new connection to the Internet, you need to set the required physical address (MAC-address).
To see the current MAC address, as well as full information about the connection, you need to right-click on the connection to the local network, then select the "Status" item in the opened context menu(see figure 7).
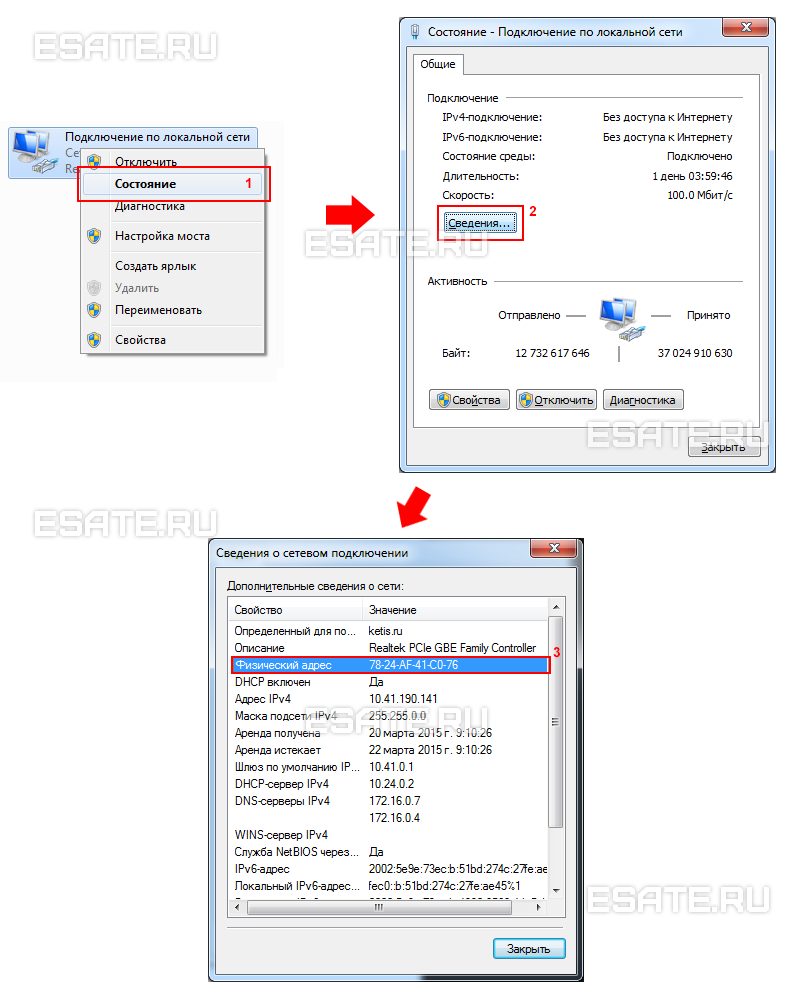 Figure 7. How to view the MAC address of a network card (network adapter).
To change the current MAC address, you need to click on the " Settings"Next to the name of a specific network card and find in the opened window of the" Advanced "tab the parameter Network address(see figure 8).
By default, Windows 7 is set to the factory MAC address of the network card. In order to change it, you need to switch to the "Value" option and enter the required address.
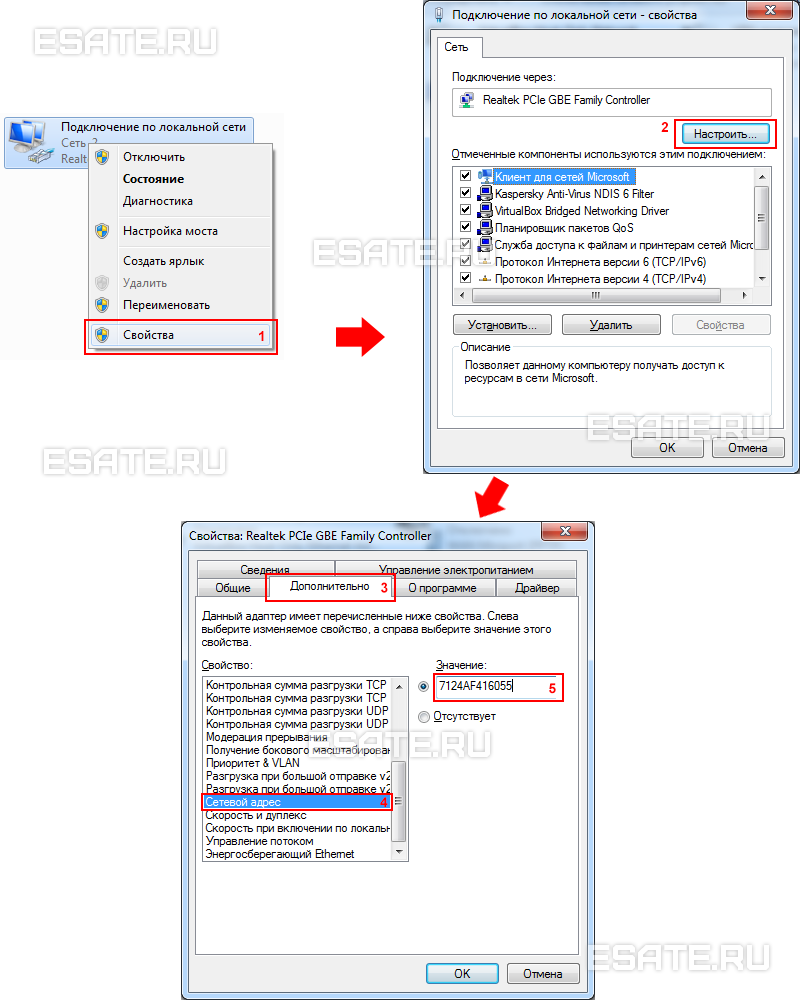 Figure 8. How to change the MAC address of the network card (network adapter).
Network diagnostics
If a situation arises when unexpected errors or failures have occurred in the operation of your network connection, you can eliminate them using the connection diagnostics. The diagnostic tool can be found in the Network Connections window.We select the window " Troubleshooting", Which, analyzing the connection status, offers a choice of possible malfunctions and how to troubleshoot. To start diagnostics, you need to right-click on the network connection and select the "Diagnostics" command in the context menu.
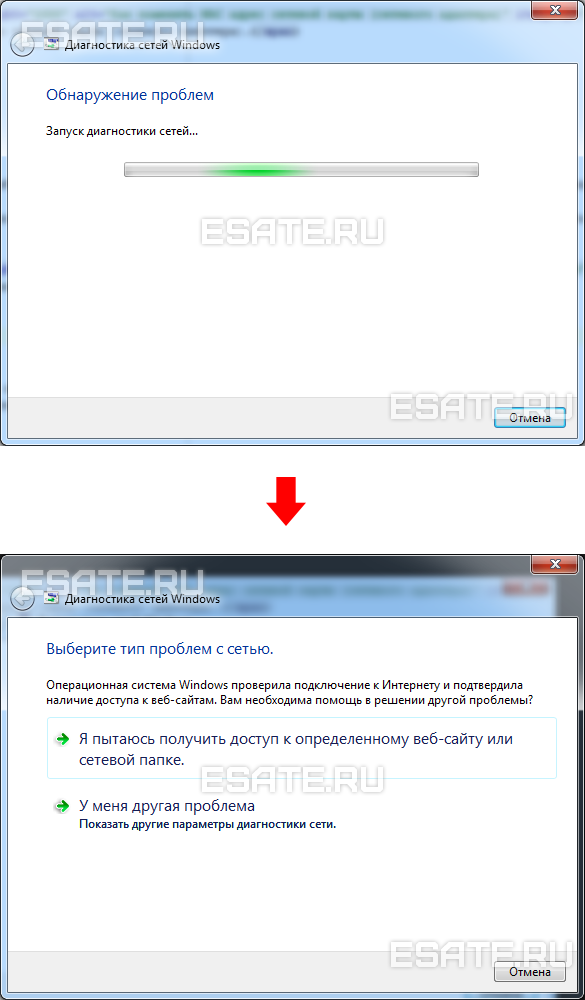 Figure 9. Opening the Local Area Connection Troubleshooter.
The second way to start checking the network connection parameters is to select desired network and click on the "Diagnostics of connections" button. The button can be seen on the toolbar.
In the dialog box that opens, to diagnose the connection, just follow the steps of the wizard to troubleshoot errors and problems. Nothing complicated.
Disconnecting a network device (network adapter)
Sometimes there are situations where network connection problems are not solved with the help of the troubleshooting wizard, but simple disconnection network adapter from the computer. This can be easily done by doing one of the following:- Select a network connection and click on the "Disconnect network device"Located on the toolbar;
- Right-click on the network connection and select the "Disconnect" command in the context menu that appears;
Conclusion
The article details how to configure, connect and diagnose network connections.If you have any doubts about your own settings and network connection, then it is better to seek help from specialists, or carefully read the article again.
Oddly enough, but many users of operating Windows systems, starting with the seventh version and higher, very often face the problem of connecting to a local network or the Internet, and at the same time the diagnostic utility gives a description in the results that "the Ethernet module does not have valid IP settings." The situation is not catastrophic, and the problem can be eliminated by several methods, which are proposed for further consideration.
The adapter does not have valid IP settings, what is the problem?
This situation can manifest itself either when wrong setting current connection (it does not matter if you are using Wi-Fi access or a wired Ethernet connection) or in case of problems from the provider.
In both cases, it will report that the connection does not have valid IP settings.
To check in the section of network connections from the PCM menu on the selected network, you need to select and then click on the information button in a new window. Next, you should see if the fields for the IP address, gateway, and DHCP and DNS servers are filled in.
If the IP address contains a combination other than 192.168 and further (for example, 169.254, etc.), such a connection will not work, and the problem is that the protocol is incorrectly configured on the terminal itself. If there are no values for the specified servers, it can be assumed that the problem occurred on the provider's side (the DHCP server has failed).
The network does not have valid IP settings: what to do first?
The connection problem may be temporary. Therefore, when it is reported that the Internet does not have valid IP settings, you can start by simply disconnecting from the network and then reconnecting.

This is done by clicking on the connection icon in the system tray or by calling the appropriate section with the ncpa.cpl command, where the disconnect line is selected from the context menu, and then reconnection.
In the case of using a Wi-Fi network, as an additional measure, you can use a full reboot of the router by disconnecting it from the power supply for about 10 seconds, turning it on again and waiting for it to be fully loaded.
Retrieving IP Settings
However, the problem may also be in the incorrectly set network settings. This is the most common situation when the system reports that the adapter (or network) does not have valid IP settings.
The tactic of retrieving the IP parameters can be used to resolve the failure. To do this, you will have to start the command console with administrator rights, and then write two commands in it, as shown in the figure below.
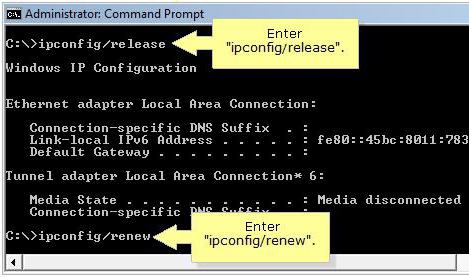
Then you should close the console and check the connection either by trying to connect or using the same diagnostic tool. The message that the network module does not have valid IP settings may no longer appear.
Setting parameters manually
But this may not help, in particular when installed automatic receipt IP in the settings of the current protocol. In the description of the problem, there may again appear a reference to the fact that the adapter does not have valid IP settings.
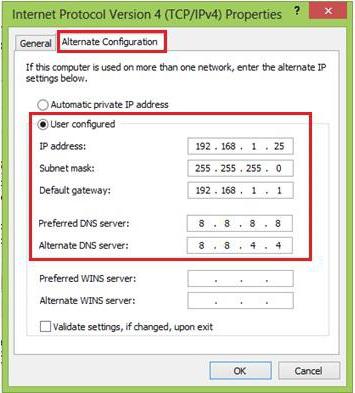
The way out of this situation is to set the correct values in manual mode. To perform these operations, enter the network connections section and, using the properties string, go to the protocol configuration (usually IPv4). Here you will have to register the IP address yourself (the address of the router in which the last number has been changed), the gateway (the value must match the address of the router in the case of a wireless network), and for DNS servers set values from four eights or from two eights and two fours.
Reset network settings
In some cases, the previous operation may not be necessary. When the network connection does not have valid IP settings, factory reset can sometimes be used.
In this case, you will need to call again command line and take the following actions by entering the appropriate commands as shown in the images.
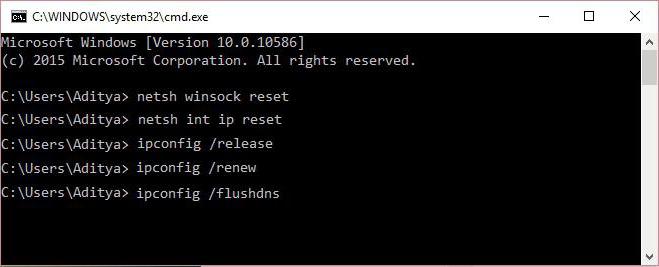
After executing all the commands, you can re-check the network status. Sometimes a crash can be fixed in this way without any problems.
Clean boot system
Often in correcting the situation with the appearance of a notification that the network module does not have valid IP settings, the so-called clean start of the system, that is, loading with the maximum disabling of unnecessary services, can help.
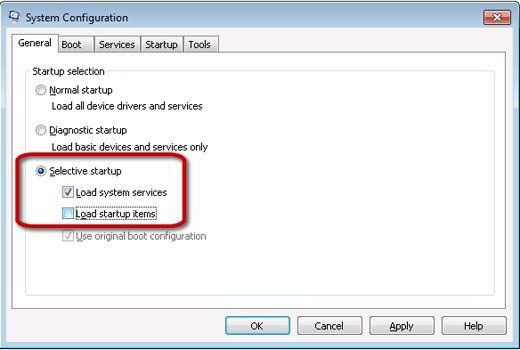
To perform such a download, you need to enter (the msconfig command in the Run console), on the tab general settings set the active line of selective start and uncheck the box from the line for loading autostart elements.
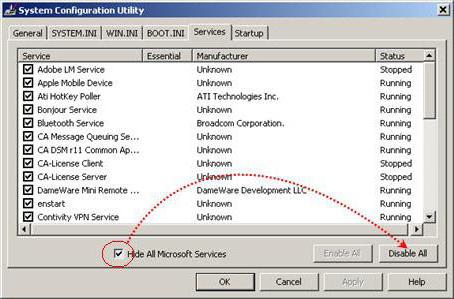
Next, in the same section, go to the services tab, check the box for hiding Microsoft services located at the bottom left, and for all that remains, use the deactivation button ("Disable all") at the bottom right. As a rule, when the system is restarted (which, by the way, must be performed without fail), the problem disappears.
Antivirus, firewall, third-party programs and drivers
However, the difficulties may not end there either. The fact is that some antiviruses, the built-in Windows firewall and installed applications can also create connection problems.
![]()
In this case, you should first turn off the antivirus protection... In addition, using the firewall.cpl command, you can open the firewall settings and activate the lines to disable firewall protection, although this is not recommended.
Finally, the list should be checked installed programs... For example, if the user installed iTunes, the Bonjour utility is installed with him, which can also cause a lot of problems. Perhaps her complete removal and fix the crash.

In the very last case, when nothing helps, you can try to completely uninstall the network adapter driver and reinstall it, after downloading the most latest version from the manufacturer's website. To uninstall, use the "Device Manager", and the driver can be downloaded, for example, from another computer, and then transferred to your terminal by copying it to removable media.
If this does not work, you can use Microsoft's NetShell utility, which can be downloaded from the company's official website.
Conclusion
In conclusion, it remains to add that at least one of the proposed methods can still fix the problem. It all depends on what exactly was the root cause of the failure. But in most cases, a reset helps. network settings, updating the IP parameters or setting the correct values in the protocol settings manually.
Certainly inappropriate to hardware or incorrect installed drivers, some unnecessary applications, antiviruses (most often free Avast) and the built-in Windows protection system can also provide Negative influence on the state of the connections, but if everything worked before and then stopped, most likely, this is not the problem.
The reasons did not indicate the impact of viruses, which can also lead to such failures. This is only due to the fact that each user, so to speak, by default must monitor his system himself and undertake a check for threats, since even the most powerful means of protection are able to skip malicious codes or software modules that have just appeared, but are not yet available in the anti-virus databases.
One of the most common situations in Windows users 10, 8, and Windows 7 - Internet problems and a message stating that network adapter(Wi-Fi or Ethernet) does not have valid IP settings when using the standard network troubleshooting and diagnostics utility.
Note: Before following the steps below, try turning off your Wi-Fi or Ethernet internet connection and then turning it back on. To do this, press the Win + R keys on your keyboard, type ncpa.cpl and press Enter. Right click on the problematic connection, select Disable. After it is disabled, enable it in the same way. For wireless connection also try turning your Wi-Fi router off and on again.
Retrieving IP parameters
If a malfunctioning connection receives its IP address automatically, then the problem in question can be solved simple update received from the router or provider IP-address. To do this, follow these steps.
If you have a different version of the OS (but it will work for "dozens" as well), then follow these steps.

Also, to reset TCP / IP settings in Windows 8.1 and Windows 7, you can use the utility available for download on the official Microsoft website: https://support.microsoft.com/en-us/kb/299357
After restarting the computer, check if Internet functionality is back and, if not, if the troubleshooting diagnostics show the same message as before.
Checking the IP Settings of an Ethernet or Wi-Fi Connection
Another option is to manually check the IP settings and change them if necessary. After making the changes listed in the individual paragraphs below, check to see if the problem has been resolved.
If none of these are helpful, try the options in the next section.
Additional reasons that the network adapter does not have valid IP settings
In addition to the described actions, in situations with " acceptable parameters IP "the culprit may be third party programs, in particular:
- Bonjour - if you installed some software from Apple (iTunes, iCloud, QuickTime), then most likely you have Bonjour in the list of installed programs. Removing this program may solve the described problem. More details:?
- If your computer has third party antivirus or firewall, try temporarily disabling them and see if the problem goes away. If so, try uninstalling and then reinstalling your antivirus.
- In the dispatcher Windows devices try to remove your network adapter, then select "Action" - "Update hardware configuration" from the menu. The adapter will reinstall, sometimes it works.
- An instruction may be helpful.
That's all. Hopefully one of the methods worked for your situation.
How to see the MAC address
Windows XP
1. Click Start, open Control Panel, click Network Connections> right-click on Local Area Connection and select Status.
2. Go to the Support menu item and press the Details button. 
3. The line Physical address in the Value section contains the mac-address of the network interface. 
Windows Vista / 7
1. Open Control Panel, click Network and Internet> Network and Sharing Center, in the left column, click Change adapter settings.
2. Right-click on the network connection for which you want to know the MAC address (usually Local Area Connection), and then click Status. 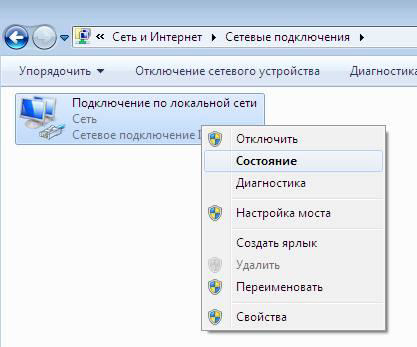
3. Click the Details button. 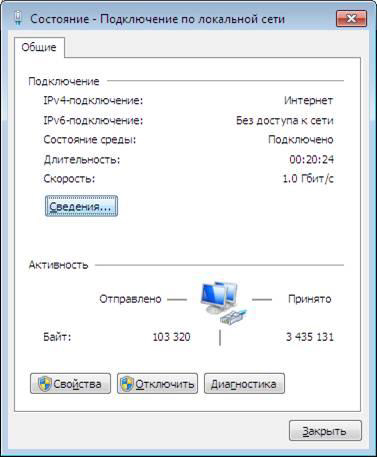
4. In the window that appears, you will see a line called Physical address, where the mac-address of your equipment is indicated. 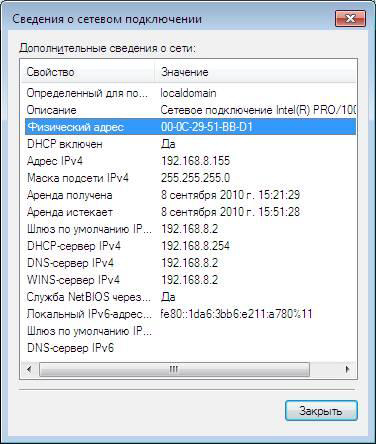
Mac OS
1. Select System Preferences> Network on the Desktop 
2. Next, select Local Area Connection (Ethernet)> Advanced. 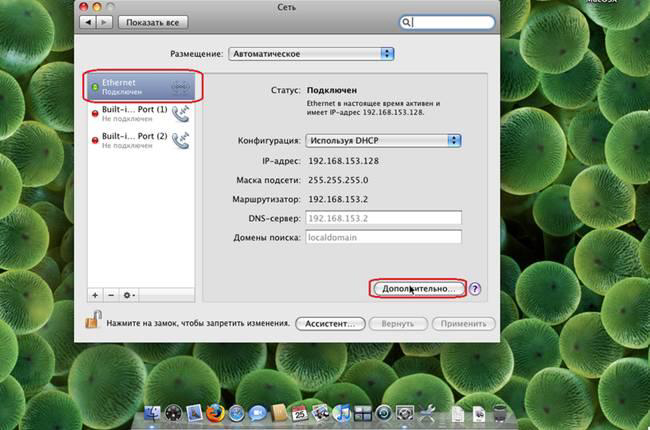
3. In the Ethernet tab, in the Ethernet identifier field, your equipment mac-address will be indicated. 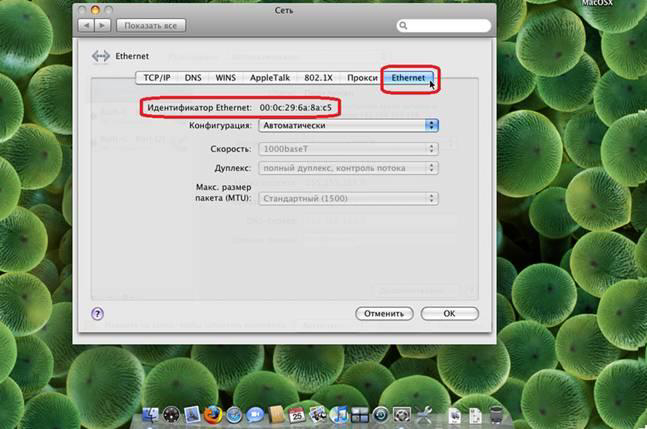
Linux
1. From the Desktop, select Menu> Accessories> Terminal Emulator. 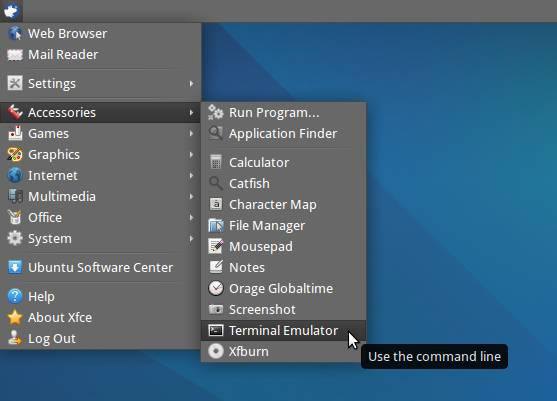
2. Enter the ifconfig command. In the eth0 category, the Ethernet HWaddr line will contain the mac-address of your equipment. 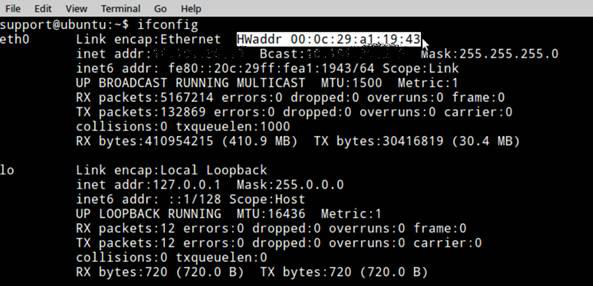
Setting up a network connection
Windows XP

2. If "Control Panel" is displayed by category (heading "Select a Category"), click on the link "Switch to Classic View". 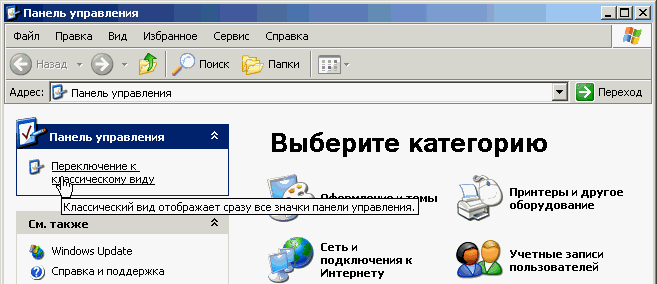
3. Double click on the "Network Connections" icon. 
4. Right-click on the network connection and select Properties from the context menu that appears. 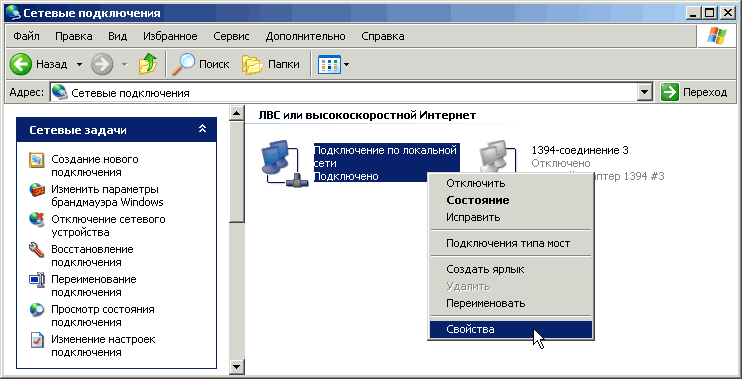
5. In the window that appears, select the TCP / IP protocol and click "Properties". 
6. In the window that appears, select "Obtain an IP address automatically" and "Obtain DNS server address automatically". 
If in "Network Connections" you do not see a shortcut for the network connection (usually called "Local Area Connection"), check:
1. Is it installed on your computer Network Card.
2. Are the drivers for the network card installed or motherboard if the network card is built into it.
Windows Vista
To connect to the Internet, you need to configure the system to automatically issue network details. Typically, the default network card is configured to get network credentials automatically. In order for your operating system to automatically receive the settings, you need to do the following:
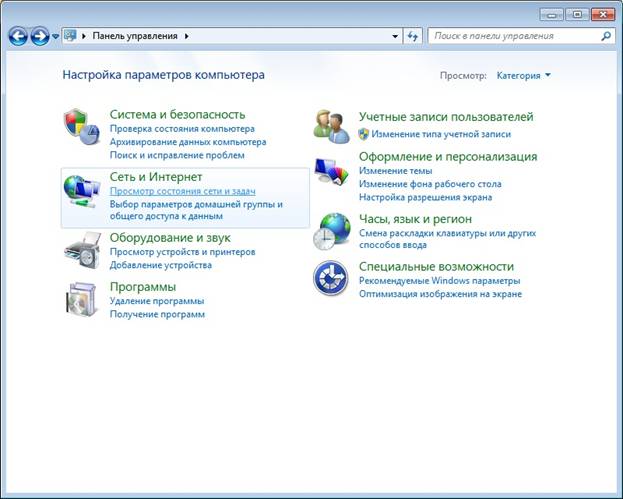
1. Go to the "Start" menu and select "Control Panel". 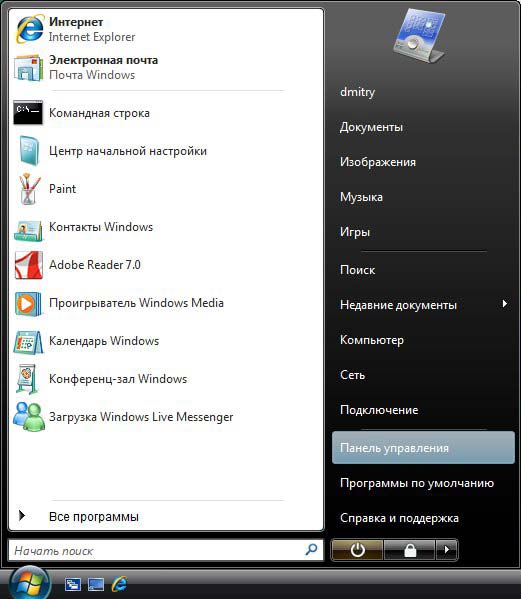
2. In the "Network and Internet" subsection, select "View network status and tasks." 
3. In the "Network and Sharing Center" that opens, click "Manage network connections". 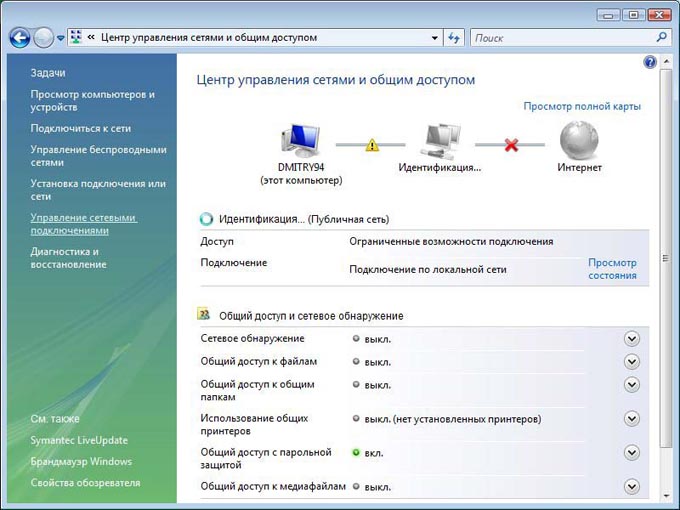
4. Double-click the left mouse button on Local Area Connection.
If you see the local area connection icon with a red cross through it or it has Exclamation point, or it is missing, it means that there is no connection to the network or the network adapter is not installed correctly. Contact the service technical support. 
5. A window is displayed showing the status this connection... Click the Properties button. 
6. Check the boxes as shown below, select the TCP / IPv4 protocol and click the "Properties" button. 
7. In the "Properties: Internet Protocol Version 4 (TCP / IP)" window, check one box next to "Obtain an IP address automatically" and the other next to the "Obtain DNS server address automatically" message. Click the "OK" button. 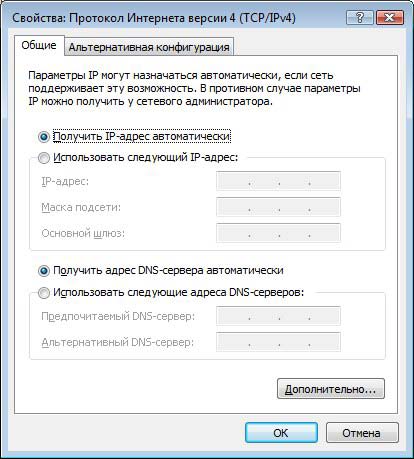
Windows 7
Insert network cable into the appropriate connector on your computer.
Click the "Start" button with the left mouse button to open the menu and select "Control Panel".

From the Control Panel menu, select Network and Internet - View Network Status and Tasks.
In the view of network information, select the current active connection. It's under the heading View Active Networks. Open the link "Local Area Connection".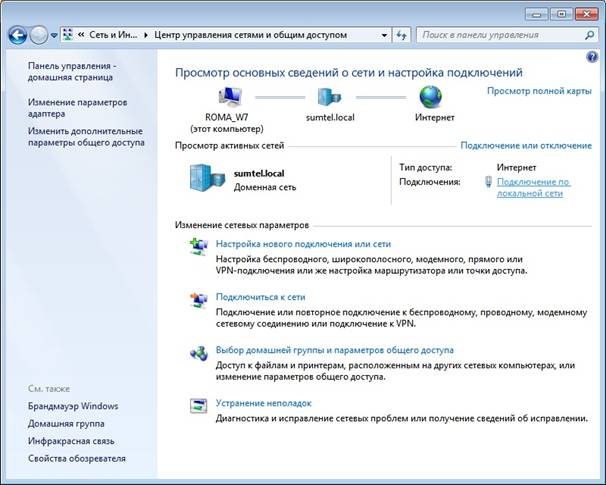
Next, the network connection status window will open, in which you must click the "Properties" button.
In the window that opens, select "Internet Protocol Version 4 (TCP / IPv4)" and click the "Properties" button.
In the properties you need to set:
- Obtain an IP address automatically
- Obtain DNS server address automatically
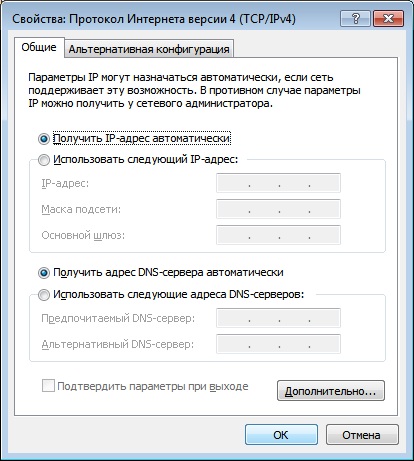
Save the settings by clicking the "OK" button.
Reboot your computer.
After rebooting, please wait 5 minutes.
Linux Ubuntu
The process of configuring network connections in Linux Ubuntu extremely simple (assuming that your network card is defined).
1.Open the network settings: 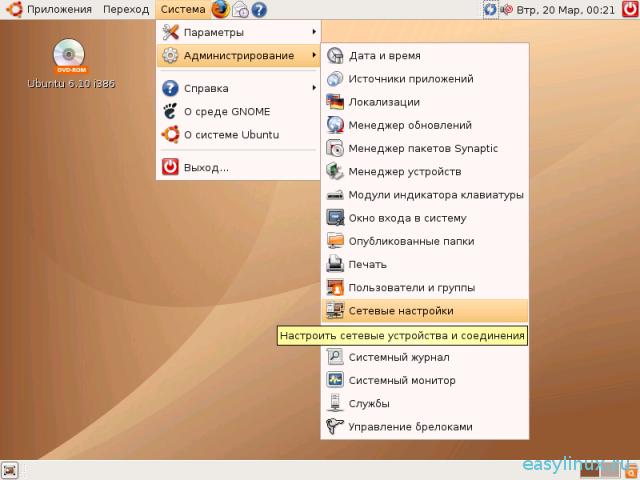
2. Enter the password. The system will display all network connection which have been identified. 
3.Choose Automatic tuning(DHCP) and click OK. 
Mac OS 10.x
1. Go to " System settings». 
2.Select "Network". 
3. On the left, select Ethernet - Configure, in the drop-down list, select using DHCP. 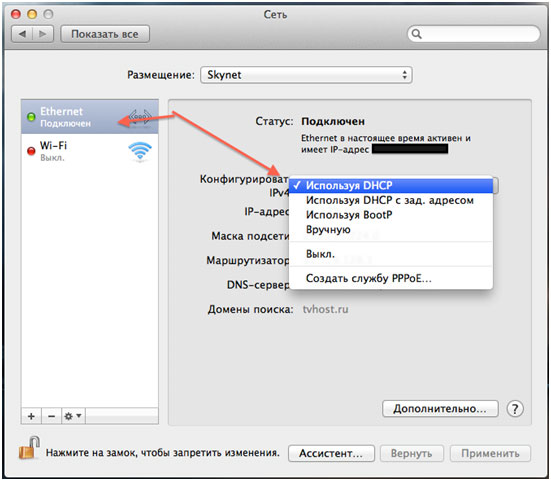
4. Click Apply. 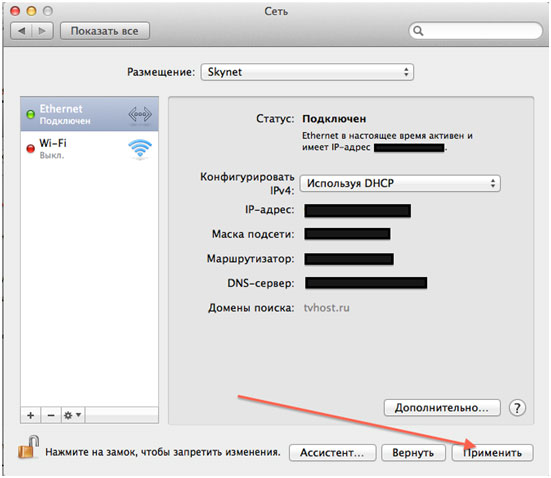
How to change the MAC address