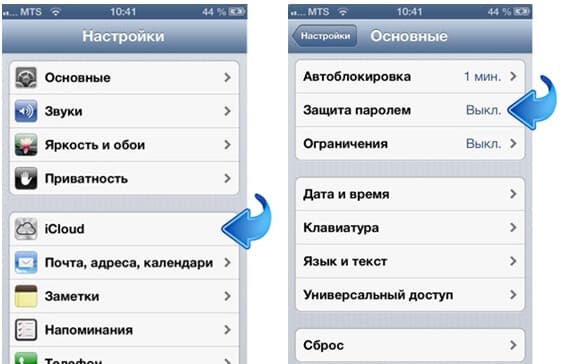
I’ll write right away that this article is not about how to connect, but how to turn on wifi (some write wi fi, wi-fi) on an asus laptop.
Please do not confuse, and this applies to all models, including n61j, eee pc, k53s, k50c, 4000, k55v, k53t, r50c, x54h, x53u, a52j, k52j or a3000.
To enable Wi-Fi (Wi-Fi, Wi-Fi) on an Asus laptop, adapter drivers must be installed on it.
Only they should be "native" - \u200b\u200botherwise nothing will come out of your venture in any way.
Where to download the original wifi drivers from and how to install - so we close this question - there should not be any problems.
Most asus laptops have a button on the side of the case (but not all). Usually it is dug in the place indicated below in the picture.
Only because models are constantly updated, other places are not excluded (read the instructions).
Sometimes the lever can be in such a place that it is hard to imagine, as if it were hidden - look carefully.
Only, even if you turn on this button (often combined with bluetooth) wifi may not work. For some reason, developers program more keys to launch. This is mainly Fn + F2, but there may be others - f1 - f12.
It is also a good idea to inspect the keyboard for buttons with an antenna icon. They, along with Fn, include wifi. Look at the photo below.

Universal fast way to turn on asus wifi laptop
All that is described above is standard ways to enable wifi on various asus laptop models, but what if they are unable to solve the problem and why?
The thing is that if you buy an asus laptop with the preinstalled windows 7, windows 8, vista or XP operating system (there are no sales today with the last two), the developers install all the drivers, components (software) on their own and test them.
Then the options described above are quite functional. By installing the OS on your asus laptop yourself, you lose all this and the process may not work.
If you have such a case, then going to this page (drivers for the wifi adapter will have to be installed).
Then (after installing and running the program) you can enable or disable wifi (if you have native drivers) with just one click, without any buttons or keys.
That's probably all you can say, but turning on wifi as I wrote above does not mean connecting, so I will briefly describe this process as well.
In the tray, click on the “networks” icon and click on the line “network management center ....”. On the left side there is an option "management of wireless networks"
After going there, click "add" and select your option to the computer or the Internet - fill in all the places by clicking on the bottom below and confirming "OK".
This is of course a very simplified description of how to connect wifi on an asus laptop to a network or another PC, but you can figure it out, but there will be questions - the “comments” option for your servants. Good luck.
The modern world can no longer be imagined without wireless technologies such as cellular communications and Wi-Fi. Wi-Fi is not only in offices, entertainment and shopping centers, but also is rapidly spreading to apartments and private houses. Unfortunately, when it comes to setting up and connecting Wi-Fi, not every Internet user can immediately perform the necessary actions and turn on Wi-Fi on a laptop. Therefore, we will try to tell in a simple language and make our instructions step by step and understandable to each reader of this article.
It is worth noting that at the moment there are quite a few laptop manufacturers: ASUS, Acer, Sony, Alienware, Compaq, DELL, HP, Lenovo, MSI, Packard Bell, Samsung, Panasonic. And in all Wi-Fi connects differently. More precisely, there are two types of WiFi inclusion: hardware and software. We will begin our instruction with a description of the hardware ways to enable Wi-Fi and describe how to connect Wi-Fi on a laptop, if it provides for the inclusion of a wireless network using buttons or a special toggle switch.
How to enable Wi-Fi on a laptop in hardware
As mentioned above, some laptop models are equipped with a special button that includes a Wi-Fi network. Therefore, carefully inspect the laptop for these sliders:


Or a separate button that allows you to configure wi-fi on a laptop:


If you did not find a special slider or button that includes Wi-Fi, then examine the F1-F12 keys, on which the antenna can be displayed. That is, the Wi-Fi network symbol:

We will try to list the necessary key combinations for popular laptop manufacturers:
- To enable Wi-Fi on laptops Asus (Asus) need to use a combination of buttons Fn + f2.
- To enable wifi on a laptop HP (Hewlett Packard) need to click Fn + F12. Or use a special key with a Wi-Fi image - an antenna.
- On laptops manufacturers Packard bel and Acer (Acer) Wi-Fi is turned on using a combination of buttons Fn + f3.
- Famous Brand Notebooks Msi use a combination of buttons to turn on Wi-Fi Fn + f10.
- To connect a laptop to wifi from Samsung (Samsung) need to pinch Fn + f12 or Fn + f9.
- On laptops from a renowned manufacturer Lenovo (Lenovo) A special mechanical slider can be installed. Or turn on Wi-Fi through a combination of buttons Fn + f5.
- Laptops from Toshiba (Toshiba) usually use a combination of buttons Fn + f8.
- On laptops Sony Vaillot (Sony Vaio) a mechanical switch can be installed.
If the Fn key is not on your laptop, it means that it is possible that Wi-Fi is enabled by either a special slider or a special button. In the absence of both, it is necessary to connect the laptop to Wi-Fi at the software level, checking the drivers and software. This is the next chapter of our instructions.
How to programmatically connect wifi on a laptop
Some laptop models come with the manufacturer’s software through which you can enable the Wi-Fi adapter of your laptop. For example, on laptops equipped with adapters from Intel, Intel PROSet software is installed, and on many Samsung laptops there is the Easy Settings program. Therefore, if the laptop does not have a special switch or button, you need to look for such software in the Windows operating system tray.
Now let's look at how to connect a laptop to the Internet via wifi, that is, the procedure for enabling Wi-Fi in the Windows operating system. Our instructions are universal and suitable for users of operating systems such as Windows 7, Windows 8 and Windows 10. First, make sure that the driver is installed on your laptop’s wireless adapter and can be seen in the device manager. To do this, go directly to the device manager by going to the "Start", then to the "Control Panel", then to "System" and open the "Device Manager".

In the device manager, find the menu item "Network Adapters" and open it. After that, all available network adapters should appear there, including wireless, which contains the word “Wireless”. This is our wireless adapter. Make sure that it is activated and there are no badges with a yellow exclamation mark (signals a problem with the drivers) and a red cross (signals a breakdown)

As mentioned above, you need to make sure that the wireless adapter is enabled. And if necessary, use it.

If there are no drivers, you need to download from the manufacturer’s website or try to update them using the system:


Your wireless network connection must be turned on. If for some reason it turned off, as in the picture above, then turn it on by right-clicking on it and selecting the “Enable” menu item. Next, just find the ladder icon in the Windows tray, click on it and find your wireless network.

After that, click the “Connect” button. If no password is set for the wireless connection, then Wi-Fi will turn on automatically. Otherwise, you will need to specify a network password, which in Windows is called a security key.

That’s all, we hope that the instruction turned out to be useful. You can ask all questions in the comments. Finally, watch a video on how to enable and configure wifi on a Windows 7 laptop:
Owners of laptops usually use a wireless connection to access the Internet, since there are Wi-Fi adapters on all laptop models without exception. However, in order to use it, sometimes you have to figure out how to enable wifi on a laptop.
Hotkeys or hardware switch
The first step is to physically turn on the Wi-Fi adapter. On different laptop models, this procedure is slightly different, but its meaning is the same: you need to find the hardware switch or use the function keys. Let's look at a few examples:
You can continue the options for turning on Wi-Fi for a long time, giving methods for MSI, Acer, Samsung and other brands. Even different series of the same manufacturer have different ways to activate the wireless module, therefore:
- Inspect the laptop case for a hardware switch or Wi-Fi power button.
- Examine the keyboard - one of the keys in the F1-F12 row should be marked with a wireless icon. If you press it together with the Fn button, the adapter will turn on or off.

If you have a Sony Vaio series laptop, then there may not be a hardware key or Fn button on its keyboard. In this case, Wi-Fi requires a special utility called VAIO Smart Network, which can be found on the manufacturer’s official website.
Fn button does not work
What to do if the Fn button does not work? How then to turn on the adapter? First you need to figure out why the key does not work. Fn runs under BIOS and has its own utility, without which the key does not function. Therefore, if the button does not work, you first need to find on the manufacturer’s website a utility for turning on hot keys (the name should contain the word "HotKey"). 
If the installation of the utility did not help or the key is physically damaged, you will have to use an alternative method of turning on the adapter. On Windows 8 and Windows 10, to enable the adapter, just click on the Wi-Fi icon in the notification panel and put the “Wireless Network” slider in the active position. If the adapter drivers are installed correctly, then the icon must be there. 
In Windows 7 there is no such function, but you can try to turn on the wireless connection through the window for changing adapter settings (this is described below). If this method does not help, then you will have to look for an external keyboard with the Fn working key and then no longer turn off the Wi-Fi module.
Wi-Fi setup on different versions of Windows
With the physical inclusion of the module, you will figure it out quickly enough. Sometimes Wi-Fi configuration ends here: the system performs the other necessary actions on its own, listing the available wireless points. But sometimes you have to establish a connection manually.
Regardless of the version of Windows, you first need to check that the drivers of the Wi-Fi module were installed without errors:

For the sake of fidelity, it is better to go to the official website of the laptop manufacturer and find the latest version of the wireless module driver for your model. In addition, right-click on the adapter and select “Enable” (if its operation is stopped).
Windows XP
In theory, Windows XP should have ceased to be used for a long time, but on some older Dell models and other laptops, the legendary system still continues to perform its functions. Wi-Fi in Windows XP is configured as follows:

The Explorer window should have a Wireless Network Connection icon. Its presence demonstrates that the Wi-Fi module is working correctly. Right-click on the icon and select “Enable”. Further:

If the list of available points does not contain the network that your router distributes, click "Refresh List". Then select the desired point by name and click Connect. If the network is password protected, you will be asked to enter the access code, after which the connection will be established.
Windows 7
On Windows 7, the order of connecting to a wireless network has slightly changed, becoming a little easier. Now all available networks are displayed after clicking on the Wi-Fi icon in the system tray. But if there is no icon, then:
- Go to the network control center.
- Click "Change adapter settings."
- Find the wireless connection and make sure it is turned on.

After turning on the wireless connection, the Wi-Fi icon will appear in the tray. Click on it to see a list of available points, select a network and click “Connect”.
Windows 8
On Windows 8, the procedure for connecting to Wi-Fi remained the same, but the “Airplane” mode was added, which you need to be able to work with. If the adapter driver is installed and the wireless connection works correctly, then on the notification panel you will see the Wi-Fi icon, when clicked, a list of available networks appears.

If there is no icon, follow the same steps as on Windows 7 - open the “Change adapter settings” window and turn on the wireless connection. If there is no wireless connection, check the drivers and module status - everything should be turned on and installed. 
If the adapter is turned on, the drivers are installed, but no available networks are found, make sure that the “Airplane” mode icon does not hang on the notification panel. If it is, you need to disable this mode. To do this, click on the icon and put the slider in the “Disabled” state.
Windows 10
On Windows 10, everything remained the same with minor changes, so you can quickly figure out how to connect the laptop to Wi-Fi:
- Click on the wireless icon in the tray.
- Select the desired network.
- Click “Connect” and enter the password.
If the access point does not appear, try adjusting the network settings. Click on the link of the same name - the "Network and Internet" section of the Windows 10 options will open. 
Here you are interested in two tabs:
- Wi-Fi - make sure the wireless network is turned on.
- Airplane mode - make sure the mode is off.
You can go to the section for changing adapter settings and enable wireless connection. Simply put, on Windows 10 you have several equivalent options - you just need to choose a more convenient way for yourself.
Turning on Wi-Fi and setting it up correctly is a fairly common problem for users who are just getting started with their laptop. The configuration process itself should not cause any difficulties, however, sometimes there are some snags that require a certain level of computer literacy. This is especially true for ASUS multimedia technology.
Non-standard Wi-Fi module management tools have been introduced into the design of this company's laptops. One of the options of the built-in computer adapter is to turn it on or off by means of mechanical elements (sliders, keys, etc.). Consider all the Wi-Fi setup methods on ASUS laptops, as well as their subtleties.
Firstly, when trying to establish a connection with a global network, you should consider what is installed on your electronic device. The most popular of them are currently Windows 10, Windows 8 and Windows 7. Other less common OSs are also known: GNU / Linux, UNIX, BSD, etc.
Secondly, do not ignore the model of your Asus laptop. Most of the existing products must be tuned according to the same principles, however, there are minor differences for older series of the company.

Enabling Wireless Internet on Windows 7
Factory configs of ASUS portable personal computers allow you to connect your electronic device to a wireless network without any additional settings. Such an algorithm is suitable for models: X570UD, X507UA, E403SA, X407UF, X441NA and other modern options.
- Initially, find the yellow icon in the lower right of the Windows boot screen. When you hover over it, the message “There are available connections” appears. It confirms that your laptop is ready to make a connection to the network, but a number of essential parameters are not defined for it.

- With the Wi-Fi correctly configured before this, you will find it in the list of possible connections. Click on the name of the connection you wish to join.

- A window pops up on the monitor, requiring the introduction of a secret character set. Remember the password, enter it in the area provided for this, and click “OK”.

- At this point, the process of connecting to the selected network should begin. Upon its successful completion, you will see the message “Connected”.

Thus, the elementary procedure is completed and the laptop can go to the global network. This method should not cause any problems for any Windows user.
More confusing is the situation when the laptop does not have access to the Internet. In this case, you will have to make some settings:

Close the troubleshooting window and continue to work normally on your technical device.
Enabling Wireless Internet on Windows 10
In 2015, Microsoft introduced the world a new operating system, Windows 10, which is rapidly spreading. The released product has undergone many different changes. One of them was an updated interface.
Intuitively, the main menu of the operating system should still be clear to the user. Nevertheless, the configuration of certain parameters may still cause difficulties.
Asus products running on Windows 10 must be configured as follows:

Now also consider the possible problems that may accompany users of Windows 10. In case of malfunctions, you will have to resort to additional settings in the "Control Panel".

After enabling this component, you should fix the pre-existing problems with connecting to Wi-Fi.
Turning on the Wi-Fi adapter on an ASUS laptop
Wi-Fi adapter is a special module on an electronic device. It allows you to recognize signals from various access points, establishing a wireless connection to the network. This technical tool is implemented in every modern laptop in the form of an integrated board.

The malfunction of the Wi-Fi adapter is expressed in the same crossed out network connection, the problems with which were described above. However, it cannot be corrected by simply turning on the wireless network. Here the snag will be hidden in uninstalled or incorrectly installed drivers. The first step to checking this will be to enter
It is a Windows management console that lists all resources installed on a laptop.
- Right-click on the “My Computer” or “Computer” shortcut, which is located in the main system interface. In the pop-up window, select "Management".

- Next, the context menu will take you to the laptop control section. In it, go to the "Device Manager" category.

- Next, enter the “Network Adapters” directory. Check the names of all modules that appeared when you open this category. If the names “Wi-Fi”, “Wireless”, “802.11 b / g / n” are present in their name, then the drivers function correctly and do not require additional installations.

- Go through all the points on the network adapter that you have and activate them by pressing the command of the same name.

Probably, after these manipulations, the Internet will begin its work. You will find out about this by paying attention to the icon located in the notification panel.
If control programs for external devices are not found on your laptop, then you will have to download and install them.
- Find out the series specific to your ASUS laptop. Usually it is written on the back of the case and fixed there in the form of a sticker.

- Open a browser and go to the official website of ASUS.

- In the search area, write the model of the laptop that you should have learned about from the sticker. It must strictly correspond to the factory name.

- In the results that appear, select your laptop and click on the inscription "Support", which is located on top.

- Go to the section on drivers and utilities. It is indicated on the official website.

- Specify the operating system you are using, as well as the 32-bit or 64-bit version of Windows.

- From the entire list of sorted sections, select the one called “Wireless”. You just need to download it.

- At the end of the driver download for the network adapter, click on the WinRar archive, which will be located in the list of your downloads.

- From the entire list of files, select "setup.exe".

Follow the instructions that will appear in the pop-ups. The system installer will install the adapter drivers, after which your ASUS laptop should not experience any problems when connecting to wireless networks.
Important!Please note that after installing and making changes to the system parameters, the electronic device will need a reboot.
Turn on wireless Internet through the keypad
Notebook manufacturers have provided several secondary ways to connect their devices to wireless networks. They can be sliders, separate mechanical buttons on the case or keyboard.
If you carefully study the keyboard of a portable ASUS personal computer, then on one of the buttons you will see a symbol of a wireless network signal. A specific key for it is not assigned, so it will be determined by the series of release of the laptop.
On more modern AsusTek product lines, Wi-Fi is activated by simultaneously pressing the “Fn” + “F2” keys.
In case of failure of this method, try to restart the device again and repeat the same button press.
According to information from the developers themselves, “Fn” and “F2” can also lose their functionality due to the use of irrelevant drivers. You can update system parameters through the specialized utility ASUS Live Update or by downloading drivers from the official ASUS website.

If none of the above methods works, then try contacting Asus service centers for repair.
Conclusion
Thus, the owner of an ASUS laptop has many options for connecting to Wi-Fi. All of them are accessible even for a person with imperfect computer literacy. Obstacles can usually occur only due to an improperly configured router; viruses that remove installed drivers or broken keys.
ASUS company with great responsibility approaches the consumers of its products and publishes recommendations for each of the devices on its official website. You can download and find detailed information for each of the drivers for ASUS at any time.
Video - How to enable Wi-Fi on Asus laptop
Hello! Since I myself use an ASUS laptop, I decided to write a separate article about turning on Wi-Fi on an ASUS laptop and connecting to a wireless network. This is a very popular topic. As a rule, when the need arises for the first time to connect a laptop to a Wi-Fi network, users have a lot of questions: “where to include this Wi-Fi,” “where to find it on Asus laptop,” “how to connect to a wireless network”, etc. e. In addition, many problems and errors may occur. Both in the process of turning on the wireless module, and in the process of connecting to the network.
We have a task: to connect an ASUS laptop to a Wi-Fi network. And here it is important to understand that the decision does not depend more on the laptop itself (manufacturer's company), or a specific model, but from the operating system installed on the laptop. Now the most popular are Windows 10, Windows 8, and Windows 7. I think that it makes no sense to consider Windows XP. Yes, they are still using this system now, but everything has been set up there for a long time. Yes, and I do not have XP installed.
We will do everything according to this scheme:
- First, I’ll show you how to connect your laptop to Wi-Fi. Most likely, you already have everything turned on and configured there. And loading yourself with some buttons and settings is unnecessary.
- Next, I will show how to turn on Wi-Fi on an ASUS laptop. This step will come in handy in the case when it fails to connect in the usual way. We will turn on the keyboard shortcut, and without using the Fn key.
I will try to show everything on the example of Windows 10 and Windows 7. Most of the settings and actions will be similar. I have a laptop ASUS K56CM (not the newest). But the article should be suitable for all models, including: X553M, X55a, X54H, N61VG, X751M and others.
We connect the Asus laptop to a Wi-Fi network
Ideally, your internet connection status should be (provided that the network cable is not connected to the laptop):
This asterisk icon indicates that the laptop sees the wireless networks available for connection, and is ready to connect to them. If you have a different status, see the article further. To connect, simply click on this icon, select the desired network, click the connect button, enter the password (if the network is secure)and you're done.

This is how the connection goes when everything is configured and turned on. Of course, errors of the type may occur, but this is another story. Ideally, everything goes as I showed above. Very cool if you did it. Next, I will show what to do if the Wi-Fi adapter in your laptop is working, the driver is installed on it, but it is disabled for some reason.
There may also be a connection icon in the form of an antenna with a red cross (no connections available):
![]()
In this case, see the solutions in the following articles:
- For Windows 7 -
- For Windows 10 -
Turn on the Wi-Fi adapter of the laptop ASUS
If the connection icon on the notification panel does not resemble a wireless network in any way, but looks like a computer with a dagger, then most likely the wireless module on the laptop is disabled or does not work at all (most often due to an uninstalled driver). Now let's figure it out.

I immediately advise you to go to the "Device Manager", and see if there is a "Wireless" adapter. If he is not there, then there is no point torturing the laptop and yourself. You need to install the driver. If the adapter is not in the device manager, then it does not turn on. And it doesn’t matter what kind of laptop you have, Asus, or some other.
Checking is very simple. In Windows 7, open Start and in the search bar start typing "dispatcher ...". Launch Device Manager. On Windows 10, exactly the same, only there is a search button next to the Start button.
In the device manager, open the "Network Adapters" tab and look. If you have an adapter there in the name of which is "Wi-Fi", "Wireless" "802.11 b / g / n", then everything is OK. We look at the article further and try to include it. Once you are already in the device manager, then try right-clicking on the adapter. If the menu has the item "Enable", then click on it. Perhaps after that, Wi-Fi will work. You will understand this by the icon in the notification panel (if the network cable is not connected to the laptop!).

If there is no such adapterIf there is only one (network card), then this most likely indicates that the Wireless adapter driver is not installed. I had already prepared an article in which I showed how to install the driver on Wi-Fi on ASUS laptops:. The instruction is very detailed. After installing the driver, everything should work.
And we continue. What to do if there is an adapter, but there is no possibility to connect to a wireless network.
Turn on Wi-Fi switch, or a combination of buttons on the keyboard
It seems to me that ASUS is no longer making separate mechanical switches to enable / disable wireless modules. But on older laptops they can be. If you have an old model, then look for such a switch on the laptop case.
Typically, a keyboard shortcut is used for these tasks. Key Fn with a key from a row "F". But ASUS laptops, most often it Fn + f2. An antenna is drawn on the F2 key. Here's what it looks like on my laptop:

If there is no result after pressing the keyboard shortcut, I advise you to press once and restart the laptop.
Trying to turn on Wi-Fi on an ASUS laptop without the Fn key
It doesn't matter which Windows you have installed. Right-click on the Internet connection icon and select "Network and Sharing Center". Next, go to "Change adapter settings."

There should be a "Wireless Network Connection". Or "Wireless Network" - in Windows 10. If this connection is with the status "Disconnected", then right-click on it and select "Enable".

In Windows 10, the wireless network can also be disabled using the Wi-Fi button:

All of these tips should definitely help you. If you are faced with a situation that is not written in this article, or the solutions described above do not help, then write in detail about your case in the comments. Write a model of your ASUS laptop, and what problem did you encounter while connecting to a Wi-Fi network.
A few more articles on this topic that may be useful to you:
- Solving various problems with connecting to a wireless Wi-Fi network -
- A separate article on resolving problems with Wi-Fi in Windows 10 -
I hope I wasted my time and my article came in handy. Write about it in the comments. Good luck!