At present, it is already difficult to find an institution, an office or even an apartment in a modern house that does not have personal and tablet computers, smartphones, laptops and televisions. Almost all the equipment has the technical ability to work with the global network, because people work there, discuss business, take training courses and spend their free time at various entertainments.
But all this makes the network protocol accessible, connecting the “access point” with the “clients” and exchanging data with the Internet, and in the common people “Wi-Fi”. However, in order to effectively use this modern technology, you must have knowledge of the WiFi setup procedures. In this article, the user will find detailed instructions how to connect and configure the WiFi on your computer.
Wi-Fi computer receivers
Most modern gadgets from the factory are equipped with Wi-Fi modules. This allows you to go through them in the "online" literally immediately buying and getting them out of the package. Therefore, the problems mainly arise from the owners of personal computers. It is solved by a simple purchase, subsequent installation and configuration of a special adapter to ensure the reception of the Wi-Fi signal.
 The following article provides a step-by-step guide for setting up wireless network in pc.
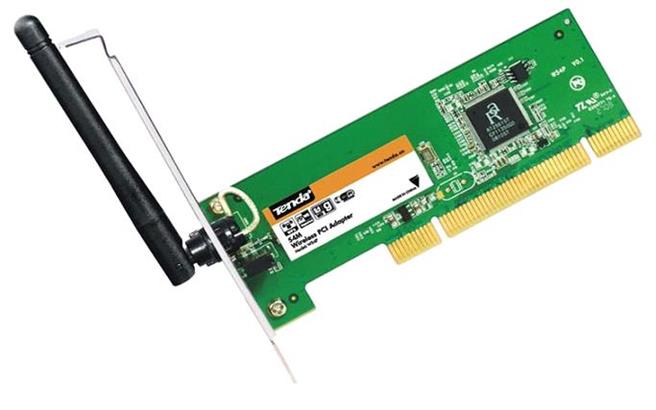
Wi-Fi modules, depending on installation methods, exist in the following 2 options:
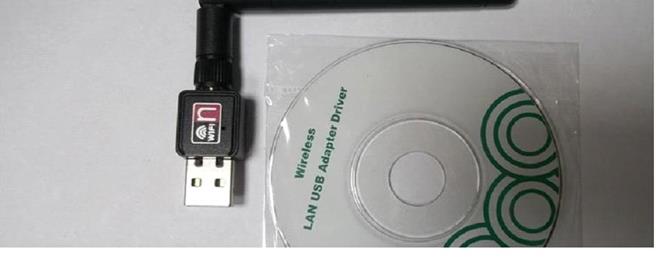
- Installed in the external ports of the computer;
- Mounted inside system unit PC.
The first option is most popular with users, because it is characterized by considerable ease of installation and operation. Connection to the computer is made via any usb-port or using a usb cable.
The second option will require for mounting it on motherboard opening the system unit, i.e., in the absence of the necessary skills, the user is better to acquire an external version of the device, working through the external port.
 The subsequent steps for setting up wi-fi receivers are the same.
Software installation
Everything wireless adapters released along with CD. The CD contains drivers and utilities for the perfect functioning of the module. The installation process provided by the equipment manufacturer software optimized for all categories of users and intuitive. You just need to follow the step by step prompts, read the contents of the pop-up windows and click on the corresponding indicated keys, for example, “Next” and “Ok”.
 Some Wi-Fi modules are quickly recognized by modern PCs and function well without installing software that comes with an adapter. But it is strongly recommended to install original drivers, since universal software may not provide full networking.
The setup procedure in the PC with Windows XP
- Through the "Start" button to enter the "Networked Environment";
- Next in the list of connections find the icon “Wireless network connection"And bring up the context menu on it;
- Click on the line "Properties";
- In the window that appears, open the "General" tab;
- Click on "Internet Protocol TCP / IP";
- Then click on the "Properties".
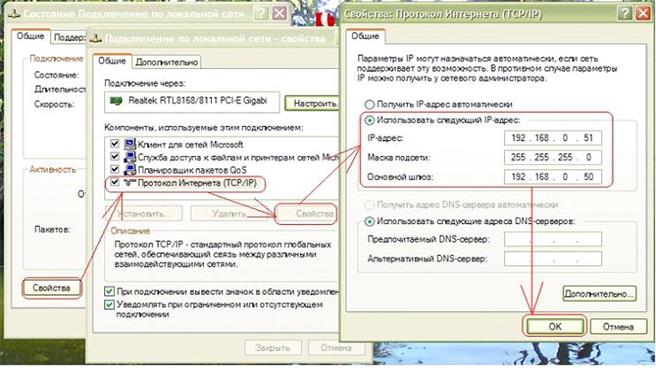 If the Internet provider requires you to work with static ip and dns, you will need to set a mark in the menu that appears on the item “Apply next ip”. When receiving addresses automatically, no changes are required.
If you marked the self-specified address, then you need to enter the following parameters in this section:
- Learn IP from an Internet provider and enter it in the first field;
- In the mask field enter “255.255.255.0”;
- In the third parameter “gateway” it is necessary to type the address of the router (it is indicated in the documents of the device), for example, “192.168.1.1” or “192.168.0.1”;
- Next, set the slider on the line “Use the following DNS addresses” to the “on” position, then enter the data into the main and backup DNS (you need to know this data through your Internet provider);
- Then enter the “Wireless Networks” tab;
- Set a mark on the item “Use Windows for settings”;
- Press the "Wireless Networks";
- In the displayed list indicate the connection of the user's router and click on "Connect";
- Type a name and password. Done, now everything works!
The setup procedure in the PC with Windows 7
To configure there are two methods:
- Set manually;
- In automatic mode.
If necessary, configure manually, then you must perform the following sequence of actions:
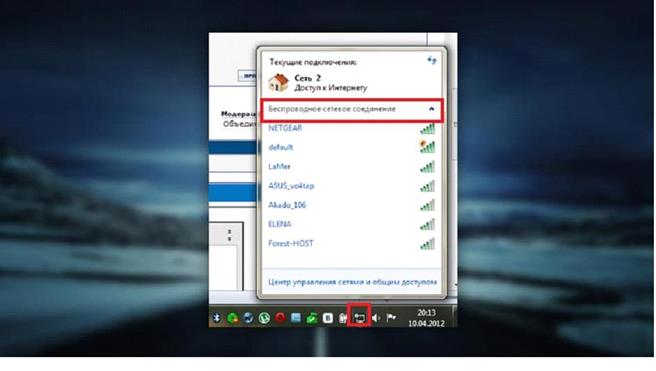
- Click on the Network icon in the tray;
- Then, on the “Center for management of networks and public access”;
- Then click on "Set up a new connection or network";
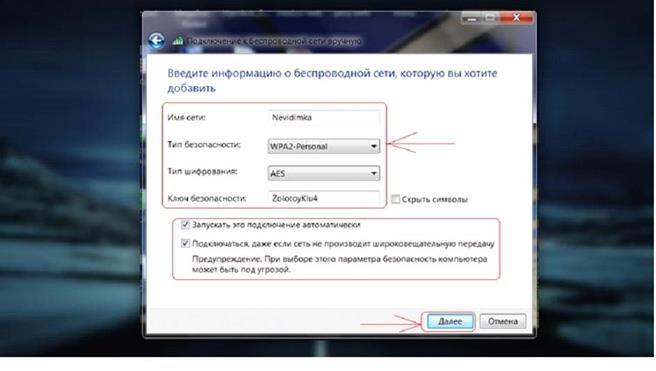
- Put a mark on "Connecting a wireless connection manually" and clicking "Next";
- In the window that appears, enter the name of the network, and the remaining parameters can not be changed. In the line "Security Key" you should dial the network access code;
- Check the box “Run this connection in automatic mode”;
- Click on “Ok”.
 If you need to configure in automatic mode, then you must perform the following sequence of actions:
How to configure in Windows 8?
To configure the need to perform the following sequence of actions:
- Click on the Wi-Fi tray icon;
- From the list that appears, select the configured user's network and click on “Connect”;
- Then fill in the name, password and click "Next";
- A “Connection complete” notification will appear, indicating that the user has managed to properly configure the connection.
Setting up a Wi-Fi at home is often a big problem. Do not want to tear off the phone to your provider - follow simple instructions and everything should work out. At best, setting up the router out of the box takes about 15 minutes. Will we notice?
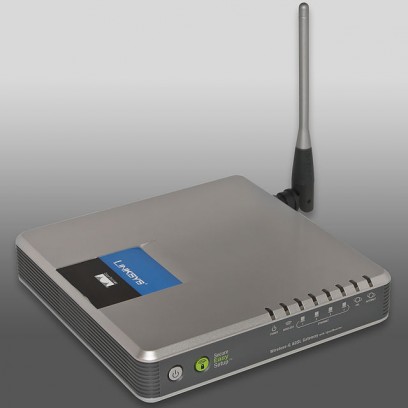
Important!For example, we took the router TP-LINK TL-WR840N . Program interfaces for setting up different models tP-LINK routers may differ slightly (not to mention the routers of other manufacturers). Look for the necessary menu items, and do not be alarmed if you have - not like in the photo instructions.
The fastest way to configureWi-Fi router - not the one with the disk. Although installation disk and comes complete with each router, this installation is not given to everyone. We will go another way - let's see how to configure the router manually.

Training
In order to successfully connect a router, you need to know the type and parameters of the Internet connection:
- IP address;
- subnet mask;
- login;
- password.
This information should be contained in the contract for the provision of Internet services. No contract or in the contract in a strange way there is none of the above points? Call technical support and find out.
Connecting the router
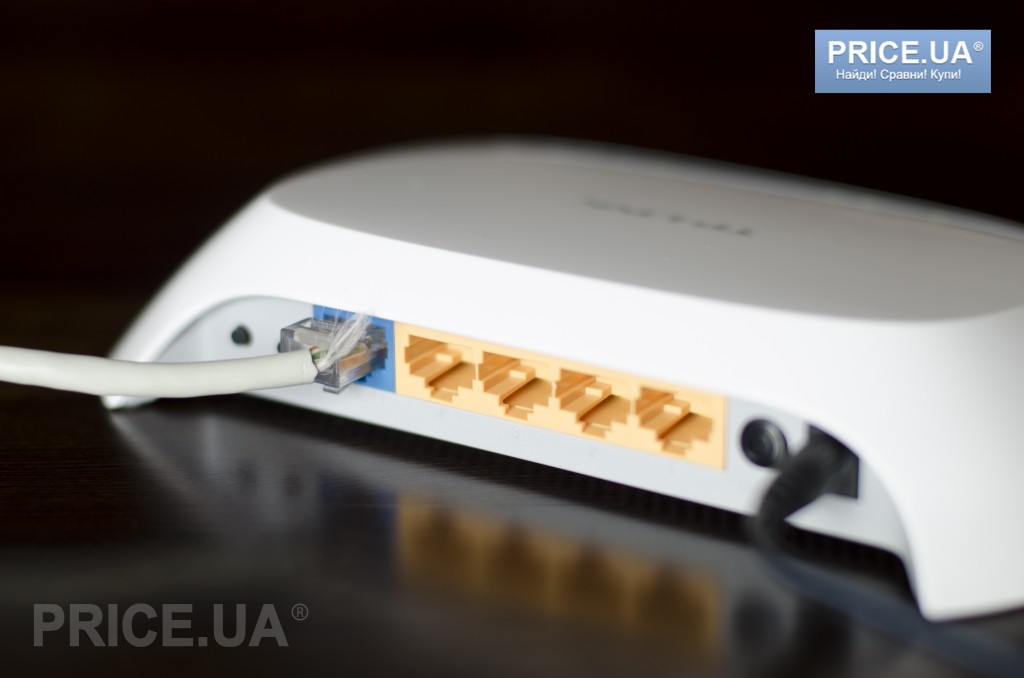
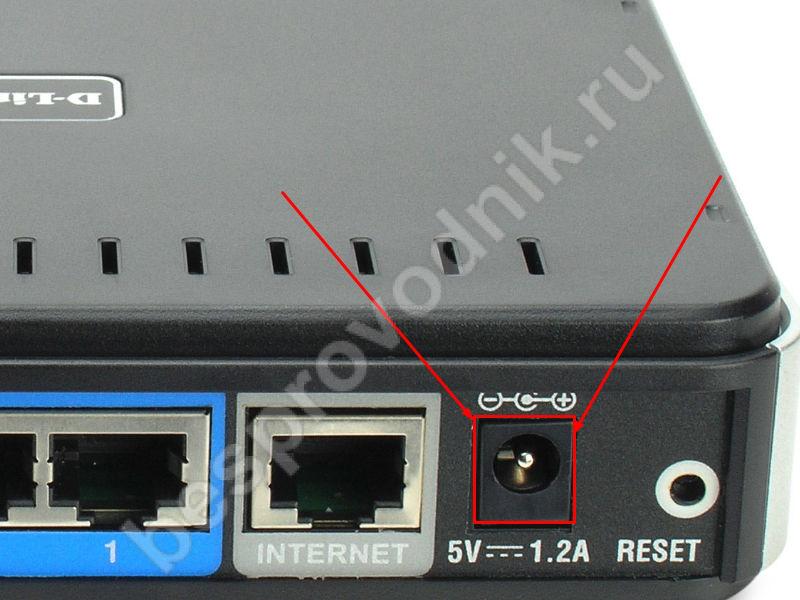
- The router is connected to the network (the power cord is included - is there such?).
- We press the button ON. on the router (many routers are also included directly from the outlet, but in vain). In our case, both the power adapter and the button are in place.
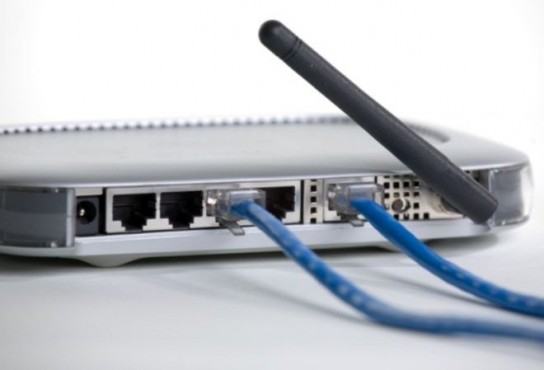
- In the box we find network cable. At one end we connect it to the router (there are many ports on the router, you need the one with which “LAN” is signed,necessarythe port is also usually highlighted in a different color than the others). Others - to the PC network board.
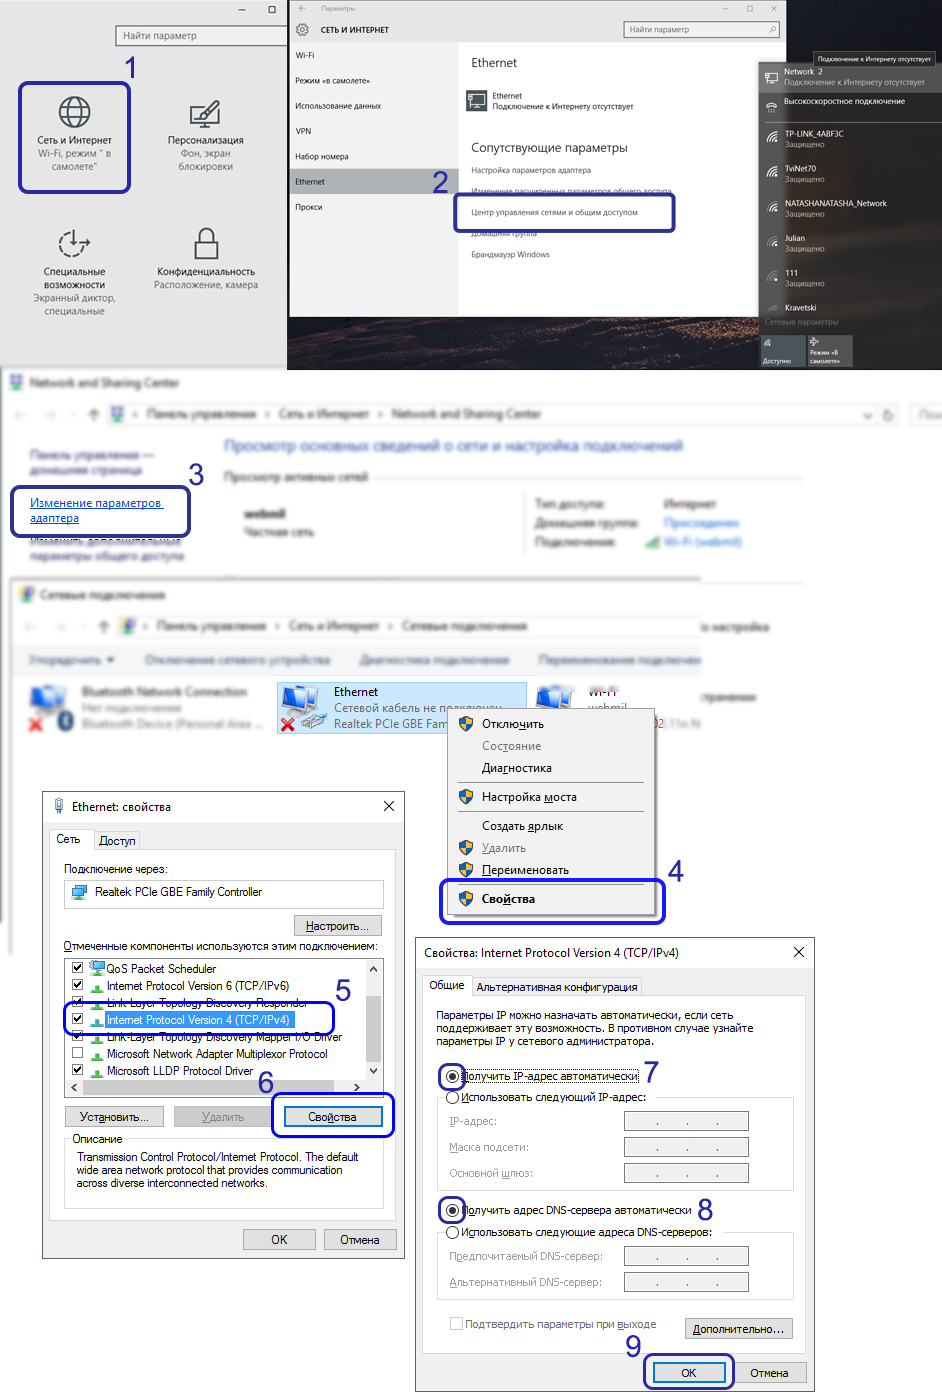
- You need to enable automatic IP address retrieval. You can do it like this:
Administration of the router
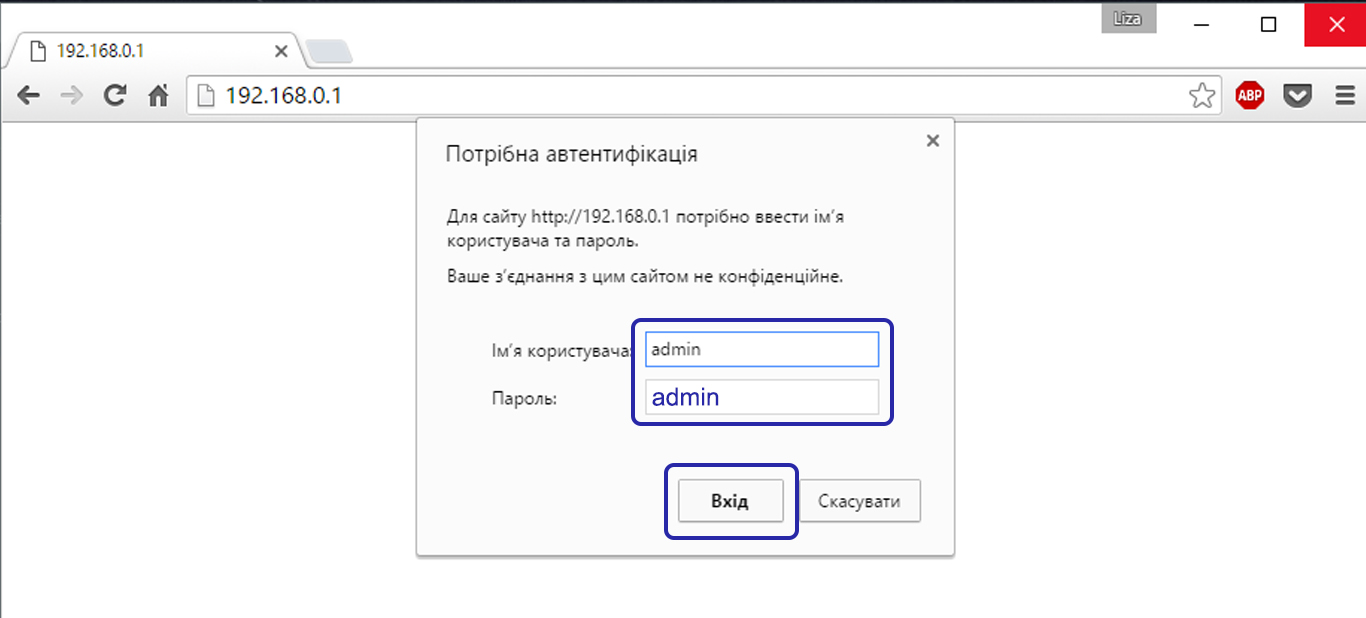
- On the PC, open any browser (we used Google Chrome).
- Register the address of the router in the address bar (for Wi-Fi routertP-LINK is 192.168.0.1 or 192.168.1.1).
- In the window that appears, enter the username and password. If the technical documentation or at the bottom of your router does not indicate the reverse, the following are used as standard on routers:
- login:admin
- password:admin
If you did everything right, this page is in front of you. The menu is always in English. On the left - the menu, in the center - the content of the selected item on the left, and on the right - an explanation and the most important settings items.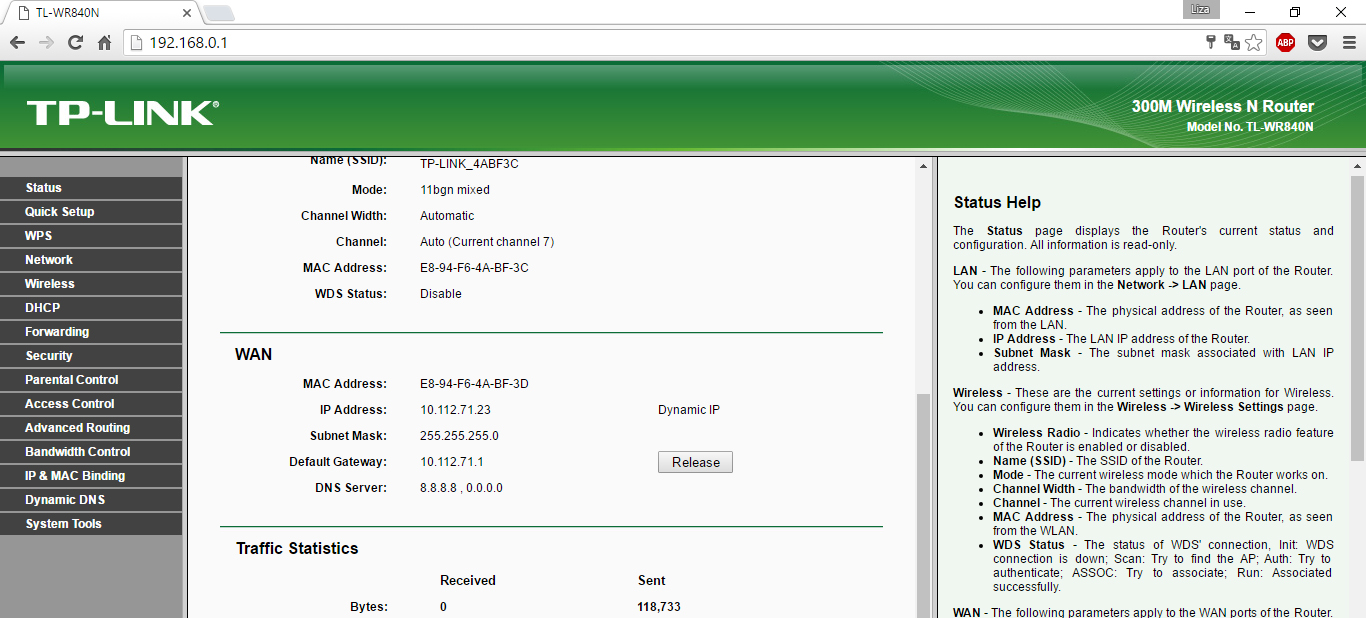
How to set up a Wi-Fi router at home
Do not be in a hurry to be intimidated: you do not need to fumble in each section with the English-Russian dictionary at hand. It is enough to put a tick in 3 points.
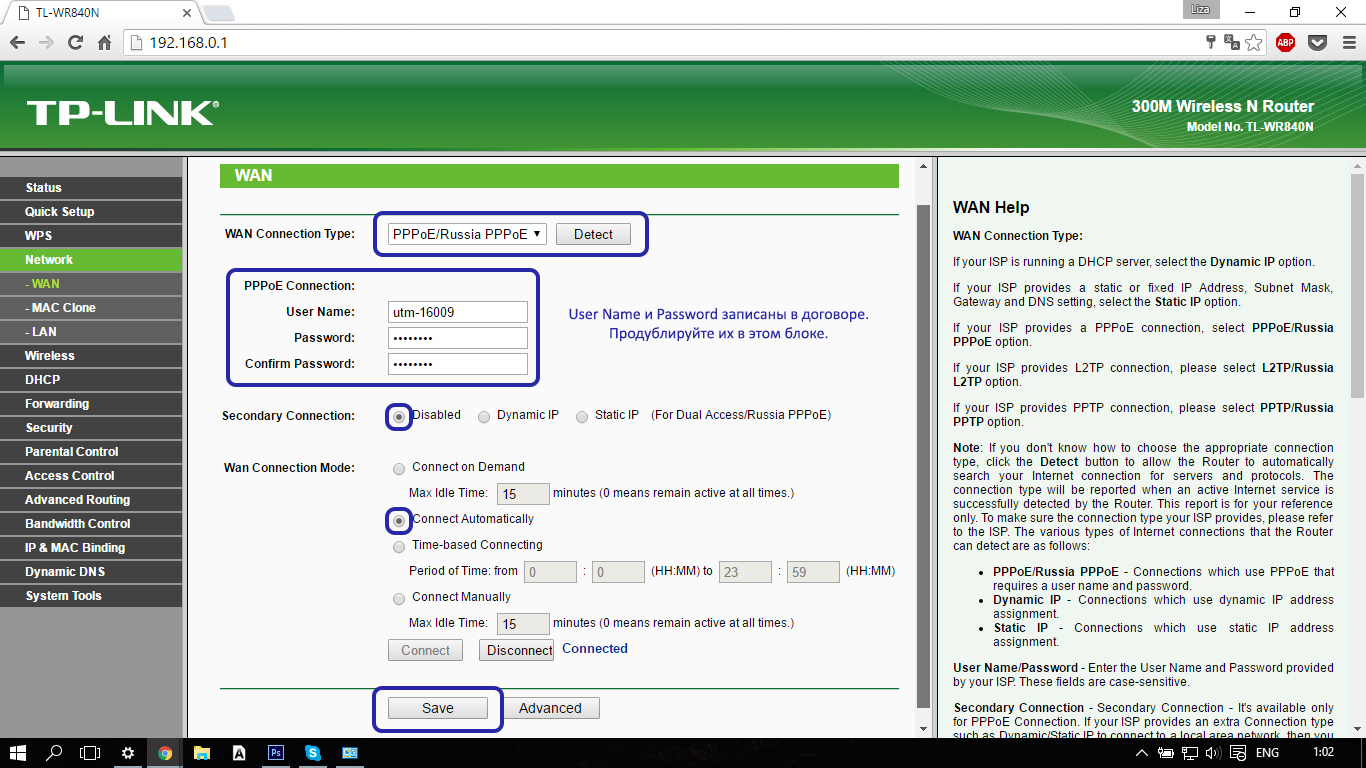
Section Networkpoint Wan. From the list, select your connection type - Dynamic IP, Static IP, PPPoE or PPTP (see agreement). In our case, this is PPPoE. Each type of connection requires adjustment. Using the tips below, configure the settings on your router and clickSave(at the bottom of the page).
PPPoE
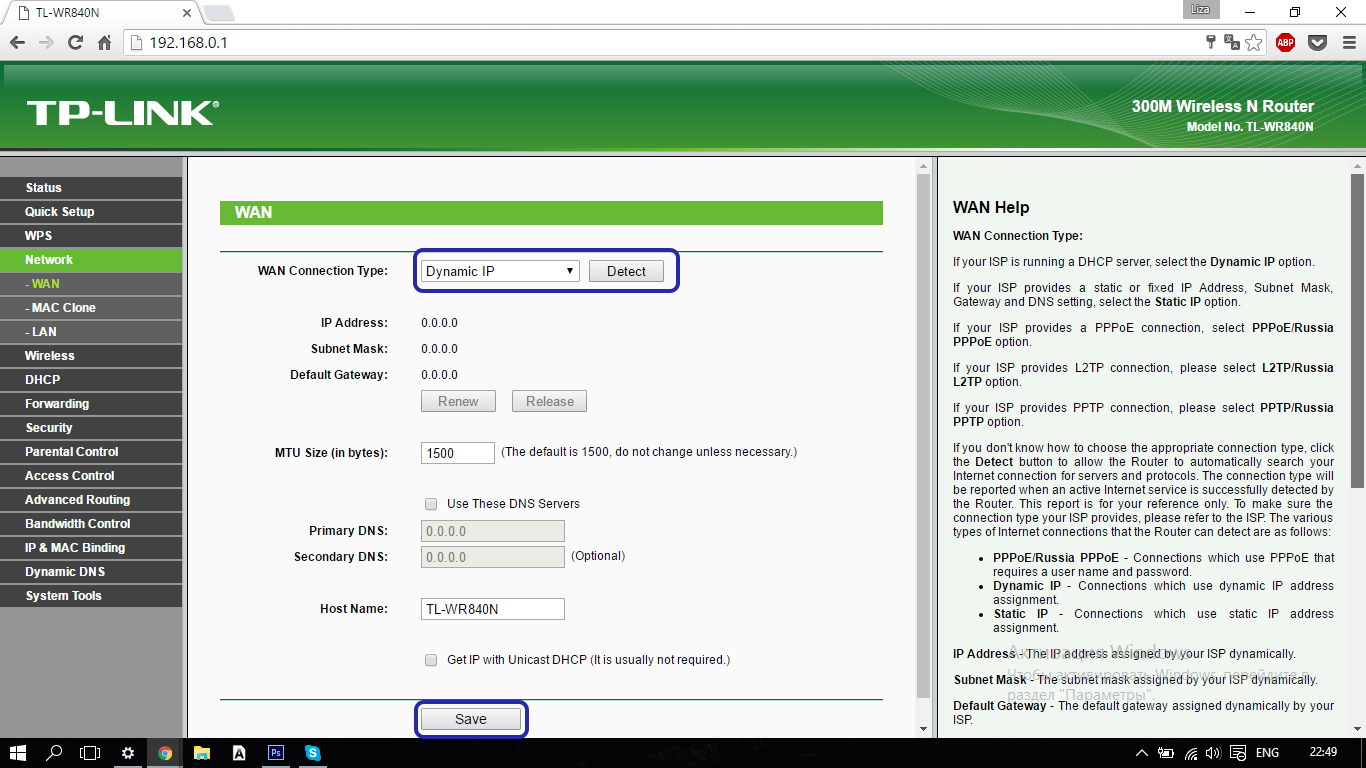
Dynamic IP
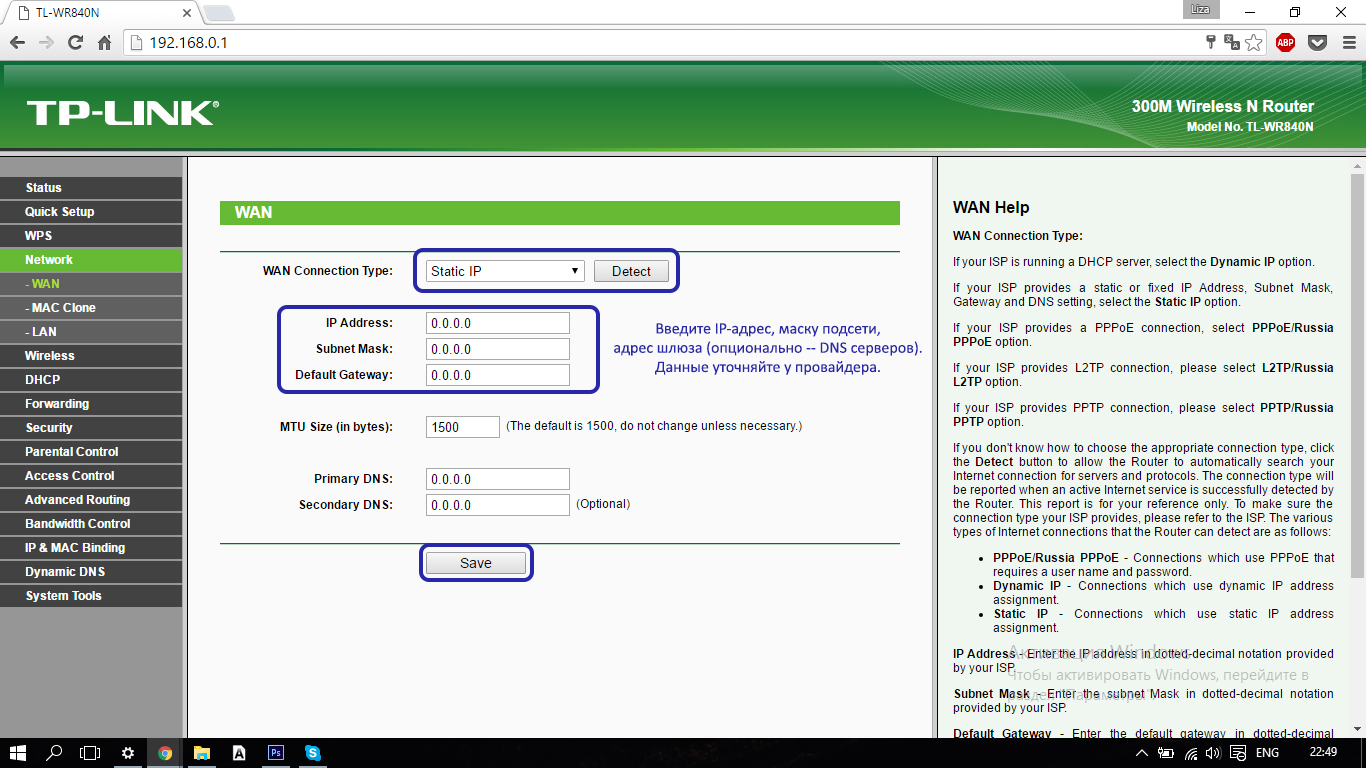
Static IP
PPTP
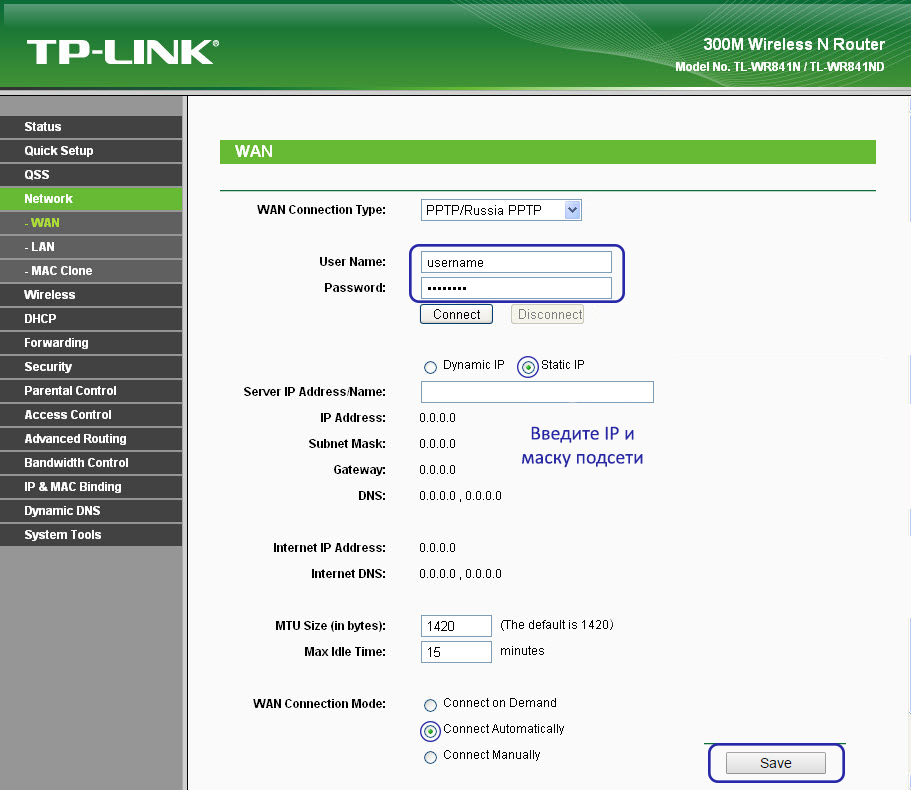
Important!The provider is sometimes bound to the MAC address network card (a characteristic phenomenon for Dynamic and Static IP), because in addition we go to MAC Clone and live through Clone MAC Adress. This is in case you did everything as stated above, but for some reason it did not work.
Wi-Fi network setup
How to connect wi-fi almost figured out - it remains to configure the Wi-Fi network. Because we go toWireless- Settings.
We find our location in the list, invent a name for this network (it’s better not to subtilize the name, but you can’t leave it as it is - you can have problems if it matches the name of the neighboring Wi-Fi).
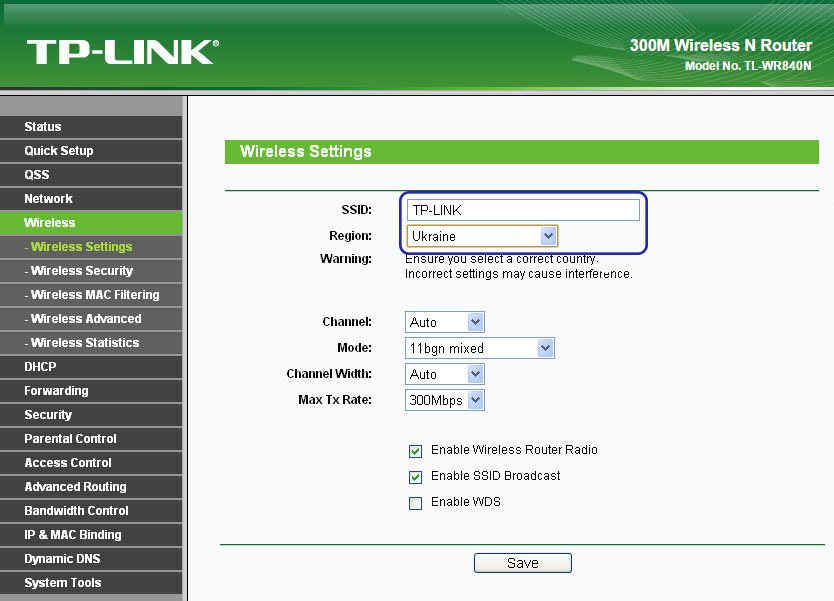
Among other things, that is on this page, such menu items may be useful:
- Enable Wireless router Radio - enables / disables Wi-Fi;
- Enable SSID Broadcast - enable / disable the visibility of the Wi-Fi network, if you disable this item, this network will not be displayed in the general search for Wi-Fi networks (only via SSID).
The latter is not a way to hide from the neighbors, so do not rush to be wise with secrecy.
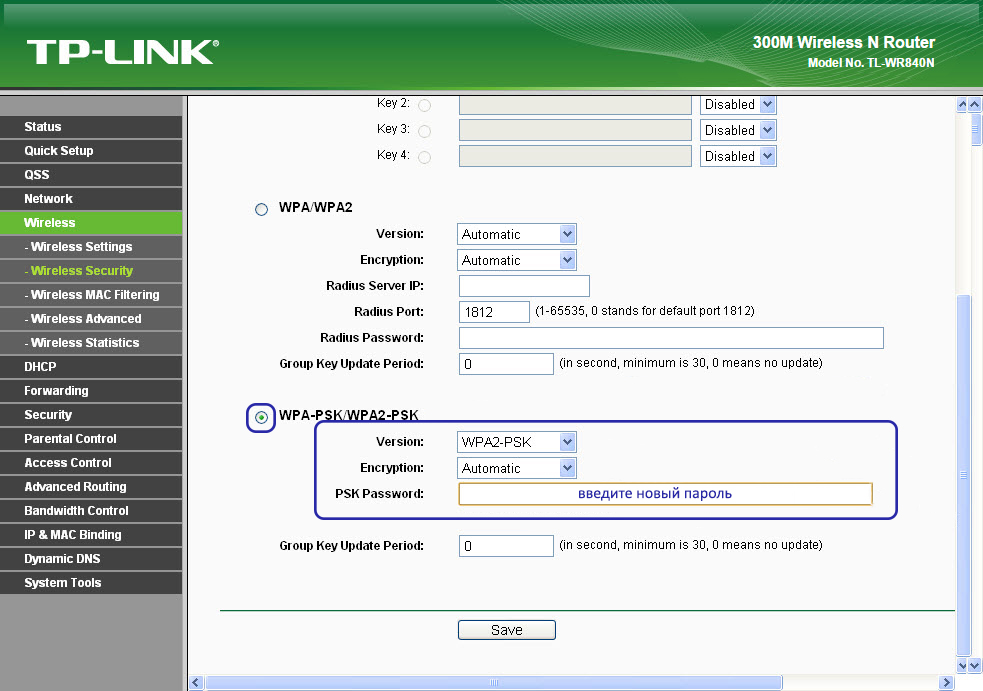
Configure Wi-Fi network security
We remain in the sectionWireless, go to the submenuSecurity. The optimal choice of parameters from the list is in the photo below. For you - only the password for Wi-Fi. We recommend to write it down in the contract for the provision of Internet services (so as not to be lost).
Connect and work
You can, of course, still configure local network and change the administrator passwords (those that admin / admin defaults on all routers). But this is a bonus points. The majority of users can start working after rebooting the router. You can do this by clickingREBOOT on the pop-up at the bottom of the message settings page.
Now we connect the cable from the provider to the highlighted port and INTERNET port (via which the Internet comes to your apartment). Other ports are for wired PCs and laptops with wireless problems.
Now you know how to connect the router in 15 minutes. How many, by the way, did you get on the timer?
P.S. Indicators
Not all routers are the same, but keep in mind:
- indicator Systemshould blink, not burn;
- Power- just burn;
- blinking middle indicators - data is being exchanged, indicators are on - there is no network activity, they are off - there is no connection;
- Inthernet - it is on when there is a connection, it is blinking - data is being exchanged, it is off - check the cable connection.
If you need a signal booster or let's say Wi-Fi adapter, the link below you can choose wireless equipment for data transfer for any occasion:http://price.ua/catalog454.html.

This article will help answer the following questions: how to properly configure a wi-fi router, how to configure an access point and bring clarity. If you believe the manufacturers of wi-fi equipment, setting up a wireless network (WLAN - Wireless Local Network) is a matter of minutes. You just need to press the button and the device itself makes the connection. But in reality, wi-fi routers are confused even by experienced PC users. Most are glad to the fact that in general a signal takes place - as usual, reliability is forgotten. You will learn in this article how to properly configure a wi-fi access point and how to make a reliable wireless connection to protect your network from unwanted guests.
How to choose a Wi Fi router or access point
Choosing a wi-fi router. The wi-fi standard is always a stumbling block for multimedia delivery. Transmit quickly large files Or you can watch HD video over a wireless network only if it complies with the 802.11n standard, which can support speeds up to 300 Mbps. We also advise you to read about the new wireless network standard - 802.11 ac, in order to purchase a device with a reserve for the future. If there is no need for this, then any router of a well-known manufacturer should be chosen (Netgear, Asus , TP-Link or D-Link), which complies with the 802.11 n standard - this will be more than enough for any high speed internet connections.
Wi-Fi adapters. Users using modern laptops or personal computers with a wireless integrated network adapter, do not need additional equipment, and owners of older laptops need to take care of Wi-Fi modules on the USB bus, or Wi-Fi Card-Bus adapters
How to locate a Wi-Fi access point or Wi-Fi router
As a rule, all 3 Wi-Fi network standards work at 2.4 GHz. In this connection, several problems arise at once. One of them comes down to the fact that in this frequency range, not only does Wi-Fi equipment work. For example, wireless interface extenders, cordless phones, microwave ovens also use this frequency in their work, which significantly increases the degree of interference. Another problem is connected with the signal transmission environment: reinforced concrete structures, the human body - all this signal quality makes it worse if they are located along its path. In order for a signal to be available on the area of the entire premises, it is important to choose the right place. The connection functions best if the router is mounted on the wall as high as possible. In addition, the router should not be directly behind a computer or other device that has a strong study or prevents radio waves due to the metal case. Also has the correct location of the antennas of the router crucial. It is possible to obtain in most cases more coverage if they are directed vertically.
Connecting and configuring a Wi-Fi router (access point) for a local (internal) network
Use a network cable to connect a computer and a router (you usually use only 3-5 of them for the external network, they are located nearby and signed). You need to make sure that you have a computer connection to your file router (in the taskbar tray, the connection icon is lit).
Then you should set the following settings in the properties of this connection:
- IP Address: 192.168.0.2
- Subnet Mask: 255.255.255.0
- The main gateway: 192.168.0.1
- DNS: 192.168.0.1
 If you found other parameters in the manual, you need to set them. Open up command line en PC (Start - Run - type ”cmd” in the opened window for Windows XP or click Start and enter ”cmd” in the search bar). Then write ping 192.168.0.1 in the command line that opens. If the packages come from 192.168.0.1, then you have done everything correctly. If there is no answer, and we see the message about waiting time limit, then you need to try to change IP 192.168.0.1 and 192.168.0.2 to 192.168.1.1 and 192.168.1.2, respectively, and try to ping the address 192.168.1.1 after. If you are still unsuccessful, then you should refer to the manual in order to understand which router accepts an IP address on the internal interface.
We also recommend that you check again whether the network cable on the router is plugged in or not the crossover cable is used. In the Wi-Fi router connection guide, it should be written how to get into the web interface for further control of the router, if you can’t find this section, or if the manual is missing - you should check the addresses 192.168.0.1 or http://192.168.1.1, depending on what we managed to ping the address. Open the router settings page in your computer’s browser. If you tried to connect the router yourself, then you need to reset the settings using the "Reset" button, which is located on the rear panel. It is also worth checking the same addresses, but with a secure protocol instead of http: //, https: //.
You will be asked on the page that opens to enter your login and password, if nothing is indicated in the instructions for wi-fi connection a router, then it is worth trying a pair of admin / password or admin / admin - these are the most common pairs, and they are found in almost all popular models of routers. After you enter the administration mode in the interface settings section, select Russian, so that everything becomes intuitive if it is present.
In Wi-Fi routers, packet forwarding is most often allowed in the system interface, so you can already turn on additional PCs and connect them through other sockets for internal network, and start using the internal network.
How to set up a Wi-Fi router
We will discuss below how to enter data to access the Internet connection, using the example of one Wi-Fi router, and for now let's move to the “Wireless Settings” settings section or the “Wireless”, “Wi Fi” and etc.
Now your home network Wi-Fi give the name in "Name (SSID)". The wireless network under this name will be listed. available networks on another device. Choose your region (Europe - the American installation has a longer range, which is prohibited for us). In the “Channel” column you need to set the value to “Auto” - then your Wi-Fi router will be analyzed on the air, and the channel with the least amount of interference will be used. By clicking on “Apply”, confirm the settings.
Wireless security
 The network is established, now it is up to the choice of protection. Anyone can without a strong password to go through your Internet connection. In defense wifi network There are three main encryption methods: WEP, WPA and WPA2. In one way or another, they are all vulnerable, but with our help your network will be protected from hackers quite reliably. WEP encryption is extremely unreliable - it is recommended not to use it. WPA (Wi-Fi Protected Access - Protected Access) encryption, based on the AES encryption method, is quite reliable and problematic to crack. A hacker will need to pick up keys for many years or a computer that will surpass current analogues by an order of magnitude.
Offers more better protection WPA2. True, here the hackers were able to find a loophole, but the costs for hacking are too high. However, all these protection methods require a dedicated authorization server (RADIUS), which is not applicable in a small office or home network. There is encryption for them using WPA and WPA2 with predefined keys. To use them on the “Wireless Settings” tab, you need to activate “WPA-PSK (TKIP)” or “WPA2-PSK (AES)”. When requesting Security Encryption, you will need to set a password - it is not recommended to use less than fifteen characters for it. Then confirm the entry by clicking on “Apply”.
Optional setting Wi-Fi router
Each device of a network is equipped with its own network MAC address (Media Access Control). It should be in the router to register the addresses of only devices known to you - others should not have access to the router. To do this, in the menu item, click “Advanced” on the “Wireless Settings” tab and select “Setup Access List” there. You will then receive a list of connected devices. Learn MAC wifi address module on a laptop or on a Wi-Fi network card on a PC, just type “ipconfig / all” on the command line. Then select the computers for which you want to open free access, and click on “Add”. Now you need to tick the box next to “Turn Access Control On”, click on “Apply” - and the protected network is ready from hackers. Do not forget that all this is done better after you set up a wireless connection on the client computers.
Pass a Wi-Fi router through the web interface and try to configure the network on your device using the following settings:
- IP - from the range of free addresses
- Mask – 255.255.255.0
- Getway – 192.168.(0-1).1
Specify the use of WEP encryption in the network authorization settings, as well as the WPA-PSK and TKIP authentication type. Enter your password from the network and connect.
Setting up the Internet on a Wi-Fi router or setting up an external network
 In case we need to dissolve the Internet on the internal network, it is necessary to connect the network cable to the external interface on the wi-fi router with the Internet (usually the external interface is a little apart from the rest and WAN is signed accordingly).
Then, in the settings of the router, you should specify the settings of the external interface of your provider: as a rule, they are in the contract, or you should call technical support. You should also not forget about DNS - surely there is a caching DNS server on the router or, in extreme cases, a DNS tunnel — you need to configure it. You also need to check if packet exchange is allowed between interfaces, if yes, then most likely the Internet already exists on your internal network.
By the way, it should be noted that the latest models of Wi-Fi routers, and from the previous ones, some (for example, Asus) have the ability to work with the PPPoE protocol, which is increasingly common with providers. If you have such an Internet, then you need to make sure that your router supports PPPoE. On this page, we have described the basic methods of connecting to the Internet so that you can define yours.
Once again we recall about the cherished button, which answers the question of how to reset the password on the router, if I forgot the old one. There is a “Reset” button on each router, after you click on it while the router is operating, it reboots and all settings are set to the initial ones.
Setting up a wi-fi router. Wi-Fi network troubleshooting
Why does not want Wi-Fi to transfer data? You are connecting to Wi-Fi, but the site cannot display the browser. So let's look at the solution to this WLAN problem.
The main problem is considered weak signal wi-Fi connections. In some cases, WLAN transmits data 1.5-2 times slower and always bad signalregardless of where the antenna is located. Reason: your network overlaps with another WLAN that is running on the same frequency. In order for several radio networks to be able to exist side by side without overlapping, in the 802.11b / g standard there are a total of 13 channels at 2.4 GHz. Many routers are configured on the sixth or eleventh channels. Can be found with free application NetStumbler and recognize neighboring WLANs and find out what channels they are working on. Download the application from the official site and start the search. After that, you will see the channels of you surrounding networks. Now via the web configuration of the router itself, set up your own WLAN to one of the channels that does not apply on this network, and check whether the signal has improved.
Over time, every contemporary is confronted with the question of how to set up a Wi-Fi router or modem. This process will require the following:
- wired internet connection;
- PC or laptop;
- wireless router;
- cable connect to the network board.
Setting up a Wi-Fi router
How to properly configure the Internet via Wi-Fi router for home? Initially, you should connect the equipment.
How to connect and configure wifi router for distribution, this video will be a visual aid.
Connection via web interface
Now almost all network routers are managed via a web interface. Therefore, it is worth considering how to set up a Wi-Fi router at home through a computer browser. To use the program, you must first enter it. To this end, we do the following:

After authorization, the settings and configurations of the acquired router will be available. Each manufacturer has created its own unique interface, so it may differ, depending on the brand of the wireless device. In this case, the essence of each program is the same, but the control is clear on an intuitive level.
Setting the main parameters
In the Wan / Basic settings / General settings (or something like that) you need to set the following parameters:
- connection type
- username and password
- iP parameters
- connection mode
Currently in most cases used pPPoE connection type, to clarify it can be found in the contract with the provider or the support service. 
We enter the username and password from the documents provided at the time of signing the contract. 
IP parameters are left Disable, or Dinamic IP, depending on the conditions provided by the operator. 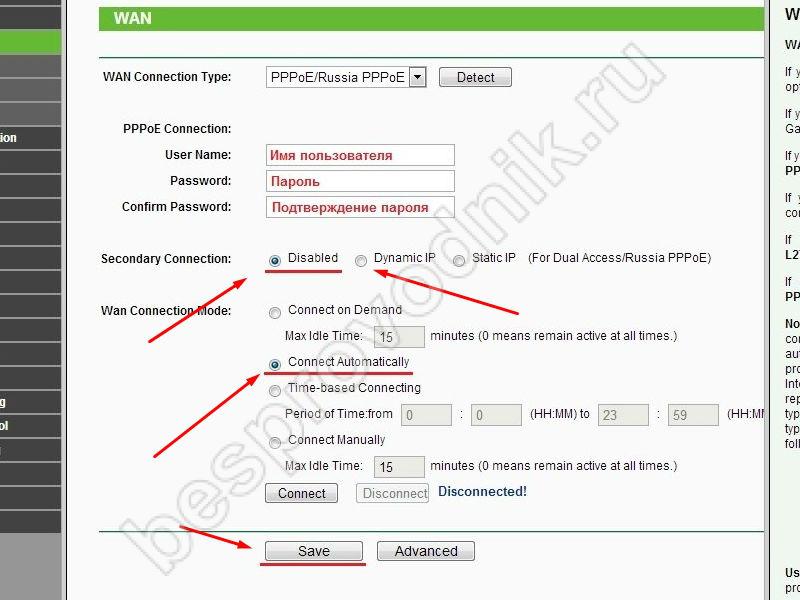
Connection mode is set to Auto, so that devices can connect to it automatically and at any time. And do not forget to save the settings! =)
After that go to setting up the WiFi connection
Open the Wireless Networks / WiFI tab or something similar.
In the tab of the basic settings of the wireless network, we need to specify
- Connection type
- Network mode
- SSID Wireless Network Name
- Channel
The type of connection is determined based on the data in the contract, most often as an “access point”. Sometimes this parameter is simply not there.
Network mode is set as b / g / n or g / n mixed. The bottom line is that, depending on the network mode, devices with different WiFi standards can work in it. So if you have an old phone or laptop, then it will not be able to connect to the Wi Fi modern standard. If you have a modern device, then it can work in most standards. 
Set the name of the wireless network as desired - this is the name of your wifi to connect, for example, “My_WaiFay”. 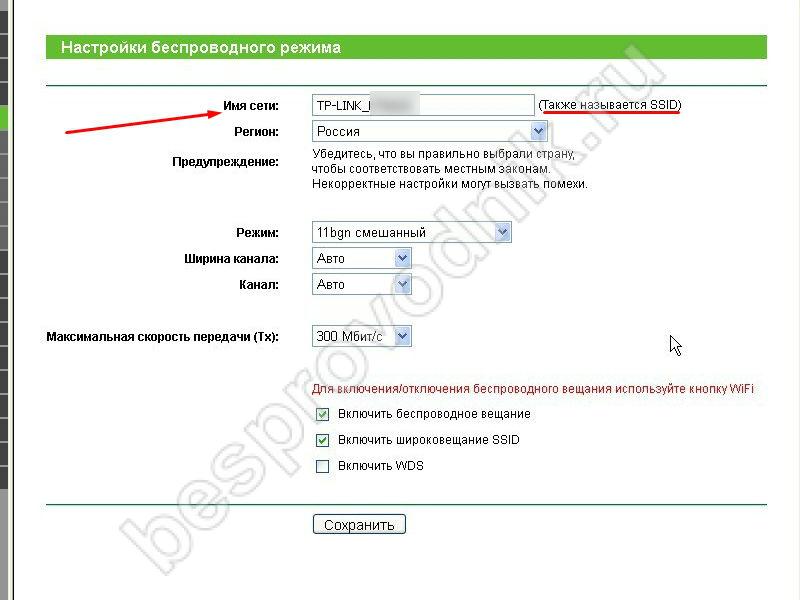
The channel can be left auto. 
However, if in this mode, you should manually change it to 7 or any other selection method. This is due to the fact that in our time there may be several routers nearby, for example, in a high-rise building and they can work in the same range, which causes difficulties.
Today, as you know, wireless networks (VLANs), or, as they are often called, private virtual VPNs, have firmly established themselves in the computer world. And when using a network connection or to access the Internet, they are given preference. But, unfortunately, not everyone knows how to turn on WiFi on your computer and even more so make it the main access point.
Wireless network
Let's start with the fact that connecting to virtual networks provides two main methods: infrastructure and connection in Ad-Hoc mode, which will be discussed later.
The first type of connection involves the use of standard network routers or ADSL modems that distribute packets of IP addresses to several devices that are currently connected to a virtual network.
In the second case, only one main computer terminal is connected, which will later act as a gateway. In other words, all other computers, laptops or mobile gadgets will be connected to it. Consider the question of how to turn on WiFi on your computer. Here are a few ways. Before you do this, you need to do some preliminary actions, without which the creation of a connection will be impossible, it simply will not work even if the configuration of some parameters is successful.
Basic WiFi components for PC
It goes without saying that some components will be required to establish a connection through the WiFi module. In principle, everything is simple. This is a computer installed (we will consider all processes based on Windows), a router and a little patience.
Note that if you need to make your computer a WiFi access point, you should use the built-in WiFi-modem (you can use some USB-devices).
Ad-Hoc connection
This connection option was developed specifically for those cases when it is required to connect all other devices through one main computer terminal. The advantages of such a connection are that there are no restrictions on how many client terminals will be connected through the main gateway.

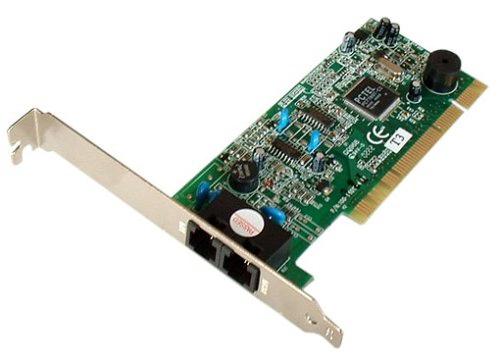
Conventional cheap routers and ADSL modems installed in apartments provide connection to the standard version of 4-6 devices. Naturally, you can purchase multi-channel routers, but now they will cost much more. It is much easier to use the embedded device on the main computer, which connects directly to (RJ-11 or RJ-45 connectors) and provides WiFi distribution for the PC.
Installing the router driver
First you need to install the driver of the device itself (provided that it is not installed yet). For this, as a rule, is used standard disk with the drivers supplied with the purchase. The installation itself does not usually cause problems, but in some cases additional settings will be required.
After installing the driver, you need to look at the status of the device. To do this, you can use the standard "Device Manager" (the device itself should not be highlighted in yellow as a problem).

But that's not all. In some computer systems, communication modules may be disabled by default. Here you will have to use the "Engage" command, having previously entered the network adapter, caused by a right click.
Basic settings of the router
Now you need to configure the adapter itself (router). This is done in any Internet browser with the introduction of the line 192.168.1.1 in the address field (for some non-standard models 192.168.0.1). After authorization using the login and password (they are indicated on the etiquette of the device itself), tick the “Enable AP” option, assign the SSID network name and select the data encryption method (usually WPA).
After this procedure in the “Wireless Networks” menu, which is in the “Control Panel”, you need to remove the check mark from the “Use for wireless network configuration” line and then configure additional parameters.
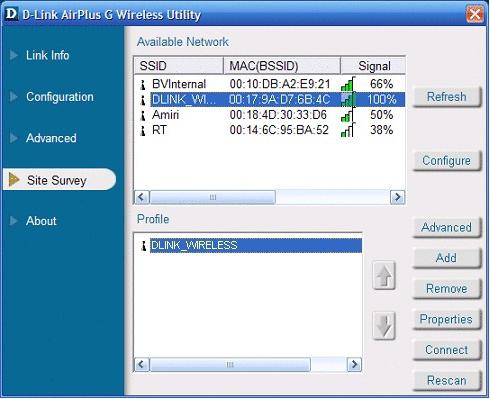
For example, for D-Link devices, you need the D-Link AirPlus G + Wireless Adapter Utility program. In the parameters, you will need to enter the same SSID value, then in the Wireless Mode section, set the Infrastructure value and save the changes.
How to distribute WiFi from a computer
Consider the basic method. Solving the problem, you can do otherwise. For this option in the management of wireless connections, select the item “Change the order of preference for networks” and add a new connection. Next you need to enter the connection name SSID (arbitrary), select the authentication "Open" and the encryption method WEP. Do not forget to use the network access key (the WiFi password on the computer) followed by confirmation.
Below there is the line “This is a direct computer-to-computer connection; access points are not used. " Opposite it you need to put a tick. On the "Connection" tab, the "Connect if the network is in range" option should be enabled.

Next, you need to go to the "Network Setup Wizard" and after detecting new equipment, check the "Ignore disabled equipment" option. In the next window, select the connection method in the line "This computer has direct connection to the internet. Other computers on the network are connected to the Internet through this computer ”, and then in the new window you should mark the line“ Wireless network connection ”. Followed by standard setting computer name, workgroup, and sharing. At the end of the setup, you will need to restart the system.
Alternative method
To answer the question of how to turn on WiFi on a computer, you can use an equally effective method, which, however, is suitable for experienced users. A normal user is unlikely to use such a method, however, we will consider it.
How to configure WiFi on the computer in this case? First you need to make sure that the components are “WLAN Autotune Service”, “ General access to connect to the Internet "and" Routing and remote access"Have the start mode" Automatic "and included. Now you need to start the console with administrator rights, then enter the line netsh wlan set hostednetwork mode = allow ssid = "XXXX" key = "YYYYYYYY" keyusage = persistent, (where XXXX is the name of the computer, and YYYYYYYY is at least an 8-digit password). It is better not to use Cyrillic when entering.

Now we run ncpa.cpl, in the properties on the “Network” tab, the Microsoft Virtual Miniport Adapter should be specified. Here you can delete unnecessary protocols and rename the connection. In the “Access” tab, the permission to use the connection by other users is established and your connection is selected. Now go to the console again and turn on the connection using the string . This is the activation of the connection.

Checking connection status is performed by string netsh wlan show hostednetworkstop service - netsh wlan stop hostednetwork, complete shutdown and removal - netsh wlan set hostednetwork mode = disallow. To start automatically when you start the system command line netsh wlan start hostednetwork need to add (register) in the startup menu.
Conclusion
Probably, it is already clear that the question of how to turn on WiFi on a computer has several basic solutions. Which of them to use, it already solves everyone. Actually, the question boils down, as is already clear, to installing drivers, setting up network adapters and making basic router settings and network connections in system.
As already mentioned, the first method of special difficulties should not cause anyone. The alternative method of creating distribution and its, as they say, “sharing” the average user is unlikely to work, although it is simpler, because you do not need to dig into the system. Here, as they say, everything is at hand, although it is necessary to carry out the preliminary settings anyway. On the other hand, all methods are effective, and what to choose depends only on the preferences of the user or