If you want to drastically change a photo in just one simple action, then nothing beats converting it to black and white. A grayscale translation can also save an image that color correction can't help, or prettier a person who needs some serious teeth whitening or skin care. These problems almost disappear when you enter the black and white realm.
But does this mean that it is necessary to install in digital camera black and white shooting mode? No no and one more time no! It is much better to shoot in color and then desaturate the pictures in Photoshop. In this case, you get a huge number of possible creative solutions, for example, the effect of partial desaturation, achieved by desaturating not the entire picture. And speaking of color, there are several tools in Photoshop that allow you to change the color of everything from a car to a hair on your head. In addition, you can give new life old photographs by adding color to them.
You have probably heard the expression “As they pay, so we work!” In Photoshop, this expression is converted to "Most fast way- not always the best. In other words, for some tricks - these include converting a color image to black and white- you have to spend a little extra time, but the result is worth it.
Let me explain with an example. Open a color image. I'll take Daska's photo.
Select the menu command Image => Correction => Desaturate (Image => Adjustments => Desaturate).
Desaturation means removing all colors from an image.

Photoshop converts the image to black and white without difficulty, but the result is unlikely to inspire you.
2. Create a Black and White Adjustment Layer.
Open palette Correction, selecting the menu item Window => Correction (Window => Adjustments), and click on the icon layer Black and white (Black & White) (looks like a rectangle, diagonally divided into black and white halves).

Photoshop will turn the image black and white and display several sliders and other controls in the palette that you can use to fine tuning created layer.
3. Move the sliders until you get a high contrast black and white image.
Although the program has discolored the image, there is still room for improvement. Move the color sliders to make things in the image look even better. Moving to the right colors areas that were previously colored with the slider's color to a lighter shade of gray; moving to the left colors the areas a darker shade of grey.


In addition, a drop-down list at the top of the palette contains a lot of ready-made settings - select the list items one at a time to see how they affect the photo. If you click on the Auto button, Photoshop will show you how it thinks your grayscale image should look.
4. Save your photo as a PSD if you want to edit it later.
Lightning touch-up
You probably already noticed the Tint checkbox at the top of the Adjustments palette when you created the Black and White adjustment layer. If you check this box, the program will add a brown tint (called a sepia tone) to the entire image. If you want to use a different color, click on the colored box to the right of the checkbox to open the color selection dialog. This technique allows you to create the so-called false two-tone images.

Channel Mixer Adjustment Layers
Using Black and White adjustment layers is the quickest and easiest way to desaturate images, but . They have no advantage over adjustment layers.
First, make sure the Background layer (or the image layer you want to work with) is selected in the Layers palette, then click on the half black, half white circle button at the bottom of the palette and context menu select a team Channel Mixer. When the Adjustments palette opens, check the box Monochrome at the top of the palette, and then move the sliders Red (Red), Green (Green) and Blue (Blue), as you like, or choose one of the presets from the drop-down list at the top of the palette.

If you want to darken or brighten the entire image, move the Constant slider at the bottom of the palette to the left or right.

Channel "Brightness"
As noted in the article on Lab mode got its name from the names of three channels. The letter "L" stands for the Lightness channel, in which the program stores all light values and thus all visible contours and details of an image. (Letters "A" and "B" stand for channels a and b, which store color information.) This means that the Luminosity channel, taken separately from the others - black and white version Images.
To see what the channel looks like, open the image and select Image => Mode => Lab from the menu (Image => Mode => Lab Color). In the Channels palette, select Luminosity. If you like the resulting image, choose Image => Mode => Grayscale from the menu and click OK when Photoshop asks permission to remove the color information.

In my case, it turned out too bright and pale. This option is not suitable, but you need to know about it. It looks different in different photos.
Converting to grayscale in the Camera Raw plug-in
If you are taking pictures in Raw, you can also use an external module to convert them to grayscale. This module is easy to use and does a good job of converting. To open an image in this format, double-click on its file icon and it will automatically open in the module Camera Raw.
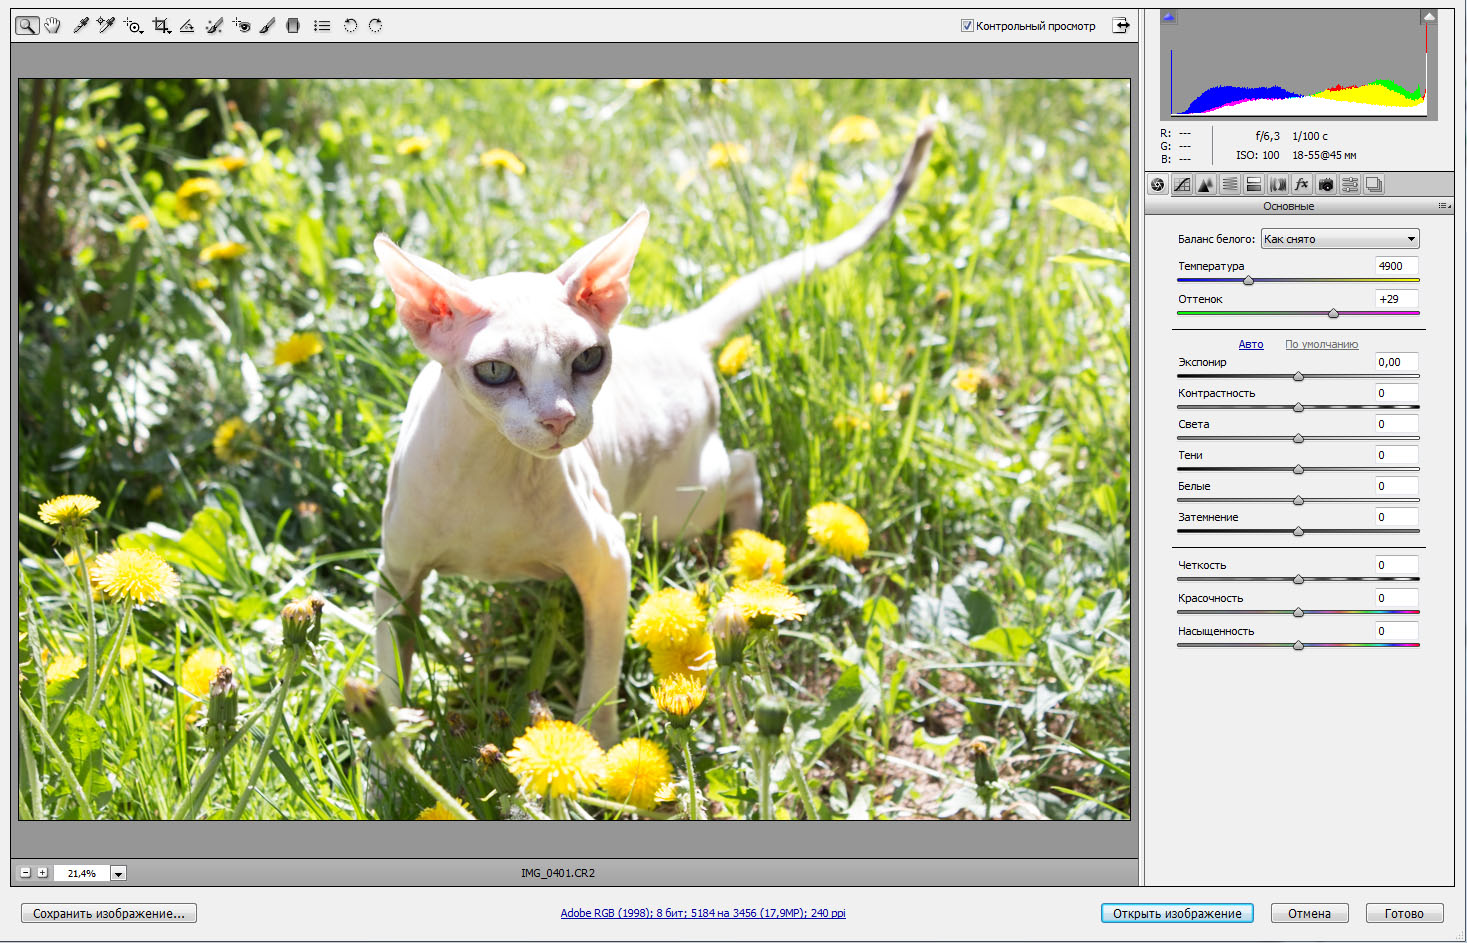
1. In the Camera Raw window, open the HSL / Grayscale panel (HSL / Grayscale).
To open this panel, click on the button of the same name. Then in that panel, check the box Convert to Grayscale. A group of sliders will appear on the right side of the Camera Raw window. To add contrast to an image, you can lighten a color by moving its slider to the right, or darken it by moving the slider to the left.

2. Open the Basic panel and move the Exposure slider to adjust the black and white image. Also move the sliders with various other settings in this tab and you will be pleasantly surprised how your black and white photography!

Even dandelions have become like dandelions!
Noticed an error in the text - select it and press Ctrl + Enter . Thank you!
Good day to you, my dear readers. I recently looked through my childhood photos here (up to 6 years old) and how many of them were black and white. It used to be a common thing, but now there are no pure black and white cameras, but still, sometimes it’s very nice to look at a photo without color. In some cases, it is even more pleasant to look at. Don't you think so?
Many cameras have a non-color shooting function (b / w, sepia, etc.), but in this article I would like to tell you how to make a picture black and white in Photoshop. It doesn't matter what kind of picture it is. The main thing is that this function still remains and no one is going to refuse it. By the way, in my article about I just used the effect of turning a color photo into black and white. Remember?
So let's get started! What do you want to convert to b/w color? Personally, I want to discolor the car that I showed you in the lesson about .

The easiest way to desaturate an image is through the Image menu. To do this, go to the menu "Image" - "Correction" - "Desaturate". After that, the photo instantly removes all the colors.

Grayscale
This method is similar to the first and it will also be easy to perform. You need to enter the "Picture" menu, then select "Mode" from the drop-down menu, and only then "Greyscale".

Voila! Your black and white image is ready.

Both methods are the easiest, but not the best. For a more subtle transformation, it is better to use other methods.
black and white
This method is convenient in that we can correct the image as we need, so the quality of the output photo will be better.
Go back to the menu "Image", then select the word familiar to us "Correction", and at the end feel free to choose "Black and White ...".

As you can see, our image has become black and white, and at the same time, various sliders with the name of the colors have appeared. With the help of them, we will correct our b / w image. Try moving different sliders in turn and you will see that the contrast and image quality change, and in certain areas. Each section has its own color.
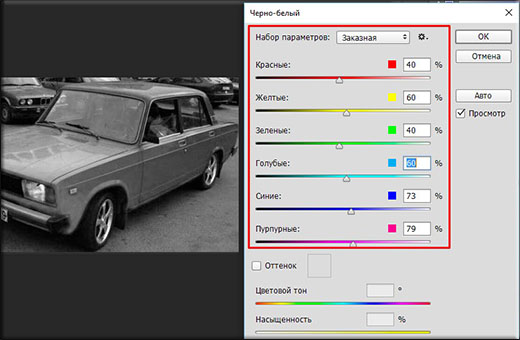
Thus adjust all the colors until the image has the best saturation and contrast. Voila.

Just do not click on "Hue", otherwise you will not get any black and white image. If you do not want b / w, but want in yellow or other colors, then please.
Adjustment layer
Most The best way creating a black and white image from a color one - create an adjustment layer. But here, too, there are several different ways such a transformation.
Channel mixing

black and white
I'll take a quick look here, as this method is identical to the Black and White method we did above. Only here everything happens through an adjustment layer.

Well, in general, these are the ways I wanted to show you. Hope you get enough.) If there are any questions, then ask. I will gladly answer them.
In addition, I would like to recommend the wonderful photoshop video tutorials for beginners. Everything you need for a beginner is collected here, the material is presented superbly and everything is told in great detail. Each element is broken down into bones, so you will know Photoshop completely. So be sure to check it out.
Well, for today I say goodbye to you. Tomorrow will be a new day and new lesson. And sleep soundly tonight. Most importantly, do not forget to subscribe to updates of my blog articles. Good luck with your learning and everything else. Bye bye!
Hi all! With you, as usual, I, Dmitry Kostin. And today we will photoshop again. Remember how we did? Be that as it may, this is not surprising, since it is not difficult to discolor an image. But how to make a black and white photo color? Is that possible?
Of course available. Already entire films are coloring. What is there to make some image color? But it's still a very interesting experience. Can you imagine? You can think of the colors you would like to see in this photo. For example, you can set the color of eyes, hair, skin, clothing and much more. This is how I colored old photos. It turned out funny)
Let me not make long introductions. Let's start coloring right now. Open any b/w photo (I chose a photo I found on the Internet).
Just look at what mode the photo is in right away. It's just possible that it is saved in the format "Greyscale", then you just won't be able to work with color.

Change the color mode to RGB. To do this, go to the top menu and select the item "Image" - "Mode". Well, if it's not the RSL, then put it.
Let's look at the first method, namely the familiar one.

Overlay options
Here is another fairly effective trick for coloring photos. The main thing here is to create a separate layer for each element. I took new photo for these needs.


By the way, this was the very first method that I learned about. When I found out about it, I liked it so much that I colored a lot of photos).
Layer mask
Well, the last way of transformation for today is with the help of a layer mask. Let's get straight to the point.

Well, as a result, a beautiful color photograph is obtained and it already looks completely different. Oops, I just screwed up a little. But you can always fix this.

I never cease to be amazed at the power of Photoshop. Indeed, in many cases the same problem can be solved in several ways, and you yourself can choose the method that suits you best. By the way, which one do you like best? Or do you have your own way of how to make a black and white photo color in Photoshop, which I have not described here? Please write in the comments.
If you want to explore the possibilities of Photoshop in the shortest possible time and learn how to work with it, then I strongly recommend that you look great video course. Everything is told in detail in it, everything is told in human language and laid out on the shelves. The material is easy to digest. So I recommend.
Well, I'm done for today. I hope you enjoyed my article. Be sure to subscribe to my blog updates, then you will always be aware of the most relevant information on the blog. I will not spam. I promise). And I wish you good luck in mastering Photoshop. Bye bye!
Sincerely, Dmitry Kostin.
I was recently asked about the process of converting an image to black and white, namely how can one know that an image is suitable for this. So in this article, I'm going to talk about how to properly convert an image to black and white and how to do it in Photoshop without quality loss.
When is the best time to convert an image to black and white?
There are three ideas that come to my mind when I'm trying to evaluate whether I should convert my image to black and white (hereinafter referred to as BW for short):
- First of all, this is a bit obvious, but what do you want the result to be? Did your client specifically ask for a B&W photo? Are you participating in the photo contest in the nomination for B&W? You're doing a series for a B&W gallery (because actually it doesn't look too good when you only have one or two B&W photos among the color ones, you want to have a good mix, don't you?) Like I said, it's pretty obvious that you need to consider the end result, but it was worth saying again.
- Secondly, it is necessary to take into account the value of the dynamic range. In photography, the term "range value" refers to the ratio of dark to light areas in an image. So when I say judge the range of an image, I'm talking about whether you have areas of deep blacks and bright whites in the photo. What is your dynamic range? For the most part, "flat" images don't look very good in B&W. Traditional black and white have good contrast and fairly stretched values throughout the histogram. So, if your image has these components, then it can be a good choice for converting to B&W.
- I'll write an article someday on color theory and color relationships, but if you have strange combinations of colors that don't look satisfactory together, then this image might be a good candidate for B&W conversion. Let's face it, some colors don't go well with others. B&W can be a great way to avoid inconsistencies and get a great photo.
Just a tip: if you squint your eyes while looking at the image, you will see fewer colors and a wider range. This can help you get an idea if your image really has the right dynamic range.
How to convert a color image to black and white
Okay, now let's talk about how to convert an image to B&W, because there are two ways: right and wrong. You can of course get the same result, but if you do it wrong, you will actually lose quality (technically, you are sacrificing bytes of information). In this article, I will talk about using Adobe Photoshop. There are other conversion programs you can buy, but in terms of value, why pay extra when you can do it very easily in Photoshop.
Step 1
If you have found an image that you want to convert to B&W, then the first step is to open the image in Photoshop. In my example, I'm using one of my wedding shots, which you can see on my website. It was taken during the first dance, and I just really love this photo in B&W.

Step 2
Do not do that!
In short, you are indeed changing color profile, which means you are losing pixel information in the colors. But you don't want that, you want to keep as much information in the image as possible.
What you want to do is done using black and white settings. You can access them either from top menu Image > Mode > Black & White(Image > Adjustments > Black&White) or in the sidebar on the right, click on the settings button (as shown in the figure), and then click on the BW icon, which is indicated by a black rectangle divided into black and white diagonally.

Step 3
As soon as you click this icon, you will see the value settings for each color (see picture). Note that Photoshop has retained all the color information in the image, just rendering it as B&W, but all your color information is preserved.
It also gives you more control over how the BW changes, as you can adjust it on a per-color basis. But keep in mind that you shouldn't go too far out of color ranges or you'll start seeing bumps and jagged streaks in gradient areas like the sky. You will see this when viewing the image immediately if you start moving the sliders too much, so you will immediately understand what I am talking about.

Step 4
After that, you can use other adjustment layers (which act like smart layers if you understand what that means and is very good decision) to adjust the image the way you want: exposure, contrast, levels, curves, filters, etc.
Step 5
Once you've done all the editing you see fit, hopefully you've got an image that you're happy with. Now you only need to save it in accordance with your needs and depending on the desired result.

David Wahlman is a wedding and portrait photographer based in Redding, California. He works in the vicinity of California and seeks to expand the geography of his filming. you can watch it best work over www.wahlmanphotography.com and follow his posts on
Many photographers agree that vintage black and white photographs have such an attractive charm and charm that their modern digital counterparts, devoid of some kind of "soul", are no match for them. Of course, black and white photography does not involve old photographic films, solvents and developers ... To make it, you just need to have a modern digital camera.
What are the benefits of such pictures?
Of course, not all are creative people who subtly feel the style and character of the picture. Are there any real advantages to black and white photography that a skilled photographer can take advantage of? Yes, and there are many.
The fact is that black and white photography not only excites nostalgia in the audience, but also focuses their attention on the picture itself. This is especially valuable for portraits: have you ever wondered why they prefer this particular format of pictures? The fact is that they allow you to focus on the foreground, making everything that is behind the person insignificant. In addition, such an image allows you to process objects in the photo at no extra cost.
In addition, black and white photography is indispensable when decorating a room in a vintage style, when you want to set a certain background. Even venerable designers often use this method, so you can also try yourself in this field.
How to make it?
In most modern digital cameras There is a mode for automatic shooting in this mode. Is this program worth using? No no and one more time no! It is much more reasonable to shoot in normal mode, “discoloring” pictures in application programs. In this case, you can adjust dozens of parameters that the camera simply “cuts”. In addition, using the same Photoshop, you can restore beautiful old black and white photographs by scanning them and improving the color balance.
We'll take a look at the hugely popular Photoshop first, and then we'll cover a couple of other image editors.

A quick way to convert a photo to black and white
First, open any photo you need to convert. Go to the "Image" menu, go to "Corrections", where click on the "Desaturate" command. It should be noted that this algorithm will allow you to make any photo black and white in just a couple of seconds, but the result is unlikely to inspire you much for further research ... This is how a black and white photo is made in Photoshop if the user is too lazy to spend time on it.
The photo is flat and blurry. In other words, it's better to use automatic modes on the soapbox...
Black and White Adjustment Layers
It's much better to use the "Black and White" layer. This method is not only simple, but also reversible. The fact is that when saving to the program, it makes changes to the second layer, and not to original image, which allows for wide creative experiments. In addition, such a black and white photograph is really voluminous and beautiful.

Transforming the Image
First you need to open the photo you want to remake. Double-click the left mouse button on the "Background" tab, if it was previously inactive. To create a black and white layer, you have to follow a few simple steps.
First, you need to open the “Correction” palette (follow the path “Window / Correction”), after which you left-click on the “Black and White” layer icon, which is visually similar to a rectangle divided by a diagonal line into two halves. Immediately after this, a layer with a discolored image will be created, after which several dialog boxes with sliders with which you can set the exact color gradation.

But how to make a photo black and white, but at the same time maintain maximum contrast between different zones in the image? To get the highest contrast picture, just move the sliders until the quality suits you. Dragging the sliders to the right will make the colors lighter, while dragging them to the left will make them darker.
At the top of the palette there is a drop-down list: experiment with its items. Perhaps you will receive some interesting effect. If you click on the "Auto" button, it will display the parameters of the "ideal" image in grayscale on the monitor. This button can also be used in the event that your experiments on decolorizing images have gone somewhere wrong.
sepia effect
Remember the relatively recent photographs of the late USSR, where there were not only black and white colors, but also a shade of brown? Do you know how to achieve such an attractive effect in a modern picture? There is nothing easier!

There is also a Tint checkbox at the top of the palette. If you check it and click "OK", the program will automatically add a brown tint (sepia effect), this applies to all elements of the image. To the right of the flag there is an icon in the form of a colored square: click on it if you want to add some other shades to the picture. In this way, so-called false two-tone photographs can be taken.
Here's how to make a black and white photo.
GIMP
All of the above is true for Photoshop. No doubt, this application is a recognized world leader. But is there any other and just as functional? There is one. It is called GIMP and has long been positioned as an alternative to its paid competitor.
In fairness, it should be noted that not in all cases such a replacement will be adequate, but the mentioned program is more than enough to discolor photographs.

Using Adjustment Layers in Channel Mixer
We note right away that this photo program uses layers in the same way, so almost all the tricks that can be used in the case of Photoshop are quite relevant here. First, still make sure that the “Background” is open on the image you opened, left-click on the icon with the image of a two-color circle crossed out diagonally at the bottom of the palette, and then select the “Mix channels” option in the context menu that appears.
After that, the “Correction” dialog box will immediately open, in its upper part, check the “Monochrome” checkbox, and then select one of the clarification options offered by the program in the drop-down list located here. This method will allow you to get beautiful black and white photographs, each of the elements in which is edited individually.
Important! If you want to make a picture with printing quality (which can then be printed), then it is advisable to use a specially calibrated monitor for this. Otherwise, you will surely be disappointed due to a mismatch in the brightness of colors and shades.

Use "Brightness"
What is the Lightness channel for? In it, the application stores all the lighting parameters of the picture, which form all the visible contours of the image too. Thus, if you take it separately from all other picture settings, you get a regular black and white photo.
Open the "Image" menu, select the "Mode" item there, and then click on the "Channel" option. A palette of the same name will appear, on which you need to select the “Brightness” item. If you don’t like the result, go back to the “Mode” item, select the “Grayscale” option there. Click the left mouse button on the "OK" button, after which GIMP will automatically delete all existing color information.
Additional gradation of parameters
The picture will turn black and white. If you need a more thorough and detailed processing of black and white photos, try to "play" with the parameters, achieving the ideal display of color, brightness and contrast of the image. It should be noted that in many cases this method gives an unnecessarily bright, but pale, pattern. However, you can play with such color gradations, it is interesting to blur
By the way, do you remember what we talked about the techniques of professional photographers at the very beginning of the article? Yes, yes, it is with the help of this method that they create an amazing effect when the face in the photo literally lives its own life. This "miracle" owes its existence to the usual psychological characteristics of a person: firstly, in pictures in color, we constantly pay attention background even if unconsciously. Secondly, black and white photographs in themselves make you focus on the central figure. Considering that the background is already becoming blurred, the brain involuntarily focuses on the foreground, snatching out more and more details.

Using the Camera Raw Plugin
If you are a professional photographer and work with RAW format, we recommend that you use the Camera Raw plugin to convert your photos. It can be used with equal success not only in GIMP, but also in Photoshop. Download the module from the official site, after which you can start creating and experimenting.
Proper use of the module
In the main Camera Raw window, open the HSL/Grayscale window. To do this, you can click on the button of the same name. Check the "Convert to Grayscale" checkbox. A panel with a set of sliders will immediately appear in the right part of the working window. To add contrast to an image, simply lighten any of the areas in the image by moving the slider to the right. However, we talked about exactly the same thing at the top of our article, so you can see the relevant recommendations there.
Then you need to open the panel "Basic" (Basic), and then "play" with the slider "Exposure" (Exposure), adjusting in detail all the parameters of the black and white image. Try to "play" with the settings, after which you yourself will be amazed at what an irresistible impression a "regular" black and white photo can produce!

paintnet
If you are not an experienced user, then you probably already had time to doubt your ability to master the capabilities of the programs described above. Which, however, is not surprising, since they have a rather complicated interface. Because of this, it is undesirable for novice users to install these applications just for the sake of converting several photos to black and white.
Therefore, for not too confident and "fledgling" artists, we would recommend installing the completely free PaintNet program from Microsoft on your computer. Despite its compact size, it is very functional and can be successfully used for our purposes. However, almost all free programs for photographs that currently exist can be described in exactly the same way.

Working with layers
Since this application also uses layers, the main stages of our work will be in many ways similar to the techniques described above, but it will be much more pleasant for you to work. This is largely due to the fact that the interface here is as simplified as possible. First, copy the layer that will contain a copy of the color image. Go to the "Layers" menu, then select "Duplicate Layer". As you can see, everything is as simple and affordable as possible.
However, you can copy the desired piece of the image directly from the "Layers" window. We will need it later. After the mentioned procedure, you are left with two layers, each of which contains exactly the same image fragment. In the same "Layers" menu, turn off the upper section of the image by clicking on the corresponding item with the left mouse button.
Go to the "Corrections" menu, and then select the item with the characteristic name "Make black and white" there. After that, the image is completely discolored. It should be noted that the picture quality in this case may not be too stunning. Keep in mind that scanned old black and white photos are strongly discouraged from being processed in this way, as their quality may be seriously affected.

Is it possible to colorize a monochrome image?
After spending so much time describing the transformation of color images into monochrome, it is time to do the exact opposite process. We will make a colorful collage from an old grandmother's picture, as if recently shot on modern camera. Is it real? Yes, but you will have to be patient.
First, you need to take the “Brush” tool, and then begin to carefully and consistently paint fragments of the photo. Once you're done with any part of the image, it's time to change the blend mode for that particular layer. You can stop at "Dim" or "Soft Light". By the way, black and white photographs of flowers are perfectly painted in this way. We note right away that this is necessary because with the mouse you are unlikely to be able to achieve the required accuracy.

By combining different algorithms in different areas of the photo, you can achieve the effect you want. We deliberately do not say the word "easy", as this whole process will take you a lot of time. Yes, it is long, monotonous and even a little boring, but the result is worth it! Here's how to colorize black and white photos. If you don't want to pay immodest sums for organizing photos from your family archives, you can try to do everything yourself.
Please note that such events require patience and perseverance, so we advise you to stock up on them. Good luck!