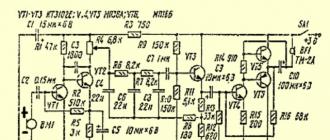
The directional microphone is powered by a low-voltage power supply of 3 - 6 volts. It is convenient to use lithium batteries from a mobile phone with a voltage of 3.7 volts and a capacity of about 800 mA. The operating current of the device is from 50 to 120 mA, depending on what type of transistors we use. The whole design of the directional microphone fits perfectly in the specified housing and has a small size. The signal is received by a piezoelectric head, then the signal is amplified by a preamplifier assembled on transistors VT1 and VT2, later passing through a filter, low frequencies are cut off from the signal and the processed signal is fed to the final amplifying stage. The degree is so high that it allows us to hear even the whispers of our neighbors. The device uses an ordinary piezoelectric head. See the directional microphone diagram below:

Almost any high-impedance speaker with a resistance of at least 25 ohms is suitable as a headphone, in this case a small head with a resistance of 32 ohms is used. All transistors can be replaced with imported ones - this will reduce the size of the board and may positively affect the overall quality of the directional microphone. It is possible to use SMD components. Instead of the final amplifying stage, you can also use an amplifier, for example, on a microcircuit, assembled according to the bridge version, but when using microcircuits, the sensitivity can be halved, but it's easier. It is possible to power the common circuit board of the directional microphone from two AA batteries with a voltage of 3 volts, but the use of a battery is convenient because it can be charged and reused, and in addition, the battery ensures long-term and reliable operation of the device.

A piezo head-microphone is placed in a specially made umbrella in order to center the sound waves at a single point - this, in turn, preliminarily increases the spectrum of the speech stream. The main thing is not to confuse the polarity of the head by connecting the central part of the head to the plus according to the scheme.

It is better to isolate the battery from the common case in order to avoid background sound, and it is also necessary that the earpiece be at a certain distance from the device, which is exactly 1 meter. If the piezoelectric head is replaced with an electret microphone, then the device will turn into a directional microphone, it is able to pick up human speech at a distance of about 15 meters. True, in this case, you will not be able to hear conversations behind the wall.

After the assembly is completed, you have in your hand a miracle device that can eavesdrop on a person without being afraid of thick enough walls! In the near future we will continue the construction of similar devices. Good luck, colleagues, AKA was with you.
Discuss the article DIRECTIONAL MICROPHONE
In the review, a super popular sound amplifying device called the Arbiter. This is a directional listening microphone that picks up and amplifies faint sounds up to 100 meters away. With this device, you can listen to and record various sounds, such as birdsong. Of course, you can also hear other people's conversations that the author of this video collection strongly does not recommend, because it is not good to do this.
Purchased from this Chinese store. Let's unpack and assemble the gadget. The first thing in the box is a parabolic catcher in the form of a pistol. It is equipped with an 8x magnification monocular with a buzzer to follow the object. Power button, volume control, recording, headphone connection. Headphones included.
Assembling and debugging a microphone for wiretapping
Let's start assembling and setting up the Arbiter for working at a distance. It is powered by one Krona battery, but this is not very good, since they have a small capacity. It is better to buy another battery. We install the battery. Now we fix the parabolic sound reflector.
How does a remote sound pickup work?
Acoustic vibrations from the microphone are transmitted to an amplifying device, which transmits the amplified sound to the headphones. We connect them. The audio amplifier is ready to go.
Let's check it out at work. We put on the headphones, turn on the button, point to the source. You can hear the singing of birds in the distance, the sound is really amplified by 15-20 times, you can clearly hear it. It is so loud that when a nearby bird sings, you have to turn down the power.
A great gadget for distinguishing and listening at a distance. If you use more powerful headphones, this eavesdropping microphone works better. You need closed-type headphones, the sensitivity and sound quality immediately increase.
Ordinary microphones are capable of recording human speech at a distance not exceeding several tens of meters. To increase the distance at which you can listen, practice the use of a directional microphone. In other words, this device picks up sounds from only one direction, ie. has a narrow beam pattern. Such devices are widely used not only in intelligence, but also by journalists, hunters, rescuers, etc.
In the simplest of them, a narrow radiation pattern is formed by using a long tube and a microphone installed in it. The tube is disguised as a cane or umbrella. In more complex designs, several tubes of various lengths can be used - this is the so-called organ-type microphone. Such a microphone is capable of capturing voice sounds at a distance of up to 1000 meters. Microphones also have a high directivity, in which the directivity pattern is formed by a parabolic sound concentrator.
There are two main types of directional microphones:
- with parabolic reflector;
- resonant microphone.
Microphone with parabolic reflector.
In a microphone with a parabolic reflector, the microphone itself is located at the focus of the parabolic sound reflector. The AD-9 directional parabolic microphone concentrates incoming sounds and amplifies them. Easy to handle and set up. The kit includes a microphone, amplifier, cable and headphones. Power supply - from the battery 9 V. Several models are issued. Common in the design of all these microphones is the presence of a pistol grip, a parabolic reflector with a diameter of about 40 cm and an amplifier. The perceived frequency range is from 100-250 Hz to 15-18 kHz. All microphones are self-powered and have connectors for connecting to a tape recorder. A sharp "needle" radiation pattern allows, in the absence of interference, to control human speech at a distance of up to 1200 m. In real conditions (in a city), you can count on a range of up to 100 m.
Below is a drawing of a directional microphone with a parabolic reflector. (fig.1)
resonant microphone.
The resonant microphone is based on the use of the phenomenon of resonance in metal tubes of different lengths. For example, one of the modifications of such a microphone uses a set of 37 tubes with a length of 1 to 92 cm. metal, as well as different lengths of tubes) - are shifted in phase. Since such devices are practically not represented on the market, the authors have no data on the advantages of resonant microphones.
From the point of view of hidden sound control, the use of directional microphones is difficult due to their often unacceptable dimensions and sources of acoustic interference. In addition, in order not to be tapped in the car, it is enough just to lift the glass. Below is a drawing of an organ-type directional microphone. (fig.2)

Low-frequency amplifier circuits that can be used in organ-type microphones are shown in Fig. 3-4.
The design of sensitive amplifiers for listening to speech has its own characteristics. One of the practical circuits of a microphone amplifier is shown in fig. 3.

This device contains a two-stage low-frequency amplifier on low-noise transistors VT 1 and VT 2, a corrective filter on a transistor VT 3 and a final amplifier, assembled according to a push-pull transformerless circuit, on transistors VT 4 -VT 6. The acoustic amplification of the audio frequency signal by the given device is 85 dB, the initial current consumption is 1.8 mA, the amplified frequency band is from 0.3 to 3 kHz, the maximum output signal level is 124 dB.
The signal from the microphone M1 type "Pine" through the capacitor C 1 is fed to the base of the transistor VT 1 . Since the sensitivity of the audio frequency amplifier is limited by the internal noise of the transistors, low-noise transistors of the KT3102 type are used to reduce noise in the first stages of the amplifier. Amplifying cascades on transistors VT 1 and VT 2 are covered by deep negative feedback, which allows for stable operation of the cascades and a more linear frequency response. The load of the second stage of the amplifier is a variable resistor R 3, it is also a volume control. A complex RC filter, consisting of elements R 3 , C 5 , R 6 , C 6 , R 7 , C 7 cuts off the "noise" RF components received by the microphone, and leaves only signals in the frequency band up to 4 kHz. This range provides the greatest intelligibility of speech information. From the filter output, the signal is fed to the final audio frequency amplifier, made on transistors VT 4, VT 5 of the KT315 type and transistor VT 6 of the KTZ61 type. The amplifier load is a TM-2A or TEM headphone. Resistors in the circuit are used type MLT-0.125. Resistor R 3 - SPZ-41 or other small size. Setting up the device is reduced to the selection of the resistances of the resistors R 1 and R 16 to set the voltage at points A and B equal to half the supply voltage.
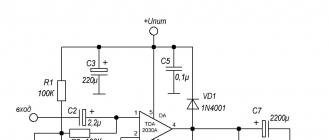
Unlike the previous device, assembled on discrete elements, the proposed device is assembled on a widespread K237UN1 chip and is designed to detect weak acoustic signals. The schematic diagram of the device is shown in fig. 4.

The circuit used an electret microphone type MKE-333. The signal from the M1 microphone is fed to the input of the K237UN1 type DA1 microcircuit, which is a low-frequency amplifier. The amplifier is included according to the standard scheme. Transistors VT 1 type KT315 and VT 2 type KT361 act as emitter followers and serve to amplify the current signal. A telephone type TM-2A is used as a load.
Adjusting the audio frequency amplifier is to obtain the maximum signal power at the output of the DA1 chip by changing the resistance of the resistor R 3. The resistance of the resistor R 3 is selected so that with a nominal supply voltage of 9 V and the absence of an audio frequency signal at the input of the DA1 microcircuit, the potential at pin 1 of the DA1 microcircuit is in the range of 3.75-3.85 V. In the case of unstable operation of the amplifier, its self-excitation, it is necessary to connect a resistor with a resistance of 2-68 kOhm between the microphone output M1 and capacitor C 2. The device is operable in the supply voltage range of 3-9 V, while the current consumed is 2-6 mA. Instead of a microphone, it is possible to connect a multi-turn inductor. It is connected between points A and B of the circuit. Microphone M1 and resistors are turned off. In the latter case, registration of variable magnetic fields is possible.
A simple directional microphone is a set of seven aluminum tubes with a diameter of 10 mm. The length of the tube determines the resonant frequency of the audio signal. The formula for calculating the length of the tubes is as follows:
L=330/2F,
where L is the length of the tube in meters; F is the resonant frequency in hertz. Based on the above formula, you can build a table. 1 for a seven-tube microphone, where N is the tube number.
Table 1. Characteristics of directional microphone tubes
| N | 1 | 2 | 3 | 4 | 5 | 6 | 7 |
|---|---|---|---|---|---|---|---|
| L,mm | 550 | 400 | 300 | 200 | 150 | 100 | 50 |
| F,Hz | 300 | 412 | 550 | 825 | 1100 | 1650 | 3300 |
A variant of placement of the electoral system, composed of directional tubes, is shown in fig. 5.

The microphone is located in a parabolic catcher, the focus of which is the guide system (Fig. 6).

Further amplification of the signal occurs through the use of a highly sensitive microphone amplifier MU. This directional microphone covers the frequency range from 300 Hz to 3300 Hz, i.e. the main information range of the speech signal.
If it is necessary to obtain a better perception of speech, then it is necessary to expand the range of received frequencies. This can be done by increasing the number of resonant tubes, for example, up to 37 pieces. In table. 2 shows the calculated data for use in the electoral system from 1 to 37 tubes. Given in table. 2 resonant system covers the frequency range from 180 Hz to 8200 Hz. A variant of placement of resonant tubes is shown in fig. 7, where the tubes are arranged in a "cochlea".
) about homemade for shooting video using a digital camera, I paid a little attention to recording sound, mentioning the possibility of using a plug-in lavalier microphone Sanyo HM-250 and synchronous recording on an audio recorder (Alesis PalmTrack).
An external recorder (left) on the camera for synchronous sound recording, and a homemade lavalier microphone mount (right) for sound recording by the camera. The disadvantages of the first design are a rigid mount that transmits sounds from the camera to the recorder (the operation of mechanisms and hand touches). Cons of the second - a long lavalier microphone cable "catches" electromagnetic interference.
In this article, the topic of homemade products for recording sound will be continued. But first, why do something yourself. The first and main answer is because it is interesting. The second - because "the hucksters got it." Recently, in a “live store” (or rather, in a shopping mall, where, as a rule, they don’t put price tags), they offered me a mediocre Audio-Technica ATR-6550 microphone at about three times the price of what they ask in Russian online stores (reasonable, but , of course, slightly higher than in the countries of "developed capitalism"). Luckily, there's the internet for pricing, and there's YouTube, which lets you check out the sound quality without buying a microphone.
So, if you type in a YouTube search the name of a microphone with an acceptable price (I rate it as a small addition about that simple homemade product (a lavalier microphone in a "anti-wind" holder), which was described in a previous article. I wrote that the Sanyo HM- 250 has a more or less uniform directivity (which was checked by the recording level indicators of the camera / recorder when the microphone was rotated around its axis). And also that it hears high frequencies worse than the built-in microphone of the camera. However (with a more careful and methodical analysis using a white noise generator and a program) it turned out that this microphone noticeably decreases its sensitivity to high frequencies with a lateral signal direction.Therefore, the microphone was removed from the lavalier of the holder bed (see illustrations for the previous article) and placed in the windproof holder head first (rather than sideways, as is possible with a holder bed.) The sound recorded with this design is better, but the long lavalier microphone wires often pick up interference, and then unpleasant humming with beating is heard in the recording. The way out is to cut (shorten) the wires and / or change them to shielded ones. Since I did not want to spoil the lavalier microphone, I decided to make a microphone from commercially available microphone capsules. Although the range of such devices in electronic stores is usually wide, not everything and not the best is available. I managed to purchase electret microphones HMO 0603B with a supply voltage of 3 V, a relatively wide range of recorded frequencies, good sensitivity and no pronounced directivity.
Homemade successful
Since it was obvious that a knowingly good capsule (or capsules for a stereo microphone) could not be found immediately, it was decided to make the design of the microphone collapsible and modular. Thus, reliability is somewhat degraded, which is very important for the final solution, but this is quite acceptable for an experimental homemade product. In the following, a normal working option will be described, as well as possible troubles when choosing other options.

Blanks for making a microphone - microphone capsules and RCA connector

Complete microphone module. A section of the connector body serves as a protective element. To stabilize the position of the primer inside the tube body, the free space can be filled with porous paper or corrugated paper rolled into a tube.
RCA connector is used for modular microphone connection. The microphone capsule is mounted on RCA pins. On the wire leading to the camera, it is wise to use a reciprocal (that is, the one for connecting a microphone) RCA connector of the "jack" type, which avoids (more likely) accidental short circuits of the camera circuit.

As a microphone housing, you can use shells from an inexpensive dynamic microphone. From such a shell, you need to remove the primer, switch, wires and ballast weight.

Cable for connecting a microphone to a camera (stereo, soldered into two mono inputs) and seals (foam rubber) for mounting it into the microphone housing

Cable assembly, ready to be installed in the microphone housing

Microphone assembly

As a mount on the camera, the design described in the last article is used. A layer of foam rubber is wound between the microphone body and the holder tube, which isolates the microphone from mechanical noise coming from the camera. To balance the microphone body, weights should be glued into its rear part.
The weak point of digital cameras when used as video cameras is the audio recording path. At least, the Canon EOS 600D I use in sound recording noticeably loses to the 100-dollar Alesis PalmTrack recorder. Even with a more or less good microphone installed, the recording quality may be low due to the mediocre amplifier and recorder built into the camera. You can reduce the effect of the internal noise of the camera's built-in amplifier by simply turning off the audio gain (for some cameras this can be done using Magic Lantern) or reducing it to a minimum while amplifying the actual signal from the microphone. To amplify the signal, I assembled a homemade "" and tested it with a camera. It turned out that such an amplifier really helps to reduce noise, but it itself catches external interference well. I was not able to install it on the camera and work normally with it - sometimes it hums, makes noise, etc. Until the problem of shielding this amplifier is solved, I tried to find a replacement for it. The requirements for compactness and low cost are met by the Fiio series headphone amplifier, for example Fiio E5. I found it on the same YouTube as an option for amplifying the microphone signal when recording a video.

Amplifier Fiio E5. On the case there are buttons for power, volume control and a bass boost switch

Amplifier is charging from USB
The Fiio E5 amplifier is not designed to work with a microphone and a camera (assuming that the load of the amplifier is low-impedance; at 16 ohms the output power will be 150 mW, at 300 ohms - 16 mW; and the input impedance of the camera, judging by the Magic Lantern website, is 2 kΩ ), and at its input there is no phantom power for amplifiers built into electret microphone capsules. For this reason, it is necessary to provide additional power for the microphone.

Standard wiring diagram for an electret microphone with two leads. The load and power resistance ratings correspond to the HMO 0603B capsule used in my design.

Modified power cord design. A 3-volt CR2032 battery and a 2 kΩ resistor are included in the circuit for each channel. When the batteries are removed, the cable works like a normal cord "without power"

When using microphones with a higher supply voltage and if you want to maintain a compact design, you can use an alternative power scheme in which both microphones are powered by one pair of batteries (6V).

To reduce the mutual influence of the channels (and with such a connection they turn out to be connected through the power circuit), resistances of 10 kOhm are installed in the load circuit. In order to balance the signals in the left and right channels, both resistances must be the same value with a reasonable degree of accuracy.

Microphone with amplifier assembly
As practice has shown, with the HMO 0603B microphone used and the above connection and power scheme, the amplifier adds a little to the signal level (on the camera amplifier, for example, you can set the gain not to 50%, but to 40% - to get a level of −12 dB, which is fundamentally not affects the noise). Nevertheless, the effect is there, and perhaps it will be better with other microphones (according to the guys who posted their video reports on YouTube).
Unsuccessful Options
The designs described above were not the first microphones I assembled. Since the on-camera microphone is relatively small, you have to use small components, including connectors. Therefore, for the first designs, I chose a 3.5 mm TRS connector (minijack). It is compact, has three contacts (in the "stereo" version) and is universal (many adapters and connectors are available). The stereo version of the connector allows you to mount both two- and three-pin microphone capsules on it and separate the signal and power circuits.

Design for testing microphones. The microphones are mounted in TRS connectors, the "ground" is connected to S (sleeve), the "plus-signal" - to R (ring) and T (tip). Stereo double converted into channel splitter
First, a stereo twin was modified to test the microphones (soldered to the TRS connector). If you open it and isolate the corresponding contacts with the help of a cambric, you will get a “stereo to 2 mono” splitter. Successful experiments with such a test design gave reason to hope that if you add wires and a power source to it, then the microphone will work too.

The insides of the microphone: a cord with two-channel wiring and load resistances built into it (I used 10 kOhm), a power supply (6 V) in the flashlight-keychain case, microphones on TRS plugs and a “safety” screw

A common problem with the TRS connector is that the “T” contact breaks off. A screw will help to remove the chip - it must be carefully screwed into the hole of the “T” contact fragment to remove this part from the inside of the socket.
Why designs with a TRS connector had to be abandoned is clear from the photo. I broke off the tip of the TRS from the microphone and the tip of the TRS connecting cord. Both times it didn't happen in the camera (meaning I was very lucky) and I decided not to risk using this type of connector again. In fairness, I note that the reason is not in the TRS connector itself, but in the quality of the components that are produced and sold. I had to deal not only with breaking contacts, but also with internal short circuits in the connectors. TRS also has one more unpleasant feature: when connecting the connectors, the contacts slide over each other and can complete the circuit in a completely different way than planned. Therefore, it is necessary (recommended) to mount all connections before turning on the power to the equipment. Assembled microphone circuits with TRS connectors, if they work, are very likely to generate noise and crackle due to poor contacts. In general, in order not to suffer with the choice of TRS connectors, I ended up choosing the more bulky and simple RCA ones ("professional microphones" are usually connected using XLR connectors - even more bulky and less versatile). Advantages of RCA: easier installation due to their large size and good separation of contacts, eliminating incorrect connection at the time of connection.
I will not argue that a homemade microphone has significantly improved the quality of the recorded sound. But subjectively, the sound of a pair of microphones is perceived as fuller when compared with the sound recorded by the microphone built into the camera. More importantly, the external microphone is more or less well isolated from the camera, and you can not be afraid to use the mechanically noisy optics stabilizer and camera focus drive, and not worry about the ability to record camera control sounds and changes in grip. The microphone capsules used in the homemade product are comparable in sensitivity to those installed in the camera, they hear mid and high frequencies better, but, perhaps, for the same reason, they make noticeably more noise. All this can be determined by ear. I plan to devote a continuation of the article to the “objective” assessment of the quality of the microphone.
Directional microphones consist of a diffuser as well as an amplifier. Many modifications are used by special services. Modern devices are produced with and without filters. Many modifications can boast of high sensitivity. If you believe the experts, then it is more expedient to purchase a model with two
The minimum threshold frequency averages 300 MHz. The impedance sensitivity does not exceed 3 mV. Many models use two amplifiers. The conductivity of the sound signal in this case increases quite strongly. On the market, a directional microphone for professionals costs about 12 thousand rubles.
How to do it yourself?
To make a directional microphone with your own hands, you first need to install the diffuser. Many experts in this situation recommend the use of diode devices. Their minimum sensitivity index is on average 4 mV. It is also worth noting that the microphone will require a small filter that will cope with impulse noise. It is more expedient to select amplifiers of a low-frequency type.
Their energy consumption is not too high. It is also worth noting that they are compact and do not take up much space in the device. The battery is directly installed behind the diffuser. To increase the conductivity of the signal, it is recommended to use a constant adapter.
Parameters of King EH031 Devices
These directional microphones reviews are mostly positive. According to experts, the signal conductivity in the device is quite high. A quality amplifier deserves special attention. This microphone uses a linear type. The protection system is used class PP40.
The working humidity of the microphone of this series is at the level of 40%. If you believe the experts, then the diffuser is perceived without problems. Foreign objects significantly reduce the quality of hearing. This directional microphone works great up to 130 meters away. Linear audio output in this case is available. There is a modification in the region of 8800 rubles.

King EH035 Series Microphones
This directional listening microphone is made with two dipole triodes. The amplifier is normally used low-frequency type. The sensitivity index at the impedance is 3.3 mV. According to experts, the signal conductivity at low frequencies is quite high.
The conductor of the modification is located at the back of the device. It is also worth noting that the model is equipped with an excellent PP42 class protection system. All this suggests that the modification is able to work at a distance of over 130 meters. Voice audibility at high frequencies is quite high. The compact dimensions of the microphone deserve special attention. The price for this product starts from 13 thousand rubles.

Features modifications King EH040
The microphone (directional) of the presented series is distinguished by high quality of audibility at low frequencies. The modification filter is used with a diode adapter. According to experts, the diffuser has a low signal conductivity. It is also worth noting that the model has problems with fast discharge. The battery in the device uses a lithium type, and it is designed for five hours of operation. He has very little energy. The amplifier in the model is of poor quality. The device costs about 12,300 rubles in stores.
Shure SV200 Device Options
This microphone (directional) is great for listening at a distance of over 100 meters. If you believe the experts, then the low frequencies are heard wonderfully. The microphone adapter is of good quality. It is also worth noting that the diffuser is able to work at high humidity. Special attention deserves a small filter that eliminates unnecessary sounds.
Interference from extraneous vibrations, it filters quite well. However, there are still some shortcomings in the device. With high frequencies over a long distance, the model copes poorly. There is no line audio output in this case. It is also worth noting that the model is quickly discharged. In this case, the battery indicator sometimes burns out. There is a modification in our time of about 14,300 rubles.

Shure SV300 Series Microphones
This microphone (directional) is best suited for operation at a distance of no more than 140 meters. The conductivity of the signal at low frequencies is quite high. At a distance of up to 80 meters, voice audibility is very good. The adapter for the battery in this case is selected dipole type. This microphone has only one diffuser. To connect headphones, a linear coaxial output is used. Also, the modification has a 3.5 mm jack. The sensitivity of high frequencies in this case is 3.3 mV.
If you believe the experts, then the device is not suitable for professionals in the best way. The model does not have an on indicator. It is also worth noting that the diffuser does not cope well with high frequencies. There is no adapter for a linear video output in the device. The battery charge indicator is not provided by the manufacturer. This directional microphone costs for wiretapping at a distance of 10-11 thousand rubles.

Features of Rode NTG-2 modifications
This microphone (directional) is produced with two cones. According to experts, the signal conductivity at low frequencies is quite high. At a distance of up to 100 meters, voice audibility is good. There is no filter for impulse noise in this case. It is also worth noting that the microphone amplifier was selected without an adapter.
If we talk about the connection, it is important to mention the presence of a coaxial connector. The modification also has a linear audio output. The audibility of high frequencies at a great distance is not very good. In this case, the sensitivity of the amplifier is at the level of 2.2 mV. According to experts, the microphone is not very good for professional use. It should also be noted that the set does not include a case. There is a directional microphone for wiretapping at a distance of about 14 thousand rubles.

Parameters of Samson R23S devices
This is a compact and high quality microphone. According to experts, the model is quite often used by special services. The operating humidity of the device is 44%. At temperatures above 45 degrees, it is prohibited to use it. The diffuser of the modification is of the diode type, and the adapters for it are selected with two contactors. The filter of the model is standardly installed of a low-frequency type. The amplifier itself is used with a low-impedance adapter.
The threshold sensitivity parameter reaches a maximum of 4.3 mV. If you believe the arguments of experts, then the model copes remarkably with wiretapping at a distance of over 150 meters. Failures in the operation of the amplifier are quite rare. The protection system at the microphone is applied class PP40. The price for this model starts from 10 thousand rubles.
Samson R25S Series Microphones
This is a professional and high quality microphone. If you believe the experts, then the signal conductivity at low frequencies is acceptable. It is also worth noting that the device is allowed to be used in wet weather. The KE line output is used in this case.

The device also has a 3.5 mm jack. The battery at the microphone is of a 2 A lithium type. If you believe the arguments of experts, then the model does not cope well with high frequencies. Modification filters are used with copper insulators. The microphone is compact in size. The price for it starts from 9300 rubles.
Features of the Sennheiser XSW 12 model
This microphone is not suitable for listening at short distances. The impulse noise filter is of poor quality. However, it is worth noting the compactness of the modification. The microphone adapter is very secure. The sensitivity index is no more than 3.2 mV.
It is also worth noting that the diffuser rarely breaks in the model. The battery is used only for 3 A. The protection system is applied class PK40. The operating humidity of this microphone is 34%. The user can purchase goods for 8300 rubles.

