Searching and processing images is an integral part of the work of any webmaster or administrator of groups in social networks. Sometimes it takes a long time to find the right picture. That is why it is a shame when it is, and its size is very small.
In this case, a service for increasing the size of images can help us, which, as the developers promise, doubles the picture without losing quality. All that remains for us to do is to test it on our own experience and decide whether to bookmark the service or not.
How to work with the Waifu2x service
The service interface (https://waifu2x.booru.pics or http://waifu2x.me/index.ru.html) is clear at a glance. We load the picture or insert the url of the picture and mark the parameters we need.

If you do not know which parameters you need, test them one by one, and choose the most optimal for yourself. By the way, upscale (upscale - this is an enlarged, stretched video sequence to a higher resolution) allows you to increase the photo scaling level by 2 times.You can mark the ones that you see in the image. After uploading, click on the "Convert" button and your picture will open in a new tab. Or you can immediately download the image to your computer without previewing it.
Photo processing results
Now let's check the transformation result. Picture # 1 has the size 426 x 639 px.

And this is the result obtained after enlarging the picture twice ( 852 x 1278 px). For a better comparison of the results, I recommend opening pictures in real sizes in new tabs.

In my opinion, the service did an excellent job and enlarged the photo, practically without loss. I will add that the picture was also tested for noise elimination, but in this photo, no significant changes were observed.
How to increase photo size correctly
I met some tips on using noise removal on the Internet: if there is no noise in the picture, then you do not need to remove it, as this can only spoil the picture. If there is noise in the picture, then select the noise removal level 1 (normal). Noise removal level 2 (high) is not recommended as it spoils almost all images. There is an improvement only in rare cases, when the picture was initially very badly damaged.
Waifu2x is more about anime or fan art and is suitable for hand-drawn images. The result is more than satisfactory.
If the original picture is initially of poor quality (blurry or with broken lines), then Waifu2x, no matter how hard it tries, will not be able to improve the quality by 4 times. This must be known and treated with understanding.
Examples of increasing the size of images
And here is another illustrative example that demonstrates the level of quality of the Waifu2x service. Original image size 100x89px was increased to 200x178px and 400x356px respectively.
As a test case -, zoomed from 100x89px before 400x356px using the GIMP editor. To see the picture in the best quality, open it in a new tab by right-clicking on “ Open picture in a new tab«.

Due to the fact that the world is rapidly changing and there are global changes in the work of algorithms in the field of neural networks for image analysis and processing, we, ordinary Internet users, can already use new, unique tools today, leaving our usual methods of work far behind.
Now there is no need to fear that a suitable picture will be found - we have in our hands an excellent tool with which all images will be in higher resolution and of good quality.
The desire to resize the photo appears in case of unsuccessful frames (when unnecessary and unnecessary details are captured), posting an avatar (on a personal page on a social network, in a forum on a website, in an online store), creating various photo portfolios, and under other circumstances. There are special tools for this.
There are three ways to resize a photo - using standard programs of the Windows operating system, using third-party programs and online via the Internet. Let's consider each method in more detail.
Three easy ways to resize a photo
How to resize a photo in paint
All versions of Windows have the Paint program. We launch it and press the "menu" button in the upper left corner. We select the item "Open" and find the photo that needs to be edited. We load it into the work area. Further, if you need to cut it, select the appropriate item in the top panel of the program. Using the cursor, define the area of \u200b\u200bthe photo that you want to leave. Cut off and save the result.
The second option is to select the "Select" function. Select the desired area of \u200b\u200bthe photo and press the key combination Ctrl + X (cut). Next, open the Paint program again. In it, the working area is empty, move the cursor there and press the key combination Ctrl + V. The photo fragment is inserted into a new Paint document. If the white background of the working area is larger than the inserted photo, it can be reduced using the same cursor. We successfully save the result.
There is a third option - when you need to reduce the photo to certain pixels. We select the item "resize" at the top of the program.

Windows 7 has a Picture Manager program. It is very similar to Paint. Run it and select the "File" item in the upper left corner. Click on "Find Picture". We find the photo. Next, select the item "Picture", there are two processing options - "Crop" and "Resize". You need to use them in the same way as with the functions of the Paint program. We change the image and save it safely on the computer.
How to resize photos using programs
There are many quality third party software available. Especially worth highlighting:
- Image Resizer,
- Movavi photo editor,
- Adobe Photoshop CC,
- PIXresizer,
- Fotosizer,
- BImage Studio, etc.
Most of them are free and freely available on the Internet. The download and installation process will take 5 to 30 minutes. Let's take Image Resizer as an example.
We find it using a search engine, download it, install it on a computer, launch it. The program window opens in which you need to click on the Add files menu. Then select the desired photo and go to the Settings section.
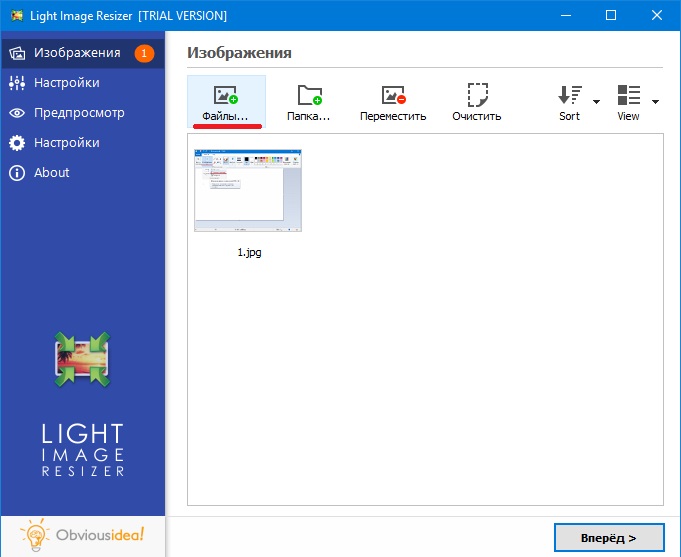
In the settings, enter the desired size and click Run. The photo with the new dimensions is saved to the desktop in a folder specially created by the program. Done!

Download Image Resizer - https://light-image-resizer.ru.uptodown.com/windows
How to resize photos through online services
Just like third-party programs, there are many online services on the Internet that offer you to crop a photo or resize it by entering pixels. The most popular and frequently used ones are:
- imgonline.com.ua,
- resizepiconline.com,
- croper.ru,
- resizenow.com,
- inettools.net,
- optimizilla.com.ru,
- reduction-image.com,
- pichold.ru.
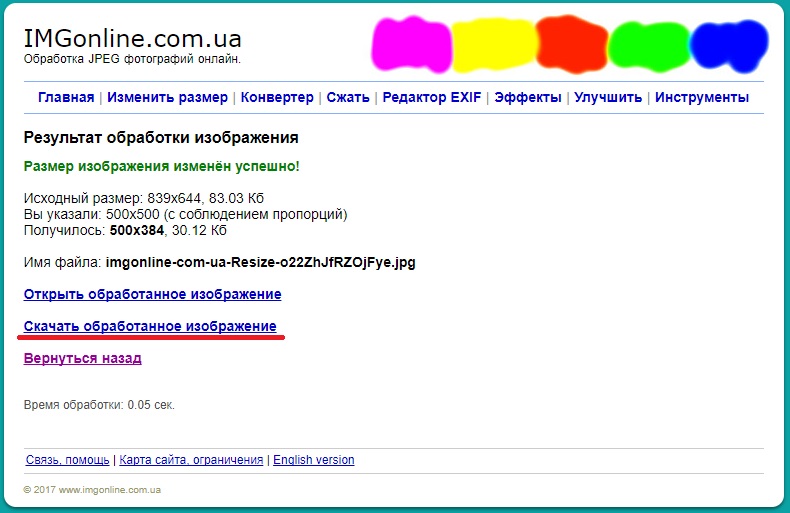
Let's take a closer look at the imgonline.com.ua service. Go to the site and click on the Resize tab.

Then we press the button "Select file". We find a photo on the computer, upload it. Next, enter the desired width and height in pixels. We select the type of resizing. If necessary, make additional settings, select the format of the future image and click "Ok".

A new page with information about the photo will open. There are two options - either open the photo for viewing (if you don't like something, you can “Go Back”), or download it. Done! The photograph has received new dimensions.
In general, using the listed methods is very simple. The main thing is to follow the prompts and enter data in the required fields. The output will always be a high-quality image with the desired pixel parameters.
Instructions
Use, for example, the simple graphics editor Paint, which is installed with the Windows operating system. You can run it through the main menu - press the win key to open it, then go to the "All Programs" section, open the "Standard" subsection and select Paint. You can do without a menu - press the key combination win and r, enter the text mspaint and click OK.
Load the photo you want to enlarge into the graphic editor. The corresponding dialog can be invoked by pressing the "hot keys" ctrl + o. Use it to find the file containing the photo on your computer and click on the "Open" button.
Specify by what percentage Paint should enlarge the photo. This setting is called by clicking on the middle button in the vertical group of three icons in the "Image" section of the editor menu. The same command is duplicated by the ctrl + w hotkeys. In the opened window "Resize and tilt", the upper section contains the scaling settings you need - increase the number in the "Horizontal" or "Vertical" field to the required value. By default, the dimensions are indicated here in percent, and the change is proportional, but if necessary, you can change both of these settings - check the box next to the “pixels” label, and uncheck the box “Maintain aspect ratio”. When the magnification options are set, click OK and Paint will resize photos accordingly.
Save made changes... If you no longer need the file with the original photo, just press the key combination ctrl + s, and the graphic editor will write the photo in its new sizes to the same file. Otherwise, click on the blue button in the upper left corner and in the drop-down menu go to the "Save As" section. Select one of the graphic formats listed there, and the application will open a standard Windows save dialog. In it you need to specify the name of the new file and the place where it should be written, and then click the "Save" button. This completes the operation of increasing and saving photos It will be completed.
Sources:
- enlarge photo online
Even the simplest modern soap dish today can make good quality graphics, which can be easily printed in large format. But sometimes the user still faces the need to enlarge the photo, and in this his irreplaceable friend and comrade Photoshop will come to his aid.
Instructions
But first, let's figure out what exactly do you mean by “enlarge photo”, because many users often confuse two completely different concepts - “enlarge photo” and “enlarge plan of photo”. Let's say you have a photo like the one above, it's a great extension that suits you just fine, but you want your subject to look like it doesn't get lost somewhere in the depths of the image. What you need will be called “zoom in on the photograph”. The Crop function can easily deal with the problem. You can find the crop in the Photoshop toolbar.

Click on the button on the panel, move the mouse cursor over the photo, press the left key and drag to the size you need. The frame can be made both variable and fixed, as desired. Pressing the Enter key will complete the operation. You have enlarged the outline of the photograph.

But most often, by the words “enlarge the photo” the user understands the enlargement of the enlargement of this photo, and this will be a more complicated option. It's easy to create small out of large, but for the opposite result you will have to make some effort, and the photo can hardly be avoided.
Currently, the most used algorithms for enlarging photos in Photoshop are the following two methods.
1. Step by step enlargement of the photo. If the photo is immediately enlarged by 100%, it will greatly lose quality, and with an increase of only 10%, the deterioration is unlikely to be noticeable to the eye. Therefore, it is better 10 times 10 than once, but 100 at once.
2. You can enlarge the photo to a size twice the desired size, sharpen it, blur unnecessary elements, add saturation, contrast and reduce to the desired size, while setting the Bicubic Sharper compression algorithm

When you take a photo with a professional or amateur camera, you get huge images, which are not always convenient to use. Well, working with them in editors is almost impossible. But if you download images via the Internet, their size can be reduced automatically to save your traffic. All images are sized in pixels and change accordingly, it is also necessary in these units.
Ways to resize a photo
- The most common and easy-to-use image editor found on almost every computer is Paint. It is located in standard programs and opens through the start menu of your computer.
- Add to this graphic editor the photo you need for work, which is too small. Next, specify in what percentage Paint should increase the size of this image. This menu item is opened by clicking on the middle key in the top menu of this graphical editor. Also, this window can be opened much easier, with a simple combination of ctrl + w. In a new window that opens, the "Resize and Skew" menu contains all the necessary parameters for resizing the image. Initially, all image sizes are set here as a percentage, and the new setting of the image size parameters is performed proportionally. Although you can change the settings for pixels. That is, the image itself will retain all its original proportions, but change the size itself. After you set the necessary parameters of the image size, you need to click on the OK button and the graphics editor will resize the edited image in the way you want.

- If the new dimensions match the required parameters, save the image. If not, repeat the procedure until the file is the size you need. You can increase the size of an image in this graphics editor in the same way. Paint is simple and easy to use, it allows you to carry out all basic manipulations with any images as quickly as possible, due to the intuitive interface and simplicity of the menu items. There are other editors, but they are not always convenient to use, because they are not preset and have more complex options for changing the properties of photos, even as simple as photo sizes.
How to resize a photo (video)
I love to do graphics: draw on a graphics tablet, process pictures and photos in Photoshop and create collages. Sometimes there is a need to enlarge an already finished but small picture. Usually, after such manipulations, the graphics looks blurry due to the fact that pixels are lost. Here's how to enlarge an image without losing quality, we'll talk now.
I tried many different programs to enlarge the image without losing quality, but all of them had a very poor image after enlarging. And then one day, already completely desperate to find what I needed, I came across a foreign site where a program was offered SmillaEnlarger beta version.
Most likely, I would have left from there, tk. I do not speak foreign languages, but due to the fact that I have a google chrome browser, I was offered a translation of this page and in the description I read that
SmillaEnlarger is a small graphical tool (Qt based) for resizing, especially enlarging high quality bitmaps. (The algorithm used is my own invention)
And I decided to try it too.
You can download the program from the official
Working with SmillaEnlarger
Go to the page of the site with this program and press the big green button " Download"(If your page is not translated, then the button is called" Download»).

The program is packed into an archive, which must be unpacked first.
As a result, you should have a folder SmillaEnlarger-0.9.0... Open it and go to the folder SmillaEnlarger.

Find the file in it SmillaEnlarger.exe, and launch it.

As you can see, there is no need to install the program. It can be simply run from this folder.
A program will open in which a picture with a dog is shown for a sample.

Upload your picture


We set the necessary parameters:
In the window OutputHeightset the size of the height of the enlarged picture.

In the window WriteResultto you can write the preferred name of the enlarged file or leave the same name that it had, only the program itself at the end of the name will add the letter "e" through the lower hyphen. The file will be saved in the same folder where it was before.

If you want to save the file to another folder, then you must uncheck the box next to the entry UseSourceFolder... Then the button is activated ChangeFolderby clicking on which you can select another folder on your computer.
Now you can click on the Enlarge & Save button below and after a couple of seconds in the specified folder you will have an enlarged picture file. And the quality of the file is quite passable.
If you want the file's performance to be even better, you can try to select other parameters.
Smilla Enlarger parameters

- OutputDimensions(Finished picture size)
Specifyzoomfactor (Specify scaling factor)
Specify width of result (Specify the width of the result)
Specify height of result (Specify the height of the result)
Fitinsideboundary (Set inner border)
Stretch to fit (Stretch)
Crop to fit (Harvest to be picked up)
Fit inside, add bars (Insert inside, add bars)
- Window OutputHeight(Height of the displayed image)
- Enlarger Parameter(Increased parameter)
Default (Default)
Sharp (Reinforced)
Painted (Tinted)
Sharp &noisy (amplified with noise)
- ThumbnailPreview(Thumbnail preview)
- Size(The size)
- Write Result to(Write the result)
- In Folder(in folder)
- UseSourceFolder(Use source folder)
- ButtonChange folder(Change folder)
- Enlarge &Save(Enlarge and Save)
- Cropping Format(Cropping format)

- Cropping(Format)
- Parameter(Parameter)
- Jobs(Work)
- Log(Journal)
- Help(Help)
The default parameters have been enough for me so far.
A video on how to enlarge an image without losing quality using the Smilla Enlarger program:
If you are using another program or know a program that enlarges the image better, then share with us in the comments below.


