Good day to you, my dear readers. I recently looked through my childhood photos (up to 6 years old) and how many of them were black and white. It used to be a common thing, but now there are no pure black and white cameras, but it is still sometimes very pleasant to look at a photo without color. In some cases, it is even more pleasant to look at it. Don't you think so?
Many cameras have a non-color shooting function (b / w, sepia, etc.), but in this article I would like to tell you how to make a picture in black and white in Photoshop. And it doesn't matter what kind of picture it is. The main thing is that this function still remains and no one is going to abandon it. By the way, in my article about I just used the effect of turning a color photo into black and white. Remember?
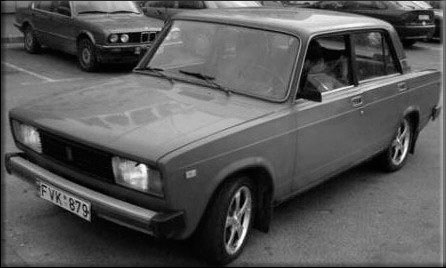
So let's get started! What do you want to convert to b / w color? Personally, I want to discolor the car that I showed you in the lesson about that.

The easiest way to desaturate an image is through the Image menu. To do this, go to the "Image" - "Correction" - "Desaturate" menu. After that, the photo instantly removes all colors.

Grayscale
This method is similar to the first one and will be just as easy to perform. You need to enter the "Image" menu, then select "Mode" from the drop-down menu, and only then "Grayscale".

Voila! Your black and white image is now complete.
Both are the easiest, but not the best. For a more subtle transformation, it is better to use other methods.
Black and white
This method is convenient because we can correct the image as we need it, so the quality of the output photo will be better.
Go back to the "Image" menu, then choose the familiar word "Correction", and at the end feel free to choose "Black and White ...".

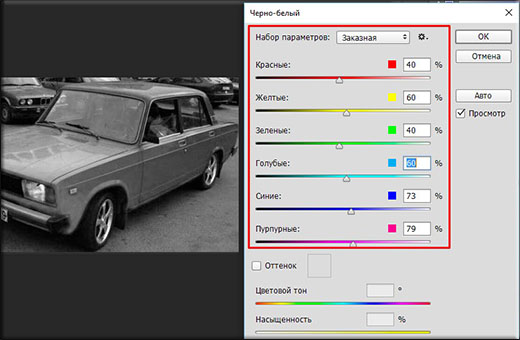
As you can see, our image has become black and white, and at the same time various sliders with the name of the colors have appeared. With the help of them, we will correct our b / w image. Try moving different sliders in turn and you will see that the contrast and image quality change, and in some areas. Each site has its own color.
Thus, adjust all colors until the image has the best saturation and contrast. Voila.

Just don't click on "Tint", otherwise you won't get any black and white image. If you do not want b / w, but you want it in yellow or other colors, then please.
Adjustment layer
The best way to create a black and white image from a color image is to create an adjustment layer. But here, too, there are several different ways to do this.
Channel mixing

Black and white
I will skim through here, as this method is identical to the Black & White method we did above. Only here everything happens through an adjustment layer.

Well, in general, these are the ways I wanted to show you. I hope you have enough of them). If you have any questions, then ask. I will be happy to answer them.
Also, I would like to recommend the wonderful photoshop video tutorials for beginners... Everything you need for a beginner is collected here, the material is presented magnificently and everything is described in great detail. Each element is disassembled by the bones, thanks to which you will know Photoshop completely. So be sure to check it out.
Well, for today I say goodbye to you. Tomorrow will be a new day and a new lesson. Get a good night's sleep today. Most importantly, do not forget to subscribe to update articles on my blog. Good luck with learning and everything else. Bye Bye!
HOW TO MAKE BLACK AND WHITE PHOTOS COLORED IN PHOTOSHOP
Today we will learn how to turn a non-color photo into a color one. I will make a reservation right away, for those who are looking for a button “make a photo in color” in this article. Alas, such a button has not yet been invented. You can desaturate a photo with one click, but you won't be able to colorize it with the same click, because a black and white photograph has no color information. So you have to work with your hands and fill our black and white image with color information in the most literal sense. Some plug-ins for Photoshop do a good job of coloring photos, but now we will not discuss some plug-ins that you do not understand where to get it. Let's talk about what is available for coloring in Photoshop itself. And there are many in it.
The method of coloring a photo is simple and primitive. A five-year-old child can master it in 10 minutes. I will tell you about all the ways to color a photo, as well as show how this simple operation can be brought to a new, more professional level. So let's get started.
THE EASIEST WAY TO MAKE A PHOTO COLORED (blend color)
To colorize a photo you will need to know how to use the tool Brush Tool, as well as have an idea of \u200b\u200bthe work of other Photoshop tools. Knowing how to highlight areas of a photo and some basic knowledge of layers and masks, which you can glean from my article Masks in Photoshop, do not hurt. In this tutorial, you will see in practice how you can automate your work in Photoshop using masks, and have full control over the color settings.

I borrowed a photograph from the collection of a photographer friend of mine. Black and white photographs look mysterious and conceptual, but what if we colorize it slightly? Create a new layer on top of the photo Layer\u003e New\u003e Layer or click on the small layer thumbnail in the layers palette Windows\u003e Laeyrs

Now select the tool Brush Tool, a brush with soft edges, make it bigger and drag the mouse over a new layer with some red color. The natural result is a red daub on a masterfully taken photograph. It doesn't suit us. To paint red, you need to change the settings of the layer itself. These settings are called overlay settings. Color Mode... You can find them only on the layers palette. Layers, above the layers themselves. Click on this dropdown menu and you'll see a whole list of different blend modes. The point is that by changing the color blending mode, we establish new rules according to which the layer color interacts with the colors of the layers that are below. The blending mode we need is called Color, and its meaning is simple - it paints the image in the color we need, while maintaining the naturalness of colors. Install let's decide Color, choose the color you want, and color the girl's hair.

That's all. Quite easy isn't it? Save me the hassle of stretching this process over 10 pages and demonstrating how I will paint step by step, skin, gloves, eyes, and so on. Coloring depends on your imagination, and realism, on the quality of work and the naturalness of the selected colors. Work with a brush, adjust the size, adjust the invisibility opasity and fill parameters, which you will find in the brush settings menu Windows\u003e Options
This is the “mask” my wife has sketched for a few minutes of work. Note that the layer blending mode is Normal. I hope you are convinced that making a color photo in Photoshop is very simple.

And this is what happens if you change the layer blending settings to Color.

COLORING A PHOTO WITH A LAYER STYLE
Now let's start to deepen and complicate the process. Complication, it is not in order to make it more difficult to work, but in order to make it easier to work. You know, all these kali mali on one layer are certainly great, but they are more suitable for creative personalities, those who like to sit and wind a clay pot on a gurney for hours. Spreading one color and another on this layer is probably convenient for the artists from the academy, who were banned from Google, so they still have not heard about Photoshop. Alas, even cartoons are drawn on a computer, 1000 drawings on paper, which are then quickly leafed through, remained in the 20th century. Personally, as a designer, I would like to have more control over the color and settings. I would like to efficiently and quickly tweak the colors through the menu, not redraw the layer.
How would we bring in more control over the image? For a start, it would be a good idea to split one layer into several layers. Let's create
really a lot of layers. And each layer will be responsible for its own area. Create a layer "hair", layer "eyes", "Gloves", "Nails" and others. I started coloring the photo myself, creating thematic layers for this. Now the control process is more manageable, at least the coloring is not on the same layer. Any part of the coloring can be muted, turned off, in other words, you can do with it everything that can be done with the layer. The other paint layers will remain intact.

But all of this still doesn't make much sense. The color of all layers is still arbitrary. On a layer "Hair"you can paint in blue and red as before. In other words, they are still Kali Mali, but more manageable Kali Mali, divided into sectors. And I would like to control the color. I want to change the entire color with one click, and not sculpt with a brush constantly redoing the result with my hands. I'll show you how this can be done using layer styles. layer style.
Create a layer and name it "Hair"... Color your hair in any color, even green. Go to the layers palette and set the fill Fillon 0% Thus, what you have drawn will become invisible.
Roughly speaking, we create a kind of raster area, turn off the fill fill and apply layer styles to the area. The area itself does not become invisible, as is the case with Opasity. The content of the area becomes invisible, but not the area itself. Therefore, the applied layer styles will be visible. But if we set Opasity to 0%, the entire layer, along with the styles, would become invisible. We will give the areas a certain style, but since we still have to apply layer blending for coloring, the original color must be removed by setting the Fill to 0%, otherwise it will shine through when blending and we will not get the desired result.

Now let's style the layer Layer\u003e Layer Style\u003e Color Overlay In the mixing menu Blend mode put the mode Color... And in the color window, set the color we need.

If you forgot to set the fill to 0%, then this can be done in the same window, in the blending settings tab Blending options... If you did it in the layers palette Layers, then the fill will already be set as it should.

Now we have full control over the color. Give each layer a different style. Double-clicking on a layer will automatically bring up the Layer Styles, where you can change the hair color with one click. You do not have to re-smear everything 100 times, the color changes in one second, and you can see the result in online mode. Color selection has become much easier.

This is what I call color control. Now let's go deeper.
COLORING PHOTOS THROUGH FILL LAYERS
You know what I think. These attempts to control the image are certainly cool, but somehow difficult. And if you need to change the color? You have to constantly click on the layer, call the style window, climb into the tab Color overlay and there to change something. Not a quick process if you want to quickly change layer colors. Of course, if we have 2 layers it is not difficult, but if we had 102 layers? This process should be made even easier. This is where the real work with layers begins. Now I will show you how to colorize a photo using fill layers.
Create a new fill layer Layers\u003e New Fill Layers\u003e Solid Color A fill layer completely covers the photo, filling the entire work surface. We just don't need this. As you can see from the layers palette, the fill layer is created with a ready-made empty mask. We need to stop the white mask with a black mask to hide the entire fill layer. You can click on the mask icon and select Delete.

Or select the mask icon and do the same from the menu Layer\u003e Layer Mask\u003e Delete... Now create a mask from scratch, not empty, but hiding. We did this in my article "Masks in Photoshop". Please select Layer\u003e Layer Mask\u003e Hide All
And you can go the other way. The mask is the same work surface as the layer itself. The mask can be drawn by hand with any painting tool. For example with a brush Brush Tool... Only unlike a layer, the mask is created in gradation from black to white, where white is the visible part, and black is the hiding part. Click on the mask thumbnail in the layer palette. The mask must be selected so that you can paint on it. Then select the fill bucket Paint bucket toll and black. Click on the work surface. The empty mask has become a hiding mask.

Now choose a regular brush Brush Tool and white. Create a hair mask by painting over the mask just like you
would paint on a layer. You can enjoy all the benefits of brush settings. Make it transparent, resize, soft edges. All this will only affect how visible our mask is. And of course, don't forget to set the layer blending mode. Colorto immediately see the result of painting. We could have gone the other way. For example, leave the mask white and paint the entire area around the hair with black. But you must admit, it is somewhat tedious to gloss over 70%
work area. And of course don't forget to work on the mask, the mask must be selected. This can be done by simply clicking on its icon in the layers palette.
As a result, you should have a fill layer with a hair mask. The advantage of this method is that you don't have to delve into color settings every time you don't know where. One simple click on the layer's fill brings up the color selection window.

Paint over other areas of the photo in the same way. In some areas where the color does not tolerate soft transitions, you will need to create selection areas. For example, in the case of nails, I created selections with the tool Magic wand tool and Polygonal lasso toll... In other cases, I got by with changing the brush sizes and switching between soft edges and hard edges.

Once you've created all of the layers in the photo, you can create other tint layers that create hair tints, shimmers, and other lighting effects. This is a professional result. Now let's look at alternative options for coloring the photo.
MAKE PHOTOS COLORED THROUGH ADJUSTMENTS LAYERS
Here's another way to colorize your photo. Let's use the color correction settings adjustiments... I can already imagine how you open the familiar to everyone Image\u003e Adjustiments, highlight the area and add effects. No, we certainly won't do that. We will get the same feces. Of course, select an area, apply color correction, select a new area, apply color correction again is an option. Only this version is dull, without any opportunity to twist and change the results.

Therefore, we will use color adjusting layers. Layer\u003e New Adjustiment Layer... A color correction layer is the same color correction, only it is applied not to the graphics layer, but is itself a layer. Imagine the photo is our layer. And on top we put red glass, which changed the color of the photo. The red glass is the color correction layer. You can remove it, make it invisible, apply layers, mask and more.
Which of the color corrections are suitable for coloring? In my opinion, color grading works best. Photo Filter... Please select Layer\u003e New Adjustiment Layer\u003e Photo Filter Or create a color adjustment layer via the layers palette menu Layers.

Now I want you to do everything that I described for coloring photos through fill layers. Create a mask, fill it with black and use a regular brush to apply a filter to the area you want. Here's what you should get:

In this case, you can readjust the filter color, change the color and correct the mask at any time. Just click on the color correction layer and in the palette Adjustimentsadjust the color. If you don't know where this palette is located, call it through Windows\u003e Ajustments. You will see for yourself that making a photo in color through color correction is as easy as through fill layers, but I personally like the latter.
Hopefully there is no need to demonstrate step by step coloring. You have already understood that you need to color all areas of the photo in the same way. I will give the final version of the photo coloring and wish you successful experiments in Photoshop. Now you know how to colorize a photo.
I was recently asked about the process of converting an image to black and white, namely how to know if an image is suitable for this. So in this article I'm going to talk about how to properly convert an image to black and white and how to do it in Photoshop without losing quality.
When is it better to convert an image to black and white
There are three ideas that come to my mind when I try to evaluate whether I should convert my image to black and white (hereinafter I will call it BW for short):
- First of all, this is a little obvious, but how do you want to get the result? Did your client specifically ask you to take a BW photo? Are you taking part in a photography competition in the category for Black White? You are doing a series for the BW gallery (because it actually doesn't look very good when you only have one or two BW photos among the color ones, you want to have a good combination?) As I said, it's pretty obvious that you need to consider the end result, but it was worth reiterating.
- Second, the value of the dynamic range must be considered. In photography, the term "range value" refers to the ratio of light to dark in an image. So when I'm talking about evaluating the range of an image, I'm talking about whether you have areas of deep black and bright white in your photo. What is your dynamic range? For the most part, "flat" images don't look very good in black and white. Traditional B&W has good contrast and fairly stretched values \u200b\u200bacross the entire histogram. So if your image has these components, then it can be a good choice for converting to black and white.
- I will write an article someday on color theory and color relationships, but if you have strange color combinations that don't look satisfactory together, then such a shot might be a good candidate for BW conversion. Let's face it, some colors don't go well with others. B&W can be a great way to avoid inconsistencies and get great photography.
Just a tip: if you squint your eyes while looking at the image, you will see fewer colors and a wider range. This can help you get an idea of \u200b\u200bwhether your image really has a suitable dynamic range.
How to convert a color image to black and white
Okay, let's now talk about how to convert an image to BW, because there are two ways: right and wrong. You can of course get the same result, but if you do it wrong, you will actually lose quality (technically, you are sacrificing bytes of information). In this article, I will be talking about using Adobe Photoshop. There are other conversion software you can buy, but in terms of expediency, why pay extra when you can do it very easily in Photoshop.
Step 1
Once you've found an image that you want to convert to black and white, the first step is to open the image in Photoshop. For my example, I am using one of my wedding photos, which you can see on my website. It was shot during the first dance, and I just really love this photo in black and white.

Step 2
Do not do that!
In short, you are actually changing the color profile, which means you are losing pixel information in colors. But you don't want that, you want to keep as much information in the image as possible.
What you want to do is done using black and white settings. You can access them either from the top menu Image\u003e Mode\u003e Black & White (Image\u003e Adjustments\u003e Black & White) or in the sidebar on the right, click on the settings button (as shown in the figure), and then click on the black and white icon, which is indicated by a black rectangle divided into black and white diagonally.

Step 3
Once you click this icon, you will see the value settings for each color (see picture). Note that Photoshop has retained all the color information in the image, just displays it as black and white, but all your color information has been preserved.
It also gives you more control over BW changes as you can tweak it on a per color basis. But keep in mind that you shouldn't go too far out of the allowed color values, otherwise you will start to see jagged edges and torn stripes in gradient areas such as the sky. You will see this immediately when you view the image if you start moving the sliders too much, so you know what I'm talking about right away.

Step 4
After that, you can use other adjustment layers (which act like smart layers, if you know what that means, and which is a very good solution) to adjust the image the way you want: exposure, contrast, levels, curves, filters, etc. etc.
Step 5
Once you've done all the editing you see fit, hopefully you've got an image that you are happy with as a result. Now all you need to do is save it according to your needs and depending on the desired result.

David Wahlman is a wedding and portrait photographer based in Redding, California. He works in the vicinity of California and seeks to expand the geography of his filming. You can check out his best work on www.wahlmanphotography.com and follow his posts on
Hello! We continue to conquer the basics of working in Photoshop. Today I have prepared a lesson for readers on the topic How to make black and white from a color photo.
Sooner or later, dealing with the processing of photos and images in the Photoshop program, we are faced with the need to turn color photography into black and white. Therefore, I decided to prepare this small lesson for my readers to show how this is done visually.
There are many ways to accomplish this operation. As part of this mini lesson, we will not consider the ways that professional photographers use, we will consider the simplest and fastest ways How to make black and white from a color photo... In the future, in future lessons, we will definitely return to this topic and see other ways, more complex and professional, which are used by advanced Photoshop users.
We will get acquainted with 3 ways converting color photos to black and white, I’ll say right away these are not professional methods, the quality after processing them is not the best, but these methods are quite suitable for learning for novice users.
So, I propose to move from words to deeds. First, let's open the image that we want to make black and white.
Now let's get down to processing. I present to your attention the first method.
Method # 1:
Convert a color photo to black and white using the H grayscale ".
To do this, we need to go to the top menu: Image / Mode / Grayscale... A window will appear with the question "Delete color information" press delete and our photo has become black and white.

Go to the menu Image / Modes / Grayscale
Very fast and easy, right? Moving on.
Attention! Remember that you can always revert an action using the CTRL + Z hotkeys. Let's move on to the second method.
Method # 2:
We make black and white from a color photo using the function “ Desaturate ".
We go up to the top menu of the program and go to:(Shift + CTRL + U ) ... See below the result of the operation performed.

We go to the top menu Image / Correction / Desaturate or press hot keys Shift + Ctrl + U
Method # 3:
Create a black and white image using the " Black and white "
This method is also extremely simple and fast, its advantage is that when using adjustment layers, the Photoshop program makes changes and corrections to a special adjustment layer, and not to the original image, which we decided to make in black and white. We also have such features as: reverse the entire editing process, control layer opacity, turn layer visibility on and off. This method allows you to get a more beautiful black and white image than the previous ones.
Step 1:
So, our photo is already open. Now go to the panel "Correction", if you have it closed, then open it through the top menu Window / Correction... We find in the panel " Correction"Adjustment layer" Black and white"And click on it.

To open the Adjustment Layers panel, go to the top menu Window / Correction
Step 2:
After you clicked on the adjustment layer " Black and white“, Our image was converted to black and white and a window with sliders appeared. In this window, with the help of many simple parameters, you can adjust the black and white effect for yourself, as you like best. Move the sliders until you achieve a contrasting black and white image. Moving the sliders to the right paints areas that were previously painted in the corresponding color of the slider into a lighter shade of gray, while moving the sliders to the left paints areas in a darker shade of gray.

At the top of this window, you can select pre-made sets or create your own set and then save it through the "triangle with stripes" menu, which is located in the upper right corner of the window. If you click on the button " Auto“Photoshop will automatically select the options for how it thinks a black and white image should look. Here's what I got.

Here's what I got
That's it for today, try it out with everyone 3 ways and write your results below in the comments. See you in the next lessons!
Hello! As usual, I am with you, Dmitry Kostin. And today we will be Photoshop again. Remember how we did it? Be that as it may, there is nothing surprising in this, since it is not difficult to desaturate the image. But how do you make a black and white photo in color? Is that possible?
Of course available. Even entire films are blooming. Why is there any image to make in color? But it's still a very interesting experience. Can you imagine? You can come up with the colors that you would like to see in this photo. For example, you can set your own color of eyes, hair, skin of clothes and much more. I tinted old photos like that. It turned out funny)
Let me not make long introductions. And immediately proceed to colorization. Open any b / w photo (I chose the photo I found on the Internet).
Just look at what mode the photo is in. It just might be saved in the format "Grayscale"then you simply cannot work with color.

Change the color mode to RGB. To do this, go to the top menu and select the "Image" - "Mode" item. Well, if it's not the RSL, then put it on.
Let's look at the first method, which is familiar to you.

Blending options
Here's another pretty effective trick for colorizing photos. The main thing here is to create a separate layer for each element. I took a new photo for these needs.


By the way, this was the very first method that I learned about. When I found out about him, I liked it so much that I colored a lot of photos).
Layer mask
Well, the last method of transformation for today is using a layer mask. Let's get down to business right away.

Well, in the end, you get a beautiful color photo and it looks completely different. Oh, but of course I missed a little. But you can always fix that.

I will never cease to be amazed at the power of Photoshop. Indeed, in many cases, the same problem can be solved in several ways, and you yourself can choose the method that suits you best. By the way, what method do you like the most? Or do you have your own way, how to make a black and white photo in color in Photoshop, which I have not described here? Please write in the comments.
If you want to quickly explore the possibilities of Photoshop and learn how to work with it, then I strongly recommend that you look excellent video course... Everything is described in detail in it, everything is told in human language and laid out on the shelves. The material is easy to digest. So I recommend it.
Well, I'm finishing it for today. I hope you enjoy my article. Be sure to subscribe to my blog updates, then you will always be aware of the latest information on the blog. I will not spam. I promise). And I wish you good luck in mastering Photoshop. Bye Bye!
Best regards, Dmitry Kostin.


