A firewall (born Firewall - firewall, it is a firewall, it is a firewall) is a program that controls the exchange of data between your computer and the rest of the network. The primary purpose of a firewall is to monitor network activity generated by applications and prevent hackers from attempting to malware send any information from your computer to the network or, conversely, unauthorized take it from a remote source.
What is an interactive firewall mode?
In this mode, you are given the opportunity to train the firewall to react to attempts of a program to show network activity.
When a call to network resources is detected, Dr.Web Firewall checks whether filtering rules have been set for these programs. If there are no rules, then a corresponding request is displayed in which the user can select a one-time action for the firewall or create a rule according to which such network activity of the application will be processed in the future.
This mode is used by default.
How to prevent the program from accessing the Internet?
To prohibit the use of the network by a specific program, you must create a new rule. Click on the mini-agent icon (spider), which is located in the lower right corner of the screen, and click on the image of the closed lock.
When the User Account Control window appears, click on the “Yes” button and, if necessary, enter the administrator password.

Click on the button to open the settings window (gear).
The Dr.Web settings window opens. Go to “Protection Components” → “Firewall”. Click on the link “Change network access for applications”. The application settings rule window opens.
- If the application is in the list, then right-click on it and in the opened context menu select the option "Change". In the "Edit rule set" window that opens, use the "Access all network resources" drop-down list to set the "Deny all" mode.
- If the required application is not already in this list, click on the "+" button. The New Rule Set for Application window opens. Using the “Browse” button, specify the path to the executable file of the application or specify the process of this application (if it is running at that moment). Using the drop-down list “Access to network resources” set the mode “Deny all”.
Red firewall icon. What to do?
A red icon indicates that the firewall is disabled. To activate it, right-click the Dr.Web icon on the taskbar. In the menu that opens, hover over the line Firewall and in the drop-down list, select Enable.
If the icon remains red, two options are possible:
- Program error - in this situation you should contact the service. technical support.
- The license does not support the use of a firewall - currently, the use of a firewall is available only in the products of Dr.Web Security Space, Dr.Web Anti-virus and Dr.Web Bastion.
A firewall notification window has appeared. What to do with him?
The appearance of a notification window indicates that the application to which the firewall has reacted is not set to a processing rule. You can do one of the following ways:
- Allow - Network activity of the application will be allowed for the current session. After restarting the computer or when you call the program again, the firewall request will be issued again.
- To ban - prohibition of network activity of the program. Only for the current session.
- Create a rule - when you configure a rule for an application, the firewall will automatically fire according to this rule. By selecting this item, you will see a window in which you will be offered two actions to choose from:
- Apply preset rule - in the drop-down list you need to determine whether the application should be allowed access by the specified protocol or denied.
- Create your own rule - You can create a new rule for the firewall to work with the current program.
Note: Always try to create rules to automate your firewall.
How to create a rule for an application (program) in Dr.Web version 8 and below?
Right-click on the Dr.Web icon in the notification area. In the menu that opens, hover the cursor over the Firewall line and select the item in the drop-down list. Customization. Click the tab Applications.
To create a rule for the program, click Create. In the window that opens, you need to specify the path to the executable file of the program for which the rule is being created, and select
- rule type to run network applications:
- Allow - allow the application to start processes.
- Forbid - prevent the application from running processes.
- Not set
- and type of rule for accessing network resources:
- Allow all - application access to the network will be allowed.
- Ban all - application access to the network will be blocked.
- Special - access will be determined by the parameters specified by the user.
- Not set - distribute the settings of the selected Firewall mode to this application.
If the firewall works in the learning mode, there is no need to configure the rules manually - it is easier to configure access for each application at the time of its first network activity, right from the firewall notification window.
How to disable the firewall?
Click on the mini-agent icon (spider), which is located in the lower right corner of the screen, and click on the image of the closed lock.
It is clear about what settings Dr.Web anti-virus should be made immediately after installing the program. In this article we will not consider all the settings of Dr.Web anti-virus, but some important program settings must be set to enhance the security of your computer.
Dr.Web Anti-virus is one of the most wonderful tools for protecting your computer from viruses. But, in the opinion of the author of this article, the default settings are insufficient to protect your computer reliably. What settings should be done immediately after installing the program on a computer, we will take a closer look at the example of setting up the 7th and 8th versions of Dr.Web Security Space.
Important note: This article recommends only enabling those settings that are disabled by default in Dr.Web, but, in our opinion, enabling them will be useful and will increase the security of your PC. The same settings that are important, but already included by default, are not discussed in this article. Just touch the settings of some functions, reappeared in version 8.0.
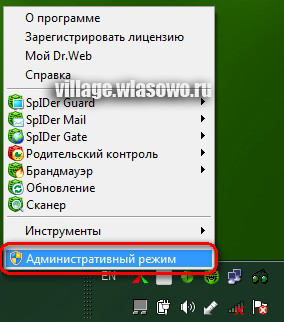
We will mainly configure two groups of settings - general Dr.Web settings and spIDer Guard component settings. If you are using an operating windows system Vista or Windows 7, you must first go into administrative mode (Fig. 1).
To do this, click on the Dr.web icon in the system tray (lower right corner of the screen) with the right mouse button and, in the context menu that appears, select the “Administrative mode” item. Answer the system request for confirmation of action.
Configuring Dr.Web 8.0

AT new version Dr.Web 8.0, in addition to the settings of the above antivirus components, we still, in part, touch the settings of the component Parental control. In Dr.Web 8.0, the settings of the components in the context menu can be selected both individually and collectively. The fact is that in 8-ke now all the settings are collected in one window and are only located on different tabs. If the user previously selected the context menu (hereinafter and under the context menu refers to the context menu of the Dr.Web icon in the system tray (right lower part of the screen)) Tools\u003e =\u003e Settings, then I got into the antivirus settings window , and now - on the “Basic” tab of the single settings window. Similarly, when selecting “SpIDer Guard” =\u003e “Settings” in the context menu, the user got into the settings window of the SpIDer Guard component, now on the tab “SpIDer Guard” of the same single application settings window. As they say, “All roads lead to Rome” and even if inexperienced users are not confused by this two-fold path - Dr.Web 8 now has a single settings window. And the settings points in each component separately are more likely an atavism of previous versions. Therefore, we will consider the settings of the new eight on the example of the very single settings window (Fig. 2).

Now go to the general settings of the Dr.Web program. Back to the program icon in the system tray. Clicking the right mouse button in the context menu, select the item "Tools", then the sub-item "Settings" (Fig. 3).
As a result, the “Basic” tab of the unified Dr.Web settings window will open (Figure 2):
Setting general parameters of Dr.Web 8.0.
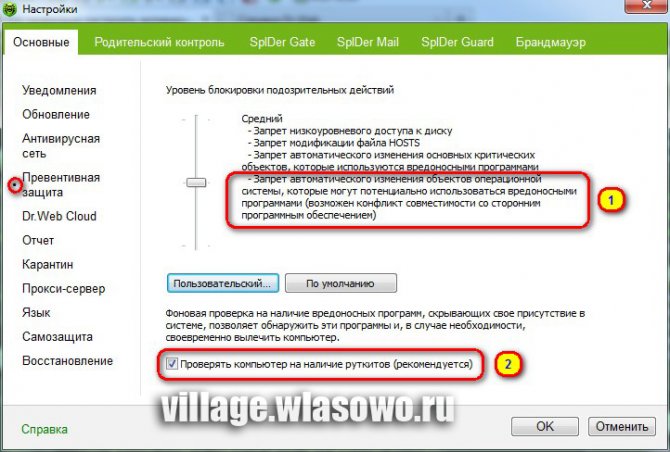
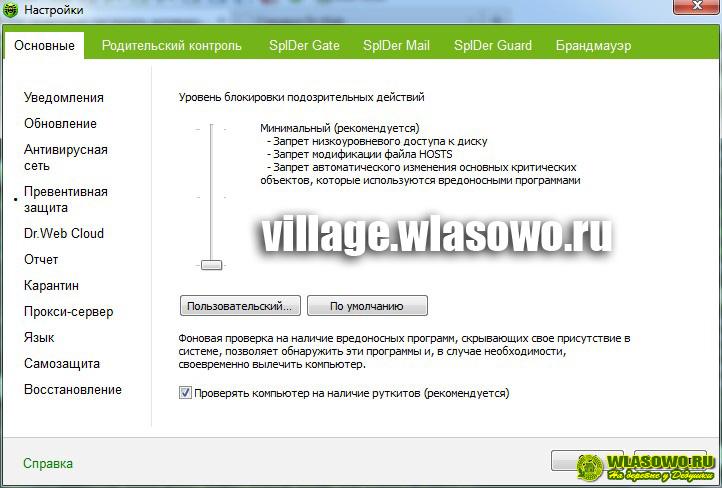
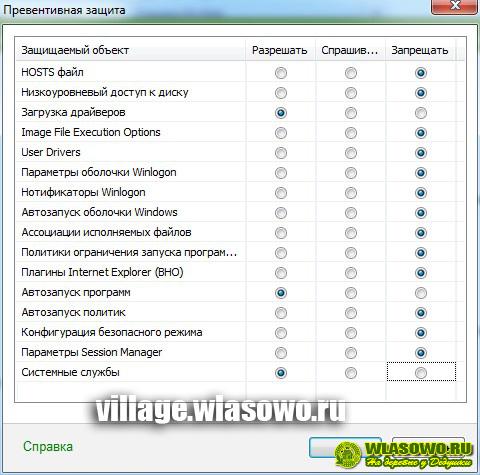
In the new version of Dr.Web 8, most of the default settings satisfy necessary requirements anti-virus security. We introduce only a few strokes to, so to speak, strengthen the topic. On the “Basic” tab of the unified Dr.Web anti-virus settings window, go to the menu on the left “Preventive Protection”.
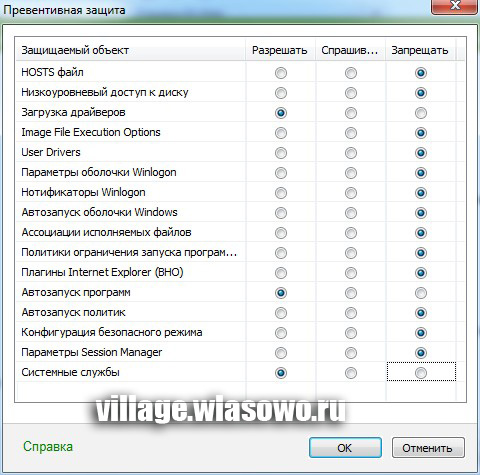
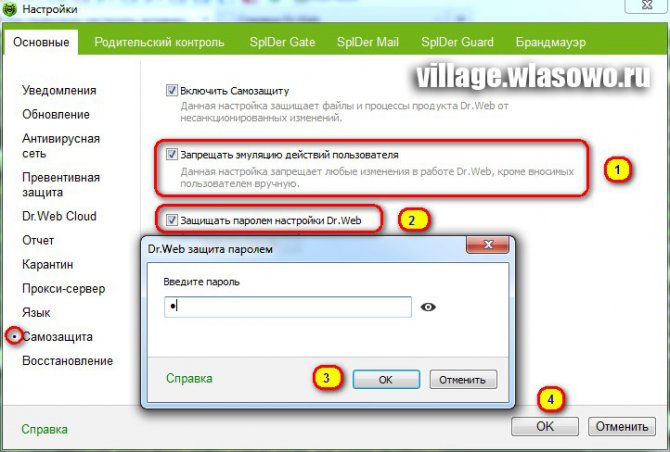
- Set the flag - "Prohibit the emulation of user actions" (p.1. Fig.7). This setting allows you to prevent any changes in the operation of Dr.Web that are made automatically. Including the execution of scripts that emulate the user's work with Dr.Web, started by the user will be prohibited.
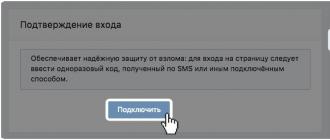
- . This setting is optional. But it may be useful in the following cases. If besides you the computer is used by someone who does not possess sufficient knowledge, then to prevent unauthorized access to the settings, you can set a password. And further. When some important modules are disabled, for example, SpIDer Guard, SpIDer Gate, Firewall, Dr.Web anti-virus opens a window with captcha (CAPTCHA) - a certain image, the numbers on which it is proposed to enter in the text field to complete the shutdown operation. So, if you enable the option to protect the settings with a password, then instead of this captcha, the program will offer to enter this same password. If, for example, entering “0000” as a password, then you will agree that it will be more convenient to enter such a password than to look every time that figures are shown there. But it is recommended to disconnect these modules only for a short time and in exceptional cases (in which it is up to you and this is not the topic of this article).
Settings of the SpIDer Guard module of Dr.Web 8.0.
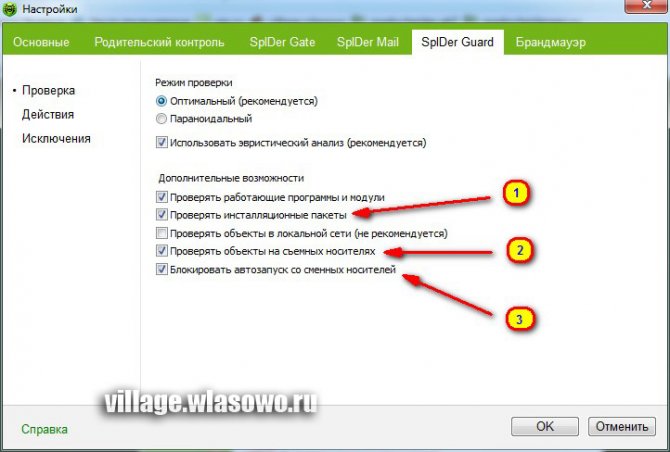
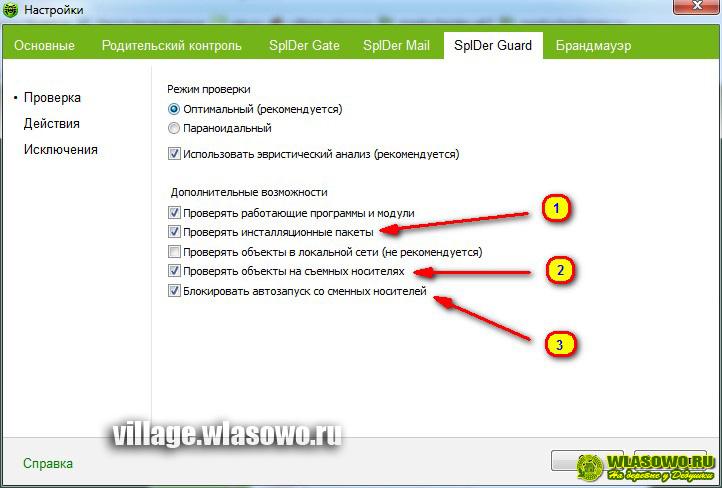
To configure the SpIDer Guard module in Dr.Web, it is enough to switch to the “SpIDer Guard” tab at the top of the unified anti-virus settings window (in the menu on the left, select “Check”). Recall that the context menu item of the Dr.Web icon in the system tray will also lead you to this tab (Fig. 8). On this tab, add only three settings.
- Set the flag - “Check installation packages”. The inclusion of this setting may seem controversial to someone, but, in the opinion of the author, for greater security of your PC, it is still worth activating this setting.
- Set the flag - “Scan objects on removable media”.Check this box to scan files on removable media (CD / DVD discs, magnetic disks (FDD), flash-drives and other storage media connected via USB-port, etc.) with any access to them, including when opening files with read-only rights. If the box is unchecked, then files on removable media will be scanned only when these files are launched for execution. The main channels for the spread of viruses, especially in the office, are the Internet and flash drives. It is often necessary to transfer information from one computer to another, and along with it, viruses. Setting this parameter in our opinion is simply mandatory. Viruses transferred from flash drives, especially at work, are simply the scourge of modern PCs.
- Set the flag - “Block autorun from removable media”.This setting prohibits automatic start active contents of external data carriers (CD / DVD discs, flash memory, etc.). Using this setting helps prevent infection of your computer through external media. But it can also cause some inconvenience due to the fact that installation of programs from CD discs will not happen automatically, and the menu of such discs will not start. But, considering the number of infections of PCs with viruses from removable media, the inclusion of this setting seems necessary. After all, it is through autorun that most of the malicious code with our beloved flash drives is activated. It should be noted that sometimes autorun from removable media can be necessary. In such cases, it is recommended to check the removable media with the Dr.Web scanner and only then, temporarily (!), Disable this setting.
Among the new features of Dr.Web 8.0 related to removable media, the parental control module has a very interesting opportunity to control access to removable media, which allows only access to trusted media.
Settings of the Parental Control module of Dr.Web 8.0.
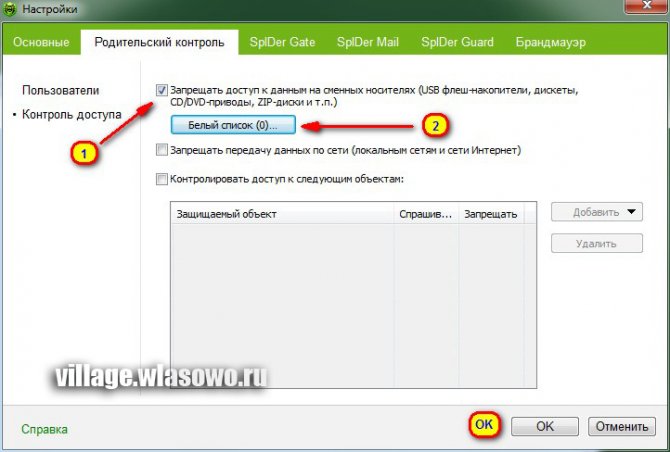
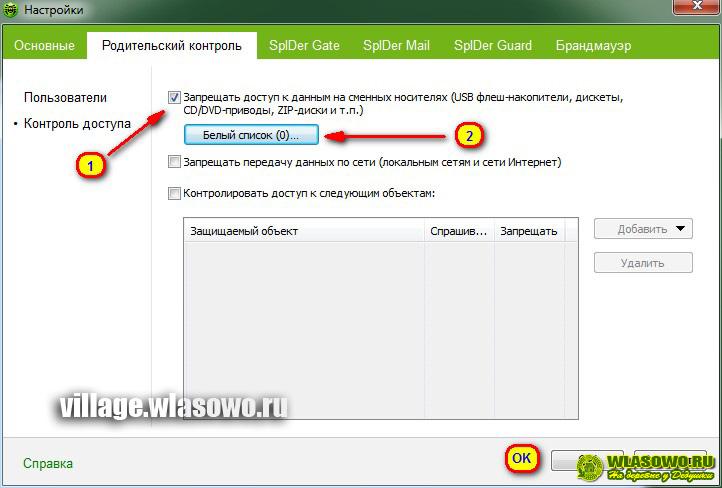
Tab " Parental control»Select the menu item on the left“ Access Control ”(Fig.9). To disable full access to removable media, set the flag Deny access to data on removable media (USB flash drives, floppy disks, CD / DVD-drives ...). So, if you need to install lock USB flash drivesthen it is enough to set this flag.
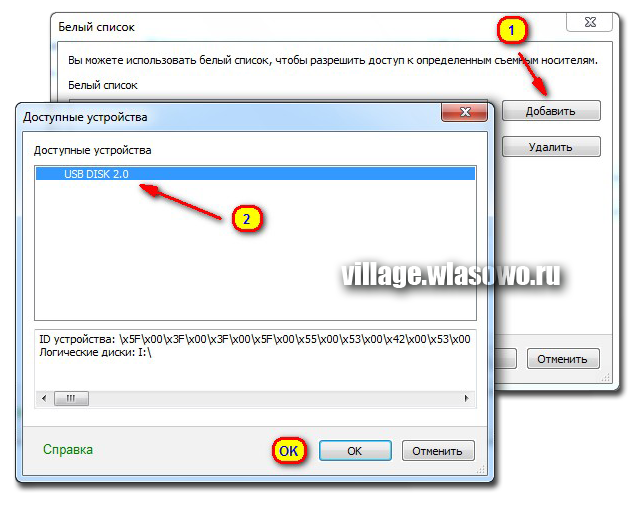
But if you need to provide access only to trusted removable media, then you need to make a trusted drive on the White List. To do this, click on the “White list” button (p.2.Figure 9) and in the window that appears (Fig.10) click the Add button (p.1). In this case, the trusted device must be connected to the PC, then it can be selected by selecting the mouse (item 2) and clicking OK. Using a combination of the protection functions of the Dr.Web settings with a password and this function, it is possible to deny access to removable media not only to the computer, but also to unauthorized people — for example, access to the USB flash drive will be blocked by the antivirus, and unauthorized people can remove the lock without will be able.
Similarly, you can prohibit or restrict access to a specific file or folder, an individual device or a whole class of devices on your PC by checking the “Control access to the following objects” checkbox and selecting them in the list.
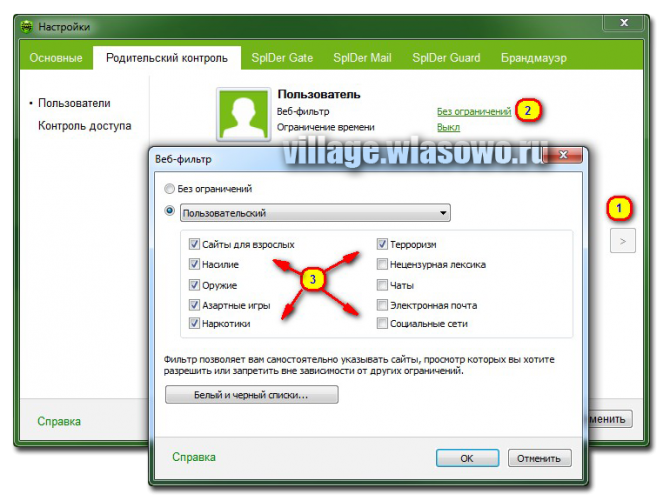
Another new feature in Dr.Web 8.0 is the ability to limit access to web resources and the time users work at a computer and on the Internet for each computer user. Work parameters are set separately for each user and are displayed next to the picture for the corresponding account. In the settings window accounts are displayed automatically (Fig.11). Using this function, you can, for example, prohibit children from accessing the Internet or working on a computer on certain days of the week and hours, as well as restricting access to certain categories of web resources.
Configuring Dr.Web 7.0
To go to the general settings of Dr.Web 7.0, right-click on the icon of Dr.Web in the system tray, select “Tools” in the context menu, then the “Settings” sub-item (Fig. 12).
As a result, a window will open on the screen. general settings Dr.Web programs (Fig. 13):
Setting general parameters of Dr.Web 7.0.
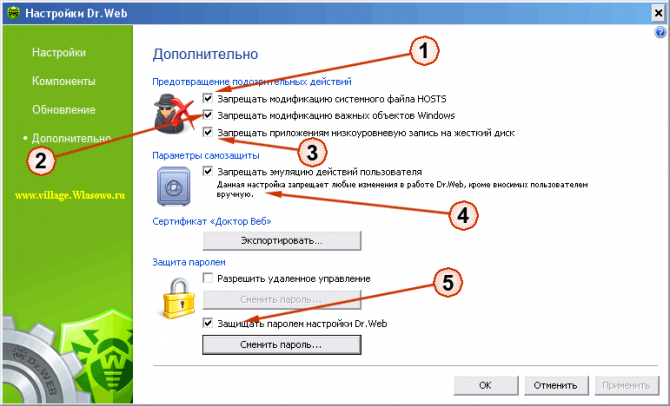
In the Dr.Web help system, these settings are referred to as “SpIDer Agent control module settings”. In the “Dr.Web Settings” window (Fig.13), go to the “Advanced” tab (click the mouse in the left part of the window). Here it is necessary to set five settings by ticking the corresponding checkboxes. By default, after installing the program, these settings are not included for reliable protection Your PC is recommended to turn them on. So:
- Set the flag - "Forbid modification system file HOSTS. Hosts file —Contains a database of domain names and is used when translating them into the network addresses of nodes. Some viruses, by modification of this filemay either block access to the site antivirus program and thus prevent the free scanner from downloading to check the system. Such, for example, as CureIt. Also with the help of this file, you can redirect the user to pages that look similar to popular resources (social networks, mail services, etc.), where the inattentive user enters credentials, thus falling into the attackers, etc.
- Set the flag - "Prohibit the modification of important objects in Windows." Enabling this setting protects certain branches. windows registry from modifications. Here we will not list which branches of the registry will be protected; you can read about it in the help system of Dr.Web. We only say that the modification of these settings is widely used by all sorts of viruses and rootkits to facilitate their own existence and complicate the fight against them by the user.
- Set the flag - "Prohibit applications from low-level writing to the hard disk." This setting prevents applications from writing to hDD sector-by-sector without resorting to the file system.
Important note: If you experience problems installing important updates from Microsoft or installing and running programs (including defragmentation programs), the developers of Dr.Web recommend turning off the corresponding options in this group of settings.
- Set the flag - "Prohibit emulation of user actions."This setting allows you to prevent any changes in the operation of Dr.Web that are made automatically. Including the execution of scripts that emulate the user's work with Dr.Web, started by the user will be prohibited.
- Optional - “Protect Dr.Web settings with a password”. The fact that this setting can be useful is described above in the corresponding section about the settings of the 8th version.
Settings for SpIDer Guard Dr.Web 7.0.
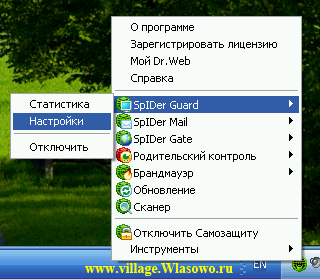
Now let's move on to setting up the SpIDer Guard module. To call the settings window of this module, we return to the Dr.Web icon in the system tray (lower right corner of the screen), right-click and select the “SpIDer Guard” menu, then the “Settings” submenu (Fig.14).
In the settings window that appears (Fig. 15), we add only three settings.

We hope that these recommendations will help you make using your PC even safer, and spending a few minutes on setting up an antivirus will pay off by saving time and money on eliminating the consequences of infection with viruses and other malicious poisoners of our mood.
Configuring Dr.Web Firewall
Firewall (it. Brandmauer) - is a program designed to protect your computer from unauthorized access from the outside and prevent the leakage of important data over the network. Other names for this concept are firewall, firewall (English firewall), filter. The concept of a firewall comes from the eponymous name of the wall that separates adjacent buildings, preventing the spread of fire. By this analogy, a class of programs was named that controls and filters the network packets passing through it in accordance with the specified rules. It should be noted that firewalls in a broad sense are hardware or software complexes, but in the context of Dr.Web anti-virus is meant a personal firewall - a component comprehensive protection Dr.Web anti-virus implemented as a module that allows you to control the connection and transfer of data over the Internet and block suspicious connections at the packet and application level.
So that setting up a firewall doesn’t cause any difficulties for users, a training video that provides general information about initial setup Dr.Web Firewall will help make setting and using Dr.Web firewall easier and more comfortable.
Video. Configuring Dr.Web Firewall Part 1.
It is clear about what settings Dr.Web anti-virus should be made immediately after installing the program. In this article we will not consider all the settings of Dr.Web anti-virus, but some important program settings must be set to enhance the security of your computer.
Dr.Web Anti-virus is one of the most wonderful tools for protecting your computer from viruses. But, in the opinion of the author of this article, the default settings are insufficient to protect your computer reliably. What settings should be done immediately after installing the program on a computer, we will take a closer look at the example of setting up the 7th and 8th versions of Dr.Web Security Space.
Important note: This article recommends only enabling those settings that are disabled by default in Dr.Web, but, in our opinion, enabling them will be useful and will increase the security of your PC. The same settings that are important, but already included by default, are not discussed in this article. Just touch the settings of some functions, reappeared in version 8.0.
We will mainly configure two groups of settings - general Dr.Web settings and spIDer Guard component settings. If you are using an operating system Windows vista or Windows 7, you first need to go into administrative mode (Fig. 1).
To do this, click on the Dr.web icon in the system tray (lower right corner of the screen) with the right mouse button and, in the context menu that appears, select the “Administrative mode” item. Answer the system request for confirmation of action.
Configuring Dr.Web 8.0
 In the new version of Dr.Web 8.0, in addition to the settings of the above anti-virus components, we still, in part, touch the settings of the component Parental control. In Dr.Web 8.0, the settings of the components in the context menu can be selected both individually and collectively. The fact is that in 8-ke now all the settings are collected in one window and are only located on different tabs. If the user previously selected the context menu (hereinafter and under the context menu refers to the context menu of the Dr.Web icon in the system tray (right lower part of the screen)) Tools\u003e =\u003e Settings, then I got into the antivirus settings window , and now - on the “Basic” tab of the single settings window. Similarly, when selecting “SpIDer Guard” =\u003e “Settings” in the context menu, the user got into the settings window of the SpIDer Guard component, now on the tab “SpIDer Guard” of the same single application settings window. As they say, “All roads lead to Rome” and even if inexperienced users are not confused by this two-fold path - Dr.Web 8 now has a single settings window. And the settings points in each component separately are more likely an atavism of previous versions. Therefore, we will consider the settings of the new eight on the example of the very single settings window (Fig. 2).
Now go to the general settings of the Dr.Web program. Back to the program icon in the system tray. Clicking the right mouse button in the context menu, select the item "Tools", then the sub-item "Settings" (Fig. 3).
As a result, the “Basic” tab of the unified Dr.Web settings window will open (Figure 2):
Setting general parameters of Dr.Web 8.0.
 In the new version of Dr.Web 8, most of the default settings meet the necessary requirements for anti-virus security. We introduce only a few strokes to, so to speak, strengthen the topic. On the “Basic” tab of the unified Dr.Web anti-virus settings window, go to the menu on the left “Preventive Protection”.
Settings of the SpIDer Guard module of Dr.Web 8.0.
 To configure the SpIDer Guard module in Dr.Web, it is enough to switch to the “SpIDer Guard” tab at the top of the unified anti-virus settings window (in the menu on the left, select “Check”). Recall that the context menu item of the Dr.Web icon in the system tray will also lead you to this tab (Fig. 8). On this tab, add only three settings.
- Set the flag - “Check installation packages”. The inclusion of this setting may seem controversial to someone, but, in the opinion of the author, for greater security of your PC, it is still worth activating this setting.
- Set the flag - “Scan objects on removable media”. Check this box to scan files on removable media (CD / DVD drives, magnetic disks (FDD), flash drives, and other storage media connected via a USB port, etc.) for any access to them, including number when opening files with read-only rights. If the box is unchecked, then files on removable media will be scanned only when these files are launched for execution. The main channels for the spread of viruses, especially in the office, are the Internet and flash drives. It is often necessary to transfer information from one computer to another, and along with it, viruses. Setting this parameter in our opinion is simply mandatory. Viruses transferred from flash drives, especially at work, are simply the scourge of modern PCs.
- Set the flag - “Block autorun from removable media”. This setting prevents the automatic launch of the active contents of external storage media (CD / DVD discs, flash memory, etc.). Using this setting helps prevent infection of your computer through external media. But it can also cause some inconvenience due to the fact that installation of programs from CD discs will not happen automatically, and the menu of such discs will not start. But, considering the number of infections of PCs with viruses from removable media, the inclusion of this setting seems necessary. After all, it is through autorun that most of the malicious code with our beloved flash drives is activated. It should be noted that sometimes autorun from removable media can be necessary. In such cases, it is recommended to check the removable media with the Dr.Web scanner and only then, temporarily (!), Disable this setting.
Among the new features of Dr.Web 8.0 related to removable media, the parental control module has a very interesting opportunity to control access to removable media, which allows only access to trusted media.
Settings of the Parental Control module of Dr.Web 8.0.
 On the “Parental Control” tab, select the “Access Control” menu item on the left (Fig.9). To disable full access to removable media, set the flag Deny access to data on removable media (USB flash drives, floppy disks, CD / DVD-drives ...). So, if you need to install lock USB flash drivesthen it is enough to set this flag. But if you need to provide access only to trusted removable media, then you need to make a trusted drive on the White List. To do this, click on the “White list” button (p.2.Figure 9) and in the window that appears (Fig.10) click the Add button (p.1). In this case, the trusted device must be connected to the PC, then it can be selected by selecting the mouse (item 2) and clicking OK. Using a combination of the protection functions of the Dr.Web settings with a password and this function, it is possible to deny access to removable media not only to the computer, but also to unauthorized people — for example, access to the USB flash drive will be blocked by the antivirus, and unauthorized people can remove the lock will be able.
Similarly, you can prohibit or restrict access to a specific file or folder, an individual device or a whole class of devices on your PC by checking the “Control access to the following objects” checkbox and selecting them in the list.
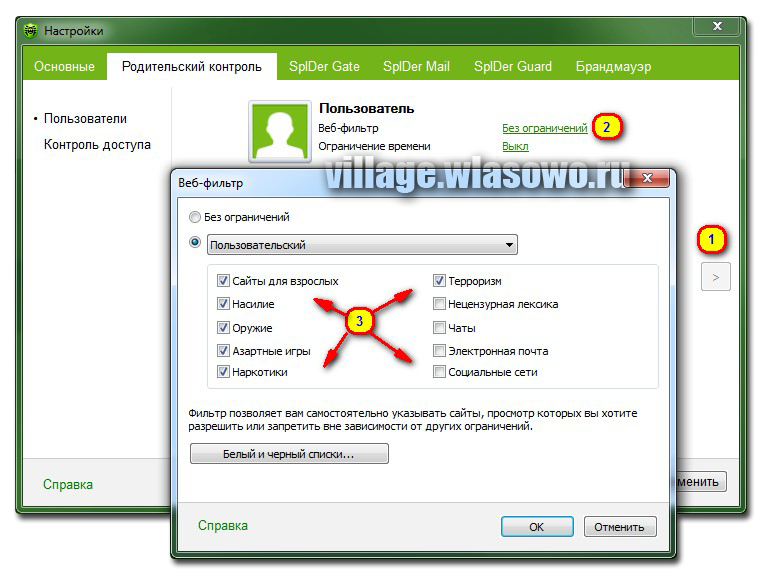 Another new feature in Dr.Web 8.0 is the ability to limit access to web resources and the time users work at a computer and on the Internet for each computer user. Work parameters are set separately for each user and are displayed next to the picture for the corresponding account. In the settings window, accounts are displayed automatically (Fig.11). Using this function, you can, for example, prohibit children from accessing the Internet or working on a computer on certain days of the week and hours, as well as restricting access to certain categories of web resources.
Configuring Dr.Web 7.0
To go to the general settings of Dr.Web 7.0, right-click on the icon of Dr.Web in the system tray, select “Tools” in the context menu, then the “Settings” sub-item (Fig. 12).
As a result, the general Dr.Web settings window will open on the screen (Fig. 13):
Setting general parameters of Dr.Web 7.0.

In the Dr.Web help system, these settings are referred to as “SpIDer Agent control module settings”. In the “Dr.Web Settings” window (Fig.13), go to the “Advanced” tab (click the mouse in the left part of the window). Here it is necessary to set five settings by ticking the corresponding checkboxes. By default, after installing the program, these settings are not enabled and it is recommended to enable them for reliable protection of your PC. So:
- Set the flag - "Prohibit modification of the system HOSTS file." The hosts file contains a database of domain names and is used when translating them into the network addresses of nodes. Some viruses, by modifying this file, can either block access to the site of the antivirus program and, thus, prevent the download of a free scanner to check the system. Such, for example, as CureIt. Also with the help of this file, you can redirect the user to pages that look similar to popular resources (social networks, mail services, etc.), where the inattentive user enters credentials, thus falling into the attackers, etc.
- Set the flag - "Prohibit the modification of important objects in Windows." Enabling this setting protects certain branches of the Windows registry from modifications. Here we will not list which branches of the registry will be protected; you can read about it in the help system of Dr.Web. We only say that the modification of these settings is widely used by all sorts of viruses and rootkits to facilitate their own existence and complicate the fight against them by the user.
- Set the flag - "Prohibit applications from low-level writing to the hard disk." This setting prevents applications from writing to the hard disk by sector without accessing the file system.
- Set the flag - "Prohibit the emulation of user actions." This setting allows you to prevent any changes in the operation of Dr.Web that are made automatically. Including the execution of scripts that emulate the user's work with Dr.Web, started by the user will be prohibited.
- Optional - “Protect Dr.Web settings with a password”. The fact that this setting can be useful is described above in the corresponding section about the settings of the 8th version.
Important note: If you experience problems installing important updates from Microsoft or installing and running programs (including defragmentation programs), the developers of Dr.Web recommend turning off the corresponding options in this group of settings.
Settings for SpIDer Guard Dr.Web 7.0.
Now let's move on to setting up the SpIDer Guard module. To call the settings window of this module, we return to the Dr.Web icon in the system tray (lower right corner of the screen), right-click and select the “SpIDer Guard” menu, then the “Settings” submenu (Fig.14).
In the settings window that appears (Fig. 15), we add only three settings.
We hope that these recommendations will help you make using your PC even safer, and spending a few minutes on setting up an antivirus will pay off by saving time and money on eliminating the consequences of infection with viruses and other malicious poisoners of our mood.
Configuring Dr.Web Firewall
Firewall (it. Brandmauer) - is a program designed to protect your computer from unauthorized access from the outside and prevent the leakage of important data over the network. Other names for this concept are firewall, firewall (English firewall), filter. The concept of a firewall comes from the eponymous name of the wall that separates adjacent buildings, preventing the spread of fire. By this analogy, a class of programs was named that controls and filters the network packets passing through it in accordance with the specified rules. It should be noted that firewalls in a broad sense are hardware or software complexes, but in the context of Dr.Web anti-virus is meant a personal firewall - a component of the comprehensive protection of Dr.Web anti-virus implemented as a module that allows you to control the connection and transmission of data over the Internet and block Suspicious connections at the packet and application level.
If you liked this material, tell your friends about it by clicking on one of the buttons. social networks below. We will be very grateful to you!
To get started with A firewall needs to:
select operation mode programs;
set up a list authorized applications;
configure settings for known networks.
Default Firewall automatically creates rules for known applications. Regardless of the mode of operation, events are recorded.
The default program settings are optimal for most applications and should not be changed unnecessarily.
Customization Allow local connections Allows all applications to seamlessly connect to your computer. Rules will not be applied to such connections. Clear this check box to apply filtering rules regardless of whether the connection is made over a network or within your computer.
Selection of operating mode
Choose one of the following modes:
Allow unknown connections - a mode in which all unknown applications are granted access to network resources;
Create rules for known applications automatically -training modewhere rules for known applications are added automatically (used by default);
Interactive Mode -training modein which the user is given full control over the reaction Firewall;
Block unknown connections - A mode in which all unknown connections are automatically blocked. Known compounds are processed Firewall according to the specified filtering rules.
Training mode
In this mode, rules for known applications are added automatically. For other applications Firewall gives you the ability to manually block or allow an unknown connection, as well as create a rule for it.
Firewall
This mode is used by default.
Interactive mode
In this mode, you are given full control over the reaction. Firewall detection of an unknown connection, and thus the program is trained in the course of your work at the computer.
Upon detection of attempts by operating system or user application to access network resources Firewall Checks whether filtering rules are set for these programs. If there are no rules, then a corresponding warning is displayed, where you are asked to choose either a temporary solution or create a rule according to which such connections will be processed later.
Unknown connection blocking mode
In this mode, all unknown connections to network resources, including the Internet, are automatically blocked.
When an attempt is detected by the operating system or user application to access network resources Firewall Checks whether filtering rules are set for these programs. If there are no filtering rules, then Firewall automatically blocks access to the network and does not display any messages. If the filtering rules for this connection are specified, then the actions specified in them are performed.
Unknown connection resolution mode
In this mode, access to network resources, including the Internet, is provided to all unknown applications for which no filtering rules are specified. Upon detection of a connection attempt Firewall does not display any messages.