We constantly write something down as memory, because you can't remember everything, and we mainly use paper stickers. A small stack of colored leaves that are back side have an adhesive strip so they can be attached to almost any surface. Stickers are used as reminders in the daily life of many people. Everything changes over time, including the way you write notes.
We decided to devote this article to a small, but very useful, utility that is part of the operating room windows systems... The utility will help clean workplace and transfer the sticky stickers to your desktop.
The program is called "Notes" and in turn is free and ideal tool for organizing stickers on your desktop. Nice is the fact that this utility is already integrated into the operating system, so install an additional software don't have to.
To begin with, we want to remind you that earlier we have already reviewed convenient organizer programs, which to this day remain relevant for use.
There are three ways to launch the program:
- Menu "Start" - "All programs" - "Standard" - "Notes".
- Menu "Start" - enter in the search bar "Notes" - select a program.
- Menu "Start" - "Run ..." - introduce "Stikynot" - press the button "OK".
After starting the program, you will see a virtual sticker on your desktop.

The size of the sticker can be changed at your discretion. You just need to pull on the edge of the sticker and stretch it to the required size. The position of the sticker can also be changed by placing it anywhere on the desktop.

The plus in the upper left corner of the sticker is responsible for creating a new note, and the cross in the upper right corner deletes the note.

The change and color of the sticker is also served. To change the color, you need to right-click in the print area and select the desired color.

In general, you can create such stickers on your desktop.

As you have already noticed, the font in the notes can be edited at your discretion - this is done using hotkeys. The following key combinations work in the Records program:
- "Ctrl + I" - highlighting text in italics.
- "Ctrl + B" - selection of text in bold.
- "Ctrl + U" - underline the text.
- "Ctrl + T" - cross out the text.
- "Ctrl + Shift +\u003e" - increase the font.
- Ctrl + Shift +<« - reduce the font.
- "Ctrl + mouse wheel up / down" - increase or decrease all text in the sticker.
- "Ctrl + E" - text alignment in the center.
- "Ctrl + L" - text alignment to the left.
- "Ctrl + R" - text alignment to the right.
- "Ctrl + Shift + L" - bulleted list (press several times to select the type of list).
For change desired text you must first select and only then press a certain key combination.
This concludes the review of the tiny but useful utility "Notes". As you can see, this program is so simple and convenient that its study will pass without any problems. The benefits of using virtual stickers on your desktop are obvious.
In addition, we want to mention similar programs for placing notes on the desktop.
The free DeskStickers program can create stickers that can be filled in with the necessary reminder. You can customize the style of each sticker, namely, you can change the rendering style, text font, add a title, icon, etc. The utility is not demanding on computer resources and takes up little space.

Liva Notes is a shareware program that allows you to place stickers on your desktop in both expanded and collapsed views. The developers have worked hard on the original style of stickers that securely store your notes. Of course, compared to other programs, Liva Notes looks more original, but you have to pay for its use.

In addition to the programs mentioned in the publication, there are a large number of utilities of this type that will be able to make stickers more beautiful and more convenient. But their disadvantage is the need to install when the standard program "Notes" is already integrated into the system by default.
I greet you again, my dear readers! Today I want to tell you how to put notes on the windows 10 desktop using the standard method and additional programs, as well as how to use them. At one time, my entire monitor was pasted over with various stickers, on which I wrote what I should do today or until a certain date. I want to tell you that my head was spinning. I have nothing against stickers, except that they constantly peel off from my monitor and may even get lost somewhere.
To bring up a note, you will need to go to the start menu and find an application there called Sticky Notes. By calling it, you will immediately see a new sticker.
If you have not found this application, then in the "Start" mode, type three letters Sti... After that, the top in the search will immediately display the same Sricky Notes application, which you can click on.
In windows 7 and 8, you can call the application through by writing the command in it Stikynot, but in the top ten, unfortunately, this cannot be done.
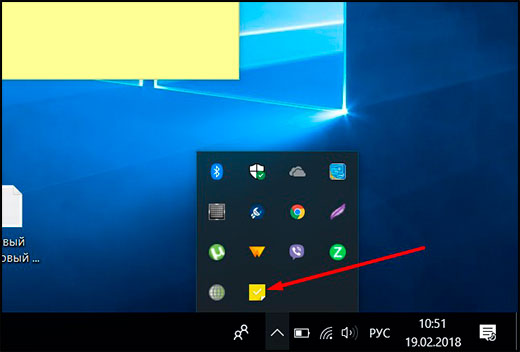
If you plan to use them often, then I would recommend that you add the application to the taskbar. To do this, enter "Start" again, find the same sticky notes and right-click on it, then select "Additionally"... And then it remains only to click on the item "Pin to taskbar".

How do I use these stickers?
When the sticker is already on your windows 10 desktop, you just need to press the left mouse button and start writing tasks in these reminders.
If you want to add another note, then you need to click on the small plus sign, which is located on the sticker. Among other things, you can change the size as you like. To do this, you just need to hold down any end of the sticker with the left mouse button (you need to have a double arrow instead of the cursor) and, without releasing the mouse, drag it in any direction, then it will increase, decrease, stretch or narrow.

If you do not need a note, then simply delete it by clicking on the trash can icon in the upper right corner.
In addition to all this, in windows 10, unlike previous versions, it is now possible to change the color of notes. To do this, click on the ellipsis icon in the right corner and select one of six colors. Best of all, the color can be changed for each note separately.

Formatting text in notes
In addition, to take regular notes, you can style the text inside differently to mark a specific meaning. To do this, select the piece of text you want to format and press one of the following key combinations.
- CTRL + B - highlighting text in bold
- CTRL + I - Highlight text in italics
- CTRL + U - Emphasize
- CTRL + T - Cross out. This is a very useful feature. With it, you can cross out already completed tasks. It's much better than removing them.
- CTRL + SHIFT + L - Creates a bulleted list.

Now your note on your windows 10 desktop can look really great and very convenient
Simple Sticky Notes is a simple and functional note taking program
In all fairness, the built-in sticker editor is quite enough to cope with common tasks. But some people need advanced functionality, so I'll share a few note-taking programs that you can download for free.
An excellent and very light reminder editor that you can download from here. After installing it and running the application, you will not notice anything unusual, since its appearance is the same as that of the built-in Windows solution. Therefore, you can work here in the same way. But if you go to the "Settings" item, indicated by an ellipsis, then you will be very surprised.
basic settings
Having a quick look at the parameters, you will be very surprised. Not only are there many more color options than there are in Notes for windows 10, but you can also set the opacity for each of them in 10% increments so that the note does not become too callous. But when you click on it, the opacity will return to 100% so that you can clearly see all your reminders.

In addition, you can now share notes on social networks and save them to a text document by clicking on the item "Export".
By default, all stickers are in the background, that is, they are displayed only on the desktop. But if you select the item "On top of all windows", then they will always be in front of your eyes, even if you are working in Explorer, browser or some program.
By clicking on the cross, you do not close the note, but simply hide it. Thus, it becomes even more convenient to work. Moreover, you can hide several unnecessary stickers so that they do not clutter up your eyes, but leave only the most important ones. And to display them all, just click on the button with the program in the notification area.
If you want the note to remain motionless in its place, then enter the item in the settings "Block" or press ALT + L... The same will need to be done if you want to return everything as it was.
Working with stickers
There is nothing difficult to work with. In principle, the circuit is the same as in the standard version. To start writing, you need to click on the sticker itself. To create a new sticker, click on "Settings" and select the first item "New note". Each of them has its own color and its own opacity.
To increase or decrease the size of a sticker, drag on any of its corners.
Formatting
The formatting of text in this program is exactly the same as in standard notes for the desktop in windows 10, and the same key combinations are used. The only thing I would like to mention is a couple of combinations that are not there.
- SHIFT + ALT +\u003e - Increases font size
- SHIFT + ALT +< - Decreases font size
- SHIFT + ALT + L - Creates a bulleted list. Yes, the standard one also has a bulleted list, but there is one caveat. If you press this combination again, it will become a numbered list. Pressing it again will make it alphabetical. Moreover, there are still many other lists. And to return to the normal display, you have to scroll through more than 20 different lists.

Alarm clock
The main feature of Simple Sticky Notes is that you can set an alarm clock for each desktop note, which will sync with your clock on your computer. This is done so that the note does not interfere with your work, but at the right moment it appears and reminds of itself.
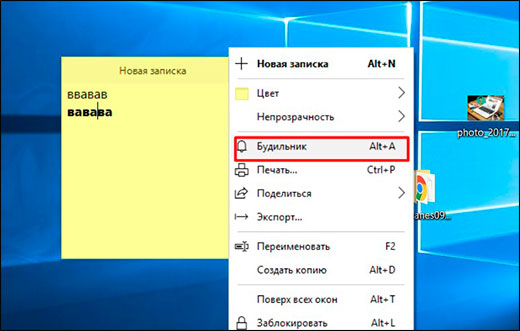
In order to activate it, click on the settings and select "Alarm" or press the key combination ALT + A.
After you open a separate settings window, put the right time to remind. Below is the date when the reminder was triggered. you can put it, thanks to the convenient calendar. Also, don't forget to repeat. If you wish, you can set this note to be triggered every day or once a week, for example.

The "Sound" window deserves special attention. By default, there is no note alert sound, so when the alarm goes off you will not hear sound signal, but nevertheless, the note itself will quickly rise before your eyes. If you need just sound notification for notes sound, then you will have to install it separately. To do this, click on the line itself, then select the "Download" item from the drop-down list.

This will immediately open your default browser. On the page that opens, you will see different sound files on several pages. Choose any of them.

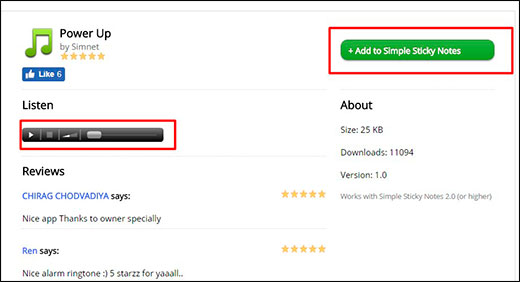
By clicking on the Play button in the section Listen, you can listen to the sound itself, and if you like it, then click on "Add to simple sticky notes"to load this sound into the program. The file will be downloaded to the Downloads folder. You just have to run the file to activate it in the program.
You don't even need to restart the program. The sound will stop automatically when you enter the Alarm settings again. Now you can set the time, date, repetitions and alarm, and then just sit back and work at your own pleasure until the actuation hour comes.

Holiline Reminder is a multifunctional program for notes, tasks and reminders
I also can't help but touch on the very cool free program Holiline Reminder, which is fundamentally different from previous solutions. Some functions are better displayed here, some, on the contrary, are not enough. You decide for yourself what is best for you.
To get started, download the Holiline Reminder program from the official website and install it on your computer, then go to the application. At the bottom you will see a scrolling line, but don't worry. You can hide it by clicking right button mouse and selecting the appropriate item. In addition, a new note will immediately appear on your desktop.
Working with notes
To start entering your tasks, just double-click on the field "Enter a new case"and then write what you need to do. If you need a new case in the same list, then click on this button again and write whatever your heart desires.

If you need a new sticker, right-click and select "Create Gadget Case"... The new gadget can be adapted to accommodate a new to-do list. Also, if you don't like blue colour, then you can change it to another by selecting "Change theme".

Well, and the most interesting thing, when one of the tasks is completed, hover over an empty space to the left of the task and click on the check mark that appears. Then the current task will be crossed out. This way you can keep track of what you've already done.

This concludes the work with the stickers. There are no formatting methods. The only other thing you can do is extend the widget itself. To do this, pull on the left or side edge. In this program, unfortunately, you cannot pull the corner.
Reminder
In addition to the usual notes on the desktop, the program has a function of reminders of important days. To activate this function, go to the taskbar and click on the Holiline reminder icon, then select the "Editor" item.


Now there will be a special mark in the calendar and by clicking on this number, you will see all your events. But this is probably the only good feature in this program, since the functionality of sticky notes is much poorer than even for standard desktop notes in Windows 10.

Outcome
Personally, of all the three solutions described in this article, I liked the Simple Sticky Notes program the most. It is very easy to use, no hassle, light weight and multifunctional. What did you like the most? Please write in the comments.
I hope my article helped you and you will use this wonderful thing, and leave the paper stickers for other things.
Well, I'm ending for today. See you in the next tutorials. Don't forget to subscribe to my blog articles updates and stay up to date. Bye bye and good luck to everyone!
Best regards, Dmitry Kostin
Today we will look at how notes are added on the desktop windows desktop 10. Notes (stickers) are virtual stickers that are used as information medium... Some stickers look like sticky stickers and are applied to the product, while others are a piece of self-adhesive paper that is glued to the refrigerator or monitor.
We are interested in virtual stickers that can be placed on the desktop. Starting with Windows 7, such information notes are present in the most operating system... With their help, brief reminders are created. They will always be in front of your eyes and will not allow you to forget anything important.
How to create stickers using the operating system
Windows 10 has an integrated application called "Sticky Notes" which in the past versions of Windows was called "Notes". It starts as follows.
- Open Start.
- Next, go to english letter "S".
- Find the Sticky Notes utility and click on its icon.
As a result of repeating these elementary actions on the desktop, a small window will appear with a text field where you can enter text information from the keyboard. The size of the active window can be changed by dragging the mouse cursor over the right or left corner of the note. By clicking on the plus icon in the window header, the user will bring up another interface for entering text information.

Changing the color scheme of the note is carried out by clicking on the menu "..." at the top on the right, then you can select the available colors. Immediately after that, the note will be colored in the appropriate color.

Recall the above, after the next update for Windows 10, the application acquired a new location and was renamed Sticky Notes. The easiest way to launch it is through search stringby entering the beginning of the program name.
To place the program icon on the initial screen in its context menu, select "Docking to the initial screen".

Formatting text in a note
If someone thinks that working with several stickers in the program is inconvenient, he is mistaken. The utility provides the simplest text formatting functions. There is no graphical access to them, but they are implemented using keyboard shortcuts.
To work with the contents of the note, the text must be selected.
1) Ctrl + B - bold text;
2) Ctrl + I - italic;
3) Ctrl + U - the selected characters will be underlined;
4) Ctrl + T - strikethrough text;
5) CTRL + SHIFT + L - create bulleted list, double tap will switch to a numbered list.
6) CTRL + SHIFT +\u003e - increase the font by one;
7) CTRL + SHIFT +< — уменьшение размера символов на единицу.

If you need to clear the desktop of stickers, just close the application, their contents are lost forever. One note is deleted by closing the corresponding window after confirming the operation.
In addition to the trash can icon, stickers are deleted using the Ctrl + D combination.
That's all. If you need more functionality, try third party application, like Two Notes (though it hasn't been updated for a long time) or ColorNote from the Windows store.
One of the best free systems management of electronic stickers today. She possesses good tools scheduling reminder displays, convenient manager notes and supports not only text but also graphic data types! In addition, the program's signature feature is the ability to exchange stickers with other users over the Internet!
The human brain - unique system! It stores information about the entire life of an individual, but, at the same time, not all of it is available to our consciousness ... The process of forgetting is responsible for the availability of certain knowledge. And we can forget everything: starting with memories of our childhood, and ending with: “What did I eat for breakfast today?” :).
Seriously speaking, few can boast of excellent memory. In the modern dynamic world, it is almost impossible to remember everything, so smart people began to come up with all sorts of tricks that allow them to remember at the right time important matters.
Stickers became one of such inventions. A simple piece of paper, stuck in time, for example, on a computer monitor, allows you to quite successfully fight "forgetfulness".
However, ordinary stickers have their drawbacks. So, for example, if there are too many of them, then sometimes it is difficult to find exactly the record we need at the moment. And in aesthetic terms, they are not very acceptable. In addition, many of them, after removal, leave traces of glue on the surface (or even do not want to peel off at all :)).
And since the stickers were very fond of common man, often working with a PC, the numerous programmer fraternity decided to implement their version of virtual sticky notes! And today I will introduce you to one of these developments, which is simply called Stickies.
Comparison with paid analogue
Stickies allows you to quickly create and conveniently manage a variety of virtual stickers, the appearance and content of which you define yourself! In terms of its capabilities, Stickies resembles the popular paid utility Power Notes. A comparison of the possibilities is given in the table below:
As you can see free version can do all the same as commercial. And even more! Unlike its paid counterpart, Stickies can show not only formatted text, but also graphics in notes, and also allows you to exchange stickers with friends via the World Wide Web!
Installation and Russification of the program
To install Stickies, just download the archive with the program from our website and run the installer from it. Only one window will appear in which you can set all the presets:
![]()
From the options here you can choose to install a special library to support "hot" keys, as well as installation for all PC users or only for the administrator. Then everything is standard: the installation path and the ability to run the program and help on it after the installation process is over. When all options are set the right way, press the "Install" button.
At the end of the installation (if you have not changed standard settings) the following windows will appear in front of us:
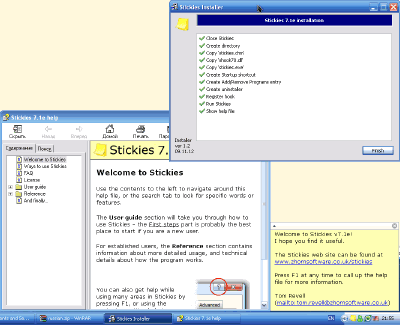
The topmost one (in the screenshot) is the installation status window. It can be closed by clicking the "Finish" button. Below you see the help window for the program. Unfortunately, there is no Russian-language version, therefore, if you are not very friendly with English, this window must also be closed.
The last window is actually an example of a program sticker, and is a greeting with links to the author's website. Also, the Stickies icon will appear in the tray, but more about that. Now the main task is to force the program to change the interface to Russian.
To do this, open the downloaded archive again, find in it a folder with the name "RUSIFICATOR" and copy its contents to the folder where the program is installed (by default: C: \\ Program Files \\ Stickies).

After that, it is enough to restart Stickies and we will get the Russian-language version of the interface. Similarly, the program can be translated into any of the languages \u200b\u200bavailable on the author's website!
Main menu interface
Now that Stickies has a Russian-language interface, I suggest you take a closer look at main menu programs. It can be called by right-clicking on the tray icon:

All functions here, as you can see, are divided into 4 (excluding the exit button) sections. The first section contains items that allow you to create new notes, the second - functions for displaying stickers, in the third - additional features programs, and the fourth is devoted to reference materials. We will return to the first section a little later, in the second, and so everything is very clear, but I propose to consider the third now.
Program settings
Specifically, we should be interested in the "Options" item:

By activating this item, we will get into a window (see the screenshot above), which contains all possible program settings. All Stickies options are divided into several tabs. I propose to briefly familiarize yourself with the capabilities of each of them:
- Are common. This tab contains settings related to the placement of new stickers on the screen, as well as their functionality. For example, here you can bind the creation of new notes to certain coordinates, apply one of possible actions when you double click on the sticker title and more.
- Appearance. Here you can find all the possible settings related to the style of the stickers. You can create up to 10 different styles design notes with different colors and the level of transparency. In addition, it is possible to download additional skins from the Internet or even create your own using a special utility!
- Network. Allows you to enable Network support in the program for sharing stickers with friends (disabled by default).
- Email. Here you can enable the program to support mail protocols, through which you can also exchange notes (by default, the function is also disabled).
- PDA. Provides the ability to customize the exchange of tasks between a computer and a PDA with Windows or a device based on Palm OS.
- Alarm clocks. Allows you to customize the functionality and sound design of alarm clocks in Stickies.
- Hotkeys. Allows you to change some keyboard shortcuts to speed up work with certain program functions.
- Additionally. Here you will find the possibility of adding to the program search engines for quick search selected texts on the Internet, and you can also set up logging of the application and some additional options... Of the latter, it is worth noting the item "Bind .sti and .ssk files to the program", which allow you to set the appropriate file associations in the registry (by default Stickies does not make any changes to it).
Here, in fact, the options are all - customize Stickies as you like;).
Working with stickers
The time has come for the most interesting thing - actually creating stickers! To do this, either double-click the left mouse button on the program icon in the tray, or select the "New note" item in the main menu (first item).
![]()
An empty window will appear in the form of a yellow sticker, in which you can enter the desired text. By clicking on the text field of the note, we will call the style change menu, with which you can change the appearance of the notes, as well as set the selection of individual words and paragraphs (for example, create a list):

Also, with activated access to the Web, from here you can create a search for the selected text (for example, in Google).
Besides changing appearance text, in Stickies we can also change the appearance of the note's background itself, as well as set the time or event for its display. For this, another context menu, which is invoked by right-clicking on the sticker title:

All items in this menu are divided into five sections. The first section contains functions for saving and printing notes. Moreover, you can save both in separate file, and in the manager of notes (about it below). The second section allows you to configure the conditions under which the sticker will be displayed.
At the same time, using the "Alarm" you can set the exact time for displaying the reminder, the "Fall asleep for" function allows you to postpone the display of the sticker for a certain period of time, and "Attach" allows us to link the appearance of a note to the appearance of a specific window (for example, the launch of a program or opening a specific web page):

The third section of the menu allows you to block the editing of the note, cancel the display of the sticker on top of all windows, or minimize the recording window to the title. The last two sections are responsible for the appearance of our reminder and allow you to set a title for the sticker.
When you activate a network and / or mail connection, another section will appear in the menu, allowing you to send notes to friends.
Adding graphics to a note
By default, all notes that are created in Stickies are text, however, you can also create stickers containing graphics. There are several ways to make this kind of notes:
- Copy the desired picture to the clipboard (select it and press CTRL + C), and then in the main menu, click the "New note from clipboard" button.
- Create a regular blank sticker and press CTRL + SHIFT + K (an empty graphics area is activated and cannot be returned to text mode).
- In "Options" set the default graphic notes. To do this, in the "General" tab, activate the item "New notes are images".

When you right-click on the workspace of this type of stickers, you will get access to graphic editing tools that will allow you to change or create the desired image from scratch.
The rest of the work with graphic notes is similar to the text mode.
Additional Stickies Tools
Now that we have figured out the basic functionality of Stickies, it's time to review additional tools... These include a note manager and a contact manager.
The notes manager is called by activating the "Notes management" item in the main program menu:

With its help, we can quickly search for the necessary reminders, edit them or adjust the display time. Also, by selecting the "Saved" item, we can first create a new category for stickers, and then the stickers themselves in the created section using the appropriate items in the "File" menu:

Also interesting: in the "Desktop" section (where all active notes are stored), we can enable two modes that are not available in the main sticker menu. This is to hide the note and switch to "ghost mode". The latter allows you to still display the sticker on the screen, but at the same time makes it "transparent" for mouse clicks.
That is, if there is a shortcut under the note, a click on the note will be perceived as a click on that shortcut! Combined with the ability to make the sticker translucent, we get a perfect reminder that is always in front of our eyes, but does not interfere with working with a computer!
The last feature we'll look at is the contact manager. It is convenient to use it if you have activated and configured Network support and / or email in options. The manager is called from the main menu of the program when you click on the "Friends" item:

To add new contact just click the "Add friend" button and fill simple formcontaining a name and email address the person you need. The contact manager allows you to sort your friends by groups and using separators. It also provides a quick-send list of up to 10 contacts called "Close Friends".
Advantages and disadvantages of the program
- unlimited number of reminders on the desktop;
- ample opportunities to customize the ways and moments of displaying notes;
- the ability to change the appearance of stickers with skin support;
- convenient sticker manager;
- the ability to create graphic notes.
- there is no way to set a password for mail;
- not really comfortable work in graphical mode.
conclusions
After analyzing several apps for creating e-stickers, I came to the conclusion that Stickies is the best free, and even one of the best of its kind, even when compared to commercial counterparts! Rich options for customizing the appearance of notes, convenient functions scheduling their display and the function of exchanging records with friends - these are the main advantages of the program.
Therefore, if you still buy paper stickers and glue them to your monitor so as not to forget about important things, then Stickies will allow you to forget about this thankless task, and save you from constant spending of money and nerves;).
P.S. It is allowed to freely copy and quote this article, provided that an open active link to the source is indicated and the authorship of Ruslan Tertyshny is preserved.
At work, I often have to make various notes and short notes. This is necessary in order not to forget anything and have time to do everything on time. Previously, paper stickers, a notebook or any piece of paper that came to hand was used for this. Sometimes such “notes” accumulated on the table by the end of the working day.
And just recently I decided to put an end to this. I thought that since I spend almost all my working time at the computer, then let all these records be on the screen of my monitor.
Surely many people know that in Windows 7 there is a program for such purposes "Notes" (“Sticky Notes”). To start it, you need to go to "Start" - "All Programs" - "Standard" - "Notes". Personally, I really like these "Notes": they are simple, but at the same time quite elegant.
In Windows XP, among standard programs such, unfortunately, no. So I had to go online looking for something like that. After spending quite a lot of time and trying about a dozen different utilities, I still found the one I wanted. It is called -. This program is easy to use, and the stickers themselves are very similar to sticky notes in Windows 7.
You can download it for free.
And download the Russian language file.
Install the program, then unpack the downloaded archive russian.zip and copy the file language70.dll to the program folder (by default: C: \\ Program Files \\ Stickies).
Then everything is simple. Immediately after the installation is completed, a yellow program icon will appear in the tray. Right-click on it: if you have already dropped the language file into the program folder, all menu items must be in Russian (if this is not the case, just click here Exit and run the program again).
If you double-click the left mouse button on the tray icon, the sticker itself will appear, on which you can write text.  Having selected the typed text, press the right mouse button. A menu will open where you can set for the text different parameters (font, size, style, selection, etc.).
  The note can be closed by clicking on the cross in the right corner (1)
.
The note can be closed by clicking on the cross in the right corner (1)
.![]() If you click the button in the left corner (2)
- the "Top of Windows" mode will turn on.
If you click the button in the left corner (2)
- the "Top of Windows" mode will turn on.
Right-clicking on the gray header area (3)
, you can save a note, set an alarm for it, make it collapsed or expanded, write a title, select a sticker color, adjust transparency, etc.  By the way, all memos created ever are not deleted after closing. They can be viewed by clicking on the yellow Stickies icon in the tray and selecting “ Managing notes”. In the window that opens, you can manage your notes (restore, delete, etc.).
  If you again right-click on the program icon in the system tray and select “ Options”, You can play around with numerous settings. Personally, I have not changed anything here, only in the "Alarm" tab I tried to set a melody ( sound file must be in .wav format).
Each time after turning on the computer, the program will start from running Windows, and all the notes made will immediately appear on the desktop (in the same place where they were before shutdown).
In general, it is very comfortable and simple program... If you have any questions about its use, you can safely ask them in the comments to the article.