- To record songs from a CD player to a computer, configure your computer to define a line input instead of a microphone input:
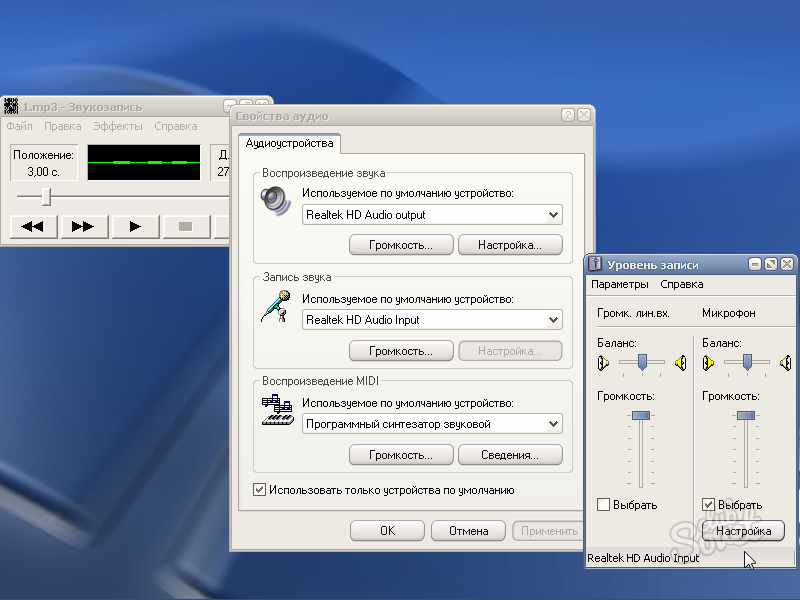
- Open up Control Panel sound devices by pressing the menu button Start and choosing Control Panel. In the search box, enter "sound", then click on Sound in the search results.
- Click the tab Record.
- Click on Line in (Line in) and select Default
- Click the button Properties, go to tab Levels and drag the volume slider to the right to increase the recording volume, then press Ok.
- In the dialog box Sound click on Ok.
- You did well!
- To overcome the 60-second limit in the program "Sound Recording" there are several ways. The first is the copy and paste method.
- Record a maximum of 60 seconds of silence. On the menu Edit select Copy and then -- Insert. This will increase the recording time to 120 seconds. From this point on, you can add 60 seconds at a time or, by copying and pasting, double this time. Thanks to these actions, you will quickly increase the recording time: 60 + 60 = 120 + 120 = 240 + 240 = 480 + 480 = 960, etc. In just four copy-paste procedures, you will have 16 minutes of recording!
- The second way to overcome the 60-second limit requires the use of the command line.
- Open a command prompt by clicking the menu button. Start. AT search bar enter "command line" and select it in the search results.
- AT command line enter the following, where filename is the name of your audio recording (file name), and filetype - file extension:
SoundRecorder / FILE filename.filetype / DURATION hhh: mm: ss
For example, if you want to record in wma format with the name "FunkyBunky" with a duration of 3 minutes and 20 seconds, enter the following
SoundRecorder / FILE FunkyBunky.wma / DURATION 0000: 03: 20
- Press the enter button and the Sound Recorder will open as an icon in the notification area.
- Make your entry for the planned duration, then it will be saved in C: \\ Users \\ YOUR USER NAME as "FunkyBunky".
- If you cannot find the Sound Recorder program on your computer, you may have deleted it (maybe some time ago, when you tried to free up some space on your hard drive). In this case, you can easily download it from any reliable website.
- To record a guitar you will need sound card with a linear input. Look at the back, side and front of the computer; you should see three connectors: pink, blue and green. In pink, you plug in a microphone. You use the blue connector as a line input for connecting, for example, a CD player. Green is used to connect speakers and headphones. To connect a guitar, do the following:
- Connect one side of the cable to the guitar and the other to the adapter from 6.3 mm to 3.5 mm, then to the microphone jack. It will work.
- However, if you want to get really high-quality sound, consider buying a USB audio interface or another active (powered) interface between your computer and your guitar.
- USB microphones and audio interfaces are excellent and budget tools for working with sound on a PC. There are excellent USB microphones with very good sound quality.
In addition to the tasks that we are accustomed to solve at the computer every day, there are occasionally not quite ordinary ones. One of these tasks is recording sound on a PC. Few know that all this is done is very simple and takes only a couple of minutes. In this article we will look at how to record your voice on a computer. Let's figure it out. Go!
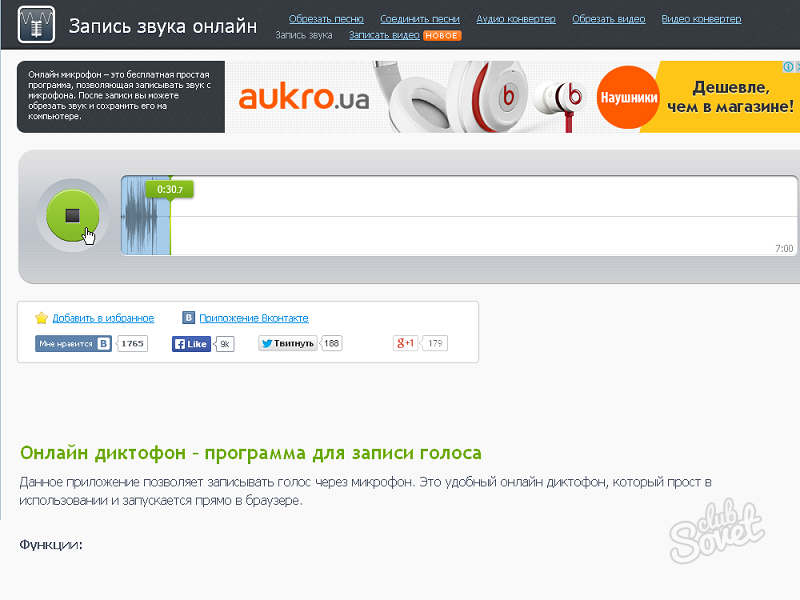
You can record sound on a PC with the Windows operating system in two ways: using the built-in tools of the system and using third-party programs.
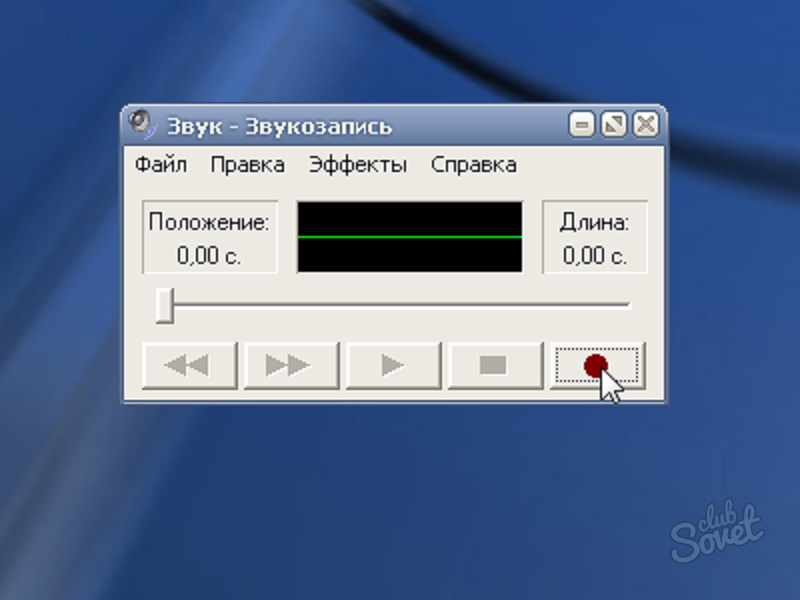
In Windows, there is a special utility called Sound Recording. It is installed in all versions. operating system both new and old. Of course, this program is not suitable for solving some difficult tasks, but for home use it will be enough to use your head, for example, to record, edit it, glue pieces, insert music, add comments. You can find this program as follows:
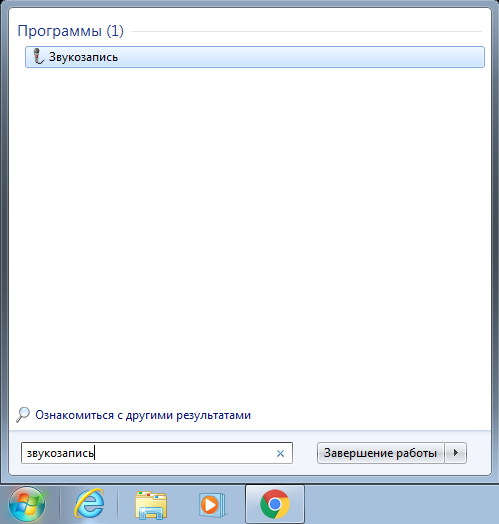
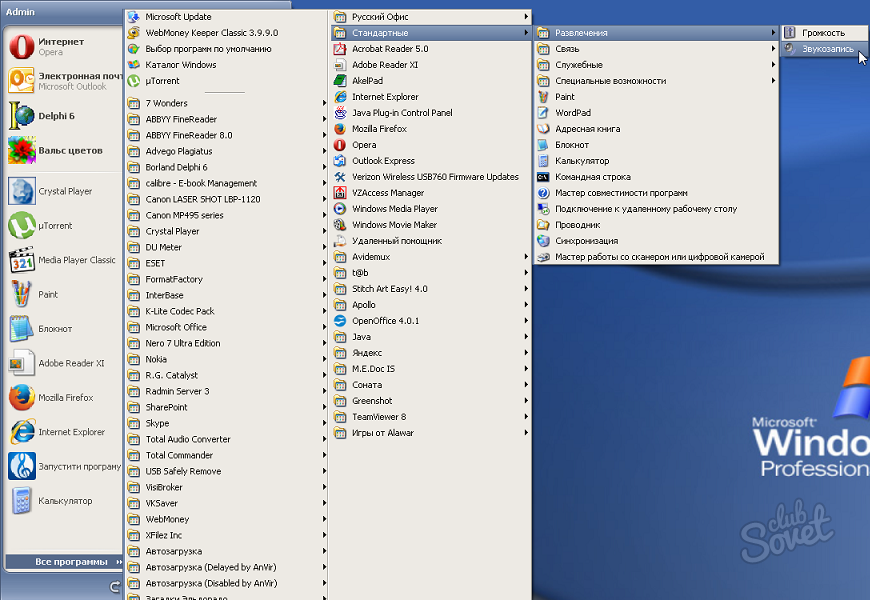
- Open Windows Search.
- In the appropriate field enter (without quotes) "Sound recording".
- Next, select the item of the same name from the list of found options.
Please note that if there is no microphone on your PC, the utility will not start. Each laptop has a built-in microphone, but the owners of stationary computers will have to purchase this device. It is also worth buying a microphone if you are not satisfied with the quality of the built-in one.
Using the utility is very simple. Just click on the “Start Recording” button to start the program to write sound or speech. When finished, click the square button to stop the process. Then save the file. By default, the maximum duration of an audio file is a minute, but do not be in a hurry to get upset, if you didn’t have enough, you should download the application from the Internet.
There are many programs that allow you to write a voice. There are both paid - for serious work with sound, and simple free for home use. Almost all applications have no restrictions on the duration of the recording and have various additional sound settings, mixers and sound effects that will make the audio better and better. However, you must understand that without a more or less high-quality microphone, no program will help you to make a good quality audio recording. You can also choose the format of the audio file, which is a definite plus, since “.wav” is not of high quality. Among the large number of such applications, you should pay attention to the following:
- Sony Sound Forge;
- WaveLab;
- GoldWave;
- Audacity.
These applications have extensive functionality and offer the user quite impressive features, however, they are suitable only for serious purposes. For home use, these programs are not suitable because of their complexity and bulkiness.
This is the way you can record your voice on your computer. As you can see, this is done very simply and quickly. Choose the method that is more optimal for solving the set tasks. Write in the comments whether this article was useful for you and ask any questions of interest on the topic considered.
Recently, recording from a microphone is becoming increasingly popular among audio lovers. Contrary to popular belief that without expensive equipment it is impossible to make a decent home record, it is not. There are a number of Russian-language programs that provide the ability to conveniently record voice and musical instruments. For example, this is audio editor AudioMASTER from AMS Software.
This article will discuss how to record sound from a microphone at home quickly and efficiently. A few simple steps will help you to independently master AudioMASTER.
STEP 1. INSTALLING THE PROGRAM
To get started, you need "AudioMASTER" - your main working tool. The size of the distribution is 50 MB, which is quite acceptable with a good Internet connection speed. After you downloaded installation file, open it with a double click of the mouse. Use the instruction that offers Setup Wizardand go to the next step.
STEP 2. RECORDING SOUND
Recording sound from a microphone is a snap. To do this, in the main window of the program, select "Record sound from a microphone". In the dialog that appears, check the recording device and click "To begin new record» . The recording process starts in exactly 3 seconds, so get ready for it in advance. If something went wrong, you can always click pause or cancel. Once the desired sound or voice is recorded, click "Save".
STEP 3. EDITING A FILE
The recorded audio file will open in the program itself. Now you can listen to it, edit it as well. In the event that its processing or correction is necessary, apply one or several functions.
Invert. If while playing a file you heard noiseswhich were not recorded, this may be due to malfunctions of the equipment. In this regard, it is advisable to use the function of inverting - change the phase of the audio signal. To do this, in the action bar, select "Invert", and then - "Apply".
Equalizer setting. Equalizer is needed in order to improve the sound quality of the audio recording by adjusting the frequencies. Click the button "Equalizer"located in the action bar. Familiarize yourself with ready-made settings and decide which one you need. If the musical instrument is recorded poorly, we recommend that you use the command "Noise Reduction". By lowering the level of a certain frequency in this preset, you can easily eliminate sound defects. To make speech more intelligible, select a setting. "Fussy Speech". You can save changes using the button "Apply".
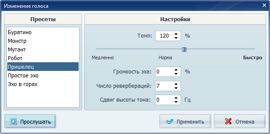
Voice change. The essence of this function is the creation of the original effect. If you want to experiment with the sound of your own voice in the recorded audio track, in the action bar click Change Voice. From the available settings, select the one you need. In addition, you can change the tempo, echo volume, etc. Changes made can be previewed using the button. "Listen"and then apply - using the button "Apply".
STEP 4. SAVING A RECORD
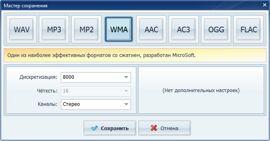
The program allows you to save audio in MP3, WAV, WMA, etc. Click File\u003e Save As in the main menu and you will see a list of available extensions. If necessary, you can read information about any of them - just click the mouse once. Now click "Save". You also have a great opportunity to save an audio file as a ringtone for mobile device. To do this, you must select in the main menu. File\u003e Save As Ringtone. Next, enter the time for trimming the desired fragment and click "Save".
Compatibility
The program supports:
Windows 7, XP, Vista and Windows 8
Using a computer to easily record your voice. To do this, you can use the built-in sound recording software "Sound recording" or other programs.
To record your voice on a computer, you must install and check the microphone settings. Click Start - Control Panel. For Windows 7 and 8, select the item Hardware and Sound - Manage sound devices - Record. For previous versions: Sounds and Audio Devices - Speech. In the window that opens, select the microphone, check its settings. Adjust the sensitivity and gain of the microphone. If necessary, we carry out diagnostics.
When recording your voice on a computer, do not forget about the quality of the recording. After all, while the sound is distorted. This is due to the quality of the microphone. There are other interferences: ambient noise. He is not heard for us, but the microphone picks it up. Therefore, it is best to record sound in a room as isolated from noise as possible.