Articles in the same category
In your attention, so that you will not be bored, and even very, very useful, and completely free))) - How to remove the background noise of the microphone? How to beautifully process your audio recordings? And make your voice as a central television announcer. And so, to your attention Adobe Audition.
How to remove background noise from a microphone
Articles on sound processing:
How to do: The extension is usually part of a dynamic control processor, which also works as a compressor. The signals around -45 dB expand with a factor of 2, as shown by the blue line on the dynamic response graph. Cons: if the noise level is high enough, the extension gives you problems similar to gating.
How it works: in analog, compassion for the Holy Grail of noise reduction, it worked by compressing the signal entering a typically noisy environment. At the output it will be expanded to return to the original dynamic range. However, any rust added by the tape will then expand to reduce, which will reduce rust.
Sound, no one will argue with me, the most important element for perception and mastering of the material. Runet in our time while in this area almost does not think about this topic and the network is often presented material, sometimes well, just awful. Some absolutely do not think about this and their knowledge of sound is only in the purchase of a cheap microphone. They write a video with their comments, which sometimes, simply, to put it mildly, do not want to listen. And rudely speaking, I want to spit.
How to do: Connect the compressor to the input and the expander to the output. You also need to carefully calibrate the levels, otherwise compression and expansion may not be completely complementary. And if the tape has been encoded with a specific noise reduction system, you must have the same encoding type to resonate. But, unlike gating, which is an automatic process, automation allows you to "tune" the moments when you put or do not place "without sound" on the loudest passages and can really give you good results.
So this is the one who is just beginning. And especially those who have already gone to the expanses of the network with their products. Dedicated.
The simplest method, noise reduction. Even if you do not want to improve sound more deeply and make it beautiful and sonorous, this technique is enough.
He at least will suppress the noise of recording a poor-quality microphone.
For this we will use the best, in my understanding, program, the sound processing program Adobe Audition CC. How and where to get it for yourself. Most reliable way, go to the official Adobe site from the link https://www.adobe.com/creativecloud/catalog/desktop.html?promoid=KOVFF select from the list and rent. Or another, if you consider yourself acceptable.
Note that the light disappears to facilitate the transition from silence to signal. How to do it: open your track and create automation curves. When the signal ends and "starts" the noise, it draws the automation curve so that it disappears in silence during the noisy part, and then gradually increases when the signal reappears.
Cons: with a lot of tracks to do this, it can be a recent work. But this process has the same limits as the use of nasal shutter. Another time saving option is building automation curves in real time during playback, but you will never be as accurate as in the design of the curve itself. He not only hisses, but also bursts, scratches vinyl, scratches and rustle.
Noise suppression
First, listen to the original record with natural noise, which we have to remove:
In the program Adobe Audition CC there is a very good loudspeaker, with which we will start working.
Noises like it never happened! That's so simple!
Apply. Write quality podcasts. Get rid of noise. Do a cleaner runet!
How to do it: open the program, download the file that you need to process, set the parameters for the best results and save the clean version. Or enter the plugin and clear the file. Although various audio editing programs include noise reduction, individual versions can cost up to several hundred euros. In addition, extreme cleaning can produce sound artifacts.
Pros: When these programs work correctly, the result can be miraculous. Whatever the best technique for different situations, you can understand it by trying and trying again. Continue, insist, and in the end you will be very surprised by the result that you can get using the right tools.
Hooray! You became the owner of a good and, probably, expensive studio microphone. Already you can not wait to try it out and please the audience with the new sound of your voice? Oh, if everything was so easy ... Microphones of this level usually have high sensitivity and catch almost all sounds in the room and, most likely, beyond.
It meets the requirements of both incoming audiophiles and more advanced ones. It uses the built-in effects, including bass, quiver and noise removal. The new one still works with the normalization of sound and the elimination of noise. Ridiculous - the function of removing the voice. Inputs and outputs help you manage a new toolbar.
One of the best programs for sound processing. Homepage: Download at this address. . Imagine a situation where you need to find out which devices are connected to the network: wireless or cable. Finds and displays information about wireless and cable connected devices on the network.
In this tutorial, we'll show you how to remove low-frequency noise and make your voice more interesting to viewers.
Software
To implement our idea, you will need to install 2 programs: Adobe Audition and Virtual Audio Cable (both programs are paid, but ... μ). The first one is used to process audio tracks, the second one is used to output the processed result to the capture program. In our case, this will be OBS. The whole chain of interactions looks like this:
The application allows you to create keyboard shortcuts for the mouse and joystick. Thanks to this you can simply run a file, a document or a website. Functions can be assigned to a multimedia keyboard, fourth and fifth mouse buttons or keystrokes in other applications. In addition, it allows one key press to disable or restart the computer, run screen savers, change the monitor resolution, control the volume, change process priorities, exit programs, drag optical drive, an empty basket.
Let's start with the microphone and create the default values - put the averaged parameters with which you can later carry out various manipulations and adjust the capture for yourself. Our values:
- Sound Capture: 50%
- Capture mode: Cardioid *
(The cardioid mode can also be a default, without any switches. So on most medium-professional and professional microphones. -Prim. sleepsomewhile)
A queue can not define your own shortcuts. A window will appear and use the mouse to select the area you want to transfer. Unfortunately, you need to install a plug-in for correct conversion of Czech symbols, otherwise there will be meaningless characters. The above standard function can be used to translate into spoken text.
Converts text to the desktop into text. Homepage: Download to. . Cleaning noise and cracks is one of the most common tasks that beginners and advanced users perform in audio editors. Not everyone is interested in mixing and editing music. However, cleaning records is of interest to most computer users.
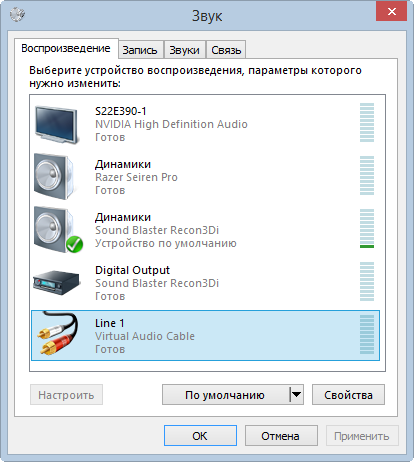
Download and install Virtual Audio Cable, then go to the audio settings (speaker icon) and there select Recorders.
Unity is power
First, we need to configure the microphone for the audio format that is used in OBS. The default is 44100Hz, for better sound you can use 48000Hz.
Its installation is not exceptional, just confirm the default settings. After executing the program, the program automatically activates the Czech interface. Working with it is similar to other audio editors. The record you want to clear must contain a section that is just noise. If you are trying to convert audio from a tape or player, simply turn on the recording with an empty space. Later you use it as a noise sample in your editor, and after cleaning the record you will cut off this unnecessary part.
If you do not use the built-in microphone in your laptop or are not connected to a computer, you need to configure the sound source in the editor. Prepare playback on the connected device a few seconds before the playback starts. Now click the "Download" button in the editor, and then start playback on the connected device. When the recording is complete, click Stop. Do not even try to fix the end of the record at the end. Much more accurate is the subsequent collection in the editor.
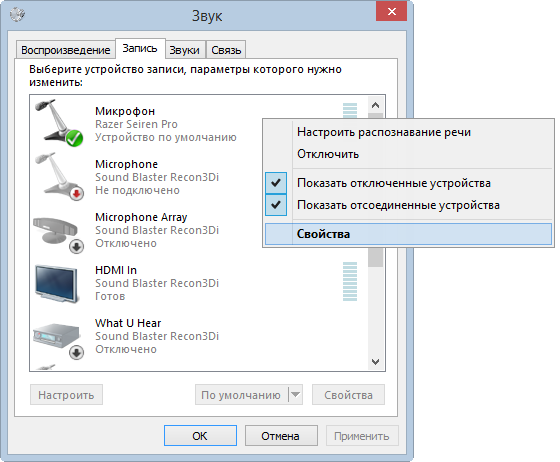
- In the Recording tab, right-click on the microphone and select Properties.
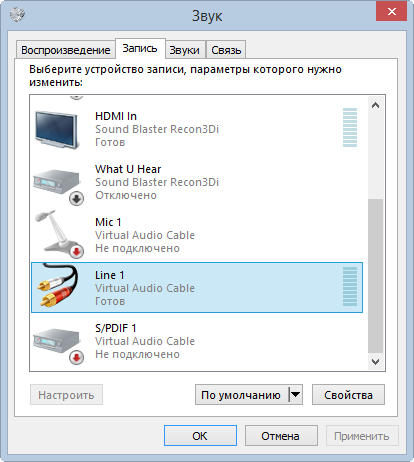
- Go back and in the Record tab select Line 1, right-click and select Properties.
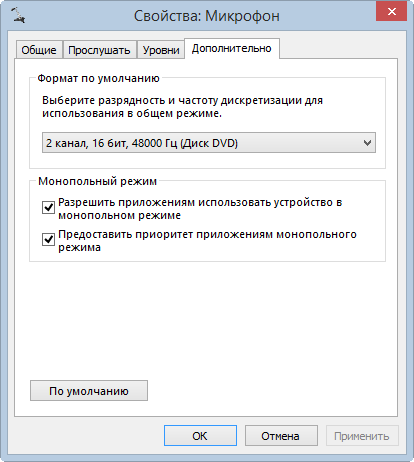
- In the window that opens, select Levels and set the volume to 50%.
- In the Advanced tab, set the default format (2 channels, 16 bits, 44100 or 2 channels, 16 bits, 48000).
Here's how to prepare a record or open an older one from the disc. Now, on the sound track, mark the part where only noise is recorded without the recording itself. As a rule, this will be the beginning or the end of the recording. Use the mouse to drag the tags. The marked part will be highlighted in a darker color.
Call up the "Noise Reduction Effects" function and click "Get noise profile" in the window that appears. Now mark the part of the entry you want to clear. In connection with the procedure described above, this will be a part without initial and final noise. You can also mark the whole record. Recall the noise reduction function, but this time press the "Remove Noise" button. The result should also be seen when comparing the original and new graphic images of the record. If you are not satisfied with the result, you can repeat the procedure and adjust the sensitivity of this function with the drawbar before pressing the "Remove Noise" button.
- Go back and in the Playback tab select Line 1, right-click and select Properties.
- In the window that opens, select Levels and set the volume to 50%.
- In the Advanced tab, set the default format (2 channels, 16 bits, 44100 or 2 channels, 16 bits, 48000).
Select all or part of the entry and click Effects. Removal of cracks. Click "Delete cracks" in the window. The noise sampling window is modal, it is impossible to display it and mark parts of the track. After clearing the recording, it takes time to delete unnecessary beginnings and endings. Again, use the mouse to mark a portion of the record that contains an empty space at the beginning. Precise settings give you a graphical display of the record, and you can also use the play button and its pointer. You can simply delete the selected part by pressing the "Delete" key.
All these settings have been made in order for Virtual Audio Cable to work properly.
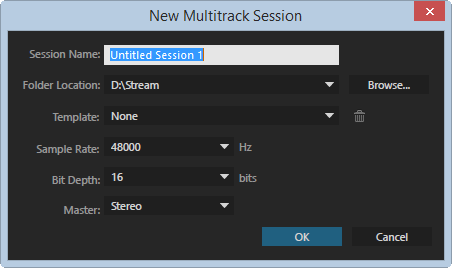
Adobe Audition Settings
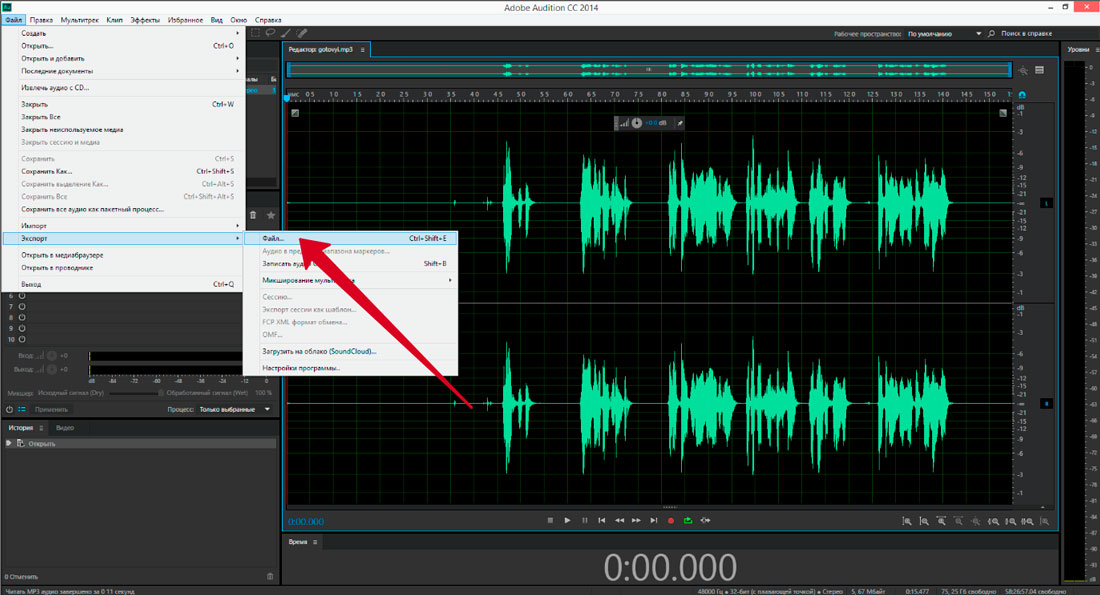
In spite of the fact that Adobe Audition has very wide functionality, we will use only some of it. Running the program for the first time you can enjoy a pristinely clean screen. Select File -\u003e New -\u003e Multitrack Session. In the opened window we leave the following settings:
Repeat the same procedure to delete an unnecessary section at the end of the entry. File function Save the project used to save distributed work. You can not open the created file on an ordinary player. Then launch the program settings dialog and click the "File Formats" tab. If you have copied it to the program folder, you should see it right now. Meanwhile, we said something about the introduction, and especially about the sound technique.
You, of course, know that in addition to the actors in the film there are several other people who create it. Someone thinks about the script, the same person often directs the film. And in the environment of amateur cinema, he also shoots. In any case, if we do not consider actors, almost one person can cope with almost everything else. But what can not be done is to hold the microphone on the pole and listen to the sound for the sound. So, in my opinion, the minimum team should consist of two people. Except that we expect that the contact sound will not be in the movie.
Click OK, then go to Edit and at the very bottom of the Preferences, and there Audio Hardware ...
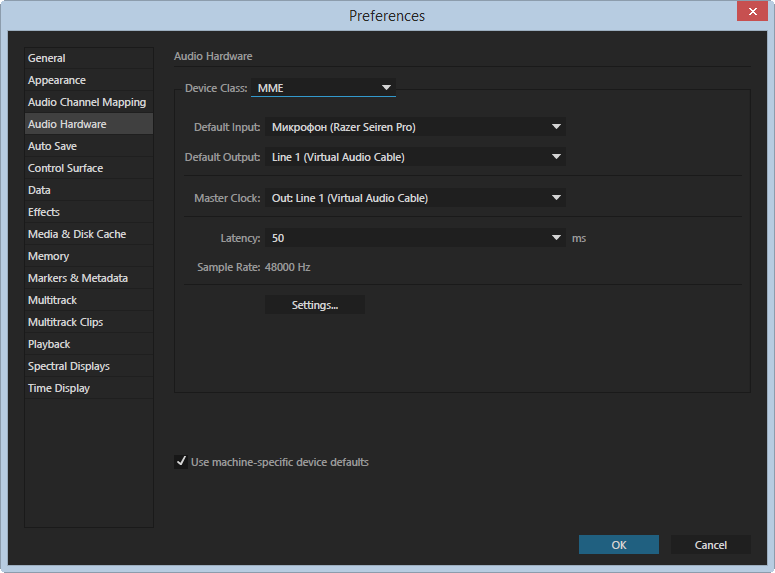
In the window that opens, select:
- Device Class - MME;
- Default Input - your microphone;
- Default Output - Line 1;
- Master Clock - Line 1;
- Lattency - 50 ms *.
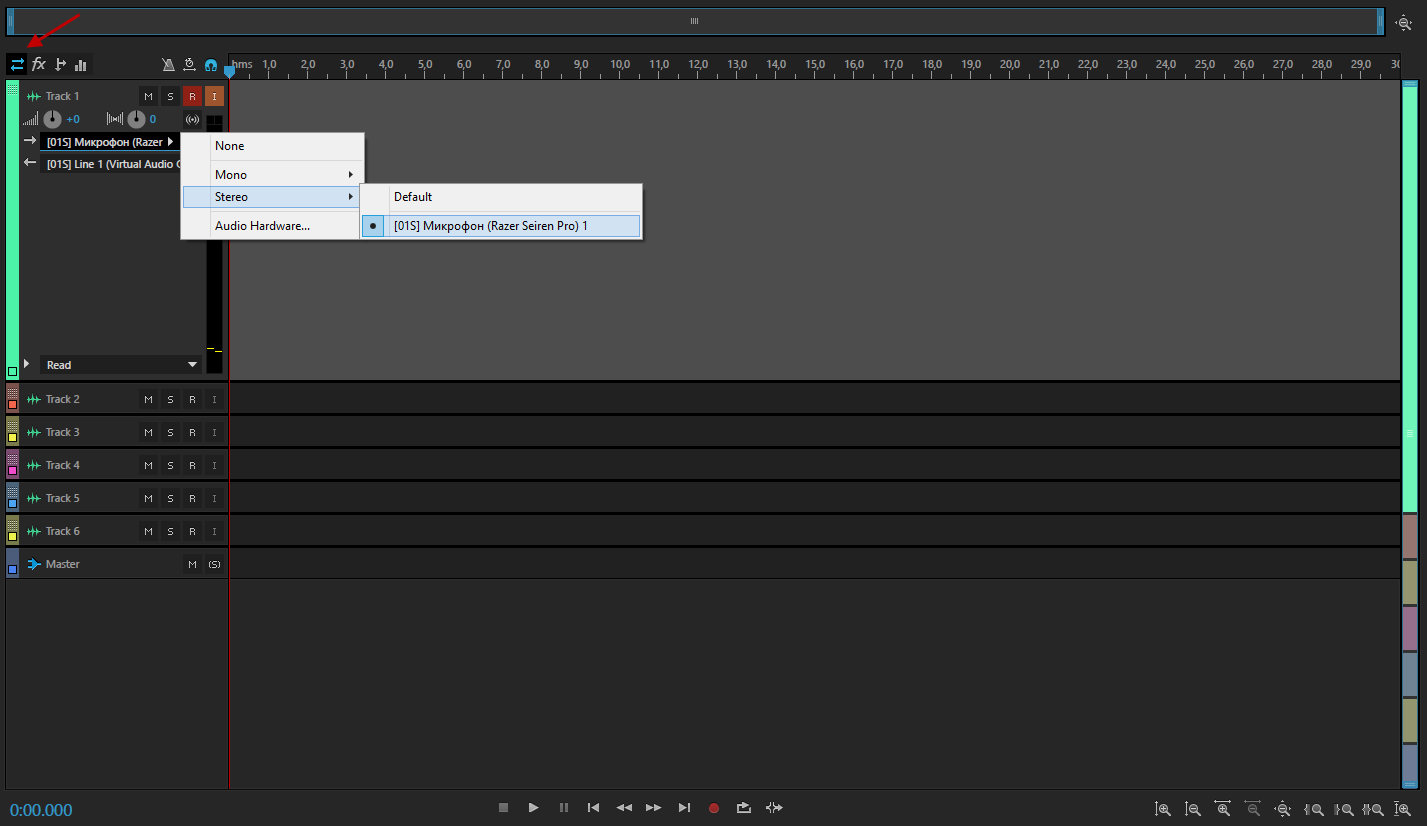
In the main editor window on Track 1, select the Input / Output icon and in the Input field select Stereo -\u003e our microphone, in the Output field, select Stereo -\u003e Line 1
By the way, the contact sound is what is removed directly in place synchronously with the video. Therefore, we have a separate role as a sound engineer. What you need is all this microphone. From the microphone - the cables leading to the recording device. Recording equipment and headphones.
Adjusting the input volume level
Whether we use a portable recording device or camera, each of which usually has an input level setting. Cameras often have the ability to switch this setting to automatic control. But how much input is generally configured? First we will say something about digital audio memory. Sound can be represented as a certain value, which varies with time. If we want to convert it into digital format, it is enough to keep the size of this value gradually. How often do we keep this number?
* If the webcam and the sound are not synchronized on the translation, set the microphone offset in the OBS audio settings, for example -50 ms.
Removing unnecessary noise
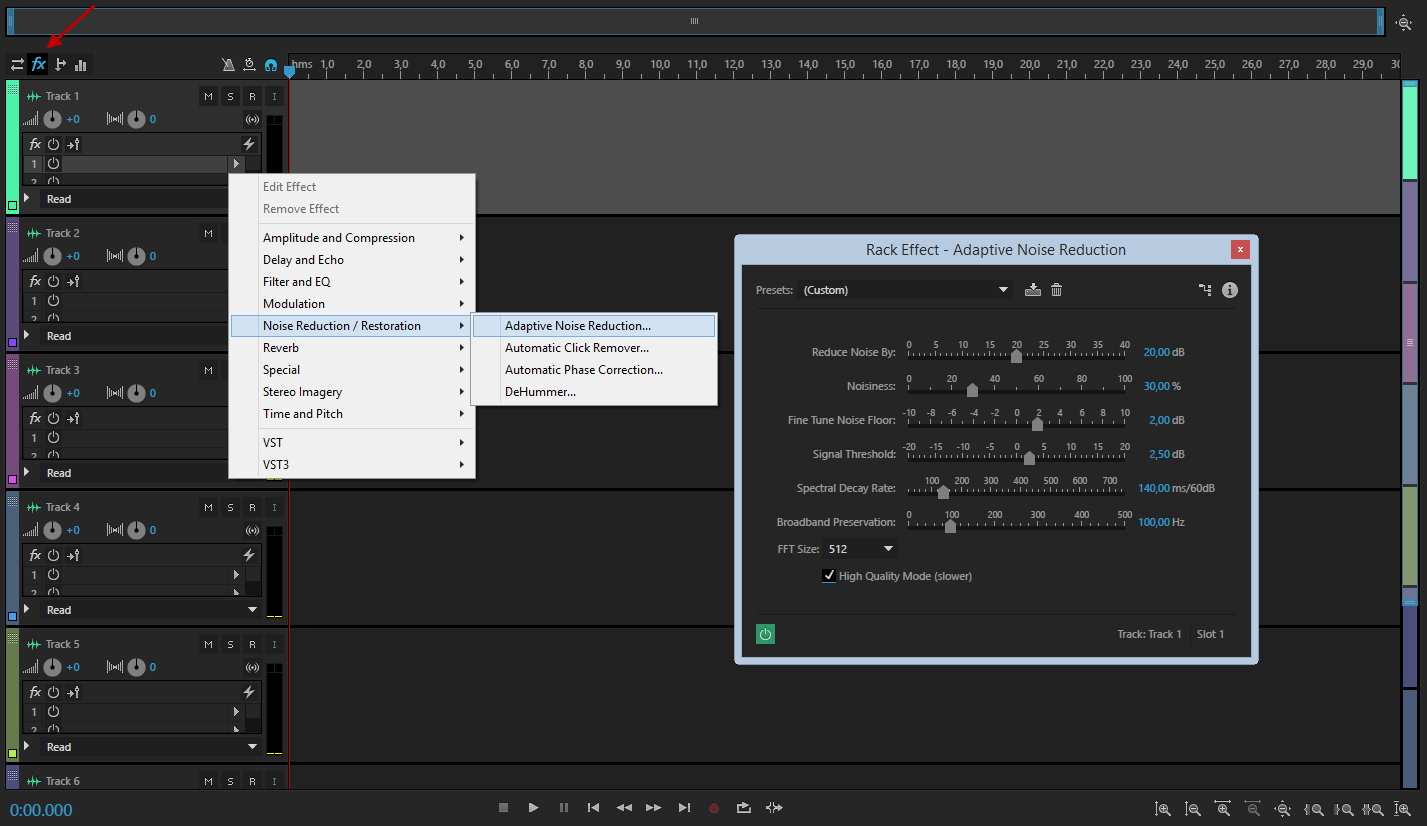
It's time to add effects that will help to get rid of unnecessary noise and make our voice more pleasant. To do this, select the Effects icon, and add our first effect - Adaptive Noise Reduction. In most cases, you can leave the default values by adding only the High Quality Mode checkbox. Did you notice the letters M, S, R, I opposite Track 1? For all settings to work, you need to activate R (Record) and, if desired, I (Monitor Imput) to activate the visual display of the incoming signal in Adobe Audition. These settings are sufficient for streaming, but if you still want to achieve better sound, then we should continue.
Input signal level a second time
When recording audio in video, usually 48 kHz. But the individual number, which we store, can not be arbitrarily large. We have some opportunities. For example, For a number from 1 to 4, we need 2 bits. From 1 to 256 we need 8 bits. So we can store the numbers up. If we record sound, it may happen that the input level exceeds this number. This leads to distortion of sound. Therefore, the input level should be sufficiently dim. But, on the contrary, we should not greatly weaken it.
Then even the strongest sound will be the number, for example. When processing, we can use the so-called normalization. This makes it the largest number in the entire audio file. If it is less than the maximum range, the entire song is amplified, so that the largest number reaches the maximum possible values.
N.B. Adaptive Noise Reduction removes noise, but reduces the amount of "pronounced" sound. This is due to the cutting out of the base noise frequencies. Consequently, in the voice there are fewer overtones, it becomes less pronounced, rich, and so on. BUT, this thing cuts noises. And some of this will be enough.
So, we could only use 11-bit numbers, where we can use the range from 1 to. But we want the range to be as large as the recording quality increases with a larger range. After this poorly recorded record is strengthened, its inferiority will be reflected.
But there is one more problem. Noise can get into the record not only during the capture of the microphone, but also on the way through the cable or the volume control on the recording device. Let's say we have a range from 1 to the amount of input that we set incorrectly, so the very loud noise reaches 10% of what we have. If the resulting record is normalized, it will increase by 10 times.
- Adaptive Noise Reduction - noise suppression;
- Hard Limiter - limits the volume of sound, suitable for those who like to scream during the broadcast, but does not want the ears of viewers to wither;
- Parametric Equalizer - adds a little bass to your voice;
- Multiband Compressor - the main processor of the voice, I would recommend here nothing to change, but play with the settings, too, is worth it;
- Dynamics Processing - allows more accurate adjustment of noise suppression, for example.
You can download the ready-made settings and independently play with Adobe Audition.
If you have any questions, we will be happy to answer them in the comments.


