Intel is no different from installing any other program, despite this world-famous name. Nowadays under the Intel logo, not only processors are produced, but also motherboards, low-end video adapters ... Times have changed a lot, so Intel has significantly expanded its sphere of influence. Today's article is a visual aid on how to install the firewood of this company, as well as where to look for them in general.
What is a driver?
Before installing the Intel drivers on your machine, you should familiarize yourself with a brief technical reference. Surely many users have a weak idea of how it works driver and why is it even needed? Generally, this is a special software designed to manage any component of your computer. Each chipset, each model, as well as the periphery needs a special tool that will connect them with Actually, this is the purpose of firewood - the dialogue between hardware and software.
Disks included.
Installing Intel drivers should not take a lot of time and effort from the user. That is why The standard package with the computer must include a disc with the original software. If you need firewood, then you should look for them, first of all, on this disk. You you need to insert it into the drive, then start the installation. After everything is finished, restart the machine.
Wheels with original wood is, of course, good, but what if they are not at hand? Especially for such cases, the automatic and manual search function “Device Manager” is built into the core of the operating system. The dispatcher's working window shows a complete list of hardware focused on the motherboard. Unknown devices needing the installation of firewood are marked with a special sign. Right-click on such a device and select "Update Driver".
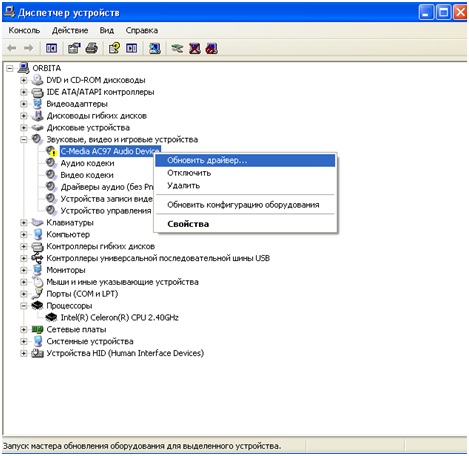
In my case there is an old Intel processor that does not need to be updated. But one of the audio devices, is just the "unknown". This, of course, is not a processor, but the principle of installation for all devices in the “dispatcher” is the same. In the next window, the system will ask you to select an automatic or manual search method. Choose the first option.

Installing Intel drivers "from the specified location" does not suit us, since we agreed that we don’t have any firewood. But if we assume you have them on a flash drive, then you can choose a manual installation and in the window that appears, specify the path to the folder where the system should look for the driver for this device. It will find it accordingly, install it, and then most likely ask you to restart the PC, which is what you should always do after you have installed the driver.
DriverPack Solution.
Surely you've heard of Driverpack solution. This is a universal program for searching and installing firewood for any modern and morally obsolete hardware. The main advantages of this utility are a simple interface, high performance and a huge database of system software. Actually, because of the large base, the program has an impressive size, but don't let that bother you.
The main working window is as follows.

The upper area contains detailed information about the functionality of the computer. Just below is an automatic search bar that will notify you that the best software has been found for a specific hardware. At the bottom - a complete list of devices that can be seen in the "manager". Nearby are buttons for searching for firewood. There is an installation option - automatic (the program will do everything on its own) manual (installation will not start without your permission) as well as finding the right drivers on the Internet.
Additional tools are located in the left area of the program. There is the same device manager, as well as expert mode with advanced settings. Once you have selected from the list what you need to install, the installation itself will go, after which you need to restart the computer.
Official site.
The manufacturer we are talking about today has its own website from where you can download firewood for any hardware. After you go to main page, go to the "Support" section.

Then, the following window will appear.
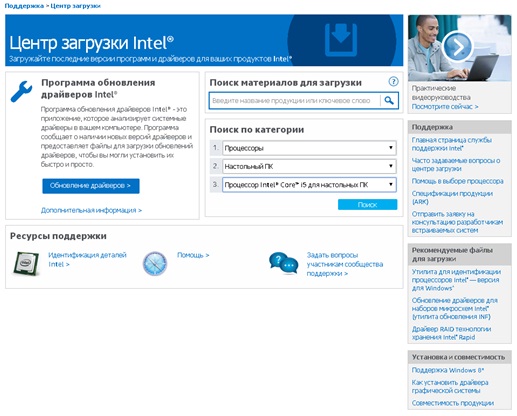
You can rotate the installation of Intel drivers in auto mode by downloading a special utility. To do this, click "update firewood" in the left part of the window.
You can search for drivers by name. Enter in the top line the name of your device, then review the list of results. A similar result will be obtained when using the "search by category". Enter the device category, type of PC, and then select the model you want from the list.
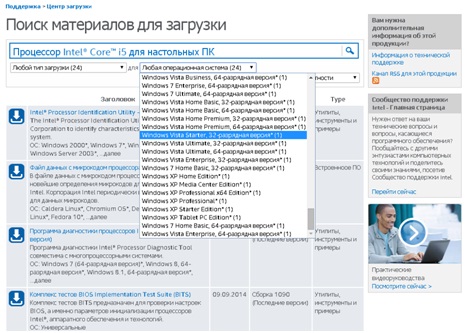
At the last stage, select the desired version of the OS, after which the results are rearranged. Downloading of the program will start after clicking on the corresponding download icon.
Well that's all! Do not forget to perform the installation after downloading and success to you in working with hardware from Intel!
Below, you can watch a video that tells you how to install your own drivers for free using driverpack programs Solution. Have a nice work!
Intel driver update utility is free program for devices Microsoft Windows, allowing you to find, download and install updates for Intel drivers.
Updates for drivers are usually quite important, especially in cases where a new version The driver fixes past errors or adds the features you need.
Of course, sometimes we try not to touch the computer, if it already works well, but driver updates can improve component performance, stability, or other parameters, such as temperature.
If you want to update drivers for Intel components, you can go to the official Intel site and download the latest versions manually from there. This method will also work, but it will take time. First you need to know the device name and version installed driverand then find the driver you need.
Note: when it comes to installing services, tasks and the like into the system, the program can show itself from the negative side. At the end of the article, we added information and instructions for uninstalling the utility.
Intel Driver Update Utility
Utility to update Intel drivers accelerates processes. It allows you to scan your computer for the presence of Intel components and driver updates, and then download and install them.
Currently, the utility supports the following components:
- Graphics drivers
- Sound drivers motherboards Intel Desktop
- Wireless drivers
- Wired Drivers
- Chipset INF
- Intel NUC drivers
- Intel Compute Stick Drivers
- Intel Desktop Board Drivers
The program is very easy to use. At startup, it displays a welcome window. You can click the settings button to change the download directory, maximum simultaneous downloads, logging level and utility language.
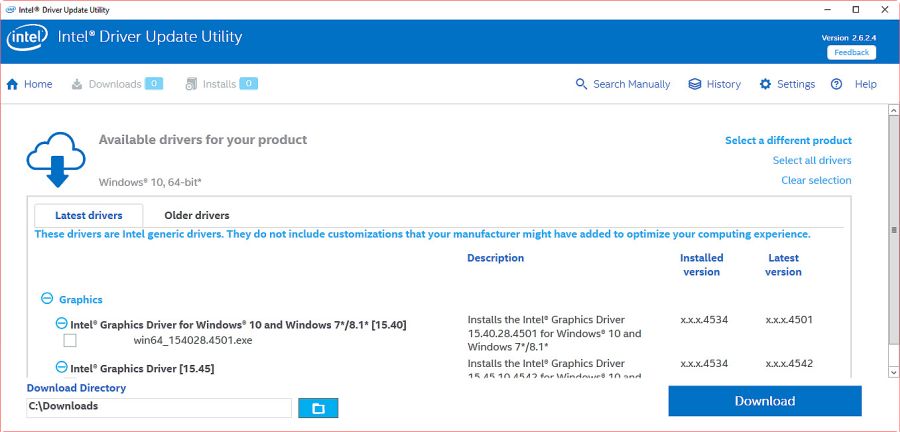
Pressing the “Start Search” button launches the scan. It takes no longer than a couple of seconds. The scan result window shows both the list of operating system devices that the utility has found for updating Intel drivers, as well as new versions of drivers for components.
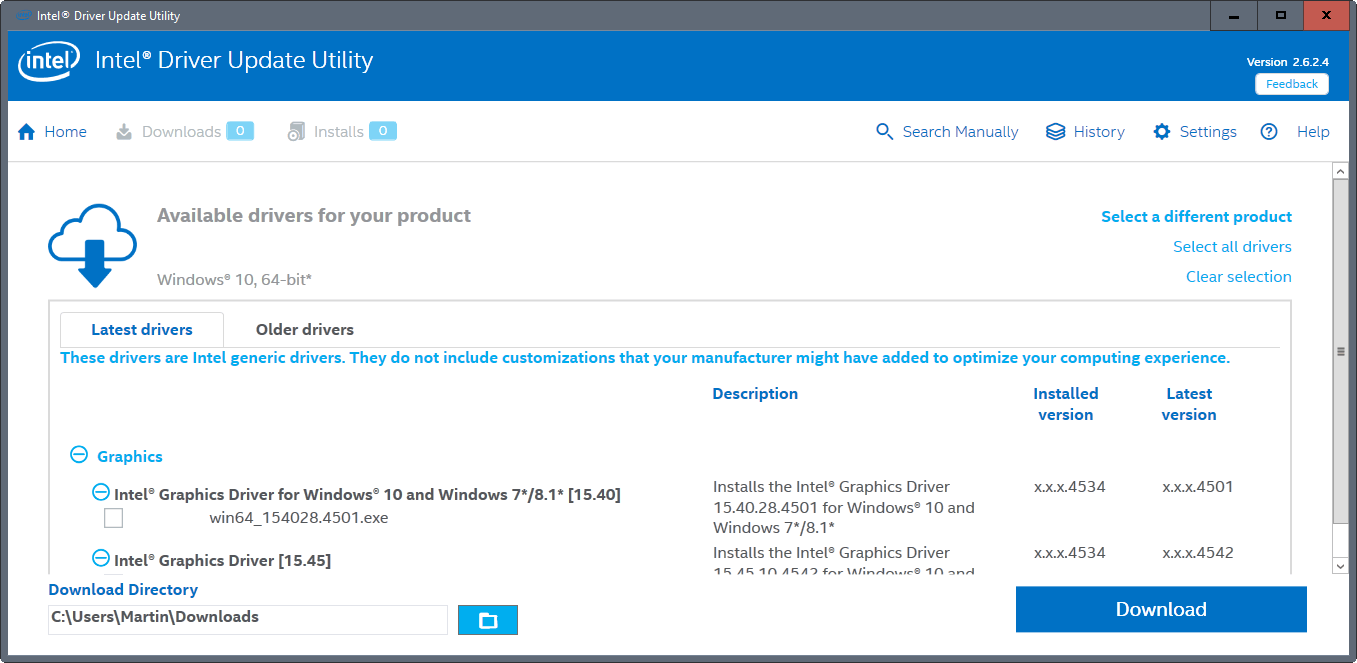
The list of drivers may consist of several items, but only one is selected. As a rule, this is the driver of the latest version, but you can choose to download another driver displayed on the screen.
You can switch to the “Earlier Driver” tab to download an earlier device driver for the device or a universal driver.
The program displays the name of the driver, the installed and latest version of the driver, as well as a description and compatibility information.
You can also change the boot directory manually before you start downloading selected Intel drivers to your local system.
Downloads are saved in the IntelComponents directory. You can install downloaded drivers directly from the Utility to update Intel drivers or run driver files from the download directory.
As a rule, a restart is required to complete the process.
Other features
The utility has several interesting features.
First, you can open the history and check if the driver you downloaded has already been used, and also find out if it is installed or not. Driver updates can be removed from the history, but they will remain on the local system.
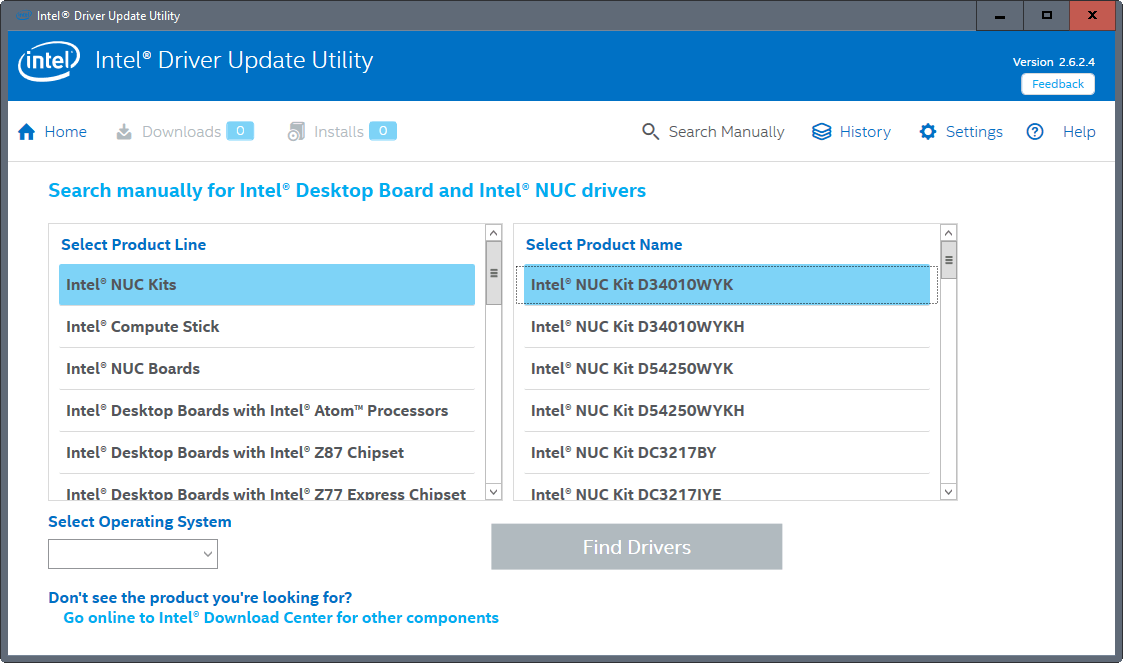
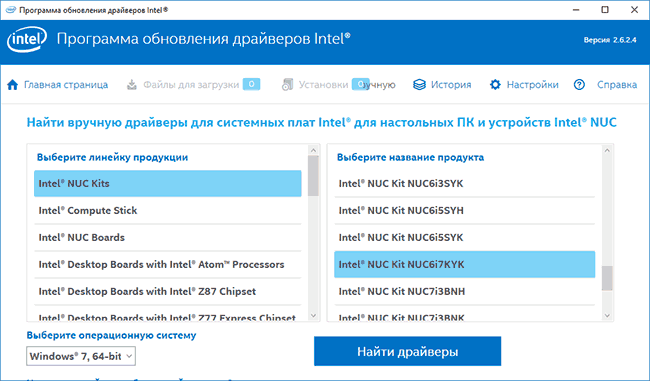
Second: you can search intel drivers manually. This is a bit tricky, since you can't just type in the name of a component or part of it. You need to select the product line, the operating system and the existing name from the list proposed.
Drivers are provided exclusively for Intel desktop boards, Intel NUC board, and Intel Compute Stick. This means that it is better to go directly to the Intel Download Center on the site, and then find and download drivers.
Uninstalling Intel Driver Update Utility

The program from Intel installs some services, scheduled tasks and drivers during installation. Some of them are directly indicated as telemetry, others, apparently, control the system in order to improve its performance.
You cannot choose what to install and what not. If you can opt out of quality improvement programs. softwarethen the scheduled telemetry tasks will continue to run.
- Energy Server Service queencreek - Intel (r) Energy Checker SDK. ESRV Service queencreek
- Intel (R) System Usage Report Service SystemUsageReportSvc_QUEENCREEK - Intel (R) System Usage Report Service SystemUsageReportSvc_QUEENCREEK
- eUser Energy Server Service quencreek - Intel (r) Energy Checker SDK. ESRV Service queencreek
- USER_ESRV_SVC_QUEENCREEK - no description
- Intel \\ Intel Telemetry 2 - Boot Loader for the Intel (R) Product Improvement Program.
The program creates the following folders in the system:
- Program Files \\ Intel \\ SUR \\ QUEENCREEK
- Program Files \\ Intel \\ Telemetry 2.0
- Program Files \\ Intel Driver Update Utility
- Program Files (x86) \\ Intel Driver Update Utility
In addition, it sets new driver semav6msr64.
When you delete a program, some components can remain. I advise you to check the services, scheduled tasks and folders listed above manually and make sure that everything is deleted. If not, delete them manually.
To remove the driver, do the following:
- Press the Windows key, type cmd.exe, hold Shift and Ctrl simultaneously, press Enter. The command prompt will start.
- Allow her to make a change.
- Type sc delete semav6msr64 and press Enter.
- Close the window.
Modern Windows 10 and 8.1, as a rule, update drivers automatically, including for Intel hardware, but drivers that are received from the Center windows updates not always the latest (especially for Intel HD Graphics) and not always the ones that are needed (sometimes just “compatible” in Microsoft's opinion).
This manual details about updating Intel drivers (chipset, video card, etc.) using the official utility, how to download any Intel drivers manually and additional Informationconcerning Intel HD Graphics drivers.
Note: The following Intel utility for updating drivers is intended primarily for PC motherboards with Intel chipsets (but not necessarily its production). She also finds updates for laptop drivers, but not all.
Intel Driver Update Utility
The official website of Intel offers its own utility for automatically updating hardware drivers to their latest versions and its use is preferable to its own update system built into Windows 10, 8 and 7, and even more so than any third-party driver-pack.
You can download the program for automatic driver update from the page http://www.intel.ru/content/www/ru/ru/support/detect.html. After a short installation process on a computer or laptop, the program will be ready to update the drivers.
The update process itself consists of the following simple steps.

This completes the whole process and updates the drivers. If you wish, as a result of searching for drivers, on the tab “Earlier versions of drivers” you can download the Intel driver in previous versionif the latter is unstable.
How to download the necessary Intel drivers manually
In addition to automatically searching for and installing hardware drivers, the driver update program allows you to search for the necessary drivers manually in the appropriate section.
The list contains drivers for all common motherboards with an Intel chipset, Intel NUC computers and a Compute Stick for various versions of Windows.
About updating Intel HD Graphics drivers
In some cases, Intel HD Graphics drivers may refuse to be installed instead of existing drivers, in this case there are two ways:
- First, completely remove the existing Intel HD Graphics drivers (see), and only then install.
- If point 1 did not help, and you have a laptop, check out the official website of the laptop manufacturer for the support page for your model - perhaps there is an updated and fully compatible integrated video card driver.
Also in the context of Intel HD Graphics drivers, the instruction may be useful:.
This concludes this short, perhaps useful instruction for some of the users, I hope all the Intel hardware on your computer is working properly.
Drivers for Intel components are sometimes very difficult to find. However, you can ease this process and automatically identify Intel components — download drivers and install them on your computer. Check out our instructions.
Often, many users have problems when operating system cannot recognize this or that device. Upon entering the device manager, it turns out that one or more “unknown devices” are displayed there, indicated by an exclamation mark in the yellow triangle.
In some situations, errors occur when installing software nvidia video cardswhen the installer gives a message that it is impossible to continue the installation of Nvidia, you first need to install the Intel drivers. What to do to solve this problem?
But now, if the computer is installed motherboard Intel or other components of this brand are used, you can easily solve this problem with the help of a special Intel program.
The Intel Driver Update Utility will first scan your computer, detect the components of this company, and automatically download and install the missing or outdated drivers. Not only does it provide quick access to latest versions Intel drivers, it is in many cases able to recognize components designated as “Unknown Device”.
How to recognize components through the Intel Driver Update Utility
The Intel Driver Update Utility simplifies the entire process of recognizing, installing, and updating. It is able to recognize drivers of the following Intel components:
- Video cards (for example, integrated graphic processors Intel i5 and i7);
- Sound cards (integrated on motherboards);
- Wi-Fi network cards;
- Ethernet network cards;
- Chipsets;
- Intel motherboards;
- Intel NUC (Intel mini-computers);
- Intel Compute Stick (microcomputer flash drive).
If any component from the above list is installed on the PC, the Intel Driver Update Utility will recognize it automatically. In addition, if you use miniature computers Intel NUC or Intel Compute Stick, the program will download all the necessary drivers for the correct operation of the system.
Using the utility is quite simple. After its launch, a window will appear through which you can search for missing or new driver versions. First click on the Start scan button and wait for them to appear in the “Available drivers for your product” section.
Before downloading, you can create a separate folder to store them. First, click on the icon in the Download Directory field and specify the folder into which you will download files. To download, click on Download.
After downloading, you can install them directly from the Intel Driver Update Utility, or do it manually by launching each installer from the specified folder.
The application allows you to not only automatically recognize the device. With it, you can download any other drivers for Intel devices. To do this, first use the "Search manually" option to find the appropriate driver and select the appropriate option. Thanks to it, it is possible to download drivers from another computer.
Alternative Installation Method
The first thing that needs to be done after reinstalling the system is to install all the drivers for the full operation of the computer. This process is quite lengthy and time consuming, but it can be accelerated, and for this, first create a backup of the current drivers before reinstalling the system. Then, without much hassle, you can put them on a “clean” system.
To create a copy, use the application. Free driver Backup, which allows you to quickly perform backup selected (or all) drivers.
Creating a backup via Free Driver Backup
The application will automatically scan your computer for all drivers and display them in a simple list. Opposite everyone will display his name, as well as the recommended action on the Action tab. By default, only Recommended are displayed. To display everything, go to the Scan Driver menu and select Scan all drivers.
To start copying, first select the items you want to save or select all in the list, and then click the Backup button. Unfortunately, the application does not offer to select a folder to save, so after creating it, you can find it in the program directory.
The tool also allows you to make other data archives - browser history, individual pages from Internet Explorera, and also - very important - the system registry. All these options can be found in the Plugins tab.
After reinstalling or “clean” installing the system, drivers can be restored using Device Manager. First, right-click on Start and select Device Manager.
The dispatcher window displays a list of all components of the PC. If, for example, you need to recognize network card (it can be found by its name in the section Network adapters), click on it with the right mouse button and select “Update Driver”.
Then select the “Search and install drivers manually” window that opens, then specify the path to the folder where backup copy (by default, the BackUp folder in the Free program directory Driver backup).
Conclusion
Creating a backup is a very convenient solution and will save a lot of time searching. If you install a new driver and want to protect yourself from problems, returning to the previous version, first make a backup copy. It is also a very useful option when old components are installed on the PC for which drivers cannot be found on the official websites.
Due to the fact that the backup is stored in the directory with the program, we recommend installing the Free Driver Backup not in the system partition. Thus, save it from accidental formatting when you reinstall the system. And better copy to another local disk or on a USB flash drive.