BIOS is a very important computer program written on the motherboard chip. It allows the user to change the settings of the software and system software, making them low-level, providing assistance in repairing, performing the functions of the controller in the operation of the motherboard. The first thing a wizard does when a computer or laptop crashes is going into the BIOS. In 80% of a hundred it is from there that he gets information about the causes of the system malfunction.
Common ways to log on to a Lenovo laptop
The most common and all known way of entering the BIOS is by pressing the Delete key on the keyboard. However, some manufacturers of computers and laptops, including Lenovo, have determined for their systems other ways to enter.
Choosing when buying a manufacturer Lenovo, you need to remember that the computer technology of this company is released, usually with an already installed operating system. If you want to reinstall the software on your laptop, you may encounter a problem: almost all modern models ignore the desired operating system, trying to return the computer to the original one. For this you will need the ability to go into the BIOS yourself to get around this problem.
Depending on the Lenovo model, you can enter the BIOS in several ways:
- press and hold the F1 or F2 keys;
- press the DELETE button;
- click the Novo Button button.
Almost all modern laptops Lenovo have on their panel or side edge button Novo Button. Finding it is not difficult. The manufacturer identified it with a corresponding figure - a curved arrow.
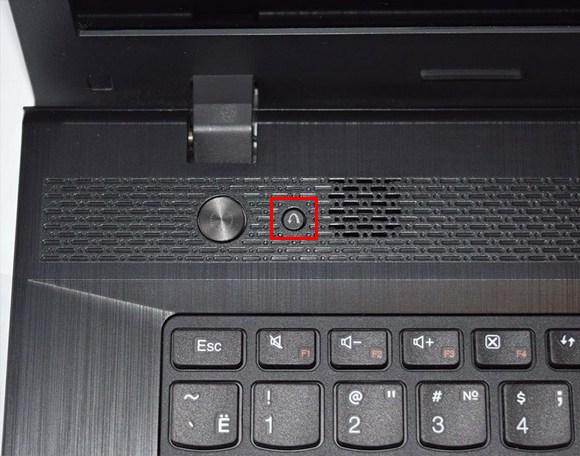
If you need to get into the BIOS on laptop Lenovoinstead of the power button, you need to click Novo Button. While loading the system will in the BIOS.
Please note that the BIOS on the monitor will not appear immediately. To enter the program, it is necessary to perform one more step - to find in the menu " Novo Button"Boot option laptop" BIOS Setup ", Which is selected with the mouse button. After selecting, press the Enter key on the keyboard. You are logged in to the software.
As in the laptop Lenovo go to the BIOS from the operating system Windows 8.1
This way of entry is not as common as previous ones, but, nevertheless, they are successfully used as ordinary users, and programmers. It is suggested by specialists for those cases when the laptop keyboard or BIOS input keys are faulty. Let's look at how to enter the BIOS in this case.

Entering the program requires the following:
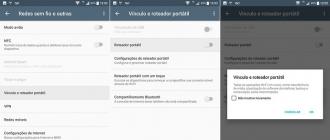
- Download laptop with the already installed operating system Windows 8.1.
- Select with the mouse pointer « Options"In the lower right corner of Win 8.1.
- Go to " Changing User Settings»And select« Update and restore».
- Select with the mouse pointer « Recovery» - « Special boot options».
- Then you need to reboot the system by selecting " Restart Now».
- The " Diagnostics". Here you need to select the function " UEFI firmware settings».
- Restart the laptop again.
After completing a number of the listed actions, you will be taken to the BIOS. Remember that this input is only possible for Lenovo laptops with Windows 8.1.
Download Lenovo laptop with flash drive via BIOS
Most often this operation is carried out by specialists in order to cure the laptop from viruses. Various software is written to removable media, but boot from it, as a rule, is not so simple. The problem is that all the latest Lenovo laptop models, starting with the 2013 release, have BIOS UEFI software, which has Secure Boot certified security keys. They allow you to download the laptop only when using a licensed the installation disk Windows 8.

In order to boot from the media in such BIOS, you must disable Secure Boot in it by doing the following:

After all the steps taken, the laptop will start the next boot from the USB flash drive.
Note that for a number of Lenovo models, it is not enough to disable only one Secure Boot parameter. To boot the system from removable media, you may need to enable compatibility mode.
In various models it can be called as CSM OS, CSM Boot, Legacy BIOS, UEFI and Legacy OS or simply CSM.
Features of BIOS in Lenovo notebooks
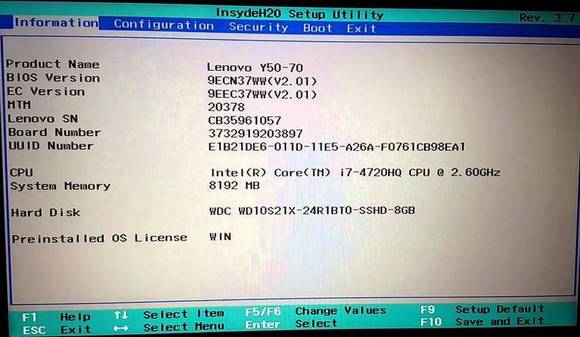
Since the main task of the BIOS software is testing the laptop, the program itself on the monitor is displayed in the form of a table divided into a number of additional tabs. They inform the user about the configuration of the laptop, show the main technical characteristics of this model, provide the ability to boot and configure the security system. On the screen, all these sections are displayed as "", " Configuration», « Boot», «», « Exit».
Pay attention to an important detail. When moving to the BIOS, the mouse connected to the laptop stops working, so when you are in the software menu, navigate using the buttons with pointers. It must be remembered that in all configurations without exception, the changed settings start working only after they are saved and the laptop is restarted.
Remember that BIOS, like any other software, requires regular updates. Do not use questionable sites and blogs for download. All products installed in laptops Lenovo, you can download and update from the official website of the manufacturer. And do it preferably on the same computer where you are going to change the software. The BIOS version can be found by going through the POST procedure by pressing the Pause / Break key.

You already know how to access the BIOS.
Conclusion
Every novice user should understand that the BIOS software is the system by which the basic settings of the fast and functional operation of the laptop are exposed. And therefore, changing them, you must clearly understand what you are doing. Unsure users better consult with a specialist or entrust testing the laptop to him.
Related Videos
Today put windows system 7 Home Basic 32 bit for this notebook (Celeron 2957U (1.4), 2048, 500, IntelHD, DVD-SMulti, WiFi, BT, Cam, Dos).
The first thing on which I hung - how to enter the BIOS of this laptop
You need to press the fn and f2 buttons simultaneously. I tried separately to press and f2, and f7, and f12 - no reaction.
The second. When installing Windows from a USB flash drive, the USB flash drive must be inserted into the USB 2.0 connector, not the blue USB 3.0 connector. Otherwise, the installation program for Windows will try to initialize the flash drive, but it will not work)
No more surprises were found when installing Windows 7.
The first impression of the laptop is very quiet.
After installation does not see the wifa. Without wifa, you can not see the network and, accordingly, there are no drivers. In the driver box only under the fault 8.1 64 bits.
The device Wi-Fi in this laptop:
Realtek RTL8723BE Wireless LAN 802.11n PCI-E Network Adapter
Download the driver (on the other device), we throw on the flash drive, we transfer to laptop Lenovo G5070, install
After installation appears vayfay.
After that, the laptop is ready for use
In terms of performance, in my opinion, it is ideal when choosing among these options (the choice among laptops in CSN at a price of up to 14,000 and a diagonal screen of 14 inches) on November 22, 2014.
It is determined on the one hand by an acceptable processor, and on the other hand - graphics card in this notebook - generations Haswell. This, in my opinion, is better than graphics, which is in the processors of the previous generation of Ivy Bridge.
Of course, it is heavily chopped, but in competing laptops - the cut graphics of the previous generation))
Name |
Price, р. |
|
|
Celeron N2830 (2.16), 2048, 320, IntelHD, DVD-SMulti, WiFi, BT, Cam, Linux |
||
|
AMD E1-6010 (1.35), 2048, 500, AMD Radeon R2, DVD-SMulti, WiFi, BT, Cam, Linux |
||
|
Celeron 1005M (1.9), 2048, 320, IntelHD, DVD-SMulti, WiFi, Cam, Dos |
||
|
Celeron N2830 (2.16), 2048, 500, IntelHD, DVD-SMulti, WiFi, BT, Cam, Dos |
||
|
Celeron 2957U (1.4), 2048, 500, IntelHD, DVD-SMulti, WiFi, BT, Cam, Dos |
||
|
2048, 500, IntelHD, DVD-SMulti, WiFi, BT, Cam, Dos |
||
|
Celeron 1005M (1.9), 2048, 500, IntelHD, DVD-SMulti, WiFi, Cam, Dos |
||
|
Celeron N2830 (2.16), 2048, 320, IntelHD, WiFi, BT, Cam, Dos |
||
|
Celeron N2815 (1.86), 2048, 500, IntelHD, DVD-SMulti, WiFi, BT, Cam, Dos |
||
|
AMD E1-2100 (1.0), 2048, 500, AMD HD8210G, DVD-SMulti, WiFi, BT, Cam, DOS, White |
||
|
Celeron N2830 (2.16), 2048, 320, IntelHD, WiFi, BT, Cam, Win8 |
||
|
AMD E1-2100 (1.0), 2048, 320, AMD HD8210G, DVD-SMulti, WiFi, BT, Cam, Win8 |
||
|
Celeron N2830 (2.16), 2048, 320, IntelHD, WiFi, BT, Cam, Win8.1 |
||
|
(HD) Celeron N2830 (2.16), 2048, 500, IntelHD, DVD-Smulti, WiFi, BT, Cam, Win8.1 |
||
|
AMD E1-2100 (1.0), 4096, 500, AMD HD8210G, DVD-SMulti, WiFi, BT, Cam, DOS |
||
|
AMD E1-2100 (1.0), 2048, 500, AMD HD8210G, DVD-SMulti, WiFi, BT, Cam, Win8 |
||
|
AMD E1-2100 (1.0), 4096, 500, AMD HD8210G, DVD-SMulti, WiFi, BT, Cam, Dos |
||
|
Celeron N2815 (1.86), 2048, 500, IntelHD, DVD-SMulti, WiFi, BT, Cam, Dos, White |
||
|
Celeron 2957U (1.4), 2048, 320, IntelHD, DVD-SMulti, WiFi, BT, Cam, Win8.1 |
||
|
AMD A4-5000 (1.5), 2048, 500, AMD HD8330, DVD-SMulti, WiFi, BT, Cam |
||
|
Pentium 2020M (2.4), 4096, 500, IntelHD, DVD-SMulti, WiFi, Cam, Linux |
||
|
AMD E1-6010 (1.35), 2048, 320, AMD Radeon R2, DVD-SMulti, WiFi, BT, Cam, Win8.1 |
||
|
(HD) Pentium N3530 (2.16), 4096, 500, Intel HD, DVD-Smulti, WiFi, BT, Cam, Gray |
I received a letter to the post office. Thought - and decided to supplement them with this article (removing, of course, all personal data)
User question:
Hello! Faced a problem windows installations 7 from a flash drive on new laptop with Lenovo!
When you turn on after the splash screen appears black screen on which something is written!
The last entry prompts you to enter a date, then, after you press enter, you need to enter the time, and then C: /
I just pressed Enter, but this C drive changed to another line and so every time!
I decided to go into BIOS! Here there were difficulties; he never installed Windows, then on the phone, friends told how to do it!
The difficulty was that the BIOS menu Lenovo is not the same as everywhere else! But somehow explained!
As a result, after saving all the parameters in the BIOS, the laptop went out! I thought I was starting to download Windows from a flash drive!
But no, there was again a black screen with the same data on time, date and disk C!
Tell me, please, what you need to enter in C: / and if not difficult, how to install the Windows with a detailed description!
Thank you in advance!
My answer:
Apparently, you have on your laptop installed some kind of operating system (such as MS DOS (Free Dos)), which is set if you buy a laptop without Windows.
I would advise you to do so:
1. Go to the computer store and buy a disk with Windows 7
2. In the BIOS of the laptop put the boot from the CD and put the system
So it will be much easier for you because:
1. It's possible that the USB flash drive was not connected
2. It is possible that the system is incorrectly written on the USB flash drive.
In C: / you do not need to enter anything. All the settings need to be done in BIOS, because when you see "C: /" on the screen it means that you have already booted into the OS, which does not have a GUI.
As a result, a letter came:
Thanks, I made an image on the disc and it worked!
Lenovo - one of the leading manufacturers of laptops, whose devices are very popular around the world, and in particular in our country. First and foremost, the laptops of this company have dispersed due to the rich model range, in which there is far not one budget model, there is a wide choice of gaming laptops, as well as stylish, thin and, of course, expensive ultrabukov. Working with laptops of this company, users often wonder how to enter the BIOS.
The BIOS is the most important component of the computer, motherboard. This software is responsible for setting up the computer, checking the hardware status, and starting operating system.
One of the most popular procedures that requires run the BIOS - reinstalling the operating system. And if in the reinstall Windows there is nothing difficult, difficulties often arise exactly at the stage of entering the BIOS.
Any laptop or desktop computer, no matter which manufacturer, has the same algorithm for entering BIOS settings:
1. The computer is sent to reboot or simply turned on;
2. At the earliest stage of the load comes into play hot key, responsible for entering the BIOS: it must be pressed frequently and repeatedly until the BIOS itself is actually displayed on the screen.
Which key is responsible for entering the BIOS?
The problem is that different buttons for entering the BIOS can be used on different notebook models. However, if we talk about the Lenovo laptop, the list of hot keys is somewhat narrowed, and there are also own solutions for entering BIOS settings.
1. F2 (Fn + F2). The most popular key that works for most Lenovo notebook models. Start attempts to enter the BIOS is necessary with it.
2. "Access IBM" button. This button is not available for the entire lineup of Lenovo notebooks and is not located on the keyboard itself, but higher or even on the side.

If you find yourself in such a button, turn off the laptop, and then click this button. The system boot selection screen is displayed on the screen, in which you need to select BIOS Setup or "Start setup utility".
3. The ThikVantage button. Another key located on the laptop. After finding it, turn off the laptop and hold down the key for a while. After a moment, the system menu appears on the screen, in which you also need to go to the BIOS.

4. Del, F1, F12. If none of the methods above, and did not help enter the BIOS, try to try your luck using these possible keys.
As a rule, these are the main ways to enter the BIOS on Lenovo notebooks.
Most of us, using computers or laptops, do not think about how these electronic devices work. Developers of modern software created operating systems with a clear interface for all. But sometimes there are times when the most incompetent user has to deal with such concepts as reinstalling the "operating system" or setting up the system. The basis that connects all the elements of the computer and controls its operation is the BIOS. It is responsible for everything from the CPU temperature and the correct boot of the OS to the maintenance of programs when accessing the hard disk and the online storage device. At the slightest failure BIOS will determine the problem and will give the chance to eliminate it. Therefore, without his "consent" to make any changes in the computer does not work.
Primary Boot Loader

Translated from English as " basic system input-output. "This is a set of microprograms that monitor the operation of the processor, video adapter, RAM, hard drive and connected devices.
For the first time it was applied by specialists from IBM and was called the primary loader. Its main functions are testing and setting up the equipment, as well as loading the operating system. Given that the BIOS is responsible for the initial boot, all of its software elements should be available immediately after power on, so they are not stored on the hard drive, but are stored in memory of one of the microchips on the motherboard. This chip has even its own constant power from the element 5V, also located on the "motherboard".
Types of BIOS
Bios in a laptop is no different from a computer one. Today there are three main types of primary loaders:
- AWARD;
- UEFI.

The first two are nothing special, except for the menu, do not differ, they have an exclusively English interface and key management. Applied on almost all brands of computers and laptops. UEFI is a completely new kind of BIOS, with a graphical shell, as well as the ability to control with the mouse. It is used since 2011 only in the latest models of computers and laptops. More experienced users know that to enter the primary bootloader on personal computer it's easy, just after turning on the power, press the F1 or F2 keys, like on a Lenovo laptop. Log into the BIOS on laptops from other manufacturers is also easy, but without a manual on the hands, you will need the name of the model and modifications.
Given that the electronics market is now flooded with Chinese laptops of various brands, the algorithms for their initial download are different. Logging into the BIOS of Lenovo, for example, is fundamentally different from this procedure on Toshiba or Asus, where the F12, Dellete or Esc keys are used.
Laptops of this brand have gained wide popularity in our country. Acceptable price and reliability have made them indispensable for both work and entertainment. Of course, sometimes you have to make the necessary settings or reinstall the operating system. But not everyone knows how to enter the BIOS on Lenovo's laptop. This is due to a variety of models, most of which, like the G500, G505, G510, B590 and V580c, allow you to enter the recovery environment or BIOS by pressing the F1 or F2 keys. On some models released before 2010, you need to combine several buttons, for example Ctrl + Alt + Ins.

If you press and hold F12 during system startup, the Quick Boot menu (BIOS sub-section) appears, allowing you to set the boot order and select the appropriate resource for it (HDD, CD-rom or USB).
What should not you do on your own?
Now that you know how to enter the BIOS on a Lenovo laptop, before making any changes, it will not be superfluous to learn a few rules so as not to disable it:
- You can not connect the power to the laptop and disconnect it from the BIOS.
- Do not experiment with changing the settings, in particular, independently to "overclock" the processor or video card. Such an operation will, with the slightest error, cause damage to the devices.
- It is not recommended to change the system date. This will lead to a conflict with the operating system.
Having basic knowledge in using computer programs and observing these simple rules, you can easily configure your laptop without special problems.
Instructions
Connect the Lenovo laptop to mains power. If power is suddenly lost during BIOS operations, this may adversely affect the continued use of the computer.
If you do not have instructions for the Lenovo laptop at hand, you will have to go online and find out the necessary information on the manufacturer's website (http://www.ibm.com/ru/ru/). This can be done both online and by downloading the instruction in the form of a deployed PDF file. In order to read this manual, a special program must be installed on the computer, for example, Adobe Reader (http://www.adobe.com/) or Foxit PDF Reader (http://www.foxitsoftware.com/).
If for technical reasons Internet access is impossible, then you will have to act on your own. Turn on the computer and watch the information appear on its screen. Usually, to facilitate the life of the user at the very beginning of the laptop for a couple of seconds (just while the BIOS is conducting a test-polling of the computer's devices) a prompt appears in the form of a key name or a combination of keys that need to be pressed and not released, While the laptop does not appear in the BIOS table.
Note the notations F2 and F12. It's these keys on the Lenovo laptop that are designed to interrupt the device's test polling and prevent the operating system from booting.
Press and hold F12 on the keyboard. Thus, you designate your desire to enter one of the BIOS partitions, called Quick Boot. This small, but very important subsection of the computer architecture is designed to determine the priority of computer boot. Entering the priority table, you can change the order in such a way that after successful work BIOS computer first addressed, for example, to CD-rom, then to the USB-port and only then to the HDD. Similar operations with the boot line are typical for the procedure for reinstalling the operating system on a Lenovo laptop.
Press F2 to enter the BIOS main menu. Here, an experienced user gets access to the settings of a large number of parameters of various devices. In contrast to conventional PCs, the BIOS of the laptop also allows:
Configure the security system;
- change the nature of the touchpad;
- Correct the output of the image on the display;
- Calibrate the battery, and also see the serial number of the device, its motherboard and other equipment.
The BIOS is a basic software that allows you to interact with the computer without accessing the disk. Here are the codes, through which you can manage any system devices, ports and disks. The BIOS is sewn in the ROM chip on the motherboard. In most cases, when the system starts, the data is copied from the ROM to the random access memory, the speed of which is much higher.
BIOS is standard, works without failures. However, in those situations when microcodes are not sufficiently developed, there is a discrepancy between the motherboard and integrated devices, more advanced equipment appears, it becomes necessary to install the BIOS again.
What is required to install the BIOS again?
To flush the BIOS, you will need specialized utilities developed by the motherboard manufacturer or other companies. With the help of these installation products, all necessary firmware is stored in the CMOS chip. It is advisable to use the "native" utilities, which are available on the disk supplied with motherboard, since they are fully adapted to the specific equipment and exclude the possibility of faults or errors.
Since CMOS in modern motherboards is something other than flash memory with microcodes and settings, in order to properly install the BIOS, you need to find a file with its corresponding version and a flasher program.
By the way, it's better to flash BIOS from Windows, because it's more convenient. A similar operation from DOS will take a long time, will require some ingenuity, although it is more reliable. Moreover, here you will have to create a boot floppy with the program-broach and firmware BIOS.
And some more important nuances. Before you start, it is important to make a backup of the current BIOS version to an external storage device using a flasher program. This will allow you to return to the old version of the software in case of failure.
It is necessary to ensure stable food at the expense of "uninterrupted". Otherwise sudden sudden voltage surges will reduce all work to NO.
When bIOS flashing from Windows it is necessary to close all active applications and disable antivirus programs.
What should I be prepared for if I need to install a new BIOS?
Even a minor error in the BIOS flashing can cause serious complications. Therefore, you should prepare in advance for their elimination. In particular, if you turn off the power or the system hangs, you will have to use the programmer. Although in this case it is advisable to turn to specialists.
If the BIOS firmware is not completely completed, it is reasonable to use the following method:
- We remove CMOS from a similar serviceable included motherboard.
- In the nest we lay several threads, thanks to which it will be easy to remove the chip afterwards.
- Install the damaged CMOS.damaged analog.
- Run firmware firmware
- When the motherboard is off, we perform reverse chip exchange.
Sources:
- how to rearrange bios
If you often work on a laptop, you may receive various errors, and from time to time there is a situation where the laptop refuses to boot due to erroneous settings made in the BIOS. In this connection it is required to reset it.
Instructions
First you need to find and download a program that allows you to reset the BIOS. As such a program, you can use BIOS_PW.EXE. You can download it from the site http://intellcity.ru. After downloading it, you need to unzip the program and run it. This utility is not installed on the computer, but simply run from the archive or folder. Alternatively, you can use another program that will also help you reset the BIOS to laptop. The most optimal utility is unlock6.exe. Download from the site http://necessary-soft.net. The actions will be the same as for BIOS_PW.EXE.
Further it is required at computer loading to remember the error code which the laptop gives out. Most often, this code will appear after three attempts to enter. Now you need to enter the console cmd, and then go to the software directory ( Software). Next, you need to enter the name of the required software, enter an error code through the space, and after one space enter 0. Then you can press the Enter button. The software will generate several passwords. Try to enter each password until one of them fits.
Next, you need to go into the BIOS and insert the specified password. Now you can set the new password as empty. It is very important to reset an already existing password on the BIOS. On this zeroing the BIOS on laptop completed.
Related Videos
The BIOS is the holiest of saints in the world of computers and programming. After all, this is a kind of "beginning" of working with a computer. It is thanks to the BIOS that you can install a new operating system, delete the old one, partition it hDD on several departments and many other things. But here's how to get into this very BIOS?

Instructions
To be fair, it's worth noting that most computers in their device are very similar. Therefore, in order to perform this or that operation, you should simply perform a certain set of actions. It concerns not only stationary computers, but also laptops.
Therefore, in order to get into BOIS, you should perform some actions in a certain sequence. Both on a stationary computer and on a laptop. So, let's begin. To start, you need to start the computer if it's off (if it's on, start the restart through the Start menu).
Then carefully look at the screen. At the bottom, an English text will appear, where the name of the key will be highlighted in large print, which you will need to click in order to enter the BIOS. Basically this key is F2 or F12. It all depends on the hardware of the computer. But, as it was said above, the most often mentioned are the mentioned keys.
When you see the name of the key, you should press it immediately. For confidence - it is better several times. Otherwise, you will have to restart the computer and perform the above operation again.
If the first time you managed to enter the BIOS by pressing the required key - excellent, you can continue to work.
When all that is needed is viewed and changed if necessary, you can go out. This is done just as simply - press the F10 key, if you want to save the changes, and exit. If you do not need to save anything, you can see the "EXIT" tab at the top of the screen. Select the tab, press Enter, and then the letter y as the answer to the question whether or not you really want to quit.
BIOS safely left behind. Log in and out successfully. The goal is achieved.
Related Videos
Sources:
- go into the bios
Typically, users log into the BIOS when installing the operating system to change the order of the boot devices. In various models of laptops installed different models motherboards, due to what the order of actions does not always look the same.

Instructions
Turn off your laptop. If you have Sony latest models then to go into the BIOS, press the F2 key when loading. If necessary, enter the password. In some models, pressing the F2 key is actual, but this is more true for older versions. In very rare models, F3 occurs. It is not superfluous to get acquainted with the specification of the motherboard.
To do this, check its labeling in Device Manager. To do this, use the "Start" menu item, right-click "My Computer". You will see a new small window on the screen with the parameters of the laptop and the operating system. On the Hardware tab, select Device Manager.
Find your motherboard in the list that opens, remember its model, find on the Internet how it will be correct to get into BIOS on this model. If you do not have the opportunity. Try to find the combination necessary for your computer by sampling and reading the manuals that come with the kit.
If you have a Dell laptop of old models, use the keyboard shortcut F2 + Esc, or some other key that appears on the monitor screen when the computer boots. If you have a Dell Studio laptop, then try the Esc + F1 key combination.
To get into the BIOS of the Toshiba laptop, use the same method as in the previous paragraph (Esc + F1), however please note that some of its models support the BIOS launch when pressing the F8 key.
If you have a Packard-Bell laptop, Gateway - be sure to see what's written on the boot screen, try using the previously worked combination Esc + F1, Esc + F2.
For some Acer, use the combination of three keys - Alt + ctrl + Esc. For rare Dell and HP models, pressing F3 for accessing the BIOS is typical.
note
Be careful when changing settings and saving them further.
Write down the combination of access for your laptop for the future.
Computers that are compatible with IBM PC, equipped with a ROM chip, which stores a special program - BIOS. It is launched immediately after power-up, checks the serviceability of the equipment and transfers control to the operating system.

Instructions
For storage bIOS settings is a separate chip of static memory, powered by a battery. Changing these settings is done using the utility CMOS Setup, which is part of the BIOS. You can not call this utility after the operating system has already started to load. Therefore, to enter it, you will have to reboot the machine or start it from the off state. Immediately after that, start quickly pressing the "Delete" key until the utility starts. If the operating system load still starts, restart, but this time, instead of "Delete" use the "F2" key. The first of these keys is used mainly in desktop computers, and the second one is used in laptops, but sometimes vice versa.
Probably, after entering the CMOS Setup, you will be asked for a password. Enter it. If the computer is foreign, and you do not know the password, do not try to bypass this protection. If you just purchased a used motherboard, and the owner forgot to turn off the password input, turn off the computer, remove the battery from the card, close the contacts of the holder (but not the battery itself), open them, and then put the item back.