It so happened that the spring of this year was issued a yield on any kind of "remake" and "second series". Whether the fantasy producers have exhausted, and it lacks the original names to invent its products, whether changes in them are not so much so that it pulls it on new model. However, one unsolicited company is already selling the same mobile phone for a year, simply increasing the number of the version number, and then not every time - and this approach does not prevent it from doing it quite successfully.
Overview router zyxel Keenetic Giga II: Zoom recommends
Wireless router keenetic Giga II Zyxel Communications, despite the seeming continuity of the Keenetic Giga model, differs from it so much that it could well claim a unique name. Being a part of the updated line of products consisting of three models - Keenetic II, Keenetic Giga II and Keenetic Ultra, he received a new hardware platform and new software. Yes, and the design became another. Only the power supply has not changed, which looks like a weak argument in favor of saving the usual name. But apparently, the success of the brand Keenetic was so great that the company decided to preserve the brand won well, leaving the principles in the basis of these models.
Zyxel Keenetic Giga II
The first thing that attracts the attention of the buyer is, of course, the design. Unlike the previous generation Keenetic, made in white tones, the style of new models is a black gloss. In addition to the subjective impression of solidity, the black color is not only less type, but also does not fade over time. After all, the router is not a mobile phone, obsoletly obsoletly before the money ended on the score. He may well unnotice for several years, and the yellowed body with the dust - not the best interior decoration. From other innovations - connectors for removable external wi-Fi antennaAllowing if necessary, connect the long-range storied vibrators to improve the quality of the signal. All network connectors, like the power supply connections, are deposited on the back panel, and two uSB ports - on the side. Among the "useful trifles", you can mark the large key control key Wi-Fi, located in a small niche from above.
Short-term pressing on it launches WPS authorization, and long, more than three seconds, includes or disconnects wi-Fi module. In general, the new type of router looks more stylish and "expensive", although the case has retained the former compactness.

Marking by the color of the ZyXEL Keenetic Giga II connectors will help not get confused in the wires
The main approach of the developers of the Keenetic series - choose a reliable platform for the minimum money and "squeeze" from it all that is possible - it deserves praise, because it is the principle that we use the following groups of enthusiasts that produce the so-called "custom" firmware (there are among them and people Brought inside with a soldering iron, but this is already the highest pilot, besides the guarantee). Add as many functions as possible in the factory firmware is also a good idea, not so much to develop the device, but noticeably improving its consumer properties, because they can still or want to reflash the device immediately after purchase.
Specifications Keenetic Giga II.
| Device type |
Wi-Fi Router |
| CPU |
MediaTek RT6856. |
| Core processor |
MIPS 34KEC. |
| CPU frequency |
700 MHz |
| RAM, MB |
256
|
| Flash memory (occupied OS), MB |
16 |
| Wireless network |
IEEE 802.11 b / g / n |
| Frequency band, GHz |
2.4 |
| Maximum speed, Mbps |
300
|
| External antennas |
2 |
| Internal antennas |
not |
| Antenna amplification ratio, DBI |
5
|
| Connectors for connecting antennas |
2 x RP-SMA |
| Number of LAN ports |
4
|
| Number of WAN ports |
1
|
| Ethernet speed, Mbps |
1000 |
| Connect to provider |
PPTP, PPPOE, L2TP, Static IP / DHCP |
| Authorization Protocols |
Pap, Chap, MS Chap, MS CHAP V2 |
| Additional protocols |
802.1x, 802.1q, 802.11i |
| Network Services |
FTP server, DLNA server, BitTorrent client, DYNDNS client, IGMP support, IP TV |
| USB interface |
2 x USB 2.0 |
| Functions of the built-in firewall |
SPI, NAT, DDOS Protection, URL Filter, IP, Mac |
| Security protocols |
WPA / WPA2 (-PSK), WEP-64/128 |
| Supply voltage, in |
100-240
|
| Power consumption, W |
18
|
| Dimensions, mm. |
158 x 110 x 32 |
| Weight, G. |
270
|
| Equipment |
Router, power supply, Ethernet cable, CD, Instructions |
| Approximate price, rub. |
4 000
|
Keenetic Giga II applies a new Central MediaTek processor (former RALINK) RT6856, operating at a frequency of 700 MHz, and as many as 256 MB of RAM - a huge amount by the standards of products of a similar class, often bypassing a smaller amount. Note that the "progenitor" of Giga II, Keenetic Giga, installed 64 MB, and the processor frequency is 384 MHz. The size of the flash memory used to the needs of the OS has doubled to 16 MB. For the user, these abstract figures mean that it will no longer feel any drawback. For example, the bandwidth of the VPN channel from the provider to the subscriber reaches the value of 200 Mbps. While the only opportunity to try the channel of such a width provides MGTS with its legendary GPON, and even then only in the Moscow region. 20 or 50-megabit channels of the overwhelming majority of LAN it is hired, not even sweat.

USB connection Zyxel Keenetic Giga I6 speeds
Read / write speed external drivesconnected by uSB interface, increased to 15 MB / s - it would seem a modest value, but we will not forget that the main destination of the router is the routing of packets, and not the performance of the NAS function at all, where work with discs is carried out at the hardware level. For comparison, we will remind that the routers of the previous generation, this figure was at the level of 3-5 MB / s. And the performance of the BitTorrent client TRANSMISSION embedded in the default firmware is about 5 MB / s, which allows you to download a movie in a resolution of 1080p about half an hour.

Interface and firmware
The software has undergone not just cosmetic changes, but a certain evolutionary jump, the result of which was the use of a new generation of built-in OS, NDMS version 2. The main difference from previous version The possibility of adding appeared custom applications, the prototype of which are plugins.
In this device, there are two of them: Skydns and Yandex.dns, in fact that are Internet filters who protect our fragile inner world from unsafe network content. Their use allows you to kill two hares at once: transfer access settings to the "cloud", increasing the convenience of ensuring the possibility of unification, i.e. Use them on several different devices, and simplify the firmware code, getting rid of the need to implement in it similar, sufficiently resource-intensive, functionality.

From other important changes to NDMS 2.0, a full-featured NAT support appeared (with the ability to use multiple external IP addresses), support multiple PPP tunnels and the ability to assign additional physical WAN interfaces to the ports of the internal switch. Simply put, this means the possibility of "hot backup" of Internet connections, with the possibility of transition to a backup option in violation of the main provider. Very interesting new opportunity Using the interface command linewho had previously been mainly among the user assemblies mentioned. This allows connecting to the router through the Telnet program, produce various thin settings (and basic too) equipment, inaccessible in the web interface shell, and easily save and restore them through a text file.

But the most interesting innovation that has not mastered even the most advanced enthusiasts, it is an independent firmware bulkhead. The bottom line is that ZyXEL offers a considerable range of possible functions, among which there are sufficiently volumetric, such as a DLNA server or SIP client, and crawl into a limited volume internal memory Immediately everything is not possible. Therefore, the user chooses the modules that he really needs, and can refuse to be unused both to save space and for some increase in the performance of the remaining. It is implemented similarly to work with repositories in Linux systems that do not require special skills: Available modules are displayed as a line list, in one of the columns of which the current versions of the modules in the router are shown to other - available on the ZyXEL website.

All that is required by the user is to mark the necessary and remove the marks from unnecessary. Missing modules are downloaded automatically, after which the firmware is reassembled and recorded in the reserved place in the internal memory. The only minus implementation of this incredible convenience is the absence of "fool protection", which blocks the ability to remove the vital parts of the firmware. Therefore, this process should be approached extremely thoughtfully, since the only way to restore the device's performance after an unsuccessful operation is a record of the default factory Firmware, which will have to download from the site any other way (and it is better to do it in advance).

In operation this unit differs little from similar devices, so its connection and configuration should not cause difficulties. In case of problems with connection, you can always reset all settings in the initial state Long withholding the "Reset" button, after which it is used to use standard login and password suitable for any ZyXEL: Admin / 1234 network device. It is only necessary to make sure that the range of the IP addresses of the computer's network card and the router are in the same subnet.

After the boot load, open your favorite browser and get into the usual web configurator interface. At the first moment, we are offered to go through the Quick Setup Wizard, but you can refuse from this, and immediately go to the extended interface. All settings are divided into partitions and subsections, the first of which are switched by the buttons with large icons at the bottom of the screen, the second bookmarks upstairs.

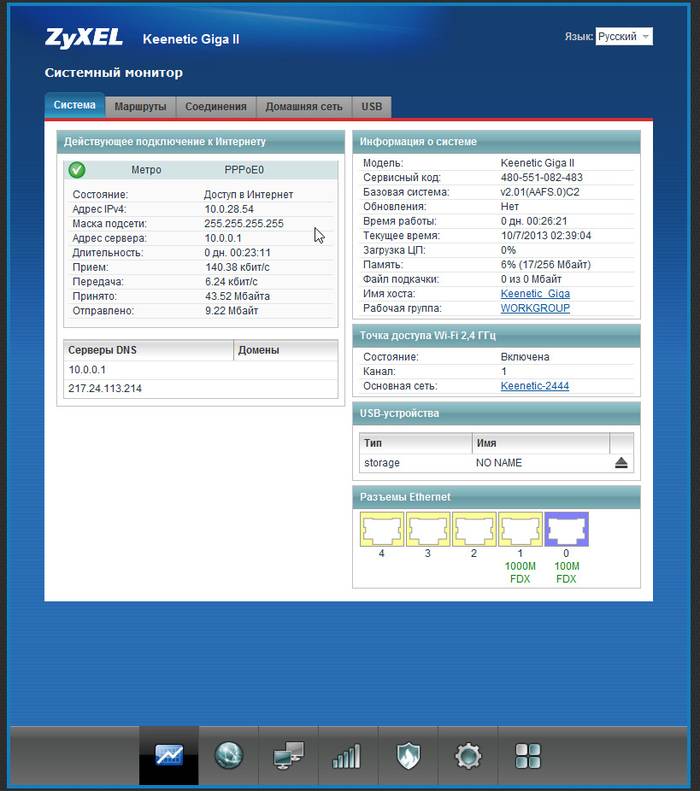
It looks beautiful, but not very ergonomically, as a result of the need to constantly move the mouse cursor back and forth. The classic tree menu in this sense is much more convenient. On the first page there is a status screen, a clearly displaying state of the device on a schematic picture with the image of ports. On adjacent bookmarks, you can see the routing table and a list of active connections, as well as the state of external USB ports, for example, the amount of free space on the disks connected to them.

The following bookmark group allows you to configure network connections. Supported as PPPOE, PPTP, L2TP and other sizes for connecting ethernet networks, so I. direct connection Through a DHCP client to providers using an IPOE or external ADSL modems. To one of the USB ports you can connect 3G or 4G modem, including modems Yota.For both the main and backup connection. This is where new features NDMS 2.0 were useful!
After all, configuring the priorities of each connection on the first of the bookmarks, it can be achieved that when a bond with a "twisted pair" will automatically be activated by a USB modem, or this happened only when the cable is physically disconnected. In general, the choice is charged. You can also use the DYNDNS service, allowing you to open access from outside to a computer that does not have a "real" IP address.

Next bookmark - Your configuration local network. You can set the range of IP addresses, the nuances of the device installed on the DHCP server router, the NAT forwarding table, or an IGMP proxy. Next, go to the group of bookmarks regulating the work point access Wi-Fi. One of the bookmarks is entitled "Guest Network": the organization of such a "network inside network" is especially popular in latelyWhen in addition to permanent users, the owner of such a network is often visited by friends and acquaintances who are also desirable to access the Internet, but with smaller privileges and bandwidth.

This option and for small offices or "eaters" attracting visitors "free Wi-Fi" will be consolidated. The parameters of the radio module are not so much, and there is neither the usual frequency band switch, nor the choice of numbers of active channels, nor the time to update the encryption keys and other settings present in other wireless routers. However, they are usually always in the same optimal position, so it is not necessary to constantly change them. Recall that, if necessary, still change them can always be used by the command line interface.

Section "Security" contains the settings of the built-in firewall, or firewall, as well as NAT tables and mentioned additional content filtering modules. Their unity in one group is useful in that creating rules for interfaces in NAT, we will not forget to open the corresponding port in the firewall setting.
The next group of bookmarks marked by an icon stylized under the gear hide the service settings. On the first of them we see the log of events, or log. Then there is a small page where we can run the ping utility, which is sometimes more convenient than making it with PC. Here you also see a primitive file manager, which allows you to record the files of settings or firmware from any media directly in the memory of the router.

Neighboring bookmarks make it possible to change the name of the device on the network, configuring the internal clock, and manage the list of users. The extreme right tab contains a previously mentioned list of firmware components and allows you to immediately change this set and rebuild it. And the last group allows you to configure additional modules from among those that are selected to assemble the firmware. Initially, the TRANSMISSION BITTORRENT client is included, the FTP server, the SMB server to access files from the Windows network, and dLNA server. As stated in the previous paragraph, this list can be changed. There you can also use any of the USB disks as a paging file if you have noticed that in cash 256 MB memory stopped enough. However, it is difficult to submit such a scenario.
The overall impression of the interface is extremely positive: on the one hand, from laconic, it is intuitive, but at the same time it contains the entire set of minimally necessary parameters, and on the other, it provides the widest possible caustomization opportunities.
Test results and conclusions
But the most interesting thing is how well the modern filling is coping with his task? To clarify this, we tested Keenetic Giga II in a bundle with a HP TX2-1210ER laptop equipped with a Minipci Express adapter Broadcom BCM94322MC. Testing was carried out both by the iXChariot program, which is a unlawful standard for measuring this kind and a simple transmission of a large file by means of Total Commander.. In the process of measurements, the laptop and the router were first in the same room on a short distance From each other, and then broadcast in different rooms separated by two walls of the standard panel building. In the zone of measurements with some weakening, signals of several more basic stationsCreating a typical picture of the radio frequency interference of a moderate degree of noise for a modern megapolis.

The details can be found in the results table, and in brief it can be concluded that, no matter how surprisingly, advertising statements are fully true. In terms of performance and quality of communication, Keenetic Giga II is at the level of products of competitors of a similar level (i.e., 802.11n Standard 300 Mbps). File transfer rate in the area 115 Mbit / s is not only sufficient for any conceivable tasks, including viewing Full HD video over a real-time network, but also exceeds 100 Mbps Ethernet network bandwidth. In principle, this value is approaching the theoretical maximum wi-Fi standard 300 Mbps, and the further growth growth is possible only by increasing the number of channels (i.e., the transition to 450 or 600 Mbps), or the use of the latest standards, such as 802.11ac. But this standard is not yet so much common as 802.11n, and the need for such a bandwidth is very controversial. Therefore, today, and for a couple of years ahead, the purchase of Keenetic Giga II seems to be the most reasonable acquisition that covers not only the current needs of most users, but also has a good potential for the future. And the company ZyXEL can only wish to continue to develop other interesting and affordable devices such as wireless Keenetic series routers.

For high performance, moderate price and excellent Zyxel Keenetic Giga II functionality gets a reward from our editorial board.
Network Device Management System, or Network Management System, This is the kernel Linux software A platform that allows you to develop user interfaces and service functions separately from hardware drivers, "communicating" directly with the "hardware". This allows you to divide tasks for programmers to different levels, which facilitates the writing of applications and increases the reliability of the system, and allows you to quickly get the finished product.

It consists of the manufacturer's adaptation level, which includes the Linux kernel, working directly with the equipment, and hardware-independent level (Hardware Adaptation Layer), which allows accessing the equipment regardless of specific implementation, By standardized calls.
Appeal to HAL levels from applications (to which the provider connection program includes the settings interface, the built-in firewall, etc.) occurs through the open API calls provided by the NDM kernel and related libraries. They can contact them system Servicesand additional applications (3RD Party Applications), such as the BitTorrent client, DLNA server, fTP server etc.).
Keenetic Giga II Test Results
Modular implementation allows manufacturers of finished products to easily develop their own, unique applications, or integrate existing ones, while going to a new hardware platform without a tiring modification and debugging associated with a changed physical implementation of available functions.

Such an approach is currently applied not only when developing routers, but also voice gateways, network drives, IP cameras, ADSL modems and many other products.
Keenetic Giga 2 - Router from the new product line of ZyXEL, specifically for which absolutely new platform NDMS V2. This model It is distinguished by its multifunctionality and impressive hardware "filling" capable of cope with high loads.
This is especially true for those users who share every day by large information arrays in working or entertainment purposes, for example, using file sharing networks.
Other features of Keenetic Giga 2 can be noted:
- the ability to download files at speeds up to 1 Gbit / s (if it allows the provider and connected package);
- work as a 3G / 4G router if you connect a USB modem to the device;
- support for removable drives;
- support torrent client, already built into the software shell;
- significantly increased overall data transfer rate.
Connecting router
Let's look at what we find in a box with a device:
- router;
- power adapter;
- network patch cord;
- instruction in Russian;
- guarantee;
- brochure with promotional information.
Connecting the device is carried out for several simple steps:

entrance
We proceed to configuring the ZyXEL KEENETIC GIGA router 2. First you need to log in and access the web interface:
- we open any browser on PC and copy to the address line "http://192.168.1.1", press "ENTER";
- once in the menu, enter the username and password ("Admin" both times), click "Login";
- in the next dialogue, the window is chosen Russian (in the upper right corner).
Internet protocols settings
Now the router is ready for further work. Consider the main types of Internet connections with which we can face.
L2TP
This type of type uses Beeline Provider.
To configure the connection in this case, you will need:

This configuration for Beeline is completed.
PPPoe
Go to installation PPPoe compoundIt is used by Rostelecom:

Wi-Fi
To install a wireless network, we need:

Attention! When specifying the security key (password), several nuances must be taken into account:
- he must consist of one word written with Latin letters and numbers;
- there are at least 8 characters and no more than 63.
On this setting is completed - restart the router and check the presence of a connection.
Video: Fast setting Zyxel Keenetic Giga II
How to configure IPTV
IPTV, or digital televisionprovided by the provider itself becomes more and more popular. To activate this feature, we will pass a simple setting process:

Attention! Some providers may not support automatic IP configuration. In this case, you need to select the "without an IP address" option. You can clarify this information technical support provider.
- opposite the port, which will be used to connect the IPTV console, press "Enable";

Software Update
About the need for timely software update, probably knows every user. Outdated software can not only start giving failures, but often does not support newest functionsadded by the manufacturer in the device. To maintain the stable operation of the router, it is necessary to regularly update its firmware, which serves as a peculiar "operating system".
We will proceed to this process:
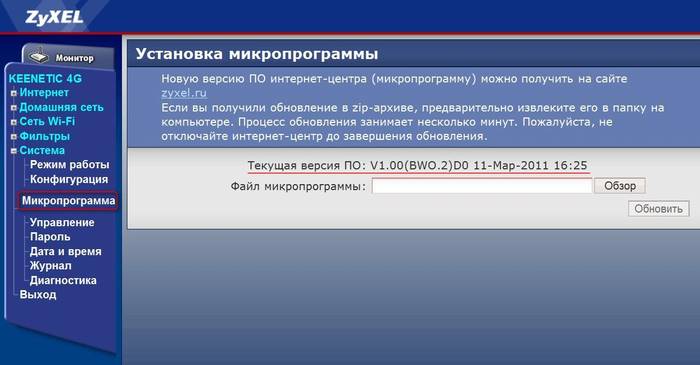
Important! During the firmware update, do not disconnect the power and do not remove the cables from the device - it can not only stop the update process, but also lead to serious malfunctions in the equipment.
Changing the factory password
After installing and configuring the router, we strongly recommend that you change standard passwordWhat will help to avoid unwanted connections from the side. So:

We remind you that standard Login And the password for this model is "admin" for both cases.
As you can see, the setting of this model is somewhat different from its predecessors. Keenetic Giga 2 is becoming increasingly distributed among users who choose the optimal combination of the price of the device and its power. Setup and preparation for work will take you quite a bit of time - just follow the instructions outlined above or ask questions in the comments to the article.
Router Zyxel Keenetic Giga II is a successful model of a well-known brand of the manufacturer of network equipment. This is a powerful device with a good set of parameters and functions that will provide a quick and high-quality Internet connection.
Users have already become accustomed to the wide functionality of routers.
Let's learn what is noteworthy this model of the router, how to independently configure it, and if necessary, change the firmware on the device.
The ZyXEL Keenetic Giga II model is the average by parameters between Keenetic II and Keenetic Ultra. The first model is a little less, but has more weak characteristics, so the choice should be done in favor of Giga II. The other model is stronger, but it is more expensive, it is rather designed for demanding users.
The Zyxel Keenetic Giga 2 filling is represented by 256 MB of RAM, 16 MB of memory for installing the firmware, the router has a gigabit port and operates at a speed of up to 300 Mbps. Such indicators are optimal for most users - usually they use the Internet at a speed of up to 100 Mbit, so the router will cope with it perfectly.
The model is equipped with 4 LAN ports and one WAN port, USB connectors for connecting various equipment, the power button is convenient to disable the router from the network each time, reset the settings.

The router is equipped with two external antennasthat positively affects the quality and signal area area. It is worth noting the stylish look - it attracts attention and looks quite interesting.
Top from above, there is a separate WPS button to quickly turn on or off Wi-Fi - it is useful to decide whether it is useful or not, but if so, it is a fairly practical solution. In general, for the home or small Zyxel Keenetic Giga II office will fit well - it is quite powerful and not too expensive at the price.
Setting up router
To enter the settings menu, you must enter a combination of 192.168.1.1. In the browser's address bar, then the authorization window will appear - the defaults are administered the values \u200b\u200bof the Admin in both rows or 1234 in the password row.

Then you can proceed to setting up the connection, Wi-Fi, IPTV, and other functions.
To set the network, select the Internet section at the bottom of the window, after which the parameters will differ depending on the type of connection.
To configure connection via DHCP protocol with automatic IP address, follow these instructions:
- Select Broadband Connection (ISP) in the table;

- You will have a form to fill data, where, first of all, you need to mention the connector where the Internet cable is connected;
- Next, check the "Enable Interface" lines and "use to access the Internet";
- In configuring IP settings from the list, select the option of automatic receipt of the address;
- Enter the number 1400 in the MTU string, save the changes.

If the connection is carried out through the static IP address, then in this form you need to select the appropriate parameter of this setting and enter the address of the address, the subnet mask and the gateway.
For connections, the configuration of which requires a larger information to enter, select the Internet section and open the Authorization tab, where the following must be done in the window that appears:
- For PPTP connections, check the check mark on the contrary to use, select this protocol from the list. In the "Connect via" row, select Broadband Connection (ISP), enter all the data from the provider - the server address, login and password, mark the automatic authentication algorithm;

- To connect PPPOE, select the appropriate protocol in the "Type" line, enter the username and password included in the contract from the provider. In "connect through" and in the check algorithm, select the same options as before;

- The connection through the L2TP protocol occurs in almost the same way. All you need to enter is a description (connection name), user name and password, server address, select an automatic authentication algorithm.

Wi-Fi Connection Setup
Router, first of all, is used to access the network through wireless connectionwhose setting is happening like this:
- Select the Wi-Fi section in the bottom line in the parameter menu;
- Turn on the access point, marking the corresponding checkbox, enter the network name;
- Row of hide SSID, that is, the network name is created in order to further protect it from hacking. When it is activated, the connection will be invisible when searching for points on other devices. To connect to the Internet, you will need to manually enter the name and password, that is, if they do not know, they will not try to take advantage of your internet;
- In line wPA key Come up with the key to connect to your network - try to create a more or less complex combination, again for your Internet to use third parties;
- Channel Select Automatic - In this case, the router itself will determine which of the available channels is loaded, and it will be connected to it.

It is still worth changing the factory login and password to access the settings menu itself after the first authorization - this is done in the System section.

If, in addition to the Internet, you use IPTV through the router, then install it on this router is quite simple. Select from below section home network and the IGMP Proxy tab. Select the activation of this function and save the change.
Software Update
To update or replace the firmware on Zixel Kinetic Gig you need to download actual version Firmware - Please note that it is intended for this router, after which we use such instructions:
- Go to the parameter menu through the browser, select the System section;
- Among the tabs, open the files by submenu, where the string is placed to specify the path to the firmware file;
- After specifying the location of the firmware, click on "Replace" and confirm your intentions, then setting the new security.

As you can see, Zyxel Keenetic Giga II is notable external species, powerful stuffing, but also easy to set up - create an Internet connection on the router can any user. No less easy to change the firmware on the device, so the model is absolutely not in vain draws attention to the other competitors. It is well combined simplicity, functionality and affordable price.
The average of the technical characteristics of the ZyXEL Keenetic Giga II router provides the user a lot of opportunities for networking. The device can be used as an amplifier. wi-Fi signal or 3G / 4G router (when connecting a USB modem), and to transmit wired communication data using 4 LAN ports. Having 256 MB of RAM and another 16 MB for firmware, the router downloads data at speeds up to 1 Gbit / s and transmits as much information using a wired network and up to 300 Mbps per second for wireless. The list of software installed software includes a torrent client.
Setting up router
Before starting the Zyxel Keenetic Giga setup, you should enable it in the dump and connect it to the provider cable and with a computer (or laptop) equipped with network card. To do this, use patch cord connected to the first LAN port device and to the corresponding PC connector. The first stage, as the instruction attached to Zyxel Keenetic Giga II implies the use of any browser, in the address bar of which should be introduced "192.168.1.1". To get started, you need to specify the username ("Admin") and the default password (matching with the name).
The next step is to go to the Internet center of the device and the VLAN settings. To do this, Keenetic Giga requires pressing the "Internet" button at the bottom and goes to the IPOE, PPPoE or L2TP tab.
Further user values \u200b\u200bdepend on the type of connection:
- for the IPoe, it is enough to select the ISP interface, set automatic setting
- parameters and enter the MAC address of the computer;
- to connect the L2TP, you need to specify the connection name, name and password;
- for PPPOE, you will have to enter just a name with a password.

If you need to configure additional features, several more stages should be performed. This will allow the router to work correctly with file sharing and VPN servers. And also run the wireless network.
Additional settings
If the Zyxel Keenetic Giga does not allow you to use the μTORRENT torrent client connected to it, to change the settings, you must enable support for the UPNP protocol. To ensure the ports of ports, follow these actions:
- Go to the device web configurator;
- Go to the "System" menu on the component tab;
- Install the UPNP service;
- Run the μTorrent application, open settings and configuration;
- Go to the connection menu by placing the UPNP redirection.

For settings VPN Server From the remote client, go to the network management center and common access. A new connection is configured in the Connection Menu to the workplace and select the first item from the list (using VPN). IN vPN settings Connections The IP address depending on the type of access is indicated: Local to enter the local network or external connection to the remote connection.

Enable Wi-Fi
To start the Wireless Wireless Network ZyXEL Keenetic Giga 2, you need to use the same settings menu by which it has been connected to the Internet. In this case, the Wi-Fi tab is selected. And in the "Access Point" tab, a check mark is installed opposite the "Enable" item.

After that, the user needs:
- Enter the name of the network (latin and numbers);
- Set the WPA-PSK protection parameter and enter a password of 8-63 characters;
- Click on "Apply".
To use the device as a wireless network amplifier, a special configuration of the ZyXEL Keenetic Giga router in the repeater mode must be performed. You can execute it by opening the settings by selecting the Internet tab and turning on the Wi-Fi client. By selecting a suitable connection from the list that appears after clicking on the "Overview" button, you can connect the router as an amplifier. This will allow expanding the action zone wireless communication. Although before starting the action in the mode of the amplifier, you will have to reboot both router - customizable and main. Then the devices are pressed on the devices. WPS activation button. After that, Keenetic Giga becomes an amplifier.

Reset
Another option provided the Internet center the possibility is to reset the factory settings. It is used when losing the password or need to reconfigure the device. And such a reset is performed as follows:
- Before reset, the router configuration is saved;
- The device is turned off;
- The reset button is pressed by a thin object to the device before the start of the fiction of the power indicator (usually no more than 10 seconds).
In this case, the router is reset to the factory settings. If it does not help, and the router does not respond even on a 30 second press, you have to replace the software. To do this, you need flashing the device, after which the reset is no longer required.
Refracting device
Installing a new software is required when the router fails appears - when the ports do not work, the network is not provided with a network or wi-Fi work. On the zyxel firmware Keenetic Giga will not need much time. For this, enough:
- Select the system section and the firmware tab;
- See already installed version firmware;
- Go to the site of the official manufacturer of the router and find a new software. Use alternative firmware versions from other resources is not recommended;
- Download new software on hard disk;
- Unpack the firmware version and through the menu (using the Overview tab) to set it to the router.
After completing flashing and rebooting the system will have to spend again zyxel setting Keenetic Giga II by creating an Internet connection and wireless network. Along with this, you will have to fulfill all other changes in the parameters of the router. And as a result, we get a fully working device and convenient to use the device whose capabilities are more than enough for the home, and for the office.
In order to get into the web interface of the router, you must open your internet browser and in the address bar dial 192.168.1.1, User Name admin (username) , Password (password) - 1234 (Provided that the router has factory settings, and its IP has not changed).
Changing the factory password
For security reasons, it is recommended to change the factory password. Default: Admin login, password 1234. In the router interface, you must go to the tab " System", Further password. In field "New password" Enter new password. In the next field it must be repeated. Next, save the settings by pressing the button " Apply».
Setting up Wi-Fi on the router
Wi-Fi.
- In the window that appears in the field Network Name (SSID) Enter your network name (any)
- In field Use the protection of connections Choose WPA-PSK + WPA2-PSK
- In field Network key Enter your password to access the network (any)
- In field Channel: Choose AUTO.
- Apply.

Setting up a network connection

NAT with automatic receipt of IP address (DHCP)
- At the bottom of the page, select the section the Internet
- In the window that appears, click on Broadband Connection (ISP)
- In field Setting the IP parameters Choose Automatic
- In field MTU size Enter 1400
- After filling out these fields, click Apply.

Connection Connection With Internet
At the top of the page, select the tab Authorization.
- In field Type (used protocol) Choose PPTP.
- In field Connect through Choose Broadband Connection (ISP)
- In field Server Address Enter Title or server address(learn from Provadyer)
- In field Username Enter your login from the contract
- In field Password Enter your password from the contract
- In field Method of authentication Choose Auto
- Service Name, Concentrator Name, Description - You can not fill
- After filling out all the fields, click Apply.

Configuring PPPOE Connection (Rostelecom, DOM.ru)
the InternetAuthorization»
- Internet access protocol: Pppoe
- Username : Your login under the contract
- Password:Your password under the contract
- Save the settings button "Apply."

Configuring L2TP Connection (Beeline)
In the router interface, you must select the tab on the left " the Internet", In the list that opens, choose" Authorization»
- Internet access protocol: L2TP.
- Description: Connection name
- Server Address: name or server address (indicated in the contract)
- Username : Your login under the contract
- Password:Your password under the contract
- Authentication method: Auto
- Save the settings button "Apply."