10
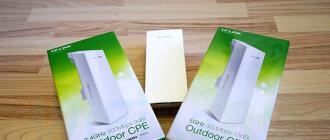
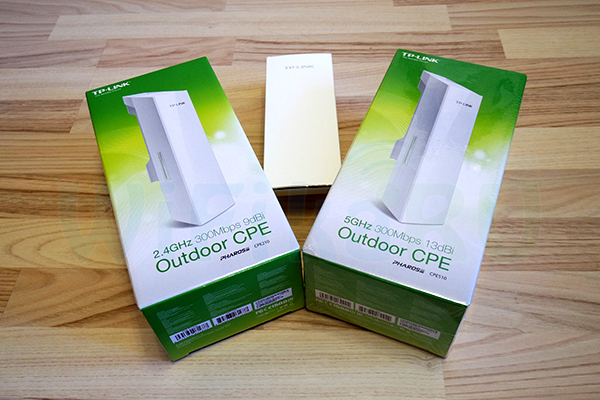
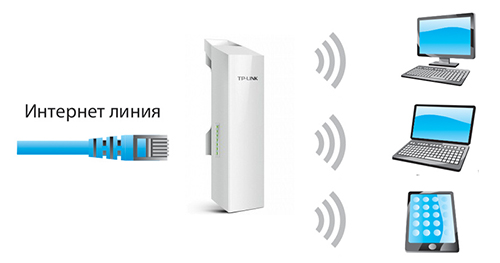
Today, our guest is two new devices that TP-LINK has kindly provided us with for reviewing and conducting various tests and experiments. So, meet - external wireless access points of WiFi of a series and CPE210 (it is possible to get according to the link).
These devices are primarily intended to distribute wiFi signal over long distances - up to several kilometers. Although they have a lot of modes - they can work literally in any configuration wireless networkwhat we are convinced of below. The differences in the two models are minimal and consist in the fact that the older model has amplified antenna, due to which it provides a longer signal range, and also operates at a less busy and more stable for receiving and transmitting data frequency of 5 GHz. But let's get everything in order.
What's inside?
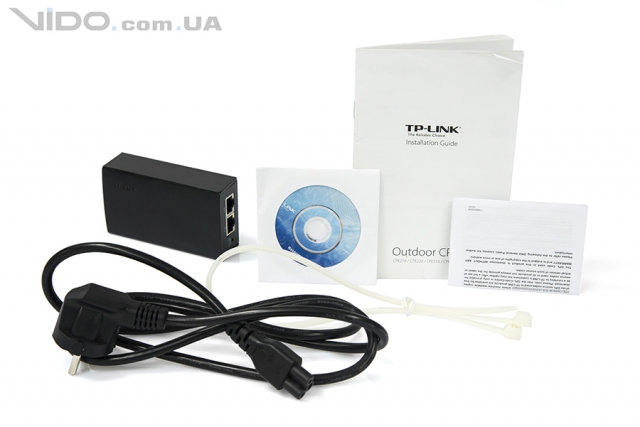
To begin, open the box and look at its contents. In our case, this action was especially pleasant, since the access points to the test came completely new only from a warehouse in an untouched factory cellophane.
Included is:
1. The access point itself
2. PoE Power Adapter
3. Power cord
4. Ties for fastening
5. Instructions, warranty and other papers

Appearance
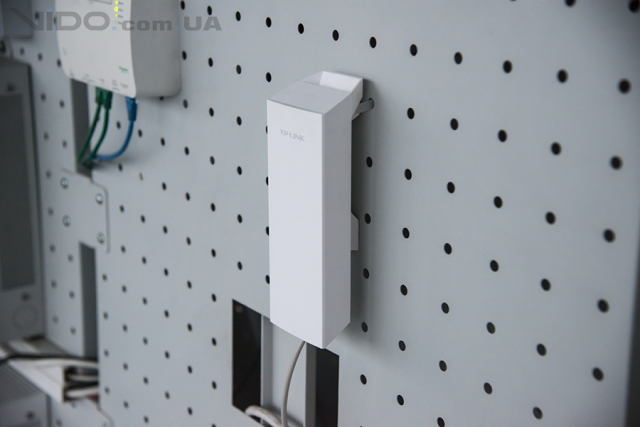
Externally, the points are exactly the same - a stylish modern plastic case, made in the traditional white color. It has a special all-weather design with a degree of protection IPX5 with the expectation of installation on the street. Also, thanks to a special case, optimum operation in different modes is achieved - high-power data transmission (up to 27 dBm / 500 mW) and high-power reception (up to -95 dBm).

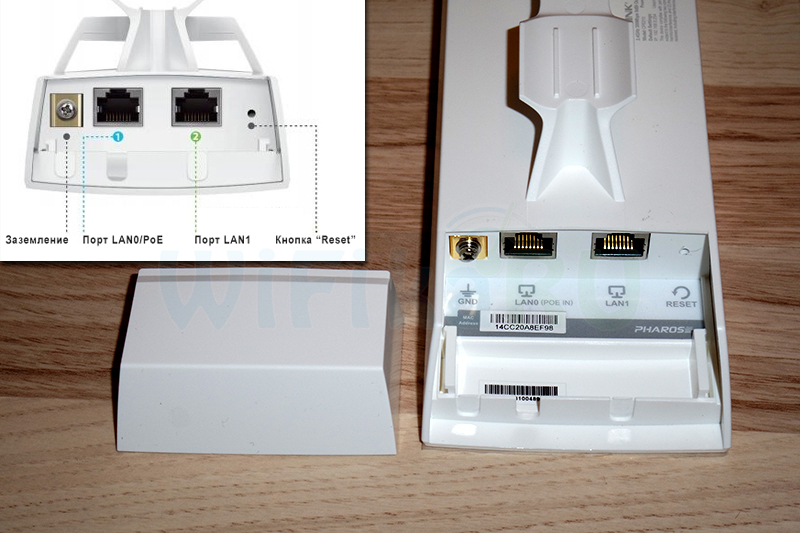
There is also a wall or pole mount on the back.
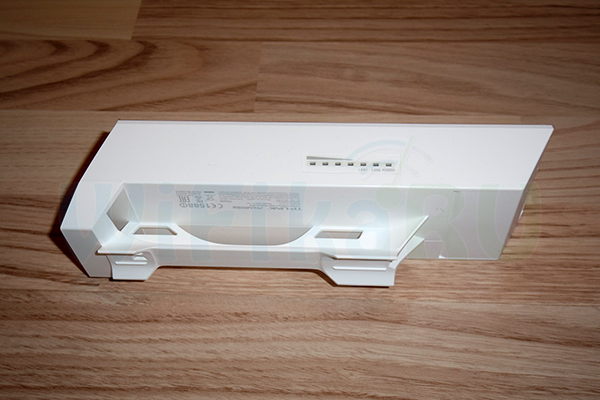
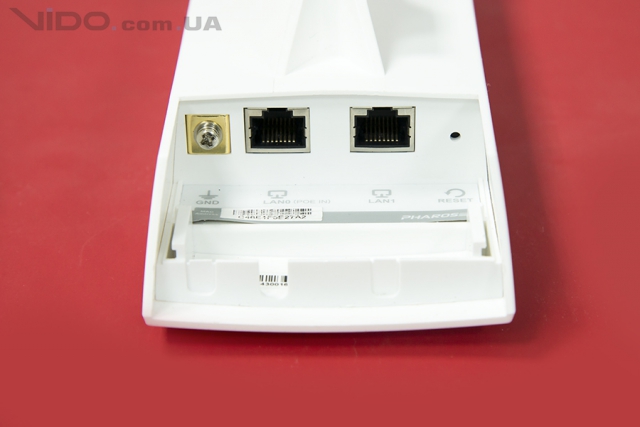
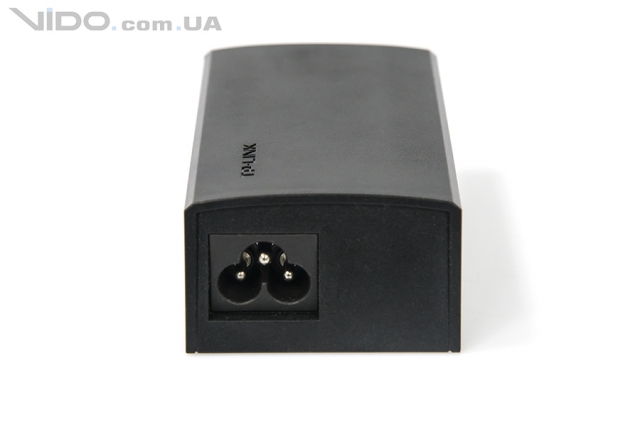
Below the protective cover is an Ethernet port for connecting a LAN cable, a PoE power connector, a ground connector and a reset button.
Specifications
1. Pharos points are equipped with a Qualcomm Atheros industrial-level Enterprise chipset.
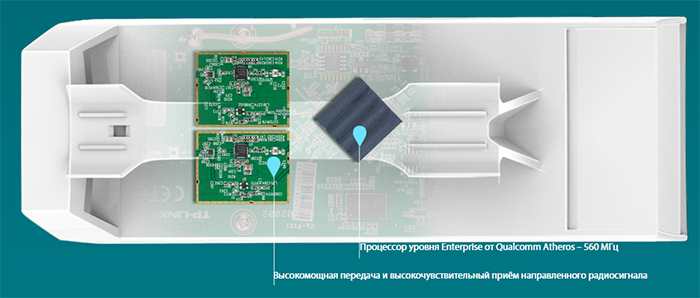
2. Built-in high-power dual-polarization antennas are designed to provide a greater range of directional radio.
In CPE210 - 9 dBi and distance up to 5 km
In the CPE510 - 15 dBi and a distance of 15 km in line of sight

3. Metallic shielding built into the housing ensures maximum signal stability

3. The working temperature of access points from -30 to +70 degrees allows you to use them on the street at any time of the year in any weather.
4. Support for PoE adapters, so that power can be fed to points over the same Ethernet cable as the Internet. When using a cable with grounding, as well as when installing a separate grounding in the corresponding connector, these parameters should provide protection against lightning strikes (up to 6000 W) and static electricity up to 15 kW.
5. The use of new technology MAXtream TDMA allows to reduce the effect of a drop in network bandwidth while simultaneously connecting several clients to a point.

As a result, according to the stated specifications, we have all-weather high-performance devices, perfectly suited for the organization of wireless networks over long distances. I also cite the official comparison table between the Pharos CPE210 / CPE510 and the previous generation models
![]()
Let's see how all this is configured.
Setting up an external wireless access point Pharos
As I said, the devices support all possible modes of operation in wiFi network. Including such a resource-intensive enough as a point-multipoint, that is, they can be used to distribute the Internet to several other similar access points or wifi routers from which separate local networks will come.

In order to get into the settings of the access point, you must first look at the information printed in small print on its back cover and find the IP address to connect, login and password. In my case, this is 192.168.0.254, admin / admin.
Next, you need to bring to a common denominator the IP address of this point and the computer or router through which we will configure it.
Namely, they must be on the same subnet as the period. That is, the IP of the computer from which the setting will be made should be 192.168.0
.XXX. If we connect the point directly to the computer for setting, then manually in the connection settings by local network A PC must be assigned a similar address (in the Internet Protocol Version 4 section).
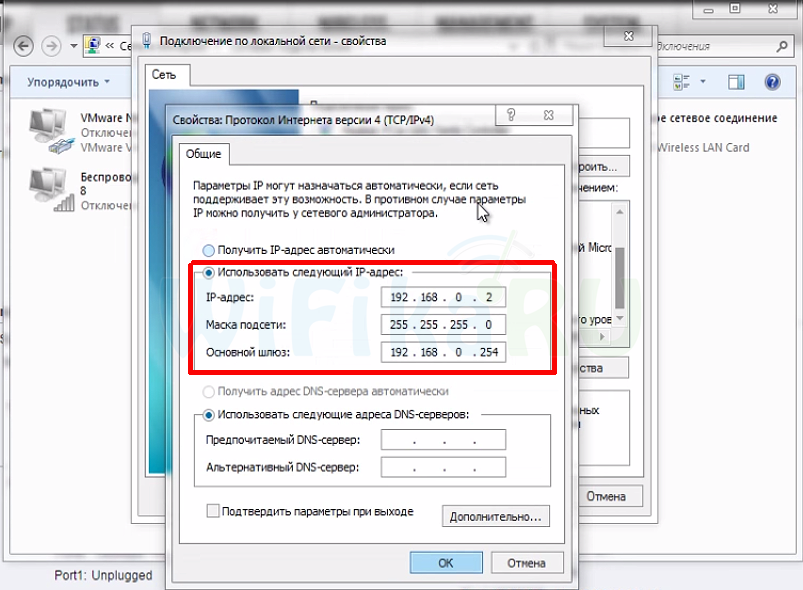
If you connect a point to a router, then the router itself, which distributes IP addresses to computers on the network, must have an address on the same subnet.
As a result, we obtain that the point has an address of 192.168. 0.254
, and computer, for example, 192.168. 0.2
.
Now you can connect the TD to our computer. To do this, take two Ethernet cables (patchcords).
The first is connected to the PoE connector on the power adapter and the other end to the LAN0 (PoE) port on the point.
Insert the second end into the LAN port on the power adapter, the other end into network card PC or LAN router.
The adapter is connected to an electrical outlet.
After that, open the browser by IP access point - http://192.168.0.254 - and get to the login page.
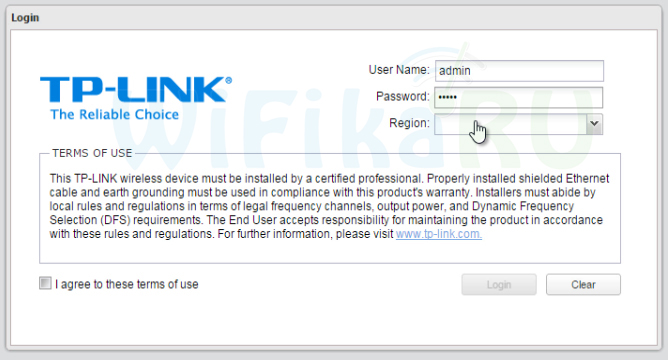
Enter the username and password that we found on the device, select your region, tick the rules and click “Next”. In the next step, we are changing the data for access to our more reliable ones.
Then we get to the admin panel. There are a lot of different settings here - we note that the latest specially designed operating system for them is installed as software for these models. PharOSwhich makes it very convenient to manage the settings of the entire network built on these outdoor access points. In a few lessons we will try to deal with them in more detail, but in the meantime we’ll go to the Quick Setup tab to see what modes our wireless access point can work with.

1. Access Point (access point)
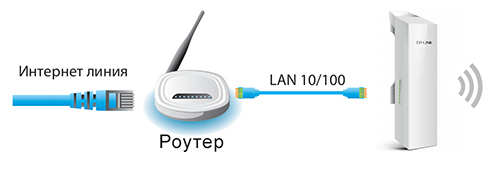
In this mode, our device distributes WiFi internetreceived by cable from the router. At the same time, the AP itself does not deal with routing within the network and does not assign IP addresses to devices connecting to it — these functions are handled by the router.
2. Client (client)
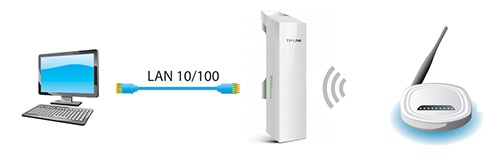
In this configuration, the device receives a signal via WiFi from another access point and transmits it via cable to a router or computer. That is, in fact, performs the work of the wireless signal adapter. If the signal is transmitted not to the PC, but to the router, then the cable from the point must be connected to the WAN port of the router.
3. Repeater (Repeater)
Here Pharos receives a signal via WiFi from another point and sends it further to the client via WiFi, thereby expanding the range of the wireless signal. At the same time, the SSID of the network and the password for connection remain the same as on the initial access point.
![]()
4. Bridge
Almost the same as the repeater, only from our device WiFi will have a different SSID and password than the original received signal from another point.
5. AP Router (router)
In this configuration, TP-LINK will work as a full-featured WiFi router, that is, to distribute wirelessly the Internet from the provider or from an ADSL modem, while assigning IP addresses to devices connected to it via the DHCP server.
Speed and range of outdoor access points Pharos
In order to get the most out of these points, you must use them in a pair. For example, if you want to transmit a WiFi signal from one house to another, then put 2 points directed at each other, and configure one as an AP, the other as a client. In this configuration, you can achieve maximum speed and range.
We managed to check how far one device working as a router will finish off. I will tell you honestly, I was pleased with the result - having fixed Pharos on my balcony, I walked out 250-300 meters outside and was able to catch the signal. True, the speed was quite small, but the distance was impressive.
In the network equipment category, we mainly tested classic wireless routers. This time, TP-LINK provided an overview of an outdoor wireless access point with equipment and software commercial level.
Equipment
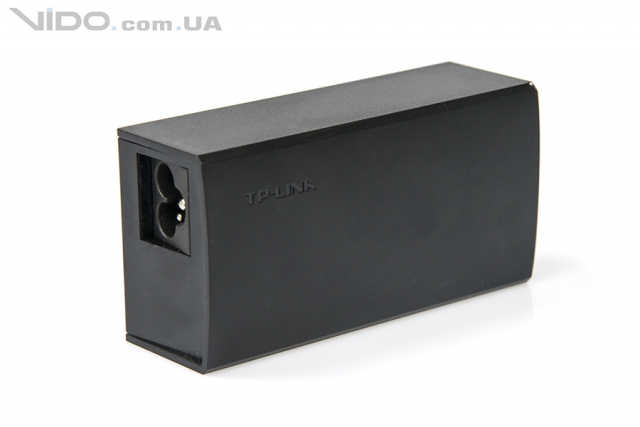
A software disc, user manual, Passive PoE power adapter with cable and a set of plastic cable ties are supplied with the device. This is enough to set up and get started.
Appearance
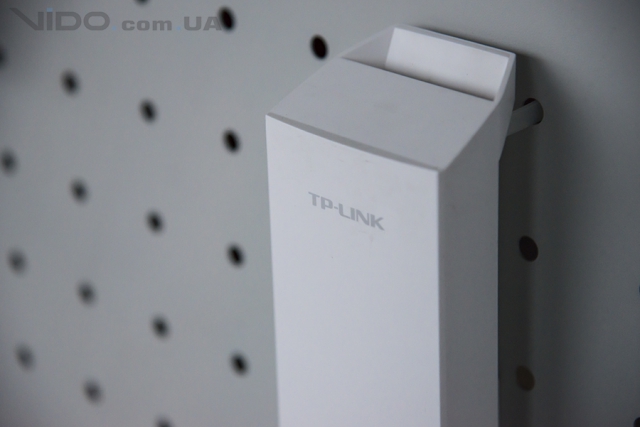
The model looks decent and resembles industrial access points to ensure mobile communications, which are accustomed to see in the towers.
The whole structure is enclosed in a non-separable white casing made of durable polycarbonate. It is reliably made and protected from moisture according to the IPX5 standard, because the positioning of the device involves the use outdoors with operating temperatures from -30 ° C to + 70 ° C.

In addition, manufacturers have provided protection against electrostatic discharge to 15 kW and lightning to 6000 V. The main part of the access point is made matte, while the front panel has a glossy finish.

Among the functional elements is to provide a place for mounting on a pole, a panel of indicators on the left side and a niche with accessible connectors, which is covered by a special cap.


The connectors are represented by two Ethernet ports of 10/100 Mbps, one of which is used for powering with the help of the Passive PoE adapter I mentioned earlier, as well as a grounding connector.
Do not forget about the reset key. By the way, the adapter, despite the white design of the main device, is painted black.

It is able to provide power at a distance of 60 meters. The dimensions of TP-LINK PHAROS CPE510 are 22.4 x 7.9 x 6 cm, with a weight of 315 g.
Functionality and web interface
The functionality of the outdoor access point TP-LINK PHAROS CPE510 is to provide a wireless Wi-Fi connection over long distances.
So, after operational tests, the manufacturer claims data transmission at a distance of no more than 15 km. Considering that the model under test is narrowly targeted, the 13 dBi 2x2 built-in bipolarization antenna provides a transmission beam width of 45 ° vertically and 30 ° horizontally. Therefore, to ensure coverage of vast areas, at a distance of more than 15 km, it is worth using several devices and additional antennas.

The model is based on the Qualcomm Atheros Enterprise AR9350B processor, with a frequency of 560 MHz and the MIPS 74Kc core. The amount of RAM is 64 MB of standard DDR2 memory, and 8 MB for firmware. TP-LINK PHAROS CPE510 works with the IEEE 802.11a / n standard with a data transfer rate of up to 300 Mbps. The device can operate in the following modes: access point, client, repeater, access point with a router, as well as a WISP wireless client. The channel width is 5/10/20/40 MHz. Security is provided by the WPA / WPA2, WPA-PSK / WPA2-PSK (AES / TKIP) protocols, as well as 64/128/152-bit WEP encryption.
To begin with, the router itself, which you want to make an access point, is the access point, only more functional. It has a DHCP server that distributes IP, there is most likely a firewall, and it roughly builds routes between connected devices, so it and the router. So, in order to turn the router into an access point, it is enough to disable some functions in it and connect it to another router or modem via cable.
In the hotel article, I already wrote. You can read if interested. There I promised in detail, using the example of different routers to show the settings that need to be made to use the router as a point wi-Fi access.
Let us use an example to find out for what purposes this mode of operation may be suitable. Suppose you have a modem or router installed on your first floor, or at one end of the house. Which perhaps distributes Wi-Fi, and maybe not, it does not matter. So, and at the other end of the house, or on the other floor, we need to set up an access point to distribute Wi-Fi. At the same time, the connection between the router and the access point will be via a network cable.
If we put an access point on the second end, then the main router will distribute IP addresses and the devices will be on the same network, which is often very important. Also, the access point mode can be useful for distributing Wi-Fi from a modem in which there is no such possibility. In fact, many applications. Otherwise, access points would simply not be sold as separate devices. Since they would not make sense.
Please note that most routers can work in other modes that might suit you better:
- Repeater mode - it is suitable if you have a goal to simply expand an already existing Wi-Fi network with one more router. We have instructions on the site, in the same way and. After setting up, there will be one Wi-Fi network, just enhanced. Internet via cable from the "repeater" will also be.
- WDS Wireless Bridge Mode - this is practically the same as the access point mode, but here the connection between routers is not via cable, but via Wi-Fi network. In more detail, on setting up such a connection, I wrote in the article:. It shows in detail on the example of popular routers: ASUS, TP-LINK, D-Link, Zyxel. There are more detailed.
Sorry that so much information and links are already at the beginning of the article, but these issues needed to be sorted out.
As for the “access point” mode of operation, it is also AP (Access Point), then on routers of different manufacturers, this mode is configured differently. For example, on routers from ASUS and Zyxel, it is enough to turn on the Access Point mode in the control panel, connect the devices with a network cable, and everything is ready. But on devices from TP-LINK, you need to manually change the IP address of the router and disable the DHCP server.
Connecting the access point to the router (modem):
We connect both devices network cable. On the main router (modem), we connect the cable to the LAN port ( home network), and on the router-access point also in the LAN-port.
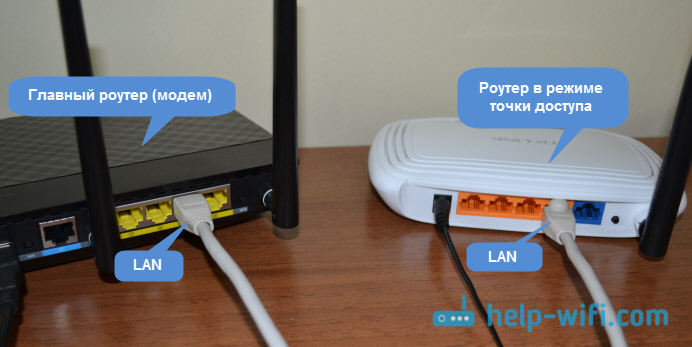
From the access point, internet via network cable also works. For many, this is important.
Setting up an ASUS router in the access point (AP) mode
On ASUS routers, as a rule, the AP mode is enabled in the control panel. After that, we simply connect it to the router, or to the modem and everything is ready. On some models, for example on the old RT-N13U, the modes are switched by a special switch on the device case. I will show the configuration of the access point on the example of the router Asus RT-N12.
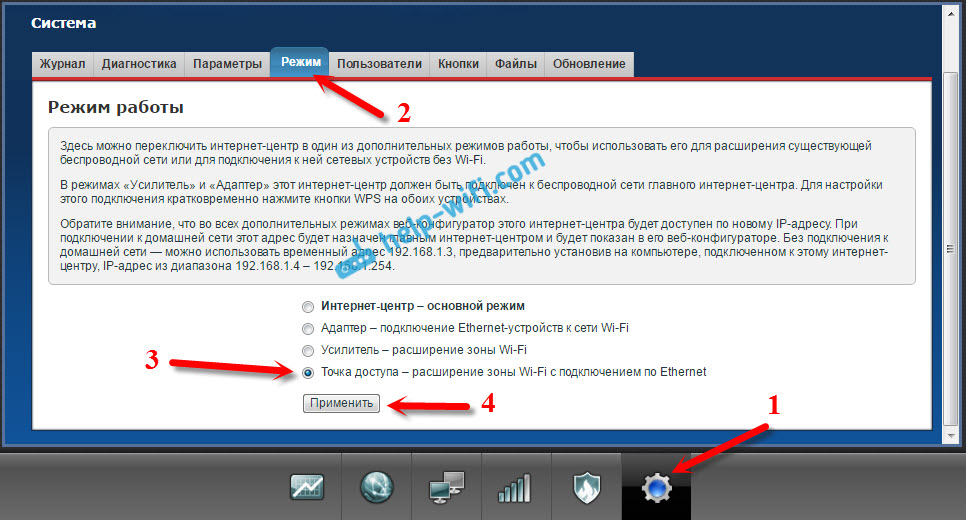
Connect to the router, and at the address 192.168.1.1, go to its settings. In the settings go to the tab "Administration". And above the tab "Mode of operation". We put the switch next to "Access Point Mode (AP)". We read the description of the mode, and click "Save".

In the next window, we need to set the IP settings. You can not change anything, but simply click "Next". But, in this case, to determine the IP-address of the access point, you will need to use a special utility "Discovery". And you can, where there is no “Get IP automatically” and change the last digit. For example, at 192.168.1.2. Now, the settings will be available at this address. DNS, if necessary, can be specified as in the screenshot below. Or, leave the automatic receipt.
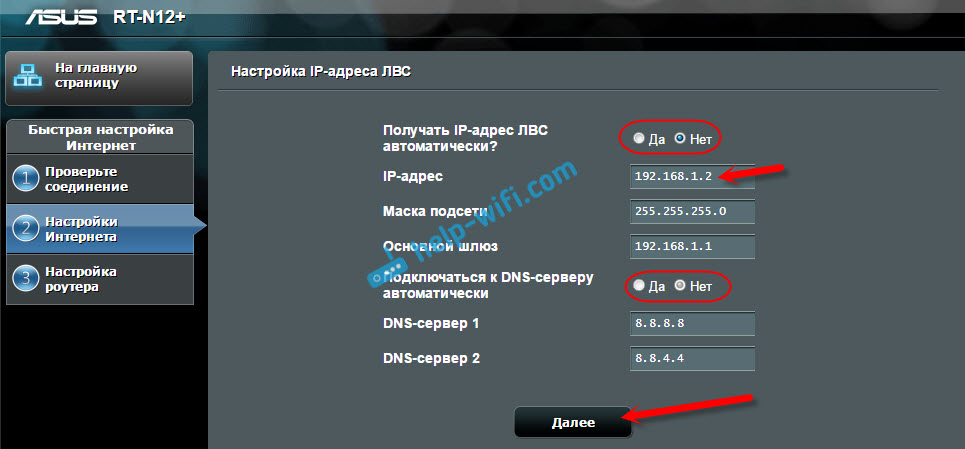
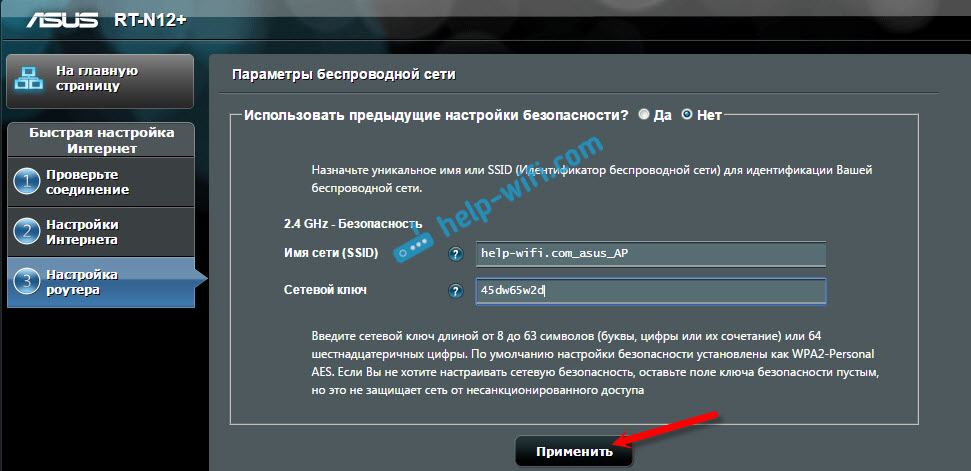
In the next window, if necessary, change wi-Fi settings network of our access point ASUS, and click "Apply".
The router will reboot, and go into AP mode. If you go to its settings, at the address that you may have indicated yourself, or which can be determined by the "Discovery" utility (you can download it by the link), then you will see a trimmed control panel. Where you can change the necessary settings, or, for example, return the device to the "Wireless router" mode.
After setup, we connect Access Point to a router, or the modem on a cable (the scheme is above)and she will be handing out Wi-Fi.
Access point from Zyxel Keenetic router
If I'm not mistaken, only Keenetiс Lite III has a mechanical mode switch on the case. In all other cases,. I immediately advise to set up a Wi-Fi network (set network name and password if needed)That then not to deal with an input in settings AP.
To activate the access point mode on the Zyxel, go to the "System" tab, and at the top, open the "Mode" tab. Highlight the item "Access point - Wi-Fi extension with Ethernet connection", and click the "Apply" button.
Allow the router to reboot. After that, you can connect it with another router, and it will already work in the "Access Point" mode.
To enter its settings, you can first enter the settings of the main router (modem), go to the customer list, and see the IP address of our Zyxel. And go on it to the web interface. Or you can simply reset the settings, and the router will work in the usual "Internet Center" mode.
TP-LINK router as a Wi-Fi access point
If you have a TP-LINK device, then you will need to manually change a few parameters. Since the switch mode is not there. Now I will show you step by step what to do. I will show the example of the router.
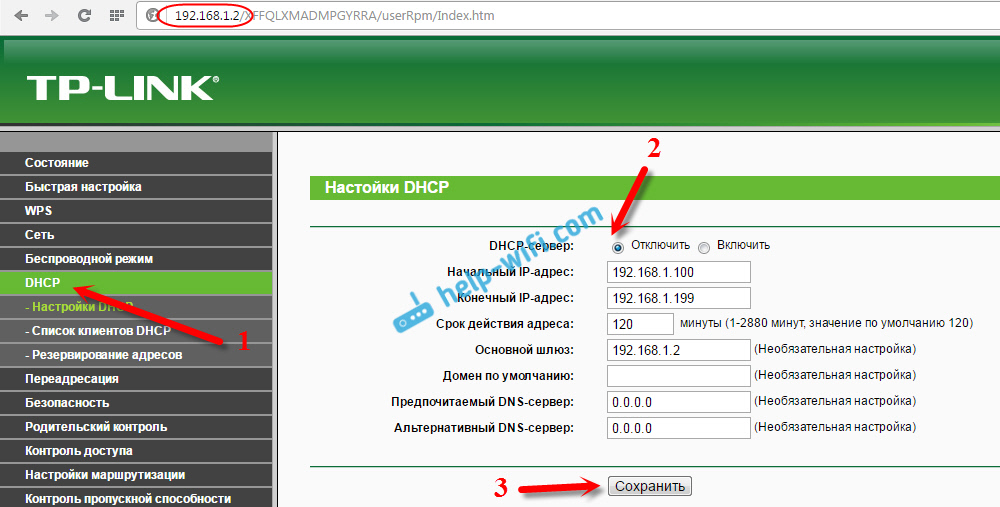
1 To start, go to, which we want to configure in the mode of a wireless access point. And changing the IP address of the router. To do this, click the "Network" - "LAN" tab. We need to set the IP address the same as the main router. (can be viewed on the device itself), but with a different number at the end. For example: if the IP address of the master modem (router) is 192.168.1.1, then in the TP-LINK settings you need to set 192.168.1.2, and save the settings. The router will reboot.

Go back to the settings, but at the new address. In my case, this is 192.168.1.2.
2 Set up a Wi-Fi network. If necessary, on the "Wireless" tab, set the Wi-Fi settings for our access point. Specify the network name and password.
3 Last step. Disable the DHCP server. To do this, go to the "DHCP" tab. Put the switch next to "Disable" (disable), and save the settings.
And reboot the router. It is possible through the control panel. Tab "System Tools" - "Reboot" button "Reboot".
We connect it to the main router (LAN - LAN), and get a Wi-Fi access point.
Configure Access Point on Netis routers
On my Netis router, I just changed the IP address, turned off DHCP, and it all worked. Go to settings at netis.cc.
Open the "Network" - "LAN" tab. Change the IP address. If the main router or modem is 192.168.1.1, then we write 192.168.1.2. What would be different only the last digit. In the same place we disconnect the DHCP server. And save the settings.
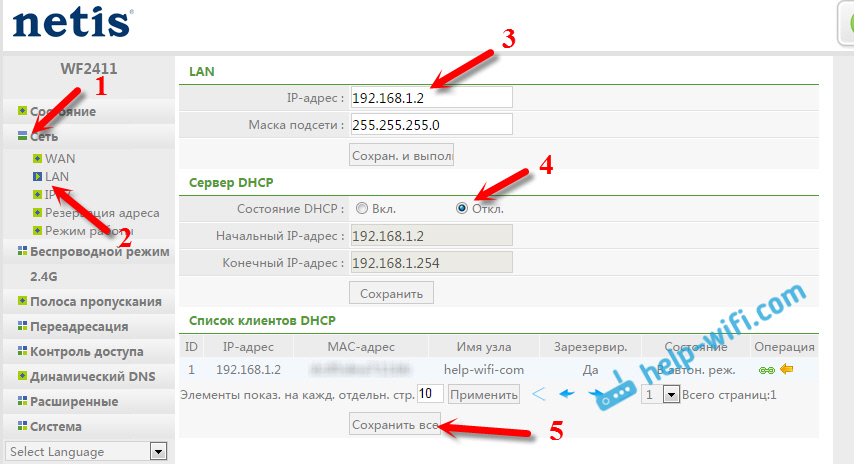
If necessary, then go back to the settings (already at the new address you asked), and on the "Wireless Mode" tab, set the Wi-Fi settings.
We connect our access point Netis with the host device with a network cable (LAN-LAN) and everything is ready.
Equipment connection diagram:
- POE injector is connected to the power supply;
- The first cable "twisted pair" is connected to the POE injector in the LAN connector and to the computer in the network card;
- The second cable "twisted pair" is connected to the POE injector in the POE connector and to the access point.
Setting up a computer network card
Setup was done in operating system Windows 7.
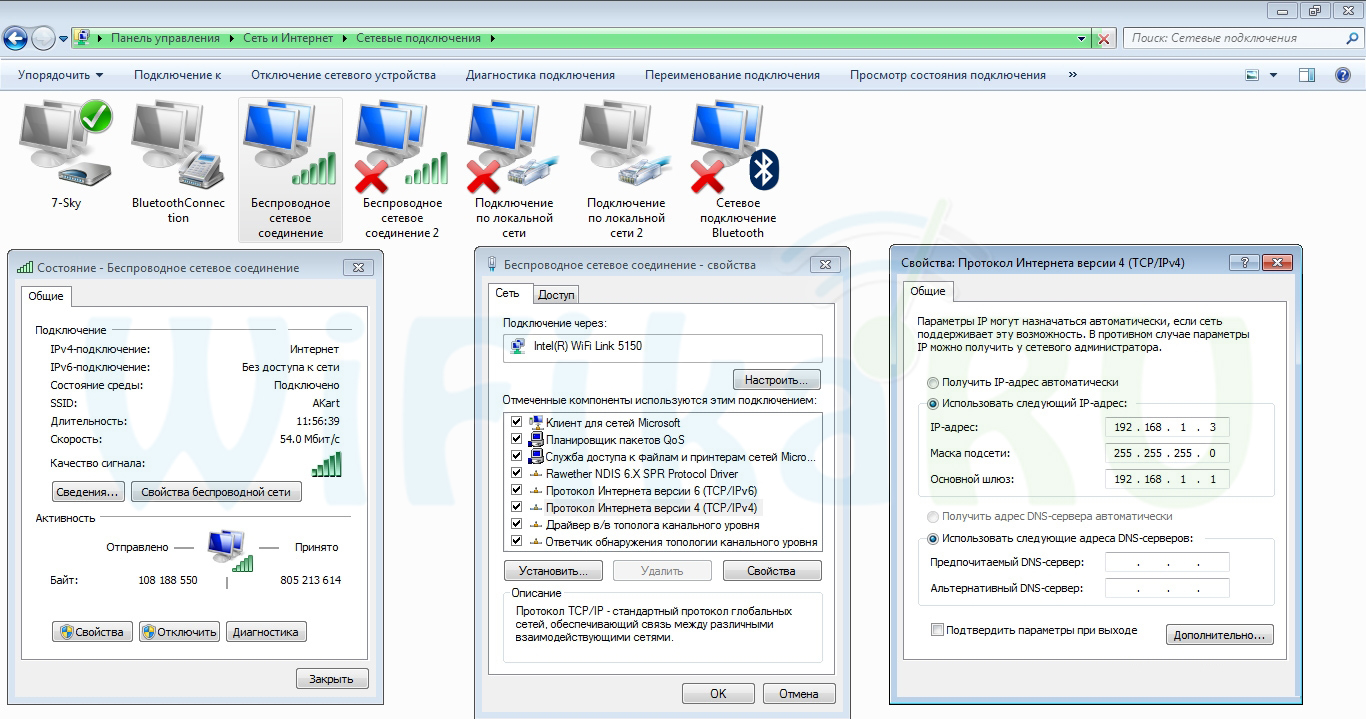
Go to "Start" → "Control Panel" → "Network Control Center and shared». .
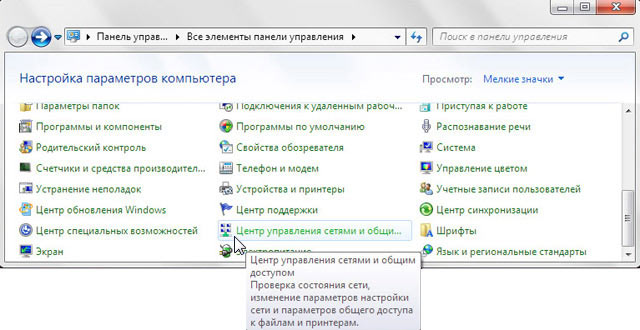
Open the "Change adapter settings."

Right-click on the “Local Area Connection” and select “Properties”.
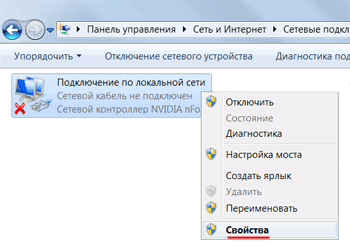
Click on "Internet Protocol Version 4 (TCP / IPv4)" and the "Properties" button.
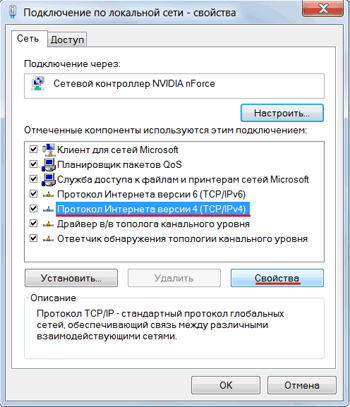
In the next window, specify "Use the following IP-address", IP-address 192.168.1.21 , Subnet mask 255.255.255.0 and click "OK".

Setting up a wireless access point TP-Link TL-WA5210G
We proceed to configure the TL-WA5210G Wi-Fi access point.
In the browser Internet Explorer (or any other) enter the address

In the next window, enter the user name adminand password admin.
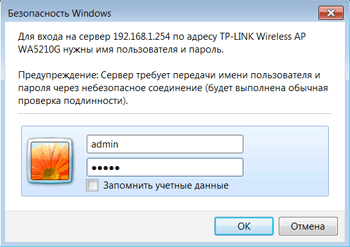
Attention! If you cannot enter the settings at the address, then the device has the default IP address changed or the IP address of the network card of the computer is not configured in one subnet, for example, 192.168.1.21. To reset the access point TL-WA5210G to factory settings, hold down the button for 8-10 seconds and release.
AP Bridge
AP Bridge (access point in transparent mode)« the bridge» )
- the name of this mode is not in the settings, but it is implied if you want to connect to the provider "transparently". Bridge mode allows you to transparently pass traffic from computers connected to the TL-WA5210G via Wi-Fi to the provider's equipment. The provider sees all connected computers and distributes them. network settings from your DHCP server. This mode is most often used when you already have a router connected to the provider’s cable, and you want to connect an access point to the router to distribute the Internet via Wi-Fi over a long distance.
Go to the menu Wireless→ Basic Settings and configure the parameters of the access point :
- SSID: name of access point;
- Region: choose a country;
- Channel
- Power: power;
- Mode: what standards will the access point work with? Leave unchanged.
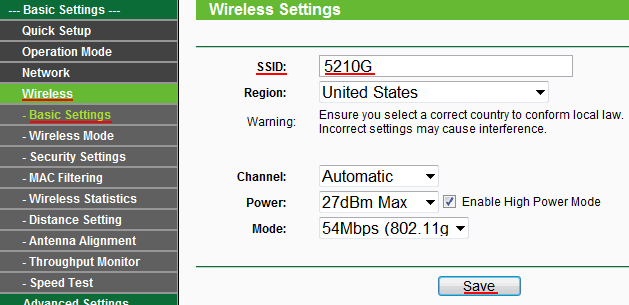
Save at the bottom of the page.
Wireless→ Security Settings and perform the settings:
- WPA-PSK / WPA2-PSK, but you need to know that not all old devices can support this type of encryption;
- Version: specify the encryption version. The safest - WPA2-PSK;
- Encryption: encryption algorithm. You can use Automatic;
- PSK Passphrase: enter the password (at least 8 characters) to connect to the wireless access point and press the button Save.

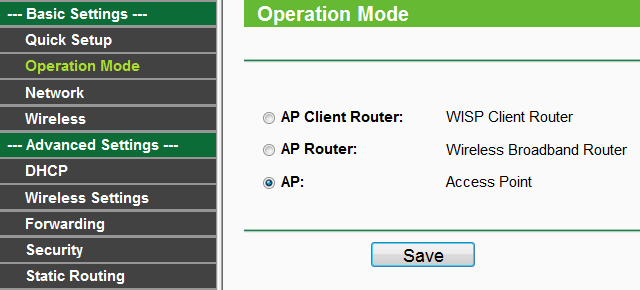
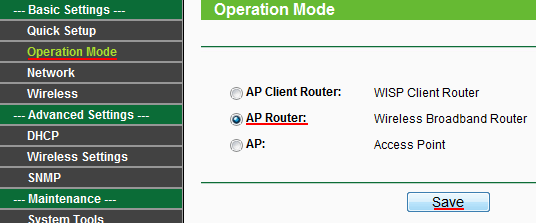
Go to the menu Operation mode, we specify the mode AP and press the button Save.
Check the parameters of the access point in the menu Status. AT Operating Mode there must be a mode Access Point, at SSID - access point name.

Now you can connect the point tP-Link access TL-WA5210G to the router or switch (if the network has a DHCP server) and connect to the access point via Wi-Fi.
The new IP address to enter the settings of the access point TL-WA5210G must be found on the router or DHCP server. To do this, open the list of connected devices, find your access point by MAC address, and see what IP address is assigned to it.
Attention! There may be situations when devices connect to an access point but not receive correct settings by DHCP. At the same time, the Internet does not work on the connected computers. In this situation, it is necessary to manually register a free static IP address from the subnet that the DHCP server serves, the subnet mask and the IP address of the Internet gateway on the TP-Link TL-WA5210G access point.
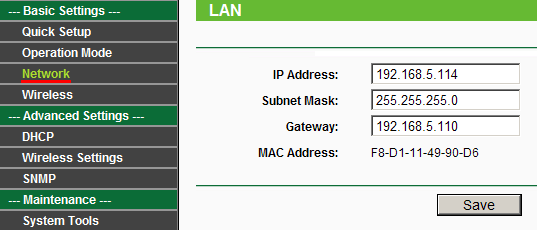
Enter the menu Network, specify in the field IP Address: static IP address in the field Subnet mask: subnet mask in the field Gateway - IP address of the Internet gateway. The new static IP address will be used to enter the access point settings. To save the settings, click Save.
Configure the TL-WA5210G in mode AP Router
AP Router (access point in router mode) - This mode is used if you need to create a wireless access point and hide the computers that will connect to it in a separate subnet. For example, you can connect the TL-WA5210G directly to the provider cable and distribute the Internet to other computers via Wi-Fi. In this mode, the provider does not see the computers that are connected to your point and the TL-WA5210G works as an Internet gateway. To isolate computers in a separate subnet, a DHCP server is configured on the access point, which will distribute the network settings via Wi-Fi.
Go to the menu Wireless→ Basic Settings and configure the parameters of the future access point :
- SSID: name of access point;
- Region: choose a country;
- Channel: Select the wireless channel on which the access point will operate. This option can be left Auto. In the future it is better to scan for the presence of others. Wi-Fi networks, find a free channel for your access point and set it manually.
- Power: power;
- Mode: what standards will the access point work with? Leave unchanged.
To save the settings, press the button Save at the bottom of the page.
Configure the security settings of the wireless point. Go to the menu Wireless→ Security Settings and perform the settings:
- Choose the type of encryption. For greater safety, it is better to use WPA-PSK / WPA2-PSK, but you need to know that not all old devices can support this type of encryption.
- Version: specify the encryption version. The safest is WPA2-PSK.
- Encryption: encryption algorithm. You can use Automatic.
- PSK Passphrase: enter the password (at least 8 characters) to connect to the wireless access point and press the button Save
Go to the menu Operation Mode,specify the operation mode AP Router and press the button Save.
After applying the settings, you will not be able to enter the settings point on the cable connection. You need to connect the access point to the provider cable (router), connect to the point via Wi-Fi and enter the address 192.168.1.254 to enter the settings.
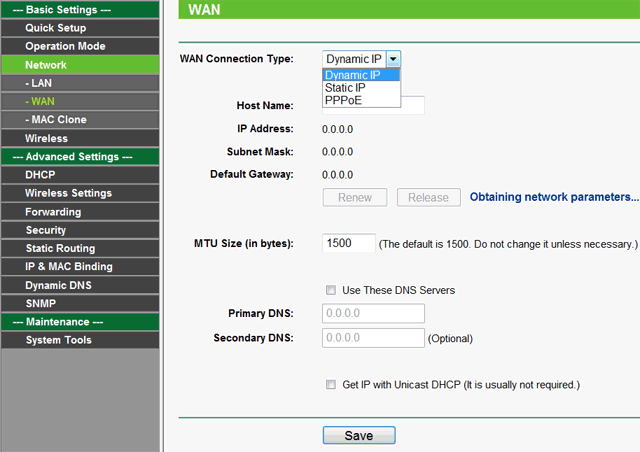
Open the menu Network - WAN and specify how TP-Link TL-WA5210G will receive network settings from the provider (router) via cable. Most often, the settings are assigned automatically by DHCP, so choose Dynamic IP and click Save.
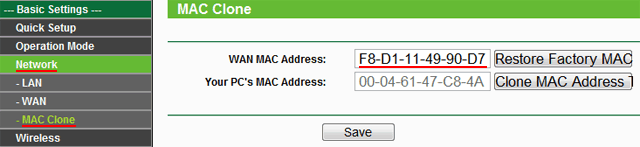
If the provider blocks access to the MAC address, go to the menu Network→ MAC Clone and in the field WAN MAC Address: Specify the allowed MAC address.
Enter the menu DHCP and check that DHCP server enabled and configured. In field DHCP server must be selected Enable, in the fields Start IP Address and End IP Address The IP addresses that will be allocated to the connected computers are indicated.

Go to the menu Status and check that we have created a wireless access point and the provider (router) has transferred its network settings to it.
In field SSID name must be specified Wi-Fi point. In section Wan The network settings that the provider (router) assigned to the 5210G point by DHCP will be indicated.

Now you can connect to the TP-Link TL-WA5210G access point and for computers connected via Wi-Fi, Internet access will work.
Change admin password
Configure the access point should only administrator. Therefore, so that no one except the administrator could enter tP-Link settings TL-WA5210G, you need to change the password to login.
Go to the menu System tools→ Password and enter the settings:
Old User Name: specify the old username admin;
Old Password: we specify the old password admin;
New User Name: enter a new username, you can leave admin;
New Password: enter a new password;
Confirm New Password: We confirm the new password.

To save the password, press the button Save.
Reset TP-Link TL-WA5210G to factory settings
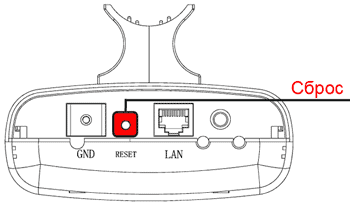
If you have forgotten the password for accessing Tp-Link TL-WA5210G or cannot enter the Web interface for setting, then restore the default settings of the access point using the button Reset near the LAN connector.
To do this, press and hold the button for about 8-10 seconds. Reset .
After resetting, configure the computer’s network card to use a static IP address, for example 192.168.1.21 , and enter in the browser address. Standard login username is adminpassword is admin.
Other articles for TP-Link TL-WA5210G:
Article Reviews
Rating: 5 Voices:
Sera 13.11.2016 13:19:21
there is such a question, I use TP-Link TL-WA5210G as a router for distribution (for myself, a tablet phone ...) he stands in the panel entrance 5 over the last one, installed a 18 dbm signal in the 47-80 dbm quarter (checked on telephony) And here it is a question is a lot of aa Ukraine ?? on the cap I will not get ??? if you tell me how to do
Reply Cancel reply
Vladimir 09/02/2016 15:16:45
TP-Link TL-WA5210G cable is connected to the adsl modem when watching online movies or downloading files with torrent the Internet constantly falls off! Writes-network without access to the Internet! Is solved only by disconnecting from the electrical network! And when I connect the cable directly to the adsl modem no problem! what's the matter how to solve this problem
Reply Cancel reply
Ilya 08.26.2016 09:30:46
please tell me how to connect the CPE210 to the router so that you can put it on the street /
~ 1.4 km distance to another NanjStationLocoM5 brand antenna and can they be switched with?