In this article, we will look at how you can organize own VPN server on Windows 7 without using third-party software
Let me remind you that VPN (Virtual Private Network) this is the technology used to access secure networks through common network Internet. VPN allows you to ensure the protection of information and data transmitted over a public network by encrypting them. Thus, an attacker will not be able to gain access to data transmitted within a VPN session, even if he gain access to packets transmitted over the network. To decrypt traffic, he needs to have a special key, or try to decrypt the session using brute force brute force. In addition, it is a cheap solution for building an enterprise network over WAN channels, without the need to rent a dedicated expensive communication channel.
Why might you need a VPN server on Windows 7? The most common option is the need to organize remote access to a Windows 7 PC at home or in a small office (SOHO) when, for example, on a business trip, visiting, in general, not at the workplace.
It should be noted that VPN server on Windows 7 has a number of features and limitations:
- You must clearly understand and accept all the potential risks associated with a VPN connection.
- Only one user connection is possible at a time and organize a simultaneous VPN access to a computer with Win 7 to several users at once, it is legally impossible.
- VPN access can only be granted to local user accounts, and integration with Active Directory is not possible
- For vPN settings server on a Win 7 machine, you must have administrator rights
- If you connect to the Internet via a router, you need to have access to it, and you need to be able to set up rules for organizing port forwarding to allow incoming VPN connections (the actual setup procedure may differ significantly depending on the router model)
This step by step instructions will help you organize your own VPN server on Windows 7 without using third-party products and expensive corporate solutions.
Open the panel NetworkConnections (Network connections) by typing "network connection" in search bar in the start menu, select the item “View network connections”.

Then hold down the button Alt, click on the menu File and select the item New Incoming Connection (New incoming connection), which will launch the wizard for creating connections to the computer.

In the wizard window that appears, specify the user who will be allowed to connect to this Windows 7 computer via VPN.

Then specify the type of user connection (via the Internet or via a modem), in this case select “Thought the Internet”.

Then specify the types network protocolsto be used to service the incoming VPN connection. At least TCP / IPv4 must be selected.

Click the Properties button and specify the IP address that will be assigned to the connecting computer (the available range can be set manually, or you can specify that the IP address will be given by the DHCP server).

After you press the button Allowaccess, Windows 7 will automatically configure the VPN server and a window will appear with the name of the computer that will be used to connect.

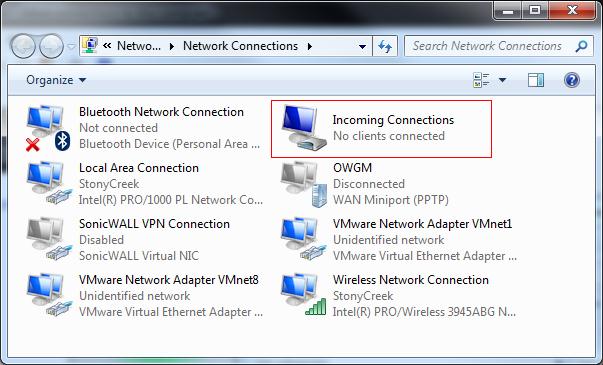
That's all the VPN server is configured, and a new connection with the name Incoming connections will appear in the network connections window.
There are a few more nuances when organizing a home VPN server on Windows 7.
Configuring firewalls
There may be firewalls between your Windows 7 computer and the Internet, and in order for them to pass the incoming VPN connection, you will have to configure them. Customization various devices is very specific and cannot be described within the framework of one article, but the main thing to understand the rule is to open the VPN PPTP port with the number 1723 and set up forward (forwarding) connections to the Windows 7 machine on which the VPN server is up.
We must remember to check the parameters of the built-in windows firewall... Open the Advanced Settings control panel in Windows Firewall, go to the Inbound Rules section and check that the “Routing and Remote Access (PPTP-In)” rule is enabled. This rule allows to accept incoming connections on port 1723

Port forwarding
Below I have posted a screenshot showing the organization of port forwarding on my NetGear router. The figure shows that all external connections on port 1723 are redirected to windows machine 7 (whose address is static).

VPN connection setup
To connect to a VPN server with Windows 7, a VPN connection must be configured on the connecting client machine
To do this, set the following parameters for the new VPN connection:
- Click right click by VPN connection and select Properties .
- In the tab Security in field TypeofVPN (VPN type) select option Point to Point Tunneling Protocol (PPTP) and in section Data encryption select Maximum strength encryption (disconnect if server declines) .
- Click OK to save the settings

Virtual Private Network, aka VPN, aka virtual private network... In fact, in a sense, such networks should be viewed as a step back, however, a step is forced and extremely effective. VPN lets you get back from global networks to local networks, albeit on a rather unusual scale.
VPN, on the other hand, allows you to unite computers scattered around the world into virtual local networks, while you can interact with other network members as if everyone is connected to the same router - play on local network, open shared folders through "Network Neighborhood", as well as print on "shared" printers. So, we suggest that you learn how to create VPN-networks, connect to them, and also solve some problems that may arise (although not necessarily) during their use. Despite the fact that the general principle always remains the same, we will talk about how to set up a VPN on Windows 7.
Server creation
Let's start creating a VPN server - a computer to which other users of our virtual network will connect. First of all, we need to get into the Network and Sharing Center. To do this, follow these steps: Start button; "Control Panel"; "Network Control Center and general access».

If in the upper right corner you see the inscription "Category", you need to click on it and switch the mode to "Large icons" - this display mode is used in our instructions.
As a result, you should see something like this:

The window displayed on your screen allows you to control almost any aspect of your computer's networking. Here you need to click on the "Change adapter settings" icon.

To start creating an inbound connection, follow these steps:

Now you have this window on your screen, with a few minor exceptions.

Firstly, the list of accounts may contain other items, and also, you are unlikely to have the use of "vpnuser", which we will now create by clicking on the "Add user" button.

Fill in the indicated fields: "User" - the client's login is indicated here; "Password" and "Confirmation" - the password of the created account (the values \u200b\u200bmust match); the "Full name" field is optional - you can leave it blank, as it does not affect functionality.

After filling in the fields, click on the "OK" button. If you want to add a few more VPN users (this can be useful for further control over them) repeat the procedure as many times as necessary. When finished with the creation, click "Next". In the next window, check the box "Via the Internet", otherwise the "Next" button will be unavailable. Accordingly, after the checkbox, click on the button and get the following window:

It remains to configure the protocols. As for their choice, it is better to leave everything as it is. However, if you plan to use applications that need IPv6 support, you can check the box next to this protocol, however, in 99% of cases this is not necessary.
It is imperative to configure IPv4 correctly:

Everything is necessary in order to be able to find connected users in the future. In addition, this way you can limit maximum amount connected, which is very useful. When done, click OK and then the Allow Access button. The VPN server has been created. It remains only to click on the "Close" button and start configuring clients. Also take a look at the Port Forwarding chapter - it can be useful.

PC connection
Let's start configuring client computers. First of all, you need to find out the server address, if you connect to a "homemade" VPN server, for this you need to go from it (from the server), for example, to the site myip.ru, which will clearly and clearly display your IP address. In the future, we recommend using services in the spirit of DynDns - so as not to waste time looking for an address.
So, to establish a VPN connection, we do the following:

This click will launch a short connection wizard, in the first step of which you need to select "Connect to a workplace" and click "Next".

Now we select the first item from the list. You may not even think about the second one in the 21st century - it is needed for DialUp modems.

If you did everything correctly, it's time to drive in the server address. This can be either the IP address that we looked at on the server, or domain namewhich can be obtained through dynamic DNS services.

In our case, the address is specified as 157.57.121.54, however, in your case the numbers will probably be different. You can fill in the field "Destination name" at your own discretion - it will not affect the operation of the network. Also, it is worth putting a tick in the "Do not connect now" item, so as not to waste time in the setup process.

As soon as the necessary data is specified, click "Next" and proceed to filling in the fields:
- "Username" - here you enter the login specified when creating the VPN server;
- "Password" - similarly - the password of the VPN user is specified in advance;
- optionally you can check the "Remember password" checkbox.
It remains to click on the "Create" button and your VPN connection is ready. If the server is running, and you are sure of the correctness of your actions, you can connect now using the "Connect now" button. In addition, you can always establish a connection using the network icon in the lower right corner.

That's all. If everything is done correctly, then you can start using your virtual network, however, we recommend that you read this article to the end - even if everything works fine now, there is a risk that problems will appear sooner or later and it is better to be prepared for them.
VPN server in Windows 7
First of all, it should be noted that the built-in VPN-server in the G7 has one important and extremely unpleasant limitation - only one person can connect to your server at a time. If you want more, install Windows Server, however, you can find a fairly effective patch on the network that removes this annoying limitation - after applying it, several connections will become available. In addition, sometimes for a complete setup, you need to configure the firewall and forward ports - we will tell you about this now.
Video: Create a Connection
Configuring firewalls
In some cases, the connection is established, but there is no connection between the computers. It's all about the built-in firewall (or firewall) of Windows.
To make it more user-friendly, you need to indicate that you trust the connected users.
We establish a connection, go to the "Network Control Center" and look for the connection icon. It is called "RAS" on the client and "VPN Connection" on the server.

We click on them on both machines and select "Home network".

That's all, your problems should disappear on this.
Port forwarding
Another snag is that home routers and ADSL modems do not open the ports required for VPN by default. In this case, you will have to do it manually.

You will have to open ports on the server, or rather, on the router to which it is connected - how this is done is described in detail in the instructions for your device, but we will only inform you that the Windows VPN server uses TCP port 1723. Also, if available such a function, disable GRE lock.
Setting parameters
Even when the VPN server is already configured, you can change its parameters. To do this, open the "Change adapter settings" window, which we used in the first part of the article, then right-click on the "Inbound connections" icon and select "Properties".

A window will appear on your screen where you can edit, delete, and add users, as well as configure protocol settings and IP ranges. In other words, change the parameters that you specified when creating the connection.
Attention! This function only works fully if the connection is idle - if someone is connected to you, disconnect it before changing the parameters.
Error 807
Network error about an interrupted connection with number 807 is a real scourge for novice admins. To get rid of it (or at least find out the cause of its occurrence), you need to do several steps:
- make sure you did everything right. This is especially true for entering the IP address on the client and opening the port on the server;

- make sure the remote access service is running. Press Win + R on your keyboard, type "services.msc" in the field and press Enter. In the window that opens, find the service "Routing and Remote Access", double-click on it and check that the fields circled in the screenshot correspond to yours;
- try to connect to yourself. Create a client connection with 127.0.0.1 as the IP address. If it fails, check the settings again, and also disable all programs that can affect network communication - antiviruses, firewalls, etc.;
- check if the VPN port is accessible from the outside. You can use the portscan.ru website. Enter 1723 in the field and click "Check". If the port is closed - check the settings of the router or ADSL modem (depending on how you are connected);
- if all the previous points pass the test, pay attention to the client computer - it must also have the Routing and Remote Access service enabled, and also disabled filtering programs.
As an additional measure, try setting everything up again.
Enabling debug logs
Sometimes to receive additional information you need to write all server events to an easy-to-read file. To start this process, press Win + R and in the window that opens, enter: netsh ras set tracing * enabled.

Press Enter and go to the Windowstracing directory, there you will find several files (5 pieces) that contain detailed information about connection attempts and transmitted data. They can be opened with any text editor. Disabling the recording is done by a similar command, however, the word enabled must be replaced with disabled. VPN is a great solution for a variety of cases. However, it gained the greatest popularity in the corporate environment. Let's say you're on a business trip with your laptop, but you want to use it as if you were in the office. Then a VPN is exactly what you need.

Besides, similar decision often used for remote access to printers - despite the fact that there are many modern protocols, such a solution is still simple and convenient.
And, of course, we must not forget about games - a VPN network greatly simplifies the launch of gaming programs designed to work on a local network. Naturally, all this is not a complete list. possible applications VPN. The functions of this service can be useful to everyone, so keep this manual ready.
Deploying a VPN server on an enterprise network is more complex than configuring basic services - NAT, DHCP, and file servers... Before getting down to business, you need to clearly understand the structure of the future network and the tasks that should be solved with its help. In this article, we will touch on the basic questions, the answers to which you should firmly know before you even approach the server. This approach will avoid many typical problems and thoughtlessly copying the settings from the example, and will also allow you to correctly configure the VPN exactly for your tasks and needs.
What is VPN?
VPN ( Virtual private network) - virtual private network, this abbreviation hides a group of technologies and protocols that allow you to organize a logical (virtual) network over a regular network. It is widely used to differentiate access and improve the security of corporate networks, organize secure access to corporate network resources from the outside (via the Internet) and, in recent times, providers of urban networks for organizing Internet access.
What types of VPN are there?
Depending on the protocol used, VPNs are divided into:
- PPTP (Point-to-point tunneling protocol) is a point-to-point tunneling protocol that allows you to organize a secure connection by creating a special tunnel over a regular network. Today it is the least secure of all protocols and it is not recommended to use it in external networks to work with information which is undesirable for unauthorized persons to access. To establish a connection, two network sessions are used: for data transmission, a PPP session is established using the GRE protocol, and a connection on TCP port 1723 to initialize and control the connection. In this regard, it is often difficult to establish such a connection in some networks, for example, hotel or mobile operators.
- L2TP (Layer 2 Tunneling Protocol) - Layer 2 tunneling protocol, a more advanced protocol based on PPTP and L2F (Cisco Layer 2 Handover Protocol). Its advantages include much higher security due to encryption by means of the IPSec protocol and combining the data channel and the control channel into one UDP session.
- SSTP (Secure Socket Tunneling Protocol) - Secure Socket Tunneling Protocol, based on SSL and allows you to create secure VPN connections over HTTPS. Requires for its work open port 443, which allows you to establish connections from anywhere, even from behind a proxy chain.
What are VPNs typically used for?
Let's take a look at some of the most commonly used VPN uses:
- Internet access. Most often used by providers of metropolitan networks, but also very common in enterprise networks. The main advantage is more high level security, since access to the local network and the Internet is carried out through two different networks, which allows you to set different security levels for them. With the classic solution - distribution of the Internet to the corporate network - it is practically impossible to withstand different levels of security for local and Internet traffic.
- Access to the corporate network from the outside, it is also possible to combine branch networks into a single network. This is exactly what VPN was conceived for, it allows you to organize safe work in a single corporate network for clients outside the enterprise. It is widely used to combine geographically dispersed units, to provide network access for employees on a business trip or on vacation, and makes it possible to work from home.
- Consolidation of corporate network segments. Often, an enterprise network consists of several segments with varying levels of security and trust. In this case, a VPN can be used to communicate between segments; this is a much safer solution than simple network bonding. For example, in this way it is possible to organize access of a warehouse network to individual resources of a sales department network. Since this is a separate logical network, you can set all necessary requirements security without affecting the operation of individual networks.
Setting up a VPN connection.
It is more likely that workstations under windows management, while the server can work both under Windows and under Linux or BSD, therefore we will consider the connection settings using the example of Windows 7. We will not dwell on the basic settings, they are simple and straightforward. Let's dwell on one subtle point.
When connecting a regular VPN connection, the main gateway will be specified for the VPN network, that is, the Internet on the client machine will be lost or will be used through a connection on a remote network. It is clear that this is at least inconvenient, and in some cases it can lead to double payment for traffic (once in the remote network, the second time in the provider's network). To exclude this moment on the tab Networkin protocol properties TCP / IPv4 push the button Additionally and in the window that opens, uncheck Use default gateway on remote network.
We would not dwell on this issue in such detail if it were not for the massive occurrence of problems and the lack of elementary knowledge about the reasons for this behavior of VPN connections among many system administrators.
In our article, we will consider another actual problem - correct setting routing for VPN clients, which is the basis for the competent construction of enterprise-level VPN networks.
Greetings! And straight to the point. What is a VPN server for? It is mainly used to change the IP address and country in order to bypass various blocking sites at work and at home. In addition, a VPN connection helps encrypt traffic and thus ensures the security of the transmitted data.
For example, using public Wi-Fi, all data transmitted over the network can be "hijacked". In theory, these can be any files, but they usually steal passwords from wallets, mail, Skype, and whatever. In this article, we will set up our own VPN server, it is not difficult. Despite the volume of the text, the main action takes up a small part, and the rest is goodies. The article also has a video.
There are tons of them on the internet, ranging from free to very paid ones. Disadvantages of Free VPN Services:
- limited in speed
- instability (sometimes everything is good, sometimes it slows down terribly)
- traffic restrictions (up to several Gigabytes per month)
- free trial limits
- periodically you need to look for other services
- not the fact that the transmitted data will be safe, you should not rely on anonymity at all, I would say.
Disadvantages of paid:
- there is not always the right country or city
- hackneyed IP addresses (used by hundreds of clients), also applies to free
- there is simply a deception without a refund, for example, traffic is not unlimited, some servers do not work or are too slow
There are also advantages of VPN services - they are ease of use, relative cheapness.
Own VPN server on VPS / VDS hosting
So, if you need a specific country or city, or you need a lot of traffic that VPN services do not provide, a guarantee of security - then it makes sense to get confused by setting up a personal VPN server. This usually requires in-depth knowledge of server system administration. But I tried to explain everything simply so that even the kettle could figure it out)
This method also has disadvantages:
- only one IP-address to which you can "transfer", but there are additional ones for a fee
- non-trivial setup for the first time
- paid
Read to the end, and I will show you how to use your VPS server to bypass locks without setting up a VPN on it.
What is a VPS / VDS server?
There are countless hosting providers on the Internet. All of them allow them to host their websites. The most popular service is shared hosting. More advanced is a dedicated virtual server - VPS (VDS is the same thing). You can host sites on a VPS, set up a VPN server, mail server, game server - whatever!
You need to know that there are several types of VPS servers: OpenVZ, Xen and KVM. For the VPN server to work, you need KVM... The server type is indicated in the hosting tariffs. OpenVZ and Xen are also sometimes suitable, but you need to write to the hosting technical support and ask if the “TUN” module is connected. Without going into details for what it is, just ask. If not, can they enable it. It also doesn't hurt to ask if the VPN will work as such (even on KVM), since some companies cover this opportunity. Oh yeah, the server's operating system is Debian, Ubuntu or CentOS (generally Linux-like). Server capacity doesn't matter.
Setting up a VPN server
I have a KVM VPS server at my disposal. Everything works here at once, you don't need to write anywhere.
- When ordering a service, you can choose the simplest tariff plan "Micro"
- All sites open even on servers in Russia
- There is a free trial period of 7 days
- Technical support helps
- For my visitors, when you enter the promo code: itlike60 - you will receive a real 60% discount on the first payment.

"Hostname" enter any or the name of your site (if in the future). "OS Template" select "Ubuntu 14.04 64bit" or any of Ubuntu, Debian, CentOS:

The operating system can then be changed if suddenly something does not work out.
After payment, the login data for the control panel and the Root password for setting up the server are sent to the mail. And also the IP address of the server, and it will be your IP address when we bring up the VPN and connect to it from the computer


Press the "Manage" button and get into the administration window:

We don't need to touch anything here. The only thing that may be needed is the reinstallation of the operating system - the "Reinstall" button, more on that later.
Now we need to connect to the server to send commands to it. For this we will use free program Putty.
Unpack the archive with the program and run the file
putty.org.ru \\ PuTTY PORTABLE \\ PuTTY_portable.exe
In the "Hostname" field, paste the IP address of the server that came in the letter, you can also copy it from the control panel:

and click "Connect". If this window popped up, then click "Yes":

Before us should appear black window console (command line). This is where we will give commands. But first you need to login. To do this, in the "login" field, enter "root"

Then copy the root password from the letter and paste it into the “password” field. To paste here from the clipboard, you just need to right-click once on the console window. In this case, the password is not printed on the screen, it feels like nothing happened. Everything is fine, press "Enter". Lines with information about the system should slip through. If it wrote some kind of error, then check everything again. Also, the console won't wait long while you search for the root password. If by that moment an error pops up, then start Putty again.
Installing and running the main script
We are already at the finish line in setting up our own VPN server. There are many instructions on the Internet on how to install a server, but they all require the knowledge of a system administrator, because small nuances are overlooked. To the delight of all dummies, there is a universal script "OpenVPN road warrior" that will do all the work itself. We only need to give the command to download and run it.
So, copy this line and paste it into the console window with the right button and press "Enter":
wget https://git.io/vpn -O openvpn-install.sh && bash openvpn-install.sh

All sorts of lines will skip and, if the script has been successfully downloaded and launched, the VPN server configuration wizard will start with us:

The script finds the expected value for each parameter and offers to agree with it, i.e. press "Enter", or enter your own value.
- The first parameter is "IP address"... The script should offer the very same IP VPS server. It should be so in 99.9% of cases, but if for some reason this is not so, then correct it to the correct address.
- The second is the protocol UDP or TCP... Leave the default UDP.
- Go ahead, "Port: 1194" - we agree.
- "What DNS do you want to use with the VPN?" - choose "Google", ie drive in the number "2" instead of one, Enter. If Google is blocked, then we leave it by default.
- "Client name" - Username. You can create access for different users. The default is "client" - we agree.
- "Press any key ..." - press "Enter" and wait a few minutes until everything is installed and configured.
In general, the creation of a VPN server is over, it's time to reap the benefits. During the installation process, the script created a configuration file for our computer. This file needs to be downloaded for us to use the server. To do this, insert into the command line:
cat ~ / client.ovpn

The contents of the "client.ovpn" file will be displayed. Now it must be carefully copied to the clipboard. Scroll up to enter the command, select with the mouse all the lines, except for the very last (for new commands), i.e. the last selected line will be “ ”. To copy the selection to the clipboard, press "Ctrl-V".
Now on a computer in Windows 7/8/10, open Notepad and paste the copied text into it. We save the file on the desktop under the name "client.ovpn".
If you plan to give access to the server to other people, it is better to create for them separate files, for example vasya.ovpn. To do this, simply run the script again and now select the 1st item - creating a new user.
Client installation for Windows 7/8/10 / XP and Android
Congratulations, we're at the finish line! Now all that remains is to install a free program that will connect to our VPN server. It is called "OpenVPN".
Download the Windows version and install it, no need to launch it.

If during the installation process all sorts of windows pop up, we agree with everything.
To connect to the server, right-click on the "client.ovpn" file on the desktop and select "Start OpenVPN on this config file":

A black window will appear with the connection initialization process. If everything went well, then the last line should be like:

A window may also appear with a question about the type of a new network, then select "Public network".
You can check it, go to the site 2ip.ru and look at your IP, it must match the IP of the VPS server:

The server console window can now be safely closed. And to close the vpn connection and return the old ip, you need to close the window from OpenVPN.
To connect next time, you just need to right-click the "client.ovpn" file from the desktop, you don't need to do anything else.
With phone it's even easier, you need to install the OpenVPN application through the playmarket, download the client.ovpn file to memory, select it in the application and connect to our vpn server.
What if something went wrong
If you feel that because of your mistake now everything is going awry, then you can reinstall operating system on the hosting. To do this, in the control panel, click "Reinstall" (see the screenshot of the panel) and select a new operating system (or the same):

We press the "Reinstall" button and wait 10 minutes. A new Root password will also be issued, do not lose it!

Connection errors
Most of the problems arise at the stage of connecting to the server in the OpenVPN program, especially in Windows 8/10. There may be errors in the black window, for example:
- FlushIpNetTable failed on interface
- All TAP-Win32 adapters on this system are currently in use
- CreateFile failed on TAP device
- DNS failed ..
In this case, the first thing to do is to give the program administrator rights and, accordingly, enter the system with administrator rights. Go to "C: \\ Program Files \\ OpenVPN \\ bin \\", right-click on the openvpn.exe file -\u003e properties. On the "Compatibility" tab, check the "Run this program as administrator" checkbox. Everything should work now.
More treatment options:
- uninstall the program and reinstall as admin
- disable the "Routing and Remote Access" service via "Control Panel -\u003e Administrative Tools -\u003e Services"
- try reinstalling from or from here
- remove all VPN programs and pribluda from other paid and free services
You can understand if the problem is in your computer or laptop by installing the OpenVPN application on your phone or tablet via the playmarket, uploading the client.ovpn file to it and connecting to our vpn server. If this does not work out, then you need to look for the reason on the server, write to the support service.
If everything works, the sites are blunt and open intermittently
Pay attention to the messages in the black window, if there are duplicate lines "read from TUN / TAP ... (code \u003d 234)"

and also to the message somewhere in the middle "WARNING:‘ tun-mtu ’is used inconsistently, local ...":
In this case, open the client.ovpn file in notepad and write in the new very first line:
tun-mtu 'server value'
server value Is the number indicated at the end of the line in the text “remote \u003d’ tun-mtu 1500 ′ ”. We substitute our value! As a result, it should look like this:

This is done because, for some reason, the MTU values \u200b\u200bon the computer and on the VPS server are different. Leave the .ovpn file for the smartphone intact!
We let traffic through a proxy without any settings at all
You can use our VPS / VDS server as a Proxy Server. To do this, we do everything as before until the moment of pressing the "Connect" button in the Putty program. You don't need to open the console and run the script. Go to the tab "SSH-\u003e Tunnel", prescribe Source Port: 3128

Oops, I finished the article later, here I have Putty in English, but the essence is the same.
If it writes the error "You need to specify a destination address in the form host.name:port", then switch to "Dynamic" instead of "Local".
On the "Connection" tab, in the "Seconds between keepalives ..." field, set 100 seconds, this is necessary so that the connection does not break due to idle time. Now we connect - press "Open", enter the username / password. Next, go to the network settings in the browser and register the proxy server there. In chrome it is “Settings-\u003e Search settings-\u003e write‘ proxy ’’ -\u003e Proxy server settings ”.We do everything as in the screenshot:

Now all sites will work through our server, but only in the browser and some programs. Other programs will not see the proxy, they will work directly. It is necessary in each program in the connection settings, if they are provided, to register the address, port and proxy type: Socks4 / 5. Or install OpenVPN and don't use a proxy.
How to let only individual sites through the proxy
Install the extension for Google Chrome or Mozilla Firefoxis called. In the settings, you need to add our proxy server:


On the "URL Patterns" tab, add site masks that should be opened through our server. The site mask is his name with asterisks on the sides.

That's it, now the added site will go through the proxy, and all the rest will go directly. If you click on the extension icon, then you can choose to let all sites through it or none at all.
Shortcut for automatic connection
You can connect Putty to a proxy with one click. To do this, before connecting, in the "Connection-\u003e Data" section, register the server login, the one that is usually root


Now you need to create a shortcut on the desktop, in which you specify the following parameters:

"C: \\ Program Files \\ PuTTY \\ putty.exe" -load myvpn -pw server_password
where myvpn Is the name of the saved session. That's it, there is only one detail left - to remove the Putty window from the taskbar to the system tray. You need to download the modification of the utility and replace the exe file. Now in the settings on the tab Behavior a corresponding checkmark will appear, but you do not need to do this.
Today, private virtual networks, referred to as VPNs, which in decryption means, will surprise no one. However, not every user of the same "seven" knows how it all works. Let's see what a VPN server on Windows 7 is, how to install and configure it using your own tools and third-party programs.
What is VPN?
Let's start with the basics. Building a VPN server cannot be complete without understanding what it really is. Apparently, not every user is faced with a similar problem and fully realizes what kind of thing it is.
And a virtual server is exactly the tool that allows you to create independent private networks based on an Internet connection, as if several computer terminals, laptops or even mobile devices were interconnected by means of cables. But only in this case we are talking about virtual cables.
What is a VPN server for?
The advantages of this technology seem to many to be a step backward in terms of the security of connection and data transmission, however, a virtual network is often much more secure than a conventional "local area".

In addition, when using a VPN connection, the user is able to exchange data between individual terminals that are scattered around the world. Yes Yes! The VPN server connection technology is such that computers can be connected to a virtual network or mobile devices, regardless of their geographic location.
Well, for gamers, this is generally a godsend. Imagine that after creating a VPN server, you can easily go through some kind of team "adventure" like Counter Strike in a team with players, for example, from Brazil. But in order for this to become possible, you will need theoretical knowledge about Now let's figure out what constitutes creation and Windows 7 in more detail.
At the same time, it is worth paying attention to several prerequisites, without which the whole process of creating a virtual server will simply not make sense.
VPN Server on Windows 7: What to Look For?
First of all, every user who creates on the home terminal should be clearly aware that there are some connection restrictions in Windows 7. The fact is that only one user can connect to the created server in one communication session. And it is impossible to bypass this obstacle with the system's own means.
In principle, as an option, you can use the installation of a special (but unofficial) patch that will help fix the problem. On the other hand, if you approach the solution to the issue of creating a normal, efficient VPN server from the point of view windows licensing, it is better to use the "seven" of the server version (Windows Server). Few people know, but it is for Windows 7 that this version is also available.
Creating a VPN server using Windows: router settings
Now, after describing all the initial concepts and questions, you can start creating the server directly. As an example, consider the initial setup that Zyxel Keenetic devices require. The VPN server in the case of using such devices is quite different in its settings (especially in the case without the preinstalled NDMS firmware).

The catch here is that the PPTE protocol, which is basic for all systems, in this case is presented in a modified form of MPTE, which makes it impossible for multiple users to access the server simultaneously. The firmware can work around this problem. After its installation, access is guaranteed at the level of a dozen simultaneously connected users.
After installing the program, the component should appear in the application center section vPN server, where you will need to configure the "Keenetic Internet Center", which will subsequently be responsible for access and the pool of IP addresses provided at the moment to clients using the PPTE protocol.
What is most interesting is that the intersection of addresses with a 24-bit mask is allowed. That is, when specifying a range, for example, 192.168.0.10 - 192.168.0.20, the address of the VPN server with a single connection of the client machine for the Home parameter can have the value 192.168.0.51.
But that's not all. A VPN server on a router (in our case, Zyxel) means access exclusively through a Keenetic account. To activate this access, you need to allow the user to access the VPN. This is done by clicking on the "account" and then placing a check mark in the appropriate field.
Another plus of such a connection is that one login and password can be used for several client accounts, which will be used to access the Keenetic VPN server. Let's pay attention to one more feature of such a connection. It lies in the fact that a VPN server created on the basis of Zyxel is able to access not only internal local networks, but also external networks. Thus, you can get remote access to any client machine connected via a Keenetic account.
The first steps
Now, let's leave the question of how to set up a VPN server on a router aside and go directly to the "operating system" itself.

First, you need to use the section of the Network and Sharing Center located in the standard "Control Panel". IN top menu select the "File" section (if it is not displayed, press the Alt key), and then click on the line of the new incoming connection.
After that, you need to use the addition of a new user, which will be assigned the name Vpnuser by default. Next, fill in all the required fields (the full name can be left blank, since this does not affect the connection in any way), and then enter the password and confirmation (there must be a complete match). If you need to add more users, we repeat the above procedure.

Now, in a new window, you need to specify the type of Internet access, after which you can proceed to one of the most important steps, namely, to configure the TCP / IP protocol, since a VPN server on Windows simply will not work without such correctly specified parameters.
Configuring IPv4
In principle, in most cases this version of the protocol is used, since IPv6 is not supported by all providers. If support is still there, the configuration of versions 4 and 6 will not differ much.

So, in the properties of the protocol, you should first use the item for allowing access to callers to the local network, and then select the indication of the IP address explicitly and write the required range. This is done so that in the future you can connect several users at the same time. At the end of the procedure, just click the "OK" button. That's it - the server has been created. But this does not end there. You also need to configure the VPN server on the client terminals in order for them to gain access.
Configuring client machines
Now, on the computer terminal from which you intend to connect to the virtual server, in the "Control Panel" you need to use the settings of the Network and Sharing Center, where a new connection is selected, after activating which the "Wizard" will start. Next, you select the type of connection to the workplace, and then use an existing VPN connection.
Now the most important point is the VPN server address. In this case, you can use the address viewed on the server itself, or enter a domain name. In order not to waste too much time on setting, the offer to connect immediately can be skipped.
Now it remains to enter the login and password that were specified when creating the VPN server, and optionally, specify the saving of data for subsequent login. This completes the procedure. If the server is active, you can connect to a virtual network.
Firewall parameters
But even if done correctly, sometimes some problems can arise. Often, such a connection can be blocked, oddly enough it sounds, by the native means of Windows, more precisely, by the built-in firewall (firewall) related to the security system.

To avoid problems, you need to find connection icons in the same Network Control Center. For the client it is RAS, for the server it is VPN. It remains only when you click on the parameter on both terminals to indicate the type of access in the form of a home network. That's all.
Port forwarding
Ports are more complicated. The problem is mainly related to ADSL modems, which simply are not able to open the necessary VPN ports. You need to manually configure these parameters.
Here again you will have to refer to.As a rule, the instructions for VPN connection are in the documentation for the device itself. It is worth noting here that Windows systems use TCP with a value of 1723. If there is an option to disable the GRE lock, it is advisable to enable it.
Error 807
Naturally, now you can rebuild the parameters of the created VPN server, however, as it is believed, the real scourge of absolutely all users who are faced with creating connections of this type for the first time is the error 807.

To get rid of it, you should first make sure that the IP address fields on the client machine and the port parameters are filled in correctly on the server.
In addition, the remote access service must be active. You can check its status by using the services.msc command entered in the Run menu (Win + R), followed by selecting the routing and remote access section. The operating status and automatic access type should be indicated here.
As a last resort, if there are problems, you can even try to connect to yourself. To do this, a new client connection is simply created, where 127.0.0.1 is specified as IP.
If this does not help, you can turn to the help of some Internet resources like portscan.ru that are able to track active external connection (the value 1723 is entered in the connection field, after which the check start is used). But, if everything is done correctly, a positive result will not be long in coming. Otherwise, you will have to check the settings of the router and virtual server.
Third Party Programs
Of course, for most users, far from such settings, all this may seem, so to speak, too homegrown. It's much easier to set up a VPN server using special automated programs.

Let's consider one of the most popular. It's called SecurityKISS. Installing it is easy. Next, you should launch the application, after which the user will be prompted to make the minimum initial settings and enter some required data. You will need to specify your own IP. You can find it out through the ipconfig command, and with several terminals in the network - ipconfig / all.
The main recommendation for this SecurityKISS client is to select from the proposed list of servers the one that is geographically located most close to the terminal from which the connection is supposed to be made. Note that in this case we are not talking about creating a server - the connection can be made to the existing servers. And this saves the user from performing all the procedures that were described above.
The connection is made to an already created server, and by and large, absolutely no matter where in the world it is located. With a good high-speed connection, even geolocation does not play a significant role.
What's the bottom line?
In principle, this is where the question of creating a VPN server can be completed. However, many users computer systems some minor inconsistencies should be noted. The point is that, depending on installed version of the same “seven”, the names of some fields or lines to be filled in may differ in their names. In addition, some "cracked" modifications of Windows 7 may have rather limited capabilities, since to save disk space or increased performance, certain functions were disabled in them. This is just the same for controls. network connections at the global level. Even having access rights at the super-administrator level won't help. Moreover, in the parameters of local group policies or in the system registry, which by and large duplicates them, nothing really can be configured.
Returning to the question of creating a VPN server, it remains to add that this technology, oddly enough, in most cases remains unclaimed, except perhaps useful to gamers who want to play with an opponent who is very far from him. System administratorsPerhaps this will not be useful either, since the connection itself, although it uses a 128-bit encryption system, is still not insured against data loss or to a virtual network. So creating a VPN server or not is a personal matter.
However, for windows systems the settings are quite complex, especially from the point of view of an untrained user. For the simplest connection, it is better to use VPN clients, which can be downloaded for free and configured in automatic mode... And there are much fewer problems with them than with a change in the configuration of the system, which is fraught with a global "meeting" when making wrong actions.
Nevertheless, information on this issue should be perceived by every user, because knowledge of how to connect to such networks can ultimately protect their terminals from threats. Sometimes, with an active Internet connection, the user may not even suspect that his machine is connected to the network, and he himself is not able to determine the level of risk and security.