I will show you how to assemble a very powerful antenna for receiving Wi-Fi, capable of receiving a signal over a distance of many kilometers, but at the same time lightweight and easy to assemble. Having crossed two popular antennas, a wave channel and a pouch antenna, I got the idea to create a Wi-Fi gun.
This antenna can be made from any sheet of metal. I took 0.3mm copper foil because it is easy to cut with scissors.
The parts of our antenna will be mounted on a hairpin, we need to cut 7 discs with a hole in the middle.

To do this, you need to place, punch or drill seven holes, and only then circulate the circle. If we do the opposite, then the drill can go to the side, but for us it is important that the hole is exactly in the middle.
We scratch out a circle according to the dimensions shown in the diagram and cut out our discs.
 Picture 1.
 You need to do it as accurately as possible, the deviation is only a millimeter and it will not work like that. The thickness of the metal and the diameter of the stud have almost no effect on the operation of our blaster and can be anything. Such circles are obtained (see Fig. 1) and after all the parts are cut out, we just need to screw them onto the hairpin, observing the size of the gaps between them.
This irradiator is easy to assemble as a constructor. We install the second plate of our
blaster at a distance as indicated in our diagram - 30 millimeters, tightening the nuts we select exactly our 30 millimeters.

On the last two discs, you need to make a hole for the wire. Our blaster is ready. Now it remains to connect it to our device. In the beginning it will be a USB modem, then we will connect it to a smartphone and finally to a router to distribute the Internet through our WI-FI gun.
To connect to a Wi-Fi whistle, you need to carefully disassemble the antenna so as not to damage the wire. We tin the soldering points and solder the wire to the outermost large disk, and the central core to the next one. We attach our gun to the bracket so that it is convenient to aim at the victim's router.
The gun catches the net even at a distance of 500 meters. Materials for a Wi-Fi gun are not expensive and available to everyone.
Wireless Internet is one of those things, without which you can no longer imagine life. Now you can use gadgets from anywhere in your home and office, game consoles, internet home appliances. But it takes good potential to run all of these things at the same time.
Most the simplest way enhance wireless signal - this is the use of an external amplifier for a router, which you can buy, or make an antenna yourself. By gaining experience and mastering the basics, you begin to better understand how to make the right choice.
Antenna polarization
Wi-Fi communication depends on radio frequency energy that is transmitted and received over antennas.
Receiving and transmitting antennas are devices that emit radio waves when electrical energy is supplied. Radio waves, like all waves in the electromagnetic spectrum, are measured in units of frequency Hertz. When referring to radio waves, the term "wavelength" is often used. Wavelength (meters) \u003d 300 / frequency (MHz). This relationship between frequency and wavelength is especially important for design and antenna design.
The orientation of the antenna relative to the earth's surface is called its "polarization". Structures that are designed for radio waves oriented generally parallel to the earth's surface are called "horizontal". If the impact is directed at right angles to the earth's surface, then we are talking about "vertical" structures.
Some antennas can be used in any polarization by simply changing the position. Factors associated with choosing one polarization over another include operating frequency, desired coverage, mechanical limitations, and common practice.

It is very important to consider that all antennas in a communication system must use the same polarization. Circular or elliptical polarization is sometimes used to maximize compatibility.
Strengthening the receiving power and signal of the router
An antenna transmits (and receives) radio waves better in certain directions, thereby increasing the effective radiated power.
Note! The total radiated power does not increase, but simply becomes stronger in one or more directions and weaker in other directions.
This "boost" is applied to both the transmitted and received signal. The unit for quantitative gain is the decibel or dB, which was named after Alexander Graham Bell.
Important! Higher dB values \u200b\u200bindicate higher gain.
The main types of antennas
What to consider when designing an antenna? To work on amplifying a signal, it is always important to remember some of the features of signal transmission over distances. The choice of the type of antenna device can significantly affect the range and stability of communication.
All Wi Fi antennas are divided into two types:
- directed,
- omnidirectional.
Which, in turn, are:
- internal,
- outdoor.
In addition, when installing the device, you need to take into account the following: a mismatch in the polarizations of the access points will lead to the fact that in one of the positions the quality level will increase, and in the other it will disappear altogether.
Omnidirectional
The best option is to expand the range home internet system is installation external antenna with good gain and omnidirectionality. An omnidirectional antenna is usually a vertically polarized antenna. In a remote area, where cellular communication is weak, it makes no sense to install such a device. The option is more applicable in urban environments.
Remember! Omnidirectional antenna models naturally interfere with each other if not placed correctly in the immediate vicinity of a conventional router.

One type of high gain omnidirectional antenna is a vertical collinear wi fi antenna with one feed point and element phasing.
Directional
An antenna is a passive device that does not add power to the signal. However, there are methods to increase the proportion of energy transferred in a certain direction by reducing the proportion of energy transferred in other directions.
If you use directional antenna amplifiers, you can significantly improve the coverage area of \u200b\u200bWi-Fi.

One of the least common (due to its high cost) types of antennas in cellular communication are sectoral antennas. Devices allow to provide high level Internet connections if using multi-panel installation schemes. Vertical and horizontal focusing of the beams (90, 120 degrees) prevents interference from other antennas.
How to connect free internet wi-fi
There are several ways to amplify the signal so that you can connect to accessible points or to a neighbor's router who shares his Wi-Fi password.
Do-it-yourself powerful antenna
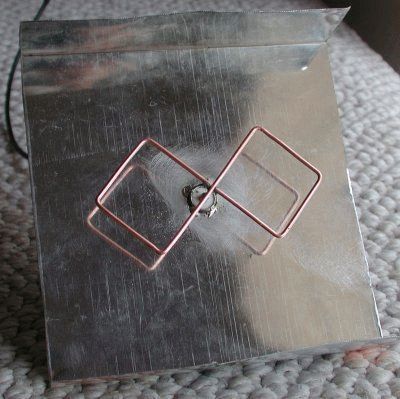
You can make a wifi directional antenna amplifier yourself, since there are many similar schemes on the Internet today. For example, a double biquad antenna with a gain of 12 dB. For assembly, you need copper wire with a diameter of 2 to 3 mm and a length of 300 mm.
A plate made of foil-clad getinax can be used as a reflector. Foil-clad getinax is a pressed paper impregnated with an adhesive and covered with copper foil. If this is not the case, then you can use any metal, for example, the lid of an old system unit or an ordinary beer can.
The first thing to start with is to bend a double figure eight from a wire with sides of squares 30 mm. To do this, the wire must be marked into 8 equal parts, bend it in the marked places at an angle of 90 degrees using pliers. The result should be a figure-eight antenna.
Next, you need to cut out the reflector from the getinax plate. Mark the center on the plate and drill two holes on it: for the antenna and the wire exit. The distance between the wire and the plate must be at least 15 mm.
Next, you need a wi fi adapter, or rather its small antenna. After drilling a hole in the adapter body, the wire is displayed. The center wire is soldered to the figure eight, and the winding to the leg. This is how the wifi antenna double biquadrat works. It remains to connect to a laptop and see how it catches signals. Compared to the built-in antenna for a do-it-yourself router, it's just a wi fi gun!

Do-it-yourself ultra-long-range wi fi antenna
For the manufacture of an antenna structure for ultra-long-distance communication, first of all, you will need a sheet of foil-clad (at least on one side) getinax or fiberglass. The material must be in good condition and of sufficient size and thickness. You will also need vinyl self-adhesive stencils with a mounting film that will protect the mentioned sheets from etching.
The rear reflector wall can be made of any flat metal sheet, even from foil, the main thing is even and flat.
The textolite is first marked out, then cut by a grinder into two parts measuring 450x350 mm. Before etching, the sheet is cleaned with fine sandpaper, which is quite important.

Between the reflector, which is also cut from the getinax, and the board itself, there must be strictly 9 mm. This 9mm can be made with flat plastic. Further assembly consists in gluing the resulting parts, holes are pre-left in soft plastic, so that you can then solder the wire. The wire and connector are bought on the radio market. The connector is selected according to the antennas of the router.
The result is an ultra-long range antenna for wifi router... At a distance of 1 km from the access point, this powerful homemade antenna has a gain of 80 dB.
Etching the PCB with a solution
Etching is not an easy task. The difficulty lies in finding a container for large sheets. If there is none, you can do it yourself again. To make a homemade container, you need a frame of four slats and a film in several layers. The film is covered and fixed with self-tapping screws.
Ferric chloride is the simplest and most commonly used method for etching PCBs.
- use ferric chloride in a confined small space;
- touch the solution with bare hands;
- use metal utensils or metal for the mixing process;
- use glass or plastic trays in the etching process;
- after use, throw the solution into the ground or somewhere.
- cover your nose and eyes during etching;
- after etching, the solution can be reused once, but must be stored in a cool place away from sunlight.
There are many interesting options on the Internet on how to do wifi antennathat can be adopted. For example, you can make a directional model from an omnidirectional antenna. To do this, it is enough to attach a reflective screen behind it, for example, from the same sheet of foil.
It remains only to choose a suitable wifi antenna, increase the range of the network and not part with wifi for a second.
Video
We have previously touched upon the designs of the Wi-Fi directional antenna. Biquadrat, canned homemade rarities. People are constantly looking for a chance to get a better design. It was mentioned: instead of a traditional wire, it is better to take a PV1 wire of the same section, which protects the installed antenna from bad weather. A board with double-sided foil, which is often recommended to be used with a reflector, does not tolerate bad weather very well, is not protected by anything, it is problematic to equip the structure with a special case. The wind load on the product will increase. Today's review focuses on design improvement techniques. DIY Wi-Fi antenna for any bad weather!
Important! Try shrink wrap for protection. Put on the reflector "fur coat", blow with a hairdryer. Soon the textolite will be tightly covered with a polymer film.
Biquad Wi-Fi Antennas
Weifai antenna, built according to a biquadratic scheme, is formed by a grounded reflector, a figure-of-eight emitter with right (90 degrees) angles. It turns out something that resembles ultra-fashionable glasses with a thin bridge in the middle. The lower half is planted on the ground, the upper half - on the signal core of the RK-50 cable.
True, the antenna for Wi-Fi will be smaller in size. The side of the square along the centerline of the copper core of the radiator is 30.5 mm. So, the figure eight is 1.5 (half the length of the side of the square) cm from the reflector and is parallel to the plate. In our case, the getinax board is bad because it is difficult to get. The reflector is just a plate of conductive electricity metal. Tin, steel, aluminum will do. Given the size of the emitter, you can make a Wi-Fi antenna reflector using a 5.25 ”laser compact disc (DVD).
Biquadrat Kharchenko
An internal reflective layer of aluminum is created to prevent the laser beam from losing energy on the surface. In addition, there is a hole in the center for the N-connector. It remains to open the protective plastic sheath, plant a reflective layer on the screen of the RK-50 cable. Please note: if the N-connector is not 1.5 cm away from the reflector with the emitter, the reception conditions will worsen. It is necessary to achieve the indicated position by placing thin metal washers or in place.
We remind you: the biquadratic eight bends from the middle by turning it 90 degrees. Both ends of the PV1 1x2.5 cable will return to the point. The thickness of the wire is 1.6 mm in diameter, between the centers of the core the side of the square is 30.5 mm. The ends fit on the connector screen, are combined with a reflector (CD), the middle part will serve the purpose of picking up the signal. The directional diagram of the device is sharply narrowed, equipped with one main lobe, which will be directed to the signal source. If this happens in a room, you will have to experimentally find a reflected beam, located in almost any direction.
The reflector will protect from neighboring interference, increase power. Blocks the effect of multipath, which is of little use to equipment. A homemade Wi-Fi antenna only receives from a narrow sector. Thanks to this, we will connect the opposite houses with a network, which would be impossible with the supplied access point.
Please note: in other cases, there may not be an antenna input connector on the housing. These access points are equipped with built-in metal circuits that receive radio waves. Traditionally, they look like intricate flat shapes from the inside of the case. We'll have to unsolder the built-in antenna.
There may be a capacitor nearby, the capacitance serves to compensate for the compression ratio of the circuit. The built-in antenna is small, powerless to form a full-fledged device for receiving radio waves. The defect is neutralized by a trimmer capacitor.
The element is not needed, because a full-size antenna for a Wi-Fi router does not need compensation. Tear the homemade turn-on circuits above the capacitor. Do not use a typical 100W soldering iron for installation. Will burn electronic components boards. You will need a small soldering iron equipped with a 25W needle tip.
The weight of the CD is small, the wind load is low, as opposed to the bulky design and will not kill anyone from below with the falling getinax board. It is recommended to avoid placing the products in the sun, but in our case the recorded information does not play a great role. Seal the N-connector if desired, extending the life of the soldered joint. A special gel compound used during installation is used printed circuit boards... Similar ones are produced by the Allur company (St. Petersburg). A few words will explain how to make a Wi-Fi antenna with your own hands more powerful.
Biquad antennas Wi-Fi - not the limit, let's run away from our neighbors
Prologue: 2 weeks, I could not find the reason in any way, then I turned the antennas into a vertical one and got 20 Mbps for 5 km, instead of horizontal 4.
Vampirenish, forum member Local networks Ukraine (spelling copied).
Before you buy a Wi-Fi antenna, think: theory shows that emitters arranged in rows narrow the radiation pattern in the direction perpendicular to the line along which the elements are built. Translated into Russian, it means: if our houses with a friend are separated by 100 meters, the width of the antenna viewing sector for the implementation of the Wi-Fi communication channel barely exceeds 15 degrees. The useful power will be directed to the window of a friend (it will only harm the inhabitants of the apartment!). To implement the circuit, use the double biquad antenna... You can increase the speed if you give the same to a friend on the DR!
How to make a Wi-Fi antenna so that it does not interfere with neighbors. You can protect yourself from uninvited guests by changing the channel, polarization. Found three ways to protect the channel by antenna configuration:
- Frequency selection.
- Choice of direction (narrowing of the radiation pattern).
- Choice of polarization.
Usually, when there is a Wi-Fi provided by the provider, the values \u200b\u200bare set by the communication provider, the client remains to obey, but if you have your own equipment, the layout is different. We can put the antenna on vertical polarization if the neighbors use horizontal polarization. Our equipment will stop seeing each other. Can be done in unilaterally or agree. Antennas will be needed like a biquad, set aside the complete ones.
Television works on horizontal polarization, communication works on vertical polarization. Just a tradition, it is convenient to hold the radio pin perpendicular to the ground when you speak. In this context, it is beneficial to use vertical polarization, usually found in routers. We offer a simple rule:
- Place with a friend opposite the antenna on the windows in the same way. Provides spatial compatibility, which is a subspecies of electromagnetic. Released microwaves, telephones, a mountain of 2.4 GHz equipment that creates interference. Place antennas equally, vertically, horizontally, tilted. Experimentally look for the position at which the speed is highest.
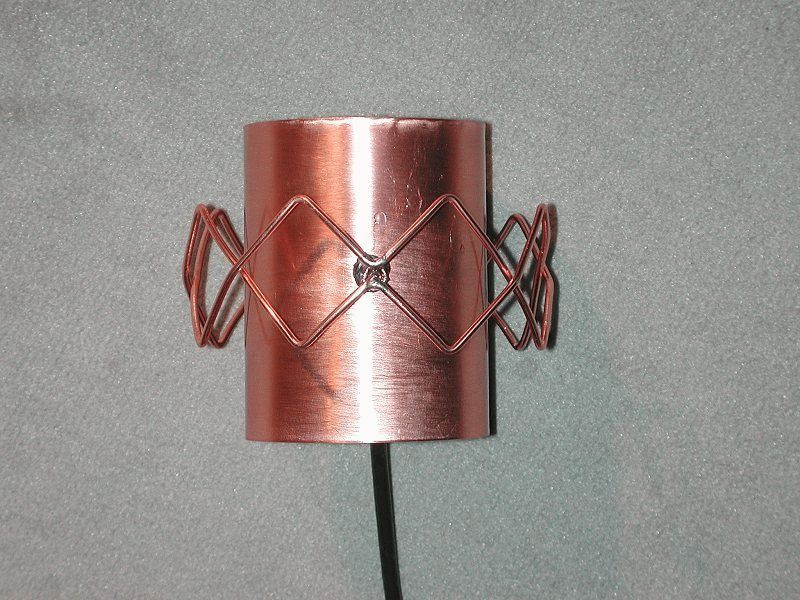
The promised novelty: a construction of four squares arranged in a row. The radiation pattern will become narrow in the perpendicular direction. Copper wire or single-core wire with a cross-section of 2.5 mm 2 50 cm long. We recommend taking with a margin. If a standard biquadratic Wi-Fi antenna for a laptop is an in-phase array of two frames, in our case there are four frames.

Frame for dual biquad antenna
When a wave moves, the current in neighboring squares is directed oppositely along the contour. Due to this, the effect of the field is added. Now you need to get four in-phase squares. Find the middle of the wire, bend it 90 degrees. We measure out 30 mm, make bends on each side in the opposite direction. We retreat twice as much, again we bend in the first direction. It will turn out capital letter W. Another 30 mm - bend the edges downwards at 90 degrees. One half is ready.
We make the second in the image and likeness so that the ends return to the point of the initial bend. Please note that it is not for nothing that we recommend using a wire with a PVC sheath - the two crosshairs in the figure are mutually insulated.
We cut off the excess wire so that the ends do not reach two or three millimeters before the first bend. A Wi-Fi antenna for a computer requires a reflector, a good piece of foil PCB or standard flat tin will do. We use the N-connector for connection.
The emitter is spaced 1.5 cm from the reflector. We put the ends on the ground, the middle - on the signal core (cable for Wi-Fi antenna RK - 50). Use a ceramic or plastic tube to reinforce the edges of the figure. For fixing, electrical insulation, use glue, sealant. For the street version, it is recommended to find a plastic case. Take a smaller distance between the homemade antenna and the receiver.
The next meeting will discuss Wi-Fi radio.
Wireless wi-Fi technologies are present everywhere today. This radio standard provides for the transmission of a signal on the 2.4 GHz frequency. For practical purposes, it is used to switch the interactive connection between the access point and the subscriber's device. The quality of the transmitted signal directly depends on the built-in or external repeater. You can expand the capabilities of the router if you know how a do-it-yourself wi-fi antenna is made. Next, we will consider several methods and step-by-step instructions for them.
Amplifier from CD packaging
It is quite simple to make it from scrap materials, subject to the main rule: the distance from copper elements to the reflective surface of the disc must be strictly 15 millimeters.
The procedure consists of several stages:
- The usual plastic packaging for 25 discs is taken.
- The locking tab must be cut at a distance of 16-18 mm.
- With the help of a file on a plastic spindle, slotted sockets are made to fix a double rhombus.
- The biquadrat (rhombus) is made of copper wire with a diameter of 2.5 millimeters.
- At this stage, you need to be careful, because it is the most important. Take 300 mm of copper cable, protect the surface, bend a rhombus from the wire. The distance between the centers is strictly observed within 30 mm. If the entire procedure is carried out correctly, the result will be a double geometric figure.
- Then the ends of the wire are sealed, and a place for attaching the coaxial cable is prepared.

Antenna for a Wi-Fi router: assembly and verification
At the next stage, you will need to attach the resulting biquadrat to the spindle, observing a vertical distance of 16 mm at all points. Using a soldering iron, the ends of the wire are fixed. Using silicone glue, attach a standard CD to the bottom of the box. Using the same adhesive, a double rhombus is fixed on the spindle.
Then the do-it-yourself wi-fi antenna is connected to the router (router). The photo below shows a diagram of how to do this. Experienced craftsmen can unsolder the standard antenna and attach a new amplifier, however, you need to be very careful here, since thin conductors can come off the board under the influence high temperature... An easier way is to install a new fixture using The result obtained, despite the simplicity of the process, will pleasantly please you.

Tin can amplifier
Such a do-it-yourself wi-fi antenna is no more difficult to manufacture than the previous version. The device will enhance the signal that partitions and furniture weaken in the apartment. The design under consideration is simple and cheap.
To manufacture the device, the following elements are required:
- wardrobe trempel;
- a couple of liter cans of beer or soft drinks;
- ordinary soldering iron and solder;
- wire (50 Ohm);
- connector connector.
The trempel can be replaced with a metal-plastic tube, which is used both indoors and outdoors, since it is not exposed to atmospheric influences.
Step-by-step instruction
In the future, the amplifier for the antenna is manufactured in compliance with the following steps:
- Holes are made in the bottom of the cans, after which they are put on the lower part of the trempel or pipe.
- The slots in the cans are made in such a way as to avoid excessive tension or slipping of the part. The pipe is looped back and fitted with a suitable clamp.
- A similar antenna for a Wi-Fi router, located on a trempel, requires stripping the soldering point, after which the ends of the wire are soldered to the banks one by one. The other end of the cable is secured to the connector used to connect to the access point.
- If a metal-plastic pipe is used as a base, both cans are soldered to the main wire. An adapter can be fitted between them and the feeder can be fixed on one of the cans. The antenna shield will be a metal foil in the tube cavity. In order to solder the braid to the foil, you must carefully make an incision and remove protective film... The attachment point should be fixed and insulated.

sheet metal
For the manufacture of this structure, a sheet of 222 by 490 millimeters is required. It must be bent in the form of a trough. Then, eight holes are made around the perimeter with a core at the same distance. At the edges they should be 8 * 2 in diameter, and in the middle 8 * 8 mm. These jacks will serve as the places for the vibrators. These elements are easiest to make from tinned food tin, and then solder them into the prepared nests.
An antenna amplifier made of tin requires maximum precision while maintaining dimensions. Do not forget to make holes for the posts as well. Their diameter depends on the thickness and characteristics of the material used as the holder. On the vibrator side, it is advisable to fill the connecting joints with varnish or wax to avoid moisture ingress. Any connector can be used for connection (BNC, N, F). The last element is the easiest to insulate. With a router, a homemade Wi-Fi antenna is connected with the second end of the wire to the corresponding connector.

During installation, it is desirable to achieve a direct line of sight of the transmitting and receiving amplifier. Note that deciduous trees jam the signal. The connecting cable should be as short as possible. If you can't do this, don't use PCI cards.
Typically, it will be sufficient to use a regular white cable with dense insulation (RG-6U), since more expensive options have the same effect. With a lot of air pollution and saturation of the WI-FI zone, it is permissible to change the polarization of the amplifier if the connection is made between two identical points. Above, several ways were considered how to make a Wi-Fi antenna with your own hands? Consumer reviews indicate that such a device has almost the same effect as a factory device, while its cost is an order of magnitude lower.
Transform the antenna regular WiFi router into an improved one, which will have a greater range, and all this can be done in 15 minutes at no cost.
Very often to inexpensive WiFi routers a narrow-band whip antenna is used. In fact, it is just a piece of wire. In expensive routers, there is already a longer antenna with matching turns. Naturally, such an antenna catches many times better. Used at home cheap model router, for which I will make a good antenna, like expensive models.
And so, let's get started ...
Remove the top of the plastic from the antenna.
A small screwdriver is perfect for this.
It is necessary to repeat the shape of the improved antenna, as shown in the photo

You will need: small insulated or bare copper wire, wood screw, measuring tape and soldering iron

Measure 7 cm of wire and make a bend in this place

Using the screw as a template, wind a full seven turns of wire around the screw, starting from the marked location. To remove the screw, turn it counterclockwise.
Cut the wire 2 cm below the resulting spring.

After that, you need to strip 3 mm of insulation or strip 3 mm of bare wire (depending on which one you use).

Cut the standard antenna wire, leaving approximately 6mm
Then remove the insulation 3 mm.
Solder the new antenna to the remaining wire.

To do this, you need to lay bare parts of the wires.

Take a large cocktail straw and slide it over the antenna.
For example, these are used in McDonald's.
The straw should be perfect for the base of the WiFi antenna as well.
They won't even go through gluing. It looks like this was intended.
To keep the straw from sticking out, you can paint it with a permanent marker.


