Everyone knows that Windows 10 automatically reboots the computer when it installs updates. This is completely unacceptable, no matter how important the update is. If the user does not restart the operating system for a certain period of time, Windows 10 displays a warning that the computer will restart at a specific time. In the end, the system reboots, even if the user is busy with something important at the moment. In this article, we'll look at how to disable automatic reboot of Windows 10 and get control over restarting your system.
Conclusion: if the relationship is updated incorrectly, nerves
Practice shows, however, that some works are often not in vain. Better: just turn it off automatic shutdown. Most critical updates require a brief restart of the computer. However, users do not want to be interrupted by a restart during their operation, and, when possible, data is lost.
Automatic restart at the scheduled time
In addition, the reboot does not happen, because the user is not on the computer, but blocked the screen. However, in many cases a satisfactory solution can not be achieved. The countdown begins immediately after the updates are installed. The behavior of the system becomes more aggressive, since the computer reboots even when the user logs on to the system.
Many users are outraged by the rude behavior of Windows 10. Center windows Updates does not give you any control for selecting and downloading updates, and there is no way to stop the automatic reboot.
FROM using Windows 10 Update Anniversary, Microsoft implemented a new feature called The feature allows you not to interfere with the user for a certain period of time. You can use it to delay the reboot of the system.
It may be useful to combine this parameter with option 4 "Configure automatic update". This is automatically downloaded and installed on a schedule. Do not automatically reboot for scheduled installations of automatic updates when users log on to the system. This option will reliably prevent data loss, but will not allow time for reboot. An authorized user is regularly asked to restart the computer, but if it is stubborn, it can take a long time.
Restart the scheduled installation
Reboot before the scheduled installation
A new concept of time use. For this purpose, the user or administrator determines a maximum period of 12 hours, which usually includes normal business hours. The corresponding option is to disable automatic restart after updates during use.If after upgrading to Windows 10 Update Anniversary - Activity period is not a solution for you, you can permanently disable the restart of Windows 10 after installing the updates if you follow the instructions below.
- Open the Control Panel.
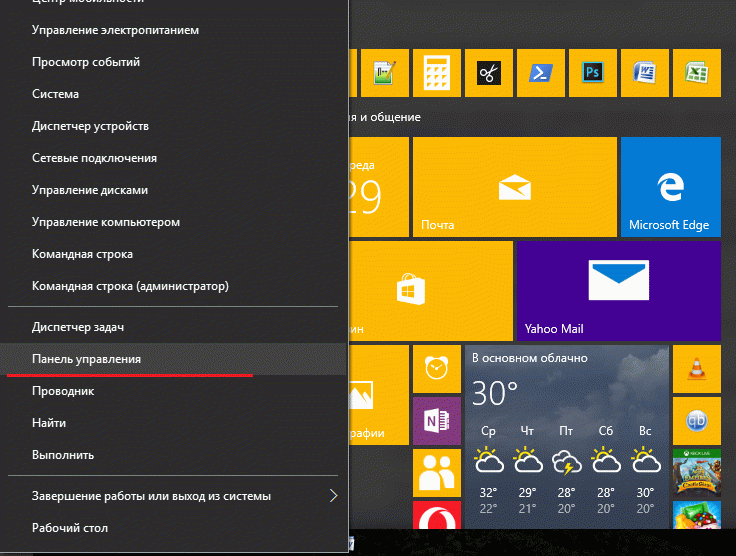
- Go to the menu Control Panel \\ System and Security \\ Administration.
Here you can also specify the period of time that the system considers as working hours. This new option can not be combined with the two existing settings. This is not an automatic restart for scheduled automatic updates when the user logs on and automatically restarts at the scheduled time.
Set the exact time of the reboot
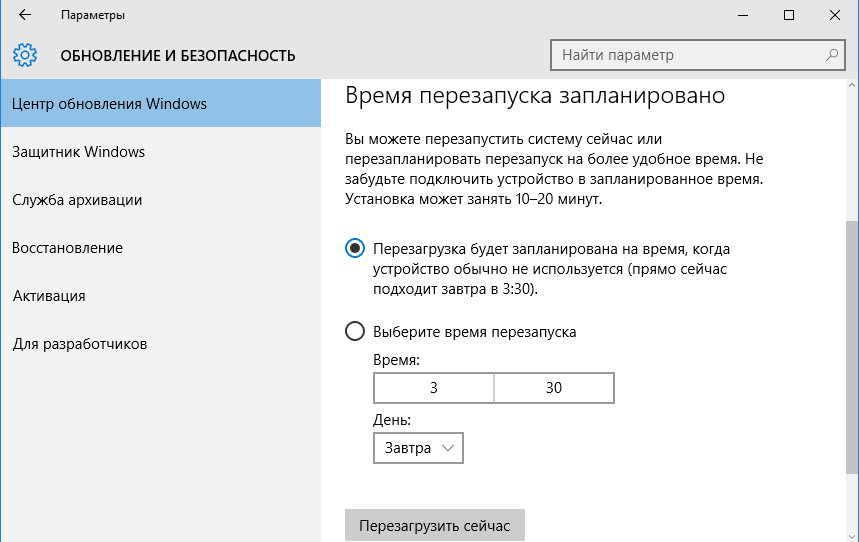
Application settings also allow you to set the exact time to restart the computer after the update. To do this, click on the "Restart Settings" link. Obviously, the computer should not be shut down during a scheduled restart outside the time of use or until an individually configured meeting.
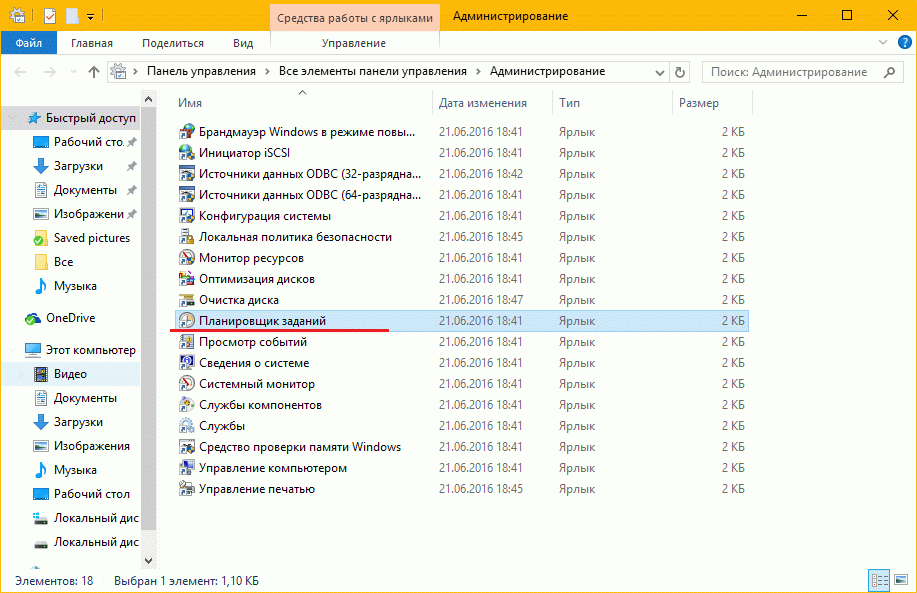
- Touch the Task Scheduler.
- Task Scheduler, open the following folder Job Scheduler Library \\ Microsoft \\ Windows \\ UpdateOrchestrator.
![]()
- There you will see a task called "Reboot" (Reboot). Disable it using the right-click menu command:
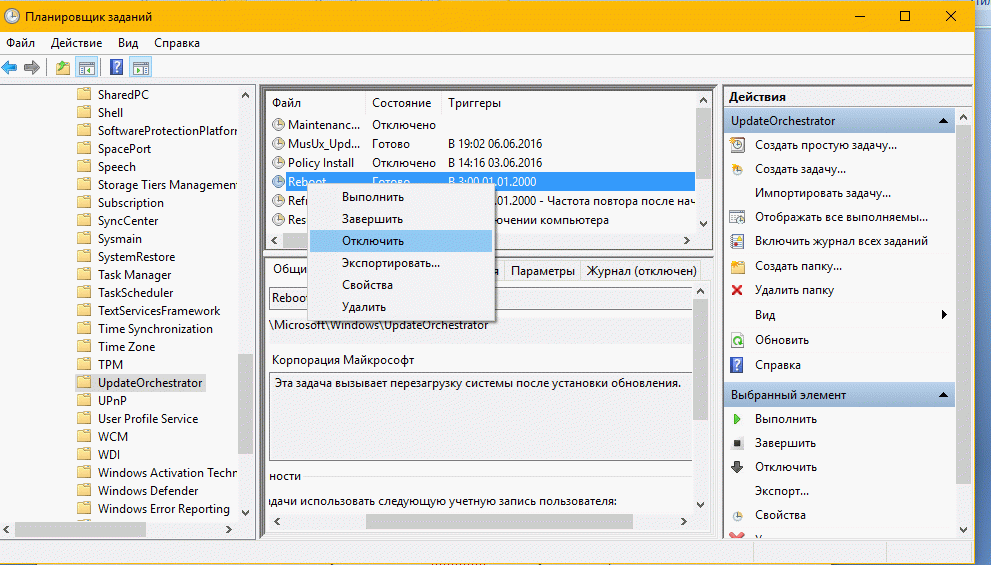
Disabling the reboot with Task Scheduler
If you still want to disable the wizard, you can use the registry key. To modify the registry, you need a local account administrator. Search only applies to local content, such as applications, files and settings. In the future, we will no longer have to be surprised by the sudden reboots after the operating system update. The user can decide for the first time when the computer should restart. During the last three days, grace may be given before the reboot is forced, or this service task will be executed immediately.
After the Reboot task is disabled, Windows 10 will never reboot automatically after the update is installed.
Some users report that Windows 10 can re-enable this task automatically. You can verify that Windows 10 will not re-enable it by following these steps.
Open the folder in Windows Explorer:
Currently unknown statistics on the behavior of the user during the automatic reboot. On the other hand, you created a new parameter to set the time that you chose yourself to restart within a week. Thus, the user not only gets more time for the mandatory reboot, but can also decide when it should be. Therefore, in Redmond, you are trying to find a balance between a newer restart and the least possible disruption of the user's activity.
However, you can set any connection as a measured use. Do you have an Internet connection with limited data? If your connection offers an unlimited number of downloads at a specific time, you can disconnect the connection as "measured", download updates and after downloading updates. You can click the "Install Now" button to download and install the updates to your liking. Click "Change active hours" in "Update settings".
C: \\ Windows \\ System32 \\ Tasks \\ Microsoft \\ Windows \\ UpdateOrchestrator

Rename the name of the Reboot file without the extension to Reboot.bak. If you can not rename the file mentioned, you must change the permissions for this file.
Rename the file to Reboot.bak.

You can also redefine the active hours to schedule specific reboots when the update is ready. Act at your own peril and risk. You should consider including automatic updates for security reasons.
Find the option "Configure automatic updates" in the right pane and double-click it. Set it to "On", then select the desired setting. For example, you can select "Automatically download and notify about installation" or "Notify to download and notify about installation".
Create an empty folder in this directory and name it Reboot.
![]()
This will prevent Windows 10 from re-creating the Reboot task and restarting the computer every time updates are installed. Later, if you change your mind, you can delete the created folder and reboot and rename the file from Reboot.bak back to Reboot.
Here you should see your new configuration. You will see that everything returns to the default setting. This parameter can also be reconfigured in the registry. Then you can click "Advanced", and here you will see a new configuration. You must create the last keys there.
This is not a good idea and will not allow your computer to even receive important security updates. Therefore this operating system is usually updated whenever updates are updated automatically and restarted to apply the changes as soon as they detect or at least think that the computer is not being used. To do this, we need to open our operating system configuration menu and go to the next path.
Configuring Automatic Updates in Windows 10
In Windows 10, the approach to updating the system has changed dramatically, and therefore the possibilities for setting up automatic updates are severely curtailed. In addition, the available settings depend on the version of Windows you are using.
So in Windows 10 Home all new features, updates and security updates are installed with Windows Update, while the user does not have any control over the upgrade process. The only thing a user can do is to postpone the reboot briefly. Pro Edition is more humane and allows you to manage some update settings - select the update source, set the schedule, and defer installation of updates (except for security updates) to long term. The possibility of completely disabling automatic updates is not provided for in any of the editions in principle.
Here we have to choose the option "Select hours of activity", and we will see how to us to open new section. Once the activity hours are set, when the update is downloaded, and to complete its installation, a reboot will be required, the computer will never automatically reboot during this period, waiting to leave a schedule for it. Have you ever been exposed to an unexpected restart?
Those who want to maintain their system without errors and vulnerabilities should support this function, because through them fixes are installed to make your system more secure. The request screen. Because there are people who rarely disconnect or reboot the machine, preferring to use the sleep mode function, this can be quite annoying, even with the ability to schedule a reboot later.
Of course, automatic updating is an important component of the operating system, and regular download and installation of updates, especially critical patches and security updates, is necessary for the stable and safe operation of the system. However, the user should be able to choose when, how and what updates to download and install. And even the ability to completely turn off the automatic check for updates should also be there. How to implement this possibility will be discussed later.
Eventually, the messages will be displayed until the system is restarted for updates to be applied. With this step, you will learn two ways to turn off this message. But keep in mind that this does not eliminate the need to restart your system after updating the service packs, as this will still be required to complete the installation.
Configuring Automatic Updates Using the Registry
In it, click "Edit", "Create", "Key". Double-click it and set the value in the Value field to 1, Hexadecimal. If, one day, you want to re-enable the automatic restart request, just set the Value field to a value.
I'll try to describe all the ways I know how to manage automatic updates in Windows 10. Let's start with the simplest and most accessible.
Windows Update
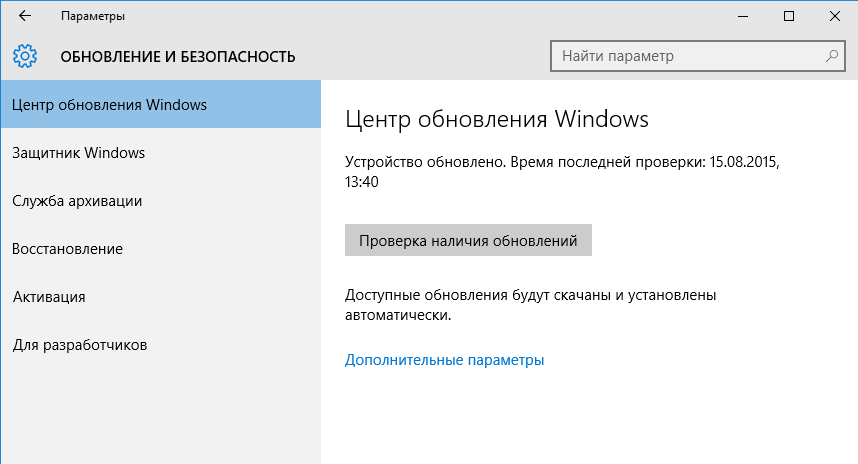
In Windows 10, the familiar classic "Windows Update" is finally removed from the control panel and is no longer available. The new update center is located in the system parameters section and you need to go to the "Start" menu in the "Options" - "Update and Security" section.
Look for options on the right side called "Automatic restart for connected users" for scheduled updates of automatic updates. Double-click this option and set its status to "Enabled". And the features to which users of the new software will have access, are charming: have you thought about using one operating system? The invitation made by the company, founded by Bill Gates, is tempting.
Have you installed the system and are not used to it? Solve your problems by referring to some of the listed tips. Before continuing the cancellation of the subscription, you need to check the status of the reservation. If "Reserve free update" appears, it means that your order was not posted.
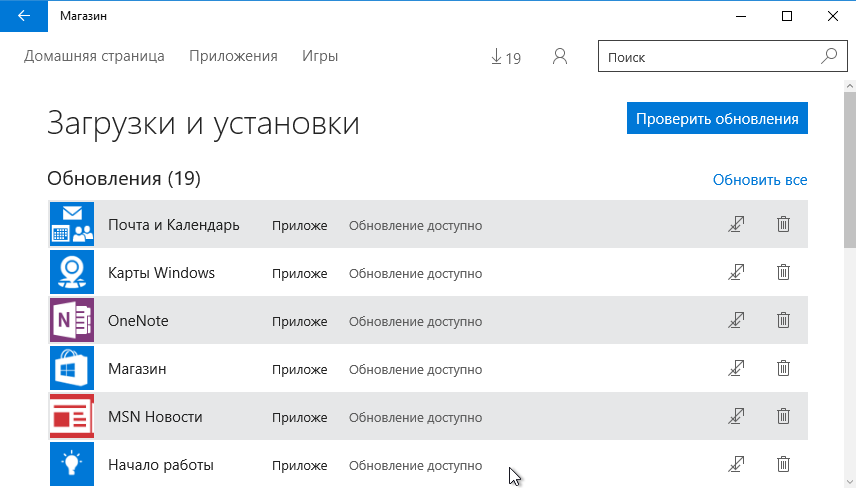
In the main window of the Update Center there is almost no choice, you can only view the list of available updates and information about them.
The only available setting allows you to select the time for the mandatory reboot. Here you can specify the desired day and time of the reboot, or reboot immediately, so as not to suffer for a long time 🙂
Windows Update
Not sure if a free update should be canceled? Then click the Settings button. Confirm and follow the "Cancel reservation". Confirm the commands and you're done. Nobody wants someone else to be outdated. In the home version, updates will be downloaded and installed without user selection, which only hinders if the system automatically restarts after the upgrade or not. This makes it easier for the company to support a larger user base in the same version, helping developers to have a more consistent audience.
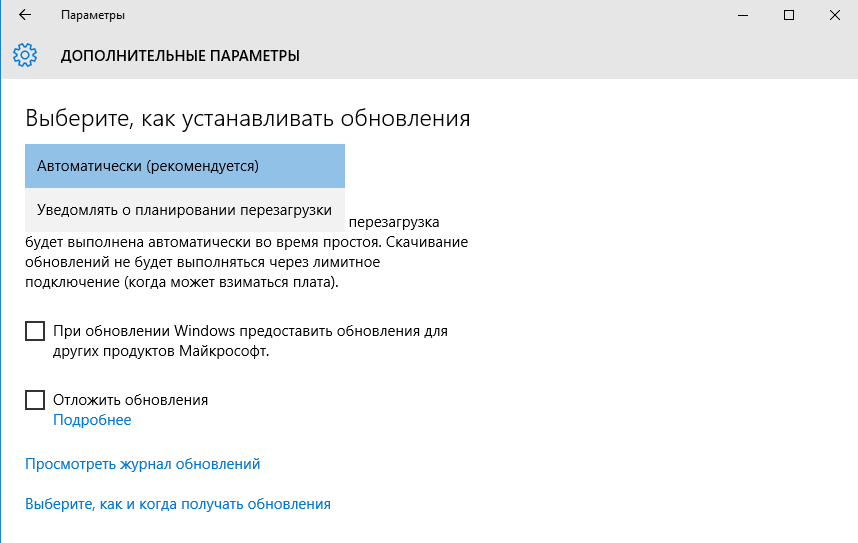
In the Home edition, all available settings are available, and in the older editions of Windows 10 (Pro, Enterprise and Education), the user can click on the link " Extra options».
In additional options, you can choose how to install updates. True choice is not rich and consists of only two options:
Disable automatic updating of modern applications
On the other hand, the action can be dangerous, since the drivers or applications can break or work incorrectly. There are 8 months to develop less critical patches, and users will also not have security updates. In the right pane, you must double-click the "Configure automatic update" rule, and then click "Enabled". In the "Configure automatic update" drop-down menu, you can select the option "Automatic download and schedule setup". as in the figure.
Automatically - updates are automatically downloaded and installed, followed by automatic reboot;
Notify about reboot planning - downloading and installing updates is also automatic, but you can schedule a restart at a convenient time.
How to get Windows Update notifications about reboot
If you have updates available for installation, you will see a warning. Select Advanced Options to choose how you want to install updates. Other options you can check. This will allow us to suspend the download and install the available security updates. Many people can assume that it is still safe to continue searching, downloading and installing operating system updates. Users, without computer literacy, really recommend this. However, they must also adhere to other prevention rules.
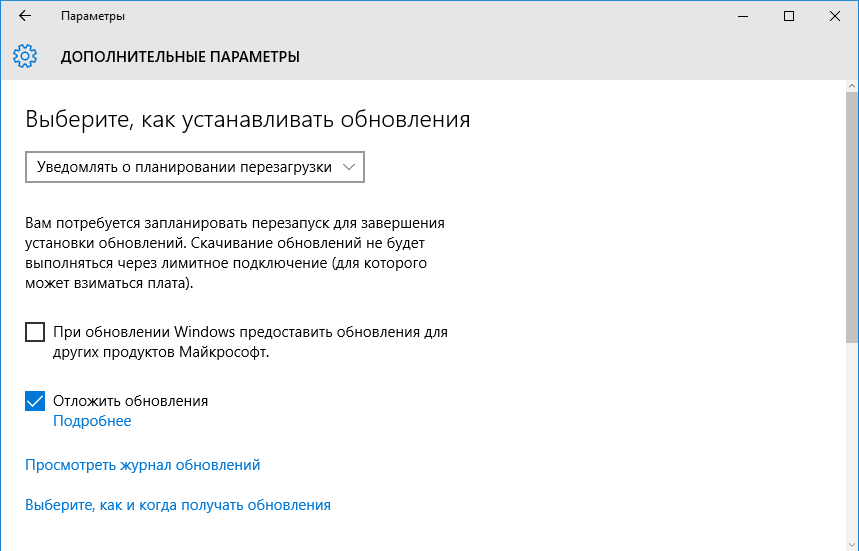
You can also enable the "Snooze updates" option, which allows you to temporarily disable downloading and installing updates. This option is designed mainly for corporate users and is designed to give them the opportunity to test new functionality (which can now be included in the updates) before it is mass-deployed in the organization. Home users have no such opportunity, so they unwittingly act as testers for the corporate sector.
Security lies in the hands of the user, and therefore whether it should follow other rules of prevention or not: the rules of prevention. Only an updated operating system is not a guarantee of security at all. Who decides to suspend the update of the installation can use the following command.
Open system configuration, for example. In the "System Configuration" window, go to the "Services" tab. Uncheck the box and click the "Use" button. Changes will only take place after the computer is restarted. We can test this by trying to find new updates. Click "Update" and "Security" again.
The pending updates do not include critical fixes and security updates that will be automatically installed in any way. The exact timeframe for which updates are being postponed is unknown, in various sources there are figures from several days to several months.
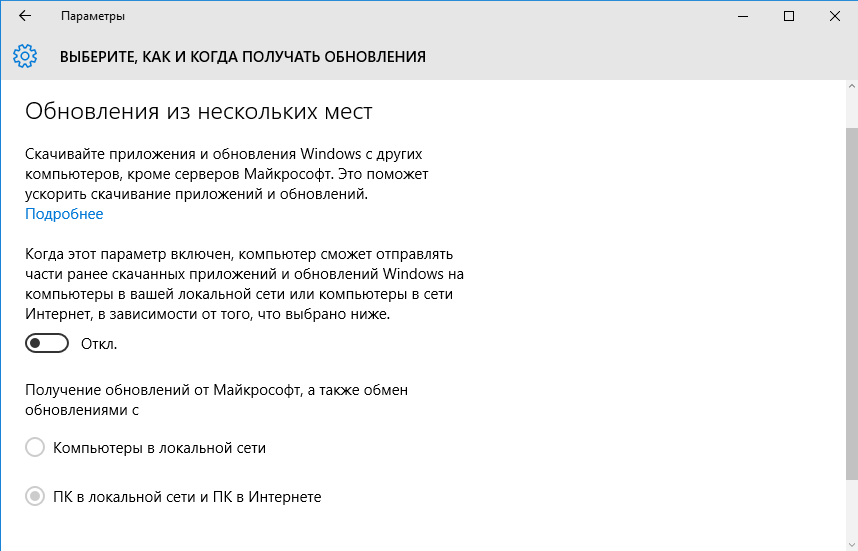
Another interesting point. In Windows 10, a new update delivery mechanism (Windows Update Delivery Optimization) is built in, based on P2P technology. Simply put, after downloading updates from windows Servers Update your computer starts to distribute them to other devices on the network, according to the principle of the torrent client.
This feature is enabled by default and to disable it you should go to the link "Choose how and when to receive updates" and set the slider to Off.
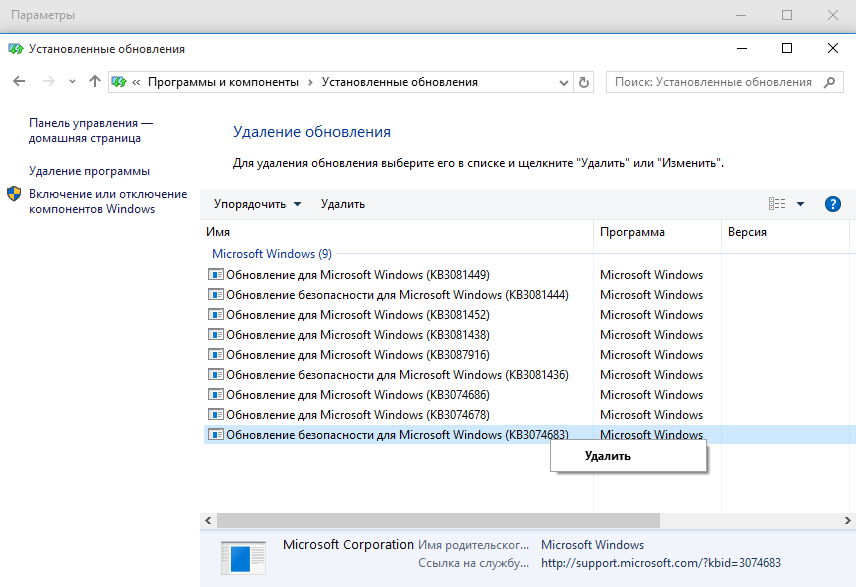
You can view installed updates in the Control Panel by going to the "Programs and Features" section - "Installed Updates". If after the update there are problems, then here is any of the installed updates can be deleted.
Disable automatic driver update
Operating windows system It contains a driver store for the most common devices. Downloading new versions of drivers by default is done automatically using Windows Update. In some cases, the presence of the driver you need quite handy, but Windows Update does not always contain the latest \\ best driver, and it's better to update the driver manually, in order to avoid unexpected hardware problems. Therefore, it is better to disable the automatic updating of the drivers, the benefit of this feature in Windows 10 is still there.
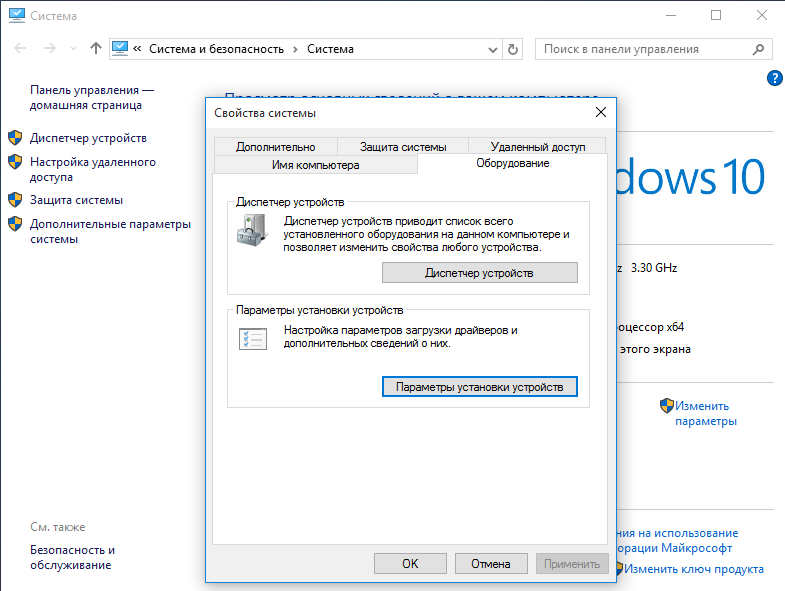
In order to get to the driver update settings, you need to open the System section in the control panel and select Advanced System Settings, then go to the Hardware tab and click the Device Settings button. You can also open the desired window by pressing Win + R and running the command rundll32 newdev.dll, DeviceInternetSettingUi.
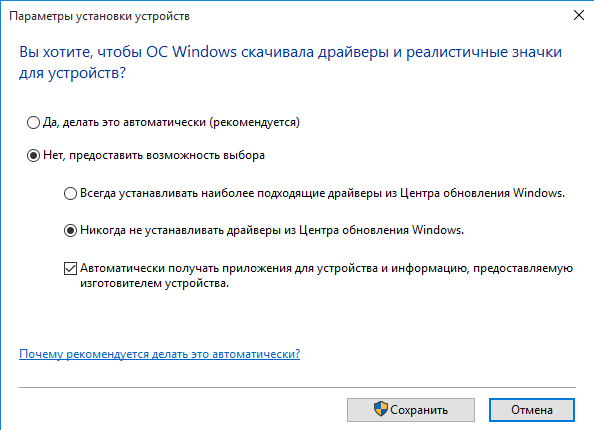
To disable the automatic download of drivers, select the "Never install drivers from Windows Update" option.
Disable automatic updating of modern applications
Modern applications (applications from the Windows store) are also updated automatically. To fix this, you need to open the "Store" item in the "Start" menu, click on the little man icon, select the "Options" item in the opened menu, and then in the item "Update applications automatically" put the switch to the Off position.
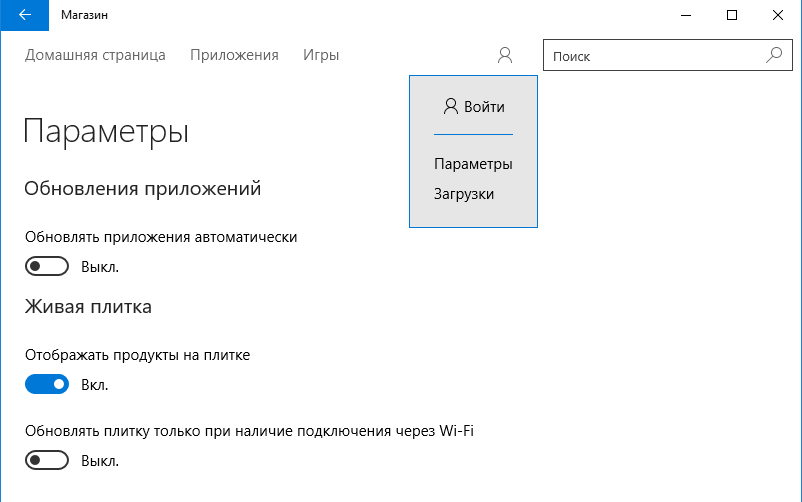
After that, applications from the store will not be updated automatically, and if necessary they will have to be updated manually.
Note. Initially windows users 10 Home could not disable automatic updating of applications from the Windows store. This feature was added later, with the update KB3081448.
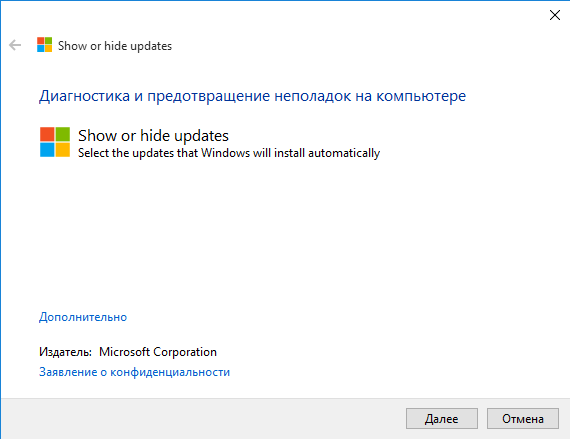
Show or hide update utility
The old Update Center, among other things, made it possible to choose and delay indefinitely (hide) updates. This new feature is not available initially, but there is a special utility from Microsoft called Show or hide update, which can do approximately the same. The utility is not part of the system but is downloaded separately.
Installation is not required, just copy and run the file wushowhide.diagcab, after which the utility starts collecting data on available updates.
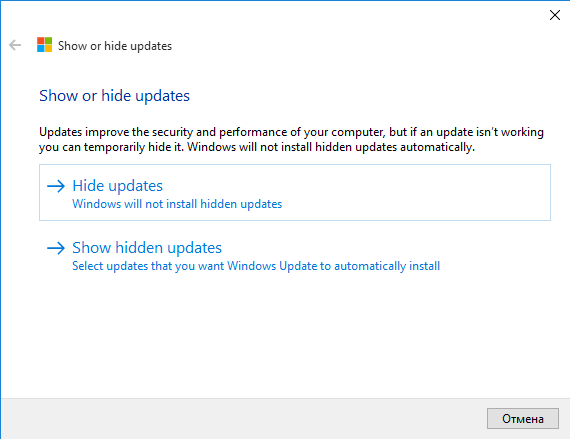
After data collection, it is suggested to choose an action. To hide updates, select "Hide updates".
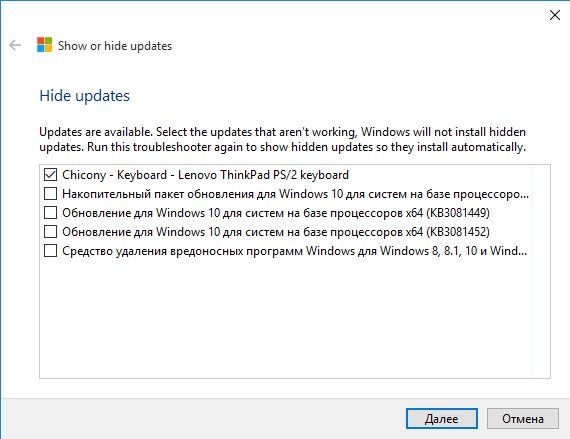
We mark those updates that need to be hidden, and click "Next".
While the update is hidden, the operating system will not install it. And, if necessary, you can restore hidden updates by running the utility again, selecting "Show hidden updates" and ticking the required update. After that, the update will be installed in the general order.

Using the "Show or hide update" makes it possible to postpone the installation of any problematic updates (including security updates), but you will not be able to completely avoid updating in this way. All small updates are part of the large and sooner or later will be installed.
These were simple ways, slowly move on to more advanced.
Configuring Automatic Updates with PowerShell
To manage updates, you can use the PSWindowsUpdate module from the Microsoft Script Center. To use, download the archive, unpack it and put it in the% WINDIR% \\ System32 \\ WindowsPowerShell \\ v1.0 \\ Modules folder. Then start the PowerShell console and allow unsigned scripts to run:
Set-ExecutionPolicy Bypass -Force
We import the module into the current session:
Import-Module PSWindowsUpdate
And output the list of commands for the module:
Get-Command-MODULE PSWindowsUpdate
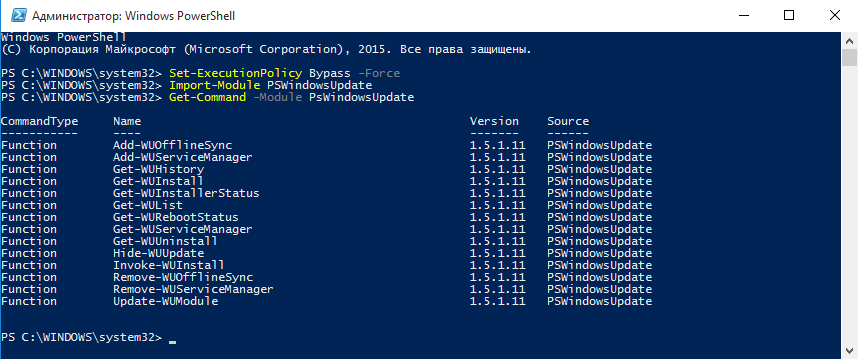
The module contains 14 cmdlets:
Get-WUList - displays a list of available updates;
Get-WUInstall - starts downloading and installing updates;
Get-WUUninstall - removes selected updates;
Invoke-WUInstall - serves to manage the update on remote computers;
Hide-WUUpdate - hides the selected updates;
Get-WUHistory - displays information about installed updates;
Add-WUOfflineSync - registers a service that allows you to install updates from the local cache (Offline sync service);
Remove-WUOfflineSync - deletes the registered service;
Get-WUServiceManager - displays a list of available update services (Windows Update, WSUS, etc.);
Add-WUServiceManager - registers the selected update service;
Remove-WUServiceManager - deletes the selected update service;
Get-WUInstallerStatus - shows the status windows services Update Installer;
Get-WURebootStatus - allows you to specify the need to reboot;
Update-WUModule - serves for centralized updating of the PSWindowsUpdate module on remote computers.
For example, we will list the available updates and hide one of them:
Get-WUList
Hide-WUUpdate -KBArticleID KB3087040 -Confirm: $ false
After that, the update KB3087040 will not be installed. If necessary, you can unlock it with this command:
Hide-WUUpdate -KBArticleID KB3087040 -HideStatus: $ false
![]()
In general, the PSWindowsUpdate module has quite a lot of features, which, according to good, should be thoroughly understood. Windows Support 10 the author has not yet announced, but the team is quite correctly executed.
Configuring Automatic Updates with Group Policies
This method is only available for older versions of Windows 10, because the editor does not have a Group Policy editor. To open the Local Group Policy editor snap-in, click Win + R and execute the command gpedit.msc. Automatic update settings are located in the Computer Configuration section - Administrative Templates - Windows Components - Windows Update.
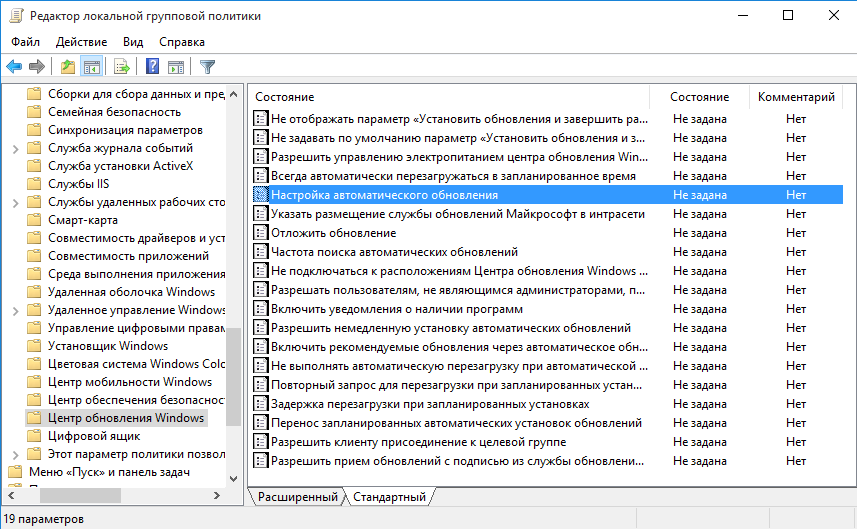
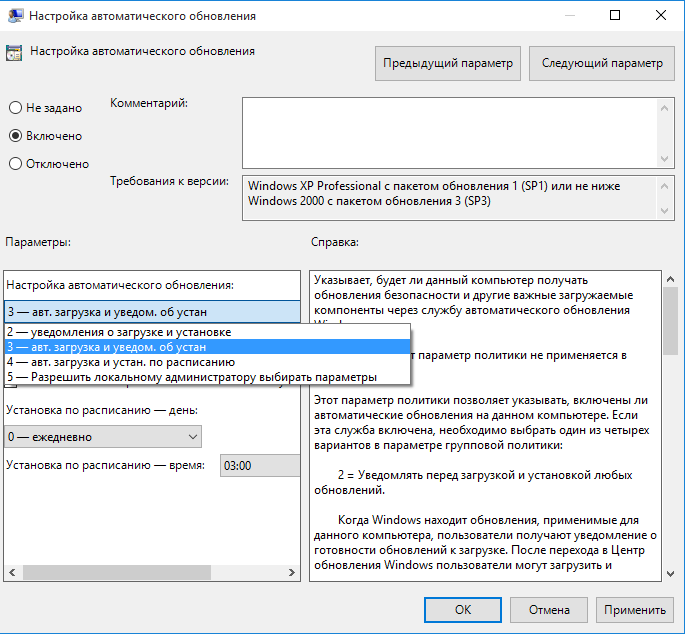
All the basic settings are set in the "Automatic update setup" policy. First it should be turned on, after which you can choose one of the 4 upgrade options:
2 - notification of download and installation of updates;
3 - automatic download and notification of the installation;
4 - automatic loading and installation on a schedule;
5 - Allow the local administrator to select automatic update settings.
If option 4 is selected, you can additionally set the day and hour for installing updates, and specify whether to install updates only during idle time, during automatic maintenance of the system.
Note. When this policy is enabled, the settings in Windows Update become unavailable. The exception is the version number 5, which allows local administrators to change the update mode in the update center.
If the option of automatic download and schedule installation is selected, you can additionally use the following settings.
Always automatically reboot at the scheduled time
If this policy is enabled, then after installing the updates the computer will be rebooted independently no matter what. To reboot was not sudden and users managed to save the results of their work, you can set the reboot timer from 15 minutes to 3 hours.
Do not perform an automatic restart if updates are automatically installed if users are running on the system
Here everything is clear from the name of politics. If this policy is enabled, after the updates are installed, the computer does not automatically restart, but displays a notification that the installation is complete and waits for the user to reboot. Cancels the previous policy.
Repeat request for reboot at scheduled settings
This policy determines the time at which the system will issue a second request when the scheduled reboot is canceled. If this policy is not active, requests will be issued every 10 minutes.
Restart delay at scheduled settings
This policy sets the time that must elapse from the time the update is installed to the restart.
Transfer scheduled automatic update settings
In the event that the computer was turned off and the updates were not installed at the scheduled time, it will be launched immediately after the next computer startup. In this policy, you can specify the amount of time that must elapse from the time the system boots up before the installation begins.
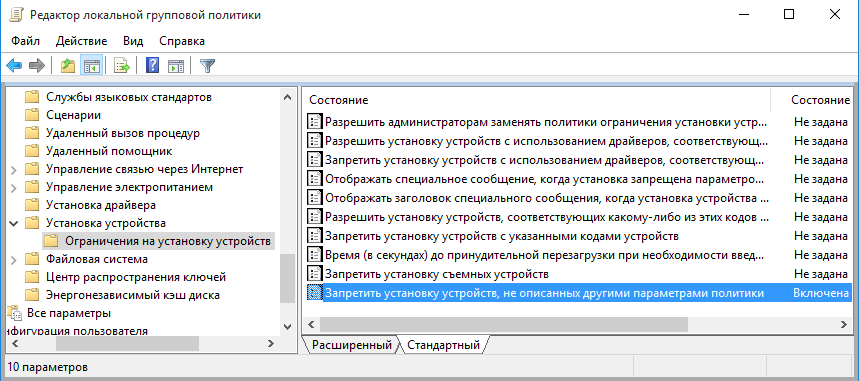
Do not install devices that are not described by other policy settings
This policy is used to disable automatic driver updates and is located in the Computer Configuration - Administrative Templates - System - Device Installation - Restriction on Device Installation section.
Note. I described the configuration of local group policies, but there are also exactly the same domain ones. And if the computer is in the enterprise network and is a member of the Active Directory domain, then (usually) the automatic update settings are determined by domain policies. Domain policies have the highest priority and override any local settings.
Configuring Automatic Updates Using the Registry
The most powerful system management tool is editing the registry. In the registry, you can set all the same settings as with Group Policy, in addition, it allows you to completely turn off automatic updates.
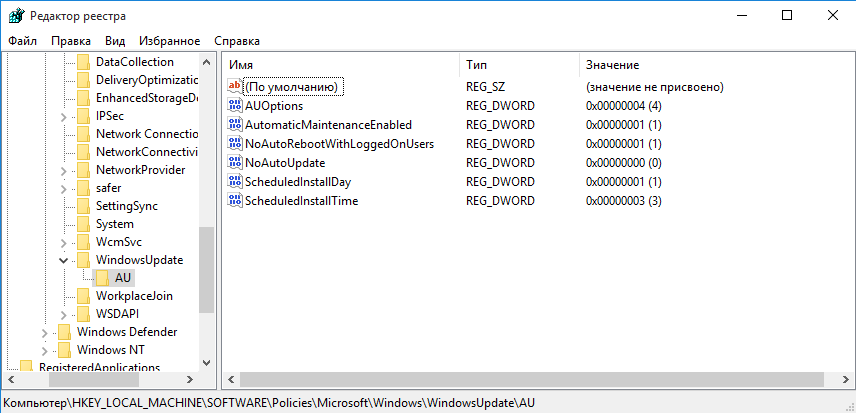
To configure, open the Registry Editor (Win + R -\u003e Regedit) and go to the HKLM \\ SOFTWARE \\ Policies \\ Microsoft \\ Windows section. Create a new section WindowsUpdate, there is a subsection with the name AU. In the AU section we create parameters of type DWORD, which are responsible for automatic updating.
Here are the most important of them.
AUOptions- the main parameter that is responsible for the method of obtaining and installing updates. Can have the following values:
2 - notify before downloading and installing any updates;
3 - automatically download updates and notify about the readiness of the installation;
4 - automatically download updates and install according to the schedule;
5 - Allow local administrators to manage update settings.
NoAutoUpdate - A parameter that allows you to completely disable automatic search and installation of updates. Value 1 - automatic updating is disabled, 0 - updates will be downloaded and installed according to the settings specified in the parameter AUOptions.
If the value is set to automatic download and schedule installation (AUOptions = 4), you can optionally specify additional parameters.
ScheduledInstallDay- the day of the week on which updates are scheduled. Value 0 means daily setting, values from 1 before 7 indicate a specific day of the week (1 - Monday).
ScheduledInstallTime -the time on which updates are scheduled. For this parameter, values from 0 to 23 hours are available, which corresponds to the hour in the day.
AutomaticMaintenanceEnabled - a value of 1 means that updates must be installed during downtime, as part of the automatic maintenance of the system.
NoAutoRebootWithLoggedOnUsers - value 1 disables automatic reboot after installation of updates. The Automatic Updates service will wait for a reboot by any user logged on to the system.
Note. Theoretically, updating management by editing the registry can work in Windows 10 Home. In practice, this was not checked because I did not have the correct wording.
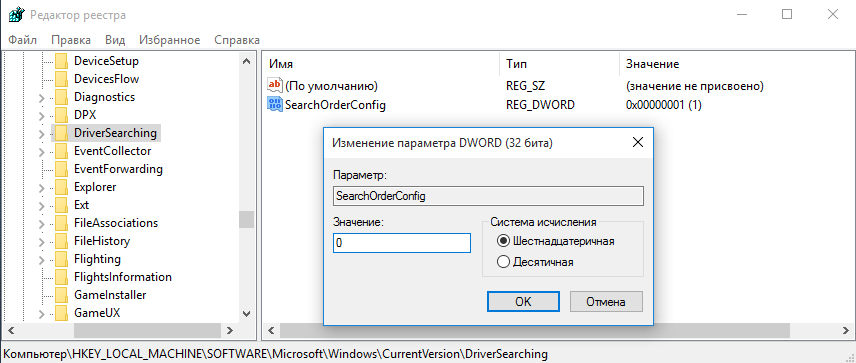
To disable the automatic driver update, in the HKLM \\ SOFTWARE \\ Microsoft \\ Windows \\ CurrentVersion \\ DriverSearching section, find the SearchOrderConfig and set its value to 0 .
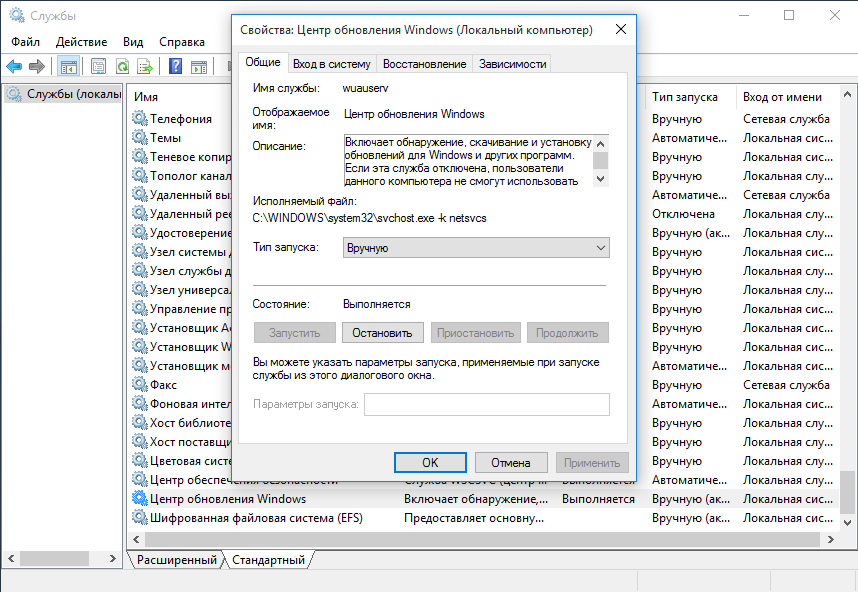
Disable the automatic update service
And for the most urgent case, you can disable the automatic update by stopping the corresponding service. To do this, open the "Services" snap-in (Win + R -\u003e services.msc), find the service with the name "Windows Update" and stop it. And that it does not start on its own, the type of launch must be set to Disabled.
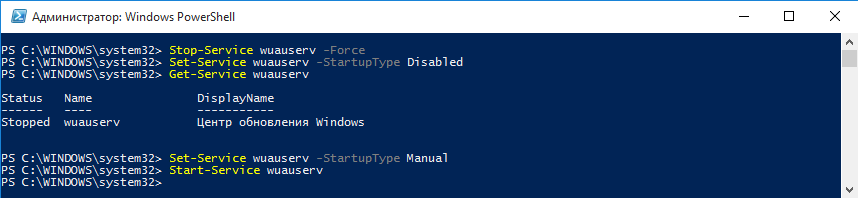
The same can be done with using PowerShell. To stop, use this command:
Stop-Service wuauserv -Force
To disable this:
Set-Service wuauserv -StartupType Disabled
View the status of the service as follows:
Get-Service wuauserv
Well and so it is possible to return all back and to start service:
Set-Service wuauserv -StartupType Manual
Start-Service wuauserv
After you disable the Service, Update Center will issue an error when you try to check for updates. This is an extremely rude method, although it works on all dozens of editions without exception, but I repeat - it's worth using in emergency cases, for example, if you need to urgently stop the update process.
Conclusion
As you can see, although it's more difficult to manage automatic updates in Windows 10, there are enough ways for this. In conclusion, I do not recommend that Microsoft permanently postpone or completely stop the automatic update. Updates have a certain expiration date, so if you do not update within 8 months, new updates can not be installed.


