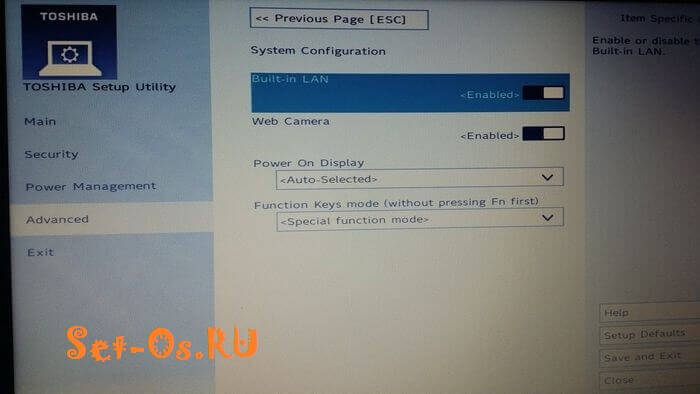
For windows installations 7 or Windows 8, you need to make additional settings in the BIOS, namely put on the boot either a USB flash drive or a drive.
Consider how this is done with the Toshiba Satellite laptop.
- Turn on the laptop and press the F2 key on the keyboard to get into the BIOS.
Observe the following
- We need to go to the Boot tab.
To do this, press the right arrow several times on the keyboard until the desired tab is highlighted in white.
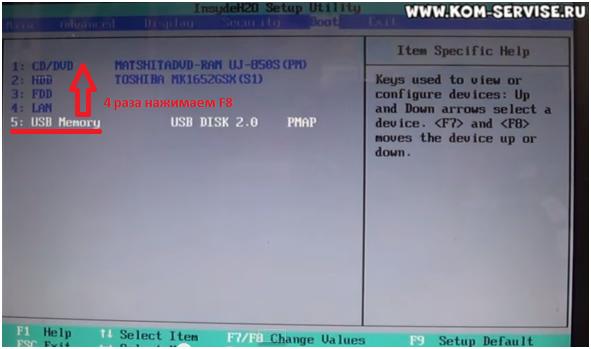
The Boot tab shows all the devices from which you can boot Windows.
For example, the first item displays the drive, the second item is the hard drive.

- Suppose we need to install Windows from a USB flash drive. It is in this list is the 5th item.
To boot from the USB flash drive, we need to select it and move it to the first position among the listed devices.
To do this, we need to press the F8 key. If we press the F7 key, the position selected by us drops down.
- Suppose we need to move the CD / DVD to the third position, and the HDD to the second.
To do this, either select the CD / DVD and press the F7 key on the keyboard, or select the HDD and press F8.

Here's what happened after the move:

- If you want to install Windows with the installation disk, then in the same way we move to the first position of CD / DVD.
After we made the necessary settings, we need to switch from the Boot tab we selected to the Exit tab.
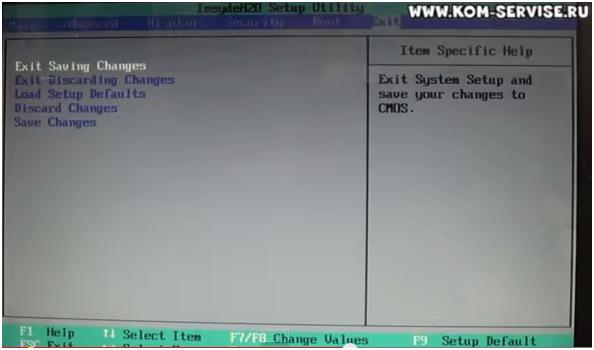
- Our settings must be saved.
To do this, select the Exit Saving Changes line and double-click the Enter button on the keyboard.
A pop-up window appears asking you to confirm the exit and save the changes.
Click Yes.

7. After the performed actions the computer reboots itself.
There is another way to select the device with which Windows will be installed.
When rebooting, press the F2 key on the keyboard, open the Boot Menu.
There is listed a list of devices that you can use to install Windows.
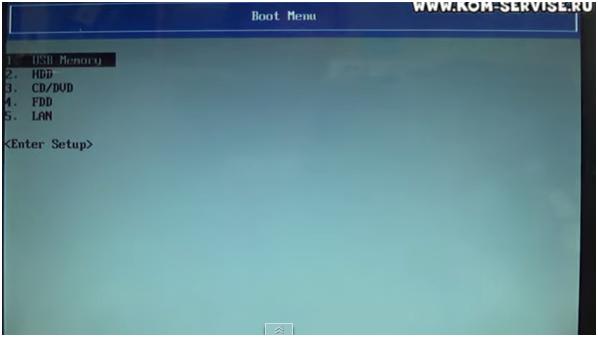
Select any device from the list by using the up / down arrows on the keyboard, moving from one line to another.
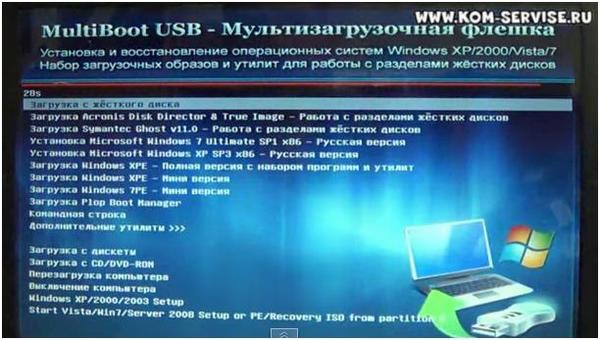
For example, we want to load Windows from a flash drive, select the first line and press Enter.
- If a USB flash drive with image of Windows already in the computer, then we see how the Windows installation begins
The whole sequence of actions can be seen in the video at the link below
To enter the BIOS, different notebook manufacturers use different buttons on the keyboard. Why they do so and why - it's hard to say. In my opinion it would be more correct to go to a meeting with the user and use the same key everywhere, as it is implemented on ordinary stationary computers. There you have to press "Del" when starting the system. On laptops, netbooks and ultrabooks the user gets exhausted while he can get into the holy-holy device. In this post I'll tell you how go into the BIOS on laptops and netbooks Toshiba Satellite. There, by default, the Quick Boot Function is activated. Accordingly, immediately after turning on the computer, the operating system boots.
On most Toshiba models, the Satellite, such as the C660, C850, is required to enter the BIOS with the notebook turned off, press the button F2. Then, without releasing it, turn on the button with the power button. As soon as you see the inscription "Toshiba leading innovation" - the button F2 can be released. Only after that you can go into the BIOS.
On some models of Toshiba notebooks (mainly those that come with SSD disks and use UEFI) in BIOS it's harder to get to. It is already necessary in the Windows operating system on the Start menu to find the programs preinstalled by the manufacturer. They must have the Bios System, HW Setup or System Setting utility.

It actually provides access to all parameters Basic System Input-Output is already from under the operating system.
If you really need it when logging in, then you can also configure the button for this action in this program.
BIOS setup for laptop Toshiba Satellite l755
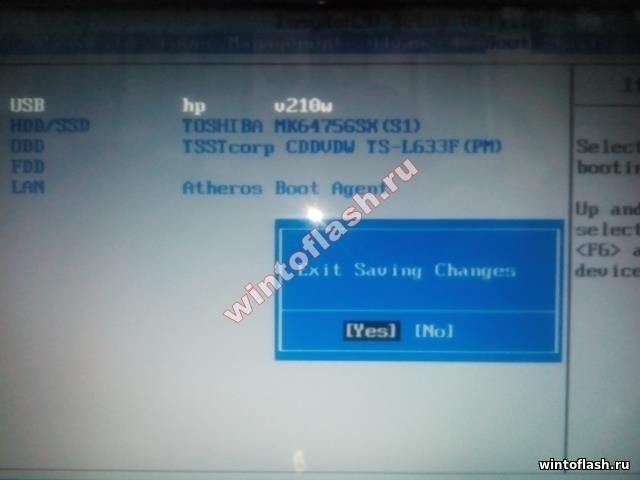
Hello.Now we will configure BIOS for downloading from a flash drive or drive. The Notebook Toshiba Satellite l755 has a "Boot menu", which allows you to quickly and without any settings choose where to download, whether it's a USB flash drive or a disk. To call the boot menu (boot menu) you need to press the "F12" and you will see such a window, as shown in the photo. Here you choose your flash drive or drive. In the example, the USB flash drive has the name "USB: HP v210w", and the drive "ODD: TSSTcorp CDDWDW TS-L633F (PM)".
Log into the BIOS of the Toshiba Satellite l755
If you still decide to go into BIOS and configure the boot from the flash drive of your Toshiba Satellite l755-16w laptop, then turn on the laptop and press the "F2" key.If everything is done correctly, you will see the same menu as in the photo.

Go to the tab "BOOT", here we see all the devices that are connected to the laptop, except for the periphery.

After prioritizing, you will need to save the settings. To save the settings, press the "F10" key (a window will appear, the same as in the photo below). Select "YES" and press "Enter".
Here's a simple bios setup for laptop Toshiba Satellite l755.
Instructions
To simplify the BIOS firmware process, it is better to use a program that allows you to work in the operating system environment windows systems. If you are dealing with a Toshiba laptop, then download the program InsydeFlash. The utility version should not be lower than 3.5.
Download firmware for your motherboard. Visit http://ru.computers.toshiba-europe.com/innovation/download_bios.jsp?service=RU. Fill in the suggested table, specifying the desired model of the mobile computer. Do not use software designed for other notebook models.
Prepare your mobile computer for firmware. Disconnect the device from the Internet. To do this, pull network cable or turn off Wi-Fi adapter. Close all unnecessary programs. Be sure to turn off the antivirus or at least suspend it.
If the laptop runs without a battery, turn off the computer and install the battery. Charge it for 40-50%. Turning off the laptop during the firmware will cause a malfunction in the motherboard.
Run the Inside Flash program. Click the search button and select the downloaded firmware file. Press the Start button and wait for the program to finish. In no case do not stop the process and do not turn off the laptop.
If this method does not work, then copy the downloaded file to USB-drive and rename it to bios.fd. Format the USB flash drive to FAT32 format.
Turn off the laptop, remove the battery. Connect the power cord to the mobile computer. Connect the USB flash drive to the USB port. Press and hold the Fn and F keys. Some Toshiba models need to use other keys. Now press the Power button. If the flash drive has an indicator, wait for it to turn on and release the Fn and F keys.
Wait for the laptop to restart or just wait 10-15 minutes. Check the stability of the device.
Sometimes an unsuccessful firmware phone or the desire to roll back to the old version, ends with a nuisance - the phone generally refuses to work. Do not rush to throw out the phone - from dead mode, you can also reflash it to a normally working version.
You will need
- Mobile phone, charger, computer with Windows OS, Phoenix program.
Instructions
Download the Phoenix program from file-sharing sites on the Internet.
Related Videos
Sources:
- how to reflash the mother
If you often work on a laptop, you may receive various errors, and from time to time there is a situation where the laptop refuses to boot due to erroneous settings made in the BIOS. In this connection it is required to reset it.

Instructions
First you need to find and download a program that allows you to reset the BIOS. As such a program, you can use BIOS_PW.EXE. You can download it from the site http://intellcity.ru. After downloading it, you need to unzip the program and run it. This utility is not installed on the computer, but simply run from the archive or folder. Alternatively, you can use another program that will also help you reset the BIOS to laptop. The most optimal utility is unlock6.exe. Download from the site http://necessary-soft.net. The actions will be the same as for BIOS_PW.EXE.
Further it is required at computer loading to remember the error code which the laptop gives out. Most often, this code will appear after three attempts to enter. Now you need to enter the console cmd, and then go to the software directory (Software). Next, you need to enter the name of the required software, enter an error code through the space, and after one space enter 0. Then you can press the Enter button. The software will generate several passwords. Try to enter each password until one of them fits.
Next, you need to go into the BIOS and insert the specified password. Now you can set the new password as empty. It is very important to reset an already existing password on the BIOS. On this zeroing the BIOS on laptop completed.
Related Videos
Firmware mobile phones we need almost 50% of the produced models, this is due to the fact that over time, new software for phones appears, the phones themselves acquire new opportunities. Also, firmware is required for phones that do not work correctly (call automatic reboot etc.).

You will need
- Phone Motorola L-series, software RSD Lite, MotoMidMan, P2KTools, data-cable (USB-miniUSB).
Instructions
Before any actions associated with the firmware of the phone, it is necessary to charge the device 100%. It is also recommended to install drivers for a particular L-series model. If the driver disk was not included, they can be downloaded from the Internet. After performing these steps, you must remove the flash card, if any, and connect the phone and the computer with a data cable. Do not forget that the firmware files are worth downloading before the phone's firmware process.
Launch the P2KTools program and save everything important for you that is in this phone: contacts, messages, pictures, applications and mp3-ringtones. If you can not save all data from your phone using this program, use the optional software: MotoMidMan and P2KAE.
Close all programs that are currently working with your phone, you can go to the "Task Manager" for full confidence (Ctrl + Alt + Delete or Ctrl + Shift + Esc). Now run the RSD Lite program.
The icon of your phone should appear in the main window of the program. Click the download button for the firmware files from the hard drive and specify the path to them.
It remains to press the Start button. On the screen of your phone will appear a few lines that indicate the beginning of the firmware (Boot Loader ... SW version). If there are no inscriptions on the screen of your phone, then it did not go into the flash mode. Press "*" + "#" + "red off button".
The process of flashing the phone can last from 5 to 10 minutes. After the firmware Motorola L-series, the program will report a successful firmware and will try to automatically restart the phone. If this does not happen (restart the phone), do this yourself. If for some reason there is a failure (a jump in the network), repeat this operation again.
Related Videos
Sources:
- to sew a motorola
Proper storage of documentation will avoid problems with finding the right contracts. Having spent a little time on filing securities, you will be sure that the necessary will always be at hand intact and intact.

Instructions
To easily find the required document, make an accounting book. Contract the number and put it in this notebook. In addition to the serial number, write down the date when the contract was concluded. The line in the journal should look like this: 1. contract №987DL from 23.03.2010. Next, in the notes, indicate the essence of the contract, if required by the corporate style of archiving.
Get for each legal entity, if there are several of them in the organization, your own journal of documents. Use the symbols for their designation. For example, enter the contracts of LLC "Funny Pictures" as 987BC. And the contracts from OJSC Murzilka mark 987M. Assign numbers in order in order to avoid confusion.
Only file the contract in the folder after it has passed all the stages of the agreement, was signed by the CEOs of both parties, all the seals have been delivered. Choose folders in the hard cover - they will ensure the safety of documents. For each legal entity, create a separate folder.
To enclose the contract in the folder, carefully remove the paper clip that connects the sheets. Punch holes through the holes. Insert the document in the folder and secure it with metal antennae. Separate one contract from another with a clean A4 sheet.
There is another way of archiving documents. Get a set of transparent files. Each contract is enclosed in a separate cover and fixed in a folder.
Do not put too many contracts in one folder - the sheets may be wrinkled. The folder should be closed easily so that the paper does not look outward.
Leave for storage of folders with documents a separate shelf on the rack. On the end of the folder indicate the year and the legal entity for which the contracts are made. So you quickly find the necessary contracts in case of need.
Folders with documents concluded three - four years ago, keep at hand is not necessary. Put them in dense cardboard boxes, by signing the year and the legal entity to which the contracts belong. Pack the package to the warehouse. Find a dry storage place. Moisture can ruin securities.
Firmware (flashing) PDA must be done for various reasons, for example, to return the device to life after the wrong of the installed program or a system failure. Also, the firmware is made for the Russification of devices.
To print text vertically or at any desired angle in the word. You need to perform a few simple steps. Let's consider one of the options using the table. We go to the "insert" section further "table", choose the required number of columns and rows. Right-click on the cell, select "Text direction". Choose the direction of the text. To make the table borders invisible, click on ...
To include in excel writing text vertically or text in excel from any angle (applicable to excel 2003, 2007, 2010, 2013, 2016), you need to perform a few simple steps. Select the cells in which we will specify the direction of the text. Right-click on the selected cells, in the context menu click on the item "format cells" in the next window select ...
In today's article we will talk about how to run the PSU (Power Supply) of your computer without the participation of the system (motherboard) board, i.e. the start will occur autonomously. All the current power supplies can be started using a regular clip or a piece of wire! For this we need: Power supply unit (PSU), there is no need to pull it out of the computer, it is enough to pull out the biggest one ...
So, after turning on the computer / laptop, we have the inscription "BOOTMGR is missing Press Ctrl + Alt + Del to restart". Typically, this error occurs after experiments with partitions of the hard disk. The solution of the problem will be considered example Windows 7. To resolve this error, you must insert a disc from your operating system and boot from it. Next, choose the language and other options, click ...


