Instruction
To get started, choose the right equipment. If you plan to include devices supporting wireless networks in your future network, then purchase Wi-Fi router. Install this device in an open area and connect the power supply to it.
Plug in the Internet (DSL, WAN) cable for Internet access. Now, using network cable, connect LAN (Ethernet) connector routerbut with a similar channel network card one of the computers or laptops.
Turn on equipment connected to Wi-Fi routerohm Launch your internet browser. Open the instructions for routerand find in it the value of the IP address of this device. Enter this value into the browser and press the Enter key.
To gain access to the equipment settings, enter the login and password, the value of which you can also find in the instructions. Now open the WAN menu. Following the recommendations of your provider, configure the parameters of this menu to gain access to the Internet. Save your entries.
Go to the Wi-Fi or Wireless Setup menu. Create your own wireless access point. To do this, enter its name, select the security type and set the password. Save the settings for this menu. Reboot Wi-Fi routerif this operation was not performed automatically. In older models, this requires disconnecting the power from the device.
Log in to the web interface again. wi-Fi settings routerbut. Open the Status menu and make sure that the device has access to the Internet.
Connect with network cables stationary computers with Ethernet ports (LAN) routerbut. Connect laptops and netbooks to Wi-Fi point access. Make sure that all devices have access to other computers on the network and the Internet.
You will need
- router;
- computers;
- network cables.
Instruction
First of all, connect all the necessary cables. The router has several cable entries - one of them is the main one, it is usually labeled WAN. Connect the cable provided by your ISP to this input.
Connect the rest of the free inputs to the cables of the computers you want to network. To connect, use cables with a conventional crimping scheme.
Now make the necessary configuration of the router. In the frequency of cases, this setting has to be done manually, most likely you will encounter the same situation. Do not worry, manual configuration of the router is not as scary as it seems at first glance.
After that, you will be prompted for your username and password. Enter the default login and password (admin / admin). After that, enter the settings menu, where you will make the basic settings.
Now we need to select the mode of the router. The router has several modes:
Bridge - in this mode, the router passes information through itself, but the settings will need to be separately set on each computer. The Access Point mode has the same properties.
NAT - address translation mode, with its help all computers on the network will be perceived by external sources as one computer with one address. Inside the network, each computer receives a separate address from this system. The advantage of this system is that many providers limit the number of computers entering the local network, and with the help of such a system you can mask the number of computers, since all of them will have one address.
DHCP - this mode allows the router to automatically distribute addresses to all computers on the network. It is most convenient if there are a lot of computers connected to the network, as in this case it will be problematic to configure on each machine.
Modern technologies are developing rapidly, and today it is difficult to imagine your life without such a popular thing as the Internet. One of the most convenient ways Accessing information from the world wide web is wifi.
At the heart of technology work wireless internet of this type lies connecting to the network through WiFi routerbut. After connecting, the Internet access is provided from any point within a certain radius of the router. It is possible to connect several devices simultaneously, for example, a laptop, phone and tablet.
Methods and connectivity, as well as the most common problems encountered, are described below.
We connect the Internet independently
Connecting a wireless router to a laptop with Windows 7, Windows 8 and Windows 10 operating systems
First, make sure that your connection kit includes:
Actually wireless router;
Power Supply;
Power cord;
CD auto install;
Manual;
At the turn of the package you can find the wiring diagram, as well as features and characteristics of this device. Then directly install and configure:
- We connect the power supply to the router and turn it on. The indicators on the front panel come on.
- Plug the power cord into the blue socket.
- We connect the router to the network card of the computer using a patch cord that connects to any of the four equivalent orange ports.
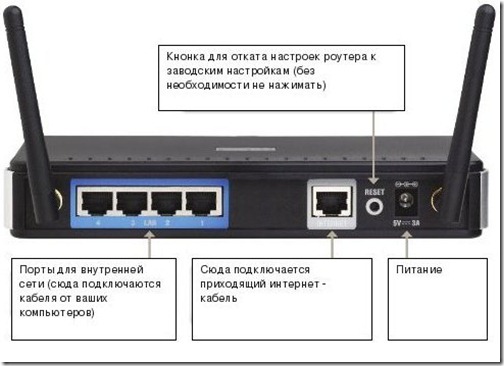
Connecting the router to the computer and network. Behind the router is the blue Wan socket, several equivalent LAN sockets, and the power supply socket.
If you have a tablet or smartphone and no network card, then the settings can be made using a wireless connection. To do this in search available networks find your router. As a rule, the network will always be open. If the network is closed, all the necessary information can be found on the back of the router.
Configuring the router on laptops with Windows 7, Windows 8 and Windows 10 operating systems
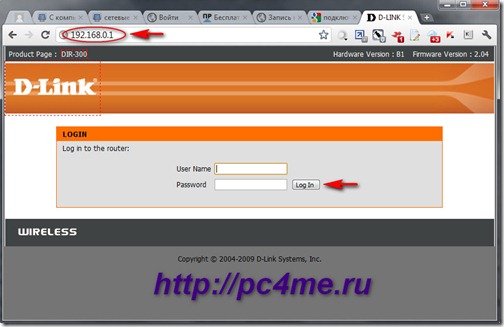
- We go inside the firmware. To do this, you must specify the IP address 192.168.0.1 in the address bar (varies and depends on the firmware, maybe 192.168.1.1). In case of problems with access, enter the address indicated on the turn of the router. It looks like tplinklogin.net. Username and password specify the standard, namely admin.
When you enter the above IP into the address bar, we get access to the router's menu. In this section, the basic necessary device settings are made.
After logging in, we get inside the WiFi firmware. By default, the Status tab opens. She is purely informative.
You can find out your type of Internet connection from your ISP by calling the hotline. Or look at the received documentation in the Settings section.
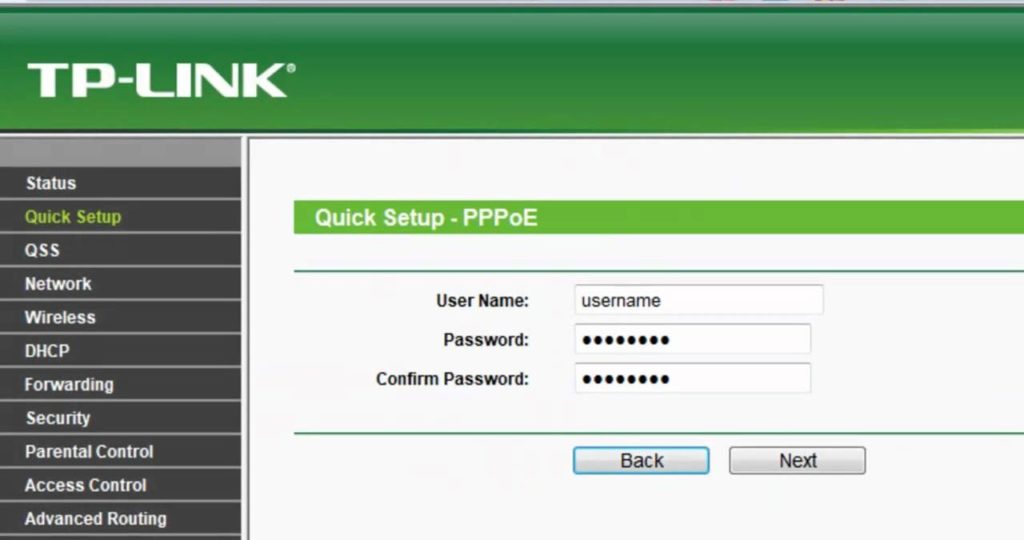
Most often, providers use either a dynamic IP address or a PPPoE connection. The difference between them is that with a dynamic IP address there is a direct connection, that is, you connect a network cable, and the Internet immediately works. For a PPPoE connection, you need to connect using your login and password.
- In the case of direct access, specify the dynamic IP in the menu and click Save. The next step will be to reset the device.
- Having selected a PPPoE connection, we register the username and password twice in the corresponding field, then again we save and reboot. If you have a static IP address, specify it, it is designated in the contract, then also click Save and reboot.
Wireless Setup
Enter the wireless settings that can be found in the menu on the left. In the Network Name line we come up with a name for your WiFi. After we save and reboot the router.
And the last - setting the wireless security. By default, the device is an open network (Disable protection is selected). If you do not want to distribute WiFi neighbors for free, you need to set a password to connect.
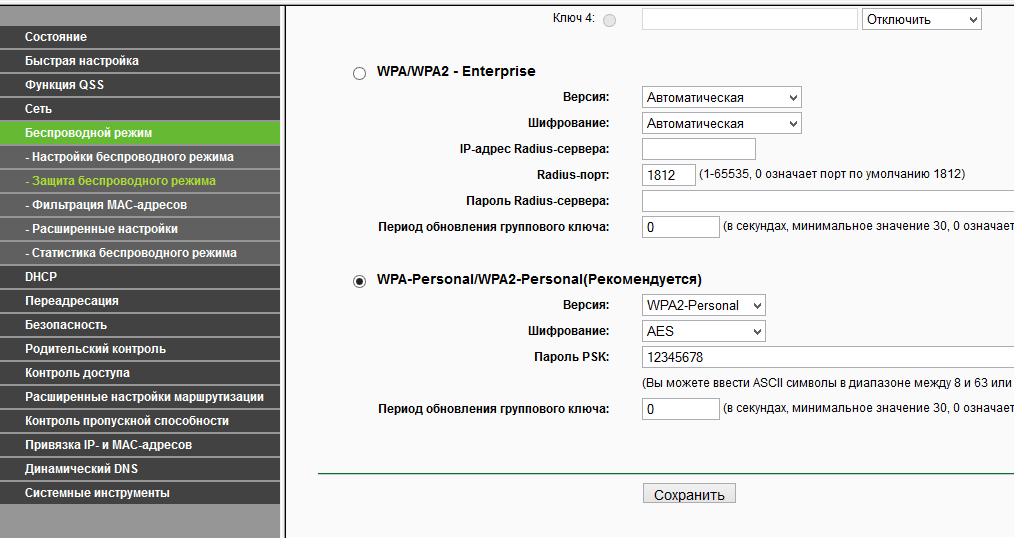
In order to restrict access, we select the recommended WPA2-Personal protection level in the wireless mode menu, create a password, save and perform a reboot.
WiFi setup is complete. Go to the Wi-Fi network and in the list that appears, select it, click Connect, enter the specified password and you can safely go on a journey through the expanses of the Internet.
Possible connection problems and their solutions
When working with the Internet have to deal with certain problems with the connection. The reasons may be very different. Some of them can be handled without problems.
Internet access is limited
If you find a yellow exclamation mark on the Internet connection icon in the tray, as well as the corresponding caption “Internet access is limited,” you need to find out the cause of this problem.
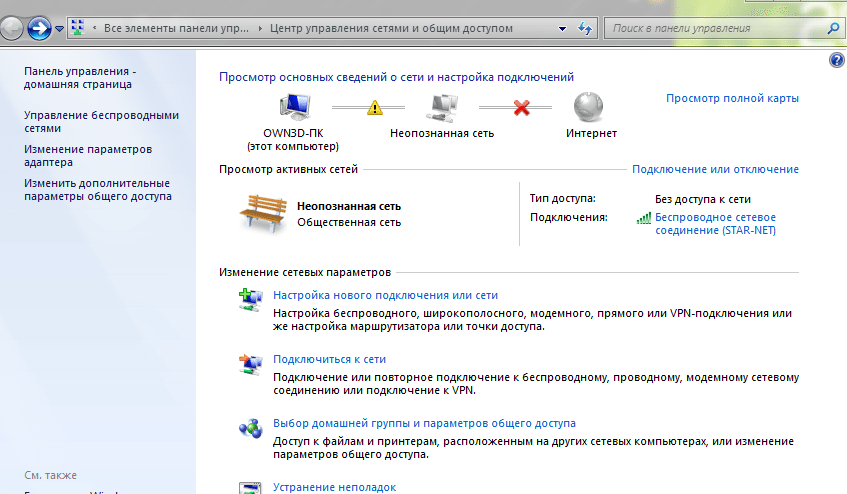
If there are problems with internet connection in the Network Control Center and shared The message Without Internet access or Unidentified network appears. It is accompanied by a distinctive yellow triangle with an exclamation mark.
- To get started, make sure that you pay online on time. This can be done by calling the provider.
- If it's not about paying, go ahead. Open the settings of the router again (192.168.0.1 or 192.168.1.1 in the address bar of the browser). Here we are interested in Advanced Settings, the Network tab.
Typically, the connection type is a dynamic IP address. In some cases, it is necessary to correct it with a static one and carry out all the necessary settings manually.
We change our connection type to Static IP and, in the IP Address section, enter the network information provided by the provider. It can be found in the contract. Click Save and exit the router settings.
If the restricted access notification is still displayed in the tray, you must perform the following steps.
- Go to the Control Panel, then to the Network and Sharing Center, select the item Change adapter settings. We click on our wireless adapter, right button Properties. Here we are interested in Internet Protocol Version 4 (TCP / IPv4), again Properties, where we check the box Obtain an IP address automatically. Save the settings by clicking OK, close the window. If it does not help, go to the fourth paragraph.
- Click the right button on the wireless network, select Diagnostics. Next, wait and follow the prompts on the screen. OS itself will try to fix problems with the Internet.
- If the above is ineffective, you should contact technical support.
The same actions are necessary not only with limited access to the Internet, but also in the absence of access to it.
Could not connect to network
There is one secret that can help. It does not require much effort. You just need to change the password to the WiFi network.
- We go to the network connections.
- Select the network to which we can not connect with the right mouse button, go to the Properties tab.
- Change network password. And we come up with a new one.
The lack of Internet on Android
If you have problems with the Internet on smartphones and tablets, a program called Host Editor will be useful. Download it and install it. In the program itself, we find the file localhost. If after it there are a few more items, they must be removed. We leave only localhost. After removing all the excess Internet should work.
Conclusion
Nothing complicated self tuning WiFi router and solving elementary problems when working with wireless networks. With most of the problems it is possible to cope on their own without recourse to specialists.
Good afternoon friends! I am very glad to welcome you on our learning Internet portal. “With computer on“ YOU ”. We continue to disassemble the plan in detail. Let me remind you that we have already chosen a specific technology. local network (Wi-Fi or DSL), we decided on the network architecture, acquired the necessary network components, went through the network educational program in detail, and today we are in for an important and crucial stage - (Wi-Fi router).
The router is the key device. home network. It provides Internet access, connects users with each other, protects the network from intrusions from “outside”, and is also able to provide additional network services, making life easier for users.
preparing to configure the router
1. In the case of Internet connection by dedicated Ethernet line (a provider has got a network cable to your apartment), you will need a wireless LAN router, on the back panel of which there is a connector labeled “WAN”. We will connect the provider's Ethernet cable to it.
2. If the provider provides you with DSL Internet access (via telephone line), the following options are possible:
- Wi-Fi router with built-in DSL-modem (the most convenient option, but it will cost a bit more expensive);
- DSL-modem with built-in router with a point connected via Ethernet wi-Fi access (a bit cheaper, but you will have to configure the access point separately and we can);
- DSL-modem connected to a Wi-Fi router (also have to configure two devices).
Which option to choose, you decide, it all depends on the price of the issue and on what devices you already have at home.
After preparing the devices, connect the provider's Ethernet cable to the WAN port of the router (or the telephone cable to the LINE port of the wireless DSL router). Next, you need to connect a computer to one of the free LAN ports of the router, with which we will configure the router (after the configuration is complete, the computer can be disconnected). We turn on the computer, we do not supply power to the router yet.
Next, you need to establish a connection (configure network) between the computer and the router. If a default DHCP server is enabled on the router, the task of which is to assign IP addresses to connected devices, then make sure that the automatic address retrieval function is enabled on your computer. To do this, do the following:
![]() Double click on the icon network connection in the task pane (the lower right corner of the desktop), the “Local Area Connection Status” window will open. Click on the “Properties” button. After that, in the opened window, select “Internet Protocol (TCP / IP)” and click on the “Properties” button.
Double click on the icon network connection in the task pane (the lower right corner of the desktop), the “Local Area Connection Status” window will open. Click on the “Properties” button. After that, in the opened window, select “Internet Protocol (TCP / IP)” and click on the “Properties” button.
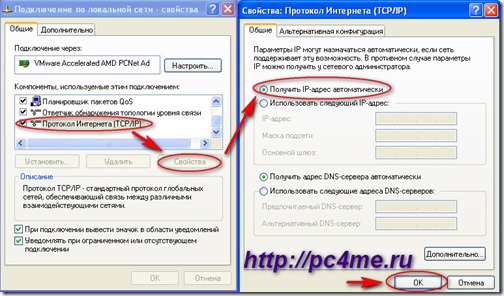
In the “Properties: Internet Protocol (TCP / IP)” window that opens, select the “Obtain an IP address automatically” option. Confirm set parameters by pressing the “OK” button.
If a default IP address is assigned to the default router, you should do the same first steps by setting the switch to “Use the following IP address” in the last window “Properties: Internet Protocol (TCP / IP)”.
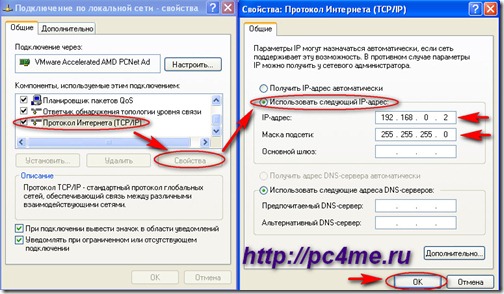
In the “IP-address” field, enter a value different from the IP-address of the router by one. In most routers, the factory default address is 192.168.0.1 (you can check this in the instructions for the router), therefore the IP address of our computer will be 192.168.0.2. Enter the appropriate subnet mask. Close all windows by clicking on the “OK” button.
Friends, if you forgot about how to set IP-addresses and subnet mask, and in general, what it is, then go back to our article and repeat again.
Great, we made all the preparatory settings for configuring the router via the web interface. Now open the router settings window. To do this, type the router's IP address in the browser’s line and specify the credentials in the corresponding fields: username and password (see the instructions for the router).
setting up a router with an ethernet internet connection
1. After you have entered your credentials correctly, the settings page of the router will open. For different models Routers settings may be slightly different, but the basic parameters for all devices are the same.
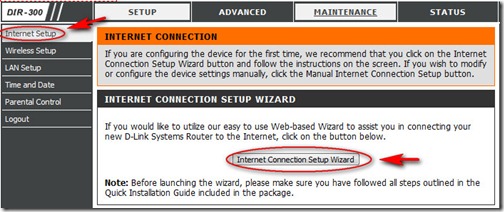
So, on the “SETUP” tab, click on the “Internet Setup” item and launch the Internet Connection Setup Wizard by clicking on the “Internet Connection Setup Wizard” button.
2. Next, the wizard will offer to change the password, set the time zone, and only then go directly to setting up an Internet connection. The first step is to determine the type of Internet connection provided by the provider (you can clarify this point in the service agreement).
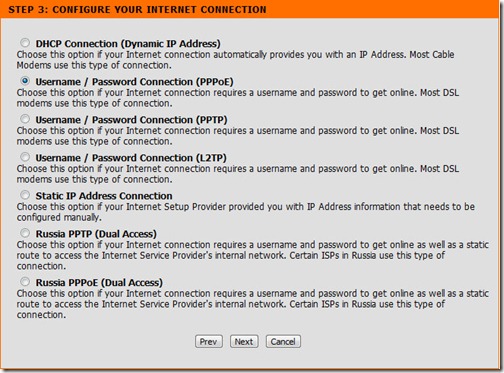
3. The following options are most common in our country:
- DHCP connection (getting dynamic address);
- Username / Password connection (Internet connection requiring login and password);
- Static IP Adress connection.
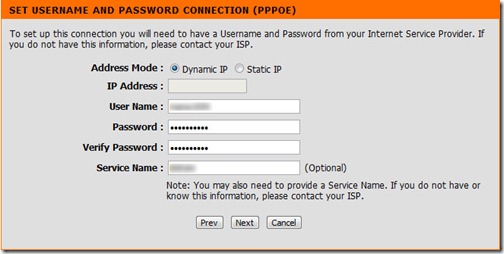
We will not consider the first option, everything is extremely simple there: the router will receive all settings from the provider automatically. In the second option, you must specify the IP address (if the provider provided it to you), the username and password (specified in the service agreement), the name of the provider (optional).
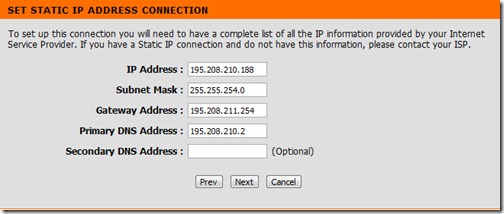
4. If you have a connection option with a static address, specify the IP address given to you, the subnet mask, the gateway address and the DNS server address.
5. If you are sure that you have done everything in accordance with the instructions, but there is still no connection to the Internet, then most likely the provider provides Internet access to devices with a specific MAC address. This situation may occur if the ISP has connected your PC to the Internet. Everything works, but when setting up the Internet through a router, there is no connection.

When connecting, the equipment of the provider remembers the MAC address of the device, and further provides services only to it. To eliminate this problem, you need to use the cloning function or manually entering the MAC address on the router.
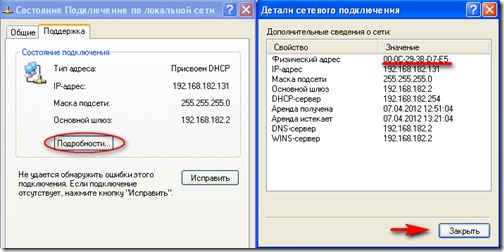
![]() To find the MAC address of your computer, double-click on the network connection icon in the task pane (the lower right corner of the desktop), the “Local Area Connection Status” window will open. Click on the “Support” tab and click on the “Details” button. The “Network Connection Details” window will open, where your MAC address will be the first line.
To find the MAC address of your computer, double-click on the network connection icon in the task pane (the lower right corner of the desktop), the “Local Area Connection Status” window will open. Click on the “Support” tab and click on the “Details” button. The “Network Connection Details” window will open, where your MAC address will be the first line.
If you did everything correctly, then on the computer from which the settings were made, Internet access should be available. To do this, open any page in the browser and enter some site address, for example, our blog. If the page opens, the connection is established - everything is in order.
If you use a DSL connection, the settings will be approximately the same, only you need to specify extra options (Port, VPI, VCI) provided by the provider.
wifi setup
1. So, go to setting up a wireless connection. Again, go to the settings panel of the router (see the procedure above). On the “Setup” tab, select the “Wireless Setup” item and launch the “Wireless Connection Setup Wizard”.
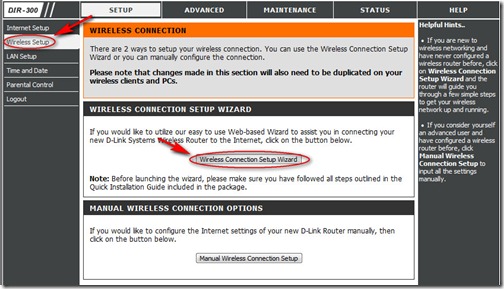
2. Next, specify the identifier (name) of the network and specify how to create a key to protect Wi-Fi network encryption. I advise you to use the option of automatic key generation. Also check the use of WPA encryption instead of the outdated WEP algorithm. Click the “Next” button.
3. The settings are complete, the encryption key is generated.
![]()
Remember it, it will come in handy when you connect other devices to the router wirelessly (you will need to specify the SSID and this key).
security setting wi-fi
1. Change the access password to the access point configuration interface. The router has a standard password for accessing the configuration interface; it is not a secret to anyone (it can be found on the site of the equipment manufacturer). To prevent fraudsters from gaining access to your Internet channel, first replace the password with a stronger one (mix different case letters and numbers, use symbols instead of letters, for example p @ Ssw0rD).
2. Disable the ability to remotely configure the router. This default feature is provided to facilitate the ability of the service to be provided via the Internet. They remotely configure or check your settings via the Internet. Disable this feature.
3. Enable encryption security (WPA or WPA2).
4. Turn off the wireless networkwhen it is not needed. If you do not use the access point (for example, at night or when you leave the house somewhere), then turn off the router. A network that is disabled cannot be hacked.
5. Restrict network access. Even the simplest routers have the ability to customize the filtering of computers by MAC addresses. List all the devices on your network to which you intend to provide Internet access. All others will be unavailable.
6. Hide your network. In the functions of setting the parameters of a wireless connection, there is a function allowing to disable the transfer of the name wireless network (SSID) When searching for a network with external devices, your network will not be visible, and therefore it will not be possible to connect to it.
So we reviewed the basic steps of configuring the router. In the next article devoted, I will tell you about the hidden features of routers - we will expand the capabilities of the router by changing the firmware of the equipment.
In such routers as TP-Link, Zyxel, Qtech, NetGear, Huawei, ZTE, D-Link, Asusthe principle of the menu and default settings is very hike.
Practically everyone knows how to connect a computer to a router. However, it happens that a single router is not enough. The reasons for this are mass: insufficient coverage, too few LAN connectors to connect all available subscribers, and so on. Such a scheme of connecting two or more devices between them in order to satisfy one or another technical requirement becomes actual.
In our article we will look at two of the most practical ways of how to connect a router to the Internet through a router. One of these methods of connecting is called “LAN-to-WAN”, and the other is “LAN-to-LAN”. What is the difference between these types of connections?
- The LAN-to-LAN method allows you to increase the capacity of the subscriber line - that is, the number of possible connections. The connection between devices is such that it is possible to transfer files and separate other physical resources.
- The WAN-to-LAN method is a technology for creating a secondary local network based on the original WiFi grid. The secondary network can be configured independently of the primary network (you can configure DNS, etc.), which, firstly, increases its security, and, secondly, it can organize services like “ parental control". There are also disadvantages to the second method: the sharing of resources and the transfer of files are impossible.
In addition to these two, there is also a third option: connect via WiFi. We will consider this scheme at last. Now let's talk about some of the necessary preparations.
What you need to do at the beginning?
There is a small list of actions necessary for the installation to be successful, and the resulting network functioned optimally:
- Assign the first and second routers. That is, decide which of the devices will be the master and which the slave.
- Check if the master router supports a bridge type of connection.
- Reset the slave router to the factory state.
- Get a suitable crossover length.
The leading router should be assigned a more powerful device. In the process of presentation, we will assume that this is exactly what you did. In addition, we will assume that the main router is already connected to the PC and the network of the provider, and also correctly configured. Testing the router on the second item can be done using a utility called “DD-WRT” - it not only tests the WiFi router, but also activates the required mode for devices that do not support it by default.
You can perform a reset using the button on the back of the slave router. Usually this button is labeled “Reset”. A crossover is a cord that connects from a router to a router so that it is possible to connect two routers in series through a cable. The veins of the crossover are arranged in a special way, so if you do not have the skill of crimping the cable, then it is better to purchase a crossover from any vendor with computer accessories.
LAN-to-LAN and LAN-to-WAN
We will configure the connection according to the first scheme as follows: 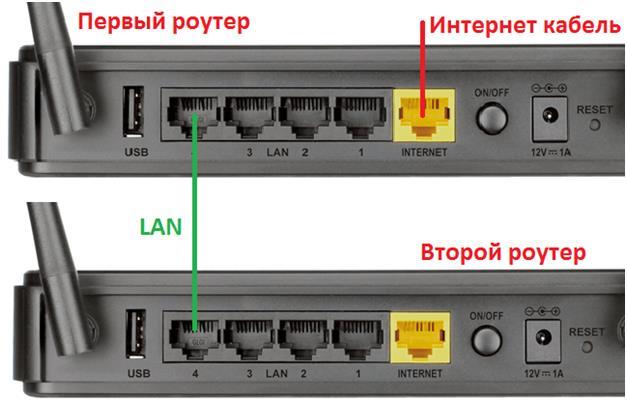
- First we connect to the first router and activate DHCP in its settings.
- Connect to the second router and, conversely, deactivate DHCP in its settings.
- Assigning the slave an IP address different from the standard one (192.168.0.1 or 192.168.1.1) - let it be, for example, 192.168.0.200. Save the changes made.
To configure the router according to the second scheme, see the picture below:
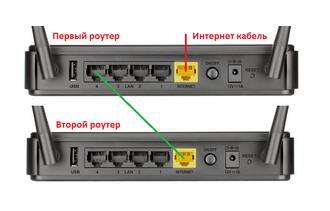
Here is the connection of the LAN port of the master to the WAN port of the slave. Now you need to figure out how to set up the Internet on the master and slave devices.
This is done like this:
- On the first router, the DHCP option is set.
- On the second router, we climb into the WAN configuration section and in the connection type field we indicate the value “Dynamic IP”.
- The DHCP option is left active, and for the address range of the secondary grid we specify something like 192.168.3.2–192.168.3.240. The main thing is that the ranges of the primary and secondary grids do not match.
- For variety, you can assign different SSIDs to the grid.
A router configured in this way discovers itself as a source of new Wifi network. Now you can wifi through the second router. Above, we looked at the organization of the chain through a network cable. To find out how to connect the Internet through the second router in another way - read on.
Connect via WiFi
To organize it, you need to have Internet on your computer and understand how to connect two routers without the help of a crossover. Make it not so difficult. On the slave, turn off the DHCP option, assign it an IP address that does not match the address of the master. The “Wireless Mode” parameter is set to “Repeat \\ Bridge Mode”.
Next, you need to connect the first network to the second network: to do this, set the SSID for the secondary grid and look for the first grid by clicking the Scan button. Having found the first SSID, we enter it with a password and immediately set the same password for the SSID of the second network. Now you can connect via the Internet from both routers.