A black screen when loading Windows is a problem that many users face sooner or later, but not everyone knows how to fix it. What should I do? First you need to study possible reasons. They are many and they are different. They can be both technical and software, and sometimes the problem lies in the usual inattention.
Problem with wires and / or connectors
A typical situation is problems with cables, connectors and power buttons.
Checking the power supply to the monitor
- If you have a desktop computer, then first check the power supply to the display. Some users are so used to working on a laptop that, changing the desktop, they do not notice the obvious. The power button on the monitor is simply turned off. It is no coincidence that the IBM team, developed for the first PC, intended to check the power supply with the very first item.
- The second frequent reason for the sudden receipt of a black screen when turned on is the insufficient contact of the power cable. In practice, there have often been cases where the cable plug was loose in the nest, and turned off when moving the display or the active participation of household members, including furry ones. In the office, the cause of poor contact between the cable and the monitor is often cleaners that touch the wires during cleaning.
Checking the contact between the video card and the monitor
The second reason for the situation when the coolers work, but the computer does not turn on and shows a black screen is the problem with the cable between the video card and the display. There can be two options:
- The cable came out of the socket.
- The cable is not connected to the main output of the video card.
With the first case, everything is clear. Just check the integrity of the cable itself and the reliability of its attachment in the connectors. But with the second case is worth explaining. Look at the back of the computer.
If the connectors for connecting the monitor cable are two, then we are dealing with one of the following situations:

In both cases, there are two options for connecting the cable. Turn off the computer, switch the wire to another connector and turn on the computer again.
Perhaps someone just switched the cable to another socket by mistake. The modern HDMI connector is not equipped with screws, like the old VGA, and you can accidentally pull it out of the socket, and then connect it to the wrong slot or insert it completely.
After restarting the computer again black screen? You may have a technical problem (more details below).
Remember that when switching any video cable, it's best to turn off the power on the computer and monitor.
"External monitor"
The laptop almost always has an output for connecting an external monitor. Therefore, if you turn on the laptop and hear the sound of the coolers working, but the screen is black, then it is likely that someone switched it to the mode of working with an external monitor. Find the function keys for controlling the external monitor on the keyboard and try turning on the internal display. Here's how they look on the ASUS laptop: 
The F7 key turns off / on the internal screen, and the F8 controls the combination of the output to the external / internal monitor of the notebook. They should be pressed together with a function key, usually denoted Fn.
That's how in Windows 8 and 10 looks like the choice of operating modes with an external monitor. 
Switching different modes by successive pressing of the combination of keys Fn and F8 for the keyboard shown above laptop ASUS. So you can accidentally turn off the internal monitor of the laptop and get a black screen when turned on.
Software Faults
System Loader Failure
The black screen and the cursor on it after loading the laptop or computer can indicate a failure in the bootloader operating system or one of the drivers. If the system startup options menu appears, try to boot into the safe mode. And if not, then the output is one. How to make a bootable flash drive is told.
Incorrect refresh rate or resolution too high
The second common problem with the black screen when loading Windows may be in the incorrectly set update rate on the video card. The fact is that old CRT monitors work with a high screen refresh rate, up to 100 Hz and higher. A modern LCD can only support 50-60 Hz. This is due to the constructive feature of such monitors.
If you received a black screen when moving from an old monitor to a new one, you need to do the following.

For the same reasons, you can get a black screen on a laptop connected to an external monitor. Try adjusting the frequency and resolution for the external display, as shown in the picture above.
Technical difficulites
What if the black screen when you turn on the computer to win by the means described in this article did not work. Perhaps the reason lies in the malfunction of the details of your PC.
If you are not a specialist in the field of computer repair, we recommend contacting the service for professional support!
The video card is out of order
With such a failure, the fan of the laptop or PC is working, but it does not start and on the screen we see a black screen. According to the POST standard we should hear one long and two or three short speaker signals(built-in speaker). This sound indication is typical for the AWARD BIOS installed in many mass notebooks and computers.
POST - BIOS self-test system. We recommend reading the article about.
Just be sure that the speaker is there and connected to the board. In some modern computers manufacturers do without it, replacing the LEDs with motherboard and even small digital indicators. But the latter can only be found in expensive motherboards for overclockers.
The monitor failed

Drive LED
The malfunction of the display itself appears exactly as well, only without sound signals. The computer does not turn on, although the coolers are working, and the screen is black. As a rule, you should see in this case and other signs of the activity of the desktop: the LED of the drive flashes, for example. You can check the fact of the failure of the display by connecting it to another PC or connecting the computer itself to a different display or TV. Many video cards now support HDMI, which is on modern TV.
If the laptop does not turn on and displays the black screen, this may indicate a malfunction of the loop connecting the system board and the display. You can check this by connecting the laptop to an external monitor. If there is an image, then the video subsystem is OK, and the display or its loop is not.
The monitor is the most important output device, through which we can visually see what happens on the computer. It is very important that the monitor works correctly, but, unfortunately, this is not always the case. What should I do if the monitor blinks when turned on?
Very often, users of monitors face a problem when after turning on the computer for several minutes the monitor can not earn correctly, constantly losing the image, which in the end is very much like "blinking". Often the problem occurs within a couple of minutes, but it happens that such a problem lasts for 15 or more minutes.
Why does the monitor "blink"?
First of all, it is necessary to understand what exactly causes the image to blink on the monitor: the monitor itself or the computer. You can only test this by connecting the monitor to another computer. If you found out from the results of the check that this problem is also actual on another computer - the problem is in the monitor itself. If the image is displayed correctly - the problem should be searched in your computer.
Problem on the side of the computer
First of all, let's look at the types of computer malfunctions that lead to a "blinking" of the monitor.
Cause 1: Video card driver malfunction
Any problems in the operation of the image should lead you to the idea that there are problems with the drivers of the video card. Therefore, the first thing you need to do is to reinstall them.

Reason 2: Video card problems
Try to disconnect the video card from your computer and connect it to another - so you can check if it's out of order. If the case is in the video card, look at the contacts and, if necessary, clean (and also remove all visible dirt). If this does not work, the video card must be taken for repair.
Cause 3: A faulty power supply
The power supply is one of the key tools of the computer, ensuring the correct operation of the entire system. In this case, if there are any problems with the monitor, you should also check the power supply, namely, try to connect a different power supply to the problem computer and look at the final state of the monitor.
If it has improved - the power unit will need to be opened, cleaned of dust, and also pay attention to the capacitors that could swell. More details about the diagnostics of the power supply unit have been previously described on our website.
Reason 4: the wrong video card was selected
Many computers and laptops have in their composition two video cards - integrated and external. The first will not allow you to work with heavy graphics programs and computer games, but at the same time it is the best choice if you need to save electricity.
Some laptops have on their body a button that allows you to switch from the mode «Stamina» on Speed. If you have a similar button, make sure that the switch is set to "Speed". If necessary, make changes.
In addition, the built-in video card can be activated via the BIOS. In this case, you should check whether this is so.
First you need to enter the BIOS. Typically, you can do this if you send the computer to reboot or simply turn it on, and at the earliest stage of the system boot, start pressing the key responsible for entering the BIOS settings. As a rule, in most cases this is either F1, or F2, or Del.
Once in the BIOS, you need to find the item responsible for the schedule. It is impossible to say exactly how it can be called in your case - it all depends on your computer and the BIOS installed. If you are a user of a desktop computer, then the item we need can be located in the section « Integrated Peripherals» . In the case of laptops, it is even more difficult to tell the location of the partition - it can be anywhere.

The purpose of the search is an item containing either the word Graphics or the GPU. For example, in your case the item can be called «Graphic Device», Onboard GPU, Primary Graphics Adapter and so on. In some cases, the item may have an "Enable-Disable" video, that is, enable and disable the built-in video card, and in some it is required to specify which one graphics adapter will be used by the computer.
If you made changes to the BIOS settings, before you exit, you need to save them, and then leave the BIOS.
Cause 5: malfunctioning of the motherboard
The problem can be much more complicated if the cause of the problem is a consequence of the incorrect motherboard of your computer. Here it is much easier to turn the computer over to diagnostics, where the specialist will be able to sum up - the motherboard is repairable, or it is easier to acquire a new one.
Cause 6: Windows crash
This type of fault is indicated last, for the reason that it is the least common, but it should not be discarded. Flicker can occur during the operation of Windows, which can sometimes suggest that the operating system itself is not working properly, for example, due to viruses on the computer.
The problem can be solved, for example, by rolling back the system to the point where the computer was working properly, or by performing a full reinstallation of the operating system (this step will be preferred most of all). It is the implementation of reinstalling the OS and will give you definitive understanding if the problem is Windows or not.
Problem on the monitor side
Now let's talk about a number of reasons that relate to monitor malfunctions that cause flicker.
Reason 1: blown capacitors
One of the most probable causes in the event that the cause of flicker lies in the monitor. In this case, you need to look under the monitor case and check the condition of the capacitors - these are small kegs that have a custom to swell. If you see that the capacitor is even slightly deformed, let alone the example in the screenshot below, then it is necessary to deal with the soldering of all problem capacitors.
![]()
Reason 2: Cable faults
If you used the same cable to connect the monitor to both one and the second computer, you should probably suspect a malfunction in the cable that connects your monitor to the computer.
If possible, try using a different cable to connect the monitor - and, quite possibly, the problem can be solved with little blood, namely, just buy a new cable for the monitor.
Cause 3: Burning backlight lamps
If the monitor serves you faithfully for many years, it is quite possible to assume that in it, over time, the lamps of illumination simply sat down. There is nothing you can do about it - the age takes its toll and it will be much easier to replace the monitor with a new one, which will work no less than for a long time.
We hope that any of the tips of this article could help you solve the problem in the monitor, and return to the comfortable use of the computer. In any case, if you are at a loss to determine the cause of the problem, do not postpone the trip to the service center or call the computer master - if you continue to wait for the blinking screen of the monitor, the matter can turn out much more seriously.
One of the most unpleasant breakdowns for ordinary users - this is a broken monitor. The reasons for its occurrence can be many. Conditionally, they can be divided into two categories:
hardware;
and software.
In most cases, problems with malfunctioning of programs and drivers, it is somewhat easier to resolve. If the problems lie in the hardware, the elimination can take a long time. You may need to purchase some new details or even turn in the monitor for repair.
Problems in the software and ways to solve them
Most often, problems unrelated to the hardware arise because of:
- incorrectly installed software ();
- damage to system files (as a result of unreasonable user actions,)

If the monitor displays only the boot screen "", then it becomes dark - then the problem lies in the depths of the operating system.
The simplest way to deal with this breakdown is by going to the menu of additional options boot Windows". In order to do this, you must perform the following actions:
- repeatedly press the F8 key before the start of the system;
- a menu appears in which you want to select an item called " last Known Good Configuration»;
- selecting it with the cursor, press the " Enter».
After that, the reboot will be performed, the old drivers and system files will be restored from the backup.

Often it happens that the problem is the virus, entered into the system through a flash drive or the Internet. To run the antivirus for deletion malware when the monitor is locked, you must perform the following actions:
- using the F8 key call a special boot menu;
- select the first item in the list under the name safe mode.
After that, the operating windows system will load in safe mode. During its operation, the minimum number of programs is started (only necessary to perform basic tasks). This makes it possible to limit the actions of the virus application, the worm, to the maximum. After the OS has been successfully started, you should perform an in-depth check to detect and.
The above methods allow you to cope with software errors in 90% of cases.

Hardware issues
Various problems associated with the hardware, it is somewhat more difficult to resolve. More often dark screen is associated with the following problems:
- power is not supplied to the monitor;
- there is no signal from the PC video adapter.
In many cases monitor does not work due to the banal lack of electricity. Check its presence is very simple - on the case of any similar device there is a special LED signaling the presence of voltage. If it does not burn, then only switch on special power cable in the socket, and also check the place of its connection to the monitor. Perhaps just connector is off.
If the electricity supply is in order, then you should check the data cable, which sends information to the screen from the video card personal computer. First of all, it is necessary inspect it for damage - even a slight inflection can disrupt the integrity of individual veins. Which will lead to the impossibility of data transfer.

It is also necessary to inspect, does anything interfere with the insertion of plugs into the connector. Often inattentive users simply forget to twist the special screws located at the ends of the cable.
Sometimes the signal does not reach the screen due to its absence - the video card may become unworkable at any time. Check it is very simple, enough connect the monitor to another PC (stationary, laptop). If after such manipulations he earned, then the problem is in the video card.
There are many reasons for the failure of the video card: blistering of capacitors, a breakdown of the cooler with subsequent overheating of the chipset, and others. For the diagnosis and repair of the card, special equipment is required. In its absence, the optimal way out of the situation will be to hand over the details to the service, or purchase a new one.

The monitor may not work due to any internal damage. To eliminate them, you will need to diagnose the entire hardware of this device. Identify the presence of internal malfunctions by the smell of burning insulation, as well as uncharacteristic sounds that occur when power is applied.
The display of a personal computer - the most important part of it. That is why it is necessary to treat it as carefully as possible, do not drop and subject to other mechanical influences of this kind of housing, the matrix. If the conditions of use are met, the technician will serve the owner for a very long time and you will never have a question, why the monitor does not work and what to do.
Users often face various problems when turning on the computer. For example, in some cases, the computer may not turn on when turning on the computer, which makes it impossible to use the computer. This situation can be accompanied by the message "No signal" or the computer monitor can be completely black.
In this article, we will consider a number of reasons that can lead to a similar problem and tell you how they can be eliminated.
Reason number 1. Problems connecting the monitor.
If you are confronted with the fact that your monitor does not turn on when you turn on the computer, the first thing to check is the connection of the monitor to the computer. First, make sure that the cable that is used to connect does not have any damage. If the cable is bitten by domestic animals or it has been interrupted, it must be replaced.
Also, you need to check the latches on the sides of the connector. They must be tightly twisted, both from the side of the monitor and from the side. If the monitor is connected via cable, try disconnecting and reinserting the cable into the connector. Maybe he just walked away.
DVA Cable Clamp
If the cable is all right, then pay attention to the monitor itself. Make sure that the monitor is turned on and connected to the power supply. To do this, press the power button and check the cable from the monitor to the wall outlet.

Source button on the monitor
Also try pressing the "Source" or "Input" button on the monitor. This can help if the monitor is waiting for a signal from another source and therefore does not turn on when you turn on the computer.
Reason number 2. Defective monitor.
If the monitor connection is ok, but it still does not turn on when you turn on the computer, then it probably went out of order. Now, when almost all have TVs with an HDMI input, it's very easy to check the functioning of the monitor. To do this, it is enough to connect any TV set to the computer instead of the monitor.

Video inputs VGA and HDMI on the TV
If an image appears on the TV, it means the monitor is guilty, and if the TV also does not show anything, you need to look for the problem in the computer itself.
If there are problems with connecting the TV, then we have an article about that,. You can click on the link and read.
Reason number 3. Problems with the video card.
If you checked everything connected to the monitor and its connection, then there may be a problem in the video card. For example, one of the video outputs may stop working on the video card. To test this, try connecting the monitor to a different video output. This may require an appropriate video output adapter or cable.
![]()
Video outputs on the video card
If the monitor does not turn on regardless of which video output is used, then it is necessary to check the health of the entire video card as a whole. This can be done in two ways:
- install another video card in the computer;
- start the computer using the built-in graphics (if the built-in graphics are present);
If there is another video card at hand, it is better to use this method. Install a different video card and try turning on the computer. If this creates difficulties, then read the article. To test the computer using the built-in graphics, you need to remove a discrete graphics card and connect the monitor to the video output on the motherboard.
Each of us at least once faced with problems when your computer suddenly stops turning on - the fans do not make a noise, the indicators in front do not light up. Or it turns on, and the monitor does not show a picture - it is lit in black and displays a message "No signal" (in the translation "no signal").
In this situation, do not despair and rush to the store for the purchase of new equipment or run to a service center.
In most cases, problems with turning on the PC are solvable at home.
To do this, it is necessary to find out what causes contribute to the problem of turning on the computer, and also to diagnose a fault and perform repair work (replacement of non-serviceable components).
This article will help you understand what happened to your computer in each particular case.
When the PC is turned on, the fans do not blink and the indicators do not turn on.
You press the power button and silence. There may be several reasons why the computer refuses to turn on. Do the following simple things:
- Check that the power cord is properly connected to the system unit
- See if the toggle switch is on (Figure 1) on the back of the computer
- Make sure that the computer's power button is pressed freely and does not fall off when you press
- Check for serviceability of your mains filter, extension cord and outlet
In rare cases, the network cable from the system unit, when the wires inside it are broken. Check the cable with a multimeter.
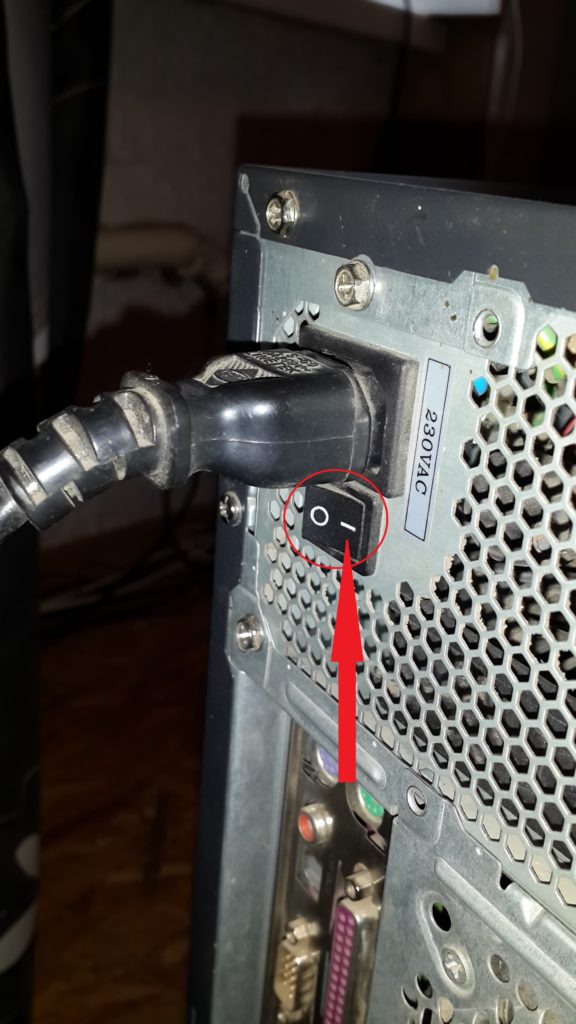
Figure 1 - toggle switch in the "on" position
Switch it to the resistance measurement mode for example 200 ohms. You can have differently for example 100 ohms. The difference is not-it is desirable to choose the lowest dimension. There are three holes in the cable plug. Measure the two extreme ones. The average is grounding - do not touch it.

Green oval - resistance measurement mode. Red circles - measured wires
If the measured wire is an integer, the multimeter indicates digits other than one.

The readings of the multimeter differ from unity, hence the wire is a whole
If the reading is "1", this is a wire break.

There is an obvious wire break - the meter readings are equal to one
In any computer store, you can purchase a new cable. The price ranges from 150 to 250 rubles
If all of the above listed methods did not help you, i.e. the computer is still "silent" - will have to be opened, the cause will be searched inside the system unit. This will be shown below.
The computer turns on, but the monitor is lit in black.

The next problem is when the computer turns on and before you a black monitor with the words "No Signal" means the following problems:
- The cable from the monitor to the video card is poorly connected
- Defective graphics card
- Faulty RAM Module
- CPU CPU is faulty
- The motherboard is partially damaged (condensers were blown up, the north bridge was burned)
It often happens in practice that these problems can be solved by taking out the RAM from the slot and inserting it

We pull out random access memory
back, as well as by pulling and inserting the back of the video card. The reason here is one-a bad contact of memory or video card due to dust ingress or oxidation of contacts.
For reliability, you can take a detergent and clean it with the contacts of the card being removed.

Eraser

Cleaning contacts with eraser
Then insert back the removable boards and try again to start the computer.
If there is no positive result, then it will be necessary to open the computer and look for the problem deeper.
When you turn on the PC, we hear strange "pique" sounds.
When you turn on the computer, you've probably heard one short, piercing "peak" sound. It means that in the computer all hardware (processor, RAM, video card, motherboard, various microcircuits, etc.) is fully functional and the computer is started up. A short sound is given to us by the BIOS chip - a system that monitors all electronic nodes in the computer, is responsible for the order of boot devices (drive, hDD). The BIOS is a chip that is soldered into the motherboard - Fig.2.

Figure 2 - BIOS chip on the computer's motherboard
If other sounds are heard during start-up of the computer, for example long and short in various combinations, this means that there are problems with the computer that need to be set by the sounds. The BIOS sounds have a certain malfunction, the decoding of which we will learn in the next section. Depending on the manufacturer of the BIOS chips, the sounds may vary.
We recognize the firm BIOS on your computer
To correctly determine the error by sound signal BIOS Let's determine which firm the manufacturer of the chip on your computer. For this:
- disconnect all wires from the system unit (in the common "processor")
- remove the side of the computer
- look for a typical chip on the motherboard as in Figures 3,4 and 5

Figure 3 - microcircuit Firm BIOS AWARD - quite common on many motherboards

Figure 4 - BIOS chip firm AMI - more common on laptops

Figure 5 - BIOS chip firm Phoenix
Sounds BIOS Award
Sounds bios AWARD there are the following:
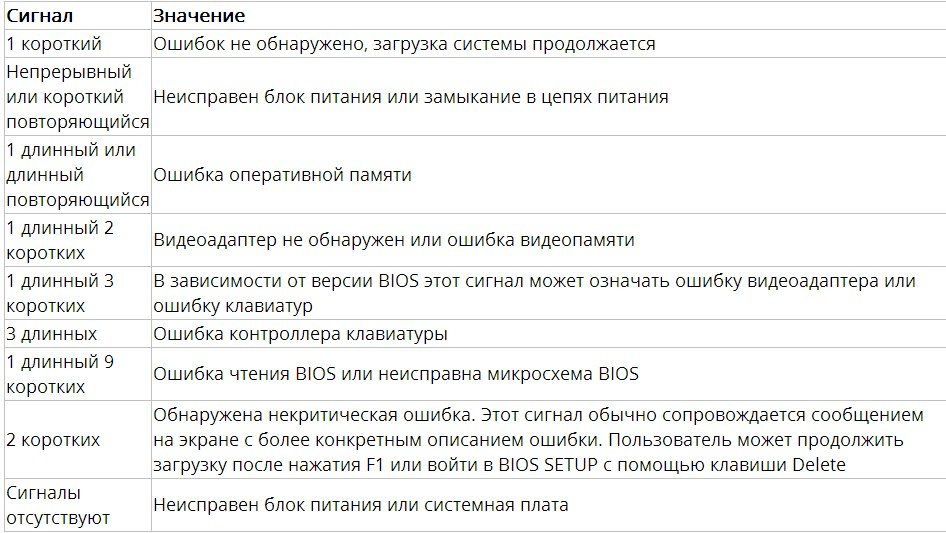
The BIOS of the company AWARD is very common in many models of PC motherboards.
BIOS AMI sounds
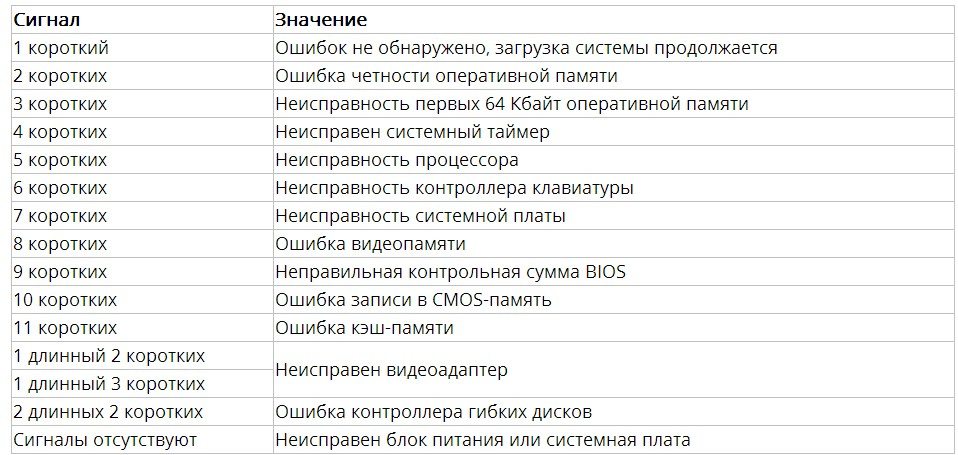
Distinguish the following sounds:
Phoenix BIOS sounds
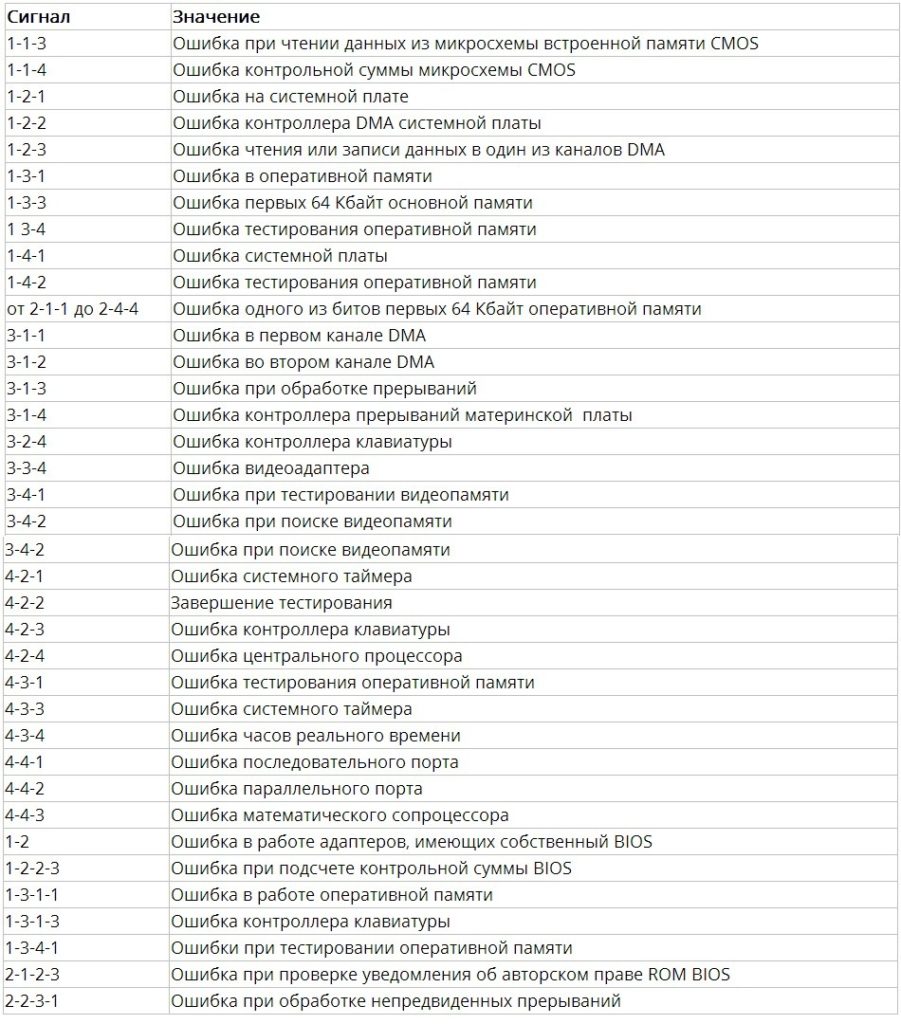
The audio coding of this BIOS is decrypted differently, in contrast to the previous two. The code consists of a series of sounds with a certain interval, for example the encoding 4-2-3 means 4 short, pause, 2 short, pause, three short sounds. New versions of this BIOS consist of four types of sounds.
Encoding of BIOS sounds:
We take a screwdriver in our hand and disassemble the PC. Diagnose and troubleshoot
There came the most interesting moment - disassembly of the computer and troubleshooting.
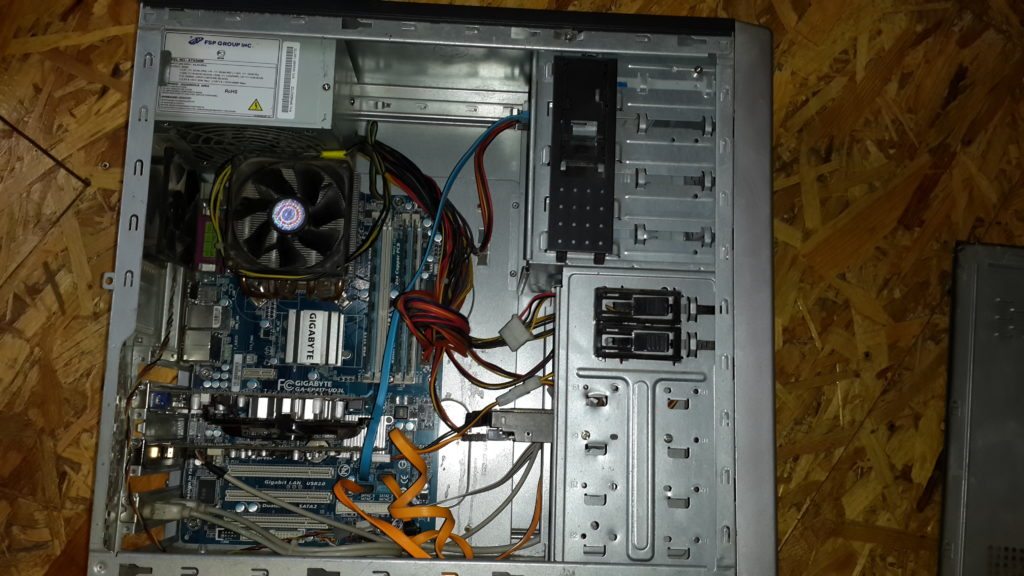
System unit without side wall
Now we will do the diagnostics if the computer does not turn on at all.
It is best to start by checking the start of the power supply. Disconnect its plug from the motherboard, see Fig. 6.

Figure 6 - Power supply plug. A red oval is surrounded by a latch.
Press firmly on the lock and pull the plug upwards with swinging movements.

Figure 7 - Removing the power supply plug from the motherboard.
So. The plug is pulled out.

Now you need to find a small piece of wire. Strip both ends from the insulation.

According to Fig. 8, insert one end of the wire into the hole of the plug where the green wire and the second into any black, thereby we will start the power supply unit without the computer. Check whether it works or not. The required wires are indicated by arrows in Fig. 8.
![]()
Figure 8 - How to properly insert a jumper to start the power supply

Computer power supply
If the power supply does not start, then it's burned. Only a qualified technician can repair it. The cost of the new power supply is on average (depending on capacity and quality) from 2000 rubles to several thousands. Typically, computers have power supplies with a capacity of 450-500 watts - their cost is from 2000 to 3000 rubles.
In case the power supply is started, ie the fan rotates on it and a click is heard during startup - probably the problem can be with the power button of the computer.
In Fig. 9 shows the place on the motherboard where the connectors for the start button of the computer are connected, as well as the reset buttons, the power indicator of the work indicator hard drive and the speaker is a bios
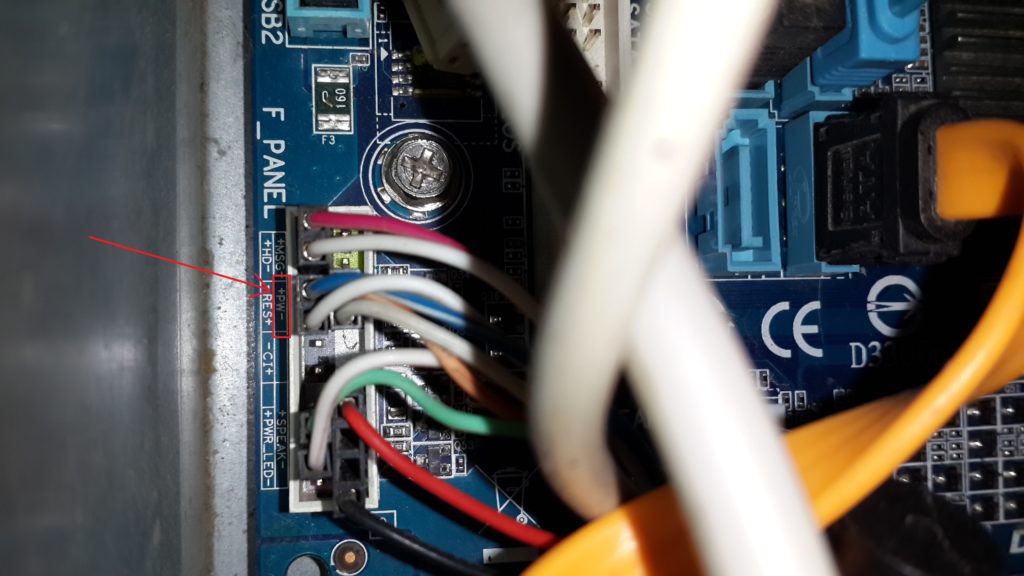
Figure 9 - the red rectangle marked the connector "+ pws-" - responsible for connecting the start button of the computer
Disconnect it and look at the connector - it should have the inscription "power sw" as in Fig. 10

Figure 10 - power sw
Let's check the computer start button for serviceability. Take the screwdriver and close the two needles in which the ower sw connector was removed.
If the computer is working, then the power button is broken and it needs to be lured. It's hard to find such a button. they are often not sold. Most often, users in such cases are torn from the button of the wire and output them from the front. To start the computer you need to close the wires for 1-2 seconds (do not twist) and disconnect.
If the computer still does not turn on, disconnect all devices connected to the motherboard.
And so, turn off the hard drive Figure 11. Disconnect the two wires marked in the figure.

Figure 11 - the arrows indicate the power cable (on the left) and the data wire (on the right)
![]()
Remove the RAM at the edges of their two

Figure 12 - in the red oval fixative that needs to be bent
Pull the memory module out of the slot. 13. If you do not have one memory module and two three or more - pull out everything.
Figure 13 - The memory module is removed from the slot
We now unscrew the bolt fixing the video card. Fig. 14

Figure 14 - in the red circle the bolt fixing the graphics card
Then bend the latch on the slot as shown in Fig. 14

Figure 15 - bend the retainer
and carefully pull out the video card.

The video card was successfully removed
It remains to remove the connectors of the USB ports on the front panel Fig. 16.

Figure 16 - Front panel USB port connectors.
When you insert the USB connector back, note the absence of one needle in the slot marked in Fig. 17,
there is also a missing hole in the connector - Fig.18.

Figure 17 - USB slot.

Figure 18 - USB connector.
Then disconnect the drive, the fans, if any. And try to start the computer again
If even this time the computer does not start, you should pay attention to the capacitors. In Fig. 19 shows blown capacitors and normal ones.
![]()
Figure 19 - Capacitors on the motherboard. The normal ones are marked with green arrows. Swollen (faulty) - pink.

Figure 20 - This is how the leaky capacitors look.
Fig. 20 shows the flowing capacitors.
Replacing the capacitors by the master, as a rule, is inexpensive - of the order of 200-500 rubles, depending on their number.
Such capacitors require replacement with new ones. Replacement is performed by a qualified technician.
Diagnosis of the computer that turns on not on the monitor there is no signal is done by pulling out the memory modules, video card. For this it is necessary to have working components to check which of them does not work.
You can refer to Figures 12,13,14 for the removal of a faulty card.
The reason for not displaying the image on the monitor is a faulty CPU CPU.
It is hidden by the cooling cooler on the motherboard Fig. 21.

Figure 21 - Cooler CPU CPU (black fan and under it radiator).
Everyone knows that the processors are manufactured by leading INTEL and AMD companies. Depending on the processor firm, the cooler fixing is also different.
Now let's clarify the dismantling of the cooler and processor of AMD.
Raise the presser foot on the cooler - Fig. 22.

Figure 22 - Bend the cooler retainer.
Then remove the cooler carefully, after unplugging the fan wires from the motherboard.
Before us the processes (square gray color) and the clamp foot - indicated by a red arrow in Figure 23

Figure 23 - The foot of the latch is marked with a red arrow.
Raise the tab of the processor lock up as shown in Figure 24.

Figure 24 - Bend the processor lock.
Very carefully pull out the processor without bending its legs Fig. 25

Figure 25 - We removed the processor.
Sometimes it happens that after removing the processor and putting it back, the computer can start when it is turned on. Do this necessarily. It can help you.
Also start the computer without a cooler. seconds to 10-15. If the processor is cold during operation, it is likely that it has been burnt.
It can happen that the processor is whole and not working socket (the seat where the processor is installed).
You can check the socket only if you find a similar processor for such a socket. About what you have a socket and what processor will suit you - all this can be found on the Internet. Entire topics are devoted to this issue.
What is CMOS checksum error?
You turned on the computer and saw on the black screen not clear CMOS checksum error. Do not worry. This is not a critical error. It appears due to an incorrect date on the computer and reset the configuration of the BIOS. For all this answers a small battery on the motherboard - Fig. 26. Your battery is discharged

Figure 26 - CMOS battery on the motherboard
It is necessary to check it with a multimeter. To begin with, pull it gently bending the lock with a screwdriver - Fig. 27.

Figure 27 - Remove the battery
We measure the voltage of the battery with the multimeter -Res. 28. Turn the multimeter into the voltage measurement mode.

Figure 28 - Measuring the voltage of the battery.
Normal voltage 3 volts - if it's new. But the computer can work if the battery is 2.5 - 2 volts.
To replace the battery it is necessary to know its model, it is written on the battery itself - "CRC 2032" - carefully look at Fig. 26 - the inscription is visible under the arrow.
A new CMOS errorum checksum error may appear again after a new battery is inserted. Fig. 29

Figure 29 - Window with CMOS error checksum error
To do this, press the DEL key on the keyboard. This will bring you to the BIOS setup - Fig. thirty.

Figure 30 - Window bIOS settings
The BIOS windows may differ in appearance different computers. The main thing to find a parameter with the words Default .... Usually responsible for resetting the BIOS settings
In the right part of the window, select the top line "Load Fail-Safe Default" by the arrow keys on the keyboard and press Enter.
A confirmation label will appear - press the letter Y and again Enter. To save the BIOS settings, press the F10 key. The computer will restart. will only change the date on the computer, because it will be rewound a few years ago due to the replacement of the battery.